Part Number: 52-224 Series
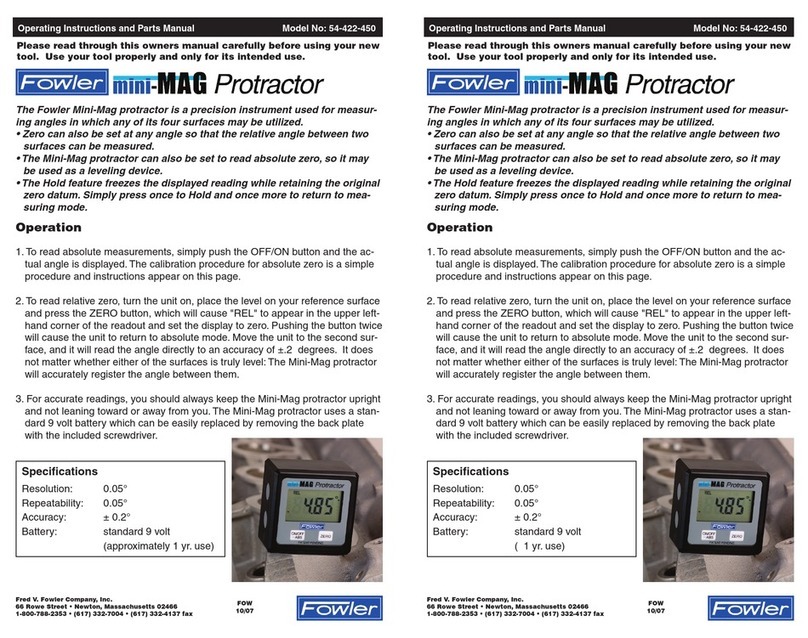
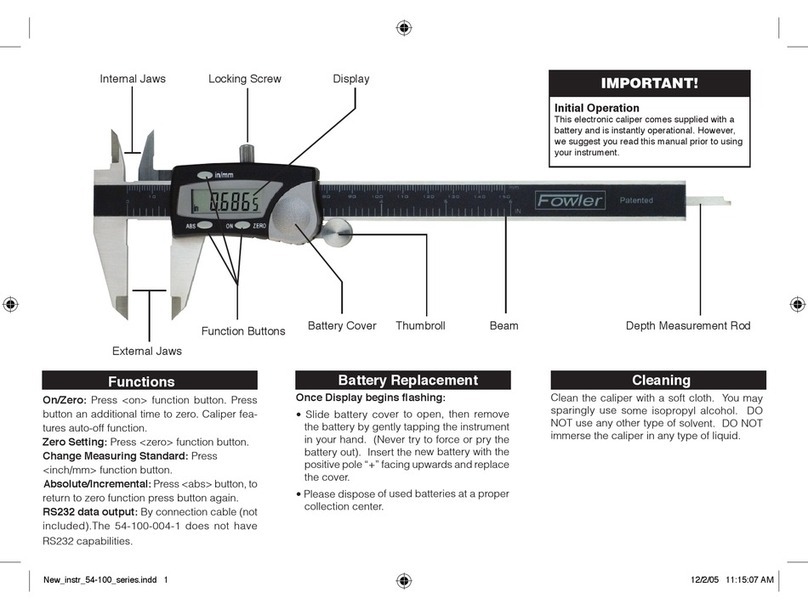
[1] Name and Function of Each Part
[3] Zero Point Adjustment
1. Heat Insulating Plate 2. Frame 3. Spindle
4. Anvil 5. Sleeve 6. Thimble
7. Ratchet stop 8. Clamp 9. Counter
To ensure operator safety, use this instrument in conformance with the direc-
tions and specifi cations given in this User's Manual.
e edge of the contact point of this instrument is sharp.
Handle it with great care to avoid injury.
• Do not disassemble this instrument.
• Do not use and store this instrument at sites where the temperature will
change abruptly. Prior to use, thermally stabilize the instrument suffi ciently
• Avoid storing this instrument in places where there is
dust, and using it at sites where it is directly subject to water or oil.
o not apply excessive force to this instrument or drop it.
• Be sure to perform the zero point adjustment before measurement.
• After use, wipe off dust, cutting chips, and moisture from this instrument, then
apply rust-preventive oil to it.
[1] Name and Function of Each Part
See the fi gure on the left
See the fi gure on the left
• Be sure to use the dedicated gage block for the zero point adjustment (all of
these should be inspected periodically), the standard bar for micrometer, or
dedicated master gages for the workpiece to perform the zero point adjust-
• Wipe off the measuring faces of the gage used and this instrument before
performing the zero point adjustment.
• Perform the zero point adjustment in the same posture and conditions as the
1) When the reading is correct on the counter and wrong on
(1) If the deviation is less than 0.02mm:
Rotate the sleeve with the supplied wrench by the observed error as in
the case for conventional micrometers. (Fig. 1)
(2) If the deviation is over 0.02mm:
Remove the ratchet stop with the supplied wrench. Push the thimble
rom the spindle, then rotate it to zero position.
Handle it with great care to avoid injury.
Handle it with great care to avoid injury.
Digital MicrometerPart Number: 52-224 Series[1] Name and Function of Each Part
[3] Zero Point Adjustment1. Heat Insulating Plate 2. Frame 3. Spindle4. Anvil 5. Sleeve 6. Thimble7. Ratchet stop 8. Clamp 9. Counter10. WrenchCounter Thimble
.001mm (Vernier).01mm.1mm1mm10mm
Safety PrecautionsTo ensure operator safety, use this instrument in conformance with the direc-tions and specifi cations given in this User's Manual. The edge of the contact point of this instrument is sharp. Handle it with great care to avoid injury.IMPORTANT• Do not disassemble this instrument.• Do not use and store this instrument at sites where the temperature will change abruptly. Prior to use, thermally stabilize the instrument suffi ciently at a room temperature.• Avoid storing this instrument in places where there is excessive moistureor dust, and using it at sites where it is directly subject to water or oil.• Do not apply excessive force to this instrument or drop it.• Be sure to perform the zero point adjustment before measurement.• After use, wipe off dust, cutting chips, and moisture from this instrument, then apply rust-preventive oil to it.[1] Name and Function of Each PartSee the fi gure on the left[2] How to ReadSee the fi gure on the left[3] Zero Point AdjustmentIMPORTANT• Be sure to use the dedicated gage block for the zero point adjustment (all of these should be inspected periodically), the standard bar for micrometer, or dedicated master gages for the workpiece to perform the zero point adjust-ment of this instrument.• Wipe off the measuring faces of the gage used and this instrument before performing the zero point adjustment.• Perform the zero point adjustment in the same posture and conditions as the measurement.1) When the reading is correct on the counter and wrong on the thimble (1) If the deviation is less than 0.02mm: Rotate the sleeve with the supplied wrench by the observed error as in the case for conventional micrometers. (Fig. 1) (2) If the deviation is over 0.02mm: Remove the ratchet stop with the supplied wrench. Push the thimble outward to disengage it from the spindle, then rotate it to zero position. (Fig. 2)
CAUTION Handle it with great care to avoid injury. Handle it with great care to avoid injury.
Fred V. Fowler Co., Inc. • 66 Rowe Street • Newton, MA 02466617-332-7004 • 617-332-4137 (fax) • Internet: www.fvfowler.com


