Franklin Chef FR 1644 User manual

Convection-Rotisserie Oven
Four rôtissoire à convection
Model FR 1644
Modéle FR 1644
Use and Care Guide with Recipes
Guide d’utilisation et d’entretien avec
recettes

1
Important Safeguards
Technical Information
Before Using Your Oven
Know the Parts of Your Oven
Using Your Oven
Tips
Cleaning and Maintenance
Troubleshooting
Recipes
Southwest Turkey with Corn Bread Stuffing
Roast Turkey with Vegetable Stuffing
Herb-Roasted Chicken with Apple Stuffing
Golden Glazed Cornish Hens
Chicken-Pesto Sandwiches
Spicy Chicken Wings
Beef Roast with Horseradish-Sour Cream
Italian Beef Kabobs
Spit-Roasted Porketta
Cranberry Barbecued Ribs
Southwest Pork Salad
Spicy Fish with Tropical Salsa
Easy Deep-Dish Pizza
Roasted-Vegetable Pizza
Cheesy Reuben Appetizer
Toffee-Topped Rich Chocolate Cake
Banana-Blueberry Muffins
Limited Warranty
Table of Contents
2-3
4
4
5
6-8
8
9
9
10
11
12
13
14
15
16
16
17
18
19
20
21
22
23
24
25
26

2
When using electrical appliances, basic safety precautions should always be followed,
including the following:
1. Read all operating instructions before use.
2. Do not touch hot surfaces. Use handles or knobs.
3. Close supervision is necessary when this or any other appliance is used by or near
children.
4. To protect against electric shock, do not immerse cord, plug or any other parts of the
oven in water or other liquids.
5. Do not let cord hang over edge of table or counter, or touch hot surfaces.
6. Do not operate any appliance with damaged cord or plug or after the appliance
malfunctions or has been damaged in any manner. Return appliance to the nearest
Authorized Service Center for examination, repair or adjustment
7. The use of accessory attachments not recommended by the appliance manufacturer
may cause hazard or injury.
8. Do not place on or near a hot gas or electric burner, or in a heated oven.
9. When operating the oven, allow at least six inches of space on all sides of the oven to
allow for adequate air circulation.
10. Keep the baking/drip pan at the lowest level when roasting or using the rotisserie to catch
drips.
11. The temperature of the door or the outer surfaces is likely to be hot when the appliance
is operating.
12. Unplug from outlet when not in use and before cleaning. Allow to cool before putting on
or taking off parts, and before cleaning.
13. To disconnect, switch the TimerDisplay to 0:00, then remove the plug. Always
grasp the plug, but never pull the cord.
14. Extreme caution must be used when moving an appliance containing hot oil or other hot
liquids.
15. Do not cover any part of the oven with aluminum foil. This may cause overheating of the
oven.
16. Use extreme caution when removing baking/drip pan or disposing of hot grease or other
hot liquids.
17. Do not clean with metal scouring pads. Pieces can break off the pad and touch electrical
parts, creating a risk of electric shock.
18. Oversized foods or metal utensils must not be inserted into the oven as they may create
a fire or risk of electric shock.
IMPORTANT SAFEGUARDS

3
19. A fire may occur if the oven is covered or is touching flammable materials, including cur-
tains, draperies or walls, when in operation. Do not store any item on the oven during
operation.
20. Extreme caution should be exercised when using containers constructed of material other
than metal or glass.
21. Do not place any of the following materials in the oven: cardboard, plastic, paper or any-
thing similar.
22. Do not store any materials, other than the manufacturer’s recommended accessories, in
this oven when not in use.
23. Always wear protective, insulated oven mitts when inserting or removing items from hot
oven.
24. This appliances has a tempered safety glass door. The glass is stronger than ordinary
glass and more resistant to breakage. Tempered glass can break but the pieces will not
have sharp edges. Avoid scratching door surface or nicking edges. If the door has a
scratch or nick, contact our toll-free custom service line before using the oven.
25. Do not use outdoors.
26. Do not use appliance for other than intended use.
27. This appliance is OFF when the timer dial is set to 0:00 and then the unit is unplugged.
28. This appliance is for HOUSEHOLD USE ONLY.
SAVE THESE INSTRUCTIONS
3-Prong Grounding Plug
The power cord of this appliance is equipped with a 3-prong grounding plug that mates with a
standard 3-prong grounding wall outlet to minimize the possibility of electric shock hazard from
the appliance. Have the wall outlet and circuit checked by a qualified electrician to make sure the
outlet is properly grounded. When a standard 2-prong wall outlet is encountered, it is your
responsibility and obligation to have it replaced with a properly grounded 3-prong wall outlet. Do
not, under any circumstances, cut or remove the third (ground) prong from the power
cord. For personal safety, this appliance must be properly grounded.
Power Cord
A short power-supply cord is provided to reduce the hazards resulting from entanglement or trip-
ping over a longer cord. An extension cord may be used with care. Make sure that the marked
extension cord rating is equal to or greater than the electrical rating of this appliance. The
extension cord should not be draped over the counter or tabletop where it can be pulled on by
children or tripped over. The electrical rating of this appliance appears on the rear panel of the
unit.

4
Technical Information
Before Using Your Oven
Model: FR1644
Electrical Input: 120VAC ~ 60 HZ
Power Consumption: 1700W
Before using your oven for the first time, be sure to:
• Wash the spit removal tool, roasting rack, baking/drip pan, rotisserie spit and skewers
with soapy water.
• Use a damp cloth to wipe the inner walls of the oven. Use a small amount of
detergent, but don’t use a spray or abrasive polishing agent. Do not wash the heat-
ing elements, and don’t submerge the inside of the oven in water.
• Place the roasting rack, baking/drip pan, and rotisserie spit and skewers inside the
oven.
• Preheat the oven by first closing the oven door and operating the oven at the highest
temperature setting for five minutes. Preheating is only necessary the first time you use
the oven, afterwards it is not necessary.
• Turn off the heating elements and turn on the motor fan to remove any smoke residue
inside the oven by setting the function dial to “Fan Only” and setting the timer dial to
5 minutes.

5
Know the Parts of Your Oven
Roasting Rack
Spit Removal Tool
Rotisserie Spit Skewers
with Skewer Screws
Rotisserie Spit
Baking/Drip Pan
Upper Heating Elements
Lower Heating Elements
Temperature Knob
Motor Fan
Function Knob
Timer Display
Power Indicator Light
Handle
Glass Door
Power cord
ON/OFF and Timer Buttons
Rotisserie Spit Support
and Socket
Rack Support Guides

6
Using Your Oven
• The range of the timer is from 0:00 to 9:59 (9 hours and 59 minutes). When the unit is
plugged in, the timer display will read 0:00. Set the desired time by pressing the + button.
Each press increases the time by one minute. Holding the + button down causes the time
displayed to increase rapidly. Press the
-
button to decrease the time reading. The timer
can be adjusted if necessary while the oven is operating. Press the ON/OFF button, then
press the + or
-
button to adjust the time as needed, and finally press ON/OFF again to
continue cooking.
• To start the oven, once the time has been set, press the ON/OFF button. (The Function
and Temperature Control knobs should also be set. See below.) To turn the
oven off at any time, press the ON/OFF button again. Pressing the button a third time will
restart the oven at the point at which its operation was interrupted.
• As the oven operates, the timer counts down. When the set time has elapsed, you will hear
a chime tone and the electric heating shuts off automatically.
CAUTION: Even though the oven is off, it is still very hot. Use oven mitts or potholders
when removing food from the oven.
Power Indicator Light
• When the indicator light is on, the oven is operating.
• When the ON/OFF button is pressed during operation, or if the timer display reaches 0:00,
the indicator light will go off and the oven will not be operating.
Function Knob
This dial offers six choices:
Broil: indicates that the two upper straight-type electric heating elements are operating.
This function can be used to broil steaks, chops and fish and to top-brown casseroles and
sandwiches.
Fan Only: With this function, the electric heating elements are not in use. Only the rear fan
is working. This function can be used for cooling the hot oven or evacuating smoke from
the interior.
Cook: Indicates that the lower straight-type electric heating element is operating. With the
baking/drip pan in place, this function can be used for roasting corn and potatoes and for
heating other foods.
ON/OFF and Timer Buttons

7
Bake: Indicates that the upper U-type and lower straight-type electric heating elements, as well
as the rear fan, are operating. This function can be used for baking bread, cakes and casseroles
and for roasting chicken or pork.
Roast: Indicates that the upper and the lower straight-type electric heating elements are
operating. This function can be used for roasting meats and poultry.
Rotisserie: Indicates that the upper straight-type and U-type electric heating elements plus the
rotisserie spit and skewers are operational. This function can be used for rotissing poultry, pork
and red meats.
CAUTION: Always have the baking/drip pan in place below the food when using the
rotisserie function.
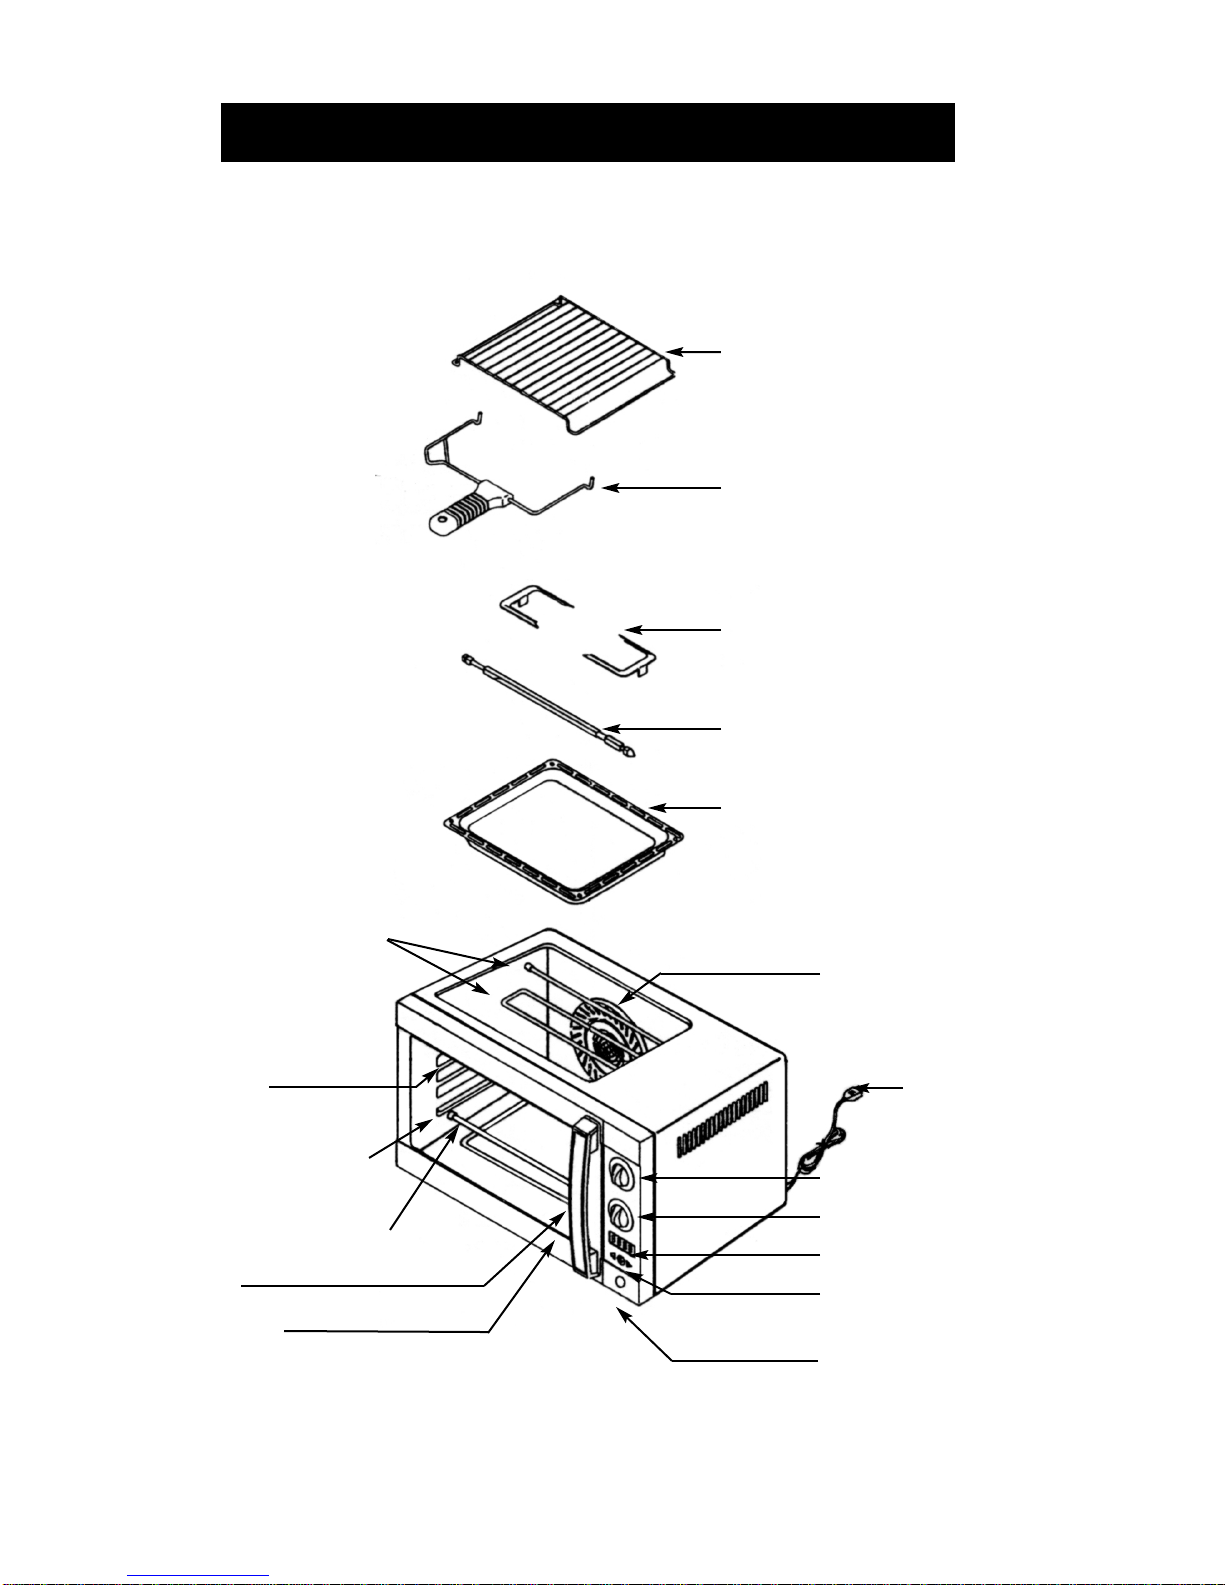
Temperature Control Knob
This thermostatic knob controls the temperature inside the oven. It maintains the proper temperature
during the various heating, roasting and baking operations.
Motor Fan
The fan circulates hot air during cooking and also helps cool the oven and evacuate smoke and
fumes when the FAN ONLY function is selected.
Roasting Rack
This rack supports food during broiling, roasting and toasting.
Spit Removal Tool
Use this to remove hot food roasted on the rotisserie spit. With the oven OFF, open the door and fit
the hooked ends of the tool under the spit, on either side of the food. Lift the left side first to ease the
pointed end of the spit out of the socket on the right side.
CAUTION: Use an oven mitt or pot holder when removing hot food.
Rotisserie Spit and Skewers
Use these for roasting foods such as chicken, pork or large pieces of meat, etc. First insert the rotis-
serie spit into the food. Install the left and right skewers onto the spit, then insert them into the food
from both sides to secure it. (Insert the skewers at different angles to hold the food more firmly.)
Tighten the thumb screw on each screw to fix skewers into place on the spit. Set the spit into the
oven by first inserting the pointed end into the opening in the right wall of the oven, then sliding the
left end of the spit into the slot on the left wall of the oven.
Baking/Drip Pan
Use this as a baking or broiling pan or as a cookie sheet. It should also be used to catch drippings
from food roasting on the rotisserie spit or roasting rack.
Heating Elements
There are two straight-type and one U-type heating elements in the upper part of the oven, and two
straight-type heating elements in the lower part. Various combinations of these heating elements will
become operational as different functions are selected. (See Function Knob on pages 6-7.)

8
Tips
• Use glass door to check the progress of your cooking. The oven will be more energy
efficient the less you open the door.
• Remove all plastic and/or paper wrappers from food before cooking.
• For broiling and roasting, place the roasting rack on the highest shelf position. If there is
insufficient space, move the rack down to the next level. Food should be no closer than
1 inch to the upper heating elements.
• For baking, set the roasting rack or baking/drip pan so that the food will be centered
vertically in the oven.
• For cooking, place the baking/drip pan on the lowest rack support guide.
• When using the rotisserie function, always have the baking/drip pan in place below the
food to prevent dripping into the heating elements.
• For best results, food and/or containers must fit in the oven without touching the heating
elements or inside walls of the oven. The oven door must close completely.
• Spray the baking/drip pan and roasting rack with nonstick cooking spray for easier
cleanup when cooking wet or sticky foods. Wash pan and rack thoroughly after each use
to prevent buildup of cooking spray.
• If required to catch drips, place the baking/drip pan one level below the roasting rack. The
pan and the rack should be set at different levels for satisfactory air convection.
• Add about 3 cups of water to the baking/drip pan before roasting or using the rotisserie.
This will reduce spattering and smoking, and will make cleanup easier.
• When a glass roasting pan is used, heat will be reflected requiring a longer cooking time.
• Always use a potholder or oven mitt when removing hot food from the oven.
Rack Support Guides
There are three different levels inside the oven for the roasting rack and baking/drip pan.
Select the best position for the food relative to the heating elements.
Door Handle
Use this handle to avoid burning yourself on the hot oven door.
Tempered Glass Door
• Be sure the safety door is closed tightly while preheating, baking or roasting.
• To avoid getting burned, don’t touch the door when the oven is in use.
• Wait until the oven cools before cleaning the door with a damp cloth.

9
1. If the oven does not become hot after being switched on:
• Be sure the the cooking time has been set on the Timer Display.
• Be sure that the temperature control dial has been set.
2. If food is often overcooked or burned, even when cooked according to the
recipe:
• Have the service agent check the thermostat.
• Check to see that the fan motor is operating normally.
3. If there is a metallic sound when the oven is in use:
• Don’t dismantle the oven. Have a service agent examine the fan.
• Before cleaning, remove the plug of the power cord from the wall outlet.
• After the oven cools, use a damp cloth or moist sponge to clean. Don’t soak the inside of
the oven or wash it in running water as this will cause serious damage to the appliance.
• The walls on the inside of the oven have a continuous clean coating that absorbs food
spatters during oven use. Remove heavy spatter after use with a nylon or polyester mesh
pad, sponge or cloth dampened with warm water. Blot dry with a paper towel or soft, dry
cloth.
• To remove baked-on stains, scrub with a paste made from baking soda and water. Rinse
and dry thoroughly.
• Do not use a sharp or hard kitchen utensil on the oven since this could damage the
surface of the appliance.
• Covering the food with aluminum foil before cooking will make cleanup easier.
• The roasting rack, baking/drip pan and rotisserie spit and skewers can be removed and
washed with running water or in a dishwasher.
• To replace the oven light, first loosen the screws holding the glass cover and remove it,
then replace the bulb with a new one. Re-assemble the glass cover and screws.
• If the oven has not been used for a long period of time, take care to remove dust and
moisture before operating.
Troubleshooting
Cleaning and Maintenance

10
Recipes
Southwest Turkey with Corn Bread Stuffing
Spicy flavors of the Southwest will make this roast turkey a family favorite.
1 tablespoon paprika
1 teaspoon ground cumin
1/2 teaspoon salt
1/4 teaspoon pepper
1 clove garlic, finely chopped
1 whole turkey or roasting chicken (8 pounds), thawed if frozen
Corn Bread Stuffing (below)
1. Heat oven to 350°F. Turn Function dial to Roast. Mix paprika, cumin, salt, pepper and garlic;
rub into turkey skin.
2. Make Corn Bread Stuffing. Stuff turkey just before roasting, not ahead of time. Fill body cavity
lightly with stuffing. (Do not pack; stuffing will expand while cooking.) Place remaining stuffing in
1-quart casserole; cover and refrigerate until turkey is done.
3. Place baking/drip pan on lowest position in oven; add roasting rack. Place turkey, breast side up,
on rack. Place meat thermometer in thickest part of inside thigh muscle so thermometer does not
touch bone.
4. Roast uncovered 2 to 21⁄2hours, placing aluminum foil loosely over turkey when it begins to
turn golden, until thermometer reads 180°F and juice of turkey is no longer pink when center of
thigh is cut. Thermometer placed in center of stuffing will read 165°F when done.
5. Place turkey on warm platter; cover with aluminum foil to keep warm. Add stuffing in casserole
to oven; roast covered 30 to 40 minutes or until hot. Let turkey stand about 20 minutes for
easiest carving. 8 servings.
Corn Bread Stuffing
1/4 cup butter or margarine
1/2 cup chopped onion
1/2 cup chopped zucchini
1/2 cup chopped pecans
1 teaspoon chopped fresh or 1/4 teaspoon dried sage leaves, crumbled
1 teaspoon chopped fresh or 1/4 teaspoon dried thyme leaves
1/2 teaspoon salt
1 package (8 ounces) corn bread stuffing
1 can (4 1/2 ounces) Old El Paso® chopped green chilies
Melt butter in 10-inch skillet over medium heat. Cook onion in butter about 2 minutes, stirring occa-
sionally, until crisp-tender; remove from heat. Stir together onion and remaining ingredients in large
bowl.
®Trademarks of General Mills, Inc. or its affiliates.
Reprinted with the permission of General Mills, Inc.

11
Roast Turkey with Vegetable Stuffing
This beautiful bird will satisfy both the meat lovers and vegetable lovers at your table.
2 tablespoons butter or margarine
2 medium stalks celery, sliced (1 cup)
1 medium onion, chopped (1/2 cup)
1/4 cup chopped fresh parsley
1 tablespoon chopped fresh or 1 teaspoon dried sage leaves
1 1/2 teaspoons chopped fresh or 1/2 teaspoon dried marjoram leaves
3/4 teaspoon chopped fresh or 1/4 teaspoon dried tarragon leaves
1/2 teaspoon salt
7 cups soft bread cubes
2 medium carrots, shredded (1 1/2 cups)
1 medium zucchini, shredded (1 cup)
1 cup chopped fresh mushrooms (4 ounces)
1 whole turkey (22 pounds), thawed if frozen
1. Heat oven to 350°F. Turn Function dial to Roast. Melt butter in 10-inch nonstick skillet over
medium heat. Cook celery and onion in butter, stirring frequently, until onion is tender. Stir in
parsley, sage, marjoram, tarragon and salt. Mix bread cubes, carrots, zucchini and mushrooms in
large bowl. Add celery mixture; toss.
2. Fasten neck skin of turkey to back with skewer. Fold wings across back with tips touching. Fill
body cavity lightly with stuffing. (Do not pack; stuffing will expand while cooking.)
3. Place baking pan on lowest position in oven; add rack. Place turkey, breast side up, on rack.
Place meat thermometer in thickest part of inside thigh muscle so thermometer does not touch
bone.
4. Roast uncovered 31/2to 41/2hours, placing aluminum foil loosely over turkey when it begins to
turn golden, until thermometer reads 180°F and juice of turkey is no longer pink when center of
thigh is cut. Let turkey stand about 20 minutes for easiest carving. 30 servings.
Reprinted with the permission of General Mills, Inc.

12
Herb-Roasted Chicken with Apple Stuffing
Apple stuffing complements the fresh herb flavors of roast chicken.
1/4 cup olive or vegetable oil
2 tablespoons chopped fresh or 1 teaspoon dried thyme leaves
2 tablespoons chopped fresh or 1 teaspoon dried marjoram leaves
1 teaspoon grated lemon peel
1/2 teaspoon salt
1/4 teaspoon coarsely ground pepper
1 whole roasting chicken (4 pounds)
Apple Stuffing (below)
1. Heat oven to 375°F. Turn Function dial to Rotisserie. Mix oil, thyme, marjoram, lemon peel,
salt and pepper; rub into chicken skin.
2. Make Apple Stuffing. Stuff chicken just before roasting, not ahead of time. Fill body cavity
lightly with stuffing. (Do not pack; stuffing will expand while cooking.) Insert rotisserie spit
lengthwise through center of chicken and stuffing; secure skewer screws on both skewers
holding chicken. Tie wings and legs securely with string.
3. Roast chicken on rotisserie over baking/drip pan 11/2to 13/4hours or until meat thermometer
reads 180°F and juice of chicken is no longer pink when center of thigh is cut. Remove rotis-
serie spit and skewers. Place chicken on platter; cover loosely with aluminum foil and let
stand about 15 minutes for easiest carving. Serve chicken with stuffing. 6 servings.
Apple Stuffing
4 cups soft bread cubes (7 slices bread)
1/2 cup chopped unpeeled tart apple
1/2 cup raisins, if desired
1/4 cup butter or margarine, melted
1 small stalk celery, chopped (1/4 cup)
1 small onion, chopped (1/4 cup)
1 teaspoon chopped fresh or 1/4 teaspoon dried thyme leaves
1/2 teaspoon salt
1/4 teaspoon pepper
Mix all ingredients in large bowl.
Reprinted with the permission of General Mills, Inc.

13
Golden Glazed Cornish Hens
The mild glaze on these hens takes on the familiar smoky flavor associated with backyard
cooking.
2 tablespoons butter or margarine, melted
1/3 cup soy sauce
1/4 cup corn syrup
1/4 teaspoon instant minced garlic or 2 cloves garlic, finely chopped
2 frozen Rock Cornish hens (1 1/2 pounds each), thawed
1. Heat oven to 350°F. Turn Function dial to Rotisserie. Mix butter, soy sauce, corn syrup and
garlic; set aside.
2. Insert rotisserie spit lengthwise through centers of hens; secure skewer screws on both
skewers holding hens. Brush some of the soy sauce mixture on hens.
3. Roast hens on rotisserie over baking/drip pan about 11/2hours, brushing frequently with soy
sauce mixture, until meat thermometer reads 180°F and juices are no longer pink when cen-
ter of thigh is cut. Remove rotisserie spit and holding skewers. Place hens on platter; cover
loosely with aluminum foil and let stand about 15 minutes before serving. Cut each hen in
half along the backbone from tail to neck with kitchen scissors. 4 servings.
Reprinted with the permission of General Mills, Inc.

14
Chicken-Pesto Sandwiches
These Italian bistro-style sandwiches are fantastico!
6 boneless skinless chicken breast halves (1 3/4 pounds)
1/2 teaspoon salt
2 tablespoons chopped fresh or 2 teaspoons dried oregano leaves
1 round focaccia bread (10 to 12 inches in diameter)
1 container (7 ounces) refrigerated basil pesto
6 slices tomato
1 1/2 cups shredded spinach
1. Flatten each chicken breast half to 1/4-inch thickness between sheets of plastic wrap or
waxed paper. Sprinkle with salt and oregano.
2. Heat oven to 450°F (MAX). Turn Function dial to Broil. Spray roasting rack with cooking
spray. Place chicken on rack; place rack 6 inches from upper heating elements in oven.
Place baking/drip pan under rack. Broil 15 to 20 minutes, turning once, until no longer pink in
center.
3. Cut bread horizontally in half; cut into 6 wedges. Spread pesto on cut sides of bread. Layer
chicken, tomato and spinach on bottom wedges. Top with top wedges. 6 sandwiches.
Reprinted with the permission of General Mills, Inc.

15
Spicy Chicken Wings
For those who love all the heat and fire that a chicken wing can deliver, we offer you this recipe.
Hot sauce heat levels vary considerably, so choose wisely!
1 cup cayenne pepper sauce (hot sauce)
1 teaspoon garlic salt
24 chicken drummettes
1 cup Original Bisquick® mix
3/4 teaspoon onion salt
1/2 teaspoon black pepper
1/4 teaspoon ground red pepper (cayenne)
Blue cheese dressing
1. Mix pepper sauce and garlic salt until blended. Pour over drummettes in shallow dish.
Cover and refrigerate at least 4 hours but no longer than 24 hours.
2. Heat oven to 450°F (MAX). Turn Function dial to Cook. Spray baking/drip pan with cooking
spray. Stir together Bisquick mix, onion salt and peppers. Remove chicken from sauce; dis-
card sauce. Coat chicken with Bisquick mixture. Place in single layer in baking pan.
3. Place baking pan on lowest position in oven. Bake 25 minutes; turn chicken. Bake 20 to 25
minutes longer or until chicken is golden brown and juice is no longer pink when centers of
pieces are cut. Serve with dressing. 24 appetizers.
®Trademarks of General Mills, Inc. or its affiliates.
Reprinted with the permission of General Mills, Inc.

16
Beef Roast with Horseradish-Sour Cream
Subtle horseradish sauce enhances the flavor of the beef roast.
1 beef boneless sirloin tip roast (10 pounds)
1/4 cup Worcestershire sauce
2/3 cup sour cream
1/3 cup horseradish sauce
1 teaspoon Dijon mustard
1. Heat oven to 325°F. Turn Function dial to Roast. Place baking/drip pan on middle position
in oven; add roasting rack. Brush roast with Worcestershire sauce. Place roast on rack. Insert
meat thermometer so tip is in thickest part of beef.
2. Roast uncovered 11/2hours; turn roast over. Roast 1 to 11/2hours longer or until meat ther-
mometer reads 140°F (medium-rare).
3. Mix remaining ingredients; serve with beef. 12 servings.
Italian Beef Kabobs
Balsamic vinegar and fresh oregano take beef kabobs to new flavor heights!
1 beef bone-in sirloin or round steak (3/4 pound), 1 inch thick
1/4 cup balsamic vinegar
1/4 cup water
1 tablespoon chopped fresh or 1 teaspoon dried oregano leaves
2 tablespoons olive or vegetable oil
1 1/2 teaspoons chopped fresh or 1/2 teaspoon dried marjoram leaves
1 teaspoon sugar
2 cloves garlic, finely chopped
1. Trim fat from beef. Cut beef into 1-inch pieces. Mix remaining ingredients in medium glass
or plastic bowl. Stir in beef until coated. Cover and refrigerate, stirring occasionally, at least 1
hour but no longer than 12 hours.
2. Heat oven to 450°F (MAX). Turn Function dial to Broil. Spray roasting rack with cooking
spray. Remove beef from marinade; reserve marinade. Thread beef on each of four 10-inch
metal skewers, leaving 1/2-inch space between each piece. Brush kabobs with marinade.
3. Place kabobs on rack; place rack 4 inches from upper heating elements in oven. Place bak-
ing pan under rack. Broil 6 to 8 minutes for medium-rare to medium doneness, turning and
brushing with marinade after 3 minutes. Discard any remaining marinade. 2 servings.
Reprinted with the permission of General Mills, Inc.

17
Spit-Roasted Porketta
Rolled into the pork, herbs flavor the meat throughout.
1 pork boneless shoulder roast (3 pounds)
1/2 cup chopped fresh parsley
1 tablespoon chopped fresh or 1 teaspoon dried oregano leaves
1 tablespoon chopped fresh or 1 teaspoon dried rosemary leaves, crumbled
1 1/2 teaspoons fennel seed, crushed
1/2 teaspoon salt
1/4 teaspoon ground red pepper (cayenne)
2 large cloves garlic, finely chopped
Paprika Coating (below)
1. Remove strings from pork roast. Unroll pork; trim excess fat. Mix remaining ingredients
except Paprika Coating. Rub parsley mixture evenly on inside surface of pork. Reroll pork;
tie with string. Cover and refrigerate at least 8 hours but no longer than 24 hours.
2. Heat oven to 375°F. Turn Function dial to Rotisserie. Make Paprika Coating. Sprinkle coat-
ing evenly on pork. Insert rotisserie spit lengthwise through center of pork; secure skewer
screws on both skewers holding pork.
3. Roast pork on rotisserie over baking/drip pan 50 to 60 minutes or until meat thermometer
reads 160°F (medium doneness). Remove rotisserie spit and holding skewers. Place pork
on platter; cover loosely with aluminum foil and let stand 15 minutes before slicing. Remove
string. Cut pork into slices. 12 servings.
Paprika Coating
1 tablespoon paprika
1 teaspoon chopped fresh or 1/4 teaspoon dried oregano leaves
1/2 teaspoon salt
1/4 teaspoon pepper
Mix all ingredients.
Reprinted with the permission of General Mills, Inc.

18
Cranberry Barbecued Ribs
Barbecue indoors! Cook tender, juicy ribs brushed with a cranberry barbecue sauce in your
oven. They’re delicious!
3 pounds fresh pork riblets or 1 rack (3 pounds) pork back ribs,
cut lengthwise across bones in half
1 cup whole berry cranberry sauce
1/2 cup hoisin sauce
1/2 teaspoon onion powder
1/4 teaspoon salt
1/8 teaspoon pepper
1. Heat oven to 375°F. Turn Function dial to Cook. Spray baking/drip pan with cooking spray.
Trim fat and remove membranes from pork riblets. (For ribs, cut between bones into serv-
ing pieces.)
2. Place pork, meaty sides up, in single layer in baking pan. Place baking pan on lowest posi-
tion in oven. Cover with aluminum foil and bake 50 minutes.
3. Mix remaining ingredients. Brush pork with half of the cranberry mixture. Bake uncovered
10 to 20 minutes longer or until pork is tender.
4. Heat remaining cranberry mixture to boiling in 1-quart saucepan. Serve with pork. 40 appe-
tizers.
Reprinted with the permission of General Mills, Inc.

19
Southwest Pork Salad
A colorful medley of yellow bell peppers, fresh salad greens and melt-in-your-mouth pork
tenderloin, this hearty salad is sure to please!
3/4 pound pork tenderloin
1/4 teaspoon salt
1/4 teaspoon pepper
8 cups bite-size pieces mixed salad greens
or 1 package (4 ounces) mixed salad greens
1 medium yellow bell pepper, sliced
3 cups sliced fresh mushrooms (8 ounces)
1 can (15 to 16 ounces) black-eyed peas, rinsed and drained
Creamy Lime Dressing (below)
1. Heat oven to 425°F. Turn Function dial to Roast. Sprinkle pork with salt and pepper and
place in baking/drip pan. Place baking pan in middle position in oven. Roast uncovered 20
to 25 minutes or until thermometer inserted into thickest part of meat reads 160°F (medium
doneness). Cool pork; cut into slices.
2. Arrange salad greens, bell pepper, mushrooms, peas and pork on large serving platter.
Serve with Creamy Lime Dressing. 4 servings.
Creamy Lime Dressing
1/2 cup sour cream
1/4 cup chopped fresh cilantro
2 tablespoons lime juice
2 tablespoons vegetable oil
1/4 teaspoon salt
Mix all ingredients.
Reprinted with the permission of General Mills, Inc.
Other manuals for FR 1644
1
Table of contents
Other Franklin Chef Oven manuals