manuals.online logo
Brands
  1. Home
  2. •
  3. Brands
  4. •
  5. Freecom
  6. •
  7. Cables And Connectors
  8. •
  9. Freecom CABLE II PARALLEL User manual

Freecom CABLE II PARALLEL User manual

Other Freecom Cables And Connectors manuals

Freecom Cable II USB User manual

Freecom

Freecom Cable II USB User manual

Freecom Cable II IEEE 1394 User manual

Freecom

Freecom Cable II IEEE 1394 User manual

Popular Cables And Connectors manuals by other brands

StarTech.com ST124HD20 quick start guide

StarTech.com

StarTech.com ST124HD20 quick start guide

Philips SWV4543S/10 Features

Philips

Philips SWV4543S/10 Features

Larson Electronics 10-50C instruction manual

Larson Electronics

Larson Electronics 10-50C instruction manual

Grip MEK-PM Assembly and operating manual

Grip

Grip MEK-PM Assembly and operating manual

Ultra Products Travel Pack #3 ULT31436 Specifications

Ultra Products

Ultra Products Travel Pack #3 ULT31436 Specifications

Surpass QCH-F Operation manual

Surpass

Surpass QCH-F Operation manual

Philips SWA6310 Specifications

Philips

Philips SWA6310 Specifications

StarTech.com CRJ4550PK quick start guide

StarTech.com

StarTech.com CRJ4550PK quick start guide

Nohau EMUL-IP2K-PC user guide

Nohau

Nohau EMUL-IP2K-PC user guide

Foxun SX-SP144E-HD4K2K operating instructions

Foxun

Foxun SX-SP144E-HD4K2K operating instructions

Philips SWA3305W Specifications

Philips

Philips SWA3305W Specifications

opticis Stretch DVIM1-1P0x user manual

opticis

opticis Stretch DVIM1-1P0x user manual

Volkswagen VAS 6558A operating manual

Volkswagen

Volkswagen VAS 6558A operating manual

NEXIBO N-13 user manual

NEXIBO

NEXIBO N-13 user manual

CYP PU-1H3HBTL Operation manual

CYP

CYP PU-1H3HBTL Operation manual

Allen-Bradley 1784-u2dhp installation instructions

Allen-Bradley

Allen-Bradley 1784-u2dhp installation instructions

Global Caché Flex Link Blaster quick start

Global Caché

Global Caché Flex Link Blaster quick start

Hauppauge USB-Live2 Quick installation guide

Hauppauge

Hauppauge USB-Live2 Quick installation guide

manuals.online logo
manuals.online logoBrands
  • About & Mission
  • Contact us
  • Privacy Policy
  • Terms and Conditions

Copyright 2025 Manuals.Online. All Rights Reserved.

CABLE II
Rev. 112
Parallel
www.freecom.com
2
FREECOM Cable II Parallel
GB
Cable II Change Adapter
Cable II Parallel
(printer port)
PARALLEL PORT
3
GB
USERS MANUAL
GENERAL INFORMATION:
Hardware requirements ..................................................................... Page 5
Software requirements ...................................................................... Page 5
Precautionary measures and operating instructions ........................ Page 5
CHAPTER 1:
Start-up operation - Hardware installation ...................................... Page 6
CHAPTER 2:
Software installation under Windows 95 / 98 / ME / NT 4.0 ............ Page 7
Software installation under DOS, Windows 3.x ............................... Page 8
CHAPTER 3:
Reference section ............................................................................... Page 10
Advanced settings in the FREECOM configuration .......................... Page 10
First Aid ............................................................................................... Page 12
© 2001 FREECOM Technologies
Table of Contents
4
FREECOM Cable II Parallel
GB GB
Dear User,
welcome to the installation of your FREECOM Cable II Parallel . Before installing
the drive, please read through the following points regarding its compatibility
with your system.
FREECOM Technologies GmbH Berlin, Germany
www.freecom.com
Warning !
All rights reserved. The products named in this manual are only used for identification
purposes and may be trademarks or registered trademarks of the respective companies.
This device was designed for home or office use.
Warning! This device is equipment complying with EN55022 class A. This equipment
can cause radio disturbances in a residential area. If this is the case, the user has to take
appropriate measures and assume all responsibility and costs for. It may not be used
near or with any life-sustaing systems.
FREECOM Technologies is not liable for any damages that may occur from the use of
a FREECOM system. All rights reserved. We reserve the right to upgrade our products
in keeping with technological advances.
5
GB
General Information
Reliableperformanceofthe FREECOM Cable II Parallel Port cannotbeguaranteed
for configurations that do not meet the following requirements:
Hardware requirements
 min. PC 486 or higher
 min. 4 MB RAM
 one disk/CD drive and one hard drive
 a parallel port interface (standard, bidirectional, EPP)
Software requirements
 min. MS-DOS Version 5.0 or higher
 Windows 3.x
 Windows 95/98
 Windows ME
 Windows NT 4.0
Precautionary measures and operating instructions
Please turn off all components prior to every system change because hardware
changes of powered components can cause damage to the computer or the
FREECOM Cable II.
 Operate the FREECOM Cable II only in the temperature range from 10 - 45°C.
 If the FREECOM Cable II is moved from a cool location to a warmer one, wait
until the Cable II and your system warms to the ambient temperature before
using it, otherwise moisture from condensation could lead to errors.
 Do not use the FREECOM Cable II in a dusty environment.
 Do not drop the FREECOM Cable II or expose it to other types of shocks.
 The FREECOM Cable II should not be used near strong electromagnetic
radiation sources (speakers, mobile phones, etc.).
 Do not use an extension cable between the FREECOM Cable II and your
computer.
 If the FREECOM Cable II is connected to a printer interface equipped with a
dongle, the dongle and the the FREECOM system will not function reliably.
GB
General Information
6
FREECOM Cable II Parallel
GB
1
CHAPTER 1: Start-up operation - Hardware installation
1. Turn off your computer and all the equipment connected to it.
2. Disconnect the printer , if applicable, from your computer.
3. Connect the FREECOM Cable II Parallel to the printer port of your
computer. Make sure that the port on your PC is indeed a parallel port and not
one intended for other peripherals such as a scanner, in order to avoid
hardware damage.
4. If desired, you can connect your printer to the printer connection of the
FREECOM Cable II Parallel.
5. Connect the drive plug of the Cable II to the FREECOM device.
6. Plug the power supply of the FREECOM device into a power outlet.
7. Turn on your computer again and, if applicable, your printer
8. Now you can begin installing the software.
PC
Printer cable Printer cable
FREECOM
Cable II
Printer
connection
Computer
connection
Drive plug
FREECOM Cable II
7
GB
2
CHAPTER 2: Software installation
2.1 Software installation under Windows 95/98, Windows ME and
Windows NT 4.0
1. Insert the "FREECOM installation disk/CD" for the operating system you are
using (Windows 95/98, Win ME or Windows NT 4.0) into the drive of your PC.
2. Click "Start", "Run" and type in "a:\setup.exe" (Example for disk) or. Press
Enter.
3. When you have accepted the agreement, a new window will appear. The set-
up program suggests "C:\Program\FREECOM\Cable II Parallel" as the standard
default directory. (If you wish to copy the files into another directory, click
"Browse" and enter the path name.) Confirmthechosen folderwith "Continue".
4. The set-up program then suggests the entry "FREECOM Cable II Parallel" as
standard in the start menu of the programme folder. (You also have the
possibility to create your own folder.) Confirm the chosen entry with "Continue"
and the files will then be installed onto your computer.
5. The set-up wizard will inform you of the installation process. Follow the on-
screen instructions.
After you restart your computer, your FREECOM drive will appear with a new
drive letter under "My Computer".
Software installation
8
FREECOM Cable II Parallel
GB
2
Note: Dont forget to remove the FREECOM installation disk/CD before
restarting your computer. (For advanced features see section 3.2 "First
Aid..." of this manual).
The installation is now complete.
For CD-RW drives please refer to the drive manual for installing the specific
mastering software.
2.2 Software installation for DOS and Windows 3.x
The installation for DOS and Windows 3.x is menu-driven to make it as easy as
possible to integrate the FREECOM drive into your system. You can select the
different commands of the menu with the help of the arrow keys. Mark your
selection with the spacebar. Confirm your selection with [ENTER] the return key.
1. Exit Windows or other software programs to get to the DOS command prompt.
2. Insert the "FREECOM installation disk/CD" for the operating system you are
using (DOS or Win3.x) into your standard drive and change to this drive by
entering either "A: [ENTER]" (Example for disk). Start the installation from the
DOS prompt by entering: FCINST [ENTER].
3. Select the language in which the installation is to be performed.
4. Select the type of connection used and the device.
5. You can now decide if you want the installation to proceed "automatically"
whereby the installation program specifies the path and modifies your
computer's start up files (refer to step 9). However, if you want to modify the
settings manually, select "user-defined".
9
GB
2
6. Read the following information screen and acknowledge it by pressing the
[ENTER] key.
7. If you wish to select a different path, you can specify in which directory the
FREECOM software is to be installed. Please enter the complete path name
including the drive letter! If the directory does not yet exist, it will be created.
8. The files will now be copied into the directory you have specified.
9. After the files have been copied, you can allow the installation program to
modify the startup files of your computer (CONFIG.SYS, AUTOEXEC.BAT)
automatically (recommended method). You can also display these modifications
or cancel the installation.
10. The installation updates your startup files and saves the original versions under
the names CONFIG.FC and AUTOEXEC.FC.
11. After the startup files have been modified, the installation is complete.
You can now exit the installation program. In order for the changes to take
effect, you must restart your computer.
Note: Don't forget to remove the FREECOM installation disk/CD before
restarting the your computer. (For advanced features see section 3.2
"First Aid..." of this manual).
The FREECOM installation is now complete.
After restarting your computer, additional boot messages are displayed which are
generated by the device drivers for the device you have just installed. The device
driver for the device is placed in the CONFIG.SYS file which creates a message that
can vary (example):
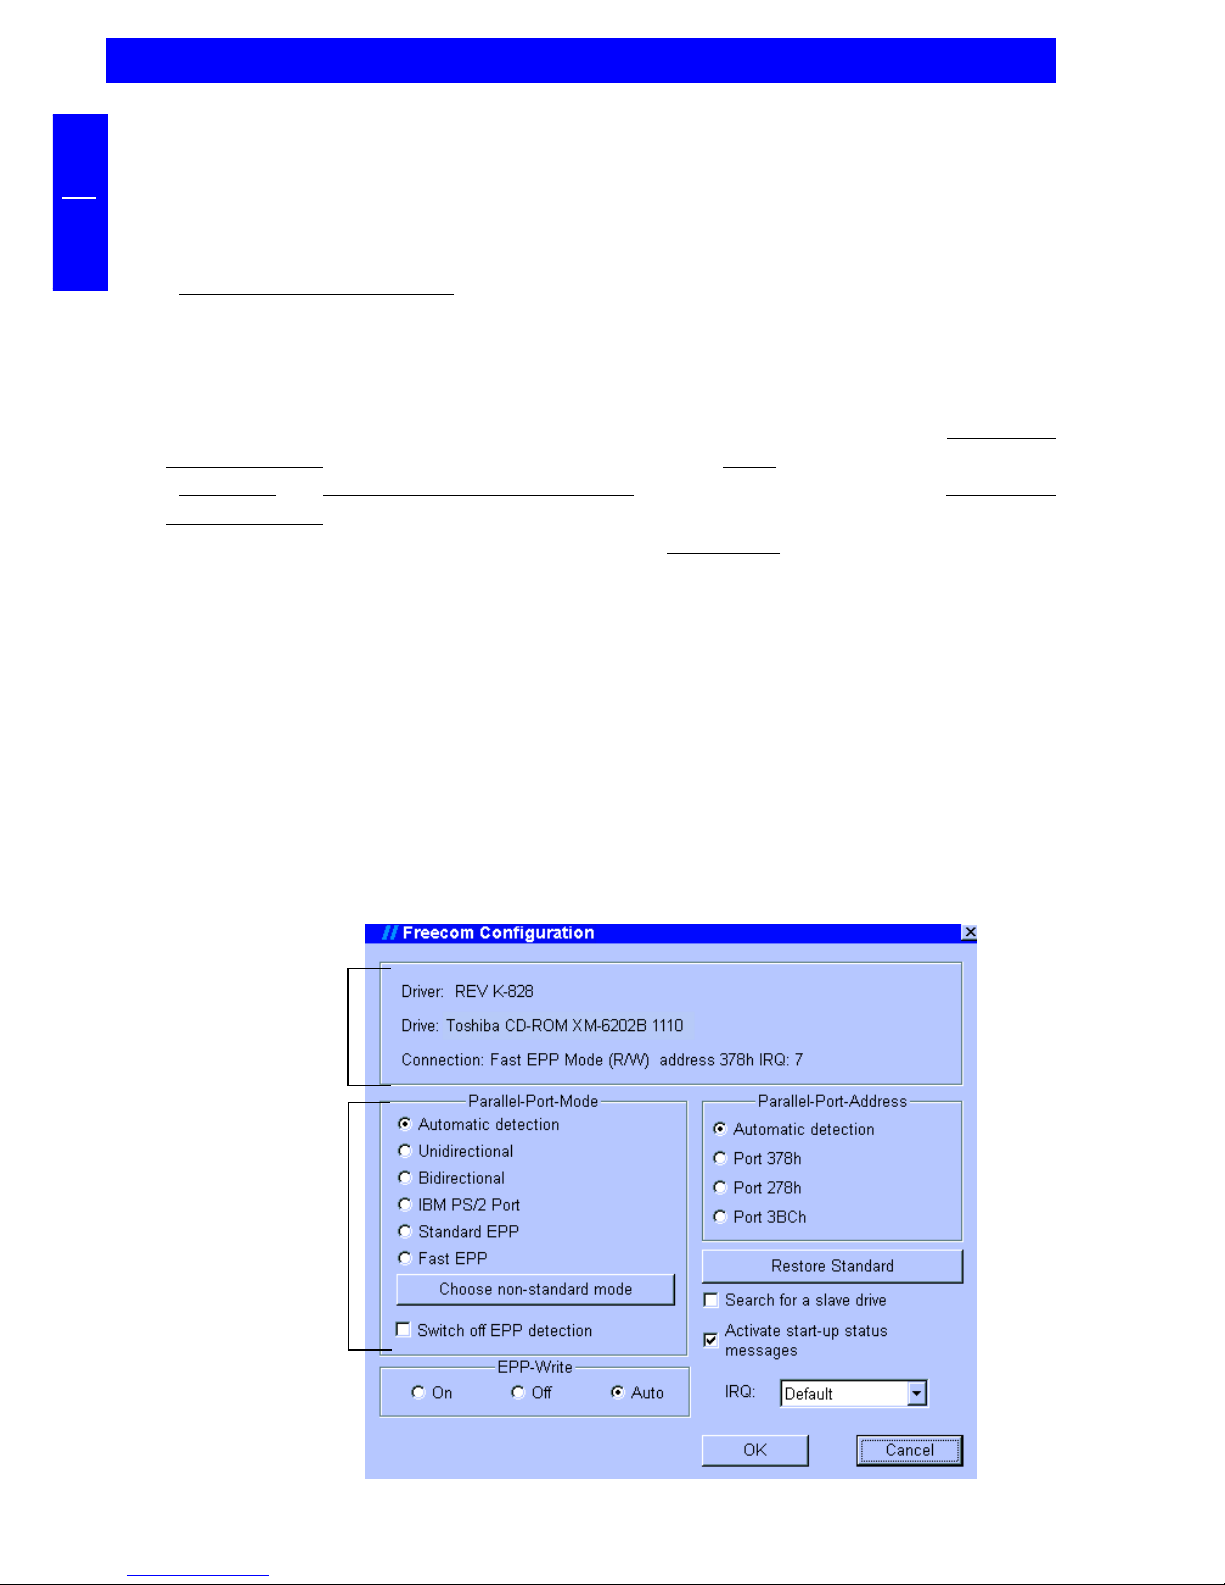
PW-CD: Freecom CD-ROM Device Driver Rev. K-936DOS
PW-CD: Copyright (C) Freecom Technologies 1995-1998
PW-CD: Mode is E0 at port address 378h
PW-CD: Drive: Toshiba CD-ROM XM-6202B 1110
PW-CD: CD-ROM drive installation successfully completed
Note: If a different driver message is displayed, this does not necessarily
indicate that an error has occurred. Please refer to the chapter 3 "Trouble
Shooting" only if the text contains the word "ERROR" or "WARNING".
Software installation
10
FREECOM Cable II Parallel
GB
3
CHAPTER 3: Reference section
3.1 Advanced settings in the FREECOM configuration
under Windows 95/98, Windows ME and Windows NT 4.0
"FREECOM Configuration" will automatically configure the FREECOM drive to
your PC. When installing the device for the first time, the setup program
automatically detects the type of parallel port in your PC and configures the
optimum data transfer mode for the parallel port. Normally, this is the optimum
setting which eliminates the need for making this setting manually. In the event
that you wish to have a different setting, you can call up the "FREECOM
Configuration" as follows: Click the Windows "Start" button and then click
"Program", "FREECOM Cable II Parallel". Double-click the icon "FREECOM
Configuration". You will see that the settings for the parallel port transfer mode
as well as the parallel port address are set to "automatic". The values detected by
the configuration program are shown in the first three lines of the upper section.
Status messages:
 'Driver' - Device driver version
 'Drive' - Drive designation
 'Connection' - Connection information (parallel port mode, EPP
write mode"(R/W)", port address and possibly
interrupt) or possibly errors.
To set the parallel port mode or address manually, simply click the desired settings.
Status lines
Settings