Freecom CABLE II PCMCIA User manual

CABLE II
PCMCIA / CardBus
Rev. 112
www.freecom.com

2
FREECOM CABLE II PCMCIA / CABLE II CardBus
GB
Cable II PCMCIA
Cable II CardBus

3
GB
TABLE OF CONTENTS
GENERAL INFORMATION:
Hardware requirements ..................................................................... Page 5
Software requirements ...................................................................... Page 5
Precautionary measures and operating instructions ........................ Page 5
CHAPTER 1:
Startup operation - Hardware installation ....................................... Page 6
CHAPTER 2:
Software installation under Windows 95 ......................................... Page 7
Software installation under Windows 98/ME ................................... Page 9
Software installation under Windows 2000 ..................................... Page 12
Software installation under Windows NT 4.0 ................................... Page 16
Software installation under DOS, Windows 3.x ............................... Page 17
CHAPTER 3:
Troubleshooting - General problems .............................................. Page 19
© 2001 FREECOM Technologies
Table of Contents

4
FREECOM CABLE II PCMCIA / CABLE II CardBus
GB GB
Dear User,
welcome to the installation of your FREECOM Cable II PCMCIA, FREECOM
Cable II CardBus. Before installing the drive, please read through the following
points regarding its compatibility with your system.
If not noted otherwise, the Cable II CardBus and Cable II PCMCIA are installed in
the same way.
FREECOM Technologies GmbH Berlin, Germany
www.freecom.com
Warning !
All rights reserved. The products named in this manual are only used for identification
purposes and may be trademarks or registered trademarks of the respective companies.
This device was designed for home or office use.
Warning! This device is equipment complying with EN55022 class A. This equipment
can cause radio disturbances in a residential area. If this is the case, the user has to take
appropriate measures and assume all responsibility and costs for. It may not be used
near or with any life-sustaing systems.
FREECOM Technologies is not liable for any damages that may occur from the use of
a FREECOM system. All rights reserved. We reserve the right to upgrade our products
in keeping with technological advances.

5
GB
General Information
Reliable performance of the FREECOM Cable II cannot be guaranteed for
configurations that do not meet the following requirements:
Hardware requirements
min. PC 486DX
min. 16 MB RAM
a PCMCIA Interface (type II)
a CardBus Interface (type II)
Software requirements
DOS/Win 3.x Win 95 Win 98 Win 2000 Win ME Win NT 4.0
Cable II PCMCIA x* x x x x x
Cable II CardBus - - x x x -
* only read mode
GB
General Information
Precautionary measures and operating instructions
Operate the FREECOM Cable II only in the temperature range from 10 - 45°C.
If the FREECOM Cable II is moved from a cool location to a warmer one, wait
until the Cable II and your system warms to the ambient temperature before
using it, otherwise moisture from condensation could lead to errors.
Do not use the FREECOM Cable II in a dusty environment.
Do not drop the FREECOM Cable II or expose it to other types of shocks.
The FREECOM Cable II should not be used near strong electromagnetic
radiation sources (speakers, mobile phones, etc.).

6
FREECOM CABLE II PCMCIA / CABLE II CardBus
GB
1
GB
CHAPTER 1: Startup operation - Hardware installation
1. Turn off your computer and all the equipment connected to it.
2. Connect the included power supply cable to the rear panel of the FREECOM
device.
Do not yet plug the power supply into the power outlet.
3. Connect the drive plug of the Cable II to the FREECOM device.
4. Attach the other connection on the Cable II to your PC. Following this, plug the
power supply of the FREECOM device into a power outlet.
5. Turn on your computer again.
6. You can now begin installing the software (Chap. 2).
"Plug&Play" with the Cable II PCMCIA for Windows 95 / 98, ME and
Windows 2000
To use the FREECOM drive for Windows, primary installation must be carried out
only once, according to the following software installation.
The FREECOM Cable II PCMCIA is Plug&Play compatible. If you work with Windows,
you can attach the PCMCIA while the drive is in use. Your FREECOM drive then
appears under "My Computer". Likewise, you can remove the Cable II PCMCIA
while the drive is in use, by first cancelling it. The FREECOM drive then disappears
from "My Computer". To cancel the PCMCIA, click on "Start", "Settings", "Control
Panel", "PC Card (PCMCIA)". Highlight the FREECOM Cable II PCMCIA and click on
"Stop". The Cable II PCMCIA can be removed when the command "You may now
safely remove the card" appears.
Computer
connection
FREECOM Cable II
connection to drive

7
GB
2
GB
1
Software installation
CHAPTER 2:Software installation
2.1 Software installation under Windows 95
No special software is required to install your FREECOM Cable II PCMCIA. We
however recommend using the driver on diskette/CD that we have enclosed. This
has been specially developed by FREECOM and is faster than the Windows driver.
FREECOM HighSpeed Driver (recommended)
Note: If you are not prompted to install the driver, Windows will install
the default driver automatically. Proceed then as described in the section
on later installation of the FREECOM HighSpeed driver.
To install the FREECOM driver, insert the FREECOM installation diskette/CD in your
PC drive.
1. Plug the FREECOM Cable II PCMCIA into the PCMCIA slot of your PC.
2. The window "Hardware Installation Wizard" opens. The FREECOM Cable II
PCMCIA is recognized as "Standard IDE/ESDI Hard Disk Controller". Confirm
with "Next" to continue the installation.
3. The Freecom driver is found in the next the window. Confirm by clicking
Finish.
4. The driver is installed from the disk/CD.
5. To finish installing the driver, Windows asks you to restart your computer. After
restart your FREECOM drive appears under My Computer with new a new
drive letter
Uninstalling the FREECOM HighSpeed Driver
To uninstall the FREECOM HighSpeed driver, select the file "DriverRemove.exe" on
the installation diskette/CD and follow the on-screen instructions.
Windows Default Driver
No special software is required to install your FREECOM Cable II PCMCIA.
1. Plug the FREECOM Cable II PCMCIA into the PCMCIA slot of your PC.
2. The window "Hardware Installation Wizard" opens. The FREECOM Cable II
PCMCIA is recognized as "Standard IDE/ESDI Hard Disk Controller". Confirm
with "Next" to continue the installation.
3. The driver is found in the next window. To install the Windows default driver,
click "Finish".
4. To finish installing the driver, Windows asks you to restart your computer. After
restart your FREECOM drive appears under My Computer with new a new
drive letter.

8
FREECOM CABLE II PCMCIA / CABLE II CardBus
GB
1
Later Installation of the FREECOM HighSpeed Driver
Note: If you are not prompted to install the driver, your system has
automatically installed the Windows default driver for your FREECOM
Cable II PCMCIA.
To install the FREECOM HighSpeed driver, proceed as follows:
1. Plug the FREECOM Cable II PCMCIA into the PCMCIA slot of your PC.
2. Open the "Device Manager" by right-clicking on the "My Computer" icon. A
menu opens. Select "Properties" and click on the "Device Manager" tab.
3. Click on the "+" next to the entry "Hard disk controllers".
4. Double-click on "Standard IDE/ESDI Hard Disk Controller".
5. Open the "Driver" tab. Then click on "Update Driver".
6. The "Update Device Driver Wizard" opens. Click on "Next".
7. The Freecom driver is automatically found in the next window.
8. To start the driver update, click Finish. To finish installation, Windows asks
you to restart your computer. Confirm by clicking Yes
9. After restart your FREECOM drive appears under My Computer with new a
new drive letter. Installation is now complete

9
GB
1
2.2 Software installation under Windows 98/ME
No special software is required to install your FREECOM Cable II PCMCIA. We
however recommend using the driver on diskette/CD that we have enclosed. This
has been specially developed by FREECOM and is faster than the Windows driver.
FREECOM HighSpeed Driver (recommended)
Note: If you are not prompted to install the driver, Windows will install
the default driver automatically. Proceed then as described in the section
on later installation of the FREECOM HighSpeed driver.
To install the FREECOM driver, insert the FREECOM installation diskette/CD in your
PC drive.
1. Plug the FREECOM Cable II PCMCIA into the PCMCIA slot of your PC.
2. The window "Hardware Installation Wizard" opens. The FREECOM Cable II
PCMCIA is recognized as "Standard IDE/ESDI Hard Disk Controller". Confirm
with "Next" to continue the installation.
3. In the next window the option for finding the best driver for the device has
been selected. Confirm with "Next".
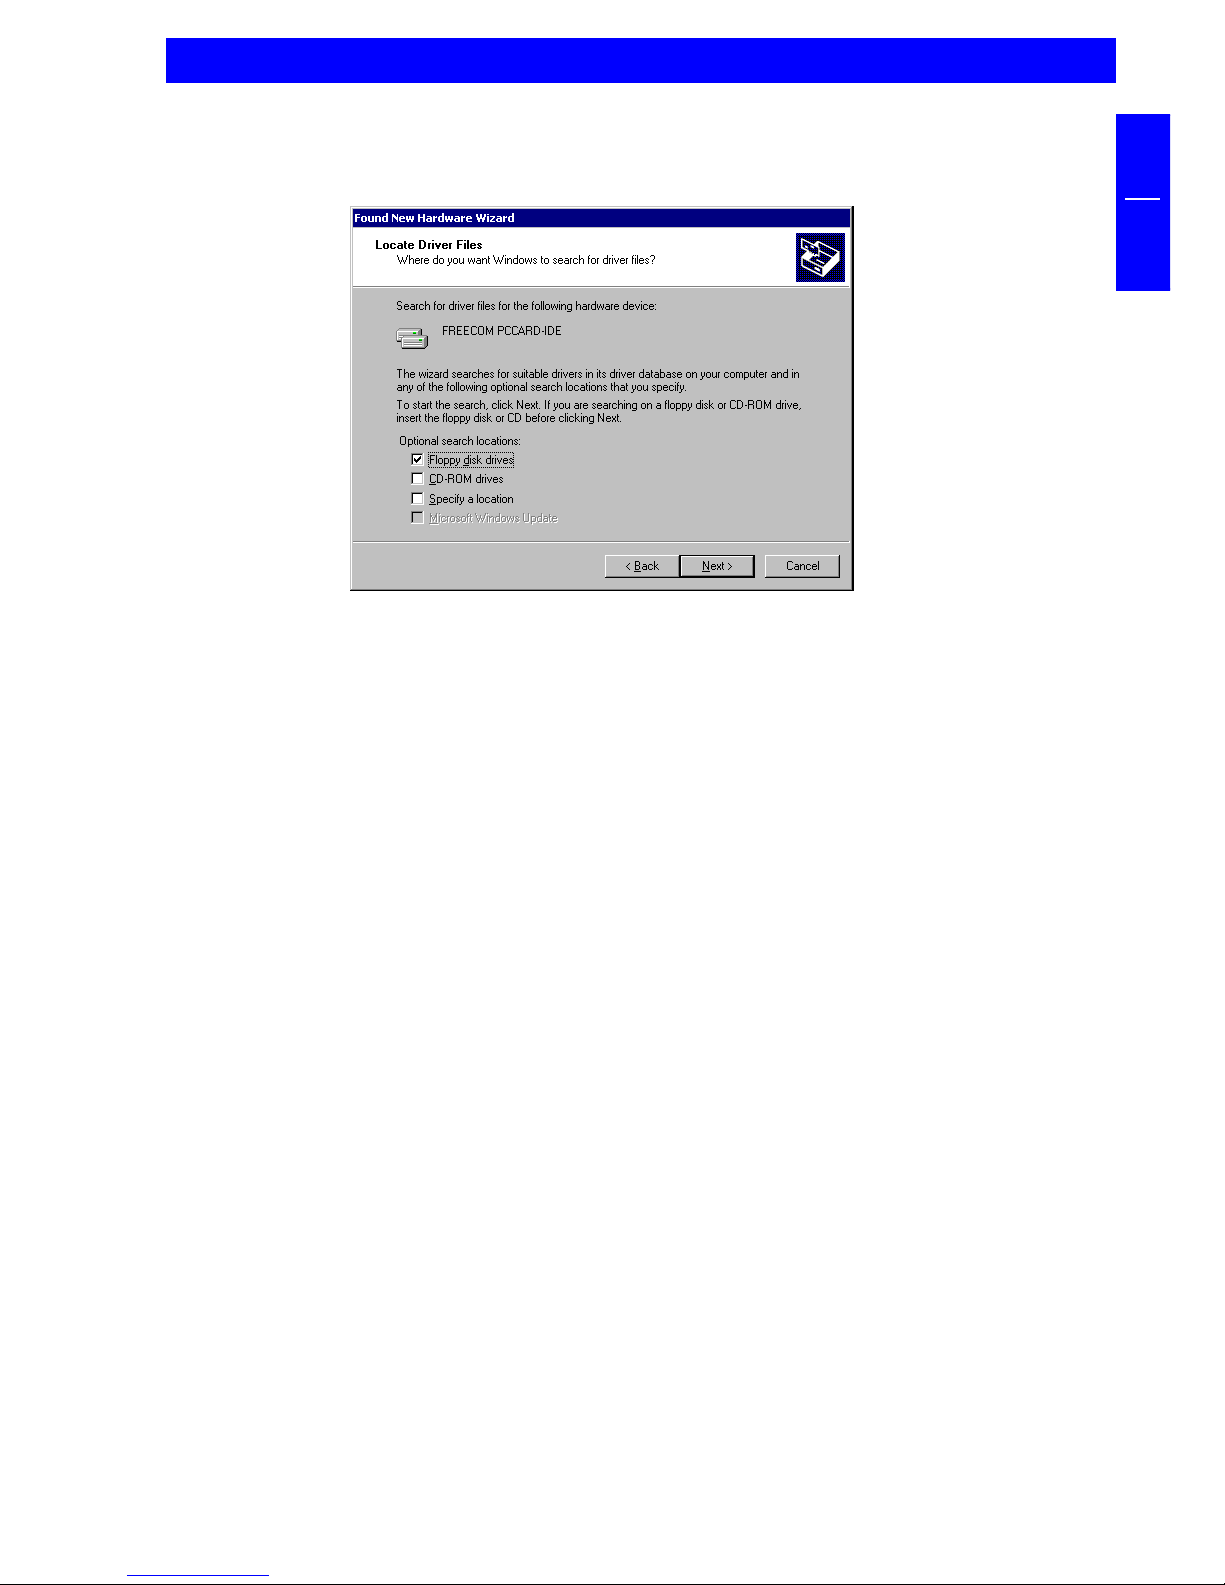
4. In the next window a search is performed for the new driver. Select the floppy
drive or the CD-ROM drive to install the FREECOM driver. Click on "Next".
5. The driver is loaded from the diskette/CD. Click on "Next" to continue the
installation.
6. After completion of the installation, click on "Finish". Your FREECOM drive
appears with a new drive letter under "My Computer". The installation is then
complete.
Uninstalling the FREECOM HighSpeed Driver
To uninstall the FREECOM HighSpeed driver, select the file "DriverRemove.exe" on
the installation diskette/CD and follow the on-screen instructions.
Software installation

10
FREECOM CABLE II PCMCIA / CABLE II CardBus
GB
2
Windows 98 Default Driver
No driver software is required to install the Windows default driver.
1. Plug the FREECOM Cable II PCMCIA into the PCMCIA slot of your PC.
2. The window "Hardware Installation Wizard" opens. Your FREECOM Cable II
PCMCIA is recognized as "Standard IDE/ESDI Hard Disk Controller". Confirm
with "Next" to continue the installation.
3. In the next window the option for finding the best driver for the device has
been selected. Confirm with "Next".
4. In the next window a search is performed for the new driver. Click on "Next"
to install the Windows default driver.
5. In the next window, click on "Finish" to conclude the driver installation. Your
FREECOM drive now appears with a new drive letter under "My Computer".
Later Installation of the FREECOM HighSpeed Driver Windows 98/ME
Note: If you are not prompted to install the driver, your system has
automatically installed the Windows default driver for your FREECOM
Cable II PCMCIA.
To install the FREECOM HighSpeed driver, proceed as follows:
1. Plug the FREECOM Cable II PCMCIA into the PCMCIA slot of your PC.
2. Open the "Device Manager" by right-clicking on the "My Computer" icon. A
menu opens. Select "Properties" and click on the "Device Manager" tab.
3. Click on the "+" next to the entry "Hard disk controllers".
4. Double-click on "Standard IDE/ESDI Hard Disk Controller".
5. Open the "Driver" tab. Then click on "Update Driver".
6. The "Update Device Driver Wizard" opens. Click on "Next".
7. In the next window the default is selected for finding a better driver than that
currently being used. (Recommended.) Confirm with "Next".
8. Now you can select where the FREECOM HighSpeed driver is to be installed.
Insert the FREECOM driver diskette/CD and select the floppy drive or the CD-
ROM drive. Confirm with "Next".
9. The FREECOM HighSpeed driver is then searched. Confirm the selection
afterwards with "Next". The FREECOM HighSpeed driver is now installed.
10. After completion of the installation, click on "Finish". Your FREECOM drive
appears with a new drive letter under "My Computer". The installation is then
complete.

11
GB
2
Software installation
Uninstallation of Windows Default Driver Windows 98
1. Plug the FREECOM Cable II PCMCIA into the PCMCIA slot of your PC.
2. Open the "Device Manager" by right-clicking on the "My Computer" icon. A
menu opens. Select "Properties" and click on the "Device Manager" tab.
3. Click on the "+" next to the entry "Hard disk controllers".
4. Right-click on "Standard IDE/ESDI Hard Disk Controller" and select the delete
option.
2.3 Assigning the drive letter under Windows 95/98/ME
After successfully completing the installation of the FREECOM drive, a new drive
letter is assigned automatically (the first available letter after the internal hard
drives). This can shift the drive letter of an internal CD-ROM drive (for example, 'D'
to 'E'). If this leads to problems, it is possible to change the drive letter assignment
as follows:
1. Click on "Start" - "Settings" - "Control Panel".
2. Click on "System".
3. Select "Device Manager" and click on "CD-ROM" or "Drive".
4. Click on the FREECOM drive, then on "Properties" - "Settings". (The currently
assigned drive letter as well as the reserved drive letters will then be displayed.)
5. Under "Reserved Drive Letter" enter a drive letter, for example "F" for the
FREECOM device as the "First drive letter" and "F" again as the "Last drive
letter".
6. Confirm your selection with "OK". When you restart your computer, the
FREECOM drive will be assigned the letter F in "My Computer".

12
FREECOM CABLE II PCMCIA / CABLE II CardBus
GB
2
2.4 Software installation under Windows 2000
Note: If you are not prompted to install the driver, Windows will install
the default driver automatically. Proceed then as described in the section
on later installation of the FREECOM HighSpeed driver.
FREECOM HighSpeed Driver (recommended)
1. To install the FREECOM driver, insert the FREECOM installation diskette/CD in
your PC drive.
2. Plug the FREECOM Cable II PCMCIA into the PCMCIA slot of your PC.
3. The window for searching for new hardware opens. Under Windows 2000,
Cable II is recognized as "PCMCIA IDE/ATAPI Controller". Confirm with "Next".
4. In the next window, the default option for finding a suitable driver for the
device is selected. Confirm with "Next".
13
GB
2
5. Select the floppy drive or the CD-ROM drive to install the FREECOM driver. Click
on "Next".
6. The driver is loaded from the diskette/CD. Click on "Next" to install the driver.
7. If a message appears that no digital signature from Microsoft Windows has
been found, confirm with "Yes".
8. Confirm completion of the software installation in the window that opens by
clicking on "Finish". Your FREECOM drive now appears with a new drive letter
under "My Computer". The installation is then complete.
Uninstalling the FREECOM HighSpeed Driver
To uninstall the FREECOM HighSpeed driver, select the file "DriverRemove.exe" on
the installation diskette/CD and follow the on-screen instructions.
Software installation

14
FREECOM CABLE II PCMCIA / CABLE II CardBus
GB
2
Windows Default Driver
If Windows does not automatically install the default driver, proceed as follows.
No driver software is required to install the Windows default driver.
1. Plug the FREECOM Cable II PCMCIA into the PCMCIA slot of your PC.
2. The window for searching for new hardware opens. Under Windows 2000,
Cable II is recognized as "PCMCIA IDE/ATAPI Controller" and the drivers are
components of the operating systems. Confirm with "Next".
3. In the next window, the option appears for finding a suitable driver for the
device. Confirm with "Next".
4. In the next window, click on "Finish" to conclude the driver installation. Your
FREECOM drive now appears with a new drive letter under "My Computer".
Later Installation of the FREECOM HighSpeed Driver
Note: If you are not prompted to install the driver, your system has
automatically installed the Windows default driver for your FREECOM
Cable II PCMCIA.
To install the FREECOM HighSpeed driver, proceed as follows:
1. Plug the FREECOM Cable II PCMCIA into the PCMCIA slot of your PC.
2. Open the "Device Manager" by right-clicking on the "My Computer" icon. A
menu opens. Select "Properties". Then click on the "Hardware" tab and start
the "Device Manager" from there.
3. Click on the "+" next to the entry "IDE ATA/ATAPI Controller".
4. Double-click on "PCMCIA IDE/ATAPI Controller".
5. Open the "Driver" tab. Then click on "Update Driver".
6. The "Update Device Driver Wizard" opens. Click on "Next".
7. In the next window, the default option for finding a suitable driver for the
device is selected. Confirm with "Next".
8. Now you can select where the FREECOM HighSpeed driver is to be installed.
Insert the FREECOM driver diskette/CD and select the floppy drive or the CD-
ROM drive. Confirm with "Next".
9. The FREECOM HighSpeed driver is then searched. Confirm the selection
afterwards with "Next". The FREECOM HighSpeed driver is installed.
10. After completion of the installation, click on "Finish". Your FREECOM drive
appears with a new drive letter under "My Computer". The installation is then
complete.

15
GB
2
Software installation
Uninstallation of Windows Default Driver
1. Plug the FREECOM Cable II PCMCIA into the PCMCIA slot of your PC.
2. Open the "Device Manager" by right-clicking on the "My Computer" icon. A
menu opens. Select "Properties". Then click on the "Hardware" tab and start
the "Device Manager" from there.
3. Click on the "+" next to the entry "IDE ATA/ATAPI Controller".
4. Right-click on "PCMCIA IDE/ATAPI Controller" and select "Uninstall...".
5. Confirm by clicking "OK". Windows removed the driver.
16
FREECOM CABLE II PCMCIA / CABLE II CardBus
GB
2
2.5 Software installation under Windows NT 4.0
1. Insert the "FREECOM installation diskette" for Windows NT 4.0 operating
system into your standard floppy drive.
2. Click "Start", "Run" and type "a:\setup.exe" (Example for disk).
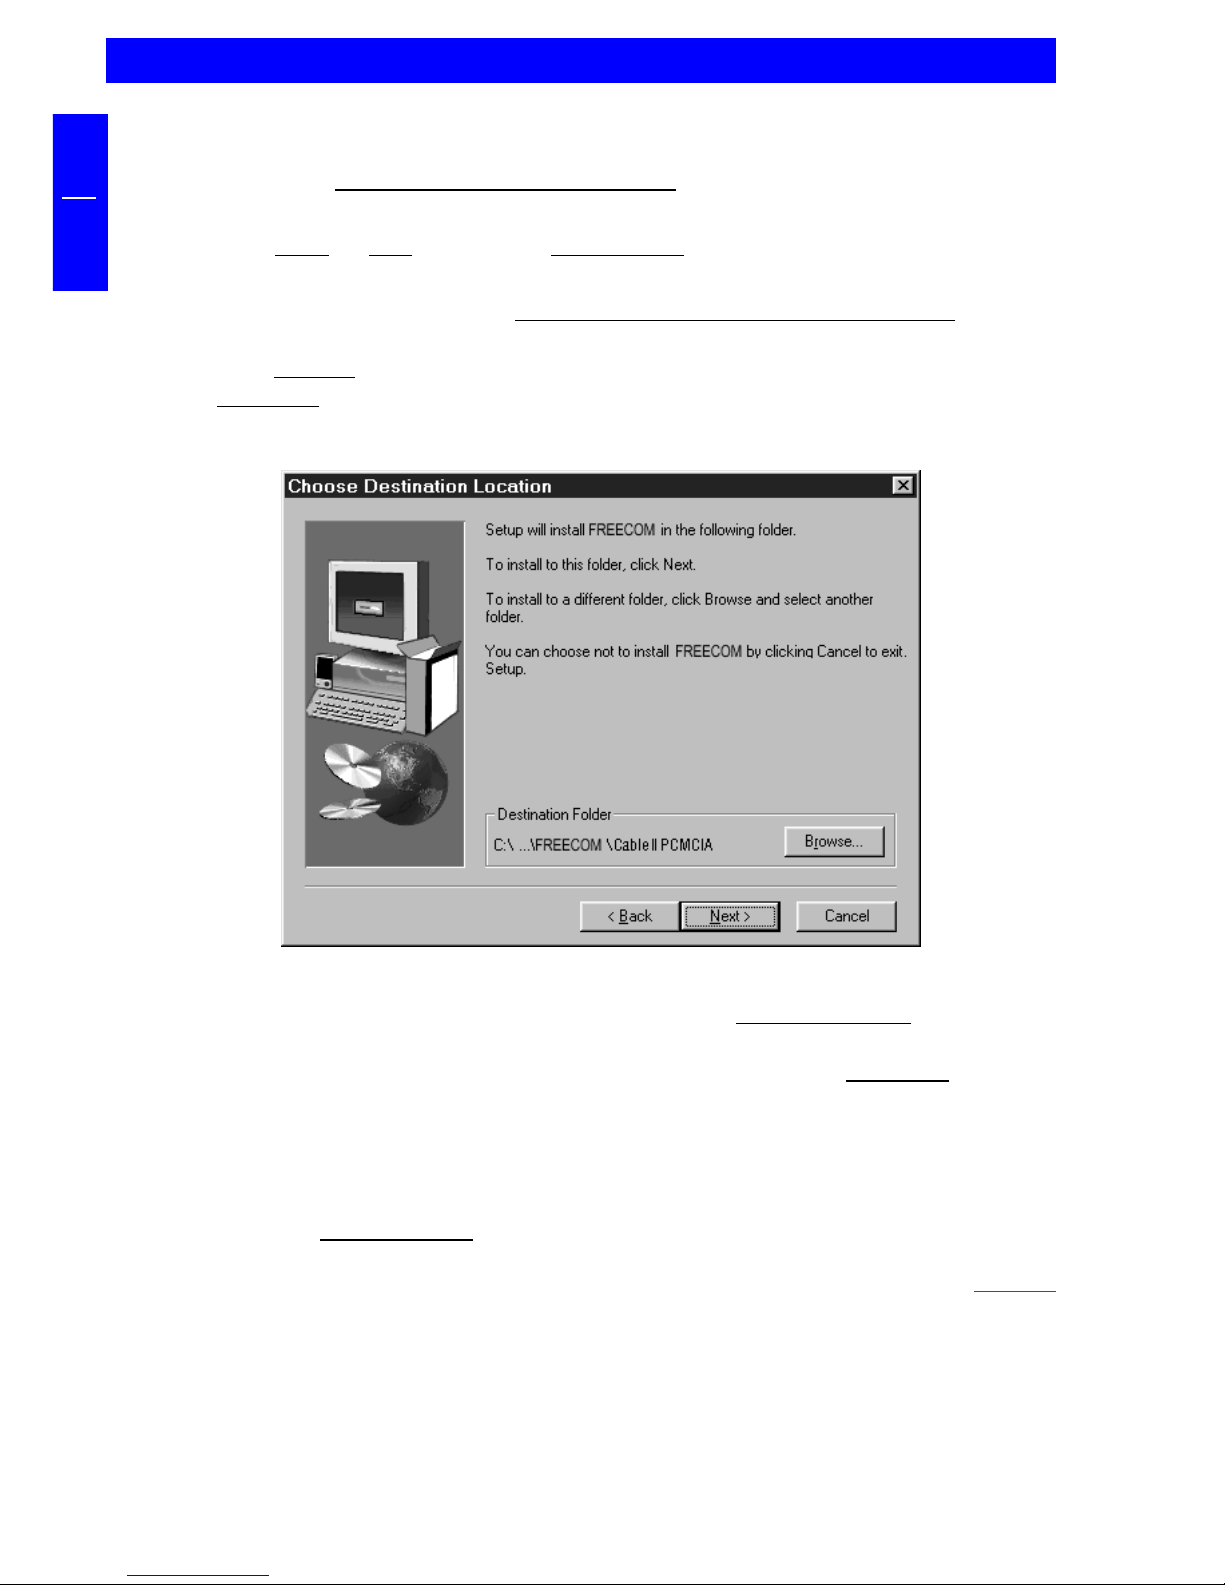
3. When you have accepted the agreement, a new window will appear. The set-
up programme suggests "C:\Program\FREECOM\Cable II PCMCIA" as the
standard default directory. (If you wish to copy the files into another directory,
click "Browse" and enter the path name.) Confirm the chosen folder with
"Continue".
4. The set-up programme then suggests the entry "Cable II PCMCIA" as standard
in the start menu of the programme folder. (You also have the possibility to
create your own folder.) Confirm the chosen entry with "Continue" and the
files will then be installed onto your computer.
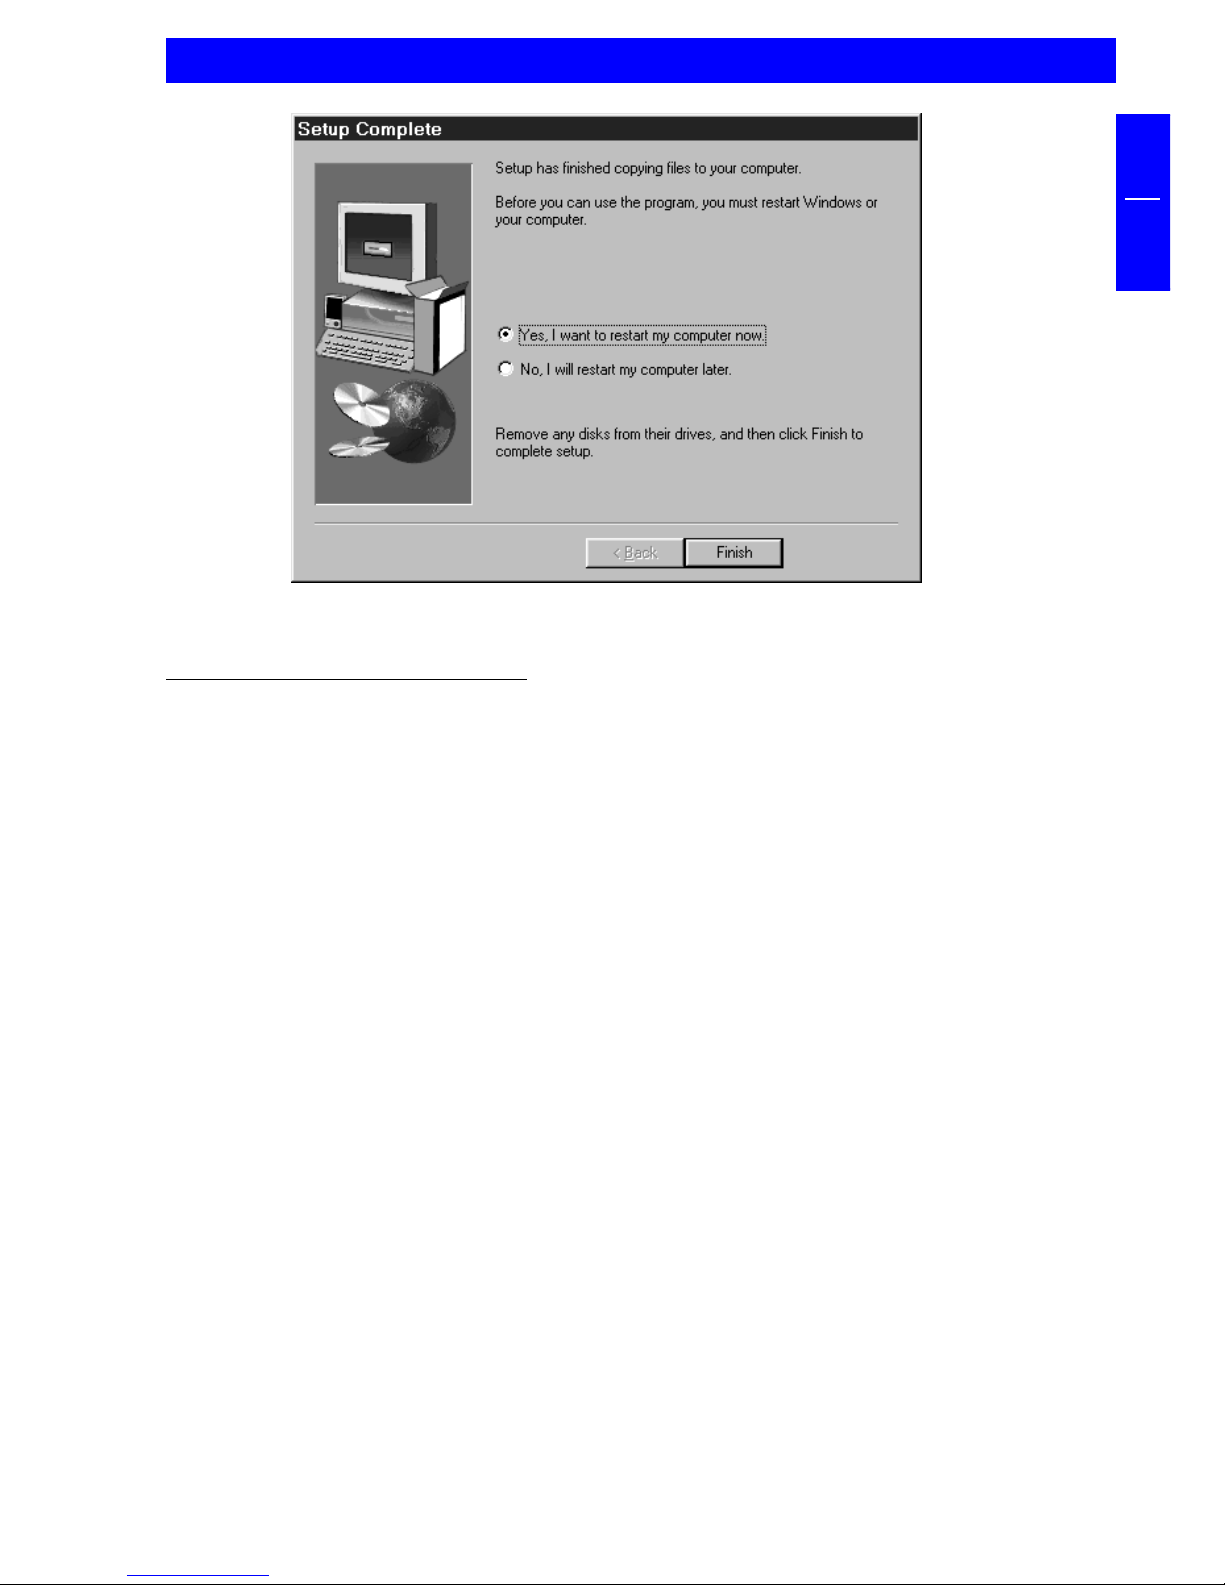
5. The set-up wizard will inform you of the installation process. Follow the on-
screen instructions.
After you restart your computer, your FREECOM drive will appear with a new drive
letter under "My Computer".
Note: Don't forget to remove the FREECOM installation disk before
restarting your computer.
17
GB
2
Software installation
The installation is now complete. For CD-R / CD-RW drives please refer to the drive
manual for installing the CD-R specific mastering software.
2.6 Software installation under DOS / Windows 3.x
The installation under DOS/Windows 3.x is menu-driven to make it as easy as
possible to integrate the FREECOM device into your system. You can select the
various menu items with the cursor keys and confirm your selection with [ENTER].
Installation sequence:
1. Exit Windows or other software such as the Norton Commander.
2. Insert the driver disk into your disk drive and change to this drive by entering
either A: [ENTER] (Example for disk). Start the installation from the DOS prompt
by entering: FCINST [ENTER].
3. Select the language in which the installation is to be performed.
4. Select the type of connection used and the device.
5. You can now decide if you want to the installation to proceed automatically
whereby the installation program specifies the path and modifies your
computer's startup files (Please refer to point 10 of these instructions). However,
if you want to modify the settings, select "user-defined." Please observe the
further instructions in these instructions.

18
FREECOM CABLE II PCMCIA / CABLE II CardBus
GB
2
6. Read the following information screen and confirm with the Enter key.
7. If you wish to select a different path, you can specify in which directory the
FREECOM software is to be installed. Please enter the complete path name
including the drive letter! If the directory does not yet exist, it will be created.
8. The files will now be copied to the directory you specified.
9. After the files have been copied, you will have the opportunity to modify the
startup files of your computer (CONFIG.SYS, AUTOEXEC.BAT). You can also
display these modifications or cancel the installation.
10. The installation updates your startup files and saves the original versions under
the name CONFIG.FC and AUTOEXEC.FC.
11. After the startup files have been modified, you can leave the installation
program . In order for the changes to take effect, you must restart your
computer.
12. If you want to undo the installation, start the program "UNINST.EXE" in the
installation directory.
Note: After restarting your computer, additional boot messages are
displayed which are generated by the device drivers for the device you
just installed.
At first, the enabler for the PCMCIA (FCPOINT.EXE) in the CONFIG.SYS file is loaded
and displays a message similar to the following (depending on your specific
device):
-----------------------------------------------------------
FREECOM PC Card driver for external ATAPI-IDE Drives Rev:744
Copyright (c) FREECOM GmbH 1996-1997. All rights reserved.
Found PCCARD: FREECOM PCCARD-IDE REV836 V5.0
Initialization using C:\FC\FCPOINT.INI completed!
-----------------------------------------------------------
If a different driver message is displayed, this does not indicate that an error has
occurred. Please refer to the chapter "Troubleshooting" only if the text contains
the word "ERROR" or "WARNING". The driver is then loaded and displays the
following depending on the device (for example FCATAPI.SYS):
PW-CD: Freecom CD-ROM Device Driver Rev. K-936DOS
PW-CD: Copyright (C) Freecom Technologies 1995-1998
PW-CD: Drive: Toshiba CD-ROM XM-6202B 1110
PW-CD: CD-ROM drive installation successfully completed
The driver assigns the device the first available letter following your last hard disk
For example, if you only have one hard drive C:, the device will be assigned the
drive letter D:.
The driver MSCDEX.EXE will also be called up for devices with a CD ROM drive. It
is responsible for assigning the drive letter to the CD-ROM.

19
GB
3
CHAPTER 3: Troubleshooting - General problems
If you still have problems getting your FREECOM drive to function properly despite
having installed it correctly, then please check the following points:
Hardware requirements:
Does your system meets the hardware requirements? (see page 5)
Connecting the FREECOM device:
Is the Cable II correctly connected to your computer and the FREECOM device?
Check if the Cable II is plugged in correctly. The Cable II must be firmly seated!
Is the drive getting power? Determine if the medium can be ejected and if the
device is getting power when the system boots.
System settings:
Do not use any memory manager such as QEMM
Disable the system's power management.
Setting options under DOS
If you cannot access drives (floppy disk, CD) after booting, please check the
following:
Are the entries for the Cable II driver FCPOINT.EXE and the device drivers
present in the startup files and have they been correctly installed?
Do the drivers display error messages during the boot procedure which indicate
possible causes?
Has a formatted disk been inserted?
Has the DOS command LASTDRIVE been set to make a sufficient number of
drive letters available? (for example, insert "LASTDRIVE=Z" into the CONFIG.SYS
file)
3.1 FCPOINT.EXE (DOS) driver error messages
When booting, the driver FCPOINT.EXE can display the following error messages.
ERROR: There is no PCCARD...
ERROR: The PCCARD in socket x is not a FREECOM PCCARD
The card has not been plugged in correctly or is defective. Remove the card from
the socket, plug it in again as far as it will go and then restart your computer.
Troubleshooting

20
FREECOM CABLE II PCMCIA / CABLE II CardBus
GB
3
Ensure that the entry FCPOINT.EXE is at the beginning (top) of your CONFIG.SYS
file. Otherwise, the address segment D000-D0FF must not be reserved by other
software (for example, EMM386). Add the parameter "X=D000-D0FF to the end of
the line containing EMM386 in the CONFIG.SYS file. As a precautionary measure,
save the original file CONFIG.SYS under another name before you make these
changes
In case other hardware is using the address segment D000-D0FF, you can specify
an alternative address for FCPOINT.EXE with the parameter /A. Example: For the
address segment C800-C8FF you would enter /AC8.
3.2 PCMCIA driver (DOS) error messages
When booting your computer, the driver can display the following error messages.
ERROR: [Drive] not found. (device dependent)
Cause: The drive was not recognized. Either the drive is not getting any power, the
Cable II was not properly initialized, or the drive is not working correctly.
Disconnect all devices then reconnect them again carefully and restart your
computer.
This problem can also occur if your computer already has two IDE controllers. The
FREECOM device can be operated at various addresses. To operate the device at a
different address, for example, 300h, add the parameter /P:300 to the end of the
line containing FCPOINT.EXE in CONFIG.SYS. In addition, add the same entry to the
end of the line of the PCMCIA driver (second FREECOM entry) for your special
device.
3.3 DOS driver for PCMCIA
Call: device=[your device driver].SYS
after FCPOINT.EXE in the CONFIG.SYS file
Function: Device-specific driver for the drive
Parameters: /P:xxx
Base address of the IDE port. Starting at this address the driver
requires 16 bytes free I/O space.
Note: You will find further parameters and information in the file info.txt
on the driver disk.
This manual suits for next models
1
Other Freecom Computer Hardware manuals

Popular Computer Hardware manuals by other brands


Motorline professional
Motorline professional MC60 User's and installer's manual

Olivella Modular
Olivella Modular Signos user manual

Extron electronics
Extron electronics AXP 64 C AT user guide

N.A.T.
N.A.T. NAT-MCH Technical reference

AMagic
AMagic ACC-ECU3 user manual

Manhattan
Manhattan 140072 installation guide


