manuals.online logo
Brands
  1. Home
  2. •
  3. Brands
  4. •
  5. Frigidaire
  6. •
  7. Refrigerator
  8. •
  9. Frigidaire LECR23EFE3 User manual

Frigidaire LECR23EFE3 User manual

This manual suits for next models

2

Other Frigidaire Refrigerator manuals

Frigidaire FFPH25M4LB User manual

Frigidaire

Frigidaire FFPH25M4LB User manual

Frigidaire FRS26KR4D User manual

Frigidaire

Frigidaire FRS26KR4D User manual

Frigidaire FRT21C5A User manual

Frigidaire

Frigidaire FRT21C5A User manual

Frigidaire FFTR21D2PW5 User manual

Frigidaire

Frigidaire FFTR21D2PW5 User manual

Frigidaire FRT21FS6D User manual

Frigidaire

Frigidaire FRT21FS6D User manual

Frigidaire FRS26KF6C User manual

Frigidaire

Frigidaire FRS26KF6C User manual

Frigidaire FPE-21TJ User manual

Frigidaire

Frigidaire FPE-21TJ User manual

Frigidaire FRT18HS6A User manual

Frigidaire

Frigidaire FRT18HS6A User manual

Frigidaire FRT22RGJ User manual

Frigidaire

Frigidaire FRT22RGJ User manual

Frigidaire LGUB2642LF Owner's manual

Frigidaire

Frigidaire LGUB2642LF Owner's manual

Frigidaire FRS26FCD User manual

Frigidaire

Frigidaire FRS26FCD User manual

Frigidaire FPHI2187KR - Professional Top Freezer Instruction Manual

Frigidaire

Frigidaire FPHI2187KR - Professional Top Freezer Instruction Manual

Frigidaire FRT18G5A User manual

Frigidaire

Frigidaire FRT18G5A User manual

Frigidaire GLHS69EE User manual

Frigidaire

Frigidaire GLHS69EE User manual

Frigidaire FRT21PRH User manual

Frigidaire

Frigidaire FRT21PRH User manual

Frigidaire FRT17A2A User manual

Frigidaire

Frigidaire FRT17A2A User manual

Frigidaire FRS6HF6J Instruction Manual

Frigidaire

Frigidaire FRS6HF6J Instruction Manual

Frigidaire FRS3R3E User manual

Frigidaire

Frigidaire FRS3R3E User manual

Frigidaire FRLF60W User manual

Frigidaire

Frigidaire FRLF60W User manual

Frigidaire FRS26R2A User manual

Frigidaire

Frigidaire FRS26R2A User manual

Frigidaire FRTX18N5BW2 User guide

Frigidaire

Frigidaire FRTX18N5BW2 User guide

Frigidaire FRS26ZTHW5 Assembly instructions

Frigidaire

Frigidaire FRS26ZTHW5 Assembly instructions

Frigidaire FPHG2399MF Owner's manual

Frigidaire

Frigidaire FPHG2399MF Owner's manual

Frigidaire FRT05LG3DS User manual

Frigidaire

Frigidaire FRT05LG3DS User manual

Popular Refrigerator manuals by other brands

Fisher Scientific 10ECEEFSA manual

Fisher Scientific

Fisher Scientific 10ECEEFSA manual

Summit FF22BDRSS user manual

Summit

Summit FF22BDRSS user manual

Hotpoint ENBGH 19xxx FW operating instructions

Hotpoint

Hotpoint ENBGH 19xxx FW operating instructions

Hitachi R-SG28KPH instruction manual

Hitachi

Hitachi R-SG28KPH instruction manual

Dometic RMH 7390 L operating instructions

Dometic

Dometic RMH 7390 L operating instructions

AEG S71700TSW0 user manual

AEG

AEG S71700TSW0 user manual

Electrolux ENB3669 Instruction book

Electrolux

Electrolux ENB3669 Instruction book

Electrolux ERN 2930 Instruction book

Electrolux

Electrolux ERN 2930 Instruction book

Beko GNE 60520 X user manual

Beko

Beko GNE 60520 X user manual

Jenn-Air JUR248LBES00 Use & care guide

Jenn-Air

Jenn-Air JUR248LBES00 Use & care guide

Dometic RGE 4000 Installation and operating manual

Dometic

Dometic RGE 4000 Installation and operating manual

Dometic L-0191B Brochure & specs

Dometic

Dometic L-0191B Brochure & specs

LG LRBP1031W - 10 Cu. Ft. Cabinet Depth Bottom Freezer... owner's guide

LG

LG LRBP1031W - 10 Cu. Ft. Cabinet Depth Bottom Freezer... owner's guide

Daewoo RN-33 Series user manual

Daewoo

Daewoo RN-33 Series user manual

Haier RF-8888-174 Service manual

Haier

Haier RF-8888-174 Service manual

Blaupunkt 5CK2 Series user manual

Blaupunkt

Blaupunkt 5CK2 Series user manual

Beko B5RCNE366HG user manual

Beko

Beko B5RCNE366HG user manual

GE TBX21 use and care manual

GE

GE TBX21 use and care manual

manuals.online logo
manuals.online logoBrands
  • About & Mission
  • Contact us
  • Privacy Policy
  • Terms and Conditions

Copyright 2025 Manuals.Online. All Rights Reserved.

Sic/eby Side
NTS
Welcome ....................... 2
_ifb Eleclnonic Confno/s Safety instructions ........... 3
lnsta llation °-Jod.._Conneot_ng
ice Maker To Water Supply ............ 4 " 5
Door Removal
instructions ................... 6
Features at a Glance .........7
Temperature Controls... 8 - 9
Looking inside .......... 10 - 12
Automatic _ce and Water
Dispenser ................ 13 o17
Food Storage
& Energy Saving Tips .......18
Normal Operating Sounds.. 19
EspaSol ........... 27
Questions? 1-800-944-9044 (UnitedStates)
1-800-668-4@0@ (Canada)
Visit the Frigidaire Elements Web Site at:
http:flwww.frigidairee_ements.com
Care & Cleaning ......... 20 - 21
Warranty ..................... 22
Before You Cail
Solutions to
Common Probmems .............. 23 o26
READ AND SAVE THESE iNSTRUCTiONS P/N241721200(M0y2006)
Congratulations on your purchase of a new refrigerator! We
here at ISiectroiux Home Products are very proud of our
product and we are completely committed to providing you
with the best service possible, Your satisfaction is our #1
priority,
Please read this Use & Care Manual very carefully, it contains
valuable information on how to properly maintain your new
refrigerator,
We know you'll enjoy your new refrigerator and ThankYou
for choosing our product, We hope you consider us for future
purchases,
PLEASE READ AND SAVE THESE INSTRUCTIONS
This Use & Care blanual provides specific operating
instructions for your model, Use your refrigerator only as
instructed in this manual, These instructions are not meant
to cover every possible condition and situation that may
occur, Common sense and caution must be practiced when
installing, operating and maintaining any appliance,
Please record your model and serial numbers be!ow for
future reference.This information is found on the eedal
plate located inside the refrigerator compartment.
NOTE: use only Soar.,and water to clean serial plate.
Model Number:
Serial Number:
Purchase Date:
Extend YourWarranty Protection
With An
Extended Service Contract
CALL t-800-944-9044
To Enjoy These Benefits:
Total freedom from repair bills so
unexpected repairs won't upset your
budget.
Fast, convenient toil-free service is just
a phone call away.
TopoquaHty repairs by factory=trained
experts.
Quick access to genuine replacement
parts so you can rest assured your
refrigerator is repaired with the proper
components.
Please attach sales receipt
here for future reference,
Please complete and mail in the Product
Registration Card included with your
refrigerator.
Please ReadAIJlnstructionsBeforeBsingThisRefrigerator.
FOR YOUR SAFETY
Do not store or use gasoline, or other flammabb Hquids
in the vicinity of this or any other appliance, Read
product UabeUsfor warnings regarding flammability and
other hazards,
o Do not operate the refrigerator in the presence of
expbsive fumes,
o Avoid contact with any moving parts of automatic ice
maker,
Remove all staples from the carton, Staples can cause
severe cuts, and also destroy finishes if they come in
contact with other appliances or furniture,
PROPER DISPOSAL OF YOUR REFRIGERATOR
OR FREEZER
Risk of child entrapment ....
Child entrapment and suffocation
are not problems of the past,
Junked or abandoned refrigerators
or freezers are still dangerous -
even if they will sit for "just a few
days," If you are getting rid of your
old refrigerator or freezer, please
follow the instructions below to
CHILD SAFETY
Destroy or recycle the carton, plastic bags, and any exterior
wrapping material immediately after the refrigerator is
unpacked, Children should NEVER use these items to play
with, Cartons covered with rugs, bedspreads, plastic sheets
or stretch wrap may become airtight chambers, and can
quickly cause suffocation.
Before you throw away your old refrigerator/freezer:
Remove doors,
. Leave shelves in place so children may not easily climb
inside,
* Have refrigerant removed by a qualified service
technician.
hes'G" dO,OO'Mo'tBeFo,owedToEnsU'eThorsafetyMe,hun!sin'Th!,Ref,geiotoi
Will Operate Properly.
ELECTRICAL INFORIVmATmON
The refrigerator must be ptugged into its own
dedicated 115 Volt, 60 Hz., AC onty electric outlet.
The power cord of the appliance is equipped with a
three@rong grounding plug for your protection against
electrical shock hazards, It must be plugged directly
into a properly grounded three@rong receptacle, The
receptacle must be installed in accordance with local
codes and ordinances, Consult a qualified electrician,
Do not use an extension cord or adapter plug.
. If the power cord isdamaged, itshould be replaced bythe
manufacturer, service technician or a qualified person to
Never unplug the refrigerator by pulling on the power
cord, Always grip the plug firmly, and pull straight out
from the receptacle to prevent damaging the power cord,
Unplug the refrigerator before cleaning and before
replacing a light bulb to avoid electrical shock,
Performance may be affected if the voltage varies by
10% or more, Operating the refrigerator with insufficient
power can damage the compressor, Such damage is
not covered under your warranty,
Do not plug the unit into an outlet controlled by a wall
switch or pull cord to prevent the refrigerator from being
IMPORTANT: Press!ng the On/Off button on the
control pane! (atthe top ofthe fresh food compartment)
not disconnect power to !!ghts and other ebctrica!
must unplug the power Cord from the wall outlet.
i t ¸i {/{: : :
DO ROt_ under
aRy circumstances
cut, remove,
or bypass the
grounding prong.
Power cord with
3:prong grounded plug
Avoid connecting refrigerator to a Ground Fault Interruptor
(GFI) circuit,
ThisOwner'sGuideprovidesspecificoperatinginstructions
foryourmodelUsetherefrigeratoroniyasinstructedinthis
Use&CareManualBeforestartingtherefrigerator,follow
theseimportantfirststeps.
LOCATION
Choose a piace that is near a grounded eHectrbaHoutiet,
Do Not use an extension cord or an adapter piug,
if possibie, piace the refrigerator out of direct sunfight
and away from the range, dishwasher or other heat
sources,
The refrigerator must be installed on a floor that is level
and strong enough to support a fully Headedrefrigerator,
Consider water suppiy availability for modeis equipped
with an automatic ice maker.
mNSTALLATION
DO Not install the refrigerator where
the temperature will drop below 55°F (13oc) or rise
above 110°F (43°C). The compressor will not be able
to maintain proper temperatures inside the
lowerfront ofyour refrigerator. Sufficient air circulation
is essential for the proper operation of your
refrigerator.
Installation Clearances
Ailow the following ciearances for ease of installation,
proper air circulation, and piumbing and electricai
connections:
Sides & Top 3/8"
Back 1"
DOOR OPENING
side against a wain, you may have to aiiow additionaH
space so the door can be opened wider.
Your refrigerator shouid be positioned to allow easy access to
a counter when removing food, For best use of drawers and
freezer baskets, the refrigerator shouid be in a position where
both the refrigerator and freezer doors can be fuliy opened,
TOE GRILLE INSTALLATION /REMOVAL
To Remove Toe Grille:
1. Open freezer and fresh food compartment doors.
2. Working from left side of toe grille, slip your fingers
between top of toe grille and cabinet. Gently pull
forward until first set of tabs are free. Slide your hand
down past the free tabs and pull forward again until the
second set of tabs are free. Continue this process until
all tabs are free and the toe grille can be removed. (See
graphic at top of page in right column.)
]re
1.
2,
3,
Install Toe Grille:
Open freezer and
fresh food
compartment doors.
Line up toe grille at
base of refrigerator,
making sure the four
bottom tabs are
resting through hobs
at base of cabinet.
ooo,oot
f::- c_/
.......................... -{:_ ,_J
JJ //
of toe grille, press in on first top tab using your thumb
and push toegrille forward until itsnaps inplace, Continue
this process until all tabs aresnapped in place and toe
grille issecured to refrigerator,
LEVELING
Allfourcorners ofyour refrigeratormust restfirmlyon a solidfloor.
Your refrigerator is equipped with adjustable front rollersto help
levelyourunit.Toensure proper doorseal and assistdoor closing,
the refrigerator should be tilted 1/4"(6 mm),front to back.
ToLevel Your Refrigerator:
1, Removetoe grille,(See '_FoRemove ToeGrille",)
2, Useflat-blade screwdriver or 3/d' socket wrench to adjust
front rollers.
3,
Raise
©1
Check both doors to be sure seals touch cabinet on all four
sides.
l#Tstallatiof# o Connecting ice Maker To Water Supply
To avoid electdc shock, which can cause death or severe personal injury, disconnect the refrigerator
from electrical power before connecting a water supply line to the refrigerator.
To Avoid Property Damage:
oCopper tubing is recommended for the water supply line. Water euppty tubing made of ¼" plastic is not
recommended since it greatly increases the potential for water leaks. Manufacturer will not be responsible
for any damage if pJastic tubing is used for supply Jine.
oDO NOT install water supply tubing in areas where temperatures fail beJow freezing.
- Chemicals from a maffunctioning softener can damage the ice maker, if the ice maker is connected to soft
water, ensure that the softener is maintained and working properly.
IMPORTANT: Ensure that your water supply line connections comply with all local plumbing codes,
Before Installing The Water Supply Line, You Wifl Need
*BasicTools: adjustable wrench, flat-blade screwdriver, and Phillips TM screwdriver
* Access to a household cold water line with water pressure between 30 and 100 psi.
*A water supply line made of 14inch (6.4 mm) OD, copper tubing. Todetermine the length of copper tubing needed,
you wiil need to measure the distance from the ice maker inlet valve at the back of the refrigerator to your cold water
pipe. Then add approximately 7 feet (2.1 meters), so the refrigerator can be moved out for cleaning (as shown).
* A shutoff valve to connect the water supply line to your household water system. DO NOT use a self-piercing type
shutoff valve.
*A compression nut and ferrule (sleeve) for connecting the water supply line to the ice maker inlet valve.
1 1
meters) of X inch OD copper tubing, a saddle type shutoff yaive (nonpiercing), (2) Y_.inch brass compressio n nuts, (2)
ferrules/sleeves, and instructions for installing a water supply line.
Plastic Water Tubing
To Connect Water Supply Line To ice Maker inlet Valve
1. Disconnect refrigerator from electric powersource.
2. Place end of water supply line into sink or bucket. Turn ON water supply Brass
and flush supply line until water is clear. Turn OFF water supply at shut compression
off valve.
3. Unscrew plastic cap from water valve inlet and discard cap.
4. Slide brass compression nut, then ferrule (sleeve) onto water supply line,
as shown.
5, Push water supply line into water valve inlet as far as it wiii go (1Ainch), waterJine
Slide ferrule (sleeve) into valve inlet and finger tighten compression nut wate_valve
onto valve. Tighten another half turn with a wrench; DO NOT over tighten, racket
6, With steel clamp and screw, secure water supply line to rear panel of -valveMet
refrigerator as shown,
7, Coil excess water supply line (about 2Y2turns) behind refrigerator as shown
and arrange coils so they do not vibrate or wear against any other surface,
8, Turn ON water supply at shutoff valve and tighten any connections that
leak. fr°mh°usehoDdwaterS_pRlY
9. Reconnect refrigerator to electrical power source. (Includeenoughtubinginlooptoallow
10. Make sure ice maker power switch is turned On (See page 14 for location of ra0vingrefllgerator°utfarcueanirlg'}
power switch).
cause !Camaker to CYC!e_w'Oor three times before making a fu!i tray of ice New plumbing may Cause ice to be
discolored or have poor flavor. Discard ice made during the first 24 hours.
Tools Necessary:
Phillips head
Cover
DOOR REMOVAL iNSTRUCTiONS:
/!!%fo'e Vat start:
1 Make sure the electrical power cord is unplugged from the wall outlet.
2 Remove any food from the door shelves.
3 Close the doors.
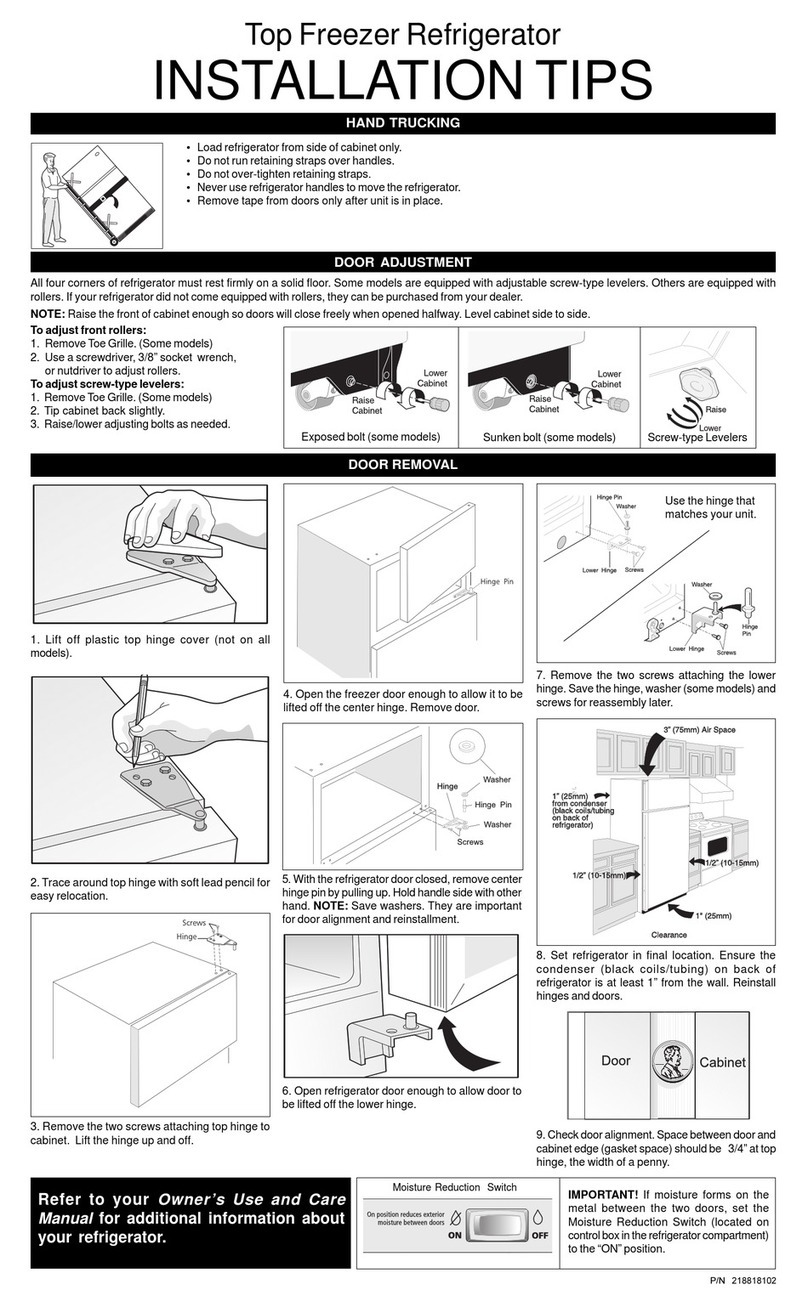
To emove t_e _ge cove:
1 Remove the three screws from the cover over the top door hinges.
2 Pull the cover forward about a half inch and lift it off.
I Trace lightly around the door's top hinge with a pencil. This makes reinstallation easier.
2 Remove the two screws from the top hinge. Lift the door off of the bottom hinge and set it
aside.
3 Remove the three bottom hinge screws and hinge, if necessary.
1 Detach the multi-wire cable connector located above the top hinge. Grasp both sides of
the connector firmly and pull apart.
2 Trace lightly around the door's top hinge with a pencil. This makes reinstallation easier.
3 Detach the water tube from the connector located below
the freezer door. The connector releases when you press
its outer sleeve inward.
4 Remove the screws from the top hinge and pull the
multi-wire cable through it.
5 Lift the door off of the bottom hinge. Lay the door on its
side to avoid damage to the Remove the three bottom
hinge screws and hinge, if necessary.
To reinstall the refrigerator and freezer doors, reverse the
above steps.
Hinge
Mumti=Wite _-, Screws
Cable YTo
\ I P
i i Hmge
Freezer and Refrigerator
Controls
Ice Cream
Ice Make
SpillSafeTM CAUTION:
Do Not Remove
Sliding Shelf Magnet Behind
Dairy
Compartment
Ice
Larg
Larg
Fixec
Door Bin
Door Bin
Fixed
Fixed
Compartment
Rack
Bin
SpillSafe TM
g Shelf
Bin
3ecial Item
Rack
Meat Keeper
Bottle
Retainer
Crisper Pan
and Cover
Fixed
Door Bin
Toe GriRle
Features may vary according to model
COOL DOWN PERmOD
To ensure safe food storage, allow the refrigerator to operate with the doors closed for at bast 6 hours before loading it
with food,
REFRIGERATOR & FREEZER CONTROLS
TemperatureControl Range
Wa_rmer
I
FaCtOry setting MidP0int 0° _i80 3°
/
C_er COldeSt :60 :21 ° 330 io
V
TEMPERATURE ADJUSTMENT
Freezer Fresh Food After 24 hours, adjust the controUs as
Fahrenheit Centigrade Fahrenheit Centigrade needed. Make your adjustments small and
gradual; allowing time for temperatures to
Warmest 60 I -14° 47° 8° guidelinesChangeandforStabilize,temperatureRefersettings,tOthe adjacent
To adjust the temperature to a higher or
Temperature Adjustment Guide
lower setting, press the Up or Down button
closest to the display, The first time you
press the button, the display shows the last
setting you entered, Each press of the
button after that increments the setting by
one degree,
The display shows your new setting
momentarily, then changes back to the
If Fresh Food compartment is too warm
If Fresh Food Compartment is too c0td
FreeZer COmpartment iS t00 _arm I
If
L
Freezer COmpartment is tOOC0td [
If [
Adjust Fresh Food control one degree
colder by pressing Down Arrow button.
Adjust Fresh Food control one degree
warmer by pressing the Up Arrow button.
Adjust Freezer control one degree colder
by pressing Down Arrow button.
Adjust Freezer control one degree warmer
by pressing the Up Arrow button.
iF TEMPERATURE DISPLAYS
FLASH...
if ever you see both temperature displays
continously flashing, it may indicate that
the control system has detetcted a
performance problem. Cal! your Frigidaire
service representative, who can interpret
the flashing message.
To maintain temperatures, a fan qrcuUates
air in the refrigerator and freezer
compartments. For good drcuUation, do not
Mock coUdair vents with food items.
OTHER CONTROL FEATURES
Cooling System On/Off Button
TURNING THE COOLING SYSTEM ON AND OFF
You can disabUethe cooling system in your refrigerator
by pressing the On/Off button Uocatedon the Ueftside of
the temperature control panel To ensure that you do not
accidentally turn off the cooling system, the button does
not work unless you press and hold it for three seconds.
Once you disable the cooling system, all refrigeration to
the freezer and fresh food compartments stops. To turn
the cooling system back on, you must again press and
holdthe On/Off button for three more seconds.
IMPORTANT:Pressing the On/Off button on the contron
panendisab!es your refrigeratoCs co0!ing system but does
not disconnect power to lights and other eJectdcaR
must unplug the power cord from the wall outlet.
SYSTEM MONITORmNG ALARMS (SeUectModeUs)
The electronic control system continuously monitors
your refrigerator/freezer for temperature consistency,
doors left ajar, and power failures. Variances from
normal operating conditions are communicated by
audible tones and a set of four status indicator lights.
NOTE: Each time You make Sett!ngs on the control pane!,
a single audible tone acknowledges your input.
USING THE ALARM RESET BUTTON
You can disable or activate the alarm system by
pressing and holding the Reset button for three
seconds. Use it, for example, to turn off audible tones
and/or flashing indicator lights.
automatically reset if you disconnect and reconnect
your refrigerator's power cord. It can only be
reactivated by pressing the Alarm Reset button.
Once you disable the alarm system, you must again
press and hold the Alarm Reset button for three more
seconds to reset (activate) the alarm system.
Alarm Reset Button Indicator Lights
The On indicator light remains offwhile the freezer and
refrigerator compartments cool toward the current cooling
settings. When temperature settings are reached, the On
light displays green to indicate an active alarm system.
RESPONDING TO ALARMS (Audible Tones &
indicator Lights)
Your refrigerator's control system can convey the following
information through audible tones and the alarm indicator
lights.
Alarm Light
On (light is
off)
Tone Condition
Alarm system is
not active while
freezer and
refrigerator
compartments
are cooling
toward the
current
temperature
settings.
How To Respond
If freezer and refrigerator
compartments do not match
your temperature settings in
three hours, expect the
control system to signal other
conditions. If cooling does
not stabilize toward your
current settings call for
assistance, using the phone
number on the back page of
this Use & Care Guide.
Steady Alarm system is No response required.
Green active.
Door Flashing _/ Freezer or Close door to disable and reset
Ajar Green refrigerator alarm.
door has been
open for over
five minutes.
High Flashing _/ Freezer or Press Alarm Reset button to
Temp Amber refrigerator turn off alarm. If
compartment temperatures do not
has been too improve, call for assistance,
warm (7.2° C using the phone number on
or higher) for the back page of this Use &
over an hour. Care Guide.
Power Flashing A power outage
Failure Amber was detected. Press Alarm Reset button to
turn off alarm and press
again to reset. Check if the
power failure lasted long
enough to affect stored food
temperatures.
iCE CREAM SHELF (SOME MODELS)
This sheUfattaches to the top of the ice dispenser container, it aUUowsstorage
of both round and rectanguUar cartons of your favorite ice cream.
To avoid persenal injury or property damage, handb
tempered glass sheJves careful!y. Shelves may break suddenly if
nicked, scratched, or exposed to sudden temperature change.
Ice Cream Shelf
CANTILEVER SHELF ADJUSTMENT
Refrigerator shelves are easily adjusted to suit individual needs, Before
adjusting the shelves, remove all food, Cantilever shelves are supported at
the back of the refrigerator,
To adjust cantilever shelves:
O Lift front edge up,
Pull sheUfout,
Replace the shelf by inserting the hooks at rear of the shelf into the wall
bracket, Lower the shelf into the desired slots and lock into position,
*Spi//Safe TMglass shelves (some models) catch and hold accidental spills, Cantilever Glass Shelf
in some models, the * SpiflSafe T__shelves slide out for easy access to
food and for fast cleaning, The shelves slide out independently of their
mounting brackets, Just pull the front of the shelf forward, Shelves can be
extended as far as the stopper wiii allow but are not removable from their
mounting brackets,
Cantilever Sliding Glass Shelf
*WhiteWestinghouse - SpilIFree TM
10