Frigor OPY65B1 User manual

User Instructions
EN
2
OVENS
Brugervejledning
DA
17
OVNE
Käyttöohjeet
FI
32
UUNIT
Bruksanvisning
NO
47
OVNER
Bruksanvisning
SV
62
UGNAR
CANDY HOOVER GROUP Via Comolli 16 Brugherio –Italy

EN 2
Safety Indications
General Instructions
Product description
Display description
Cooking Modes
General notes on cleaning
Maintenance
Pyrolysis
Troubleshooting
Installation
Summary
3
7
9
10
12
13
13
14
16
77

EN 3
• During cooking, moisture may condense inside the oven cavity
or on the glass of the door. This is a normal condition. To reduce
this eect, wait 10-15 minutes after turning on the power before
putting food inside the oven. ln any case, the condensation dis-
appears when the oven reaches the cooking temperature.
• Cook the vegetables in a container with a lid instead of an open
tray.
• Avoid leaving food inside the oven after cooking for more than
15/20 minutes.
• WARNING: the appliance and accessible parts become hot dur-
ing use. Be careful not to touch any hot parts.
• WARNING: the accessible parts can become hot when the oven
is in use. Young children should be kept at a safe distance.
• WARNING: ensure that the appliance is switched o before re-
placing the bulb, to avoid the possibility of electric shocks.
• Disconnect the appliance from the mains electricity supply be-
fore carrying out any work or maintenance.
• WARNING: in order to avoid any danger caused by the accidental
resetting of the thermal interruption device, the appliance should
not be powered by an external switching device, such as a timer,
or be connected to a circuit that is regularly switched on and o.
• Children under 8 should be kept at a safe distance from the appli-
ance if not continuously supervised.
• Children should not play with the appliance.
• The appliance can be used by those aged 8 or over and by those
with limited physical, sensorial or mental capacities, without ex-
perience or knowledge of the product, only if supervised or pro-
vided with instruction as to the operation of the appliance, in a
safe way with awareness of the possible risks.
• Cleaning and maintenance should not be carried out by unsuper-
vised children.
• Do not use rough or abrasive materials or sharp metal scrapers
to clean the oven door glasses, as they can scratch the surface
Safety Indications

EN 4
and cause the glass to shatter.
• The oven must be switched o before removing the removable
parts. After cleaning, reassemble them according the instruc-
tions.
• Only use the meat probe recommended for this oven.
• Do not use a steam cleaner or high pressure spray for cleaning
operations.
• IF THE OVEN IS PROVIDED BY THE MANUFACTURER WITH-
OUT PLUG:
• HE APPLIANCE MUST NOT BE CONNECTED TO THE POWER
SOURCE USING PLUG OR SOCKETS, BUT MUST BE DIRECTLY
CONNECTED TO THE SUPPLY MAINS. The connection to the
power source must be carried out by a suitably qualied profes-
sional. In order to have an installation compliant to the current
safety legislation the oven must be connected only placing an
omnipolar breaker, with contact separation compliant to the re-
quirements for overvoltage category III, between the appliance
and the power source. The omnipolar breaker must bear the
maximum connected load and must be in line with current leg-
islation. The yellow-green earth cable should not be interrupted
by the breaker. The omnipolar breaker used for the connection
must be easily accessible when the appliance is installed.
The connection to the power source must be carried out by a
suitably qualied professional considering the polarity of the
oven and of the power source.
The disconnection must be achieved incorporating a switch in
the xed wiring in accordance with the wiring rules
• IF THE OVEN IS PROVIDED BY THE MANUFACTURER WITH
PLUG:
The socket must be suitable for the load indicated on the tag
and must have ground contact connected and in operation. The
earth conductor is yellow-green in colour. This operation should
be carried out by a suitably qualied professional. ln case of in-

EN 5
compatibility between the socket and the appliance plug, ask a
qualied electrician to substitute the socket with another suita-
ble type. The plug and the socket must be conformed to the cur-
rent norms of the installation country. Connection to the power
source can also be made by placing an omnipolar breaker, with
contact separation compliant to the requirements for overvolt-
age category III, between the appliance and the power source
that can bear the maximum connected load and that is in line
with current legislation. The yellow-green earth cable should not
be interrupted by the breaker. The socket or omnipolar breaker
used for the connection should be easily accessible when the ap-
pliance is installed.
The disconnection may be achieved by having the plug accessi-
ble or by incorporating a switch in the xed wiring in accordance
with the wiring rules.
• lf the power cable is damaged, it should be substituted with a ca-
ble or special bundle available from the manufacturer or by con-
tacting the customer service department. The type of power
cable must be H05V2V2-F.
• This operation should be carried out by a suitably qualied pro-
fessional. The earth conductor (yellow-green) must be approxi-
mately 10 mm longer than the other conductors. For any repairs,
refer only to the Customer Care Department and request the
use of original spare parts.
• Failure to comply with the above can compromise the safety of
the appliance and invalidate the guarantee.
• Any excess of spilled material should be removed before clean-
ing.
• A long power supply failure during an occurring cooking phase
may cause a malfunction of the monitor. ln this case contact
customer service.
• The appliance must not be installed behind a decorative door in
order to avoid overheating.
• When you place the shelf inside, make sure that the stop is di-

EN 6
rected upwards and in the back of the cavity. The shelf must be
inserted completely into the cavity.
• When inserting the grid tray pay attention that the anti-slide edge
is positioned rearwards and upwards.
• WARNING: Do not line the oven walls with aluminium foil or sin-
gle-use protection available from stores. Aluminium foil or any
other protection, in direct contact with the hot enamel, risk melt-
ing and deteriorating the enamel of the insides.
• WARNING: Never remove the oven door seal.
• CAUTION: Do not rell the cavity bottom with water during cook-
ing or when the oven is hot.
• No additional operation/setting is required in order to operate
the appliance at the rated frequencies.
• The oven can be located high in a column or under a worktop. Be-
fore xing, you must ensure good ventilation in the oven space
to allow proper circulation of the fresh air required for cooling and
protecting the internal parts. Make the openings specied on last
page according to the type of tting.
• For a correct use of the oven it is advisable not to put the food in
direct contact with the racks and trays, but to use oven papers
and/ or special containers.
• WARNING: before initiating the automatic cleaning cycle:
- Clean the oven door;
- Remove large or coarse food residues from the inside of the oven
using a damp sponge. Do not use detergents;
- Remove all accessories and the sliding rack kit (where present);
-Do not place tea towels.
• ln ovens with meat probe it is necessary, before making the
cleaning cycle, close the hole with the nut provided. Always close
the hole with the nut when the meat probe is not used.
• During the pyrolytic cleaning process, surfaces can heat up more
than usual, children must therefore be kept at a safe distance.
• If a hob has been tted above the oven, never use the hob while
the Pyrolizer is working, this will prevent the hob from overhea-
ting.

EN 7
General Instructions
Safety Indications
We thank you for choosing one of our products. For the best results with your oven, you should
read this manual carefully and retain it for future reference. Before installing the oven, take note
of the serial number so that you can give it to customer service sta if any repairs are required.
Having removed the oven from its packaging, check that it has not been damaged during trans-
portation. If you have doubts, do not use the oven and refer to a qualied technician for advice.
Keep all of the packaging material (plastic bags, polystyrene, nails) out of the reach of children.
When the oven is switched on for the rst time, strong smelling smoke can develop, which is
caused by the glue on the insulation panels surrounding the oven heating for the rst time. This
is absolutely normal and, if it occurs, you should wait for the smoke to dissipate before putting
food in the oven. The manufacturer accepts no responsibility in cases where the instructions
contained in this document are not observed.
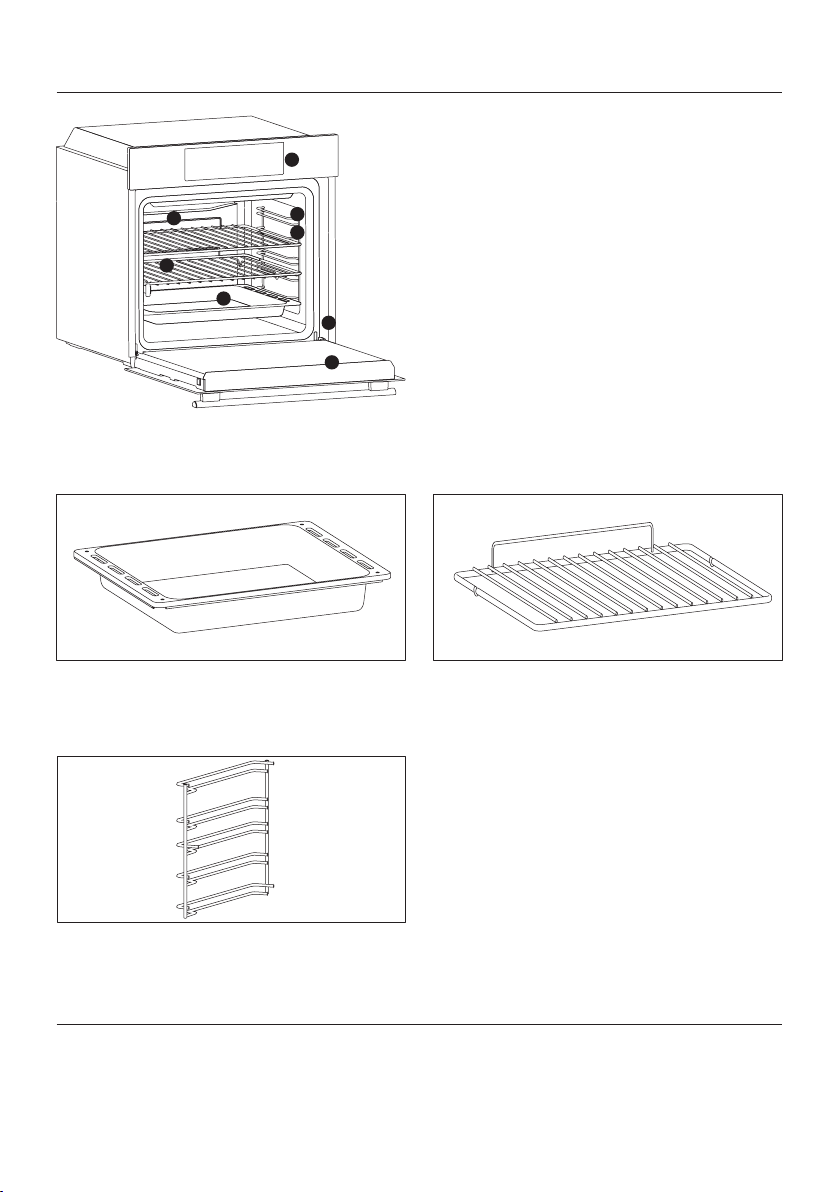
NOTE: the oven functions, properties and accessories cited in this manual will vary, depending
on the model you have purchased.
Only use the oven for its intended purpose, that is only for the cooking of foods; any other use, for
example as a heat source, is considered improper and therefore dangerous. The manufacturer
cannot be held responsible for any damage resulting from improper, incorrect or unreasonable
usage.
The use of any electrical appliance implies the observance of some fundamental rules:
- do not pull on the power cable to disconnect the plug from the socket;
- do not touch the appliance with wet or damp hands or feet;
- in general the use of adaptors, multiple sockets and extension cables is not recommended;
- in case of malfunction and/or poor operation, switch o the appliance and do not tamper with it.
Electrical Safety
ENSURE THAT AN ELECTRICIAN OR QUALIFIED TECHNICIAN MAKES THE ELECTRICAL
CONNECTIONS. The power supply to which the oven is connected must conform with the
laws in force in the country of installation. The manufacturer accepts no responsibility for any
damage caused by the failure to observe these instructions. The oven must be connected to
an electrical supply with an earthed wall outlet or a disconnector with multiple poles, depending
on the laws in force in the country of installation. The electrical supply should be protected with
suitable fuses and the cables used must have a transverse section that can ensure correct sup-
ply to the oven.
CONNECTION
The oven is supplied with a power cable that should only be connected to an electrical supply
with 220-240 Vac power between the phases or between the phase and neutral. Before the oven
is connected to the electrical supply, it is important to check:
- power voltage indicated on the gauge;
- the setting of the disconnector.

EN 8
The grounding wire connected to the oven’s earth terminal must be connected to the earth ter-
minal of the power supply.
WARNING
Before connecting the oven to the power supply, ask a qualied electrician to check the conti-
nuity of the power supply’s earth terminal. The manufacturer accepts no responsibility for any
accidents or other problems caused by failure to connect the oven to the earth terminal or by an
earth connection that has defective continuity.
NOTE: as the oven could require maintenance work, it is advisable to keep another wall socket
available so that the oven can be connected to this if it is removed from the space in which it is
installed. The power cable must only be substituted by technical service sta or by technicians
with equivalent qualications.
A low light around the central main switch could be present when the oven is o. This is a normal
behavior. I can be removed just turning the plug upside down or swapping the supply terminals.
Recommendations
Installation
After each use of the oven, a minimum of cleaning will help keep the oven perfectly clean.
Do not line the oven walls with aluminium foil or single-use protection available from stores. Al-
uminium foil or any other protection, in direct contact with the hot enamel, risks melting and de-
teriorating the enamel of the insides. In order to prevent excessive dirtying of your oven and the
resulting strong smokey smells, we recommend not using the oven at very high temperature. It
is better to extend the cooking time and lower the temperature a little. In addition to the acces-
sories supplied with the oven, we advise you only use dishes and baking moulds resistant to very
high temperatures.
The manufacturers have no obligation to carry this out. If the assistance of the manufacturer is
required to rectify faults arising from incorrect installation, this assistance is not covered by the
guarantee. The installation instructions for professionally qualied personnel must be followed.
Incorrect installation may cause harm or injury to people, animals or belongings. The manufac-
turer cannot be held responsible for such harm or injury.
The oven can be located high in a column or under a worktop. Before xing, you must ensure good
ventilation in the oven space to allow proper circulation of the fresh air required for cooling and
protecting the internal parts. Make the openings specied on last page according to the type of
tting.

EN 9
1. Control panel
2. Shelf positions (lateral wire
grid if included)
3. Grids
4. Trays
5. Fan (if present)
6. Oven door
7. Lateral wire grids (if present:
only for at cavity)
8. Serial number
Product description
ACCESSORIES
Drip tray Metal grid
Collects residues that drip when cooking food
on the grills.
Holds baking trays and plates.
Lateral wire grids (only if present)
Located on both sides of the oven cavity, holds
metal grills and drip pans.
1
2
7
3
8
4
6
5
First Use
PRELIMINARY CLEANING; Clean the oven before using for the rst time. Wipe over external surfaces with
a damp soft cloth. Wash all accessories and wipe inside the oven with a solution of hot water and washing
up liquid. Set the empty oven to the maximum temperature and leave on for about 1 hour, this will remove
any lingering smells of newness.

EN 10
Display description
1. Timer/automatic mode
2. Fan function
3. Defrost mode
4. Temperature or clock display
5. LCD display adjustment controls
6. Function selector knob
7. Programme selector knob
WARNING!
The rst operation to carry out after installa-
tion, or after a power cut, is to set the time of
day (a power cut has occured if the display is
ashing 12:00).
200°-> The temperature LED “°” ashes until
the displayed temperature is reached.
HOT -> When a programme nishes, if the
oven is still hot, the display shows “HOT”, alter-
nating with the time, even if the knobs are po-
sitioned to OFF.
6 7
1
4
5
2
3

EN 11
FUNCTION HOW TO ACTIVATE
HOW TO
DEACTIVATE
WHAT IT DOES WHY IT IS NEEDED
SILENCE
MODE
Rotate the left function
selector to the position
“Silence mode “
Rotate the function
selector to the
position OFF.
Enables you to turn
o the sound of the
minute minder.
To turn o the sound of the
minute minder
SET
THE TIME
Rotate the left function
selector to the position
“Set the time”.
Use the buttons “ + “ or
“ - “ to set the time
Rotate the function
selector to the
position OFF.
Enables you to set
the time which
appears on the
display
To set the time
NB : Set the time when you rst
install your oven or just after a black
out (the clock is showing a pulsating
12.00)
COOKING
DURATION
Turn the right function
selector to a cooking
function
Rotate the left function
selector to the position
“Cooking Time Du-
ration”
Set the time of cooking
by using buttons “ + “
and “ - “
Lighting Auto appears
When the cooking
time has elapsed,
the oven switch o
automatically and the
alarm rings for few
seconds To stop the
cooking functions
early,
turn the function
control to OFF or set
the time on 00.00; by
rotating the function
selector to Cooking
Time Duration and by
using the buttons “ +
“ and “ - “
It allows to preset
thecooking time
required for the
recipe chosen.
When the cooking
time is
set, turn the
function
selector toOFF to go
back to actual time.
To view the cooking
time selected, turn
the left function
selector to Cooking
Time duration.
For cooking the desired recipes.
END OF
COOKING
Turn the right function
selector to a cooking
function
Rotate the left function
selector to the position
“End of cooking”
Set the end time of
cooking by using but-
tons “ + “ and “ - “
Lighting Auto appears
When the cooking
time has elapsed,
the oven switch o
automatically.
To stop the cooking
functions early, turn
the function control
to OFF
It allows to preset
the end of cooking
time you want.
When the cooking
time is set, turn the
function selector to
OFF to go back
to actual time.
To view the cooking
time selected, turn
the left function
selector to End of
cooking Time
NOTE: Delayed
cooking feature is
not available for
following cooking
modes: Fan Grill
& Grill
This function is normally used with
the COOKING DURATION function
For example, the desired food
needs to cook for 45 minutes and I
want it to be ready for 12.30; in this
case: at the end of the set time, the
oven automatically switches o and
an alarm sounds. Select the desired
cooking function. Set the cooking
duration to 45 minutes (“-” “+”).
Set the end of cooking to 12:30
(“-” “+”). Cooking will automatically
begin at 11:45 (12:30 minus 45 mi-
nutes), at the end of the set cooking
time, the oven will automatically
switch o.
WARNING: by setting only the
end of cooking time, and not the
cooking duration, the oven will im-
mediately switch on and switch o
at the end of the set cooking time.
MINUTE
MINDER
Turn the left function
selector to the position
Minute Minder.
Set the time of cooking
by using buttons “+”and
“-”
Set the time on 00.00
by turning the left
function
selector to the posi-
tion Minute Minder,
and using
the button “ - “
Emits an audible
signal at the end of a
set time.
During operation,
the display shows
the remaining time.
Allow to use the oven as alarm even
if the oven is switch o
CHILD
SAFETY
LOCK
Turn the left function
selector to the position
Child lock.
Press the button “ + “
during 7 seconds
Child lock is available
when “ STOP “ appears
on display
Turn back the left
function selector to
Child lock and press
button “ + “ during 7
seconds.
Indication STOP
disappears.
The oven cannot be
used.
This function is useful when there
are children in the house.

EN 12
Cooking Modes
* Tested in accordance with the EN 60350-1 for the purpose of energy consumption declaration and energy class.
Symbol
T °C
de-
fault
T °C
range Function
LAMP: Turns on the oven light.
DEFROST: When the dial is set to this position. The fan circulates
air at room temperature around the frozen food so that it defrosts
in a few minutes without the protein content of the food being
changed or altered.
220 50 ÷ 280
* CONVENTIONAL : Both top and bottom heating elements are
used. Preheat the oven for about ten minutes. This method is ideal
for all traditional roasting and baking. For seizing red meats, roast
beef, leg of lamb, game, bread, foil wrapped food (papillotes), aky
pastry. Place the food and its dish on a shelf in mid position.
210 50 ÷ 280
MULTI-LEVEL: We recommend you use this method for poultry,
pastries, sh and vegetables. Heat penetrates into the food better
and both the cooking and preheating times are reduced. You can
cook dierent foods at the same time with or without the same
preparation in one or more positions. This cooking method gives
even heat distribution and the smells are not mixed.
Allow about ten minutes extra when cooking foods at the same
time.
L3 L1 ÷ L5
GRILL : use the grill with the door closed.
The top heating element is used alone and you can adjust the tem-
perature. Five minutes preheating is required to get the elements
red-hot. Success is guaranteed for grills, kebabs and gratin dishes.
White meats should be put at a distance from the grill; the cooking
time is longer, but the meat will be tastier. You can put red meats and
sh llets on the shelf with the drip tray underneath.
190 50 ÷ 280
* COOK LIGHT: This function allows to cook in a healthier way, by re-
ducing the amount of fat or oil required. The combination of heating
elements with a pulsating cycle of air ensures a perfect baking result.
L3 L1 ÷ L5
Supergrill: gratin, roasts, grilled meat,sh, vegetables.
The oven has ve grill levels from L1 to L5. This function is more
powerful from grill that you can make barbecue. Turn food two thirds
of the way through cooking (If necessary).
ECO ECO ÷
SUPER PYROLYSIS

EN 13
The lifecycle of the appliance can be extended
through regular cleaning. Wait for the oven to
cool before carrying out manual cleaning op-
erations. Never use abrasive detergents, steel
wool or sharp objects for cleaning, so as to not
irreparably damage the enamelled parts. Use
only water, soap or bleach-based detergents
(ammonia).
GLASS PARTS
It is advisable to clean the glass window with
absorbent kitchen towel after every use of
the oven. To remove more obstinate stains,
you can use a detergent-soaked sponge, well
wrung out, and then rinse with water.
OVEN WINDOW SEAL
If dirty, the seal can be cleaned with a slightly
damp sponge.
General notes on cleaning
REMOVAL AND CLEANING OF THE SIDE RACKS
1. Remove the wire racks by pulling them in the direction of the arrows (see below)
2. To clean the wire racks either put them in the dishwasher or use a wet sponge, ensuring that they
are dried afterwards.
3. After the cleaning process install the wire racks in reverse order.”
Maintenance
ACCESSORIES
Clean accessories with a wet, soapy sponge
before rinsing and drying them: avoid using
abrasive detergents.
DRIP PAN
After using the grill, remove the pan from the
oven. Pour the hot fat into a container and
wash the pan in hot water, using a sponge and
washing-up liquid.
If greasy residues remain, immerse the pan in
water and detergent. Alternatively, you can
wash the pan in the dishwasher or use a com-
mercial oven detergent. Never put a dirty pan
back into the oven.

EN 14
Pyrolysis
The oven is equipped with a pyrolyser cleaning
system, which destroys food residues at high
temperature. The operation is carried out au-
tomatically by means of the programmer. The
resulting fumes are rendered “clean” by passing
over a Pyrolyser wich starts as soon as cooking
begins. As very high temperatures are required
by the Pyrolyser, the oven door is tted with a
safety lock. The pyrolyser can be stopped at
any time. The door cannot be opened until the
safety lock is displayed.
NOTE : If a hob has been tted above the
oven, never use the gas burners or the electric
hot-plates while the Pyrolyser is working, this
will prevent the hob from overheating.
TWO PYROLYTIC CYCLE are pre-set:
ECO PYROCLEAN : Cleans a moderately stai-
ned oven. Operates for a period of 90 minutes.
SUPER PYROCLEAN : Cleans a heavily stained
oven. Operates for a period of 120 minutes.
Never use commercially available cleaning pro-
ducts on a Pyrolytic oven!
Tip : Carrying out Pyrolytic cleaning immedia-
tely after cooking allows you to take advantage
of residual heat, thus saving energy.
Before executing a pyrolytic cycle:
•Remove all the accessories from the oven
because they are not able to tolerate the
high temperatures used during the pyrolytic
cleaning cycle ; in particular removing grids,
side racks and the telescopic guides (refer
to the chapter REMOVING GRIDS AND SIDE
RACKS) . In ovens with meat probe it is ne-
cessary, before making the cleaning cycle ,
close the hole with the nut provided.
•Remove any large spillages or stains as it
would take too long to destroy them. Also
excessively large amounts of grease could
ignite when subject to the very high tempe-
ratures of the Pyrolytic cycle.
•Close the oven door.
•Excess spillage must be removed before
cleaning.
• Clean the oven door;
• Remove large or coarse food residues from
the inside of the oven using a damp sponge.
Do not use detergents;
• Remove all accessories and the sliding rack
kit (where present);
• Do not place tea towels.
Using the pyrolitic cycle:
1- Rotate the function selector to the position
“ “. On the display, appears the indication “
ECO “ or “ SUP “. The preset time is 90 min, this
can be varied from 90 min (Eco mode) to 120
min (Sup mode) via the programmer (setting
button “ + “ or “ - “). If the oven is very dirty, it
is recommend o increase the time to 120 min,
if the oven is moderately dirty reduce the clea-
ning cycle time to 90 min.
2- It is possible to defer the start time of the
pyroclean cycle by changing the END time via
the programmer.
3- After few minutes, when the oven reaches a
high temperature, the door locks automatical-
ly. The pyroclean cycle can be stopped at any
time by turning the function selector back to ‘0’
(the word OFF will be displayed for 3 seconds).
4- Once the pyroclean cycle is nished, the
pyrolysis will switch o automatically. On the
display appears the indication “END” until the
door is locked then “0--n”.
5- You can turn the function selector back to “
0 “ but if the temperaure is still high, the “0--n
“ indication appears to inform that the door is
locked.
Use of the pyrolytic cycle in Touch Control
ovens:
1- Rotate the function selector into position
pyrolisys. The display will show either “ECO” or
“SUP“
2- The pre-set time is90 minutes but it can
be varied from 90 min. (Eco mode) to 120 min.
(Sup mode) using the programmer (“ +” or “-”
key). If the oven is very dirty, the time should be
increased to 120 min., while if the oven is only
a slightly dirty, reduce the cleaning cycle to 90
min.

EN 15
CHANGING THE BULB
1. Disconnect the oven from the mains supply.
2. Undo the glass cover, unscrew the bulb and replace it with a new bulb of the same type.
3. Once the defective bulb is replaced, replace the glass cover.
This product contains one or more light sources of energy eciency class G (Lamp) /F (10 Led).
Aquactiva Function
The Aquactiva procedure uses steam to help remove remaining fat and food particles from the oven.
1. Pour 300 ml of water into the Aquactiva container at the bottom of the oven.
2. Set the oven function to Static ( )or Bottom ( )heater
3. Set the temperature to the Aquactiva icon
4. Allow the program to operate for 30 minutes.
5. After 30 minutes switch o the program and allow the oven to cool down.
6. When the appliance is cool, clean the inner surfaces of the oven with a cloth.
Warning: Make sure that the appliance is cool before you touch it.
Care must be taken with all hot surfaces as there is a risk of burns.
Use distilled or drinkable water.
300 ml

EN 16
Waste management and environmental protection
This appliance is labelled in
accordance with European Di-
rective 2012/19/EU regarding
electric and electronic appli-
ances (WEEE). The WEEE con-
tain both polluting substances
(that can have a negative ef-
fect on the environment) and base elements
(that can be reused). It is important that the
WEEE undergo specic treatments to cor-
rectly remove and dispose of the pollutants
and recover all the materials. Individuals can
play an important role in ensuring that the
WEEE do not become an environmental prob-
lem; it is essential to follow a few basic rules:
- the WEEE should not be treated as domestic
waste;
- the WEEE should be taken to dedicated col-
lection areas managed by the town council or a
registered company.
In many countries, domestic collections may
be available for large WEEEs. When you buy a
new appliance, the old one can be returned to
the vendor who must accept it free of charge
as a one-o, as long as the appliance is of an
equivalent type and has the same functions as
the purchased appliance.
Troubleshooting
Problem Possible cause Solution
the oven does not heat
up The clock is not set Set the clock
The oven does not
heat up A cooking function and temperature has
not been set Ensure that the necessary settings
are correct
No reaction of the
touch user interface Steam and condensation on the user in-
terface panel
Clean with a microber cloth the
user interface panel to remove the
condensation layer
SAVING AND RESPECTING THE ENVIRON-
MENT
Where possible, avoid pre-heating the oven
and always try to ll it. Open the oven door as
infrequently as possible, because heat from
the cavity disperses every time it is opened.
For a signicant energy saving, switch o the
oven between 5 and 10 minutes before the
planned end of the cooking time, and use the
residual heat that the oven continues to gen-
erate. Keep the seals clean and in order, to
avoid any heat dispersal outside of the cavity.
If you have an electric contract with an hour-
ly tari, the “delayed cooking” programme
makes energy saving more simple, moving the
cooking process to start at the reduced tari
time slot.

DA 17
Sammendrag
18
Sikkerhedsanvisninger
22
Generelle instruktioner
24
Produktbeskrivelse
25
Vis beskrivelse
27
Tilberedningstilstande
28
Generelle bemærkninger til rengøring
28
Vedligeholdelse
29
Pyrolyse
31
Fejlfinding
77
Installation

DA 18
Sikkerhedsanvisninger
•Under madlavning, kan fugt kondensere inde i ovnrummet eller
på lågens glas. Dette er en normal tilstand. For at reducere
denne effekt, skal du vente 10-15 minutter efter at have tændt
for strømmen, før du sætter mad ind i ovnen. Under alle
omstændigheder forsvinder duggen, når ovnen når
tilberedningstemperaturen.
•Tilbered grøntsagerne i en beholder med låg i stedet for en åben
bradepande.
•Undgå at efterlade mad inde i ovnen efter madlavning i mere end
15/20 minutter.
•ADVARSEL: Apparatet og de tilgængelige dele bliver varme
under brug. Pas på ikke at berøre varme dele.
•ADVARSEL: De tilgængelige dele kan blive varme, når ovnen
er ibrug. Børn skal holdes på sikker afstand.
•Sørg for, at apparatet er slukket, før du udskifter lampen,
for at undgå risikoen for elektrisk stød.
•Frakobl apparatet fra elforsyningen ved hovedkontakten, før der
udføres arbejde eller vedligeholdelse af apparatet.
•ADVARSEL: For at undgå enhver fare forårsaget af utilsigtet
nulstilling af den termiske afbryderanordning, bør apparatet ikke
strømforsynes af en ekstern afbryderanordning, såsom en timer,
eller være tilsluttet et kredsløb, der regelmæssigt tændes
og slukkes.
•Børn under 8 år skal holdes i sikker afstand fra apparatet, hvis det
ikke overvåges kontinuerligt.
•Børnene må ikke lege med apparatet.
•Apparatet må kun anvendes af personer på 8 år eller derover
og af personer med begrænsede fysiske, sensoriske eller mentale
evner, uden erfaring eller viden om produktet, hvis de overvåges
eller forsynes med instruktioner om betjening af apparatet,
på en sikker måde med bevidsthed om de mulige risici.

DA 19
•Rengøring og vedligeholdelse bør ikke udføres af børn
uden opsyn.
•Brug ikke grove eller slibende materialer eller skarpe
metalskrabere til at rengøre ovnlågens glas, da de kan ridse
overfladen og forårsage, at glasset knuses.
•Ovnen skal være slukket, før de aftagelige dele fjernes.
Efter rengøring skal de samles igen i henhold til instruktionerne.
•Brug kun det anbefalede stegetermometer til denne ovn.
•Brug ikke en damprenser eller højtryksspray til rengøring.
•HVIS OVNEN LEVERES AF FABRIKANTEN UDEN STIK:
•APPARATET MÅ IKKETILSLUTTES STRØMKILDEN VED HJÆLP
AF STIK ELLER STIKKONTAKTER, MEN SKAL VÆRE DIREKTE
TILSLUTTET STRØMFORSYNINGEN. Tilslutningen til strømkil-
den skal udføres af en behørigt kvalificeret fagmand. For at få
et anlæg, der er i overensstemmelse med den gældende
sikkerhedslovgivning, må ovnen kun tilsluttes ved at placere
en omnipolær afbryder med kontaktadskillelse, der er i overens-
stemmelse med kravene til overspændingskategori III, mellem
apparatet og strømkilden. Den omnipolære afbryder skal kunne
holde til den maksimale tilkoblede belastning og skal være
ioverensstemmelse med gældende lovgivning. Det gul-grønne
jordkabel må ikke afbrydes af afbryderen. Den omnipolære
afbryder, der anvendes til tilslutningen, skal være let tilgængelig,
når apparatet er installeret.
Tilslutningentilstrømkildenskalforetagesafenbehørigtkvalificeret
fagmand, der tager hensyn til ovnens og strømkildens polaritet.
Afbrydelsen skal opnås ved at indsætte en afbryder i den faste
ledning i overensstemmelse med ledningsreglerne
•HVIS OVNEN LEVERES AF FABRIKANTEN MED STIK:
Stikkontakten skal være egnet til den belastning, der er angivet
på mærkaten, og skal have tilsluttet og virkende jordkontakt.
Jordlederen er gul og grøn. Denne handling skal udføres
af en passende kvalificeret professionel. Hvis stikkontakten

DA 20
og apparatets stik ikke passer sammen, skal du bede en kvalificeret
elektriker om at udskifte stikkontakten med en anden egnet type.
Stikket og stikkontakten skal være i overensstemmelse med
de gældende standarder i installationslandet. Tilslutning til
strømkilden kan også ske ved at placere en omnipolær afbryder
med kontaktadskillelse, der opfylder kravene til overspæn-
dingskategoriIII,mellemapparatetogdenstrømkilde,derkanholde
til den maksimale tilsluttede belastning, og som er i overens-
stemmelse med gældende lovgivning. Det gul-grønne jordkabel
må ikke afbrydes af afbryderen. Stikkontakten eller den
omnipolære afbryder, der anvendes til tilslutningen, skal være let
tilgængelig, når apparatet er installeret.
Afbrydelsen kan opnås ved at have stikket tilgængeligt eller ved
at inkorporere en afbryder i den faste ledning i overensstem-
melse med ledningsreglerne.
•Hvis strømkablet er beskadiget, skal det udskiftes med et kabel
eller et særligt bundt, der er tilgængeligt fra producenteneller ved
at kontakte kundeserviceafdelingen. Strømkabeltypen skal være
H05V2V2-F.
•Denne handling bør udføres af en kvalificeret fagmand.
Jordlederen (gul-grøn) skal være ca. 10 mm længere end
de øvrige ledere. Kontakt udelukkende kundeserviceafdelingen
og kræv brug af originale reservedele, ved behov for reparation.
•Hvis dette ikke overholdes, kan det forringe apparatets sikkerhed
og ugyldiggøre garantien.
•Eventuelt overskydende spildt materiale skal fjernes
inden rengøring.
•Et langvarigt strømsvigt under en igangværende tilberedning kan
forårsage en funktionsfejl på monitoren. Kontakt i så fald
kundeservice.
•For at undgå overophedning må apparatet må ikke installeres bag
en afdækningsdør.
•Når du placerer pladen i ovnrummet, skal du sørge for, at stoppet
er rettet opad og bagest i ovnrummet. Pladen skal sættes helt ind
i ovnrummet.
Table of contents
Languages:
Other Frigor Oven manuals