Fuchs Audio Technology Full House-50 User manual

Instrument Amplifiers
V 1.1
Operations Manual covers :
Full House-50 , Blackjack-21-II, Lucky 7-II, Four Aces
(heads/combo)
Fuchs Audio Technology
407 Getty Ave, Clifton, NJ 07015
(973) 772-4420 (fax) 973-772-4460
Website: www.fuchsaudiotechnology.com
Email: info@fuchsaudiotechnology.com
2000-2005 Fuchs Audio Technology. All rights reserved.
11-28-2011-AMF Rev-2 (25-Aug-2012)

A Note from Annette,
First of all, Thank You for purchasing a Fuchs Audio Technologyamplifier!
Due to player demand, Andy Fuchs redesigned the popular Lucky-& Blackjack series
amps into a great new series of amps, to provide great ODS and TDS style tones at a
lower price. Just like all our other amps and pedals, each amplifier is precision
handmade by the staff at Fuchs Audio, and is built to the same high standards of
excellence found in all Fuchs products, regardless of price. With over two decades
experience in the service, manufacturing, and design of tube audio/music equipment,
we at Fuchs Audio are extremely proud of the quality and tremendous musicality of this
new series.
Please read this manual carefully. Although these amps were created to be simple
amplifiers to operate they will perform to fullest glory by your full understanding of the
contents of this manual.
Feel free to call or e-mail us (we prefer emails!) with comments & questions about your
amp, or just to find out what’s new here at Fuchs Audio.
Lastly, I recommend checking out our new web site: www.fuchsaudiotechnology.com,
for product/user updates, cool links and other info benefiting our customers.
Sincerely,
Annette Fuchs
President
Fuchs Audio Technology
407 Getty Ave, Clifton, NJ 07015
(973) 772-4420 (fax) 973-772-4460
Website: www.fuchsaudiotechnology.com
Email: info@fuchsaudiotechnology.com
(“Fuchs Audio Technology” & all product names are registered trademarks of Fuchs Audio Technology)

Table of Contents (by section)
1) Introduction to the Fuchs Audio Casino series amplifier
2) Please Read before powering up your amp
3) Diagrams- FRONT/REAR panels, Tube bias diagram
4) Front panel Controls, inputs & their functions
5) Rear Panel controls, inputs/outputs
6) Biasing power tubes & other technical info.
7) Warranty/repair information & mail-in warranty form
2000-2005 Fuchs Audio Technology. All rights reserved.

1 Introduction to the Fuchs Audio Casino series™amplifiers
Representing a new direction for Fuchs Audio Technology, the Casino series ™ brings
the high build quality and awesome tones people expect of Fuchs products, to a new
more affordable price range. These amps are based on a three 12AX7 preamp stage, and
each model has it’s own unique power stage. The 4-Aces By switching to a 6V6, you can
reduce power to less than 5-watts. Unlike other amps in this price range, this series
features two channels, a digital reverb, gain boost, and a ton of features unlike any
other boutique D-style amp in this pricerange. They feature a full compliment of
extremely flexible tone controls. A surprising amount of clean headroom is available
before the output stage begins distorting with a sweet yet cutting rock edge.
The chassis (like all Fuchs products) is aircraft grade aluminum; our internal construction
is mixed PC board and hard wired. On these models the preamp tubes and power supply
circuitry are on the circuit card, while the power tubes and transformers are mounted
on the chassis. A detachable power cord is standard. By using single point grounding,
the amp is quiet and free of hum at all operating levels.
A single input and 3 speaker outputs for 4-8-16 ohms are provided. An effects patch jack
is provided as is a dual footswitch jack for channel and gain boost via a dual LED
footswitch.
Features:
¾” solid wood cabinet with durable tolex covering.
Anodized aluminum chassis with long lasting silk-screened labeling
Heavy duty Cliff brand jacks. Solid metal-shaft Alpha potentiometers.
Ultra-long-life fuse-lamp pilot lamp and heavy duty AC power and standby switches.
Simple user adjustable fixed output tube bias.
Specifications:
Size: 8” tall 10.5 inches deep 19” wide.
Weight varies by model.
Tube compliment: 4-Aces: 2-6SN7 power triode, 3 X 12AX7 preamp tubes, Lucky-7:1-EL-
34 (or 6V6 with rebias) power tubes, 3-12AX7’s, Blackjack-21: 2-6V6 power tubes, 3 x
12AX7, Full-House-50 2 x 6L6 and 3 x 12AX7.
Power output: 4-Aces: 4-watts into 4-8-16-Ohms Lucky-7: 7-Watts into 4-8-16-ohms
Blackjack-21: 20-watts into 4-8-16 ohms, Full-House-50 50-Watts into 4-8-16 ohms.
Input Impedance -1Meg.

“2 Please read before powering up your amplifier.
Please see Panel Diagrams in next section 3 for assistance.
1) Inspect to make sure power & pre-amp tubes are intact & snuggly seated in their
sockets.
2) Make certain a speaker (load) is plugged into speaker input jack on the back of
the amplifier. Failure to have a speaker connected to the amp will result in
damage to the output tubes! Your amp is supplied with 4,8 and 16 ohm speaker
output jacks, select the one which matches your speaker(s) impedance.
3) Reduce Front panel GAIN controls to moderate level.
4) Install instrument cable from guitar into front panel INPUT
5) Be sure both POWER switch (front panel) is in DOWN (0ff) position and standby
is in off (down) position.
6) Install power cord to amplifier (AC POWER IN) and to appropriate AC power
source.
7) POWER UP amplifier by: 1) flipping POWER switch UP. Allow at least 30 seconds
to 1 minute for tubes to heat up. Then switch amp to operate mode via standby
switch.
8) The Amplifier is now fully on and ready to use. Feel free to adjust all controls as
you see fit.
9) Provide adequate and unimpeded ventilation.
10) Do not expose the unit to drips or splashes.
11) Do not to place liquids on the unit.
12) Properly ground the unit (i.e. make sure the outlet used is grounded, and ground
is not defeated between the outlet and unit).

3Diagrams of FRONT & REAR Panels, Tube Bias Diagram
Front Panel
Rear Panel
Tube Bias diagram
Biasing for various models:

See diagram above for location of bias trimmers and test points
4-Aces: Set bias controls for .020 volts on each test point (20-Ma per 6SN7 Class AB-1)
Lucky-7: Set for .05 volts on one test point (50-Ma for single EL-34 Class-A)
Blackjack-21: Set for .02 volts on each test point (20-Ma per tube Class-AB-1)
Full-House-50: Set for .036 volts on each test point (36 ma per tube Class AB-1)
PREAMP TUBES AND THEIR FUNCTIONS:
V-1 12AX7 (nearest to input jack). Main input preamp, first clean and overdrive preamp
(premium tube recommended)
V-2 12AX7 (middle tube) Overdrive only preamp.
V-3 12AT7 Phase inverter/driver tube
4Front Panel Controls, inputs & Their Functions
Input Jack:
Input jack is a 1/4" phone plug, designed for 1-Meg impedance, guitar-level signal. This
input will readily accept pedals/effects without any loss in performance. Pedals/effects
input is also inserted to this input in series with your guitar.
Clean Gain Control:
The gain control sets the overall gain/volume for the amplifier in the clean (channel-1)
mode. Adjust to volume /tone taste.
High Control:
Adjust the high control to taste, it controls adjusts the high frequency spectrum of your
amplifier.
Mid Control:
Adjust the Mid control to taste, it controls adjusts the mid frequency spectrum of your
amplifier.
Low Control:
Adjust the Low control to taste, it adjusts the low frequency spectrum of your amplifier.
OD-Gain:
The OD-gain control sets the amount of drive in the gain channel. This channel is
accessed by the left footswitch button, or by pulling the Overdrive Master control knob
out. This control will adjust how much gain and distortion you will have in channel-2.
OD-Master:
The OD-Master controls the volume of the amp in channel-2 (overdrive) mode. The
Overdrive gain (above) sets the amount of distortion, and the Overdrive master sets the
volume at which the drive channel operates.

OD-tone:
The OD tone control is a simple high cut control which allows you to go from “woman
tone” (full counter clockwise), to D-style (center 30% range), to rock/English tones (full
clockwise).
Reverb Level:
The Reverb level control adjusts the amount of reverb return to the amp.
Reverb Decay:
The Reverb decay adjusts the time it takes for the reverb signal to decay.
Counterclockwise is the shortest decay, and turning all the way clockwise increases the
decay time.
5REAR Panel Controls, inputs/outputs
AC power cord input:
Using a standard IEC power cord. Connect to AC POWER IN on the amplifier and to AC
power source. Please note the voltage on the chassis, and make sure you are supplying
the correct AC voltage to the unit. Damage from incorrect voltages is not covered by
warranty.
AC power Fuse:
This fuse protects the amplifier if any malfunction occurs. Use ONLY the stock fuse
rating as supplied by factory and shown on the rear panel for the voltage and current in
your location.
Speaker outputs:
4, 8, 16 ohm outputs. Use the same impedance as the speaker you are using for
maximum power and performance.
Standby/Play switch:
Up is play mode. When amp is not being used, but being warmed up, place amp into
standby mode.
Effects Loop Patch jack:
This is a stereo ¼”. The tip is the return to the power amp. The ring is the send from the
preamp. This may be used with an outboard effect loop like the Plush Tube FX loop, or
various other aftermarket devices for this purpose. Depending on the outboard unit you

are using, an effects loop device may not be needed. You can try any unit you like, and
see if the tone and performance is acceptable to you without damage to the unit.
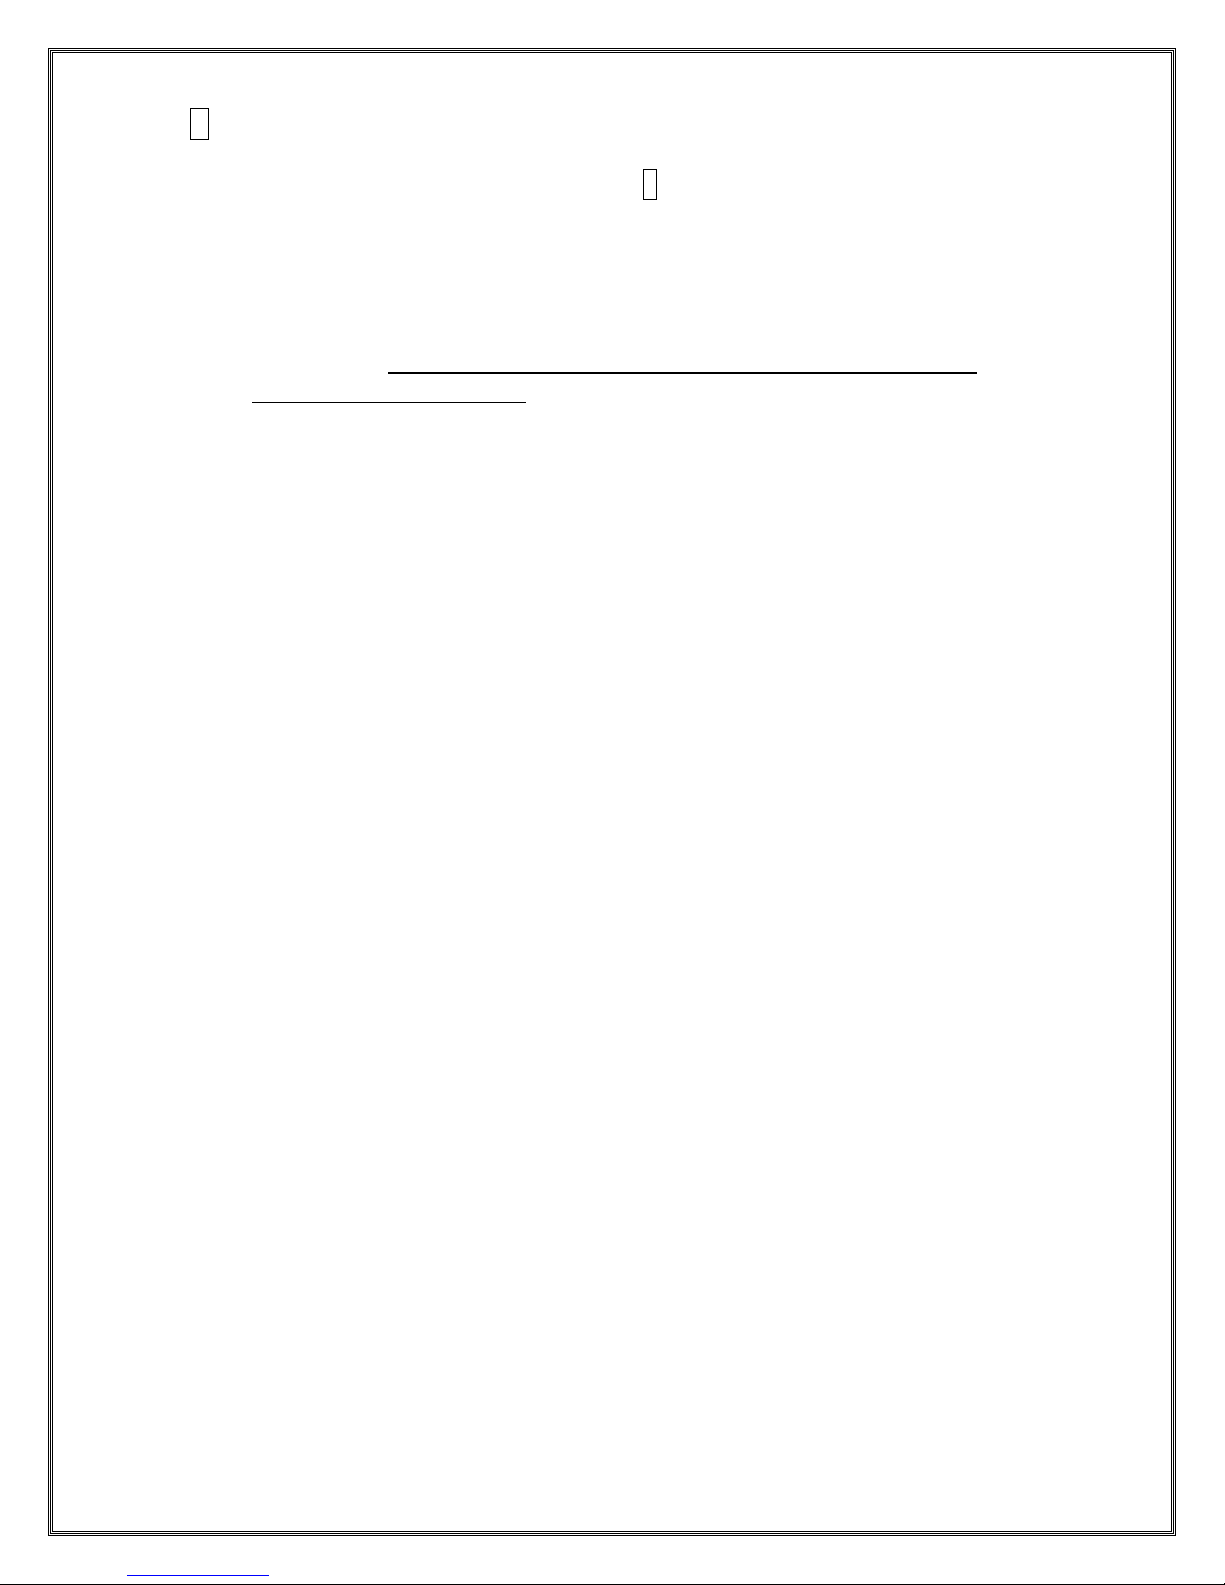
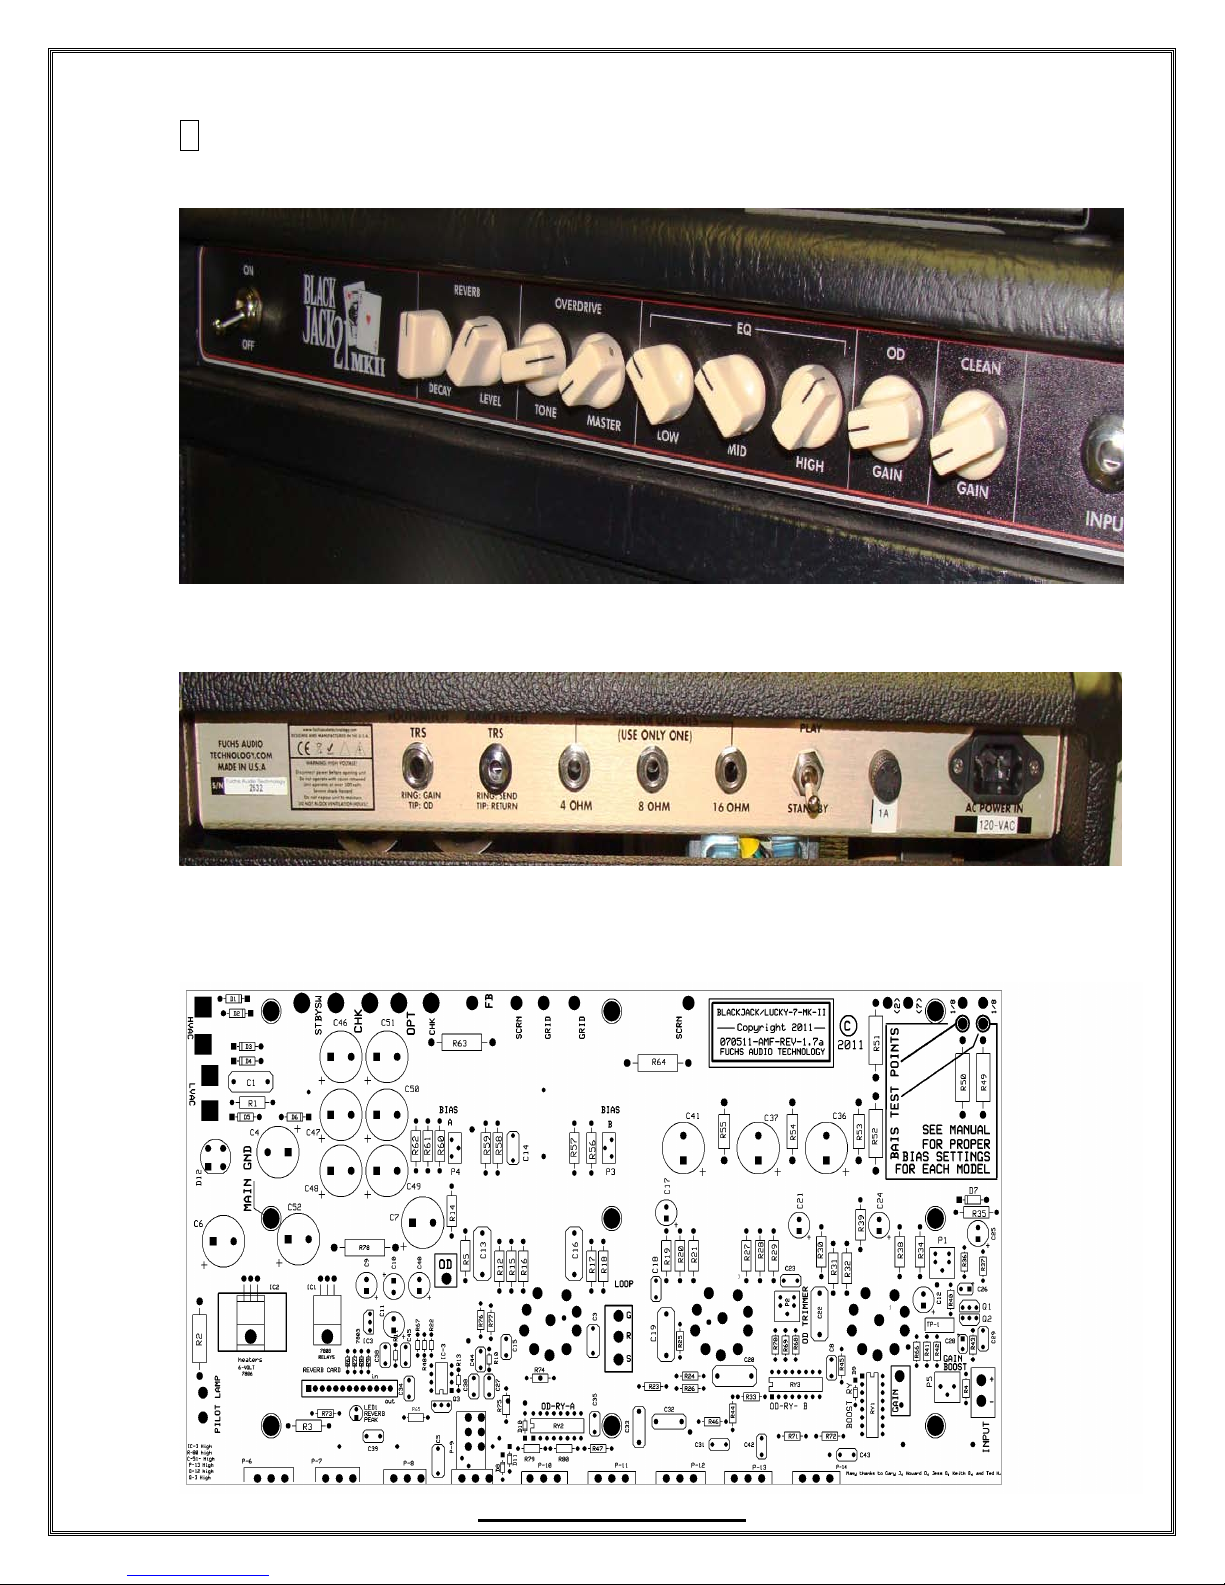
Footswitch Jack:
This is a stereo ¼” phone plug. The tip is overdrive select, and the ring activates a gain
boost, which does not disable tone controls, and works on both clean and dirty
channels.
6 Biasing the amplifier power tubes & other technical info
The circuit board is shown earlier in the manual with the chassis sitting on its
transformers, and front panel facing you. There are exposed high-voltages in this
chassis, even with the amplifier shut-off! If you are not familiar with tube amplifiers
and/or high voltages, do not attempt to remove the chassis from its cabinet or to
attempt to service this amplifier. Refer servicing to the factory or to someone with
experience servicing these types of amplifiers.
DISCLAIMER: There are exposed high-voltages within this amplifier. Do not attempt to
service, repair or conduct tube biasing unless you are qualified to do so. Please contact
Fuchs Audio beforehand with questions in this regard. Fuchs Audio takes no
responsibility or shall be held liable for any personal harm caused or damage to this
amplifier as a result of unauthorized service, repair or internal adjustments
made to this amplifier.
FCC COMPLIANCE STATEMENT: This equipment has been tested and
found to comply with the limits of Part 15 of the FCC Rules. These limits
are designed to provide reasonable protection against
harmful interference in a residential installation. This equipment generates,
uses and can radiate radio frequency energy and, if not installed and used
in accordance with the instructions, may cause harmful interference to
radio communications. However, there is no guarantee that interference
will not occur in a particular installation. If this equipment does cause
harmful interference to radio or television reception, which can be
determined by turning the equipment off and on, the user is encouraged to
try to correct the interference by one or more of the following measures:
•Reorient or relocate the receiving antenna. •Increase the separation
between the equipment and receiver. •Connect the equipment into an outlet
on a circuit different from that to which the receiver is connected. •Consult
the dealer or an experienced radio/TV technician for help.

DISCLAIMER:
Δ Read, retain, and follow all instructions. Heed all warnings.
Δ Only connect the power supply cord to an earth grounded AC receptacle in
accordance with the voltage and frequency ratings listed under INPUT POWER
on the rear panel of this product.
Δ WARNI NG: To prevent damage, fire or shock hazard, do not expose this unit to rain
or moisture.
Δ Unplug the power supply cord before cleaning the unit exterior (use a damp
cloth only). Wait until the unit is completely dry before reconnecting it to power.
Δ Maintain at least 6 inches (15.25 cm) of unobstructed air space behind the unit
to allow for proper ventilation and cooling of the unit.
Δ This product should be located away from heat sources such as radiators, heat
registers, or other products that produce heat.
Δ This product may be equipped with a polarized plug (one blade wider than the
other). This is a safety feature. If you are unable to insert the plug into the outlet,
contact an electrician to replace your obsolete outlet. Do not defeat the safety
purpose of this plug.
Δ Protect the power supply cord from being pinched or abraded.
Δ This product should only be used with a cart or stand that is recommended by
the manufacturer.
Δ The power supply cord of this product should be unplugged from the outlet
when left unused for a long period of time, or during electrical storms.
Δ This product should be serviced by qualified service personnel when: the power
supply cord or the plug has been damaged; or objects have fallen, or liquid has
been spilled onto the product; or the product has been exposed to rain; or the
product does not appear to operate normally or exhibits a marked change in
performance; or the product has been dropped, or the enclosure
damaged.
Δ Do not drip nor splash liquids, nor place liquid filled containers on the unit.
Δ CAUT I ON: No user serviceable parts inside, refer servicing to qualified personnel
only.
Δ Fuchs ® amplifiers and loudspeaker systems are capable of producing very
high sound pressure levels which may cause temporary or permanent hearing
damage. Use care when setting and adjusting volume levels during use.

7 Warranty Information
The Fuchs Audio TechnologyAmplifier Warranty
In the United States, Fuchs Audio Technologyguarantees our products to be free from
defective workmanship or material failure for a period of FIVE years (tubes excluded) from date
of new purchase to the original purchaser. This excludes tubes, which are covered for 90 days by
Fuchs, and whatever period the manufacturer of the tube provides. Outside of the United
States, the warranty is based on each country's local laws and distributor's policies. Contact
your local dealer or distributor for details.
This does not apply to Fuchs amplifiers that have been tampered with, damaged by shipping
carriers, reverse engineered, or modified. Your warranty form/information must be returned to
Fuchs Audio Technologywithin 30 days of purchase, or your warranty will not be in effect.
Fuchs Audio Technologyreserves the right to suspend or terminate the above warranty at our
sole discretion, should damage from any of the above limitations and or exclusions be detected
upon examination.
Keep the information on this page for your records.
Please mail-in warranty form on next page
FUCHS MODEL :
SERIAL NUMBER:
OPTIONS INCLUDED:
Fuchs Audio Technology
407 Getty Ave, Clifton, NJ 07015
(973) 772-4420 (fax) 973-772-4460
Website: www.fuchsaudiotechnology.com
Email: info@fuchsaudiotechnology.com

WARRANTY REGISTRATION FORM
This completed form must be returned to Fuchs Audio Technology within 30 days of purchase along
with a copy of your receipt from your authorized dealer.
Please fill in all requested information on this form so we may register you for future warranty repairs
or future upgrades, should they become available.
Purchasers Name: ___________________________________________________
Address: ___________________________________________________________
City: ____________________ State: _____ Zip: __________ Country:___________
Phone Number: _______________________ E-Mail address: ________________
Model: ___________ Serial Number: ___________________________________
Date of Purchase: ___________________________________________________
Dealer Name: ______________________________________________________
Comments:
_________________________________________________________________
_________________________________________________________________
_________________________________________________________________
_________________________________________________________________
_________________________________________________________________
_________________________________________________________________
Please return this form to:
Fuchs Audio Technology
407 Getty Ave, Clifton, NJ 07015
(973) 772-4420 (fax) 973-772-4460
Website: www.fuchsaudiotechnology.com
Email: info@fuchsaudiotechnology.com
This manual suits for next models
3
Table of contents
Other Fuchs Audio Technology Musical Instrument Amplifier manuals