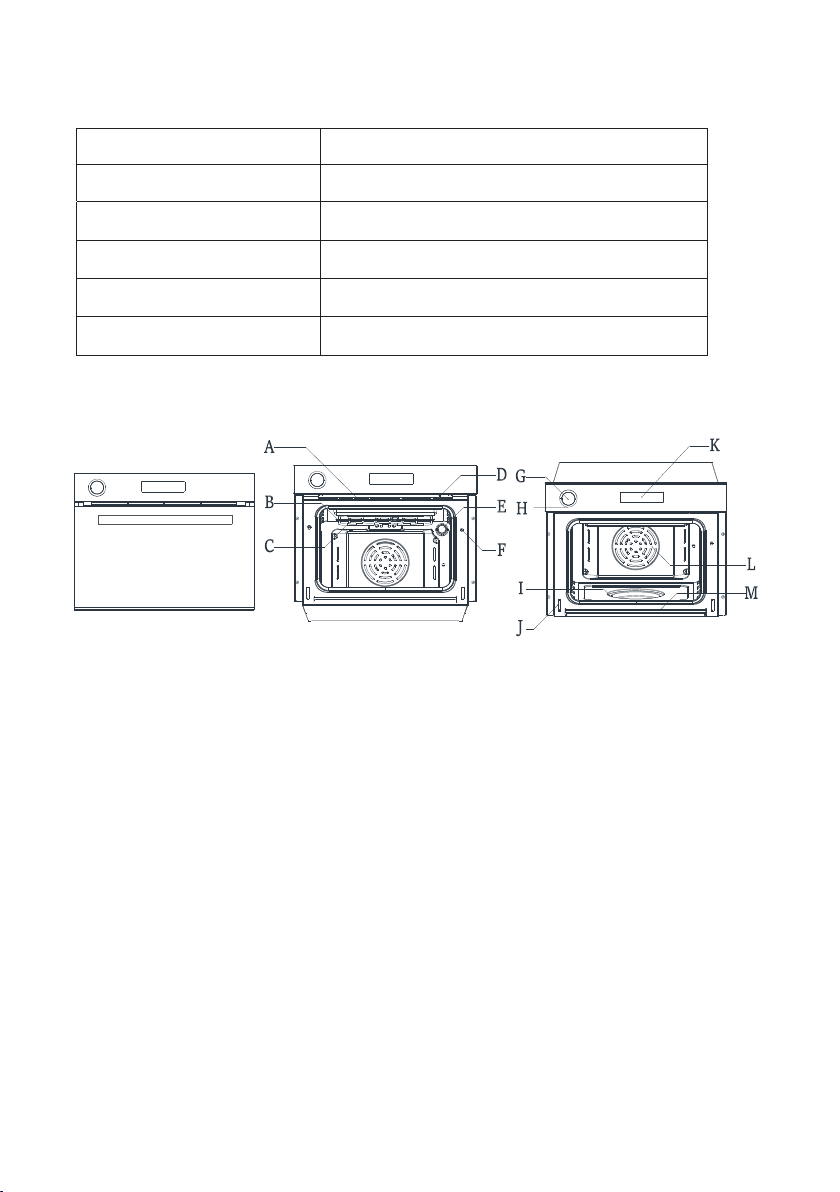
Fujioh FV-ML71 Manual

Please read this manual carefully
before using this appliance.
Built-in Multifunctional Steam Oven
Operating / Installation Manual
FV-ML71


Contents
Important Notes
Power Connections
General Warnings
Installation Instructions
Technical Specification
Oven Overview
Accessories
Operating the Multifunctional Steam Oven
Cleaning Water Reservoir
Oven Settings
Recommended Steaming Times
Recommended Baking & Grilling Times
Cleaning and Maintenance
Trouble Shooting
Circuit Diagram
--------------------------------------------------------
----------------------------------------------------
-----------------------------------------------------
-----------------------------------------------
-----------------------------------------------
---------------------------------------------------------
------------------------------------------------------------
------------------------
--------------------------------------------
-----------------------------------------------------------
------------------------------------
---------------------------
------------------------------------------
-------------------------------------------------------
--------------------------------------------------------
Disposal -----------------------------------------------------------------
Page 1
Page 1
Page 2
Page 4
Page 6
Page 6
Page 7
Page 7
Page 7
Page 9
Page 16
Page 17
Page 18
Page 21
Page 22
Page 23


Important Notes
Dear customer,
Thank you for choosing our product. Before unpacking it, please read this
manual carefully to operate and install your appliance safely and correctly.
● This appliance is designed to be handy for any adult to use at home. Do not
allow children to play with it.
● Children need to be supervised when the product is in operation so that
they do not go near it.
● This product must be connected in accordance with current electrical
regulations. Fixed wiring installation is to be done only by an authorised
electrician.
● Before maintenance or cleaning of the product, disconnect the appliance
from the mains and wait for the oven to cool down first.
● For any repairs, always contact authorised Customer Service Center and
ask for original spare parts. Repairs by untrained personnel may lead to
damage and void the warranty.
● Please flush the built-in reservoir before using if the multifunctional steam
oven has not been used for more than a month.
IMPORTANT!
THE APPLIANCE MUST BE CONNECTED IN ACCORDANCE WITH THE
CURRENT ELECTRICAL RULES AND REGULATIONS. INSTALLATION IS TO BE
DONE ONLY BY AN AUTHORISED ELECTRICIAN.
IMPORTANT!
THIS APPLIANCE MUST BE EARTHED.
● Means for disconnection in the form of an isolation switch must be
incorporated into the fixed wiring .
● The insolation switch can easily be reached after the oven is installed.
● Please check and confirm that the electric meter, circuit breaker, power
supply cable and socket are adequate to withstand the maximum power
load of the product. (Refer to the technical specifications for maximum
load.)
● Earthing should be tested regularly to ensure that it is working properly.
● After connection to the mains, please check that the supply cable does not
overheat.
Power Connections
!
!
-1-

-2-
● Never use reductions, shunts or adaptors that can cause overheating or
burning.
● The supply cable must be positioned as much that it is not exposed to any
external heat source exceeding 50℃ at any point or its length.
IMPORTANT! The manufacturer shall not be liable for any direct or indirect
damage caused by faulty installation. The installer must ensure that the product
installation and power connection complies with all local and general regulations
in force.
● Ensure that the appliances is switched off before replacing the lamp to
avoid the possibility of electrical shock.
● The appliance and its accessible parts become hot during use. Care
should be taken to avoid touching heating elements. Children less than 8
years of age shall be kept away unless continuously supervised.
● Do not use harsh abrasive cleaners or sharp metal scrapers to clean the
oven door glass since they can scratch the surface, which may result in
shattering of the glass.
● A steam cleaner should not to be used.
● Fixed wiring must be protected.
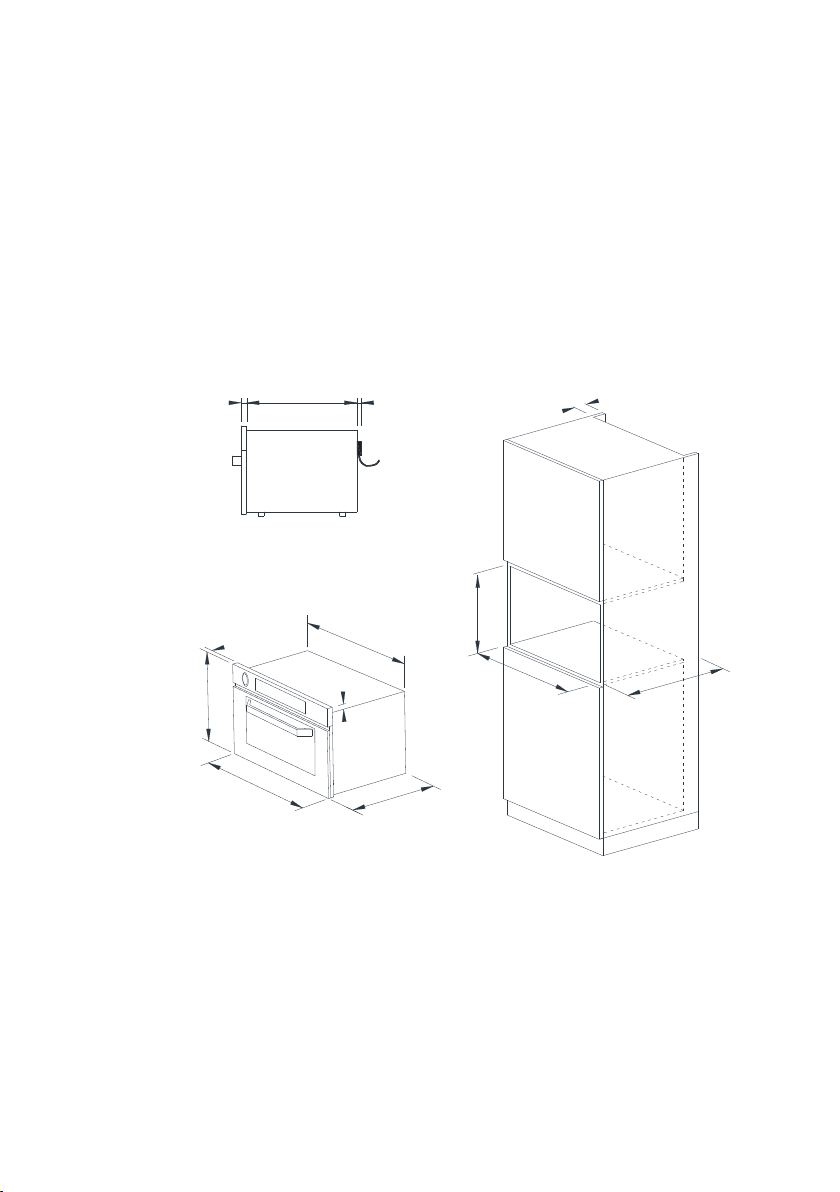
● The door should be situated more than 85 mm above floor after installation
of the oven.
● Surfaces of storage drawer can get hot.
● If the supply cord is damaged, it must be replaced by a special cord or
assembly available from the manufacturer or service agents.
● In order to avoid a hazard due to inadvertent resetting of the thermal
cut-out, this appliance must not be supplied through an external switching
device, such as a timer, or connected to a circuit that is regularly switched on
and off by the utility.
● This appliance can be used by children aged from 8 years and above and
persons with reduced physical, sensory or mental capabilities or lack of
experience and knowledge if they have been given supervision or instruction
concerning use of the appliance in a safe way and understand the hazards
involved. Children shall not play with the appliance. Cleaning and user
maintenance shall not be made by children without supervision.
● WARNING: Unattended cooking on a hob with fat or oil can be dangerous
and may result in fire.
!
General Warnings

-3-
NEVER try to extinguish a fire with water, but switch off the appliance and
then cover flame e.g. with a lid or a fire blanket.
WARNING: Danger of fire: do not store items on the cooking surfaces.
● WARNING – If the surface is cracked, switch off the appliance to avoid the
possibility of electric shock.
● WARNING – Accessible parts may become hot when the grill is in use.
Children should be kept away.
● Excessive spillage must be removed before cleaning.
● The oven must be switched off before removing the guard.
● After cleaning, the guard must be replaced in accordance with the
instruction.
● An additional protective means to avoid contact with the oven door is
available. This part should be fitted when young children are likely to be
present.
● Metallic objects such as knives, forks, spoons and lids should not be
placed on the hob surface since they can get hot.
● If during the test of Clause 11, the temperature rise at the center of the
internal bottom surface of a storage drawer exceeds that specified for
handles held for short periods in normal use, the instruction shall state that
these surfaces can get hot.
● The oven must be switched off before removing the guard and that, after
cleaning, the guard must be replaced in accordance with the instructions.
● The appliance must not be installed behind a decorative door in order to
avoid overheating.
● Disconnection of the appliance after installation, by accessible plug or a
switch in the fixed wiring.
● This appliance should be connected to a circuit which incorporates an
isolating switch which can accessible by the user after installation providing
full disconnection from the power supply. The disconnection may be achieved
by incorporating a switch in the fixed wiring in accordance with the wiring rules.
● Children less than 8 years of age shall be kept away unless continuously
supervised.

-4-
When designing the cabinet ensure that:
● The cabinet openings are as Diagram 1.
● There is a supporting panel underneath for the oven to sit on.
● There is adequate space around the appliance for air to circulate.
● The materials, laminates, edging and adhesive used to construct the
cabinet withstand temperature up to 120℃.
● For the most efficient air circulation, the cabinet construction should
incorporate a recessed rear panel (min. 70mm) which allows the hot air to
rise through the space behind the cabinet while drawing fresh air through the
space beneath the oven door.
● There must be no rear panel directly behind the oven itself so that air can
circulate freely. Refer Diagram 2.
Installation Instructions
23mm
454mm
597mm
480mm
545mm
13mm
457mm
18mm
23mm
Diagram 1
4 5 0 m m
560mm
Min.
550mm
Min 70mm

Diagram 3
220-240V~
N
L
Diagram 2
-5-
Diagram 4
● Fit the appliance to the cabinet by inserting the mounting screws into the
4 holes that can be seen on the oven frame when the door is open. Refer to
Diagram 4.
● Ensure that the oven is fitted firmly in place as described above and properly
insulate the electrical connection to prevent the possibility of it coming into
contact with any metal parts. All live and insulated parts must be secured in
such a way that they can only be removed by using tools.
● Do not switch on the appliance until it has been fully and correctly installed.
IMPORTANT!
The power socket must be connected to a switch with earth leakage
protection. If the power cable is damaged, immediately contact a qualified
electrician to have it replaced.
!

-6-
Technical Specifications
Product
Model Number
Voltage (AC) 220 - 240V~
Frequency 50 - 60Hz
2200W
45 L
FV-ML71
Built-in Multifunctional Steam Oven
Rated Power
Oven Capacity
A - Oven Vent
B - Top Heating Element
C - Grill
D - Door-Lock
E - Oven Lamp
F - Door Switch
G-
H-
I-
J-
K-
L-
M-
Oven Overview
Water Reservoir Inlet
Water Reservoir Outlet
(push G open the water
inlet point and the
outlet point located
underneath.)
Water Heating Element
Hinge Slot
Control Panel Display
Fan Forced Heating
Gutter

-7-
Accessories
Sponge
Water Jug
Screws
S/S Tray1
S/S Tray2
Small Rack
Baking
Accessories
Set
Installation
Rubbers
Operating The Multifunctional Steam Oven
Before First Use
Before using the multifunctional steam oven for the first time, we
suggest to :
● Remove and clean all accessories.
● Remove the special film covering the oven door glass (if there is any).
● Set the empty oven to heat each baking element - Fan Force, Grill,
and Full Grill at maximum temperature for 45 mins. This is to remove
any unpleasant smell caused by working residues.
● Let the oven cool down and clean the oven cavity with soapy water
and wipe dry.
● Flush the built-in water reservoir three times. Refer to “Cleaning
Water Reservoir” section.
● Lastly run the steaming function for 10 mins to flush and clean the
rest of the steaming system.
Cleaning Water Reservoir
The built-in reservoir needs to be flushed 3 times to clean it and remove
any unpleasant smell before it’s first usage. Refer to the instructions
below:
1. Connect the appliance to power and press the display screen to turn
the oven on.
2. Push to open the Water Reservoir Inlet and use a suitable jug with 1L
of water. Refer to Diagram 5.
3. Open the oven door and hold an empty jug below the Water Reservoir
Outlet located under the Inlet point. Refer Diagram 6.

WARNING: Use appropriate vessel to store the water coming out from the built in water
reservoir cleaning. (The water outlet locates under the popup water inlet.)
Empty and cleaning the built in water reservoir after every use to clean.
CAUTION
1.0L
1.0L
Diagram 5 Diagram 6
-8-
4. Press icon on the top left hand corner of display screen to
discharge water. Keep the oven door open.
5. Continue discharging until the water reservoir is empty and repeat
this process again twice.
IMPORTANT! Flush the built-in water reservoir before using if
the oven has not been used for more than a week.
IMPORTANT! We recommend using filtered or distilled water
to avoid the water system from getting blocked and stain build-up.
WARNING! Do not let children play near, around or with the
oven.
!
!
!

-9-
Oven Settings
1. Plug in the oven, touch the display screen to turn on the oven.
Bake: Choose the cooking function/food to bake or grill the food.
Steam: Choose the food to steam cooking.
Unite: Choose the food you cook, and set the cooking for steaming first then
grilling/baking to make the food juicy inside and crispy outside.
Recipe: There are some set recipes available to choose, so make the cooking
get easier.
Setting: To set the date & time, language, latest version of the software,
brightness and Wi-Fi connection.
Connect to internet: Press “Setting” icon, then press Wi-Fi to connect to
internet; or press the Wi-Fi icon on the top right corner of homepage to
connect to internet.
2. Bake Setting
You can choose the food you want to cook by pressing Bake icon.

-10-
● When baking, adjust the cooking temperature and time.
When you choose the food you want to bake or grill, you can adjust the
cooking functions, temperature and cooking time as your personal
preference by sliding the numbers on the display.
After setting is completed, press to start cooking.
There 8 different cooking functions to choose.
After the oven starts baking, the display panel will constantly remain on, you
can see the working time and current temperature.
When the cooking is finished, the display will show as below, press “OK” to
confirm and the lock will release.
Start
Reset
Slide or press
the function
icons to select
the cooking
function as per
your preference.

-11-
3. Steam Setting
● Select the kind food to steam, in the sub-menu you can select different foods.
Sub menus:
● Adjust the cooking temperature and time.
The default setting of cooking time and temperature is displayed when the food
to be cooked is selected, but you can also adjust the time and temperature as
per your preference by sliding the numbers on temperature and time settings.

-12-
● When steaming.
After the oven start steaming, the display panel will always on, you can see
the working time and current temperature.
After the cooking finish, the display will show as below, press “OK” to confirm
and the lock will release.
● Important Information on Steaming.
Operation, Cautions & Warnings
For safety, the oven door locking mechanism is automatically activated once
cooking starts. To inspect the food while cooking, press to pause cooking
and unlock to door. To resume, close the door and press .
If the oven is still hot, steam will be released when the door is opened. Stay
away from the appliance and wait until the steam has completely dissipates
before attempting to remove the cooked food.
In the last 3 minutes of cooking, to reduce the amount of water remaining on
the water heating element after cooking, the oven will cease pumping water
onto the heating element. Any water that remains on the heating element
will continue to be heated as normal till the time is up.

Slide or press
the function
icons to select
the cooking
function as per
your preference.
As a safety precaution, just as the cooking is about to end the oven will
release some steam from the chamber through the oven vents.
In the last minutes the temperature may drop off slightly if the water on
the heating element is depleted and/or due to the venting.
There may be water remaining on the heating element after cooking.
The fan motor will continue to work for 15 minutes after cooking time has
finished.
WARNING! The oven door surface temperature can go up to 55℃
during the cooking process.
WARNING! When opening the door of a hot oven, open it gradually
to allow the steam to slowly escape and avoid the risk of scalding.
4. Combination Cooking Setting – Unite Function
● Select the kind food to cook, in the sub-menu you can select different foods.
● Adjust the cooking temperature and time.
The default setting of cooking time and temperature is displayed when the food
to be cooked is selected, but you can also adjust the time and temperature as
per your preference by sliding the numbers on temperature and time settings.
-13-

● When the oven is working.
After the oven starts cooking, the display panel will constantly remain on, you
can see the working time and current temperature.
After the cooking is finished, the display will show as below, press “OK” to
confirm and the lock will release.
5. High Temperature Steam Function
● There is function for steaming with high temperature, which can be used for
making stew, meat, or make the steaming time shorter the energy.
-14-

-15-
6. Recipes
● There are some recipes available with cooking steps to make cooking more
easier and fun.
7. Settings
● In the settings, you can connect Wi-Fi, adjust the brightness of the screen,
set the date and time, choose the languages (only available in Chinese and
English) and update the software.

-16-
Recommended Steaming Times
IMPORTANT! The above information is for reference only. Cooking
times depend on the type of food, its consistency and volume. Initially,
monitor the performance when you cook. Find the best settings (heat,
cooking time etc.) for your cookware, recipes and quantities when you use
this appliance.
Porridge
Whole Grain
Boil Egg
Soft Boiled
Medium
Hard Boiled
Fruits
Apple/Pear in Pieces
Cherry
Chinese Rhubarb
Chinese Stews
Food
Vegeables
Broccoli(small size)
Cauliflower
Cauliflower(small size)
Green Soya Bean
Pea
Potato (half cut without skin)
Potato(with skin)
Carrot(in pieces)
Asparagus
Meat & Sausage
Chicken(whole)
Chicken in pieces
Pork
Fish
Salmon Filets
Flatfish Filets
Bean
Soaked Lentil
Dry Bean
Dry Lentil
Rice & Grain
Wheat
Temperature(°C) Time(mins)
100
100
100
100
100
100
100
100
100
100
100
100
100
90
100
100
100
100
100
100
100
100
100
100
100
100
100
100
100
20-25
6-7
5
7-9
10-15
7-10
7-10
10-15
22-25
20-22
6-8
6-8
6-8
8-10
10
20-25
30-35
6-8
10-14
10
15-20
16-35
!
Sausage
Pork Rib
5
5-6
8-10
5
5
5
40-80
Table of contents
Other Fujioh Oven manuals