2018 FMPInc. All Rights Reserved
Power: You may run this pedal on the 9 volt battery (included) or on any voltage between 9 and 18 Volts DC as long as the adapter is (standard) 2.1mm x 5.5mm barrel plug with
“Negative to Center Pin” configuration. Unplug guitar cable from INPUT when not using pedal to prolong battery life. If you have an adapter plugged in to the DC outlet there is no
need to unplug the guitar cable from the INPUT because our DC outlet is true-bypass and disconnects the battery supply line, keeping the battery fresh. For standard 9 volt
operation, the Fulltone IPS-9 is a great 9VDC regulated adapter which can be used in all countries offering 100-240 volts AC.
For 18VDC power, buy a well-regulated adapter like the Fulltone IPS-18, which is also for use in all countries offering 100-240 volts AC.
Battery replacement: remove the 2 thumbscrews (#3 & #11)from the sides of the pedal and pull the housing apart. Remove & Replace the battery with either a Carbon-zinc or
Alkaline type battery. Do not use Lithium or rechargeable batteries.
Warranty: User assumes all risks and liability. and is responsible for any injuries and/or damages related to the use of this product. Fulltone products carry a Limited 5 year
Warranty (to the original owner, non-transferable) with proof of purchase the product was bought from an Authorized Fulltone Dealer. There is no need to register your
product, simply keep a copy of your original sales receipt. The Warranty covers failure due to manufacturing errors only and is void if a modification or repair is attempted by
anyone other than Fulltone and/or if we deem that any operator-caused abuse or damage has occurred. If you are having a technical issue please do not call your store.
Instead, go to our website.
Fulltone Musical Products Inc.
11018 Washington Blvd. Culver City, CA 90232
for more info & demonstration videos go to www.Fulltone.com and
www.YouTube.com/FulltoneEffects
for questions related to Sales, Repair, Product Registration, or Technical issues go to www.Fulltone.com/contact-us
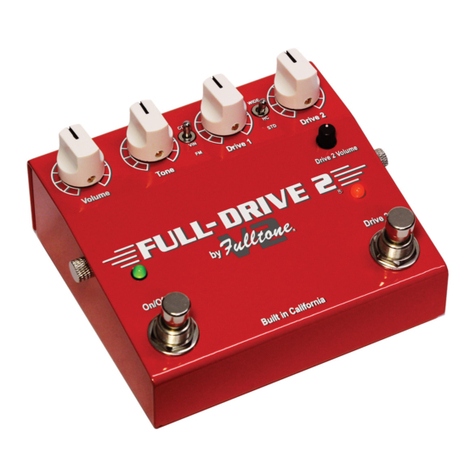
CLIPPING MODES: Note: all clipping modes apply to both Drive 1 or Drive 2 channels.
LEFT CLIPPING TOGGLE SWITCH (#6):
CC (Comp-Cut) bypasses all clipping diodes, leaving a mostly clean-boost that can get somewhat dirty sounding as the 4558 chip gets driven harder
Note; none of the modes on right toggle switch are audible when the left toggle is in CC position.
VIN (Vintage mode) is Normal diode clipping with strong midrange presentation.
FM (Flat-Mids) uses a proprietary feedback circuit that returns signal to the clipping section cancelling out some of the midrange content, creating a very open, natural sound.
RIGHT CLIPPING TOGGLE SWITCH: (#8)
WIDE implements a Mosfet & Schottky diode in each direction. Less Compressed, more open, more Bass.
HC (Half-Clipped) clips only the top part of the waveform, leaving bass notes solid and percussive, and higher notes signing with sustain.
STD (Standard) same slightly asymmetrical diode clipping as on a vintage 90s Full-Drive. Softer, rounder, more compressed.
DRIVE 2 CHANNEL
Offers a choice of different volume level and/or different distortion setting than Drive 1 channel. It is one or the other, the channels are not stackable.
Drive 2 footswitch (#13): When active (LED #12 lit) Drive 2 and Drive 2 Volume are now functioning, allowing you to either (or both) a different distortion level and volume
Drive 2 overdrive knob (#9): dictates the amount of Overdrive only active when the Drive 2 footswitch (#13) is turned on and LED #12 is lit.
Drive 2 Volume knob (#10): is only functional when the Drive 2 footswitch (#13) is turned on and LED #12 is lit, allowing you to go beyond where the Master Volume (#4) is set.
DRIVE 1 (MAIN) CHANNEL
On/Off footswitch (see #1 on diagrams above): is a “master” On/Off for the pedal using True-Bypass routing to eliminate all connections to the circuit when pedal is turned off.
We use the Fulltone designed and manufactured Triple-Pole-Double-Throw (3PDT) footswitch, the toughest, longest-lasting, and best-sounding switch we’ve come across.
Volume Knob (#4): is a “master” volume.
Tone knob (#5): is an active treble boost & cut circuit. You’ll find the 12 to 1 o’clock position to be pretty neutral. Turn knob counter-clockwise (CCW) to around 10 o’clock for
smoother, less present sounds, or turn it clockwise (CW) for brighter, more cutting tone. This is a “master” tone control, affecting both Drive 1 and Drive 2 channels.
Drive 1 overdrive knob (#7): is operable when LED #2 is lit.Turn knob CW for more distortion or CCW for less distortion. Drive 1 has just as much available distortion as Drive 2,
allowing you to set the exact same sound at two different volumes, or allowing one channel to have a cleaner sound while the other channel is set for a dirtier sound.
Note: when Drive 2 is active, Drive 1 overdrive knob ceases to function.
Page 2
