Fusion F-300 User manual

1. Before using
2. Name of parts
3. Function of control panel
4. Operation
5. Characteristics
6. Specification
7. Maintenance
8. Trouble shooting
1. Before using
Contents
This flash is a very precise photographic equipment therefore don't forget to read this operation manual
very carefully before using
1. Please read manual instruction before using it.
2. Input voltage should be checked before use.
3. Don't move or shock when power on. Coil of modeling lamp might be cut off in case of moving with
lamp on.
4. Connect to the properly functioning and grounded 3-pin receptacles only.
5. Attach or disattach reflector, snoot, or other accessories after halogen lamp turned off and cooled off.
6. Don't keep halogen lamp lighting for a long time when it is over 500W/s because
using snoot can overheat highly.(It normally heats up to 200
℃
when a snoot is being used)
7. Use softbox made of noninflammable materials.
8. Be careful of electric shock when using this equipment in humid places.
9. Keep this equipment where children can not be reached
www.alb.co.kr
F-300 / F-600 / F-900 / F-1200
12
2. Parts
2354 8 9 10 11
23
24
21 22
6 7
1
2
3
7
4
5
6
Flash tube
Protective cap
Glass dome
Flash tube lug
Ceramic base
Flash tube plate
Modeling lamp
Modeing lamp socket
Locking lever
8
Flash tube holder
Control panel
9
12
11
10
13
14
Modeling lamp volume slider
Photo cell
Modeling lamp fuse
Synchro socket
16
15
Fuse holder & Fuse
17
20
21
19
18
Power socket
Power switch
Stand adaptor
Holes for umbrella fixing
Stand adaptor for fixing bolt
23 Power cord
24 Synchro cord
22 Flash angle control bolt
1
F-600
INDOOR USE ONLY
12 13
17
16
20
19
14
15
18

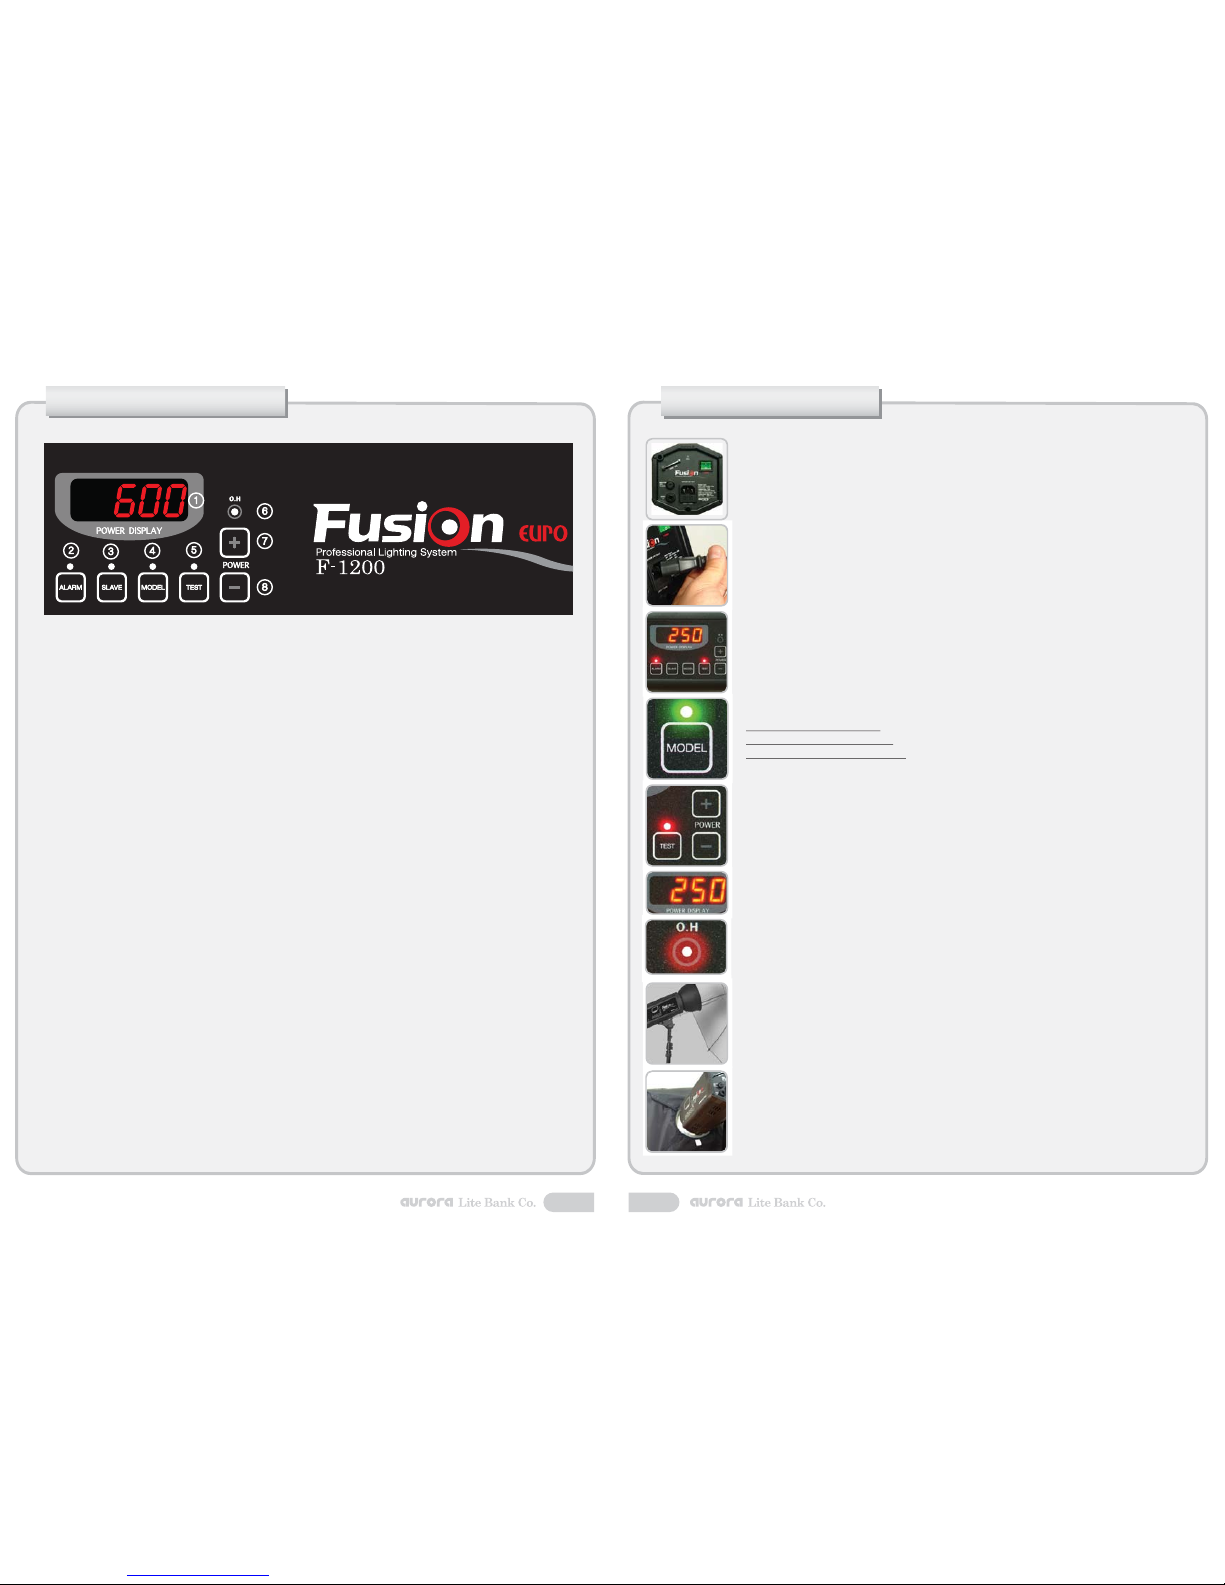
3. Functions of Control Panel
1. Power Display :
Output display in Ws or Joule
2. Alarm :
Charging indicator
- Alarm on : Alarm beeps while being charged
and stops beeping when fully charged.
- Alarm off : Turns beep off during charging.
3. Slave :
Switch for light sensor
- Slave on : Operated by light sensor as well as synchro cord.
When photo cell senses another light flash, it will fire the flash as result.
- Slave off : Operated by synchro cord only (photo cell is disabled).
4. Modeling control :
There are 3 modes for modeling lamp
- Pressing mode control once (red light on) modeling lamp lights up to full.
- Pressing mode control again (green light on) modeling lamp tracks with flash output
- Pressing mode control again (no light) modeling lamp is manually operated by slide
volume on the back panel.
5. Test control :
the test button will trigger the flash when pressed. It will also serve to dump
excess power. The red light indicator is on when charging is finished and off while it is charging.
6. O.H :
This indicator turns on and starts beeping when circuit boards are over heated.
The modeling lamp will go off and whole system stops functioning except cooling fan.
When it cooled off enough, it will then automatically restart to operate.
7. Power up :
Flash output increment. when reached to maximum,
press one more time to go to minimum.
8. Power down :
Flash output decrement. When reached to minimum,
press one more time to go up to maximum
34
4. Operation
1. All powers are off lighting volume is minimized when a flash is released from the factory.
First check the modeling light and power switch are turned off.
2. Connect synchro cord as well as power cord into their appropriate socket.
3. Turn on the power switch then 5 will automatically appear on the display window.
The flash power is set at the minimum 5 Ws initially.
4. All operation switches are a one-touch system.
Alarm, Slave, and Modeling buttons are off initially. The photographer may turn them
on or leave them off as per their needs.
5. Modeling switch operates in 3 different modes
- Press once, red light appears: modeling lamp is set at full.
- Press twice, green light appears: modeling lamp will now track with flash power.
- Press three times, no light appears: modeling lamp is off but it can be controlled by manual
dimmer at the back panel.
6. Increase or decrease flash power with up and down controls.
7. Digital display screen works as overcharge indicator. When overcharged, it will blink. When
overcharge has occurred press test button once to dump the charge.
8. When overheated, Over.H. lamp will turn on. Turn it off to allow the unit to cool down.
Once the unit has cooled down turn it on again. ( 10~15 min )
9. When using an umbrella with your Fusion first mount a standard reflector model ALRD114 then
mount an umbrella through the hole in the reflector and the two holes in the umbrella mount.
Note: After use, cool the flash and umbrella down first before pulling out the umbrella.
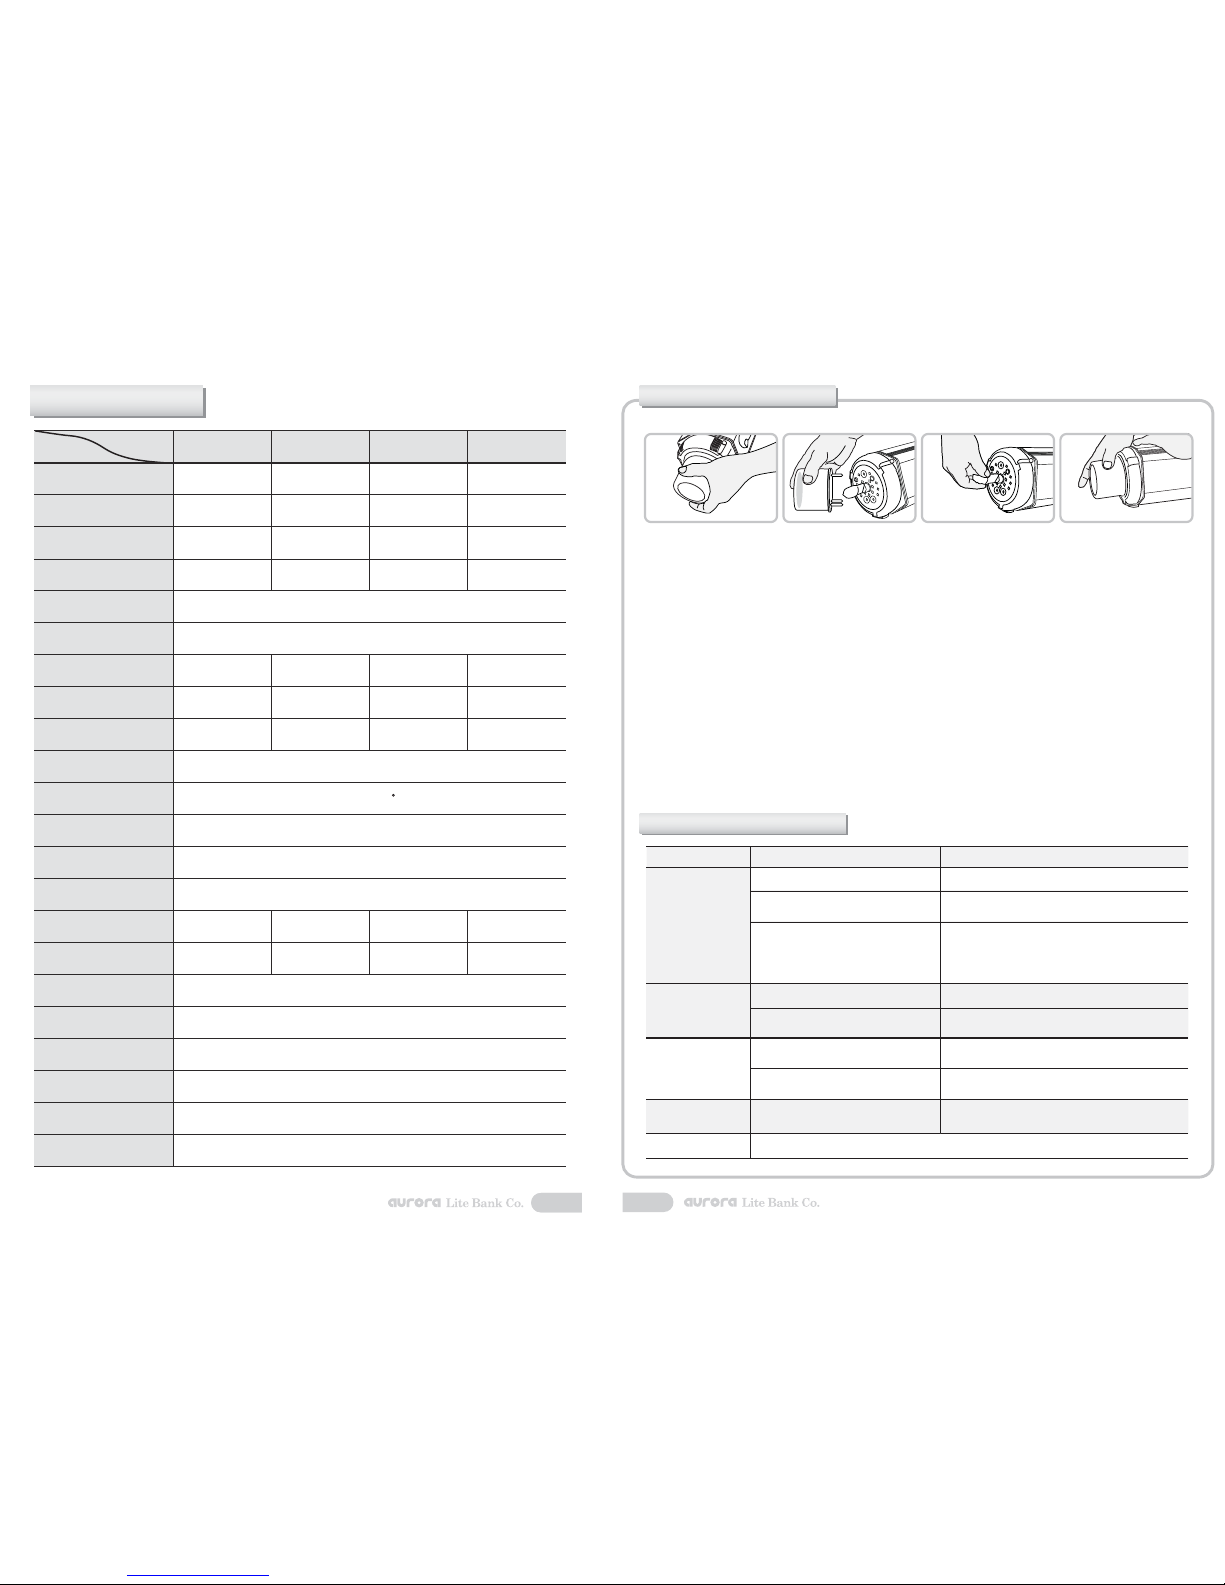
10. To use a softbox, after assembling the softbox with an Aurora flash adaptor, place it onto the flash.
Fit the claws of the adaptor into the holes in the flash front, and then rotate the softbox clockwise
until you hear a clicking sound.
To detach the softbox, cool down the flash and the softbox first.
When they are cool enough to touch, press the locking button with one hand and rotate the softbox
anti clockwise and pull it out with the other hand.

7. Trouble shooting
1. How to replace a flash tube or halogen lamp.
6. Maintenance
①
Hold Pyrex dome of flash tube with one hand while holding a flash head with the other hand.
②
Pull out the glass dome from the flash head. Because it is firmly fixed, you may try to detach it little by
little, rather than pulling it all at once.
③
Pull out the halogen lamp wrapping with a soft fabric. Touching a halogen lamp with bare hands can
shorten the life of lamp. For optimum life of the bulb do not leave fingerprints or stains on the lamp.
If the bulb is dirty you must clean it with a soft fabric cloth.
It is recommended to wear gloves throughout the process.
2. How to replace a fuse
- First pull out the electrical cord.
- Open up the fuse holder with the appropriate screw driver and take out the fuse.
- Replace the defective fuse with new one identical to the original.
3. How to keep flashes
- Place the protective cap while carrying or when not in use.
- To clean the glass dome and flash tube use a soft cloth. Dust can damage flash tube.
④
Replace a defective halogen lamp with to a new lamp and replace the glass dome over
the flash tube and press it firmly towards the flash head.
②③ ④①
SYMPTOM
No operation
Others
Slave is off Make sure slave is on.
Adjust the flash position where the light can reach to the
photocell
Isolate the flash from the other light
sources such as the sun. Cover up part of photo cell
which is exposed to too bright light source using
thick paper
The light does not reach the photo cell.
Ambient lights are too bright
Dust or dirt on the synchro cord jack Remove dust or dirt
If the flash fires fine by test button, then
replace the synchro cord with new one
Broken or bad connection of the cord
Possible problem with charging Check the supply input voltage is correct and
not lower than required.
Check if the cooling fan normally operates.
Cool the flash off and then use again.
Check if the electricity cord is properly
plugged in. Change a fuse.
Overheating
No electricity
Please consult with authorized A/S center, dealers or manufacturer.
POSSIBLE CAUSE SOLUTION
No synchronization
through photo cell
Problematic
synchronization using
the sync cord
Continuous beeping
6
5. Specification
MODEL
SUBJECT
F-300 F-600 F-900 F-1200
10AF
Die cast with Titanic Aluminum
All models
All models
Digital display screen flickers and auto dumps
Audible alarm
modeling lamp, power cord, synchro cord, protective cap, spare fuse
AC 110V 50/60Hz or AC 220V 50/60Hz,
Power range Joule/Ws
Flash power variation
Power increment
Recharging time
Input voltage
Safety fuse
Minimum exposure at 2m
ISO 100, T=1/60
Minimum exposure at 2m
ISO 100, T=1/60
Flash duration T=0.5
Voltage stabilization
Color Temperature
Modeling lamp
Sync voltage
Trigger
Dimensions
Weight
Housing
Plug-in flashtube
Cooling fan
Overcharge indication
Over temp indication
Completed with
5~300Ws 5~600Ws 5~900Ws 5~1200Ws
1/128~Full
16 steps
0.3~1.2sec
1.42 f-stop
16.4 f-stop
1/1740 sec 1/1740 sec 1/1740 sec 1/1740 sec
1.42 f-stop
22.3 f-stop
1.42 f-stop
22.8 f-stop
1.42 f-stop
32.2 f-stop
0.3~1.5sec 0.3~2.5sec 0.3~3sec
19 steps 21 steps 22 steps
1/192~Full 1/256~Full 1/512~Full
±0.1%
5500
±
100 K
150W~1KW halogen lamp ( GX 6.35 )
DC 6V
RF remote, Infrared remote, Synchro cord, Photo cell, Test button
18×13×33cm 18×13×37cm 18×13×42cm 18×13×46cm
3.0Kg 3.2Kg 4.2Kg 4.6Kg
5

741-1 Sangyeck-dong, Buk-gu, Korea Tel : (82-53) 384-9874 Fax : (82-53) 384-9886,
7
For warranty, please fill out this form and mail to Aurora Lite Bank Co.,
741-1 Sangyeok-dong, Buk-gu, Dae-gu, 702-101, Korea or fax to +82-53-384-9886.
Aurora Lite Bank warrants this product to be free of defects in materials and workmanship
for a period of 12 months from the date of purchase.
We or our authorized service centre will repair or replace this product without charge with
respect to the parts and labor, providing our examination indicates that functional defect
exists under normal usage.
This warranty, however, does not include damage caused by the following reasons and
repair or replace for defects due to the followings will be charged.
- Abuse and improper handling
- Improper maintenance
- Unauthorized repairs or modifications
- Natural disaster such as flood, moisture or animal damage
- Defective connection tools
- When wasting parts; modeling lamp, soft box, flash tube, synchro cord,
connecting cable, photo condenser need to be replaced
This warranty is valid only for the original owner and applies to customers who properly fill
out and return this warranty card.
Where did you purchase this product?
Name
Street Address
City
State/Province Zip Code
Country
Phone Number Fax Number
E-mail Address
Purchase Date
※ This product can be modified For better quality and function without prior notice.
Warranty Card
This manual suits for next models
3