Fusion EXO BEAM 10 User manual

1
EXO BEAM 10

2
Product Introduction:
1.1 Before unpack the fixture, pls make sure that the packing is in good condition, following items will be found in the
box:
-The fixture
-This users guide
-1.5m power cable with powercon
1.2 Specification
Source
Light source: Advanced 90w white led
Led life: 20.000 hours
Luminous Flux: 361903lx@3m/130285lx@5m
Control: Remote on/off via DMX
Optical System
Beam angle: 1°
X/Y
Pan: 630°(4.3 sec) or 540°(3.9 sec),Tilt:360°(2.2 sec)
16-bit resolution
Auto repositioning
Features
DMX channels: 16
Super fast, smooth and silent movement
Nice maping effect with dimming and color fading at the same time
white color mixing to create vivid, saturated and uniform color effect
zoom from 1°
Full range 0-100% dimmer
Various strobe
RDM function to change DMX address, display flip, X/Y Reverse and so on
Software upgrade via DMX
Hibernation when lost DMX for preset time
Indicate temperature info of base, arm and lamp
Fan speed auto change according to temperature
Aluminum cooling system
Display

3
2.4inch super nice OLED display with friendly English menu
Auto lock
Flip
Back-up communicating IC
Pre-set wireless and battery holder
1.3 Description of the Device
1. Project lens
2. Head
3. Arm
4. Base
5. Display
6. Foot stand
7. Wireless indicating light
8. Battery
9. Mode/Esc
10. Down
11. Up
12. Enter
13. PowerCon input
14. Vacuum vent valve
15. 5pin dmx input
16. 5pin dmx output
17. Vacuum vent valve
18. PowerCon output
19. Antenna

4
1.4 Colors and Gobos
1
Primary Red
2
Blue
3
Primary Green
4
Amber
5
Cyan
6
Magenta
7
5RGB-13 cool white
8
CTO 3200K
9
CTC 6000K
10 Pink
11
Fern Green
12
Yellow
13
Orange
14
Dark Blue
Rotating & static gobo wheel

5
2. Safety and maintenance Information
2.1 Safety Info
Before operate this unit, please carefully read this users guide and keep if needed in future. It’s
necessary to respect following rules.
The disposal of the device after lifecycle could damage the environment, need to take it to special
company for recycling or return to authorized dealer.
The products referred to in this manual conform to the European Community Directives and are
therefore marked with CE logo.
Keep this device away from children and unauthorized users, the manufacturer will not take
responsibility for the damage due to any disregard of the information provided in this manual and
wrong operation.
Before operate the device, pls make sure the fixture is in good housing, ensure pan and tilt can rotate
in its complete range.
--0.5m
Pls make sure minimal 0.5m distance need to kept between the fixture to any flammable material.
The device can only run with 100-240v voltage, 50/60Hz power, don’t connect to any other wrong
power. Disconnect the device from main power before open the shield or maintenance.
The device is designed only for indoor usage, pls keep it away from moisture. Do not expose the
device under the sun or directly to any other lighting source.
Never look directly into the projecting lens when the fixture is power on, the light may trigger
epileptic seizures in photosensitive persons or persons with epilepsy. Especially at beam effect,
extreme caution and observance of these safety instructions is mandatory.

6
Don’t put or install the device on a surface that subject to vibration or bumps.
Ta=4
5℃
The device is supposed to work in the temperate range -20° C and +45° C, do not use the device
when the temperate exceed this range.
The lens, shield need to be replaced when obviously broken, never use the device when the shield is
not completed closed.
Safety I class device, need to be earth connected.
When the fixture is hanged overhead, the safety rope must be fixed to the bottom of the device to
the appropriate fixing point.
Always carry the device by the handles, do not take the head or arm directly for transportation.
2.2 Maintenance
2.2.1 Operation only allowed to qualified person, damages due to unprofessional operation or remove of any parts
inside will not be considered in warranty service. There are no serviceable parts inside the device or package, service
only leaves to authorized dealers.
2.2.3 Never allow the optical components contact with oil, fat or any other liquid.
2.2.4 A regular clearance of the device is needed for long-term usage, this is very helpful to maintain the lifetime and
brightness need to use a soft and lint-free cloth to clean the optical system, fan and air flowing tunnel.
2.2.5. Trouble Shooting
Problems
Possible reasons
Checking or solutions
Device not power up
Powercon or power cable damaged
Faulty power supply
Change a good power cable to try
Replace new power supply
Pan/Tilt error or vibrate
Faulty Pan/Tilt PCB
Faulty opto sensor
Cable loosen
Replace PT007 PCB
Replace opto sensor OP001
Check the cable connect to OP001
LED off
Temperature protection
Fan not working
Faulty LED
Dimmer and strobe set at 0
Faulty power supply
Check the temperature from menu
Check the fan speed info from menu
Replace new LED
Set dimmer and strobe channel at 255
Replace new power supply
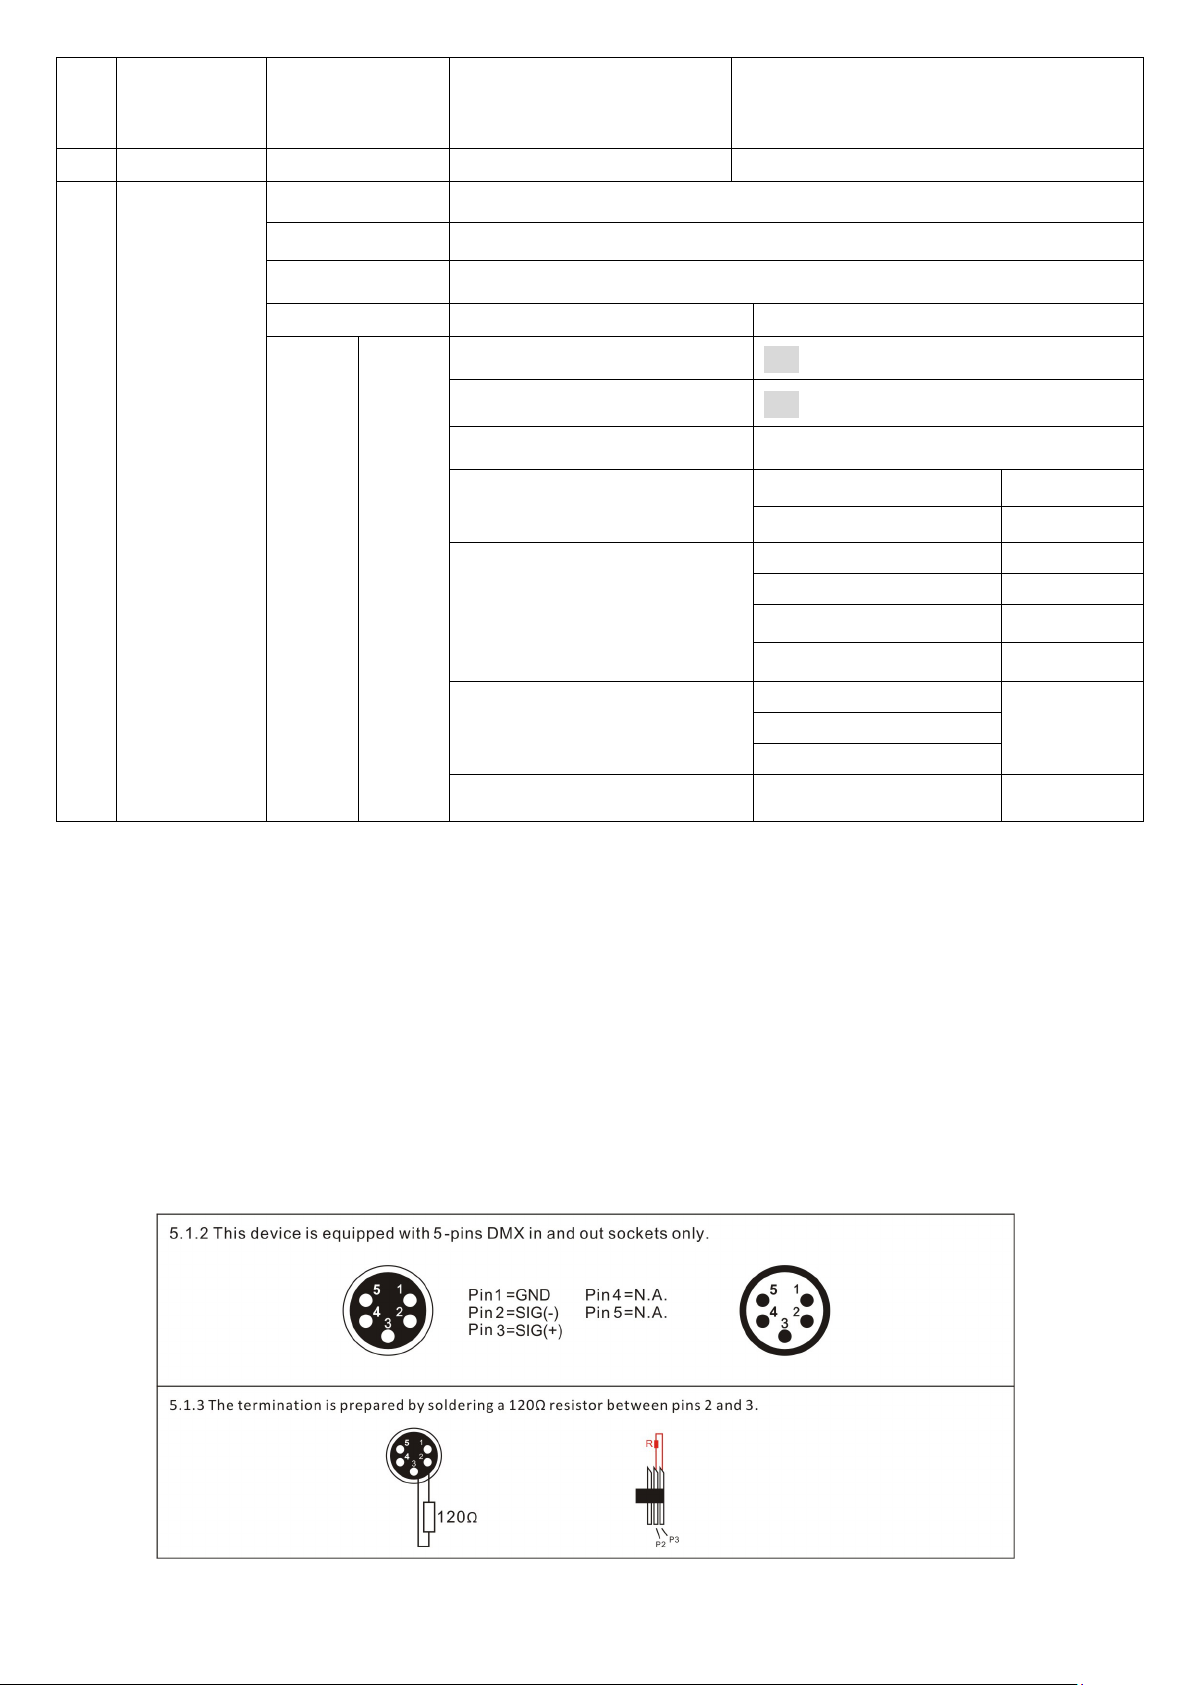
Device not response to DMX
Faulty communication IC
Faulty display PCB
Wrong DMX addressing
Faulty DMX cable
Replace the IC with back-up one in the display PCB
Replace new display PCB
Check the address and setting
Change to a good DMX cable
2.2.6 Replacement of the fuse
Need to replace with same type and rating, which originally installed in the device.
Step One: Unplug power cable from main power.
Step Two: Unscrew the fuse holder out of the housing with a screwdriver.
Step Three: Remove the broken fuse and replace with an exact same type of new fuse.
Step Four: Insert the fuse holder back to the housing and screw tight and reconnect power.

7
3. Installation
3.1 The device could be either put on a solid and even
Surface, or mounted upside down or sideways like left
picture.
3.2 The mounting place must be sufficient stable and
be able to support a weight of 10 times of the unit’s
weight. When the fixture is hanged, always
additionally secure the device with the safety chain,
fasten the safety rope at a suitable position so that the
maximum fall of the projector will be 20 cm
3.3 How to do mounting installation.
Step one: Installation the clamp onto the omega bracket;
Step two: Install the clamp and bracket on the bottom of panel, fasten the quick-locks;
Step three: Install the whole device onto appropriate truss and fasten the clamps, tight the safety rope with the truss or
other fixing point at a suitable position that drop down distance not exceed 20 cm.
4. Control menu
4.1 Menu tree
Default setting shadowed. mark with ①can be basic reloaded, ②be program reloaded, ③can be private reloaded.
0
DMX Address①XXX
1
Control Mode
Standard
2 Protocol
Setup
DMX
WDMX
3 Fixture
Settings
Pan Invert
OFF/ON
Pan Invert
OFF/ON
Pan Degree
630/540
Position
Feedback
OFF/ON
Pan Disable
OFF

8
Reset Disabled
Current Disabled
Tilt Disable
OFF
Reset Disabled
Current Disabled
Zoom lnvert
OFF/ON
Dimmer Curve
Soft/Linear
No Signal
Blackout
Hold
Captured Scene
Capture Scene Press ENTER 3S to
Capture Scene
stored
PWM
600Hz
2200Hz
3000Hz
4800Hz
9600Hz
25kHz
Display Mode
Auto/On/Off
Display
Orientation
Normal/Upside Down
Max.
Temperature
60~90℃/140~ (90℃)(194℉)
Fan Mode
Regulated/High/Medium/Low
Load Settings
Preset1
Press ENTER(3s) to confirm
Preset2
Press ENTER(3s) to confirm
Preset3
Press ENTER(3s) to confirm
Lock Set passcode
off/on
3 Manual
Control
Reboot Press ENTER(3s) to Reboot
Manual DMX
Control XXX
... XXX
Capture Scene Press ENTER(3s) to Confirm
4 Information
Firmware
Version
Master........V.1.0.00
Motordriver........V.1.0.00
LED Driver......V.1.0.00
Fixture Details
RDM ID......676C005BXXXX
Serial......... 2301XXXXXXX
MAC..... F8912A1E01C0
RDM..... 8912A1E01CC0
Device Life
Power Cycles ..... 20
Hours Total .. 10000h
Hours User ... 10000h
DMX Link Status DMX framesec
DMX datapacket
Temperatures LED temper

9
Fan Speeds
Fan1
Motor Fan1
LED Fan
Error log
5 Service
Test All Running
Test Pan only Running
Test Tilt only
Running
Default Settings Press enetr 3s
Service
Advanc
ed
Press
enter
6s
Pan Disable OFF/ON
Tilt Disable OFF/ON
Units %C/%f
Offsets
Pan
XXX
Prismz ...
Reset Counter
Device Hours
XXX
Power Cycles
XXX
Max. Temperature XXX
Temperature Unit XXX
Save settings
Preset 1
Stored
Preset 2
Preset 3
Factory Backup Pres enter 3s
5. DMX connection and DMX protocol
5.1 DMX addressing:
5.1.1 The device is controlled by universal DMX 512 protocol, DMX address is the start channel used to receive
instructions from the external controller. For independent control, each fixture must be assigned its unique address
control channels. For example, this device has four channel modes: 19/98/18/20, if we set the mode at standard 19
channels mode, and there are several models need to be independently controlled, we just simply address first fixture
at 1, and second fixture at 20, third one at 39, etc.
If the devices have the same address, they will behave synchronically.
DMX addressing is limited, don’t set the address so high that without enough control channels for the fixtures.
Display is flashing when no DMX signal is received.

10
5.1.4 Connection: use DMX cable with 5 pin XLR-plugs to connect the controller with the fixture or one fixture with
another.
5.2 DMX chart
Chan
nel name function Min
DMX Max DMX
St
1 Pan Pan Coarse 0 255
2
Pan fine
Pan fine
0
255
3
Tilt
Tilt Coarse
0
255
4
Tilt fine
Tilt fine
0
255
5 Color
Indexed
Position 1 (Open) 0 3
Position 2 4 7
Position 3 8 11
Position 4 12 15
Position 5 16 19
Position 6 20 23
Position 7 24 27
Position 8 28 31
Position 9 32 35
Position 10 36 39
Position 11 40 43
Position 12 44 47
Position 13 48 51
Position 14 52 55
Position 15 56 59
Indexing
Color wheel indexing 0 –360°, Split colors 60 167
Wheel Spin
CW Fastest to Slow 168 211
Stop 212 212
CCW Slow to Fastest 213 255

11
6 Gobo
Indexed
Position 1 (Open)
0
8
Position 2
9
15
Position 3
16
22
Position 4
23
29
Position 5
30
36
Position 6
37
43
Position 7
44
50
Position 8
51
57
Position 9 58 64
Position 10 65 71
Position 11 72 78
Position 12
79
85
Position 13
86
92
Position 14
93
99
Position 15
100
106
Position 16
107
113
Position 17
114
120
Position 18
121
127
Wheel Spin
Stop 128 128
CW Fastest to Slow
129
191
Stop
192
192
CCW Slow to Fastest
193
255
7,8 Gobo rotation
Gobo index 0
–
360
°
0
32767
Gobo rotation CW fast
–
slow
32768
49151
Gobo rotation stop
49152
49152
Gobo rotation CCW slow –fast
49153
65535
9 Shutter
Closed
0
15
Pulse, random, slow
–
fast
16
47
Ramp-up, random, slow
–
fast
48 79
Ramp-down, random, slow
–
fast
80
111
Ramp-up-down, random, slow
–
fast
112
143
Strobe with b/o pause 5
–
0.1 sec.
144
199
Strobe 1 - 10Hz
200
239
Open
240
255
10 Dimmer coarse Dimmer Coarse 0 255
11 Dimmer Fine Dimmer Fine 0 255
12 Focus Focus In to Focus Out 0 255
13
Focus Fine
Focus Fine
0
255
14 Prism 1
Close
Prism Close
0
3
Continuous
Positioning from 0-360 degrees
4
127
Wheel Spin
Stop
128
128

12
CW Fastest to Slow 129 191
Stop
192
192
CCW Slow to Fastest
193
255
15 Prism 2
Close
Prism Close
0
3
Continuous
Positioning from 0-360 degrees
4
127
Wheel Spin
Stop
128
128
CW Fastest to Slow 129 191
Stop 192 192
CCW Slow to Fastest 193 255
16 Control
No function
0
0
Dimmer curve extra soft*
10
15
Dimmer curve linear* No function
16
21
Display off*
22
27
Display auto-off* Display on*
28
33
Display orientation normal*
34
39
Display orientation invert* No function
40
45
No DMX = blackout* 46 51
No DMX = hold* 52 57
No DMX = stand-alone* No DMX = DMX shot* No function
58
63
Fan regulated*
64
69
Fan high*
70
75
Fan medium*
76
81
Fan low*
82
87
No function
88
93
Position feedback off*
94
99
Position feedback on*
100
105
Effect shortcuts off*
106
111
Effect shortcuts on* 112 117
Tilt invert off*
118
123
Tilt invert on*
124
129
Pan invert off*
130
135
Pan invert on*
136
141
Zoom invert off*
142
147
Zoom invert on*
148
153
Focus tracking off*
154
159
Focus tracking near*
160
165
Focus tracking medium* Focus tracking far* 166 171
No function 172 177
Framing Control = PI Mode, (position/Index)*
178
183
Framing Control = LR Mode, (left/right)*
184
189
No function
190
195
PWM 2200 Hz **
196
201
PWM 3000 Hz **
202
207

13
PWM 4800 Hz ** 208 213
PWM 9600 Hz **
214
219
No function
220
225
PWM 25 kHz **
226
231
Set fixture to factory defaults** No function
232
237
Reset pan/tilt *
238
243
Reset head*
244
249
Reset all*
250
255
6.1 RDM, stand for “Remote Device Management”, with this function, users can realize remote control of the device,
such as remotely changing DMX address, reverse pan/tilt setting, check a lot of useful information such as temperature,
power consumption, fan speed. Etc. Every single device has a unique RDM code before left factory to distinguish from
each other, usually not suggest users change this code freely.
6.2 Software upgrade function via DMX cable, if there is any new firmware for this device come out, it can be upgraded
simply via a software upgrade box, no need to change any mechanical parts. The upgrade box is not included in the
package, if need any further assistance pls just contact authorized dealers.
6.3 Hibernation, the device will enter sleeping mode if activated after a period of disconnecting DMX signal to save the
power consumption, and will return immediately as soon as the DMX signal is sent again.
6.4 Display back-up communication IC, there is a back-up communication IC installed in the display PCB, so users could
replace at once if the working one is broken, no need to wait long time from service.
6.5 Display flip, by choose the upside down from the menu, the display will flip automatically, this function is useful to
read menu conveniently when device is hanged.
7. Dimensions Drawing

14
8. Technical specification
Power supply
100-240 V AC, 50/60 Hz ~
Power consumption
185W(input), 200W(output)
LED
Advanced 90w white led
DMX channels
16 modes
Beam angle
1°
Luminous flux
361903lx@3m/130285lx@5m
Fuse
T 3.15 A, 250 V
Device dimensions 380x207x516mm
Net Weight 25.5KG
Table of contents