FXA FXALD1802 User manual

FXA D1802
Instruction manual (Original instructions) GB pg 5-14
Käyttöohje (Alkuperäisten ohjeiden käännös) FI pg 15-23
Bruksanvisning (Översättning av originalinstruktionerna) SE pg 24-33
Bruksanvisning (Oversettelse av de opprinnelige instruksjonene) NO pg 34-43
Руководство пользователя (Перевод исходных инструкций) RU pg 44-54
Kasutusjuhend (Tõlgitud originaal juhendist) EE pg 55-63
Instrukcijas (Tulkojums no oriģinālvalodas) V pg 64-73
Instaliavimo instrukcijos (Vertimas originali instrukcija) T pg 74-83
Instrukcja obsługi (oryginalna instrukcja) P pg 84-94

2
(1)
10
1
(2) (3)
7
2 3 4
5
11
9
8
8
6

3
(4) (5)
(6) (7)
(8) (9)
(10) (11)

4
IMPORTANT! Read all safety warnings, instructions, illustrations and specifications provided with this
power tool.
TÄRKEÄÄ! Lue tarkkaavaisesti kaikki tämän työkalun kanssa toimitetut varoitukset, ohjeet ja
spesifikaatiot, ja katso lisäksi kuvat.
VIKTIGT! Läs uppmärksamt alla varningar, instruktioner och specifikationer som bifogas med
detta verktyg och studera bilderna.
VIKTIG! Les nøye gjennom alle advarslene, instruksene og spesifikasjonene som følger med
verktøyet, og se på tegningene.
ВАЖ О! Пpoчтитe вce yкaзaния, инcтpyкции, иллюcтpaции и cпeцификaции, поставляемые
c электроинструментом.
TÄHTIS! Lugege läbi kõik elektrilise tööriista kohta esitatud ohuhoiatused ning tutvuge
tööriista jooniste ja tehniliste andmetega.
SVARĪGI! Izlasiet visus drošības brīdinājumus, instrukcijas, specifikācijas un apskatiet attēlus šī
elektroinstrumenta dokumentācijā.
SVARBU! Perskaitykite visus saugos įspėjimus, visas instrukcijas, paveikslėlius ir techninius
reikalavimus, pateikiamus su šiuo elektriniu įrankiu.
WAŻNE! Prosimy przeczytać wszystkie dotyczące narzędzia ostrzeżenia i instrukcje oraz
przestudiować ilustracje i specyfikację.
(12) (13)
(14)

5
INTRODUCTION
Thankyou for purchasing this product which has
passed through our extensive quality assurance
process. Every care has been taken to ensure that it
reaches you in perfect condition.
SAFETY FIRST
Before attempting to operate this power tool the
following basic safety precautions should always be
taken to reduce the risk of fire, electric shock and
personal injury. It is important to read the instruction
manual to understand the application, limitations and
potential hazards associated with this tool.
CERTIFICATE OF GUARANTEE
This product is guaranteed for a period of 2 Years,
with effect from the date of purchase and applies only
to the original purchaser. This guarantee only applies
to defects arising from, defective materials and or
faulty workmanship that become evident during the
guarantee period only and does not include
consumable items. The manufacturer will repair or
replace the product at their discretion subject to the
following. That the product has been used in
accordance with the guide lines as detailed in the
product manual and that it has not been
subjected to misuse, abuse or used for a purpose for
which it was not intended. That it has not been taken
apart or tampered with in any way whatsoever or has
been serviced by unauthorised persons or has been
used for hire purposes. Transit damage is excluded
from this guarantee, for such damage the transport
company is responsible. Claims made under this
guarantee must be made in the first instance, directly
to the retailer within the guarantee period. Only under
exceptional circumstances should the product be
returned to the manufacturer. In these case it shall be
the consumer’s responsibility to return the product at
their cost ensuring that the product is adequately
packed to prevent transit damage and must be
accompanied with a brief description of the fault and
a copy of the receipt or other proof of purchase. The
manufacturer shall not be liable for any special,
exemplary, direct, indirect, incidental, or consequential
loss or damage under this guarantee. This guarantee
is in addition to and does not affect any rights, which
the consumer may have by virtue of the Sale of Goods
Act 1973 as amended 1975 and 1999.
STATUTORY RIGHTS
This guarantee is in addition to and in no way affects
your statutory rights.
PRODUCT DISPOSA
When this product reaches the end of it’s life or is
disposed of for any other reason, it must not be
disposed of in household waste. In order to preserve
natural resources, and to minimise adverse
environmental impact, please recycle or dispose of
this product in an environmentally friendly way. It
should be taken to your local waste recycling centre
or other authorised collection and disposal facility.
If in doubt consult your local waste authority for
information regarding available recycling and / or
disposal options.
IMPORTANT INFORMATION ABOUT THIS
PRODUCT
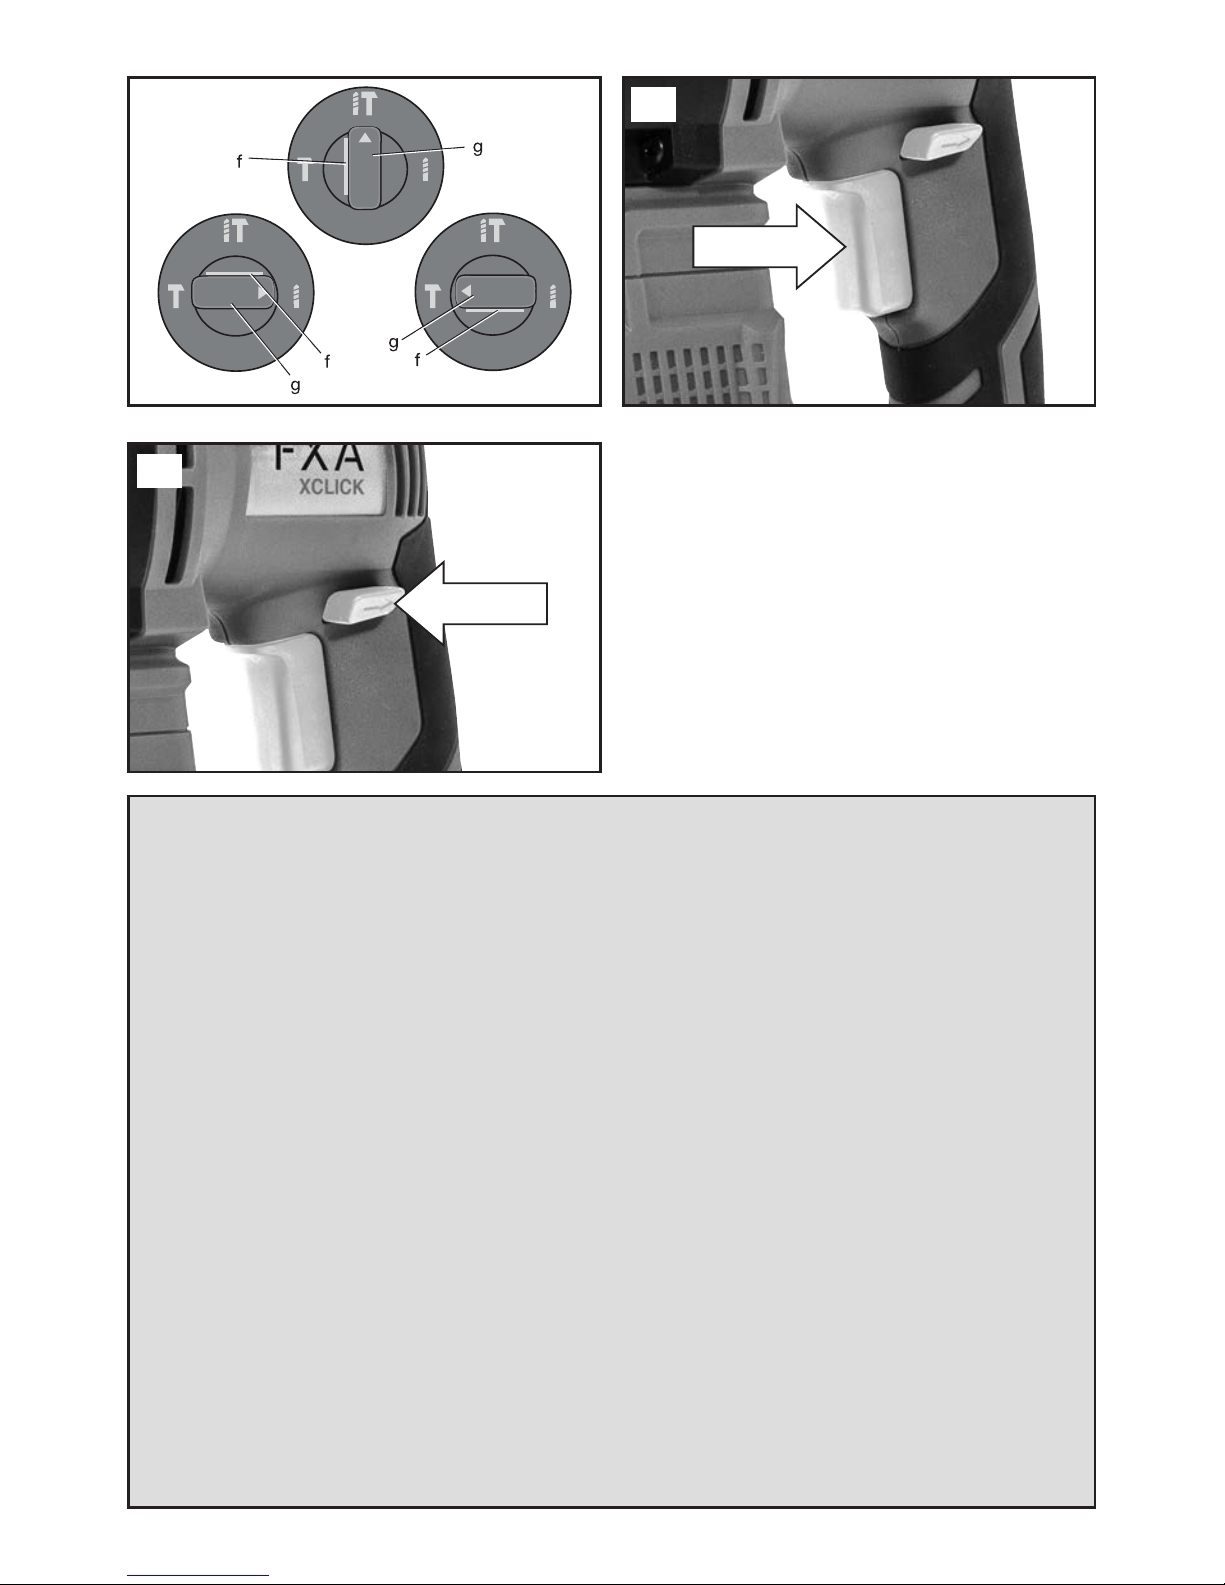
This product is specifically designed to work with the
XA XCLICK range of batteries and charger.
SPECIFIC SAFETY INSTRUCTIONS
Wear ear protectors. Exposure to noise can cause
hearing loss.
Use auxiliary handle supplied with the tool. Loss of
control can cause personal injury.
Hold power tool by insulated gripping surfaces, when
performing an operation where the cutting accessory
may contact hidden wiring or its own cord. Cutting
accessory contacting a “live” wire may make exposed
metal parts of the power tool “live” and could give the
operator an electric shock.
When using this product it is essential that the
following rules for use are followed:
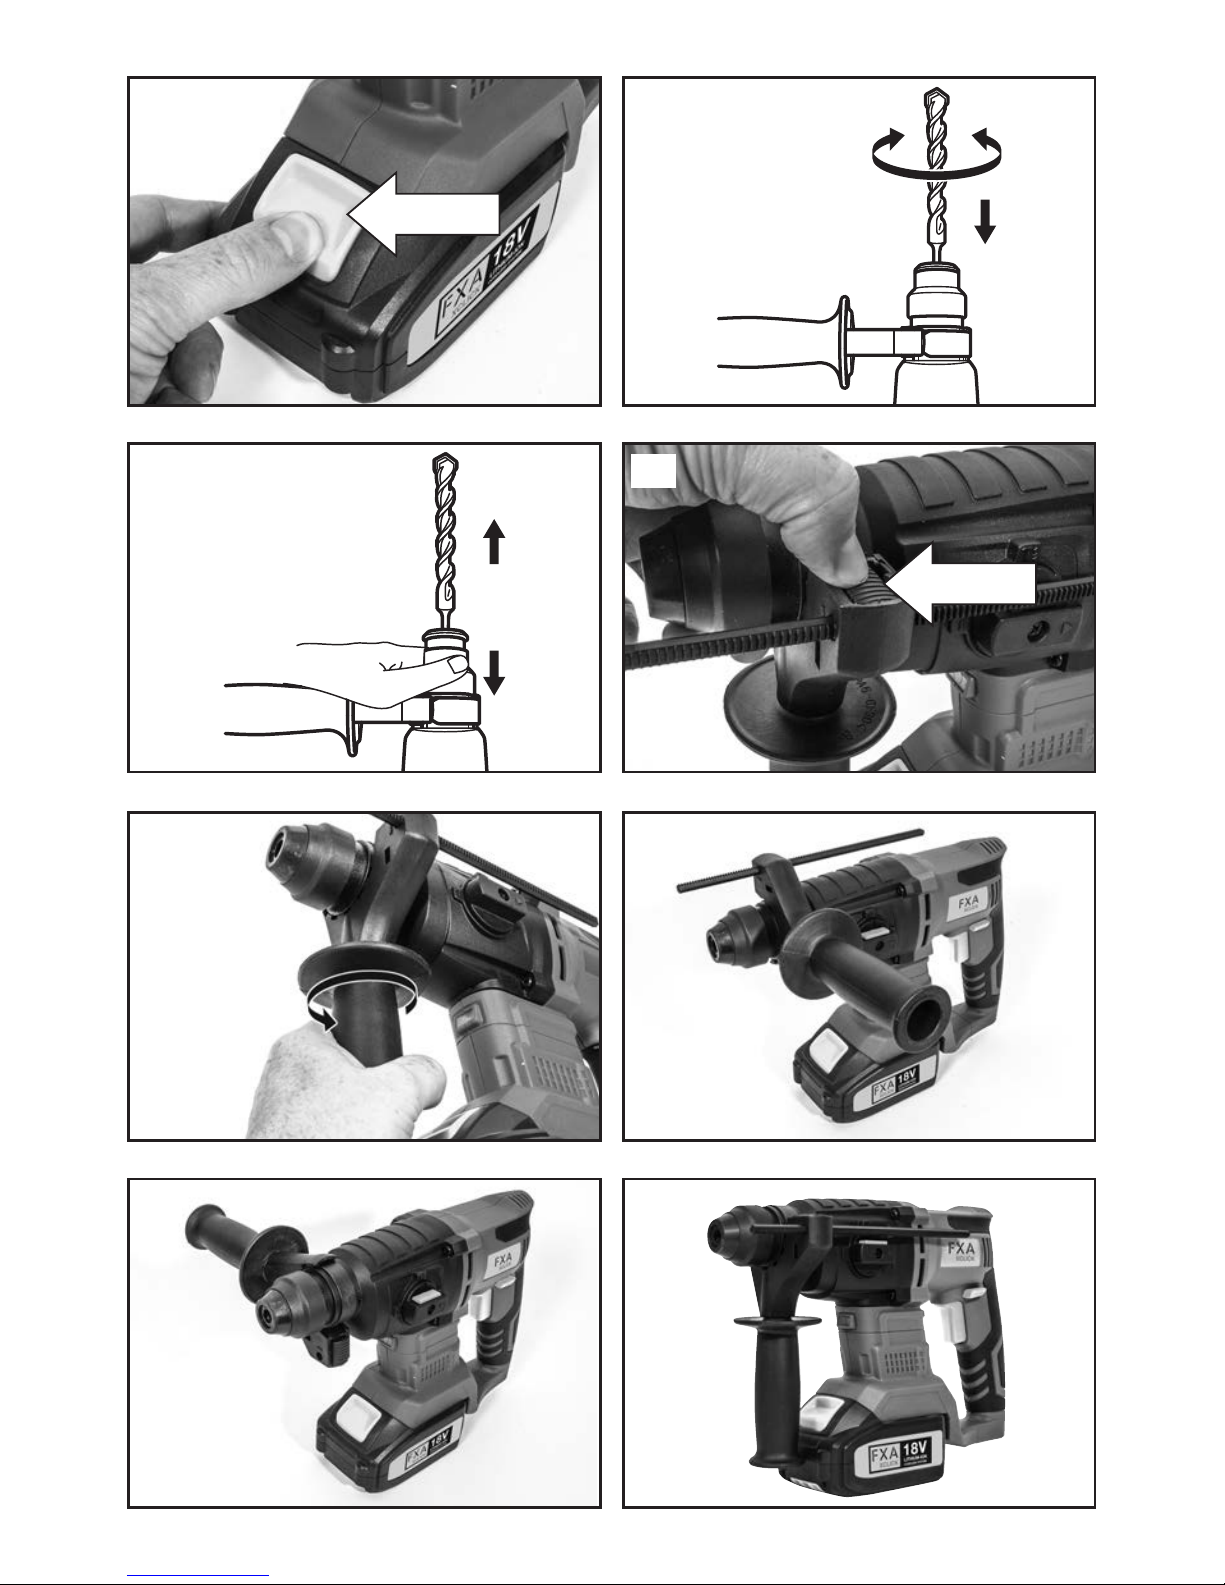
When drilling it is common that the core / drill bit jams
in the material being drilled. This will result in the
product trying to rotate around the drill bit and
potentially come out of your grip. This product has a
safety clutch mechanism. This safety clutch
mechanism will be activated and stop the drive to the
drill bit BUT only if you resist the initial forces caused
by the jamming by securely holding the product with
both hands.
ALWAYS ensure that the auxiliary handle is firmly
affixed and secured.
The auxiliary and main handle must be firmly held to
resist any movement of the product when the core
drill or drill bit becomes jammed.
ALWAYS use this product when standing on a firm
and secure platform or the ground. (DO NOT USE ON
LADDERS OR STEPS.)
NEVER start the product with the core or drill bit
jammed in position.
DO NOT stretch to hold the product. Do not work
above shoulder height or below knee height, as the
product cannot be securely held.
VIBRATION AND NOISE REDUCTION
To reduce the impact of noise and vibration emission,
limit the time of operation, use low-vibration and low-
noise operating modes as well as wear personal
protective equipment.
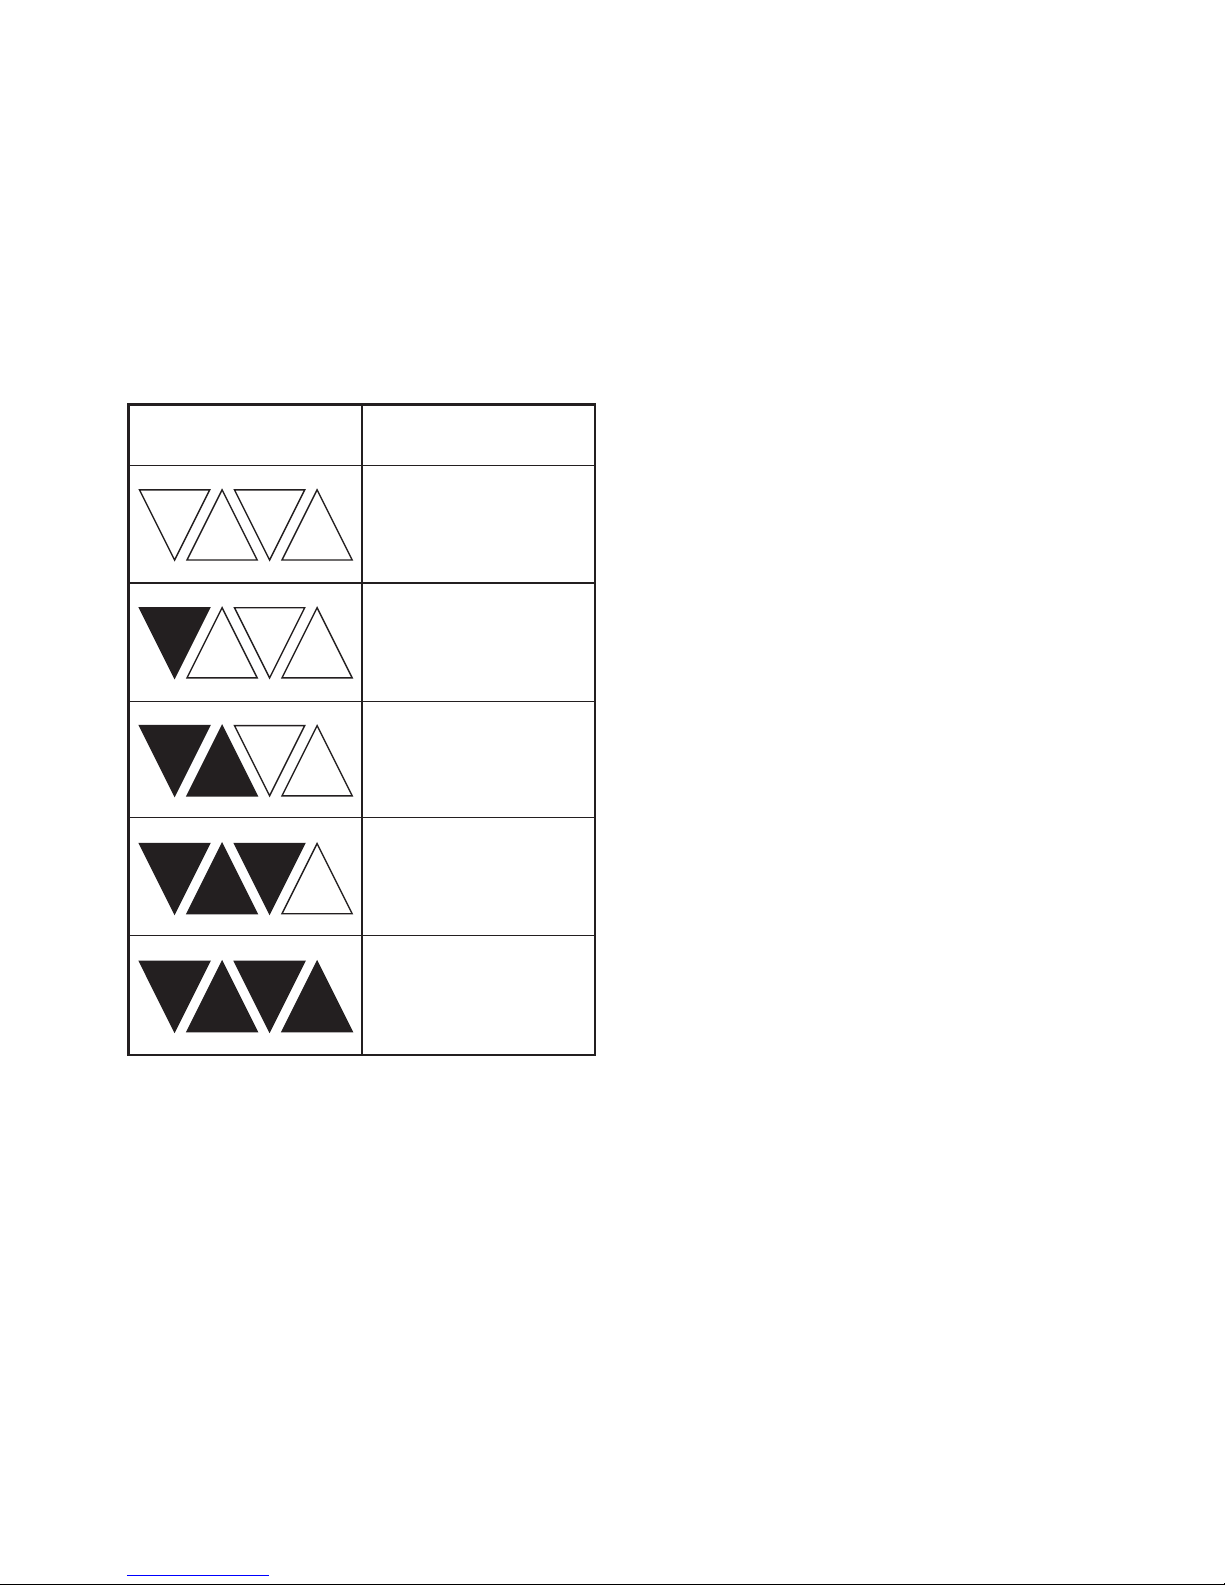
Charger Battery
(Not Included) (Not Included)
XADL1051 XAJDB180Li
XAJDB180Li-II

6
Take the following points into account to minimise the
vibration and noise exposure risks:
Only use the product as intended by its design and
these instructions.
Ensure that the product is in good condition and well
maintained.
Use correct cutting attachments for the product and
ensure they are in good condition.
Keep tight grip on the handles/grip surface.
Maintain this product in accordance with these
instructions and keep lubricated (where appropriate).
Plan your work schedule to spread any high vibration
tool use across a longer period of time.
EMERGENCY
amiliarise yourself with the use of this product by
means of this instruction manual. Memorise the safety
directions and follow them to the letter. This will help
to prevent risks and hazards.
Always be alert when using this product, so that you
can recognise and handle risks early. ast intervention
can prevent serious injury and damage to property.
Switch off and disconnect the battery if there are
malfunctions. Have the product checked by a qualified
professional and repaired, if necessary, before you
operate it again.
RESIDUA RISKS
Even if you are operating this product in accordance
with all the safety requirements, potential risks of
injury and damage remain. The following dangers can
arise in connection with the structure and design of
this product:
Health defects resulting from vibration emission if the
product is being used over long periods of time or not
adequately managed and properly maintained.
Injuries and damage to property due to broken cutting
attachments or the sudden impact of hidden objects
during use.
Danger of injury and property damage caused by
flying objects.
ADDITIONA SAFETY RU ES CHARGERS
1. Before using the charger, read all the instructions
and cautionary markings on the charger and battery
pack as well as the instructions on using the battery
pack.
2. Only charge your batteries indoors as the charger is
designed for indoor use only.
3. DANGER! If the battery pack is cracked or
damaged in any other way, do not insert it in the
charger. There is a danger of electric shock or
electrocution.
4. WARNING! Do not allow any liquid to come into
contact with the charger. There is a danger of electric
shock.
5. The charger and battery packs supplied with it are
specifically designed to work together. Do not attempt
to charge the battery pack with any other charger than
the one supplied.
6. Do not pull on the power cord to disconnect it from
the mains supply socket.
7. Do not use the charger if it has been subjected to a
heavy knock, dropped or otherwise damaged in any
way. Take the charger to an authorised service centre
for a check or repair.
8. Do not disassemble the charger. Take it to an
authorised service centre when service or repair is
required. Incorrect re-assembly may result in the risk
of fire, electric shock or electrocution.
9. To reduce the risk of an electric shock, unplug the
charger from the power supply before attempting to
clean it. Removing the battery alone does not reduce
the risk.
ADDITIONA SAFETY RU ES FOR THE BATTERY
PACK
1. The battery pack for this tool has been shipped in a
low charge condition. You should charge the battery
pack fully before use.
2. Do not incinerate the battery pack even if it is
seriously damaged or can no longer hold a charge.
The battery pack can explode in a fire.
3. A small leakage of liquid from the battery pack may
occur under extreme usage or temperature conditions.
This does not necessarily indicate a failure of the
battery pack. However, if the outer seal is broken and
this leakage comes into contact with your skin wash
the affected area quickly with soap and water. If the
leakage gets in your eyes flush your eyes with clean
water for a minimum of 10 minutes and seek
immediate medical attention.
Inform the medical staff that the liquid is a 25-35%
solution of potassium hydroxide.
4. Never attempt to open the battery pack for any
reason. If the plastic housing of the battery pack
breaks open or cracks, immediately discontinue its
use and do not recharge it.
5. Do not store or carry a spare battery pack in a
pocket or toolbox or any other place where it may
come into contact with metal objects. The battery
pack may be short- circuited causing damage to the
battery pack, burns or a fire.
BATTERY CHARGING INFORMATION
Charging rates for NiCad and/or Li-Ion NiCad and/or
Li-Ion battery charging rates are determined by the
time taken to fully charge the battery and are
determined by the charge current. The three most
commonly used charging rates are typically:

7
BATTERY CHARGING INFORMATION
Charging rates for NiCad and/or Li-Ion NiCad and/or
Li-Ion battery charging rates are determined by the
time taken to fully charge the battery and are
determined by the charge current. The three most
commonly used charging rates are typically:
ast charge.
Slow charge.
Trickle charge.
FAST CHARGE BATTERIES
The charging rates for fast charge batteries can vary
between 30 minutes and 90 minutes. The charging
rate for the battery supplied with a cordless power
tool is stated in the product manual.
S OW CHARGE BATTERY
The charging rates for slow charge batteries are
between 3 hours and 5 hours.
TRICK E CHARGE BATTERIES
The charging rates for trickle charge batteries are
between 7 hours and 9 hours.
IMPORTANT!
NICAD AND/OR I-ION BATTERY CHARGING
INFORMATION.
A WAYS FU Y DISCHARGE A NiCad and/or i-
Ion BATTERY BEFORE CHARGING AND NEVER
EXCEED THE CHARGING RATE TIME, EXCEPT
WHEN “CONDITIONING” A NEW BATTERY.
CHARGING PROCEDURE
When charging a new NiCad and/or Li-Ion battery it
should be fully discharged followed by a full charge
for the charging rate for the battery as stated in the
product manual plus 30 minutes. This should then be
followed by a full discharge and a further full charge
for the charging rate for the battery as stated in the
product manual plus 30 minutes. This procedure will
condition the battery and equalise the cell voltages.
ollowing this procedure will ensure the optimum
operation of the battery.
When repeatedly using the charger to charge a
number of batteries always allow the charger to cool
down before charging another battery. It is
recommended that the cooling down period is not
less than 30 to 45 minutes.
When charging a battery that has been discharged
during heavy use allow the battery to cool down
before charging. It is recommended that the cooling
down period is not less than 30 to 45 minutes.
NICAD AND/OR I-ION CHARGING & CHARGERS
NiCad and/or Li-Ion batteries need to be recharged
with a reasonable amount of care, largely because
they can be damaged by overcharging.
Overcharging can result in the battery temperature
and internal pressure to rise rapidly. This can cause
the cells to distort and lose electrolyte, and in extreme
cases where the internal pressure is extremely high
they can even explode.
This situation can also arise when an overcharged
battery is fitted to the product and is being used. In
order to avoid this extreme situation it is of vital
importance that NiCad and/or Li-Ion batteries are fully
discharged before charging and that the charge time
is not exceeded except when “Conditioning” a new
battery. Repeated charging of partially discharged
batteries could cause failure of one or more of the
cells.
SE F DISCHARGE
A lithium battery can self discharge and lose its stored
charge. Typically it can lose approximately 5% of its
charge in the first month after fully charging (when
stored at room temperature), and then loses it by a
further 3% per month. When stored at higher
temperatures the self discharge rate will be
accelerated.
BATTERY CHARGING INDOORS
This charger is designed to be used indoors. We do
not recommend that it is used inside your home.
Ideally batteries should be charged on a bench in a
workshop, garage or shed. If the charging operation is
to be carried out in your home the area must be well
ventilated and the charger must be placed on a non
combustible surface ensuring that the ventilation slots
are not blocked. Never exceed the charging time
except when “Conditioning” a new battery, as this
could damage the battery and charger.
BATTERY DISPOSA
When the battery fails to charge or maintain its
charge, its usable life is exhausted. To preserve
natural resources, please recycle or dispose of the
battery pack properly. This battery pack contains li-ion
cells. Before disposal ensure that the battery pack is
fully discharged by operating your cordless product
then remove the battery pack from the drill housing
and cover the battery pack connections with heavy
duty tape, to prevent short circuit and energy
discharge which could result in a fire. Do not attempt
to open or remove any of the components.
Consult your local waste authority for information
regarding available recycling and / or disposal
options.
SPECIFIC SAFETY INSTRUCTIONS
RE-CHARGEAB E BATTERIES.
Batteries may leak or explode if not charged or
handled correctly. Always observe the following
precautions when handling batteries. Ensure that the
machine is switched off before removing or fitting
batteries.
Do not use this battery with any other product.
Do not attempt to fit the battery the wrong way round.
Do not short out, or attempt to dismantle the battery.

8
Do not expose the battery to flames or excessive
heat.
Do not immerse in or expose the battery to water.
Do not store or transport the battery with loose metal
objects such drill and driver bits.
Batteries are prone to leakage when discharged. To
avoid damage to the product, remove or
re-charge the battery when no charge remains. Store
the battery in a cool place when not in use.
After prolonged use the battery may become hot.
Before removing the battery, switch the machine off
and allow the battery to cool down. Do not use the
battery if you notice any discoloration or distortion of
the battery casing.
GENERA SAFETY RU ES
WARNING! Read all instructions ailure to follow all
instructions listed below may result in electric shock,
fire and/or serious injury. The term "power tool" in all
of the warnings listed below refers to your mains
operated (corded) power tool or battery operated
(cordless) power tool.
SAVE THESE INSTRUCTIONS
1) WORK AREA
a) Keep work area clean and well lit. Cluttered and
dark areas invite accidents.
b) Do not operate power tools in explosive
atmospheres, such as in the presence of
flammable liquids, gases or dust. Power tools
create sparks which may ignite the dust or fumes.
c) Keep children and bystanders away while
operating a power tool. Distractions can cause you
to lose control.
2) E ECTRICA SAFETY
a) Power tool plugs must match the outlet. Never
modify the plug in any way. Do not use any
adapter plugs with earthed (grounded) power
tools. Unmodified plugs and matching outlets will
reduce risk of electric shock.
b) Avoid body contact with earthed or grounded
surfaces such as pipes, radiators, ranges and
refrigerators.
There is an increased risk of electric shock if your
body is earthed or grounded.
c) Do not expose power tools to rain or wet
conditions. Water entering a power tool will
increase the risk of electric shock.
d) Do not abuse the cord. Never use the cord for
carrying, pulling or unplugging the power tool.
Keep cord away from heat, oil, sharp edges or
moving parts. Damaged or entangled cords
increase the risk of electric shock.
e) When operating a power tool outdoors, use an
extension cord suitable for outdoor use. Use of a
cord suitable for outdoor use reduces the risk of
electric shock.
3) PERSONA SAFETY
a) Stay alert, watch what you are doing and use
common sense when operating a power tool. Do
not use a power tool while you are tired or under
the influence of drugs, alcohol or medication.
A moment of inattention while operating power
tools may result in serious personal injury.
b) Use safety equipment. Always wear eye
protection. Safety equipment such as dust mask,
non-skid safety shoes, hard hat, or hearing
protection used for appropriate conditions will
reduce personal injuries.
c) Avoid accidental starting. Ensure the switch is in
the off position before plugging in. Carrying power
tools with your finger on the switch or plugging in
power tools that have the switch on invites
accidents.
d) Remove any adjusting key or wrench before
turning the power tool on.
A wrench or a key left attached to a rotating part
of the power tool may result in personal injury.
e) Do not overreach. Keep proper footing and
balance at all times. This enables better control of
the power tool in unexpected situations.
f) Dress properly. Do not wear loose clothing or
jewellery. Keep your hair, clothing and gloves
away from moving parts. Loose clothes, jewellery
or long hair can be caught in moving parts.
g) If devices are provided for the connection of dust
extraction and collection facilities, ensure these
are connected and properly used. Use of these
devices can reduce dust related hazards.
4) POWER TOO USE AND CARE
a) Do not force the power tool. Use the correct
power tool for your application. The correct power
tool will do the job better and safer at the rate for
which it was designed.
b) Do not use the power tool if the switch does not
turn it on and off. Any power tool that cannot be
controlled with the switch is dangerous and must
be repaired.
c) Disconnect the plug from the power source before
making any adjustments, changing accessories, or
storing power tools. Such preventive safety
measures reduce the risk of starting the power
tool accidentally.
d) Store idle power tools out of the reach of children
and do not allow persons unfamiliar with the
power tool or these instructions to operate the
power tool. Power tools are dangerous in the
hands of untrained users.

9
e) Maintain power tools. Check for misalignment or
binding of moving parts, breakage of parts and
any other condition that may affect the power
tools operation. If damaged, have the power tool
repaired before use. Many accidents are caused
by poorly maintained power tools.
f) Keep cutting tools sharp and clean. Properly
maintained cutting tools with sharp cutting edges
are less likely to bind and are easier to control.
g) Use the power tool, accessories and tool bits etc.,
in accordance with these instructions and in the
manner intended for the particular type of power
tool, taking into account the working conditions
and the work to be performed. Use of the power
tool for operations different from intended could
result in a hazardous situation.
5) BATTERY TOO USE AND CARE
a) Recharge only with the charger specified by the
manufacturer. A charger that is suitable for one
type of battery pack may create a risk of fire when
used with another battery pack.
b) Use power tools only with specifically designated
battery packs. Use of any other battery packs may
create a risk of injury and fire.
c) When battery pack is not in use, keep it away from
other metal objects, like paper clips, coins, keys,
nails, screws or other small metal objects, that can
make a connection from one terminal to another.
Shorting the battery terminals together may cause
burns or a fire.
d) Under abusive conditions, liquid may be ejected
from the battery; avoid contact. If contact
accidentally occurs, flush with water. If liquid
contacts eyes, additionally seek medical help.
Liquid ejected from the battery may cause irritation
or burns.
6) SERVICE
a) Have your power tool serviced by a qualified repair
person using only identical replacement parts. This
will ensure that the safety of the power tool is
maintained.
UNPACKING
Caution! This packaging contains sharp objects. Take
care when unpacking. Remove the machine, together
with the accessories supplied, from the packaging.
Check carefully to ensure that the machine is in good
condition and account for all the accessories listed in
this manual.
Also make sure that all the accessories are complete.
If any parts are found to be missing, the machine and
its accessories should be returned together in their
original packaging to the retailer.
Do not throw the packaging away, keep it safe
throughout the guarantee period, then recycle if
possible, otherwise dispose of it by the proper means.
Do not let children play with empty plastic bags due
to the risk of suffocation.
COMPONENTS & CONTRO S (FIG 1)
CHARGING THE BATTERY PACK
Warning! Only charge in compatible 18V chargers.
Use of other chargers may result in fire, damage or
serious personal injury.
The battery pack for this tool has been shipped in a
low charge condition to prevent possible problems.
Therefore, you should charge it until the green LED on
the front right hand side of the charger comes on.
Note: Batteries will not reach full charge the first time
they are charged. Allow several cycles (operation
followed by recharging) for them to become fully
charged.
irst read the safety instructions then follow the
charging instructions.
Plug the charger into a standard 230V~50Hz mains
socket outlet, the green LED on the front left hand
side of the charger will illuminate.
Do not allow the cable to become knotted or kinked.
Place the battery pack into the charger base.
(Note the battery has raised ribs which allows it to fit
into the charger only one way). Time the charge for
60/130 minutes only.
2,0 Ah -battery, charge for 60 minutes
4,0 Ah -battery, charge for 130 minutes
The red LED on the front right hand side of the
charger will illuminate to indicate charging is in
progress. A green LED will illuminate when the battery
is fully charged.
Unplug the charger when not in use and store it in a
suitable storage cabinet.
Avoid charging your battery in freezing conditions as
charging power will not be sufficient.
1. SDS chuck
2. Depth stop
3. Depth stop locking button
4. Mode selector
5. orward/Reverse lever
6. On/Off Switch
7. Handle
8. SDS chisel bits x 2 ( lat & Point)
9. SDS drill bits x 3 (6, 8,10mm)
10. Auxiliary handle
11. Work light

10
When charging more than one battery pack in
succession allow at least 30 minutes for the charger
to cool down before charging an additional battery.
Always remove the battery pack and store it safely
when the tool is not in use.
Caution: If at any point during the charging process
none of the LEDs are lit, remove the battery pack from
the charger to avoid damaging the product. DO NOT
insert another battery.
CHARGE STATUS
To display the amount of charge left in the battery,
press the charge level indicator button, ig.2.
YOU WI NEED
(Items not supplied)
Suitable personal protective equipment
Battery
Charger
Keyed drill chuck
Chuck key
(Items supplied)
Auxiliary handle
Depth stop
SDS drill bits x 3
SDS chisel bits x 2
INSTA ING THE BATTERY PACK
Warning! Always remove battery pack from your tool
when you are assembling parts, making adjustments,
cleaning, carrying, transporting or when not in use.
Removing battery pack will prevent accidental starting
that could cause serious personal injury.
NOTE: To avoid serious personal injury, always
remove the battery pack and keep hands clear of the
lock-out button when carrying or transporting the tool.
Turn the auxiliary handle so it is out of the way of the
tool base. Slide the battery pack into the tool base,
ig.3. (Note the battery has raised ribs which allows it
to fit into the pole saw only one way). Make sure the
battery pack snaps into place and that battery pack is
secured in the tool before beginning operation.
Improper installation of the battery pack can cause
damage to internal components.
REMOVING THE BATTERY PACK
Turn the auxiliary handle so it is out of the way of the
tool base. Locate the battery release catch on the top
of the battery and press downwards, ig.4. Whilst
holding down the battery release catch slide the
battery pack away from the tool.
FITTING SDS BITS
Different drill bits can be used with this product
depending on the workpiece material and application
required.
Warning! Always use drill bits according to the
intended use. or example, never use a drill bit
intended for working on wood for working on stone or
vice versa.
Observe the technical requirements of this product
(see section “Technical specification”) when
purchasing and using drill bits.
Some drill bits are very sharp and become hot during
use.
Handle them carefully. Wear protective gloves when
handling cuts.
INSERTING SDS BITS
Apply a thin coating of grease to the splined drive
system (SDS) shank of the drill bit.
Insert the bit into the tool. Turn the bit and push it in
until it engages, ig.5.
After installing, always make sure that the bit is
securely held in place by trying to pull it out.
REMOVING SDS BITS
Pull the chuck sleeve backwards and remove the SDS
drill bit, ig.6.
Insert a new one as described above, if desired.
WOOD AND META DRI BITS
Warning! Do not use a keyed drill chuck for hammer
drilling or chiselling applications! It is intended
exclusively for drilling with drill bits for wood and
metal.
INSERTING
Note: A keyed drill chuck allows normal bits (non SDS
type) to be used with the product.
Charge level indicator Amount of charge
remaining
0-10%
10-25%
25-50%
50-75%
75-100%

11
o fit a keyed drill chuck (not supplied), turn the chuck
and push it in until it engages.
Insert a chuck key (not supplied) into one of the holes
on the keyed drill chuck and then turn the key
anticlockwise until the tool socket is opened wide
enough to insert the drill bit.
Insert the drill bit all the way to the stop.
Insert the chuck key into one of the holes on the
keyed drill chuck and then turn the chuck key
clockwise until the drill bit is securely fastened and
centred in the keyed drill chuck.
Warning! After short operation, switch the product off,
disconnect it from the battery and check once again
that the drill bit is properly fastened. Caution, the drill
bit could be hot.
REMOVING
Insert the chuck key into one of the holes on the
keyed drill chuck and then turn the chuck key
anticlockwise until the tool socket is opened wide
enough to pull out the drill bit.
DEPTH STOP
he depth gauge is convenient for drilling holes of
uniform depth. Push down the depth stop locking
button enough to allow the depth stop to be inserted
through the locating hole Fig.7.
Align the tip of the depth stop with the drill tip. Now
pull the depth stop back by the required drilling depth.
Release the depth stop locking button to fix the depth
stop in position.
AU ILIARY HANDLE
his drill is supplied with the auxiliary handle fitted, to
adjust the position of the auxiliary handle slacken the
handle by rotating it in an clockwise direction Fig.8.
Adjust the auxiliary handle so that you can hold the
product safely during operation (Fig.9 to 11).
Turn the auxiliary handle anti-clockwise to tighten the
clamp.
Warning! Never operate the product without the
auxiliary handle to avoid accidents and injury. Always
ensure that the auxiliary handle is attached and
secured correctly before operation. The auxiliary
handle provides better control of the product in case
of sudden jams during use when considerable forces
are released.
DRILLING MODES (FIG.12)
Caution: ool must come to a complete stop before
activating the mode selector button or damage to the
tool may result.
o select the operating mode, press mode selector
button (f) and turn the mode selector (g) so the arrow
points to the corresponding symbol.
Release the mode selector button and check that the
mode selector switch is locked in place.
Note: he arrow on the mode selector must be aligned
with one of the symbols at all times. here are no
operable positions between the positions.
ROTARY DRILLING MODE
Use rotary drilling mode for wood, metal, and
plastics.
HAMMER DRILL MODE
Use this mode for masonry drilling.
HAMMER ONLY MODE
For light chiseling.
VARIAB E SPEED CONTRO (FIG. 13)
Simply apply light pressure to the trigger to start the
drill on a slow speed. Increasing the pressure on the
switch will increase the speed of the drill.
Note: You might hear a high pitched noise from the
switch during use. Do not be concerned; this is a
normal part of the switch function.
FORWARD & REVERSE SWITCH
This feature is selected via a slide switch located
above the trigger, ig.14. To select direction of the
drill rotation simply push the button fully in on the left
side for reverse rotation. To change to forward
rotation push the button fully in on the right side of the
handle.
Note: As a safety precaution from accidental
engagement while being carried pushing the
forward/reverse button into the middle or neutral
position will render the drill inoperative.
Caution: To prevent gear damage, always allow the
chuck to come to a complete stop before changing
the direction of rotation.
Note: The drill will not run unless the direction of
rotation selector is pushed fully to the left or right.
Avoid running the drill at low speeds for extended
periods of time. Running at low speeds under
constant usage may cause the drill to become
overheated. If this occurs, cool the drill by running it
without a load and at full speed.
ED WORK IGHT
Caution: Do not look in the light or see the source of
light directly.
Pull the On/Off trigger to light up the lamp. The lamp
keeps on lighting while the switch trigger is being
pulled. The lamp goes out immediately after releasing
the trigger.
GENERA OPERATION
Check the product, its battery and charger as well as
accessories for damage before each use. Do not use
the product if it is damaged or shows wear.
Double check that accessories or drill bits are properly
fixed.

12
Always hold the product by its main handle and
auxiliary handle at all times. Keep the handle surfaces
dry to ensure safe support.
Ensure that the air vents are always unobstructed and
clean. Clean them if necessary with a soft brush.
Blocked air vents may lead to overheating and damage
the product.
Switch the product off immediately if you are disturbed
while working by other people entering the working
area. Always let the product come to complete stop
before putting it down.
Do not overwork yourself. Take regular breaks to
ensure you can concentrate on the work and have full
control over the product.
Warning! Keep in mind that there are buried objects
hidden in every household. Ensure that there are no
gas, water or power lines hidden in the working area
that may be hit before operation – danger of electrical
shock and serious damage to people and property.
Use a suitable detector to trace such objects in
advance!
DRI ING
Always hold the product perpendicular to the point to
be drilled.
Holding it at an angle may cause slipping or jamming
of the drill bit.
Always place the drill bit tip directly on the point to be
drilled first and then switch the product on.
Pre-drill larger holes with a small diameter drill bit first.
Doing so makes drilling with large diameter drill bits
easier.
HAMMER DRI ING MODE
Use this function to drill holes in masonry.
Note: In principle, drill masonry in the hammer drilling
operation mode. However, in the first few seconds of
operation, the drill bit may deviate from the original
desired position due to the hammer action. To avoid
this, turn the hammer function off and pre-drill the hole
in the drilling mode.
Choose the SDS drill chuck and set the mode selectors
to the correct position. Insert a suitable SDS drill bit.
DRI ING MODE
Use this function for drilling holes into wood, wood
similar materials, plastic or metal.
Choose the keyed drill chuck and set the mode
selectors to the correct position. Insert a suitable drill
bit.
Punch the drilling point before operation in order to
avoid slipping of the drill bit.
Use a metal drill bit for drilling into plastic and metal.
Where necessary use a cooling lubricant that is
available at your specialist dealer.
MAINTENANCE
Warning! Always switch the product off, remove the
battery and let the product cool down before
performing inspection, maintenance and cleaning work.
Keep the product clean. Remove debris from it after
each use and before storage.
Regular and proper cleaning will help ensure safe use
and prolong the life of the product.
Inspect the product before each use for worn and
damaged parts. Do not operate it if you find broken
and worn parts.
Warning! Only perform repairs and maintenance work
according to these instructions. All further works must
be performed by a qualified specialist.
GENERA C EANING
Clean the product with a dry cloth. Use a brush for
areas that are hard to reach.
Remove stubborn dirt with high pressure air (max. 3
bar).
Note: Do not use chemical, alkaline, abrasive or other
aggressive detergents or disinfectants to clean this
product as they might be harmful to its surfaces.
Check for worn or damaged parts. Replace worn parts
as necessary or contact an authorised service centre
for repair before using the product again.
UBRICATION
All of the bearings in this tool are lubricated with a
sufficient amount of high grade lubricant for the life of
the unit under normal operating conditions. Therefore,
no further lubrication is required.
REPAIR
This product does not contain any parts that can be
repaired by the consumer. Contact a qualified
specialist to have it checked and repaired.
STORAGE
Clean the product as described.
Store the product and its accessories in a dry, frost-
free place.
Always store the product in a place that is inaccessible
to children.
The ideal storage temperature is between 10°C and
30°C.
We recommend using the original package for storage
or covering the product with a suitable cloth to protect
it against dust.

13
TRANSPORTATION
Switch the product off and disconnect it from the
battery before transporting it anywhere.
Attach transportation guards, if applicable.
Always carry the product by its handles.
Protect the product from any heavy impact or strong
vibrations which may occur during transportation in
vehicles.
Secure the product to prevent it from slipping or
falling over.
TECHNICA SPECIFICATION
Voltage 18V DC
No load speed 0-1850 min-1
Impact rate 0-4800 min-1
Impact energy 2.0J
Drilling capacities
Wood 40mm
Steel 13mm
Masonry 18mm
Weight 2.0kg
Sound Pressure Level LpA 91 dB(A)
K=3dB(A)
Sound Power Level LWA 102 dB(A)
K=3dB(A)
Sound Pressure Level LpA 83 dB(A)
K=3dB(A)
Sound Power Level LWA 94 dB(A)
K=3dB(A)
Vibration Level ah(CHeq)=15.4/m/s2,
(Main handle) K=1.5m/s2
Vibration Level ah(CHeq)=12.9/m/s2,
(Auxiliary handle) K=1.5m/s22
Vibration Level ah(CHeq)=16.9/m/s2,
(Main handle) K=1.5m/s2
Vibration Level ah(CHeq)=15.7/m/s2,
(Auxiliary handle) K=1.5m/s2

14
SYMBO S
The rating plate on your tool may show symbols. These represent important information about the product or
instructions on its use.
ENVIRONMENTA PROTECTION
Information for (private householders) for the environmentally responsible disposal of Waste Electrical and
Electronic Equipment (WEEE)
This symbol on products and or accompanying documents indicates that used and end of life
electrical and electronic equipment should not be disposed of in household waste. or the
proper disposal, treatment, recovery and recycling, please take these products to designated
collection points, where they will be accepted on a free of charge basis. Alternatively, in some
countries you may be able to return your products to your retailer upon the purchase of an
equivalent new product. Disposing of this product correctly will help to save valuable resources
and prevent any potential adverse effects on human health and the environment which could
otherwise arise from inappropriate waste disposal and handling. Please contact your local
authority for further details of your nearest designated collection point. Penalties may be applicable for incorrect
disposal of this waste in accordance with national legislation.
FOR BUSINESS USERS IN THE EUROPEAN UNION.
If you wish to discard electrical and electronic equipment, please contact your dealer or supplier for further
information.
Information on Disposal in other Countries outside the European Union.
This Symbol is only valid in the European Union.
If you wish to dispose of this product, please contact your local authorities or dealer and ask for the correct
method of disposal.
Conforms to relevant safety
standards.
Read the instruction manual.
Product conforms to RoHs
requirements
Waste electrical products should
not be disposed of with
household waste. Please recycle
where facilities exist. Check with
your Local Authority or retailer for
recycling advice.
General warning
Wear hearing protection.
Wear eye protection.
Wear respiratory protection.
130°
Li-ion
Thermal link with operating
temperature
Contains Lithium Ion

15
ESITTE Y
Kiitos, että ostit tämän tuotteen, joka on läpäissyt
kattavan laatutarkastusprosessimme. Kaikki on tehty
sen varmistamiseksi, että saat sen täydellisessä
toimintakunnossa.
TURVA ISUUS ENSIN
Seuraavat perusvarotoimet on tehtävä ennen
sähkötyökalun käyttämistä tulipalojen, sähköiskujen ja
henkilövahinkojen estämiseksi. On tärkeää lukea nämä
käyttöohjeet, jotta ymmärrät tämän työkalun käytön,
siihen liittyvät rajoitukset ja potentiaaliset vaarat.
TAKUUTODISTUS
Tällä tuotteella on 2 vuoden takuu, joka alkaa
ostopäivästä ja koskee vain ensimmäistä ostajaa.
Tämä takuu kattaa vain virheet, jotka aiheutuvat
raaka-aine- ja valmistusvioista, ja jotka tulevat esille
takuuaikana. Takuu ei korvaa kuluvia osia. Valmistaja
korjaa tai vaihtaa tuotteen harkintansa mukaan
edellyttäen seuraavassa mainittuja asioita. Tuotetta on
käytetty käsikirjan ohjeiden mukaisesti, ja sitä ei ole
käytetty väärin tai huolimattomasti tai tarkoitukseen,
johon sitä ei ole tarkoitettu käytettäväksi. Laitetta ei
ole purettu osiin tai peukaloitu millään tavalla, sitä ei
ole huollatettu valtuuttamattomilla henkilöillä tai
käytetty vuokrauksen kohteena. Kuljetusvauriot eivät
kuulu tämän takuun piiriin. Niistä on vastuussa
kuljetusliike. Takuuvaateet on esitettävä ensisijaisesti
suoraan jälleenmyyjälle takuukauden aikana. Tuote
tulee palauttaa valmistajalle vain poikkeuksellisissa
tapauksissa. Näissä tapauksissa ostajan vastuulla on
tuotteen palauttaminen omalla kustannuksellaan ja
varmistaen, että se on asianmukaisesti pakattu
kuljetusvaurioiden estämiseksi. Mukaan tulee liittää
lyhyt kuvaus viasta ja kopio kuitista tai muusta
ostotodistuksesta. Valmistaja ei ole vastuussa mistään
erityisistä, esimerkillisistä, suorista, välillisistä,
satunnaisista tai epäsuorista menetyksistä tai
vahingoista takuun aikana. Tämä takuu tulee lisänä,
eikä vaikuta oikeuksiin, joita kuluttajalla saattaa olla
vuoden 1973 Tavaranmyyntilain ja siihen vuonna 1975
ja 1999 tehtyjen muutosten mukaisesti.
AKISÄÄTEISET OIKEUDET
Tämä takuu on lisänä, eikä vaikuta lakisääteisiin
oikeuksiisi.
TUOTTEEN HÄVITTÄMINEN
Kun tuotteen käyttöikä loppuu tai se hävitetään
jostakin muusta syystä, sitä ei saa hävittää
kotitalousjätteen mukana. Luonnonvarojen
säilyttämiseksi ja haitallisten ympäristövaikutusten
minimoimiseksi, kierrätä tuote tai hävitä muulla
ympäristöystävällisellä tavalla. Tuote tulee viedä
paikalliseen kierrätyskeskukseen tai muuhun
viralliseen keräily- ja hävityspisteeseen.
Jos olet epävarma, kysy kierrätys- ja/tai
hävittämisvaihtoehdoista paikalliselta jäteliikkeeltä.
TÄRKEITÄ TIETOJA TUOTTEESTA
Tuote on suunniteltu toimimaan XA XCLICK -sarjan
akkujen ja latureiden kanssa.
ERITYISET TURVA ISUUSOHJEET
Käytä kuulosuojaimia. Melulle altistuminen voi
aiheuttaa kuulon menetyksen.
Käytä lisäkahvaa, joka toimitetaan työkalun mukana.
Hallinnan menetys voi aiheuttaa henkilövahingon.
Pitele sähkötyökalua eristetystä tartuntapinnasta, kun
suoritat sellaisia toimintoja, joissa leikkuuväline voi
joutua kosketuksiin piilossa olevien johtojen tai
työkalun oman virtajohtonsa kanssa. Jännitteiseen
johtoon osuva leikkuuväline voi tehdä sähkötyökalun
näkyvät metalliosat jännitteisiksi ja käyttäjä voi saada
niistä sähköiskun.
Tätä laitetta käytettäessä on tärkeää noudattaa
seuraavia sääntöjä:
Porattaessa on yleistä, että ydin/poranterä jumittuu
porattavaan materiaaliin. Tästä seuraa se, että tuote
yrittää pyöriä poranterän ympäri ja saatat menettää
sen hallinnan. Tässä tuotteessa on
varmuuskytkinmekanismi. Tämä
varmuuskytkinmekanismi aktivoituu, ja se pysäyttää
poranterän, MUTTA vain jos vastustat jumittumisen
aiheuttamia voimia pitämällä tuotetta tukevasti
molemmin käsin.
Varmista AINA, että apukahva on kunnolla kiinnitetty ja
varmistettu.
Apukahvasta ja pääkahvasta on pidettävä kunnolla
kiinni, jotta pystyt vastustamaan tuotteen liikkeitä, jos
ydinpora tai poranterä jumittuu.
Seiso AINA tätä tuotetta käyttäessäsi vakaalla alustalla
tai maaperällä. (ÄLÄ KÄYTÄ TIKKAILLA TAI
PORTAILLA.)
Älä KOSKAAN käynnistä tuotetta ydin tai poranterä
jumittuneessa asennossa.
ÄLÄ kurkottele pitääksesi konetta. Älä työskentele
hartiatason yläpuolella tai polvien tason alapuolella,
koska silloin tuotetta ei voi pitää vakaasti.
TÄRINÄN JA ME UN VAIMENNUS
Voit vähentää melua ja tärinää rajoittamalla
käyttöaikaa, käyttämällä vähäisen tärinän ja vähäisen
melun toimintatiloja sekä käyttämällä
henkilönsuojaimia.
Ota seuraavat kohdat huomioon tärinä- ja
meluvaarojen vähentämiseksi:
Käytä tuotetta vai siten kuin se on suunniteltu ja
näiden ohjeiden mukaisesti.
aturi Akku
(ei ole mukana) (ei ole mukana)
XADL1051 XAJDB180Li
XAJDB180Li-II

16
Varmista, että tuote on hyvässä kunnossa ja hyvin
huollettu.
Käytä tuotteelle tarkoitettuja leikkuuvarusteita ja
varmista, että ne ovat hyvässä kunnossa.
Pidä vakaasti kiinni kahvoista/tartuntapinnasta.
Huolla tuotetta ohjeiden mukaan ja huolehdi sen
voitelusta (mikäli sovellettavissa).
Suunnittele työaikataulusi siten, että voit jakaa
tärisevällä työkalulla työskentelyn pidemmälle
ajanjaksolle.
HÄTÄTI ANNE
Tutustu tämän tuotteen käyttöön käyttöoppaan avulla.
Muista turvallisuusohjeet ja noudata niitä
kirjaimellisesti. Tämä auttaa välttämään riskit ja vaarat.
Ole aina valppaana tuotetta käyttäessäsi, siten voit
tunnistaa riskit ajoissa ja käsitellä ne oikein. Nopea
puuttuminen voi estää vakavan henkilövahingon tai
omaisuusvahingon.
Sammuta ja irrota akku, jos ilmenee toimintahäiriöitä.
Tarkastuta laite ammattihenkilöllä ja korjauta se, mikäli
tarpeen, ennen kuin käytät sitä uudelleen.
JÄÄNNÖSRISKIT
Vaikka käyttäisit tuotetta kaikkien turvamääräysten
mukaisesti, joitakin onnettomuus- ja
omaisuusvahinkoriskejä ei voida välttää. Seuraavia
vaaroja voi esiintyä tuotteen rakenteesta ja
suunnittelusta johtuen:
Tärinästä aiheutuvat terveydelliset ongelmat, jos
tuotetta käytetään pitkiä aikoja tai jos sitä ei hoideta
asianmukaisesti ja huolleta oikealla tavalla.
Henkilö- ja omaisuusvahingot rikkoutuneiden
leikkuutyökalujen tai piilossa oleviin kohteisiin
äkillisesti osumisen takia.
Sinkoutuvien esineiden aiheuttamat henkilö- ja
omaisuusvahingot.
ATUREIDEN ISÄTURVAOHJEET
Lue ennen laturin käyttämistä kaikki ohjeet ja laturin ja
akun varoitusmerkinnät sekä myös akun käyttämistä
koskevat ohjeet.
Lataa akkuja vain sisätiloissa, sillä laturi on suunniteltu
vain sisäkäyttöön.
VAARA! Jos akku on murtunut tai jollain tavalla
vaurioitunut, älä laita sitä laturiin. Se aiheuttaa
sähköiskun tai tappavan sähköiskun vaaran.
VAROITUS! Älä päästä laturiin mitään nesteitä. Se
aiheuttaa sähköiskun vaaran.
Laturi ja sen mukana toimitettu akku on varta vasten
valmistettu toimimaan yhdessä. Älä yritä ladata akkua
muilla latureilla kuin laitteen mukana tulevalla.
Älä irrota virtajohtoa pistorasiasta johdosta vetämällä.
Älä käytä laturia, jos siihen on kohdistunut voimakas
isku, se on pudonnut tai vaurioitunut muulla tavalla.
Vie laturi valtuutettuun huoltoliikkeeseen
tarkastettavaksi tai korjattavaksi.
Älä pura laturia. Vie se valtuutettuun huoltoliikkeeseen,
jos se vaatii huoltamista tai korjauksia. Virheellinen
kokoaminen voi aiheuttaa tulipalon, sähköiskun tai
tappavan sähköiskun.
Voit vähentää sähköiskun vaaraa irrottamalla laturin
virtalähteestä, ennen kuin yrität sen puhdistamista.
Yksinään akun poistaminen ei vähennä tätä vaaraa.
AKKUA KOSKEVAT ISÄTURVAOHJEET
Työkalun akku toimitetaan alhaisen latauksen tilassa.
Sinun tulee ladata akku täyteen ennen laitteen
käyttämistä.
Älä polta akkua vaikka se olisi pahasti vaurioitunut tai
se ei pitäisi enää varausta. Akku voi räjähtää tulessa.
Akussa voi olla pientä nestevuotoa äärimmäisessä
käytössä tai äärimmäisissä lämpötiloissa. Tämä ei
välttämättä merkitse akun toimintahäiriötä. Jos
ulkokuori on kuitenkin rikkoutunut ja vuotavaa
akkunestettä pääsee ihollesi, pese altistunut alue
nopeasti saippualla ja vedellä. Jos akkunestettä
pääsee silmiisi, huuhtele silmiä puhtaalla vedellä
vähintään 10 minuuttia ja hakeudu välittömästi
lääkäriin.
Ilmoita hoitohenkilökunnalle, että neste on 25–35 %
liuos kaliumhydroksidia.
Älä koskaan yritä avata akkua mistään syystä. Jos
akun muovinen kotelo rikkoutuu tai murtuu, lopeta heti
akun käyttö, äläkä lataa sitä enää uudelleen.
Älä säilytä tai kuljeta vara-akkua taskussa,
työkalulaatikossa tai muussa paikassa, jossa se
pääsee kosketuksiin metalliesineiden kanssa. Akku voi
joutua oikosulkuun, joka vaurioittaa akkua, aiheuttaa
palovammoja tai tulipalon.
TIETOA AKUN ATAAMISESTA
NiCad ja/tai Li-ion NiCad ja/tai Li-Ion-akkujen
lataustehot määrittää aika, jonka akun täyteen
lataaminen kestää. Tähän aikaan vaikuttaa latausvirta.
Kolme yleisintä lataustehoa ovat:
Nopea lataus.
Hidas lataus.
Ylläpitolataus.
NOPEASTI ADATTAVAT AKUT
Nopeasti ladattavien akkujen latausaika voi vaihdella
30 minuutin ja 90 minuutin välillä. Akkukäyttöisen
sähkötyökalun mukana tulevan akun latausaika on
merkitty tuotteen käyttöoppaaseen.
HITAASTI ADATTAVAT AKUT
Hitaasti ladattavien akkujen latausaika on 3 tunnin ja 5
tunnin välillä.
AKKUJEN Y ÄPITO ATAUS
Akkujen ylläpitolatauksen latausaika on 7 tunnin ja 9
tunnin välillä.

17
TÄRKEÄÄ!
NICAD- JA/TAI I-ION-AKKUJA KOSKEVAA
ATAUSTIETOJA
PURA NICAD- JA/TAI I-ION-AKKU AINA
KOKONAAN ENNEN ATAAMISTA, Ä ÄKÄ
KOSKAAN Y ITÄ ATAUSAIKAA PAITSI JOS
KYSEESSÄ ON UUDEN AKUN ”KUNNOSTUS”.
ATAUSMENETTE Y
Ladattaessa uutta NiCad- ja/tai Li-Ion-akkua, se tulee
purkaa aivan tyhjäksi ja ladata sen jälkeen aivan
täyteen akun latausajan mukaisesti, joka on ilmoitettu
tuotteen käyttöoppaassa plus 30 minuuttia. Tämän
jälkeen se tulee purkaa uudelleen aivan tyhjäksi ja
ladata sen jälkeen uudelleen aivan täyteen akun
latausajan mukaisesti, joka on ilmoitettu tuotteen
käyttöoppaassa plus 30 minuuttia. Tämä toimenpide
kunnostaa akun ja tasoittaa kennojännitteet. Tämä
toimenpide varmistaa akun optimaalisen toiminnan.
Jos käytät laturia toistuvasti useamman akun
peräkkäiseen lataamiseen, anna laturin jäähtyä
akkujen välillä. On suositeltavaa, että jäähtymisjakso
kestää vähintään 30–45 minuuttia.
Kun lataat akkua, joka on purkaantunut kovassa
käytössä, anna akun jäähtyä ennen lataamista. On
suositeltavaa, että jäähtymisjakso kestää vähintään
30–45 minuuttia.
NICAD- JA/TAI I-ION-AKKUJEN ATAAMINEN JA
ATURIT
NiCad- ja/tai Li-Ion-akkujen lataus on tehtävä
huolellisesti, koska ylilataaminen voi vaurioittaa niitä.
Ylilataus voi nostaa akun lämpötilaa ja sisäinen paine
voi nousta äkisti. Tämä voi aiheuttaa kennojen
vääntymistä ja elektrolyytin vuotoa, sekä niissä
äärimmäisissä tapauksissa, joissa sisäinen paine on
erittäin korkea, akut voivat räjähtää.
Tämä voi tapahtua myös, jos yliladattu akku
kiinnitetään laitteeseen ja laitetta aletaan käyttää.
Näiden äärimmäisten tilanteiden välttämiseksi on
tärkeää, että NiCad- ja/tai Li-Ion-akut tyhjennetään
täysin ennen latausta ja latausaika ei ylitä ilmoitettua
paitsi uuden akun ”kunnostuksessa”. Toistuva vain
osittain purkautuneiden akkujen lataaminen voi
aiheuttaa yhden tai useamman kennon toimintahäiriön.
ITSEPURKAUS
Litiumakku voi purkautua itsestään ja menettää
ladatun varauksen. Yleensä akku menettää noin 5 %
latauksesta ensimmäisen kuukauden aikana täyteen
lataamisen jälkeen (säilytettäessä huonelämpötilassa)
ja sen jälkeen 3 % kuukaudessa. Jos akkua
säilytetään korkeammassa lämpötilassa, itsepurkaus
nopeutuu.
AKUN ATAAMINEN SISÄTI OISSA
Tämä laturi on suunniteltu sisäkäyttöön. Emme
suosittele sen käyttämistä kuitenkaan asuintiloissa.
Akut olisi parasta ladata verstaan pöydällä,
autotallissa tai vajassa. Jos akku on pakko ladata
asuintiloissa, tilan pitää olla hyvin ilmastoitu ja laturi
tulee asettaa syttymättömälle alustalle varmistaen,
että ilmanvaihtoaukot ovat esteettömät. Älä koskaan
ylitä latausaikaa, paitsi uuden akun ”kunnostuksessa”,
sillä se voi vaurioittaa akkua ja laturia.
AKUN HÄVITTÄMINEN
Kun akku ei enää lataudu tai lataus ei pysy, akun
käyttöaika on loppunut. Kierrätä akku luonnon
resurssien säästämiseksi tai hävitä akku
asianmukaisesti. Tässä akussa on li-ion kennot.
Varmista ennen hävittämistä, että akku on täysin
purkautunut käyttämällä akkukäyttöistä työkalua.
Poista akku sitten työkalusta ja peitä akun liitännät
vahvalla teipillä, joka estää oikosulun syntymisen ja
sähkövirran purkautumisen, mikä voisi aiheuttaa
tulipalon. Älä yritä avata tai poistaa mitään
komponentteja.
Saat lisätietoja kierrättämisestä ja/tai
hävitysvaihtoehdoista ottamalla yhteyden paikallisiin
jätehuoltoviranomaisiin.
ERITYISET TURVAOHJEET
ADATTAVAT AKUT.
Akut voivat vuotaa tai räjähtää, jos niitä ei ladata ja
käsitellä oikein. Noudata akkujen käsittelyssä aina
seuraavia varotoimia. Varmista, että kone on kytketty
pois päältä ennen akun irrottamista tai kiinnittämistä.
Älä käytä tätä akkua minkään muun laitteen kanssa.
Älä yritä kiinnittää akkua väärinpäin.
Älä oikosulje tai yritä purkaa akkua.
Älä altista akkua liekeille tai korkeille lämpötiloille.
Älä upota akkua veteen tai altista sitä vedelle.
Älä säilytä tai kuljeta akkua irrallisten metalliesineiden,
kuten poranterien, kanssa.
Akut voivat vuotaa, kun niitä puretaan. Vältä laitteen
vioittuminen poistamalla tai lataamalla akku, kun
varausta ei ole enää jäljellä. Säilytä akku viileässä
paikassa, kun se ei ole käytössä.
Akku saattaa kuumentua pitkäaikaisen käytön jälkeen.
Kytke kone pois päältä ennen kuin irrotat akun ja anna
akun jäähtyä. Älä käytä akkua, jos huomaat akun
kotelossa värjäytymiä tai vääntymiä.
Y EISET TURVA ISUUSSÄÄNNÖT
VAROITUS! Lue kaikki ohjeet
Alla olevien ohjeiden noudattamatta jättäminen voi
aiheuttaa sähköiskun, tulipalon ja/tai vakavan
vamman. Käsite ”sähkötyökalu” kaikissa alla
luetelluissa varoituksissa viittaa työkaluun tai
akkukäyttöiseen (johdottomaan) sähkötyökaluun.
PIDÄ NÄMÄ OHJEET TA E A
1) TYÖA UE
a) Pidä työalue puhtaana ja hyvin valaistuna.
Roskaiset tai pimeät alueet lisäävät
onnettomuusriskiä.

18
b) Älä käytä työkaluja ympäristöissä, joissa on
räjähdysvaara, kuten helposti syttyvien nesteiden,
kaasujen tai pölyn läsnä ollessa. Työkalut
synnyttävät kipinöitä, jotka voivat sytyttää pölyn tai
höyryt tuleen.
c) Pidä lapset ja sivulliset poissa työkalua
käytettäessä. Häiriötekijät voivat haitata
keskittymistä.
2) SAHKÖTURVA ISUUS
a) Sähkötyökalun pistokkeiden tulee vastata
pistorasiaa. Älä koskaan muuta pistoketta millään
tavalla. Älä käytä sovitinpistokkeita maadoitettujen
sähkötyökalujen kanssa. Muuttamattomat
pistokkeet ja yhteensopivat pistorasiat vähentävät
sähköiskun vaaraa.
b) Vältä vartalokosketusta maadoitettuihin pintoihin
kuten putkiin, lämmittimiin, liesiin tai jääkaappeihin.
Sähköiskun vaara kasvaa, jos vartalosi on
maadoitettu.
c) Suojaa sähkötyökalut sateelta ja kosteudelta.
Sähkötyökalun sisään päässyt vesi lisää
sähköiskun vaaraa.
d) Älä käytä johtoa väärin. Älä koskaan käytä johtoa
sähkötyökalun kantamiseen, vetämiseen tai
irrottamiseen pistorasiasta. Pidä johto kaukana
lämmöstä, öljystä, terävistä reunoista ja liikkuvista
osista. Vaurioituneet tai sotkeutuneet johdot
lisäävät sähköiskun vaaraa.
e) Kun sähkötyökalua käytetään ulkotiloissa, käytä
jatkojohtoa, joka soveltuu ulkokäyttöön.
Ulkokäyttöön sopivan johdon käyttö vähentää
sähköiskun vaaraa.
3) HENKI ÖTURVA ISUUS
a) Pysy valppaana, katso mitä teet ja käytä tervettä
järkeä käyttäessäsi työkalu. Älä käytä työkalu
ollessasi väsynyt tai huumeiden, alkoholin tai
lääkkeiden vaikutuksen alaisena. Hetkellinen
epähuomio työkalu käytettäessä voi johtaa
vakaviin henkilövammoihin.
b) Käytä suojavarustusta. Käytä aina suojalaseja.
Turvavarustus kuten hengityssuojain,
liukumattomat turvajalkineet, suojakypärä tai
kuulosuojain käytettynä asianmukaisissa
olosuhteissa vähentää henkilövammoja.
c) Vältä vahinkokäynnistyksiä. Varmista, että kytkin
on off-asennossa (sammutettuna) ennen virran
kytkemistä. Työkalun kantaminen sormi kytkimellä
tai virran kytkeminen päälle työkaluihin, joiden
kytkin on päällä, voi aiheuttaa onnettomuuksia.
d) Poista säätöavaimet tai jakoavaimet ennen
työkalun käynnistämistä. Jako- tai muu avain, joka
on jätetty kiinni työkalun pyörivään osaan voi
aiheuttaa henkilövamman.
e) Älä kurkottele. Pidä asianmukainen jalansija ja
tasapaino kaiken aikaa. Tämä mahdollistaa
työkalun paremman hallinnanodottamattomissa
tilanteissa.
f) Pukeudu asianmukaisesti. Älä pidä löysiä vaatteita
tai koruja. Pidä hiuksesi, vaatteesi ja käsineesi
poissa liikkuvista osista. Löysät vaatteet, korut tai
pitkä tukka voivat jäädä kiinni liikkuviin osiin.
g) Jos pölynpoistoon tai keräyslaitteisiin kytkettäviä
laitteita on toimitettu, varmista, että ne on kytketty
ja niitä käytetään asianmukaisesti. Näiden
laitteiden käyttö voi vähentää pölyyn liittyviä
vaaroja.
4) TYÖKA UN KÄYTTÖ JA HUO TO
a) Älä käytä voimaa työkaluun. Käytä
käyttötarkoitukseesi soveltuvaa työkalua.
Asianmukainen työkalu toimii paremmin ja
turvallisemmin teholla, jolla se on suunniteltu.
b) Älä käytä työkalua, jos kytkin ei käännä sitä päälle
ja pois päältä. Työkalu, jota ei voida kontrolloida
kytkimestä on vaarallinen, ja se tulee korjata.
c) Säilytä seisovat työkalut poissa lasten ulottuvilta,
äläkä anna henkilöiden, jotka eivät tunne työkalua
tai näitä ohjeita, käyttää työkalua. Työkalut ovat
vaarallisia kouluttamattomien käyttäjien käsissä.
d) Pidä työkalut kunnossa. Tarkasta liikkuvien osien
kohdistusvirheet tai kiinnitykset, osien murtumat ja
muut seikat, jotka voivat vaikuttaa sähkötyökalujen
käyttöön. Jos työkalu on vaurioitunut, korjauta se
ennen käyttöä. Monet onnettomuudet aiheutuvat
huonosti kunnossapidetyistä työkaluista.
e) Pidä leikkaustyökalut terävinä ja puhtaina.
Asianmukaisesti kunnossapidetyt leikkaustyökalut,
joissa on terävät leikkausreunat, eivät juutu
helposti ja niiden käsittely on helpompaa.
f) Käytä työkalua, lisävarusteita ja työkalupaloja tms.
näiden ohjeiden mukaisesti ja tavalla, johon
kyseessä oleva sähkötyökalu on tarkoitettu, ottaen
huomioon työolosuhteet ja suoritettava työ.
Työkalun käyttö toimintoihin, joihin sitä ei ole
tarkoitettu, voi johtaa vaaralliseen tilanteeseen.
5) AKKUTYÖKA UN KÄYTTÖ JA HUO TO
a) Lataa vain valmistajan määrittämällä laturilla.
Yhdentyyppisen akun kanssa sopiva laturi voi
aiheuttaa palovaaran, jos sitä käytetään
toisentyyppisen akun kanssa.
b) Käytä sähkötyökaluja vain määritettyjen akkujen
kanssa. Muiden akkujen käyttäminen voi aiheuttaa
henkilövahingon tai tulipalovaaran.
c) Kun akku ei ole käytössä, pidä se erillään muista
metalliesineistä, kuten paperiliittimistä, kolikoista,
avaimista, nauloista, ruuveista tai muista pienistä
metalliesineistä, jotka voivat muodostaa kytkennän
navasta toiseen. Oikosulun luominen akun napojen
välille voi aiheuttaa palovammoja tai tulipalon.

19
d) Sopimattomissa olosuhteissa akusta voi vuotaa
nestettä; vältä kosketusta. Jos vahingossa altistut
nesteelle, huuhtele vedellä. Jos nestettä pääsee
silmiin, hakeudu lisäksi lääkärin hoitoon. Akusta
vuotanut neste voi aiheuttaa ärsytystä tai
palovammoja.
6) HUO TO
a) Jätä työkalun huolto pätevälle korjaajalle, joka
käyttää ainoastaan täsmälleen samanlaisia
varaosia. Näin varmistetaan, että työkalun
turvallisuus säilyy.
OSAT JA SÄÄTIMET (KUVA 1)
PAKKAUKSESTA PURKU
Huomio! Tämä pakkaus sisältää teräviä osia. Ole
varovainen pakkausta purkaessasi. Poista laite sekä
mukana olevat tarvikkeet pakkauksesta. Tarkista
huolellisesti, että laite on hyvässä kunnossa ja kaikki
käyttöoppaassa luetellut tarvikkeet ovat mukana.
Varmista myös, että kaikki tarvikkeet ovat täydellisiä.
Jos jokin osa puuttuu, laite ja tarvikkeet tulee palauttaa
alkuperäisessä pakkauksessa jälleenmyyjälle.
Älä heitä pakkausta pois, pidä se tallessa koko
takuuajan ja kierrätä sen jälkeen, mikäli mahdollista,
muutoin hävitä se asianmukaisella tavalla. Älä anna
lasten leikkiä tyhjillä muovipusseilla tukehtumisvaaran
takia.
AKUN ATAAMINEN
Varoitus! Lataa vain 18 V:n yhteensopivilla latureilla.
Muiden latureiden käyttö voi aiheuttaa tulipalon,
vaurioita tai vakavan henkilövahingon.
Työkalun akku toimitetaan alhaisen latauksen tilassa,
jotta estetään mahdolliset ongelmat. Tästä syystä
akkua täytyy ladata, kunnes laturin oikealla puolella
oleva vihreä LED-valo syttyy.
Huomautus: Akut eivät saavuta täyttä latausta
ensimmäisellä latauskerralla. Kestää useita
tyhjentymiskertoja (uudelleenlatauksen jälkeen) ennen
kuin ne lataantuvat täyteen.
Lue ensin turvallisuusohjeet ja noudata sitten
latausohjeita.
Yhdistä laturi normaaliin 230 V:n, 50 Hz:n pistorasiaan.
Vihreä LED-valo laturin edessä vasemmalla syttyy.
Älä anna kaapelin mennä solmuun tai kiertyä.
Aseta akku laturin pohjaan.
(Huomioi, että akussa on koholla olevat liitäntäpiikit,
joten akku sopii laturiin vain yhdellä tavalla). Latausaika
on vain 60/130 minuuttia.
2,0 Ah akku, latausaika 60 minuuttia
4,0 Ah akku, latausaika 130 minuuttia
Punainen LED-valo laturin edessä oikealla palaa
ilmaisten latauksen olevan käynnissä. Vihreä LED-valo
ilmaisee akun olevan täyteen ladattu.
Irrota laturi pistorasiasta, kun sitä ei käytetä ja säilytä
se sopivassa säilytyspaikassa.
Vältä akun lataamista pakkasta vastaavissa
lämpötiloissa, koska latausteho ei ole silloin riittävä.
Jos lataat useamman kuin yhden akun peräkkäin, anna
laturin jäähtyä vähintään 30 minuuttia aina ennen
seuraavan akun lataamista.
Poista aina akku ja säilytä se turvallisesti, kun työkalu
ei ole käytössä.
Huomio: Jos jossakin kohtaa latausta mikään LED-valo
ei pala, poista akku laturista laitteen vaurioitumisen
välttämiseksi. ÄLÄ aseta laturiin toista akkua.
ATAUKSEN TI A
Näet akun jäljellä olevan varauksen painamalla
lataustason ilmaisinpainiketta, kuva 2.
1. SDS-istukka
2. Syvyysvaste
3. Syvyyden lukitusnuppi
4. Tilavalitsin
5. Suunnanvaihtokytkin
6. Käynnistyskytkin
7. Kahva
8. SDS-talttaterät x 2 (litteä ja piikki)
9. SDS-poranterät x 3 (6, 8, 10 mm)
10. Apukahva
11. Työvalo
ataustason merkkivalo Jäljellä oleva
varauksen määrä
0-10%
10-25%
25-50%
50-75%
75-100%

20
TARVITSET
(Toimitukseen kuulumattomat tarvikkeet)
Soveltuvat henkilönsuojaimet
Akku
Laturi
Avaimellinen poraistukka
Istukan avain
(Toimitukseen kuuluvat tarvikkeet)
Apukahva
Syvyysvaste
SDS-poranterät x 3
SDS-talttaterät x 2
AKUN ASENTAMINEN
Varoitus! Poista akku aina työkalusta, kun asennat
osia, teet säätöjä, puhdistat, kannat tai kuljetat laitetta
tai kun laite ei ole käytössä.
Akun poistaminen estää tahattomat käynnistymiset,
jotka voivat aiheuttaa vakavan henkilövahingon.
HUOMAUTUS: Poista akku aina vakavien
henkilövahinkojen välttämiseksi, ja pidä kädet poissa
lukituksen vapautuspainikkeelta, kun kannat tai kuljetat
työkalua.
Käännä apukahva, jotta se ei ole työkalun pohjan
edessä. Liu’uta akku työkalun pohjaan, kuva 3.
(Huomioi, että akussa on koholla olevat liitäntäpiikit,
joten akku sopii varsisahaan vain yhdellä tavalla).
Varmista, että akku napsahtaa paikoilleen ja akku
pysyy kunnolla kiinni työkalussa ennen kuin aloitat
työskentelyn.
Akun virheellinen asentaminen voi aiheuttaa vaurioita
laitteen sisäisille osille.
AKUN POISTAMINEN
Käännä apukahva, jotta se ei ole työkalun pohjan
edessä. Etsi akun vapautussalpa sen päältä ja paina
alaspäin, kuva 4. Kun pidät akun vapautussalpaa
painettuna, liu'uta akku irti työkalusta.
SDS-TERIEN KIINNITTÄMINEN
Tuotteessa voidaan käyttää erilaisia poranteriä riippuen
työkappaleen materiaalista ja vaaditusta käytöstä.
Varoitus! Käytä aina määritetyn käytön mukaisia
poranteriä. Esimerkiksi älä käytä puumateriaaliin
tarkoitettua poranterää kiveen tai päinvastoin.
Huomioi tuotteen tekniset vaatimukset (katso kohta
”Tekniset tiedot”), kun ostat ja käytät poranteriä.
Jotkin poranterät ovat erittäin teräviä ja tulevat hyvin
kuumiksi käytön aikana.
Käsittele niitä varovasti. Käytä aina suojakäsineitä, kun
käsittelet teriä.
SDS-TERIEN SYÖTTÄMINEN
Levitä ohut rasvakerros uritettuun vääntöjärjestelmään
(SDS) poranterän varteen.
Syötä terä työkaluun. Käännä terää ja työnnä sitä,
kunnes se kiinnittyy, kuva 5.
Varmista asennuksen jälkeen, että terä on kunnolla
kiinni yrittämällä vetää se irti.
SDS-TERIEN POISTAMINEN
Vedä istukan holkki taaksepäin ja poista SDS-
poranterä, kuva 6.
Aseta uusi, kuten edellä on kuvattu, mikäli tarpeen.
PORANTERÄT PUUTA JA META IA VARTEN
Varoitus! Älä käytä avaimellista istukkaa
vasaraporaukseen tai talttakäytössä. Se on tarkoitettu
ainoastaan puuhun ja metalliin tarkoitettujen
poranterien kanssa käytettäväksi.
ASETTAMINEN
Huomautus: Avaimellinen poraistukka mahdollistaa
normaalit terät (ei SDS-tyyppiset) tuotteen kanssa
käytettäviksi.
Kiinnitä avaimellinen poraistukka (lisävaruste)
kääntämällä istukkaa ja työntämällä sitä, kunnes se
kiinnittyy.
yönnä istukka-avain (lisävaruste) johonkin avaimellisen
poraistukan rei’istä ja käännä sitten avainta
vastapäivään, kunnes työkalun leuat aukeavat
tarpeeksi, jotta voit työntää siihen poranterän.
yönnä poranterä niin syvälle kuin se menee.
yönnä istukka-avain johonkin avaimellisen poraistukan
rei’istä ja käännä sitten istukka-avainta myötäpäivään,
kunnes poranterä on kunnolla kiinnitetty ja keskellä
avaimellista poraistukkaa.
Varoitus! Kun olet käyttänyt lyhyen aikaa työkalua,
sammuta se, irrota akusta ja tarkista poranterän
kiinnitys uudelleen. Varo, poranterä voi olla kuuma.
POISTAMINEN
yönnä istukka-avain johonkin avaimellisen poraistukan
rei’istä ja käännä sitten istukka-avainta vastapäivään,
kunnes työkalun leuat aukeavat tarpeeksi, jotta voit
vetää poranterän irti.
SYVYYSVASTE
Syvyysmittari on kätevä, jos halutaan porata reikiä,
joissa on sama syvyys. Paina syvyysvasteen
lukituspainiketta alas riittävästi, jotta saat
syvyysvasteen työnnettyä reiän läpi, kuva 7.
Kohdista syvyysvasteen kärki poran kärjen kanssa.
Vedä syvyysvastetta taaksepäin haluamaasi
poraussyvyyteen.
Vapauta syvyysvasteen lukituspainike, jolloin
syvyysvaste kiinnittyy paikoilleen.
APUKAHVA
Pora toimitetaan apukahva kiinnitettynä. Voit säätää
apukahvan asentoa löysäämällä kahvan kiertämällä sitä
myötäpäivään, kuva 8.
Säädä apukahva siten, että voit pitää tuotetta
turvallisesti käytön aikana (kuvat 9–11).
Apukahvan kääntäminen vastapäivään kiristää
puristimen.
Table of contents
Languages:
Other FXA Drill manuals