manuals.online logo
Brands
  1. Home
  2. •
  3. Brands
  4. •
  5. Gaggenau
  6. •
  7. Warming Drawer
  8. •
  9. Gaggenau WS 461 User manual

Gaggenau WS 461 User manual

Other manuals for WS 461

2

Other Gaggenau Warming Drawer manuals

Gaggenau WSP22 1 2 Series User manual

Gaggenau

Gaggenau WSP22 1 2 Series User manual

Gaggenau WSP22.1.2 User manual

Gaggenau

Gaggenau WSP22.1.2 User manual

Gaggenau WS 461 User manual

Gaggenau

Gaggenau WS 461 User manual

Gaggenau WS461110 User manual

Gaggenau

Gaggenau WS461110 User manual

Gaggenau WS 461 User manual

Gaggenau

Gaggenau WS 461 User manual

Gaggenau MW 420 620 User manual

Gaggenau

Gaggenau MW 420 620 User manual

Gaggenau WSP 222 User manual

Gaggenau

Gaggenau WSP 222 User manual

Gaggenau WS46 1 2 Series User manual

Gaggenau

Gaggenau WS46 1 2 Series User manual

Gaggenau WS 28 User manual

Gaggenau

Gaggenau WS 28 User manual

Gaggenau WS482710 User manual

Gaggenau

Gaggenau WS482710 User manual

Gaggenau WS482110 User manual

Gaggenau

Gaggenau WS482110 User manual

Gaggenau WS 463 User manual

Gaggenau

Gaggenau WS 463 User manual

Gaggenau WS26 User manual

Gaggenau

Gaggenau WS26 User manual

Gaggenau WS461710 User manual

Gaggenau

Gaggenau WS461710 User manual

Gaggenau WS461100 User manual

Gaggenau

Gaggenau WS461100 User manual

Gaggenau WS 462 User manual

Gaggenau

Gaggenau WS 462 User manual

Gaggenau WSP 221 User manual

Gaggenau

Gaggenau WSP 221 User manual

Gaggenau WS482710 User manual

Gaggenau

Gaggenau WS482710 User manual

Gaggenau WSP221710 User manual

Gaggenau

Gaggenau WSP221710 User manual

Gaggenau WS 28 User manual

Gaggenau

Gaggenau WS 28 User manual

Gaggenau WSP221130 User manual

Gaggenau

Gaggenau WSP221130 User manual

Gaggenau WS 482 User manual

Gaggenau

Gaggenau WS 482 User manual

Gaggenau WSP 221 User manual

Gaggenau

Gaggenau WSP 221 User manual

Gaggenau WS 28 User manual

Gaggenau

Gaggenau WS 28 User manual

Popular Warming Drawer manuals by other brands

Siemens HW 290 Series instruction manual

Siemens

Siemens HW 290 Series instruction manual

Viking DEWD102SS Quick reference guide

Viking

Viking DEWD102SS Quick reference guide

Miele ESW 6229 Operating and installation instructions

Miele

Miele ESW 6229 Operating and installation instructions

Brandt WD1014X user guide

Brandt

Brandt WD1014X user guide

APW Wyott WD-2CMF Specification sheet

APW Wyott

APW Wyott WD-2CMF Specification sheet

KitchenAid KOWT107ESS installation instructions

KitchenAid

KitchenAid KOWT107ESS installation instructions

Hanseatic TCN14J6D-S user manual

Hanseatic

Hanseatic TCN14J6D-S user manual

Cardini WD6299 instruction manual

Cardini

Cardini WD6299 instruction manual

GE Monogram ZTD910SBSS Dimension Guide

GE

GE Monogram ZTD910SBSS Dimension Guide

Dacor IWD24 Planning guide

Dacor

Dacor IWD24 Planning guide

Nordmende WD515IX user manual

Nordmende

Nordmende WD515IX user manual

Electrolux EW30WD55GS Use and care guide

Electrolux

Electrolux EW30WD55GS Use and care guide

Wolf WWD30 troubleshooting guide

Wolf

Wolf WWD30 troubleshooting guide

Jenn-Air JWD6030CDX user guide

Jenn-Air

Jenn-Air JWD6030CDX user guide

Fisher & Paykel WB30SDEX1 Quick reference guide

Fisher & Paykel

Fisher & Paykel WB30SDEX1 Quick reference guide

Fisher & Paykel WB60SDTB1-SET Quick reference guide

Fisher & Paykel

Fisher & Paykel WB60SDTB1-SET Quick reference guide

Bosch HWD2720UC installation manual

Bosch

Bosch HWD2720UC installation manual

KitchenAid KEWS105 Use & care guide

KitchenAid

KitchenAid KEWS105 Use & care guide

manuals.online logo
manuals.online logoBrands
  • About & Mission
  • Contact us
  • Privacy Policy
  • Terms and Conditions

Copyright 2025 Manuals.Online. All Rights Reserved.

fa
Ú
ﺐﺼﻧ یﺎﻤﻨﻫار
دﯾﺷﺎﺑ ﮫﺗﺷاد رظﻧ رد ًﺎﻔطﻟ
قرﺑ ﮫﺑ لﺎﺻﺗا
،تﺳا هدﺷ بﺻﻧ ﺢﯾﺣﺻ لﮑﺷ ﮫﺑ ﮫﮐ ظﻓﺎﺣﻣ یاراد قرﺑ زﯾرﭘ ﮏﯾ ﮫﺑ دﯾﺎﺑ طﻘﻓ هﺎﮕﺗﺳد
زﺎﺟﻣ صﺻﺧﺗﻣ ﮏﯾ طﺳوﺗ ﺎﮭﻧﺗ دﯾﺎﺑ لﺎﺻﺗا لﺑﺎﮐ ضﯾوﻌﺗ ﺎﯾ زﯾرﭘ بﺻﻧ .دوﺷ لﺻﺗﻣ
.درﯾﮔ تروﺻ ﮫطوﺑرﻣ تاررﻘﻣ تﯾﺎﻋر ﺎﺑ و
ﮫﺑ ار قرﺑ لﺑﺎﮐ .دوﺷ لﺻﺗﻣ قرﺑ ﮫﺑ هدﺷ ﮫﺋارا قرﺑ لﺑﺎﮐ طﺳوﺗ ﺎﮭﻧﺗ دﯾﺎﺑ هﺎﮕﺗﺳد
.دﯾﻧﮐ لﺻو هﺎﮕﺗﺳد تﺷﭘ
شورﻓ زا سﭘ تﺎﻣدﺧ زﮐرﻣ زا دﯾﻧاوﺗ ﯽﻣ ار نوﮔﺎﻧوﮔ یﺎھ ﮫﺧﺎﺷود ﺎﺑ قرﺑ یﺎھ لﺑﺎﮐ
.دﯾﻧﮐ ﮫﯾﮭﺗ ﺎﻣ
رطﺧ ﯽﮑﯾرﺗﮑﻟا ﮫﻓﺎﺿا رﺎﺑ .دﯾﻧﮑﻧ هدﺎﻔﺗﺳا طﺑار لﺑﺎﮐ ﺎﯾ قرﺑ ﯽھار ﮫﺳ ،مﯾﺳﻘﺗ لﺑﺎﮐ زا
.دراد هارﻣھ ﮫﺑ یزوﺳ شﺗآ
ﮏﯾ دﯾﺎﺑ ،دﺷﺎﺑﻧ سرﺗﺳد رد رﮕﯾد هﺎﮕﺗﺳد بﺻﻧ زا دﻌﺑ قرﺑ زﯾرﭘ ﮫﮐ ﯽﺗروﺻ رد
یﺎﮭﺗﻧا ود نﯾﺑ نﺎﯾرﺟ ﻊطﻗ زا دﻌﺑ ﮫﮐ دوﺷ ﮫﯾﺑﻌﺗ ﺎھ بطﻗ مﺎﻣﺗ یارﺑ نﺎﯾرﺟ ﻊطﻗ دﯾﻠﮐ
لﻗادﺣ مﯾﺳ
3.دزادﻧﺎﯾﺑ ﮫﻠﺻﺎﻓ رﺗﻣ ﯽﻠﯾﻣ
بﺳﺎﻧﻣ یﺎھ تﻧﯾﺑﺎﮐ
فﮐ و راوﯾد نﯾﺑ .دﺷﺎﺑ هﺎﮕﺗﺳد تﺷﭘ رد ﻰﺑﻘﻋ هراوﯾد یاراد دﯾﺎﺑﻧ بﺻﻧ لﺣﻣ تﻧﯾﺑﺎﮐ
لﻗادﺣ دﯾﺎﺑ ﯽﯾﻻﺎﺑ تﻧﯾﺑﺎﮐ ﯽﺗﺷﭘ هراوﯾد زﯾﻧ و تﻧﯾﺑﺎﮐ35.دﺷﺎﺑ ﮫﻠﺻﺎﻓ رﺗﻣﯾﻠﯾﻣ
.دﯾﻧﮑﻧ بﺻﻧ تﻧﯾﺑﺎﮐ ﮏﯾ برد تﺷﭘ ار هﺎﮕﺗﺳد
.دﻧوﺷ هدﯾﺷوﭘ دﯾﺎﺑﻧ اوھ یدورو یﺎھ ﮫﻧﺎھد و ﮫﯾوﮭﺗ یﺎھرﺎﯾﺷ
دروﻣ دوﺷ ﯽﻣ بﺻﻧ ﻻﺎﺑ رد ﮫﮐ ار ﯽھﺎﮕﺗﺳد بﺻﻧ یﺎﻣﻧھار رد دوﺟوﻣ تﺎﻋﻼطا
.دﯾھد رارﻗ ﮫﺟوﺗ
هﺎﮕﺗﺳد بﺻﻧ
رد ارﻧآ و هدوﻣﻧ ﺢطﺳ مھ ﺎھ تﻧﯾﺑﺎﮐ ﺎﺑ ار هﺎﮕﺗﺳد سﭘﺳ .دﯾﻧﮐ لﺻو قرﺑ ﮫﺑ ار هﺎﮕﺗﺳد
.دﯾﻧﮐ ﭻﯾﭘ دوﺧ لﺣﻣ
ﮫﺟوﺗ : زا دﻌﺑ دﯾﺎﺑﻧ لﺎﺻﺗا لﺑﺎﮐ .دوﺷﻧ مﺧ ﺎﯾ دﻧﮑﻧ رﯾﮔ لﺎﺻﺗا مﯾﺳ ﮫﮐ دﯾوﺷ نﺋﻣطﻣ
.دﺷﺎﺑ سﺎﻣﺗ رد هﺎﮕﺗﺳد فﮐ ﺎﯾ تﺷﭘ ﺎﺑ بﺻﻧ
.دﺷﺎﺑ سﺎﻣﺗ رد هﺎﮕﺗﺳد فﮐ ﺎﯾ تﺷﭘ ﺎﺑ بﺻﻧ زا دﻌﺑ دﯾﺎﺑﻧ لﺎﺻﺗا لﺑﺎﮐ
PP
en
ÂInstallation instructions
Please observe
Electrical connection
The appliance must only be connected to a properly installed
protective contact socket. The installation of the socket or
replacement of the connecting cable must only be carried out
by a qualified electrician in accordance with current regulations.
The appliance must only be connected with the power cable
provided. Connect the power cable to the back of the appliance.
Power cables with various plug types are available from our
after-sales service.
Do not use multi-plug adapters, power strips or extension leads.
There is a risk of fire in the event of overloading.
If the plug is no longer accessible subsequent to installation, an
all-pole disconnecting device must be present on the installation
side with a contact gap of at least 3 mm.
Fitted units
The fitted cabinet must not have a back panel behind the
appliances. There should be a gap of at least 35 mm between
the wall and the cabinet base as well as the rear panel of the
cabinet situated above.
Do not install the appliance behind the door of a unit.
Ventilation slots and intake openings must not be covered.
Read the information in the installation instructions for the
appliance installed above.
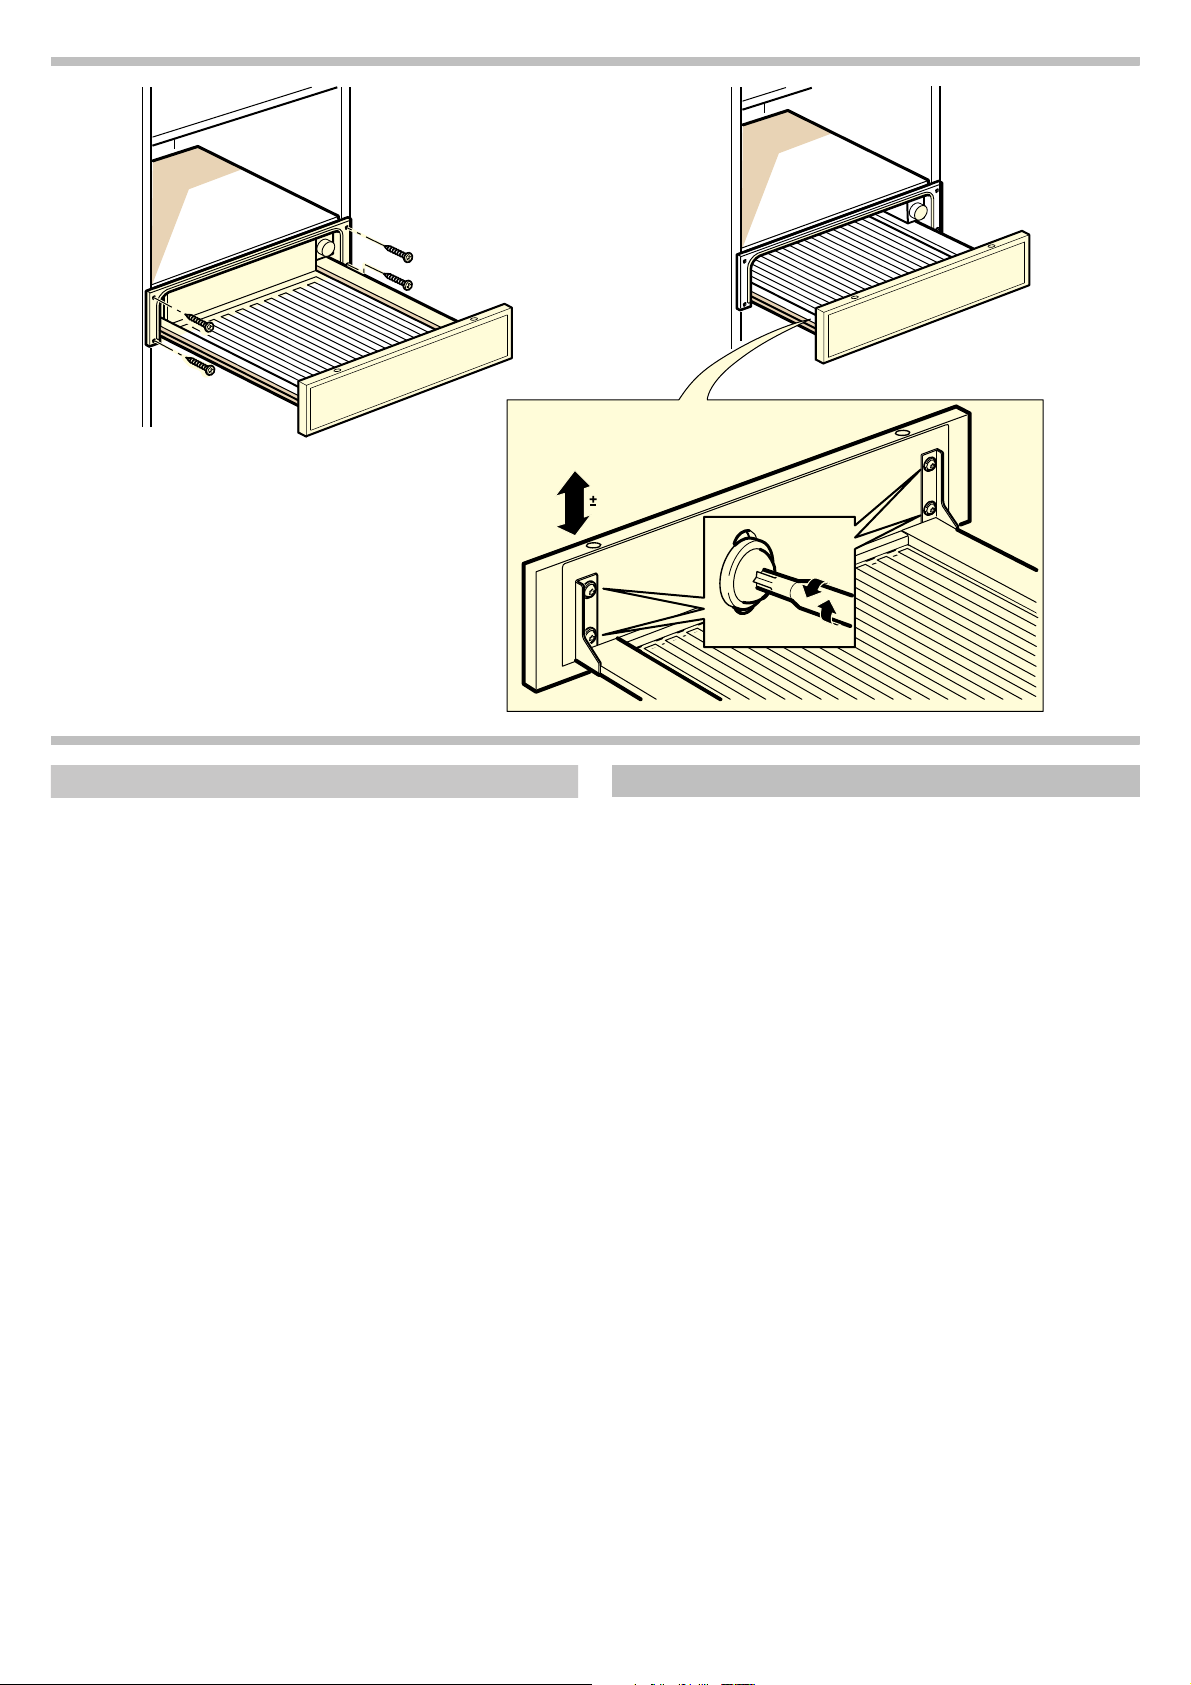
Installing the appliance
Connect the appliance to the mains. Then align the appliance
flush with the units and screw it in place.
Note: Ensure that the connector lead does not become trapped
or bent. After installation, the connector lead must not be in
contact with the back or the base of the appliance.
After installation, the connector lead must not be in contact with
the back or the base of the appliance.
*9001242130*9901242130960824
WS 461
بﺻﻧ یﺎﻣﻧھار
fa
PP
PP
PP
PP


PLQ
 

Â
Installation instructions