Galeria Selection 4017805424975 User manual

OPERATION MANUAL
RADIO PROJECTION CLOCK
EAN 4017805424975
1
RADIO PROJECTION CLOCK
Thank you for purchasing this projection radio alarm clock. Designed and equipped with
innovative components and technology it will display the exact time and indoor temperature. It
does not require any adjustment, as this is done via the time signal received. It projects time
and room temperature in a forward direction against the ceiling or wall.
Please read this operating instructions carefully before using the device in order to get familiar
with its properties and features. Keep the instructions safe for future reference.
For operating the device you will need:
2 x 1,5 V batteries (Type: AAA, LR03)
Safety precautions
The device is intended for use in the European Economic Area in Switzerland.
The device has been designed and manufactured to provide you with many years of satisfactory
operation when used correctly. To guarantee this, please follow the safety instructions listed
hereinafter.
1. Do not expose the device to extreme stress such as impacts, extremely high
temperatures or extremely high humidity. Such conditions can cause damage to
electronic parts or single components.
2. Never let the device drop into water as this could result in a complete malfunctioning of
the product.
3. Never use abrasive cleaning or scouring agents or corrosive substances, this could
damage the device irreparably. These could damage the device irreparably and hence
result in scratched plastic parts or corrosion of circuits.
4. Never open the housing. That will void the warranty.
5. Only use new batteries according to the instructions in this handbook. Never mix old and
new batteries. Old batteries could leak and damage the device.
6. The device must only be used as intended.
7. Have repairs done by authorized personnel only.

OPERATION MANUAL
RADIO PROJECTION CLOCK
EAN 4017805424975
2
8. Only use the device after you have carefully read this user manual. Keep the manual
safe for future reference. When giving away or selling the device, make sure to also
hand over this user manual.
Power adapter warnings
1. Disconnect the power adapter before cleaning and when not using the device for a
longer period of time.
2. Only use the power adapter provided for this device.
3. Warning! Never immerse the power adapter in water or other liquids. Never hold the
power adapter under running water.
Battery warnings
1. Do not expose batteries of extreme temperatures such as direct sunlight or fire. Do not
place the device on heating appliances. Leaking battery acid can cause damage.
2. Always insert the batteries heeding correct polarity (+ and -) as indicated in the battery
compartment.
Caution! Inserting the battery incorrectly poses an explosion hazard.
1. Only replace with batteries of same type and suitable specifications.
2. Do not mix old and new batteries or batteries of different types or manufacturers.
3. Should a battery leak, use a cloth to remove it from the battery compartment. Dispose of
batteries accordingly. In case of leaking batteries, avoid contact with skin, eyes and
mucous membranes. In case of acid contact with skin, rinse the affected areas
thoroughly with clear water and immediately seek medical attention.
4. Batteries can be life threatening if swallowed. Keep batteries out of reach of children and
pets. In case batteries have been swallowed, seek medical advice immediately.
5. Do not let children replace batteries without supervision by an adult.
6. Store batteries at a well-ventilated, dry location.
7. Remove the batteries when not using the device for a longer period of time.

OPERATION MANUAL
RADIO PROJECTION CLOCK
EAN 4017805424975
3
Rechargeable batteries
8. Risk of explosion! Do not dismantle or short-circuit batteries. Do not throw into fire.
Non rechargeable batteries
9. Risk of explosion! Do not recharge, dismantle or short-circuit batteries, and do not
reactivate them by any other means. Do not throw into fire.
10. Remove exhausted batteries immediately and dispose of accordingly.
Product overview, LCD display and controls

OPERATION MANUAL
RADIO PROJECTION CLOCK
EAN 4017805424975
4
A1: Time B1: Projection arms
A2: Alarm icon B2: SNOOZE button
A3: Radio signal display B3: DOWN button
A4: Seconds display B4: UP button
A5: Temperature display B5: ALARM button
A6: Weekday display B6: MODE button
A7: Snooze display B7: Power adapter socket
A8: Day B8: 24-hour projection switch
A9: Month
Operation
Remove the battery compartment cover located on the bottom of the device. Insert 2
new batteries (type: 1,5 V, AAA) observing the correct polarity.
Replace the batteries when the display quality weakens.
You may also operate this device using only the supplied mains adapter. Remove the
batteries when doing so.
Once the power supply has been connected, the clock starts searching for the radio clock signal
transmitted by the atomic clock in Frankfurt/Mainflingen. This will take approx. 5 to 8 minutes,
provided there is no interference with the radio communication.
When receiving the radio signal, the device will automatically set the data and time
(DCF77), with the radio signal icon being displayed at the same time.
If the clock cannot receive the time signal, the radio signal icon (A3) does not light up. In such a
case you may adjust the time manually.
Note:
When the system is searching for the radio clock signal and the radio clock icon (A3) is flashing,
you can only control the background light. All other buttons are not available during that time.
Press the DOWN button (B3) at any time to cancel searching for the radio clock signal.
The radio clock signal search will be cancelled automatically, if an alarm gets activated.

OPERATION MANUAL
RADIO PROJECTION CLOCK
EAN 4017805424975
5
If you do not wish to use any other functions of the clock, the installation process is now
completed. Refer to the instructions below for further functions and features regarding the
operation of this device.
Information on synchronizing the radio clock signal:
Time and date are radio-controlled. The current time is synchronized with the radio signal from
Frankfurt, Germany (DCF77).
Time and date are radio-controlled. The current time is synchronized to the radio signal from
Frankfurt, Germany (DCF77). DCF77 is a time signal broadcast as encoded time information on
a normal frequency of 77.5 kHz. The transmitting power is approx. 50 kW with a broadcasted
power of approx. 30 kW and coverage of approx. 1500 km in the vicinity of Frankfurt/Main
(Mainflingen). When using the clock for the first time, the clock automatically starts searching for
the radio signal and the reception icon starts flashing. Once the device reveices the radio
clock time, the icon lights up steadily in the display. The receiver icon flashing indicates
that a signal is currently being received.
Search for the radio signal manually:
Press and hold the DOWN button (B3) for 2 seconds in order to start the manual search
of the radio signal. The radio signal icon (A3) starts flashing in the display.
Please also observe the following operating instructions:
1. The device will be synchronized automatically every day.
2. Do not install the device near sources of interference, such as TV appliances,
computers, or similar.
3. Avoid placing the device next to or on metal surfaces.
4. It is not recommended to use the device in locations such as airports, basements,
factories and rooms that incorporate reinforced concrete in their walls.
5. Do not start radio reception while in a moving vehicle such as a car or train.

OPERATION MANUAL
RADIO PROJECTION CLOCK
EAN 4017805424975
6
Manual setup of date and time
If you are not located within the radio signal range or if there is no reception, you can set the
time manually. The radio clock will nevertheless continue searching for radio signals every hour.
Once a radio signal is being received again, the time will be adjusted automatically.
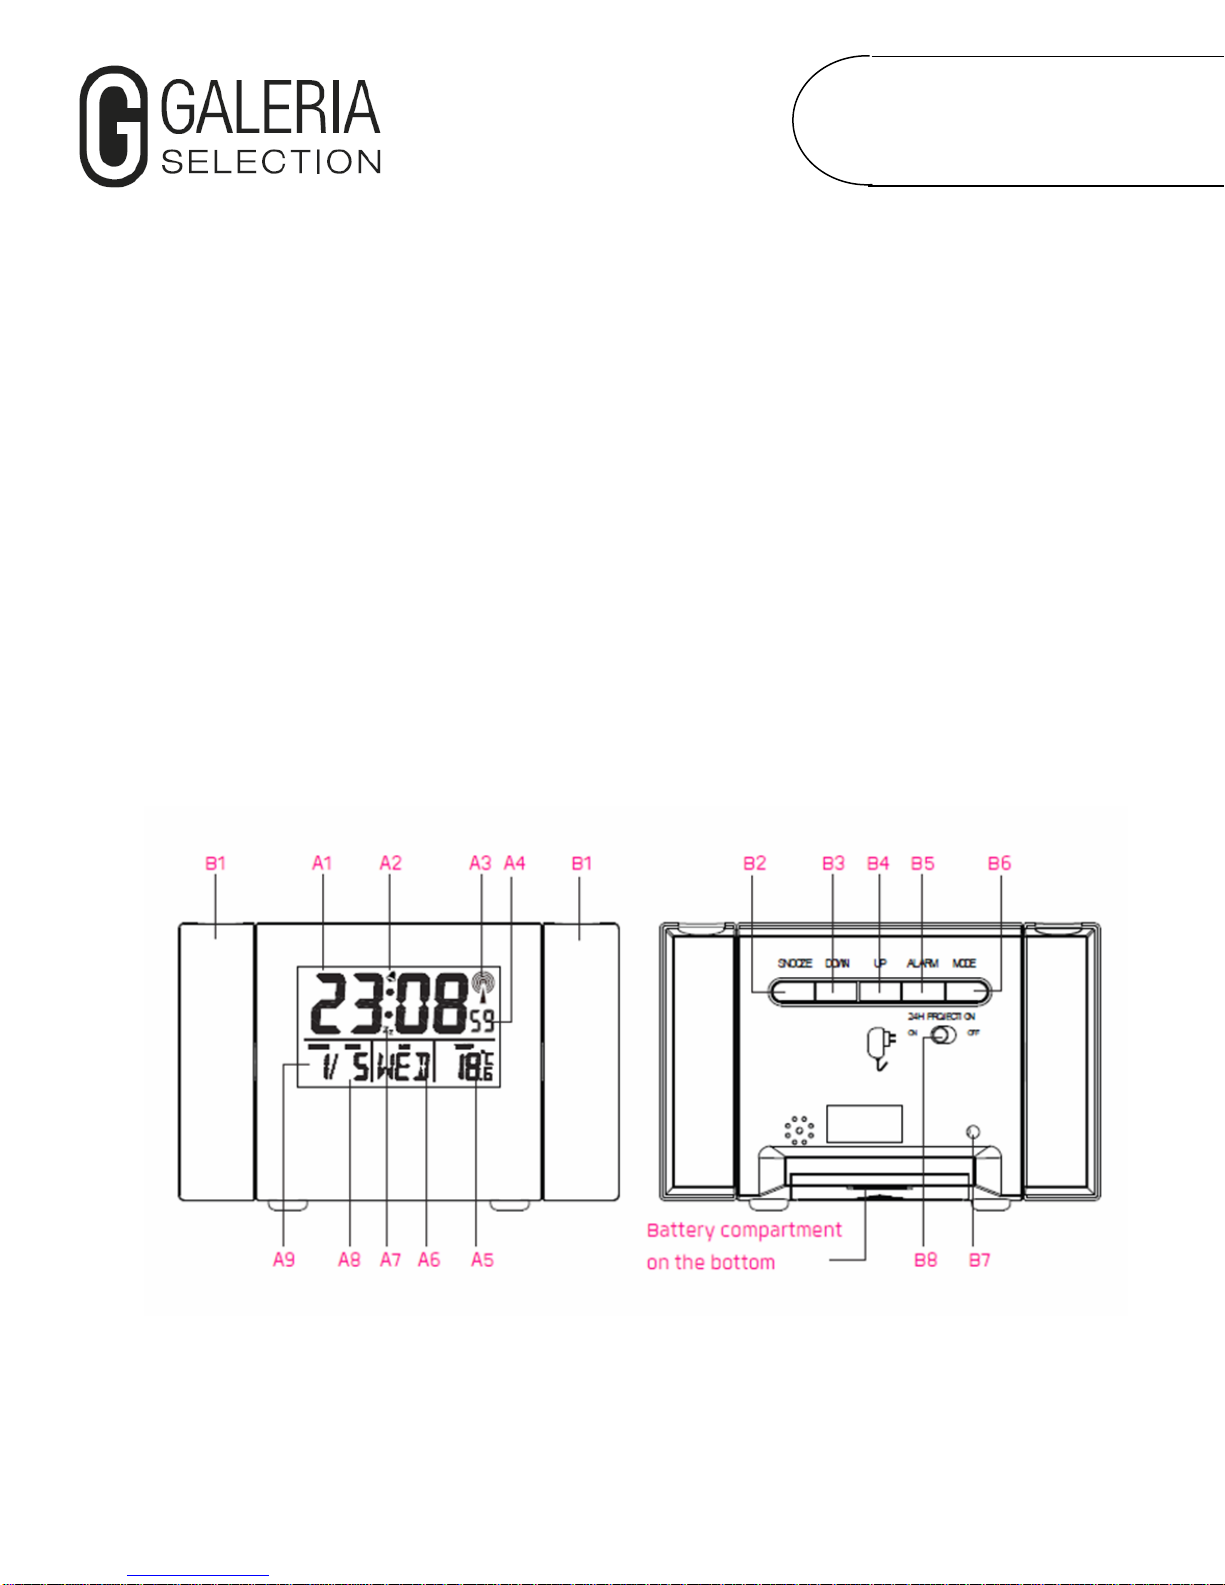
1. When in normal time display mode, press and hold the MODE button (B6) for several
seconds until you hear a brief acoustic signal indicating the manual setup mode.
2. Press the UP (B4) or DOWN (B3) buttons to configure the settings. Press and hold the
UP (B4) or DOWN (B3) buttons for approx. 2 seconds in order to adjust the values in
fast mode.
3. Press the MODE button (B6) respectively to save the setting and to move to the next
value. Pressing the MODE button (B6) will generate an acoustic signal.
4. Then adjust the other values as described previously in the following order: Year, month,
day, language, time display mode (24 or 12 hour display), time zone, hours and minute.
Setting the calendar
The year indicator starts flashing. Press the UP (B4) and DOWN (B3) buttons to set the
year. Confirm your setting by pressing the MODE (B6) button.
The month indicator starts flashing. Press the UP (B4) and DOWN (B4) buttons to set
the month. Confirm your setting by pressing the MODE (B6) button.
The day indicator starts flashing. Press the UP (B4) and DOWN (B3) buttons to set the
day confirm your setting by pressing the MODE (B6) button.
Manual setup of date and time
Weekday display in 7 languages
The weekday display starts flashing. Press the UP (B4) and DOWN (B3) buttons to
select the desired language. There following languages available to display the
weekday:
German (GER)/English (ENG)/Italian (ITA)/Dutch (NET)/Spanish (ESP)/ Danish (DAN).
Confirm your setting by pressing the MODE (B6) button.
12/24h
The 12h/24h indicator starts flashing. Then press the UP (B4) and DOWN (B3) buttons
to switch between 24-hour and 12-hour display mode. Confirm your setting by pressing
the MODE (B6) button.
Time zone setting (12/-12)

OPERATION MANUAL
RADIO PROJECTION CLOCK
EAN 4017805424975
7
The time zone starts flashing. Press the UP (B4) and DOWN (B3) buttons to set the time
zone. For use in Germany, leave the setting at “00”. Confirm your settings by pressing
the MODE (B6) button.
Note: (This function is useful when you are located within the DCF77 reception area but
wish to use another time zone, for example Great Britain.) In order to take the time
difference into account, you can rectify the existing difference manually.
Time
The hour indicator starts flashing. Press the UP (B4) and DOWN (B3) buttons to set the
hours. Confirm your setting by pressing the MODE (B6) button.
The minute indicator starts flashing. Press the UP (B4) and DOWN (B3) buttons to set
the minutes. Confirm your setting by pressing the MODE (B6) button.
The manual setup has been completed by then.
Make sure: If there is no function within 30 seconds, the system returns to regular time display
mode. All settings configured that far will be saved.
Alarm settings
Setting the alarm time (alarm)
1. Press the MODE (B6) button once to switch to alarm mode (AL).
2. Press and hold the MODE button (B6) for 2 seconds until the hour display of the alarm
time starts flashing. Press the UP (B4) and DOWN (B3) buttons to set the hours first.
Confirm your setting by pressing the MODE (B6) button.
3. The minute indicator of the alarm time starts flashing. Press the UP (B4) and DOWN
(B3) buttons for setting the minutes. Confirm your setting by pressing the MODE (B6)
button. Proceed as follows to return to normal time display mode:
NOTE: The alarm function is saved, but will not be activated automatically.
Switching the alarm on and off.
1. Press the ALARM button (B5) to activate the alarm function. The display will show the
alarm function icon (A2).
2. Press the ALARM button (B5) again to deactivate the alarm function. The alarm function
icon (A2) turns off.
Displaying the set alarm time
1. When in normal time display mode, briefly press the MODE button (B6) to display the set
alarm time.
2. Briefly press the MODE button (B6) again to return to normal time display mode.

OPERATION MANUAL
RADIO PROJECTION CLOCK
EAN 4017805424975
8
Interrupting the alarm (SNOOZE), switching off the alarm clock for the current day.
1. Once the alarm sounds, it can be cancelled by pressing the SNOOZE (B2) button.
The “zZ” icon (A7) is flashing in the display. The alarm repeat functions has been set to
5 minutes by default. The alarm sounds again after 5 minutes.
2. Press any other button to turn off the alarm for the current day. The alarm sounds the
next day at the preset alarm time. The alarm time symbol (A2) lights up steadily in the
display.
Other functions
Temperature display
In order to switch a temperature value from °Celsius to °Fahrenheit, press the DOWN
button (B3) when in normal time display mode.
Backlight
Press on top of the radio clock or press the SNOOZE (B2) button to turn on the
backlight. After approx. 5 seconds, the light will turn off again.
Projection
The alarm clock features 2 projection arms, left and right from the main body. The arms
can be swiveled to the front by up to 90°. Adjust the sharpness of the projection by
moving the device accordingly.
Press on the top of the radio clock to turn on the projection light. After approx. 5
seconds, the light will turn off again.
Connecting the included power adapter to the adapter socket (B7) on the back of the
device allows for continuous projection. To do so, first remove the batteries from the
device and set the “24H PROJECTION” switch (B8) on the bottom of the device to “ON”
position.
WHEN USING THE POWER ADAPTER, ALWAYS REMOVE THE BATTERIES AND
SET THE “24H PROJECTION TO “ON” POSITION IN ORDER TO ACTIVATE
CONTINUOUS PROJECTION.
Troubleshooting, maintenance and care
Do not install the device near interfering sources (TVs, computers, or similar).
Avoid placing the device next to or on metal plates.
We do not recommend using the device in location such as airports, basements, high-
rise buildings or factories. Do not start radio reception while in a moving vehicle such as
a car or train.

OPERATION MANUAL
RADIO PROJECTION CLOCK
EAN 4017805424975
9
Clean the device with a slightly damp, lint-free cloth. Never use sharp cleaning agents.
Replacing batteries
When the display weakens it is recommended to replace the batteries. Always use new
batteries and do not mix old and new batteries.
Technical data
Radio alarm clock
Temperature measuring range: -10 °C to +50 °C
Radio clock: DCF77
Batteries: 2 x new AAA, 1.5 V batteries
Power adapter
Input: 100 –240 V, 50 / 60 Hz, 0,2 A
Output: 5 V –500 mA
Service address
If you have any further questions regarding the device, please contact our hotline 02129/344664
or 02129/343387 from Mondays through Fridays from 10 to 15 o’clock. When calling, please
keep the article number of your device and the date of purchase ready.

OPERATION MANUAL
RADIO PROJECTION CLOCK
EAN 4017805424975
10
DISPOSAL INFORMATION 7 INFORMATION ON ENVIRONMENTAL PROTECTION
Battery information
1. Caution! There is a risk of explosion if the batteries are replaced in an improper
way.Only replace batteries by the same or an equivalent type of battery.
2. Always change the whole set of batteries. Do not mix old and new batteries, or batteries
with different state of charge.
3. Ensure that you use the batteries correctly. Respect the (+) plus/(-) minus polarity on the
battery and on the housing. Batteries which are used incorrectly may leak, or may cause
a fire or an explosion in extreme cases.
4. Never expose batteries to heat (for example blazing sun, fire) and never throw them into
a fire. The batteries may explode.
5. The connections should not be short-circuited.
6. Remove used batteries from the product immediately. Remove the batteries if you know
that the device will not be used for a long period. Otherwise the batteries may leak and
cause damage.
7. Keep all batteries out of the reach of children. Seek medical attention immediately
8. If batteries are swallowed.
9. Do not attempt to charge non-rechargeable batteries.
10. Rechargeable batteries must be removed from the device before charging.
11. If batteries leak, remove them from the battery compartment using a cloth and dispose of
them in accordance with regulations. Avoid skin and eye contact with the battery acid. If
your eyes come into contact with the battery acid, rinse them with lots of water and
contact a doctor immediately. If battery acid comes into contact with skin, wash the site
with lots of water and soap.
12. Remove the batteries from the product before disposing of the product.

OPERATION MANUAL
RADIO PROJECTION CLOCK
EAN 4017805424975
11
Labelling of waste electrical and electronic equipment according to directive 2012/19/EU Article
14 (2) e) in conjunction with Annex IX:
Environment Protection
Discarded electric appliances are recyclable and should not be discarded in the domestic waste!
Please actively support us in conserving resources and protecting the environment by returning
this appliance to the collection centres.
Labelling of the disposal of waste batteries according to directive 2006/66/EG Article 20 (1) e) in
conjunction with
Annex II
Used batteries must not be disposed of through household garbage, since they might contain
toxic elements and heavy metals that can be harmful to the environment and human health.
consumers are there for obligated to return batteries to retail or local collection facilities free of
charge. used batteries will be recycled.
they contain important raw materials such as iron, zinc, manganese or nickel.
the crossed-out wheelie bin symbol indicates. batteries and rechargeable batteries must not be
disposed of through household garbage.
the symbols below the wheelie bin indicate:
Pb: battery contains lead
Cd: battery contains cadmium
HG: battery contains mercury
Hereby, Weinberger GmbH & Co. KG, declares that the radio equipment type [EAN at the end
of the construction manual] is in compliance with Directive 2014/53/EU.is in compliance with
Directive 2014/53/EU.
The full text of the EU declaration of conformity is available at the following internet address:
Weinberger GmbH & Co.KG
Bergische Str.11
Industriegebiet Ost
42781 Haan
info@weinberger-group.de
WARRANTY

OPERATION MANUAL
RADIO PROJECTION CLOCK
EAN 4017805424975
12
The statutory warranty is valid for this product.
Damage which is caused by improper handling or operation, by incorrect set up or storage, by
improper connection or installation, as well as by force majeure or other external influences, is
not under guarantee. If product specific information is enclosed then we recommend that you
promptly read and comply with this.
Information:
If this product no longer functions correctly, then check whether this is due to a reason such as,
for example, an interrupted electrical supply (in so far as this concerns an electrical device) or
incorrect use in general.
Ensure that you attach, or have ready, the following documents or information for your product if
possible:
Sales receipt
Device name/type/brand
Description of the fault that has occurred with information on the fault which is as specific
as possible
Please contact your retailer for warranty claims or faults.
GWL 8/14 DE
Table of contents
Popular Clock manuals by other brands

La Crosse Technology
La Crosse Technology 404-3840TX manual

Siemens
Siemens GPS1000 2XV9450-1AR82 user manual

Oregon Scientific
Oregon Scientific RM928N user manual

Nixie Clock
Nixie Clock Divergence Meter user manual

La Crosse Technology
La Crosse Technology WT-3141b Quick setup instructions

Silicon Laboratories
Silicon Laboratories SI5324 manual