Garmin TACX NEO BIKE PLUS Instruction manual
TACX®NEO BIKE PLUS
Quick Start Manual ..................... 2
Snelstartgids...........................19
Manuel de démarrage rapide.........37
Manuale di avvio rapido ..............55
Schnellstartanleitung .................73
Guía de inicio rápido ..................91
Manual de início rápido............. 109
Manual de iniţiere rapidă ........... 127
Manual Memulai Cepat ............. 145
クイックスタートマニュアル.. 163
빠른 시작 설명서 .................. 181
คูมือเริ่มตนอยางรวดเร็ว ............ 199
快速入門手冊....................... 217
Tacx®NEO Bike Plus
Quick Start Manual
Before Assembly
WARNING
See the Important Safety and Product Information guide in the product box for product warnings and
other important information.
Dimensions and Clearance
When finding a suitable location for the Tacx® NEO Bike Plus trainer, consider the maximum
dimensions. The dimensions of the Tacx NEO Bike Plus trainer are shown with and without the fans.
Tacx recommends a minimum of 60 cm (24 in.) clearance on all sides of the trainer.
2 Quick Start Manual
EN

Cycling Posture
NOTE: Cycling posture is unique to each cyclist and may require several adjustments. Pedals and
tablets are not included with the Tacx NEO Bike Plus trainer and can impact your cycling posture.
The image contains guidelines for the correct cycling posture while using the Tacx NEO Bike Plus
trainer.
Your elbows should be slightly bent, and you should be able to reach the shifters and brakes
comfortably. At the bottom of the pedal stroke, your knee should be slightly bent.
Quick Start Manual 3
EN

Adjusting the Trainer Geometry
Before you assemble the Tacx NEO Bike Plus trainer, consider that the saddle and handlebars have set
screws installed from the factory that can be adjusted and tightened using a hex key. To install the 4
handles as shown in this manual, you must remove the 4 set screws using a hex key.
NOTE: If multiple riders will use trainer, Tacx recommends installing the handles for easy adjustments.
The handles are packaged in the assembly kit with the screws and washers. If you are the only rider that
will use the trainer and you do not make geometry or posture adjustments, you can use the set screws
and a hex key.
• Get off the trainer before adjusting the saddle or handlebars.
• Match the geometry of the trainer to your road bike.
TIP: For instructions on how to measure your road bike, see the owner's manual.
• If you adjust your saddle more than 1 cm, check the saddle height and the handle bar reach again.
• Do not exceed the maximum range of the saddle or handlebars.
• If you change your pedals or saddle, check the geometry of the trainer again.
After you tighten each handle, align the handle to be parallel to the frame or rail. Pull out and twist the
handle.
4 Quick Start Manual
EN

Tacx NEO Bike Plus Assembly Instructions
Order of Assembly
A
Trainer legs: page6
B
Pedals: page7
C
Bottle cage: page8
D
Saddle: page9
E
Handlebar with display: page10
F
Fans with tablet mount: page11
Alternative tablet mount: page13
G
Tablet: page13
H
Power cable: page14
Assembly Kit
NOTE: The assembly kit contains manuals, bolts, washers, tools, and other parts that are
required for each assembly task.
Quick Start Manual 5
EN
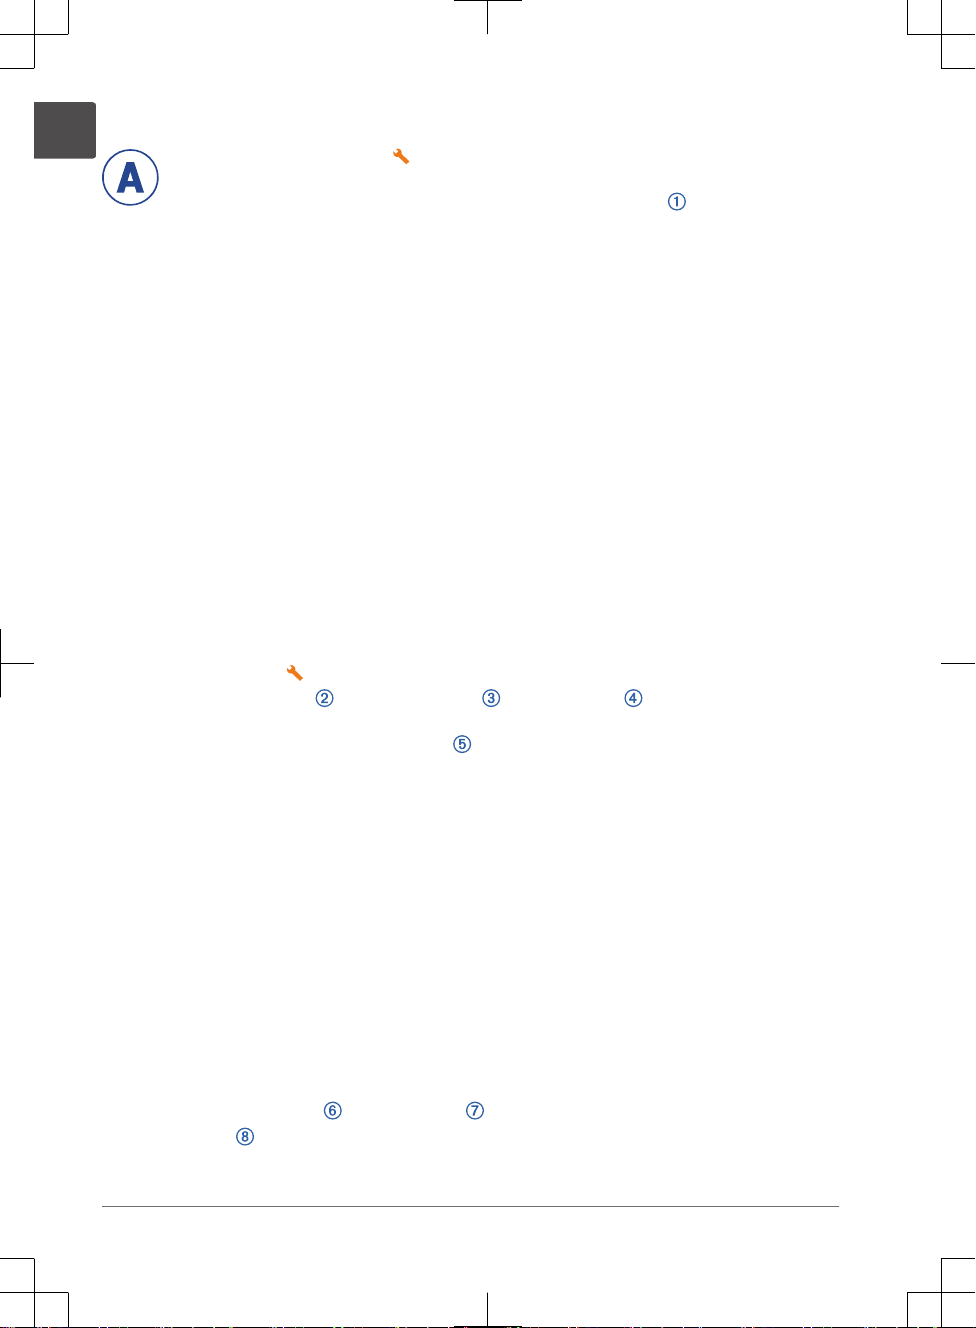
Installing the Legs on the Trainer
You must have the assembly kit for this task. You must have at least two people to
assemble the Tacx NEO Bike Plus trainer. Use care when lifting the trainer.
1Place the trainer on the floor, and tilt it back to install the front legs .
2Open the assembly kit .
3Use the M10 x 90 mm bolt , M10 x 130 mm bolt , 10 mm washers , and the 8 mm hex key to
install the front legs.
4Tilt the trainer forward to install the back legs .
5Use the M10 x 65 mm bolts , 10 mm washers , and the 8 mm hex key to install the back legs.
6Turn the knobs on the front legs to stabilize and level the trainer (optional).
A
6 Quick Start Manual
EN
Installing Your Pedals
Pedals are not included with the Tacx NEO Bike Plus trainer. For installation instructions
specific to your pedals, see the manufacturer's instructions.
1Install the right pedal first.
2Apply a thin layer of grease on the pedal spindle threads.
3Insert the spindle into the crank arm.
There are five crank length (mm) options. Use the same crank length for both pedals.
B
Quick Start Manual 7
EN
4Tighten the spindle according to the instructions provided with your pedal.
5Repeat steps 2 through 5 to install the left pedal.
NOTE: The left pedal spindle has a left-handed (reverse) thread.
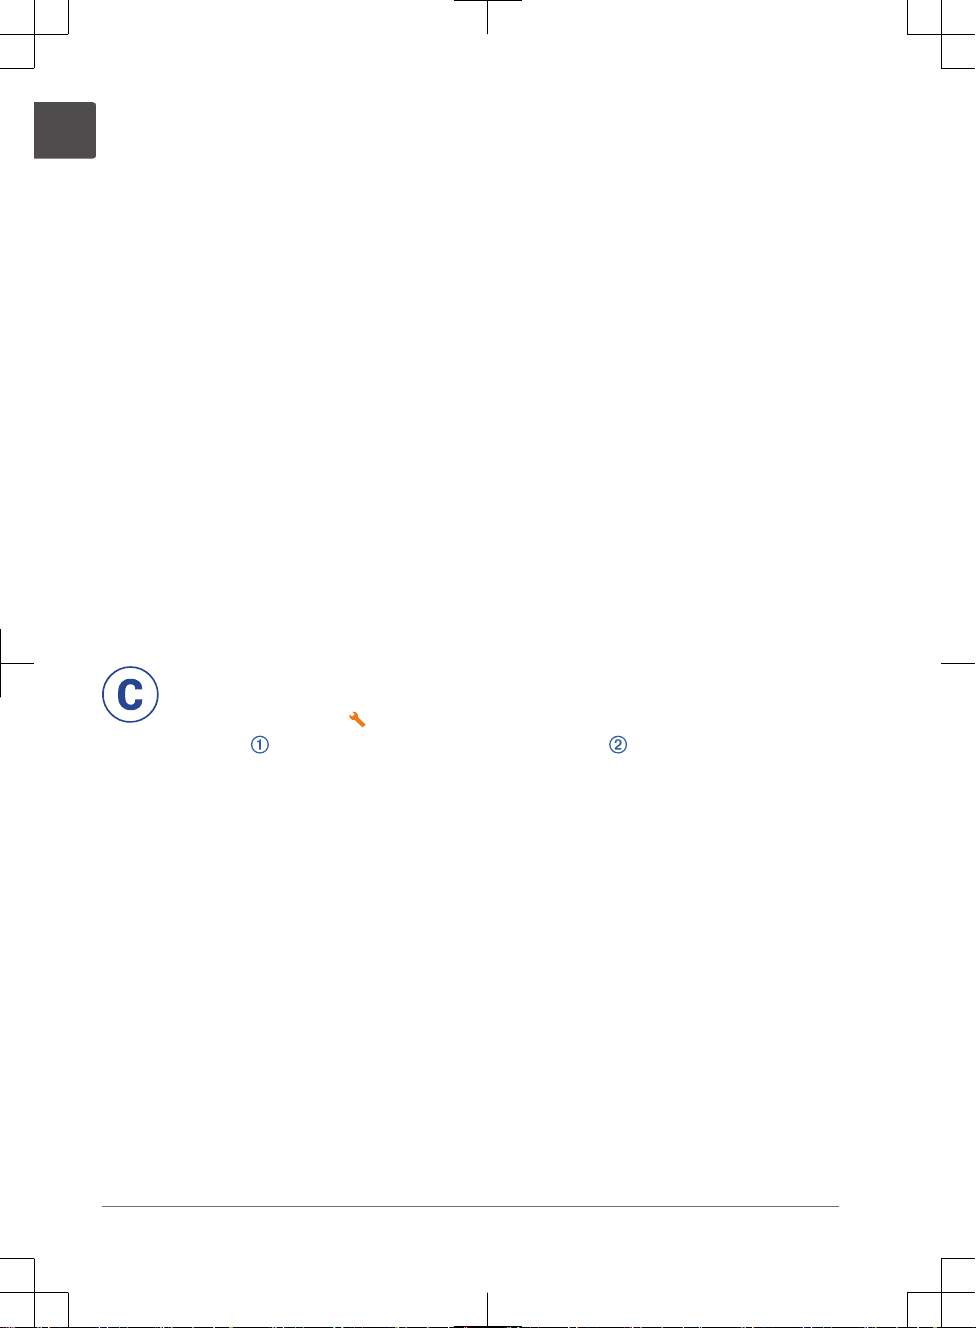
Attaching the Bottle Cage
You can attach the optional, standard-sized bottle cage to the trainer. The bottle cage is
packaged in the gift box. The screws are preinstalled on the frame.
1Open the assembly kit .
2Use the 2 screws and the 4 mm hex key to attach the bottle cage .
C
8 Quick Start Manual
EN
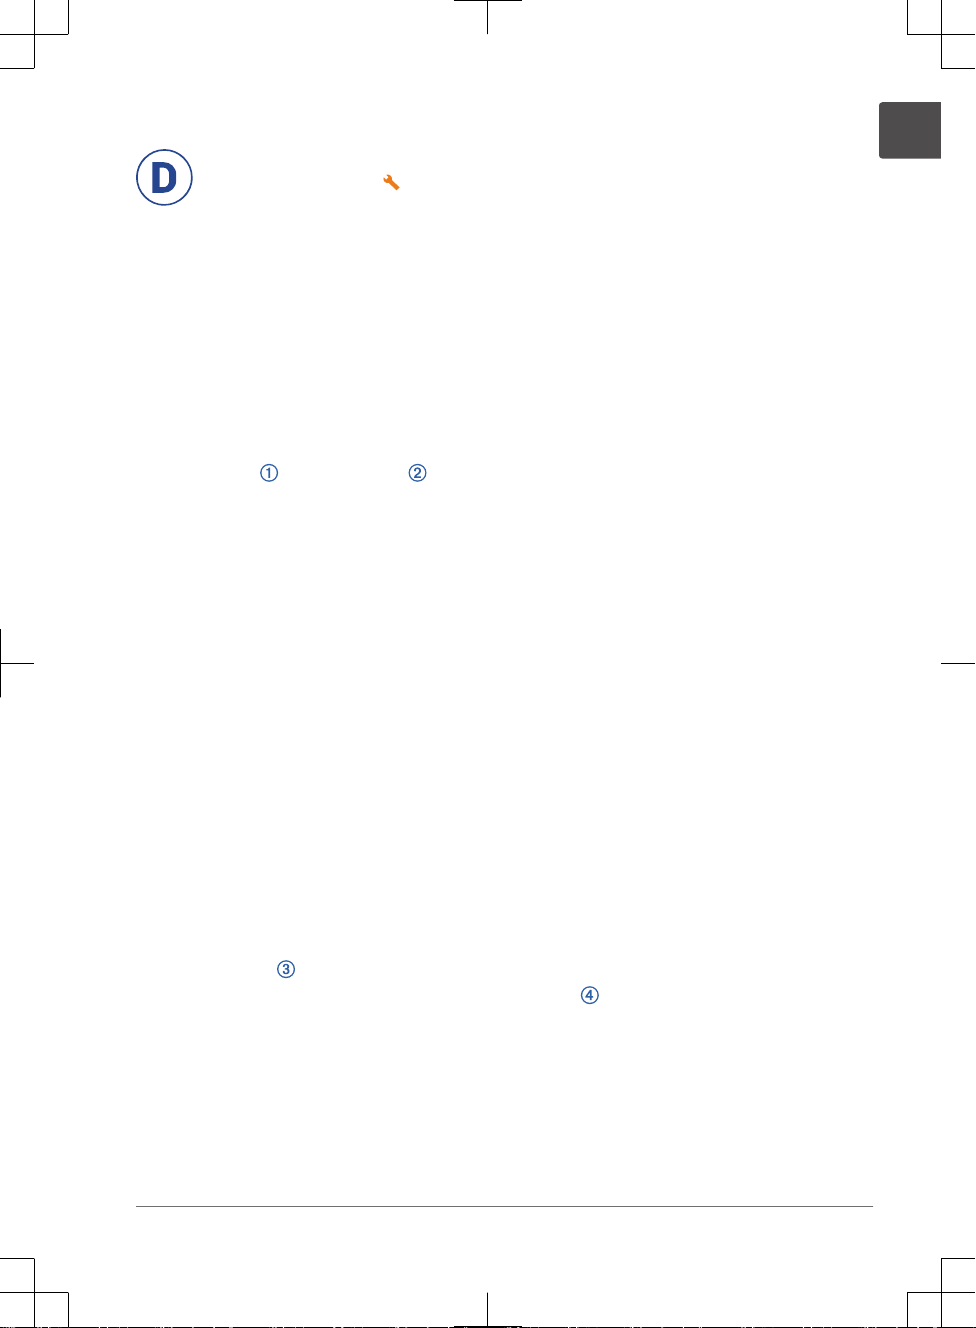
Installing the Saddle
Before you install the saddle, see the topics on posture (page3) and geometry (page4).
1Open the assembly kit .
2Use the 6 mm hex key to remove the set screw.
3Place the cap on the saddle rail .
4Slide the saddle onto the saddle rail.
5Adjust the saddle setback, and secure the M12 x 25 handle .
The maximum setback distance is 15 cm.
D
Quick Start Manual 9
EN

6Use the 8 mm hex key to remove the set screw from the saddle post.
7Adjust the saddle height, and secure the M16 x 22 handle .
The maximum saddle height is 26 cm.
8If necessary, use the 5 mm hex key to adjust the saddle angle bolt .
Installing the Handlebar
Before you install the handlebar, see the topics on posture (page3) and geometry (page4).
1Open the assembly kit .
2Use the 6 mm hex key to remove the set screw.
3Place the cap on the handlebar rail .
E
10 Quick Start Manual
EN
4Slide the handlebar onto the handlebar rail.
5Adjust the handlebar reach, and secure the M12 x 25 handle .
The maximum handlebar distance is 15 cm.
6Use the 8 mm hex key to remove the set screw from the handlebar post.
7Adjust the handlebar height, and secure the M16
x 22 handle .
The maximum handlebar height is 26 cm.
8If necessary, follow these steps to adjust the
handlebar angle.
9Use the Torx 20 to remove the handlebar cover
.
10 Use the 5 mm hex key to loosen the 4 screws.
11 Adjust the angle of the handlebar.
12 Tighten the 4 screws.
13 Replace and secure the handlebar cover.
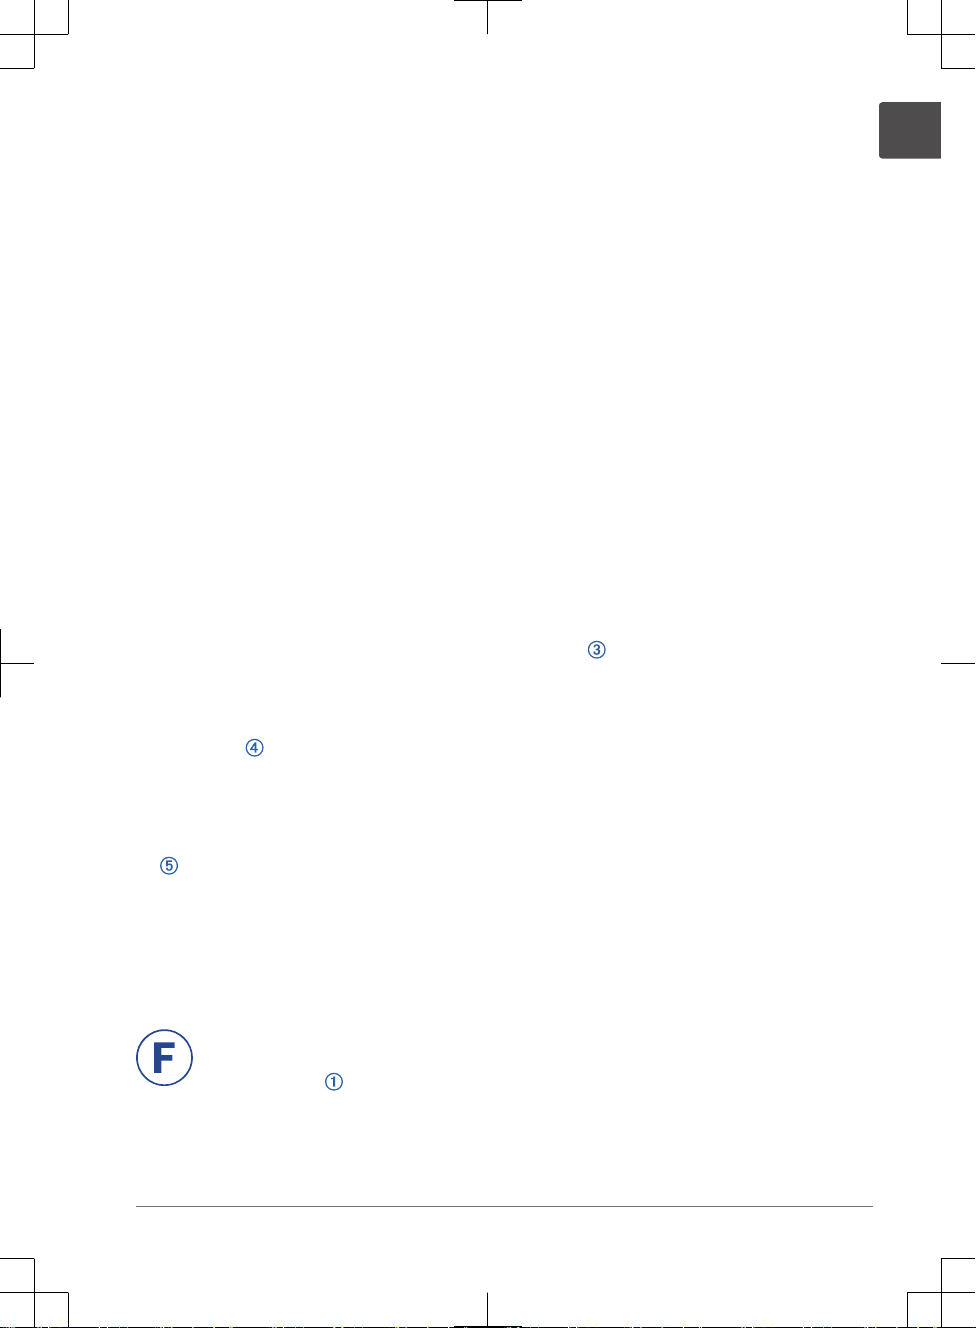
Installing the Fans with Tablet Mount
The tablet mount is between the fans
(page13).
1Align the fans with the back of the
display.
F
Quick Start Manual 11
EN

TIP: You may need to move the fan cables out of the way.
2 Use the M4 x 10 bolts and the Torx 20 wrench to install the fans.
3Connect the display cable and the fan cables to the ports .
4Use the knobs to adjust the angle of the fans.
5 Place the rubber mat into the tray.
12 Quick Start Manual
EN

Attaching Your Tablet to the Trainer
NOTICE
Before your first ride, read all of the instructions and secure your tablet to the trainer. Garmin® is not
responsible for damage caused to your tablet due to incorrect mounting of the tablet holder.
The clip fits most standard-sized tablets. If your tablet has a thick case or folio, you can
remove the case or folio before attaching the tablet to the trainer. The assembly kit includes
a separate tablet mount if you choose not to install the fans. For more information, see the
owner's manual.
1 Connect the rubber strap to the clip .
2Connect the rubber strap to the back of the
mount .
G
Quick Start Manual 13
EN
3Position your tablet on the trainer, and secure it with the clip.
4Connect your tablet cable to a USB port .
TIP: The right USB port is for high-output charging (12.5 W). The left USB port is for low-output
charging (2.5 W).
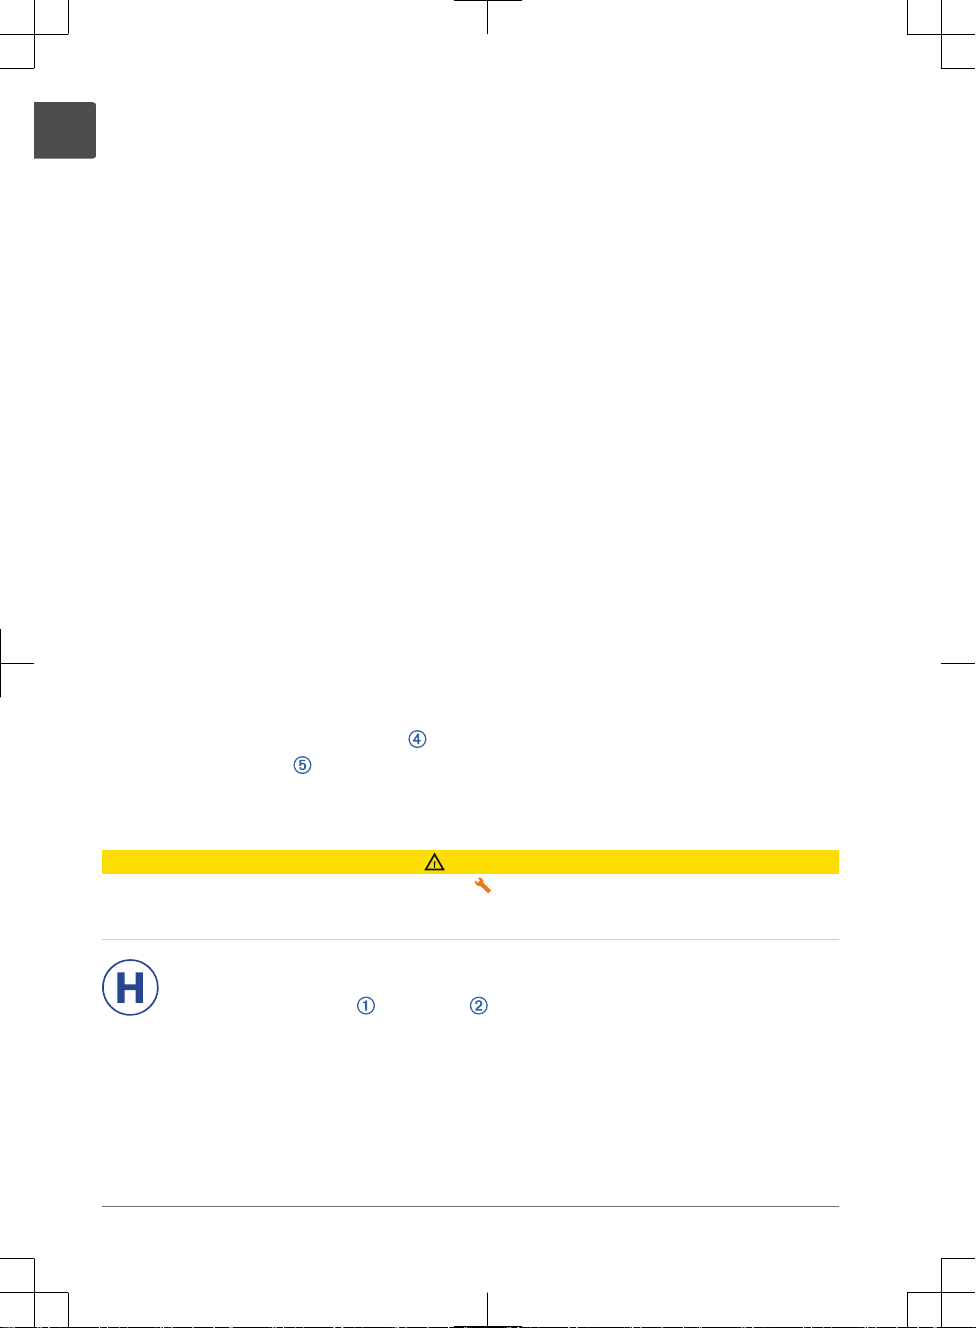
Connecting the Power Cable
CAUTION
The power cable and adapter are in the assembly kit . Do not attempt to use a third-party power cable
or adapter with the Tacx NEO Bike Plus trainer because this could lead to personal injury or damage to
the trainer.
You can use the Tacx NEO Bike Plus trainer with or without power. Some of the trainer features
require power, including downhill assistance.
1Plug the power adapter into the port .
H
14 Quick Start Manual
EN

2Connect the power cable to the power adapter.
3Plug the power cable into a standard wall outlet.
4Rotate the crank.
The display and fans turn on. The floor LED is blue.
Training
Display Data
The display turns on as soon as you start pedaling. The display data varies if you are connected to the
Tacx Training app, a third-party app, or optional wireless sensors.
Quick Start Manual 15
EN

Displays the ANT+® or Bluetooth® connection status, including your phone or optional wireless sensor.
Displays your current speed in kilometers per hour or miles per hour.
Displays your current heart rate in beats per minute (bpm). You must have a connected ANT+ heart rate
monitor.
Displays the current front gear (by default, the left shifter).
Displays the current rear gear (by default, the right shifter).
Displays an error message or an available trainer software update. For more information, connect to the Tacx
Training app or see the owner's manual.
Displays your current power output in watts.
Displays your current cadence in revolutions per minute (rpm).
Displays the manual training mode (page18) and additional data.
Going for a Ride
Your first ride on the Tacx NEO Bike Plus trainer should be a short, manual training ride. You should
learn how to use the basic features and get comfortable with the controls and settings.
1Start pedaling.
The display and fans turn on. The floor LED is blue.
2Use the shifters to change the front and rear gears:
16 Quick Start Manual
EN

• Press to shift the front gear up.
• Press to shift the front gear down.
• Press to shift the rear gear up.
• Press to shift the rear gear down.
The list includes the default shifter functions. You can customize the shifters to behave like
Campagnolo® , Shimano®, or SRAM® shifters. For more information, see the Tacx Training app.
3Hold both control buttons to select a manual training mode (page18).
4Press either button to select a mode.
The active mode icon blinks for 1 second to confirm your choice.
5During your ride, select an option:
• Press to increase the incline, value, or resistance.
• Press to decrease the incline, value, or resistance.
6If necessary, squeeze the brakes to slowly come to a stop.
Quick Start Manual 17
EN

Training Modes
You can choose a training mode when you are doing a manual workout on your Tacx NEO Bike Plus
trainer. Training modes are not available if you are connected to the Tacx Training app or another
third-party app.
Symbol Mode Description
Slope Training is based on a fixed incline so you can simulate gradients and hills. You can use the
control buttons to set the incline and use the shifters to change gears.
Power Training is based on a fixed power output value so you can ride at a controlled and constant
effort level. You can use the control buttons to set the value.
Resistance Training is based on 20 possible resistance levels so you can ride without a specific target,
such as a spin class. You can use the control buttons to change the resistance level.
Tacx Training App
You can download the Tacx Training app to your compatible phone, tablet, or computer.
• Ride exciting courses without leaving your home.
• Create your own rides, workouts, and more.
• Manage your training, customize the default settings, and diagnose issues.
• Sync your indoor training data with your Garmin Connect™ account.
• Update your trainer software.
Riding with the Tacx Training App
1From the app store on your phone or tablet, install and open the Tacx Training app.
2Follow the instructions in the app to complete the pairing and setup process.
3Select a workout or course.
4Start pedaling.
The display and fans turn on. The floor LED is blue.
5Follow the on-screen instructions.
Device Information
Device Care and Storage
WARNING
See the Important Safety and Product Information guide in the product box for product warnings and
other important information.
• Unplug the trainer when it is not in use.
• After every use, clean the aluminum disc on the left side of the trainer with a moist cloth, and dry it
thoroughly.
• Clean the saddle, handlebar, and pedals with a cloth and a mild cleaning solution.
• Clean the trainer before storing it.
• Use the small wheels on the back of the Tacx NEO Bike Plus trainer to move the trainer.
NOTE: You should stabilize and level the trainer after moving it.
18 Quick Start Manual
EN

Specifications
Power supply Use the included 48 Vdc 90 Watt power cable.
100 - 240 V
Operating temperature range From -0º to 40ºC (from 32º to 104ºF)
Wireless frequency 2.4 GHz @ 0 dBm maximum
Maximum weight 120 kg (265 lb.)
Getting the Owner's Manual
Go to www.garmin.com/manuals/NEOBikePlus.
Tacx®NEO Bike Plus
Snelstartgids
Vóór montage
WAARSCHUWING
Lees de gids Belangrijke veiligheids- en productinformatie in de verpakking voor
productwaarschuwingen en andere belangrijke informatie.
Afmetingen en speling
Houd bij het vinden van een geschikte locatie voor de Tacx NEO Bike Plus trainer rekening met de
maximum afmetingen. De afmetingen van de Tacx NEO Bike Plus trainer worden met en zonder de
ventilators getoond.
Tacx beveelt een minimale speling van 60 cm (24 inch) aan alle zijden van de trainer aan.
Snelstartgids 19
NL
20 Snelstartgids
NL
Other manuals for TACX NEO BIKE PLUS
1
Table of contents
Languages:
Popular Exercise Bike manuals by other brands


Sunny Health & Fitness
Sunny Health & Fitness SF-B121021 user manual

Monark
Monark 827E instruction manual

Stamina
Stamina 1310 owner's manual

American Fitness
American Fitness SPR-BK1072A owner's manual
 Service manual")
Cateye
Cateye CS-1000 (CYCLO SIMULATOR) Service manual

BH FITNESS
BH FITNESS H9158H Instructions for assembly and use