Garmin Fuslon SG-TW10 SIGNATURE Series User manual
SG-TW10 SIGNATURE SERIES COMPONENT TWEETER
INSTALLATION INSTRUCTIONS
Important Safety Information
WARNING
See the Important Safety and Product Information guide in the product box for product warnings and other
important information.
This device must be installed according to these instructions.
Disconnect the vessel's power supply before beginning to install this device.
CAUTION
Continuous exposure to sound pressure levels over 100dBA may cause permanent hearing loss. The volume
is typically too loud if you cannot hear people speaking around you. Limit the amount of time you listen at high
volume. If you experience ringing in your ears or muffled speech, stop listening and have your hearing checked.
To avoid possible personal injury, always wear safety goggles, ear protection, and a dust mask when drilling,
cutting, or sanding.
NOTICE
When drilling or cutting, always check what is on the opposite side of the surface to avoid damaging the vessel.
It is strongly recommended that you have your audio system installed by a professional installer to ensure
optimum performance.
You must read all installation instructions before beginning the installation. If you experience difficulty during
the installation, go to support.garmin.com for product support.
After installing an audio system, you should run the connected speakers and subwoofers at low to medium
volumes for the first few hours of use. This helps to improve the overall sound by gradually loosening up the
moving components of new speakers and subwoofers, such as the cone, spider, and surround.
GUID-C95B60D7-5586-4AB8-98F6-1D873D427610 v3May 2022

Tools Needed
• Electric drill
• Drill bit (size varies based on surface material)
• 51mm (2in.) hole saw
• Phillips screwdriver
• Wire strippers
• 16 AWG (1.3 through 1.5mm2) or larger marine-grade, fully-tinned copper speaker wire (optional1)
If needed, you can purchase this wire from your Fusion® or Garmin® dealer:
◦010-12899-00: 7.62m (25ft.)
◦010-12899-10: 15.24m (50ft.)
◦010-12899-20: 100m (328 ft.)
• Solder and water-tight heat shrink tubing or water-tight, heat-shrink, butt-splice connectors (optional)
• Marine sealant (optional)
NOTE: For customized installations, additional tools and materials may be needed.
Mounting Considerations
This component tweeter is designed to fill in high-frequency music detail in your system when you install Fusion
Signature Series speakers in a low area on the boat.
NOTICE
This product is compatible only with Fusion Signature Series speakers and with specific DSP-enabled stereos
rated at 2Ohm stable (per channel). You must confirm that this product is compatible with your speakers and
stereo before installing, because installing this product with an incompatible speaker or stereo may result in
damage. Check with your local Fusion dealer or go to garmin.com for compatibility information.
NOTE: You should connect, configure, and listen to the tweeters to confirm their ideal placement before cutting
any mounting holes in your vessel (Configuring the Tweeter Speakers, page5).
Selecting the correct mounting location is critical to optimize the performance of each tweeter.
• You should place the tweeters as close as possible to the paired Fusion Signature Series speakers, and high
enough that the high-frequency sounds are heard and a sound stage effect is achieved.
• You should select mounting locations that enable you to hear sound from all speakers and tweeters at
the same time to achieve a sound stage effect. To achieve this effect, you should not mount the speakers
side-by-side.
• You must select mounting locations that provide sufficient clearance for the mounting depth of the tweeters
as specified in the product specifications.
• You should select a flat mounting surface for the best seal.
• You should protect the speaker wires from sharp objects and always use rubber grommets when wiring
through panels.
• You should select mounting locations that avoid potential obstacles, such as fuel and hydraulic lines and
wiring.
• To avoid interference with a magnetic compass, you should not mount the tweeters closer to a compass than
the compass-safe distance value listed in the product specifications.
•NOTICE
You should protect all terminals and connections from grounding and from each other. Failure to do so could
result in permanent damage to the audio system and void the product warranty.
You must turn off the audio system before making any connections to the source unit, amplifier, or speakers.
Failure to do so could result in permanent damage to the audio system.
1 A terminated 2m (6.5ft.) cable is included for each speaker, and should be sufficient for most installations.
2

Mounting the Tweeter Speakers
Before mounting the tweeters, you must choose a location following the guidelines above.
Before cutting the mounting surface you should verify that there is enough clearance for the tweeter behind the
surface. Refer to the specifications for clearance information.
1Mark the center location of the tweeter on the mounting surface.
2Using a 51mm (2in.) hole saw, cut the hole for the tweeter.
3Place the tweeter in the hole to test the fit.
4If necessary, use a file and sandpaper to refine the size of the hole.
5After the tweeter fits correctly in the hole, mark the mounting holes for the tweeter on the surface.
6Remove the tweeter from the hole.
7Using an appropriately sized drill bit for the mounting surface and screw type, drill the pilot holes.
NOTICE
Do not drill the pilot holes through the holes on the tweeter. Drilling through the tweeter may damage it.
8Route the speaker wires on the included 2m (6.5ft.) cable through the hole and connect it to the paired
speaker and the stereo (Speaker Connections, page4).
NOTE: Avoid routing the speaker wire near sources of electrical interference.
9Connect the speaker wires the included 2m (6.5ft.) cable.
10 Place the tweeter in the cutout.
11 Test the tweeter to make sure it plays music correctly.
12 Secure the tweeter to the mounting surface using the included screws .
NOTE: Do not over tighten the screws, especially if the mounting surface is not flat.
13 Push the bezel onto the tweeter front until it snaps in place.
NOTE: The bezel attaches securely to the tweeter when you snap it in place. You should test the tweeter for
correct operation before attaching the bezel.
3
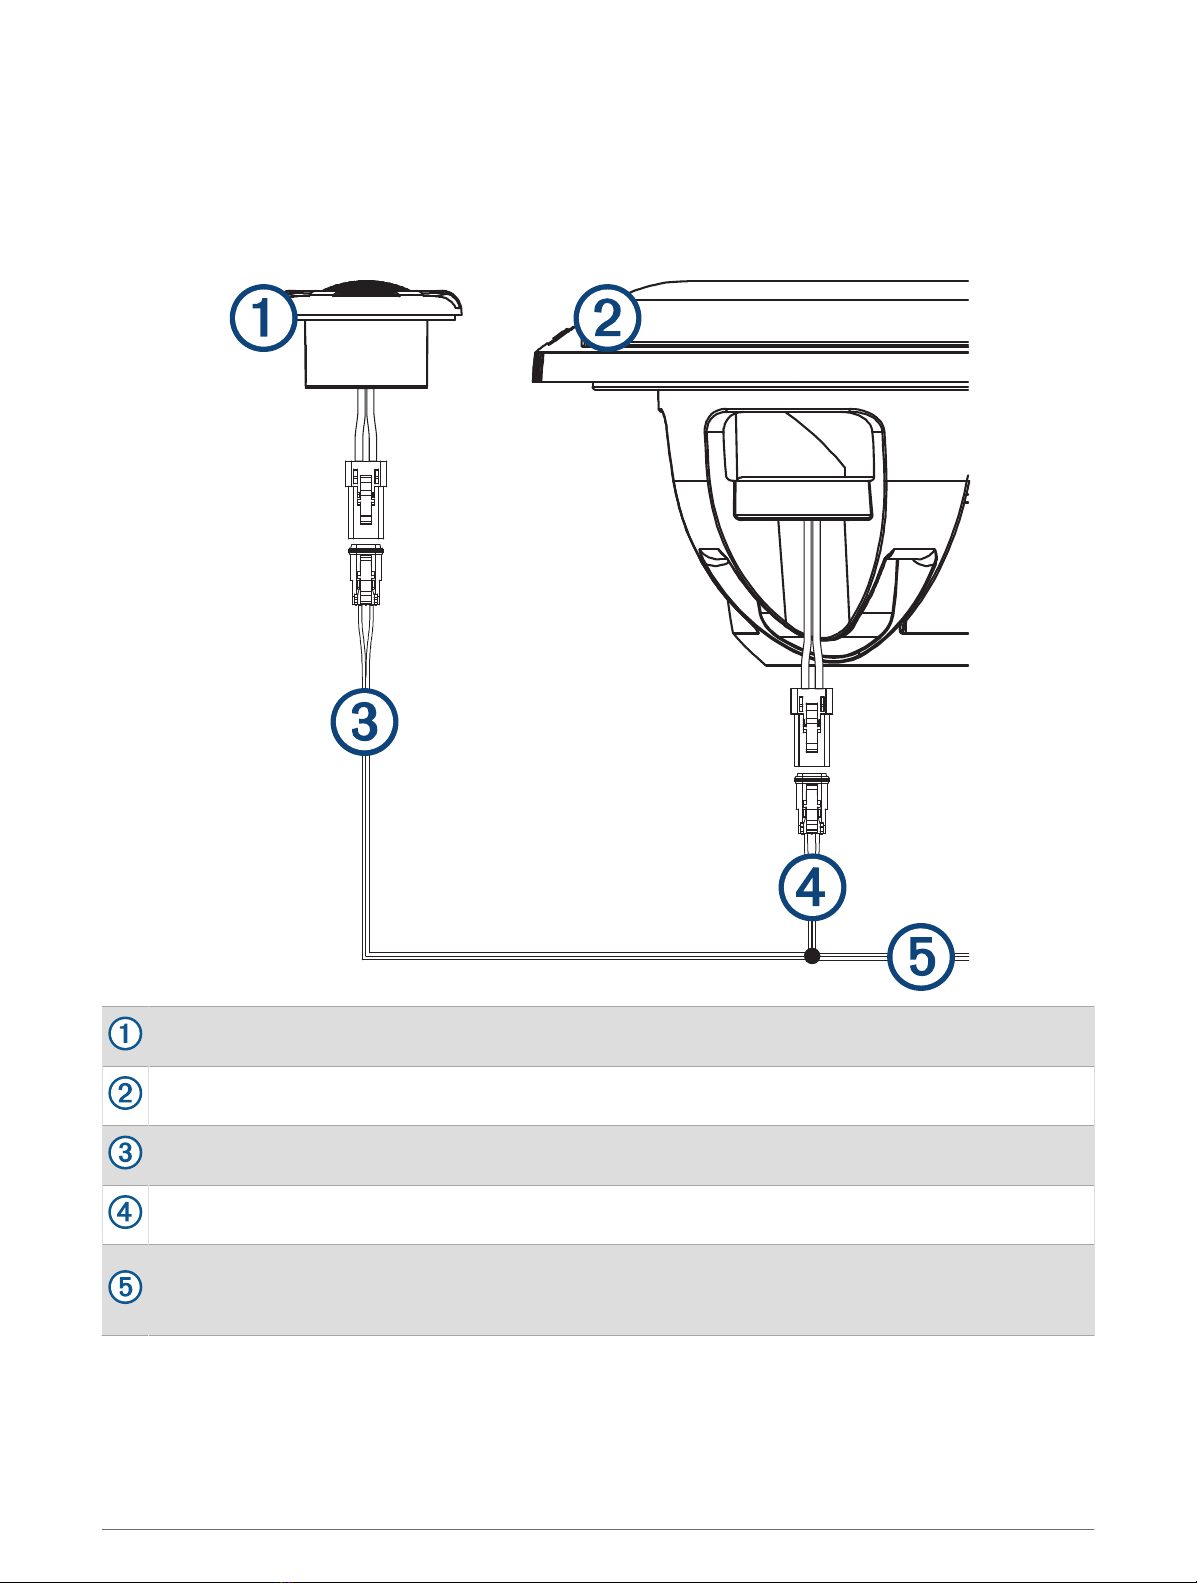
Speaker Connections
These component tweeters are designed for use with Fusion Signature Series speakers.
The tweeter contains an internal passive crossover, and no additional crossover module is required. You must
connect the speaker wire from the stereo to the same wires as the Fusion Signature Series speaker using the
included 2m (6.5ft) cable. You should use 16 AWG (1.3 through 1.5mm2) or larger speaker wire if an extension
is required.
SG-TW10 Component Tweeter
Fusion Signature Series speaker
2m (6.5ft) cable (included with the SG-TW10 Component Tweeter)
Speaker wire harness (included with the Fusion Signature Series speaker)
Speaker wire from the stereo (not included)
You should use a water-tight connection method when connecting the wires from the speakers to the
stereo.
4

Wire Strain Relief
NOTICE
Failure to secure the wiring-harness connections can damage the speaker.
The wires connected to the speaker and the included wiring harness use Amphenol™ AT Series™ connectors, and
these connectors must be secured during installation to provide strain relief for the internal wire connections to
the speaker. You can secure these connections using various methods.
• You can use cable ties or other third-party fastening devices to secure the connection to an appropriate
location.
• You can use the various Amphenol A Series™ clips produced by Amphenol to secure the connection. You can
check with your local electronics or marine dealer, or go to the Amphenol-Sine website for more information.
Configuring the Tweeter Speakers
For proper performance, you must configure the DSP profile on your stereo for the tweeters.
1After you connect the tweeters to the Fusion Signature Series speakers, turn on your DSP-capable stereo.
2Using the Fusion-Link™ remote control app, open the DSP settings for the stereo.
3Select the DSP profile for the Fusion Signature Series speakers and tweeter, and apply it to the stereo.
4If necessary, fine tune the tweeter output by adjusting the treble from the tone settings on the stereo.
See the owner's manual for your stereo for more details on adjusting the tone settings.
Speaker Information
True-Marine™Products
True-Marine products are subjected to rigorous environmental testing under harsh marine conditions to surpass
industry guidelines for marine products.
Any product that bears the True-Marine stamp of assurance has been designed for simplicity of use and
combines advanced marine technologies to deliver an industry leading entertainment experience. All True-
Marine products are supported by the Fusion 3-year worldwide limited consumer warranty.
Cleaning the Speakers
NOTE: When mounted correctly, these speakers are rated IP65 for dust and water ingress protection under
normal conditions. They are not designed to withstand high pressure water spray, which may occur when
you wash down your vessel. Failure to carefully spray-clean the vessel may damage the product and void the
warranty.
NOTICE
Do not use harsh or solvent-based cleaners on the speakers. Using such cleaners may damage the product and
void the warranty.
1Clean all salt water and salt residue from the speaker with a damp cloth soaked in fresh water.
2Use a mild detergent to remove a heavy buildup of salt or stains.
Troubleshooting
Before you contact your Fusion dealer or service center, you should perform a few simple troubleshooting steps
to help diagnose the problem.
If the Fusion speaker has been installed by a professional installation company, you should contact the
company so the technicians can assess the problem and advise you about possible solutions.
There is no sound coming from the speakers
• Verify that all connections from the source device and/or the amplifier are connected correctly to the speaker
terminals.
5

The audio is distorted
• Verify that the source volume is not too loud for the speaker, and reduce the volume if necessary.
• Verify that the panels surrounding the speaker on the vessel are not rattling.
• Verify that the source device and/or the amplifier are connected to the speaker terminals correctly.
• If the speaker is connected to an amplifier, verify that the input level of the amplifier is matched to the output
level of the stereo. For more information, see the manual for the amplifier.
Specifications
Max. power (Watts) 330W
RMS power (Watts) 60W
Efficiency (1W/1m) 91dB
Frequency response 3kHz to 20kHz
Impedance 4Ohm nominal
Impedance when connected to a Fusion Signature
Series speaker 2Ohm nominal
Recommended amplifier power (RMS) From 25 to 140W per channel
Diaphragm material Aluminum (hard dome)
Min. mounting depth (clearance) 31mm (1 1/4in.)
Mounting diameter (clearance) 51mm (2in.)
Compass-safe distance 110cm (3ft. 7 1/4in.)
Operating temperature range From 0 to 50°C (from 32 to 122°F)
Storage temperature range From -20 to 70°C (from -4 to 158°F)
Ingress protection rating IEC 60529 IP65 (protected against dust and water
ingress)
Wiring connector type Amphenol AT Series AT 2-way
6
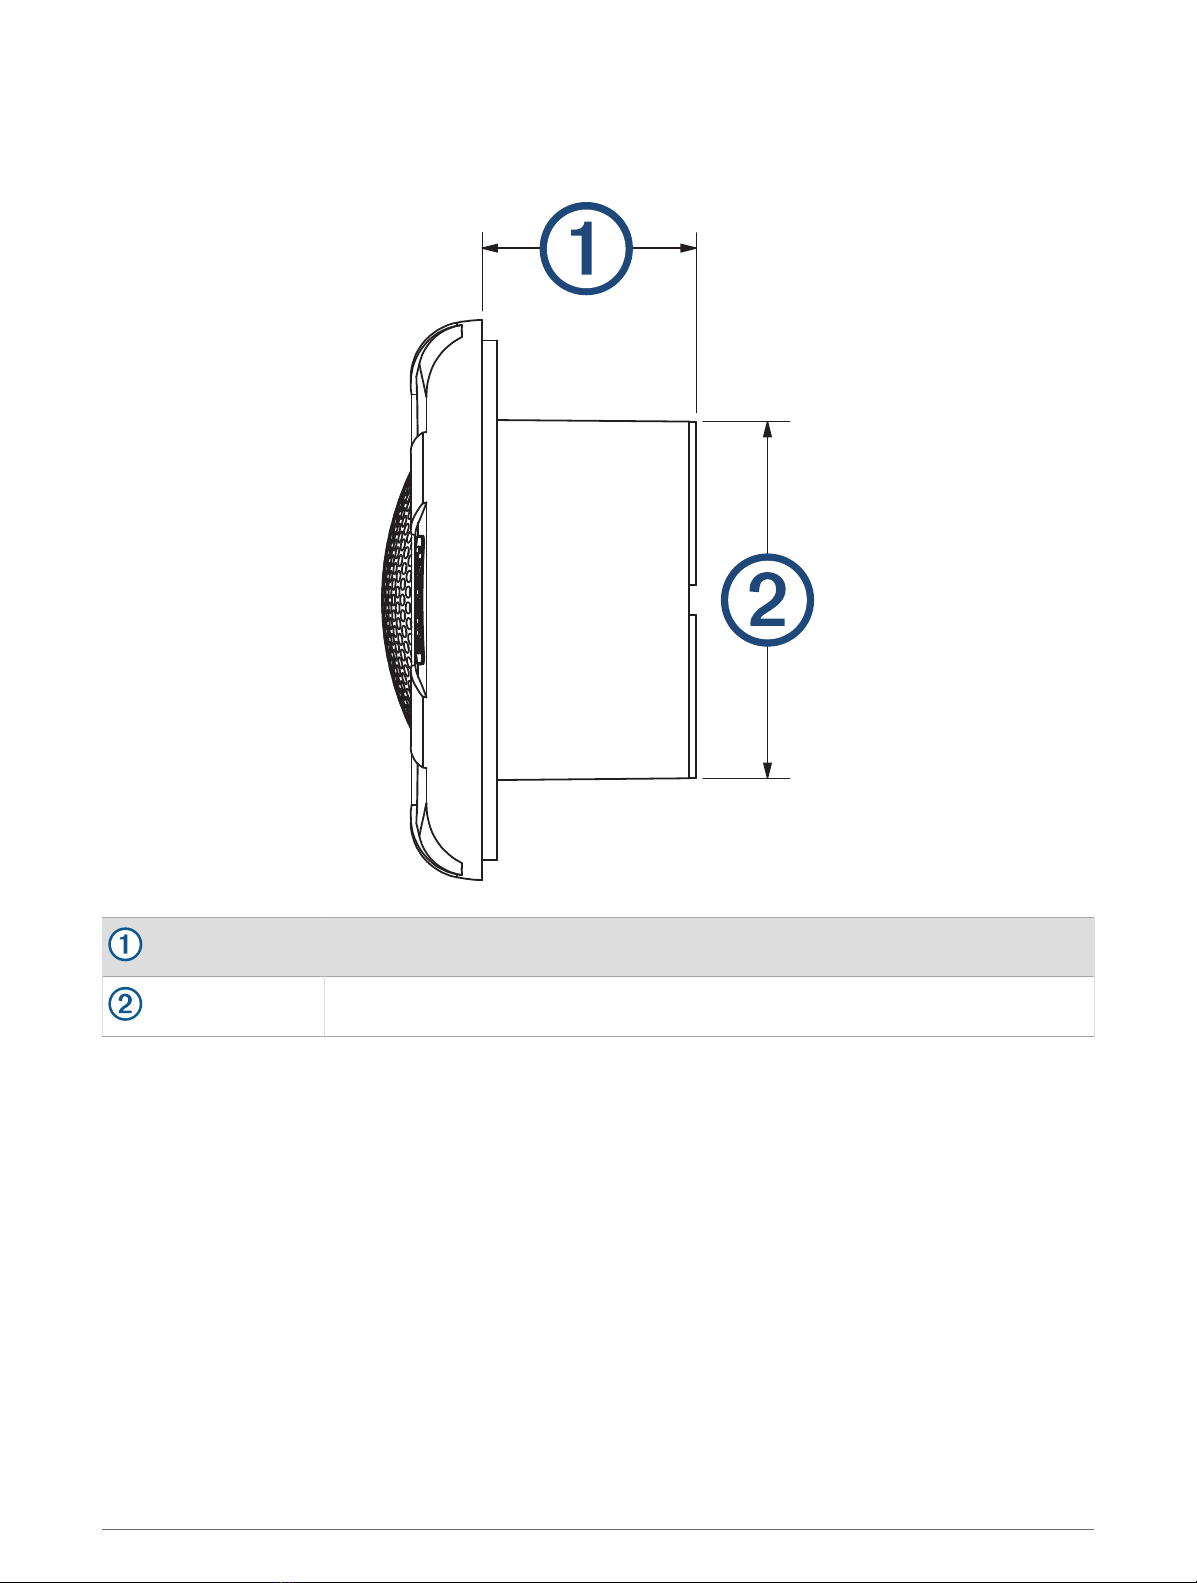
Dimension Drawings
Side View
28mm (11/8in.)
47mm (17/8in.)
7
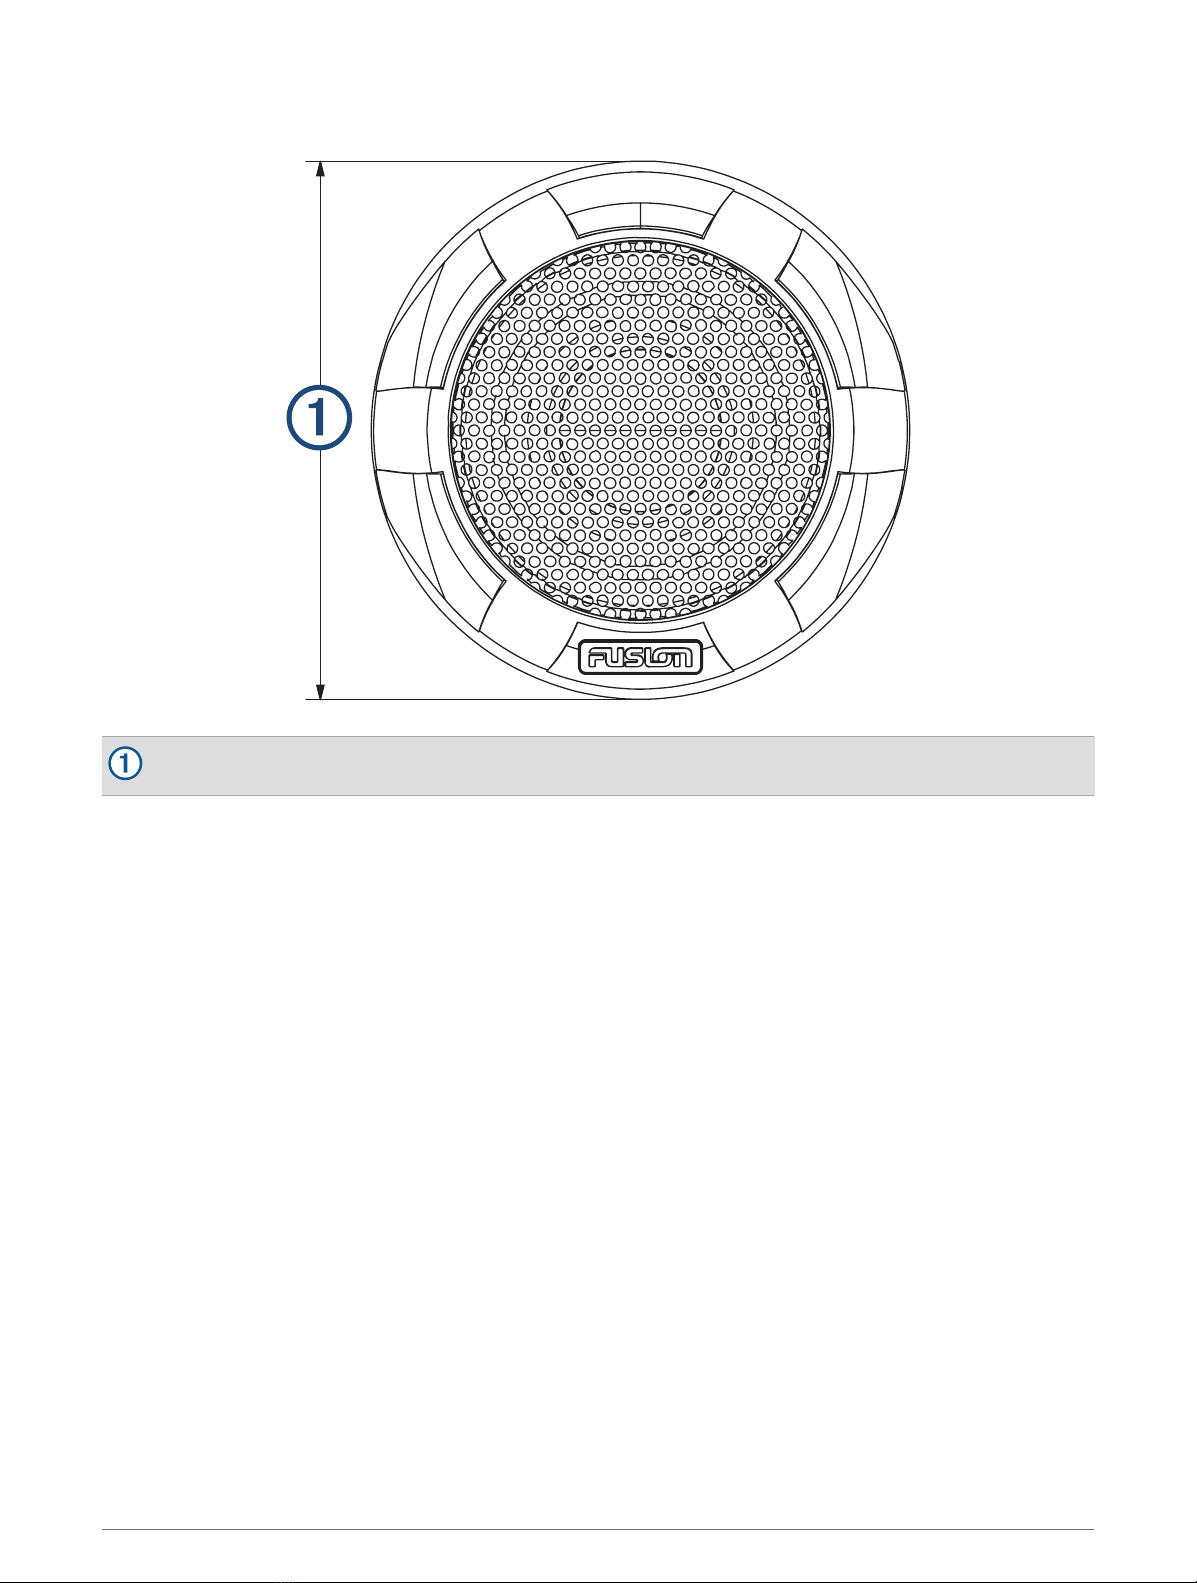
Front View
74mm (215/16in.)
8

物質宣言
部件名称 有毒有害物质或元素
铅 汞 镉 六价铬 多溴联苯 多溴二苯醚
塑料件
磁钢
金属连接件
金属结构件(T铁甲板)
电线
PC 混纺软件
本表格依据 SJ/T11364 的规定编制。
: 代表此种部件的所有均质材料中所含的该种有害物质均低于
(GB/T26572) 规定的限量
: 代表此种部件所用的均质材料中, 至少有一类材料其所含的有害物质高于
(GB/T26572) 规定的限量
* 该产品说明书应提供在环保使用期限和特殊标记的部分详细讲解产品的担保使用条件。
产品
連絡地址
委製銷售:台灣國際航電股份有限公司
聯絡地址:新北市汐止區樟樹二路 68 號
電 話:(02)2642-8999
客服專線:(02)2642-9199
© 2022 Garmin Ltd. or its subsidiaries
Garmin®, the Garmin logo, Fusion®, the Fusion logo, and True-Marine™ are trademarks of Garmin Ltd. or its subsidiaries, registered in the USA and other countries. These
trademarks may not be used without the express permission of Garmin.
Amphenol™ and Amphenol AT Series™ are trademarks of Amphenol Sine Systems. CURV® is a registered trademark of Propex Furnishing Solutions.
9

© 2022 Garmin Ltd. or its subsidiaries support.garmin.com
Table of contents
Other Garmin Speakers manuals


