GAS MAX ASB1 User manual
MAX
HARDCORE CAR AUDIO
MAX
ASB1-8/ASB1-10

WE PLAY LOUD!!
We know what you want. You want it LOUD, and that
is exactly what we do, what we live for. Vibrations,
gut-punches and straight up loud music - that’s what
makes us tick. We won’t dress up in fancy words or
claim to be something we’re not. We are the NO
BULLSH!T car audio brand!
Every single product with the GAS logo on it is born
out of passion, the same that has driven us for two
generations and that will keep us rolling up to your
neighbourhood, winning and pushing the limits for
many generations to come!
It’s up to you to choose your own level of loud, and if
you don’t like what we do that’s OK. You are welcome
We don’t exclude, we don’t judge and we do not make
up any excuses for who we are.
We are GAS and we are proud to be LOUD!

TABLE OF CONTENT
SAFETY.........................................................................................................
UNPACKING...................................................................................................
DIMENSIONS.................................................................................................
SPECIFICATIONS...........................................................................................
MAX ASB1-8.....................................................................................
MAX ASB1-10....................................................................................
Recommended cables......................................................................
FEATURES....................................................................................................
Impressive compact bass................................................................
Optimized power..............................................................................
Simple installation...........................................................................
Full control.......................................................................................
FUNCTIONS...................................................................................................
HOW TO.........................................................................................................
Install active slim subwoofer............................................................
Tweaking & settings.........................................................................
TROUBLESHOOTING......................................................................................
No power/sound..............................................................................
Unwanted noise...............................................................................
Distortion.........................................................................................
WARRANTY & DISPOSAL..............................................................................
THE GAS WORLD...........................................................................................
3
4
4
5
5
5
6
7
7
7
7
7
8
10
10
13
16
16
16
16
17
18

SAFETY
Make sure to pay attention to the instructions when you see this symbol:
Do not expose your new active subwoofer to excessive damp or moisture. If the active
subwoofer is exposed it might result in electric failure, shock or damage to the
product. Servicing is required when the product has been damaged in any way and/or
doesn’t operate normally. Refer all servicing to qualified service personnel only.
Keep the cables inside the vehicle separate from sharp edges or components that
may be affected or take damage. Follow the recommended cable sizes and always use
high quality cables and accessories. Even if you’re eager to put the subwoofer to use
– take no shortcuts when installing the cables, make sure that all connectors are
protected and secured.
Do not drill any holes without checking what lies beneath, and don’t cut anything
without making sure that no important components risk being damaged.
There is a first time for everything, if you need help - ask a friend or contact your local
GAS AUDIO POWER dealer/installer.
We want you to experience your products to the MAX, but we don’t want you to injure
yourself or others. Use common sense, respect high pressure levels and volume, and
follow your local laws and regulations.
3
NO COMPROMISES! Especially when it comes to safety. Before installing your MAX
ABS1 series active subwoofer, make sure that you read through the manual and
follow the instructions. Save the manual for future usage and reference!
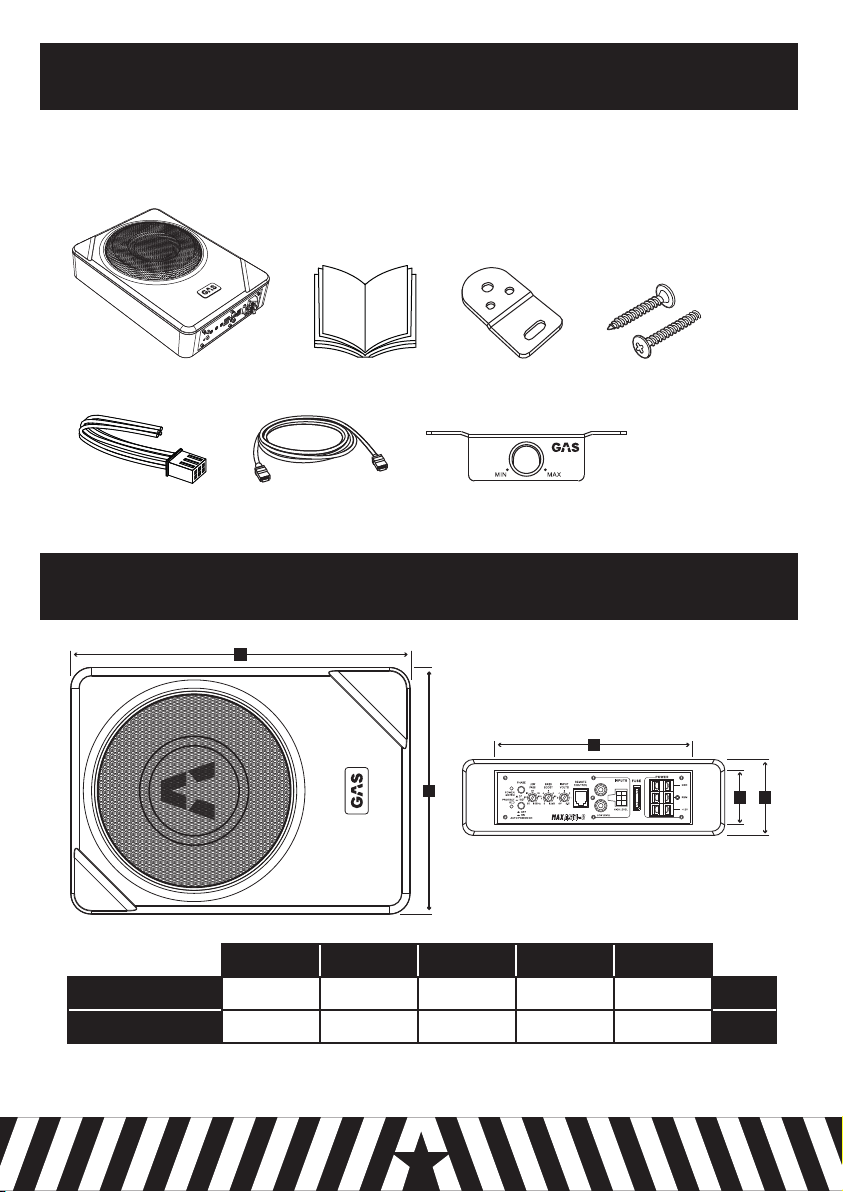
UNPACKING
Unboxing your new MAX product is an experience, make sure that the active subwoofer and
all the accessories are included in the packaging:
4
Manual
DIMENSIONS
A
B
ASB1-8
ASB1-10
A B C D E
mm
mm
342
360
242
263
170
174
44
44
85
87
C
D E
Brackets
(4 pcs)
Remote cable
Subwoofer Screws
(12 pcs)
Remote
HI input cable

SPECIFICATIONS
5
Below you’ll find the specifications that has been checked and tested in our workshop. The
specified sensitivity isn’t directly connected with the sound pressure in the vehicle, and
shouldn’t be used as the sole indicator for comparison with other subwoofers.
MAX ASB1-8
Component
Size
Power* RMS
Power* MAX
T.H.D
Freq. response
Active Subwoofer
8” (200mm)
130W
260W
< 0.3%
20-150Hz
*Power @ 14.4V / 1% THD
Input sensitivity HI
Input sensitivity RCA
S/N ratio
1.0V-8.0V
0.15V-6.0V
> 95dB
Low pass filter 50-150Hz
Bass EQ 0-12 dB @ 45Hz
Subsonic filter
Phase 0/180
Damping factor >120
Bass remote Yes, level
Power fuse 15A
Power voltage 10-16V
REM voltage 11-15V
High level input Yes, Auto ON/OFF
Low level input Yes
Weight 4.04 Kg
MAX
Component
Size
Power* RMS
Power* MAX
T.H.D
Freq. response
Active Subwoofer
10” (250mm)
150W
300W
< 0.3%
20-150Hz
*Power @ 14.4V / 1% THD
Input sensitivity HI
Input sensitivity RCA
S/N ratio
1.0V-8.0V
0.15V-6.0V
> 98dB
Low pass filter 50-150Hz
Bass EQ 0-12 dB @ 45Hz
Subsonic filter
Phase 0/180
Damping factor >125
Bass remote Yes, level
Power fuse 20A
Power voltage 10-16V
REM voltage 11-15V
High level input Yes, Auto ON/OFF
Low level input Yes
Weight 4.65 Kg
ASB1-10

SPECIFICATIONS
6
Power cable 10AWG (6mm
Speaker cable
REM cable
8AWG (10mm
14AWG (1,5mm 12AWG (4mm
14AWG (1,5mm 12AWG (4mm
Power cable 10AWG (6mm
Speaker cable
REM cable
8AWG (10mm
14AWG (1,5mm 12AWG (4mm
14AWG (1,5mm 12AWG (4mm
RECOMMENDED MIN SIZE RECOMMENDED MAX SIZE
MAX ASB1-8
RECOMMENDED MIN SIZE RECOMMENDED MAX SIZE
MAX ASB1-10
RECOMMENDED CABLE SIZES

7
FEATURES
If you have this in your hand, you have finally made it. Congratulations! You are ready to take
the next step, to enter a world of NO COMPROMISES with an active slim subwoofer that’ll
take the audio experience in your car to the next level. So get out there and impress the
non-believers! Show them that true dedication is and that “good enough” just doesn’t cut it.
IMPRESSIVE COMPACT BASS
We want everyone to have access to truly great sound - even if it’s in a smaller car or when
you need the space in your trunk. Our engineers worked hard on how to manifest the MAX
experience in a compact format that’s so small it can fit under a seat. The MAX ASB1 was
designed to test the limits and is packed with a lot of power, bass and impressive per-
formance that fulfills your need for high quality bass.
OPTIMIZED POWER
The subwoofer is equipped with the latest Class AB amplifier. Together with its enhanced
performance, the amplifier can deliver up to 130/150W (RMS) directly to the 8/10” woofer.
We know that LOUD is not good enough for you, not without the performance to match it. To
make sure that the bass perfectly matches your sound system, we’ve included customizable
settings such as a low-pass filter, bass EQ and 0°/180° phase shift control.
SIMPLE INSTALLATION
When we say that everyone deserves great bass, we mean it. To achieve this, we made sure
to make it easy for you to integrate the ASB1 with your current sound system. You won’t even
need a new head unit to connect it. There are two methods you can use: Low level (by using
the RCA pre-out) or High level (by using the speaker cables). If you use the High-level input,
the best-in-class pre-amplifier with Auto Sense Circuit allows the amplifier to turn on and
off without the need for a remote turn on wire. It almost sounds too easy, right?
FULL CONTROL
Going on a cruise or a longer road trip? If you want to listen to a different kind of music after
a while, you still want to optimize the bass for that genre. The included bass remote gives
you full access to adjusting the bass level whenever you want to. Simple and easy.

FUNCTIONS
NO COMPROMISES - that’s the spirit of the MAX series. The MAX active subwoofers are
made for the enthusiasts out there who crave high precision audio! We’ve packed the active
subwoofer with a bunch of interesting features. We know you’re itching to get your new
sound system going, but make sure to read through these pages - so you can get the most
out of your setup!
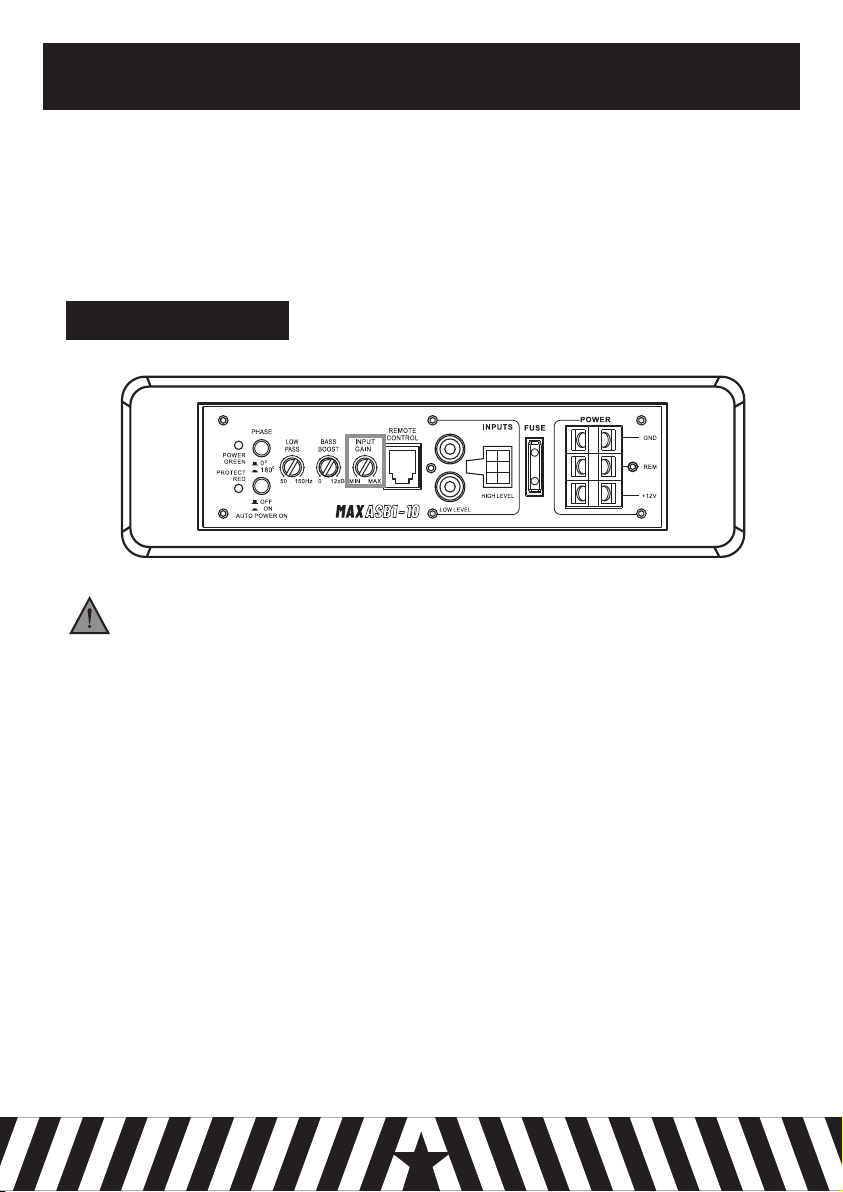
POWER LED LIGHT
1
The LED light glows green when
the power is on.
8
PROTECTION LED LIGHT
2
The LED light glows red when the
protection circuit is active.
PHASE SHIFT
3
Switch to compensate for time
alignment in the sound system.
LOW PASS FILTER
4
Rotate to limit the output
above selected frequency.
BASS BOOST (EQ)
5
Rotate to boost the bass at 45Hz,
Variable between 0-12dB.
INPUT GAIN/VOLTS
6
Rotate to syncronize your head
unit’s output signal with the active
subwoofer’s amplifier.
Read through and follow
the HOW TO instructions.
REMOTE CONTROL INPUT
7
Use this to connect a remote level
output control knob for an easy
access and adjustment of the
active subwoofer’s output.
1
2
3 4 5
10
6 7 8
12
11
13
14
9

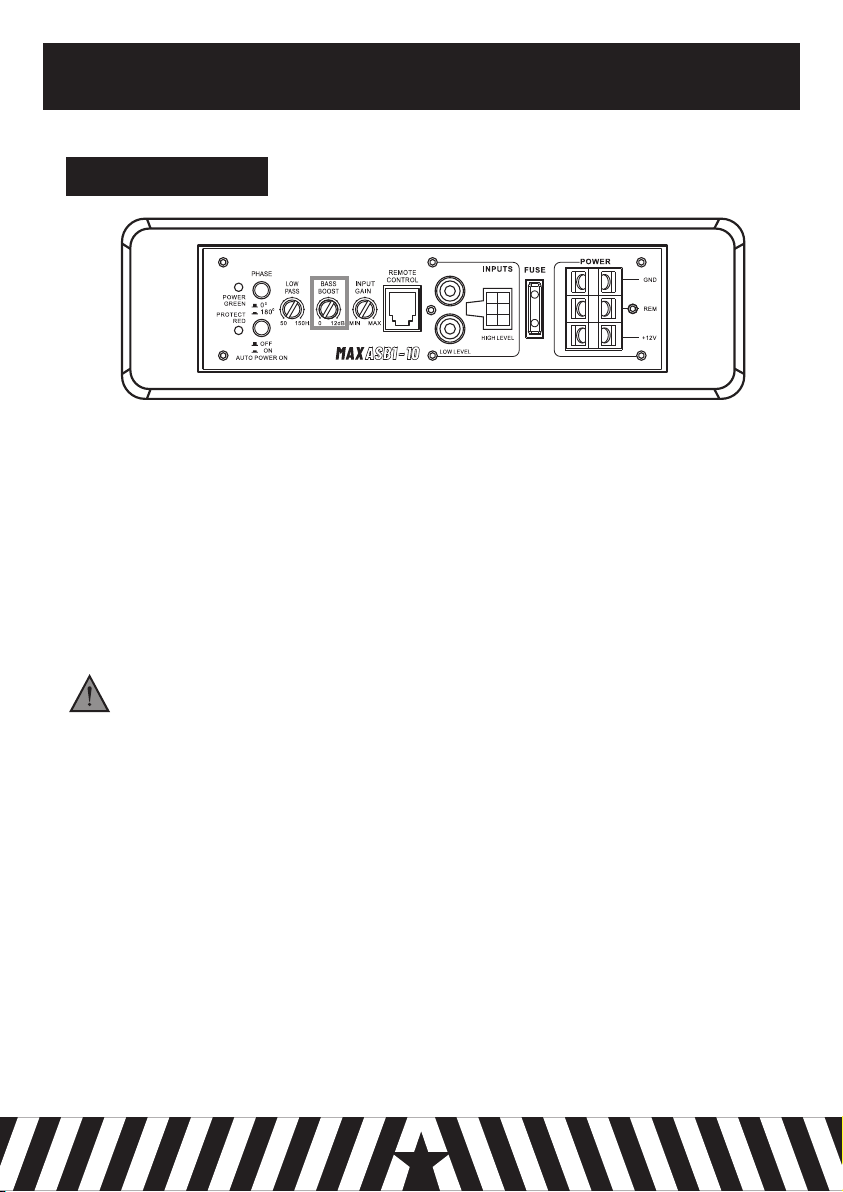
FUNCTIONS
9
RCA INPUT (LOW LEVEL)
8
Connect to your head unit’s RCA
outputs (left & right channels).
HIGH LEVEL INPUT
9
Use instead of RCA/low level input
to connect the subwoofer’s output
directly to the head unit.
AUTO TURN-ON
10
Turns on the active subwoofer
automatically when it receives
signal. NOTE! Can only be used
with the High Level connection.
FUSE
11
Protects your subwoofer from
major damage in case of a power
failure. NOTE! Only use the proper
load stated in the Specifications.
GROUND INPUT
12
Terminal input connector for the
ground cable ( - power cable).
REMOTE INPUT
13
Terminal input connector for the
active subwoofer that controls the
turn-on signal.
+12V INPUT
12
Terminal input connection for the
+12V cable (+ power cable).
1
2
3 4 5
10
6 7 8
12
11
13
14
9
A well-built sound system will set you aside from the rest and elevate your vehicle! It’s
important that you carefully read the instructions on the following pages. This is to make
sure that you install and use the active subwoofer correctly, for the true MAX EXPERIENCE!
10
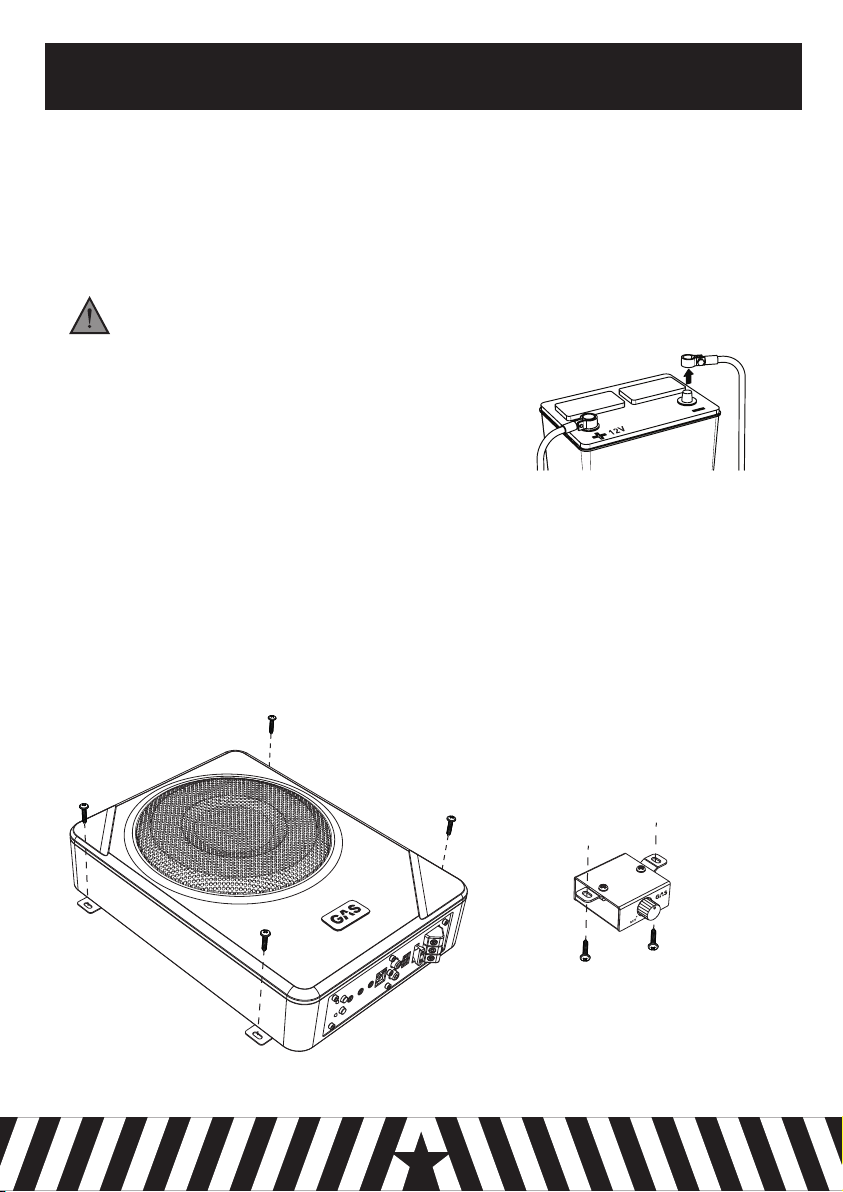
INSTALL ACTIVE SLIM SUBWOOFER
HOW TO
Make sure your vehicle is up to task. You need a 12VDC negative ground electric system
and the power source and the alternator should be fully functional and healthy.
Disconnect and secure the negative terminal from your
power source to eliminate the risk of damaging your-
self or the products. Place the negative terminal in a
secure position so that it won’t accidentaly contact
the positive or the negative power source post.
Have all the necessary tools ready and close at hand. Make sure that the needed wiring
accessories are prepared. Your wiring kit should be of the recommended size stated in
this manual (see the SPECIFICATION chapter).
Find the perfect location to place your active slim subwoofer! The ASB1 slim subwoofer has
been made to fit under the seat of most modern car models. For a simple installation that
takes up minimum amount of space. Always use great care when attaching a new product
to your vehicle - Check clearances in front, behind and on both sides of the planned installa-
tion spot before drilling any holes or installing any screws.
11
HOW TO
Find the best way to run the cables through your vehicle! This might take some time, and may
vary between different models. Preferably the cables shouldn’t be visible when you’re
finished and they shouldn’t be placed in a way that they obstruct any of the vehicle’s
functions or hinder you from operating the vehicle safely. It’s also important you don’t run
the power cable together with the signal cable, since this can cause interference. Make sure
to use high quality signal cables to avoid noise problems.
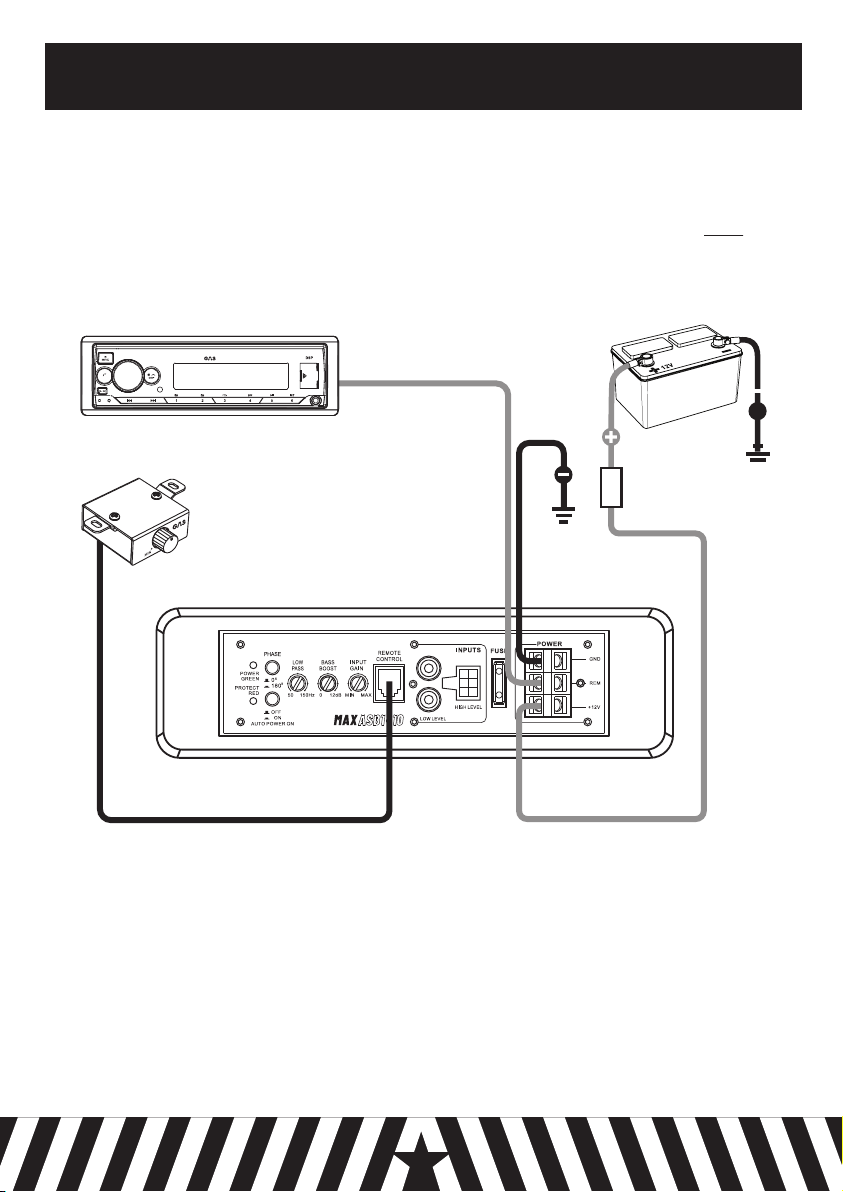
FUSE
/
Tra ck
BAN D
MIC R ST
IR
AUX
MAX M140-BTX

12
HOW TO
If you don’t have any RCA outputs on your head unit you can use the high level input function
instead. Use the included HI input cable. This will connect the speaker output of the head
unit directly to the active slim subwoofer’s amplifier. When you use the high level input the
subwoofer’s amplifier will turn on automatically when the head unit starts. This means you
don’t need to connect the REM (remote cable) to the subwoofer’s amplifier.
Left +
Right +
WHITE CABLE
GREY CABLE
Left -
Right -
WHITE/BLACK CABLE
GREY/BLACK CABLE
MAX ASB1-8/10
R+ L+
R- L-
WARNING! Do not connect Low Level Input and High Level Input at the same time.
This might cause damage to the ASB1 product and to your sound system.
HIGH LEVEL INPUT (HI)
For audio connection between the head unit and the active slim subwoofer, you can either
use Low Level Input (RCA) or High Level Input. Low Level Input (RCA) is preferred for the
best audio performance.
/
Tra ck
BAN D
MIC RS T
IR
AUX
MAX M140-BTX
LOW LEVEL INPUT (RCA)
13
HOW TO
TWEAKING & SETTINGS
The devil is in the details. Tweak the settings on your MAX active slim subwoofer using the
following recommendations and cross the line that separates the average user from the
hardcore high-power audio junkie!
INPUT GAIN/VOLTS
Every sound system is different, and there are several ways to set the amplifier gain. To get
started you can use your own senses and audio skills by following the instructions below.
Use your own senses and audio skills
If you are planning to set the gain by hand, do so in a quiet environment. The more
experience you have in making this sort of settings, the easier it is to get a good result. If
you haven’t done this before, a tip is to ask a friend to help you out.
• Set the gain to minimum.
• Set the volume on your head unit to 75%.
• Start to play your favourite track that you are really familiar with and knows the sound of
by heart, or use the test tones on a sine-wave test CD or digital test track.
• Slowly start to increase the level/gain.
• When you hear that the sound starts to change and you can note distortion, stop and turn
the gain down slightly.
Remember that the gain setting is not a volume control! It’s there to let you sync your head
unit’s output signal with the amplifier.
Example: ASB1-10

14
HOW TO
The Low Pass Filter crossover is used to regulate the maximum and minimum frequencies
each speaker is allowed to reproduce. Check out the ASB1 active slim subwoofer’s fre-
quency response in the Specification section. Don’t allow the Low Pass Filter to pass
through lower- or higher frequencies than your subwoofer can handle.
The different frequency bands reproduce different types of sound:
CROSSOVER (LPF)
40-80 80-160 320-640160-320 640-1280 1280-2560 2560-5120 5120-1020020-40 10200-20400
HZ
Mid
bass
Upper
bass
Middle
midrange
Lower
midrange
Upper
midrange
Lower
treble
Middle
treble
Upper
treble
Low
bass
Top
octave
Band
Type
Low Pass Filter (LPF): 30Hz- 4000Hz variable, no frequencies above the chosen frequency
cut point are allowed to pass through to the subwoofer.
Example: ASB1-10
15
HOW TO
BASS BOOST (EQ)
If everything is tuned correctly and the gain has been set, the BASS BOOST should remain in
default (0dB). This function will apply level/gain at 45Hz centre frequency. Be adviced that
equiping the bass from 0-12 dB is a lot, an increase of +3dB doubles the output!
WARNING! The information below is for experienced users and bass addicts only, if you are
new to the wonderful world of low frequencies, leave the BASS BOOST in default mode or
consult with your local GAS AUDIO POWER dealer.
If you use the BASS BOOST, make sure to turn down your gain first (to 0) before you start
adjusting it. Start a music track and very carefully turn the BOOST dial up until you start
hearing distortion, then follow the HOW TO chapter about gain to optimize your system.
Incorrect usage of the BASS BOOST can permanently damage your subwoofer.
Example: ASB1-10

16
TROUBLESHOOTING
NO POWER/SOUND
Start by looking over the active subwoofer to make sure it isn’t damaged. If your active
subwoofer doesn’t get any power, the most common issue is either in the wiring or in the
amplifier. Use a multimeter to measure the amplifier’s voltage on the +12V terminal and the
remote signal terminal. Use a multimeter to make sure that you have a negative ground
connection. Check the built-in fuse on the active subwoofer’s amplifier. If there’s no power
coming through – control the fuse on the power cable. If this is intact - make a full check of
the wiring to ensure cable integrity.
Check all the speakers connected to your sound system. Check all the speaker cables and all
the signal cables. Check your head unit to make sure no settings are limiting the amplifier’s
functions or the active subwoofer. When all of the above has been tested/looked over, and
all is as it should be but there’s still no sound, consult your local GAS AUDIO POWER dealer.
DISTORTION
Start by looking over the active subwoofer and other speakers in the sound system so
there’s no damage or connection issue with the wiring. Check the speaker cables to make
sure that the polarity isn’t reversed on one channel. Check the settings on the subwoofer’s
amplifier, make sure that the gain is set according to the amplifier’s instructions. Lower the
effetcs of the slim subwoofer amplifier’s Bass BOOST settings, or turn it off.
UNWANTED NOISE
Start by looking over the active subwoofer and other speakers in the sound system so there
is no damage or connection issue with the wiring. Make sure that your signal cables or
speaker cables aren’t too close to the power cables. Check your amplifier’s grounding point
and make sure that the surface is clean. When all of the above has been tested/looked over,
and the unwanted noise does not vanish, consult your local GAS AUDIO POWER dealer

17
This product is covered by warranty, depending on the conditions in the country where it’s
sold. If the equalizer is returned for service, please include the original dated receipt (or a
copy) with the product. Make sure that the equalizer is packaged properly and secured,
preferably in its original packaging.
This product has been granted with the CE certification mark to show that the product
follows the health, safety, and environmental protection standards for products sold
within the European Economic Area (EEA).
The crossed-out wheelie bin symbol means that the product, literature and packaging
included must be taken to separate collection at the end of their working life. Don’t
dispose of these products as unsorted municipal waste: take them for recycling. For
info on your nearest recycling point, check with your local waste authority.
GAS Audio Power products comply with the relevant pro-
visions of the RoHS Directive for the European Union. In
common with all Electrical and Electronic Equipment (EEE)
the product shouldn’t be disposed of as household waste.
Alternative arrangements may apply in other jurisdictions.
GAS Audio Power is a global partner of the European Mobile
Media Association, an organization that focus on promoting
the custom made mobile media installations to consumers.
WARRANTY & DISPOSAL

You’ve entered the world of GAS. We aim to please, and we’ve made sure to have products
made for you. No matter what stage of the LOUD-addiction you might find yourself in, there
is a GAS product to fill your need.
18
Just starting out? The MAD series is made to play LOUD
and to be the express lane to a no bullsh!t sound system
that will make sure everyone can hear you coming!
THE GAS WORLD
MAD
The MAX series holds products made to deserve the
center stage. Powerful, heavy duty and designed to be
noticed. We made NO COMPROMISES because we know
that you wouldn’t accept it.
MAX
The CMP series has been developed for the crucial
seconds when the dB-counter starts to tick. All CMP
products have hand-picked, high quality, COMPETITION
GRADE components and they are specially designed
to withstand an awesome amount of power.
CMP

THANKS FOR JOINING
GAS AUDIO POWER!
Winn Scandinavia AB reserves for possible typos, factual or numeric errors that may have been printed on
any products, package designs, user manuals and/or other included accessories.
GAS AUDIO POWER and SHAKY are registered trademarks by Winn Scandinavia AB and is
protected by relevant laws and jurisdictions such as Copyright and Trademark laws.
Winn Scandinavia AB ׀ Elementvägen 15, 70227 Örebro, Sweden ׀www.winnscandinavia.com
This manual suits for next models
2
Table of contents
Other GAS Car Stereo System manuals


