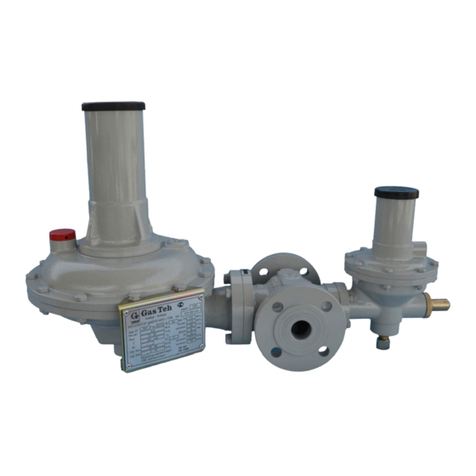
GasTeh 143 Quick guide

GAS PRESSURE REGULATOR WITH OR WITHOUT
INCORPORATED SAFETY SHUT-OFF DEVICE TYPE: 143
(shut-off device: - for high pressure –VP
- for high and low pressure –VNP)
REGULATOR PRITISKA BEZ I SA
BLOKADNIM MEHANIZMOM TIP: 143
(blokada od: - visokog pritiska –VP
- visokog i niskog pritiska - VNP)
SAFE USE GUIDE
UPUTSTVO ZA MONTA@U, RUKOVANJE I ODR@AVANJE

GT-143-02 1
INTRODUCTION
This Safety use guide provides instructions and safety informations on pressure equipment so as to
avoid any foreseeable risk during the use. For any information refer to regulator type: 143 see
Technical manual (GT-143-01).
UVOD
Uputstvo za rukovanje, montažu i održavanje pruža informacije i instrukcije za bezbedan rad kako bi
se izbegli mogući rizici pri upotrebi. Za ostale informacije vezane za tehničke karakteristike pogledati
Tehnički katalog (GT-143-01).
GENERAL REMARK
Regulators type: 143 and type 143-BV are devices whose function is to maintain the value of the
controlled pressure within its tolerance field irrespective of inlet pressure disturbance.
Regulators type: 143 and type 143-BV are pilot controlled regulators in which the net force required to
move the control member is supplied by pilot regulator.
Regulators type: 143 and type: 143-BV are designed and manufactured according to EN 334 and 14382.
Conformity to Directive 2014/68/EC and CE marking of pressure regulator and relevant accessory
requires installation on system with minimum requirements according to: EN 12186 and EN 12279.
Only accessories produced and labeled by GasTeh can be incorporated to regulators type: 143 and type:
143- BV as additional pressure accessories (e.g. filters, silencers, etc.).
For problems with regulators type: 143 and type 143-BV with incorporated pressure accessories produced
by other manufacturers, GasTeh will not be responsible.
OPŠTE PRIMEDBE
Regulatori pritiska tip:143 i tip:143- BV su uređaji čija je funkcija obezbeđivanje konstantne vrednosti
izlaznog pritiska u okviru regulacione grupe, nezavisno od promene ulaznog pritiska.
Regulatori pritiska tip:143 i tip:143- BV su pilotski regulatori kod kojih se sila potrebna za održavanje
konstantnog pritiska dobija iz pilota.
Regulatori pritiska tip:143 i tip:143- BV su konstruisani i proizvedeni u skladu sa EN 334 i EN 13482.
Usklađenost sa direktivom PED 2014/68/EC i CE označavanje regulatora pritiska i odgovarajućih
uređaja zahteva instalaciju na sisteme u skladu sa odredbama EN 12186 i EN 12279.
Kao dodatni uređaji pod pritiskom dodati regulatorima pritiska tip:143 i tip:143-BV, moraju se koristiti
isključivo oni proizvedeni od strane GasTeh-a (npr: filteri, prigušivači, itd.).
Za probleme nastale korišćenjem dodatnih uređaja drugih proizvođača na regulatorima pritiska tip:143
i tip:143- BV, GasTeh neće biti odgovoran.

GT-143-02 2
PED CATEGORIES AND FLUID GROUP
Regulators type: 143 and type: 143- BV are classified as differential strength regulators, and marking for
these types of regulators is the symbol DS.
Regulators type: 143 and type: 143- BV are fail-to-open regulators.
According to PED 2014/68/EC gas pressure regulators type: 143 and type: 143- BV depending of their
size are in the following groups:
Size
Category
Fluid group
DN25
Art.3.3
1
DN40
I
1
DN50
II
1
DN65
II
1
DN80
II
1
DN100
II
1
DN150
III
1
All size with
shut-off device
IV
1
Table 1.
Pilot type: 119 incorporated in regulator type: 143 and type: 143- BV conform to PED 2014/68/EC
Article 3.3 and were designed and manufactured according to sound engineering practice (SEP) and they
are not CE marked.
Safety shut- off device (for size DN25 to DN50) GT.BM.VNP.25.100-06(20,75).P.Z, GT.BM.VP.25.100-
06(20,75).P.Z, GT.BM.VNP.40.100-06(20,75).P.Z, GT.BM.VP.40.100-06(20,75).P.Z,
GT.BM.VNP.50.100-06(20,75).P.Z and GT.BM.VP.50.100-06(20,75).P.Z incorporated in regulator
type: 143- BV, conform to PED 2014/68/EC Article 3.3 and were designed and manufactured according
to sound engineering practice (SEP) and they are not CE marked.
Safety shut- off device (for size DN65 to DN150) GT.BM.65.100., GT.BM.80.100., GT.BM.100.100.,
and GT.BM.150.100. incorporated in regulator type: 143- BV, conform to PED 2014/68/EC Article 3.3
and were designed and manufactured according to sound engineering practice (SEP) and they are not CE
marked.
Choke valve type: 375 incorporated in regulator type: 143 and type: 143- BV conform to PED
2014/68/EC Article 3.3 and were designed and manufactured according to sound engineering practice
(SEP) and they are not CE marked.

GT-143-02 3
KATEGORIJE I GRUPE FLUIDA PREMA PED DIREKTIVI
Regulatori pritiska gasa tip: 143 i tip: 143- BV spadaju u klasu regulatora koji sadrže elemente
projektovane za pritiske (PSD) koji su manji od projektnog pritiska (PS). Na tablici nose oznaku DS.
Regulatori pritiska tip: 143 i tip: 143- BV su u izvedbi u otkazu otvoreni.
Prema PED 2014/68/EC regulatori pritiska tip: 143 i tip: 143- BV, zavisno od dimenzija, spadaju u
sledeće grupe:
Dimenzija
Kategorija
Grupa fluida
DN25
Art.3.3
1
DN40
I
1
DN50
II
1
DN65
II
1
DN80
II
1
DN100
II
1
DN150
III
1
Svi regulatori sa
blokadnim meh.
IV
1
Tabela 1.
Piloti tip: 119 ugrađeni na regulatore tip: 143 i tip: 143- BV, prema direktivi PED 2014/68/EC spadaju
u kategoriju Art.3.3 i projektovani su i proizvedeni u skladu sa Sound Engineering Practice (SEP) i ne
označavaju se CE znakom.
Blokadni mehanizami (za dimenzije DN25 do DN50) GT.BM.VNP.25.100-06(20,75).P.Z,
GT.BM.VP.25.100-06(20,75).P.Z, GT.BM.VNP.40.100-06(20,75).P.Z , GT.BM.VP.40.100-06(20,75).P.Z,
GT.BM.VNP.50.100-06(20,75).P.Z i GT.BM.VP.50.100-06(20,75).P.Z ugrađeni na regulatore tip: 143-
BV, prema direktivi PED 2014/68/EC spadaju u kategoriju Art.3.3 i projektovani su i proizvedeni u
skladu sa Sound Engineering Practice (SEP) i ne označavaju se CE znakom.
Blokadni mehanizami (za dimenzije DN65 do DN150) GT.BM.65.100., GT.BM.80.100., GT.BM.100.100.,
i GT.BM.150.100. ugrađeni na regulatore tip: 143- BV, prema direktivi PED 2014/68/EC spadaju u
kategoriju Art.3.3 i projektovani su i proizvedeni u skladu sa Sound Engineering Practice (SEP) i ne
označavaju se CE znakom.
Prigušnica tip: 375 ugrađeni na regulatore tip: 143 i tip: 143- BV, prema direktivi PED 2014/68/EC
spadaju u kategoriju Art.3.3 i projektovani su i proizvedeni u skladu sa Sound Engineering Practice
(SEP) i ne označavaju se CE znakom.

GT-143-02 4
REGULATOR TYPE: 143 AND TYPE: 143-BV SPECIFICATION
Available size : DN25, DN40, DN50,DN65, DN80, DN100, DN150
Nominal pressure: PN64/100, ANSI300/600
! WARNING !
Design pressure (PS): 100 bar
Maximum operating pressure: 100 bar
Range of outlet pressure: 1 ÷75 bar
Temperature class: 2 (-20°C ÷ +60°C)
Maximum temperatures and pressures above mentioned should not be exceeded!
Pressure regulator does not require any safety accessory installed upstream for protection against
overpressure compared with design pressure PS, when reducing station installed upstream is sized for a
max downstream incidental pressure MIPdis less or equal 1,1 x PS.
SPECIFIKACIJA REGULATORA TIP: 143 I TIP: 143-BV
Nazivne dimenzije: DN25, DN40, DN50, DN65, DN80, DN100, DN150
Klasa pritiska: PN64/100, ANSI300/600
! UPOZORENJE !
Projektni pritisak (PS): 100 bar
Maksimalni radni pritisak: 100 bar
Opseg izlaznog pritiska: 1 ÷75 bar
Klasa temperature: 2 (-20°C ÷ +60°C)
Navedene maksimalne temperature i pritisci ne smeju biti prekoračeni!
Regulator pritiska ne zahteva dodatni sigurnosni uređaj instaliran pre regulatora za zaštitu od prevelikog
pritiska u odnosu na projektni pritisak PS, kada je redukciona stanica pre regulatora projektovana za
maksimalni pritisak jednak ili manji od 1.1 x PS.

GT-143-02 5
MARKING OF REGULATOR / OZNAČAVANJE REGULATORA
The nameplate shall contain all basic informations about mentioned products. / Tablica regulatora mora
sadržati sve potrebne informacije o osnovnim karakteristikama regulatora.
Table 2. / Tabela 2.
NOTE 1:
- for regulator dimension DN25 (art.3.3 acc. to PED 2014/68/EC): - (nothing)
- for regulators DN40 (category I acc. to PED 2014/68/EC): CE sign
- for regulator dimension DN50 to DN100 (category II acc. to PED 2014/68/EC): CE sign and 2028
- for regulator dimension DN150 (category III acc. to PED 2014/68/EC): CE sign and 2028
- for all regulators with shut-off device (category IV acc. to PED 2014/68/EC): CE sign and 2028
PRIMEDBA 1:
- za regulator DN25 (art.3.3 po direktivi PED 2014/68/EC): - (ništa)
- za regulatore DN40 (kategorija I prema direktivi PED 2014/68/EC): CE znak
- za regulator DN50 do DN100 (kategorija II prema direktivi PED 2014/68/EC): CE znak i 2028
- za regulator DN150 (kategorija III prema direktivi PED 2014/68/EC): CE znak i 2028
- za sve regulatore sa blokadnim mehanizmom (kategorija IV prema direktivi PED 2014/68/EC): CE znak i 2028
List of symbols:
Wds –specific set range
pds –set point
pdo –relief valve –set pressure
ds–nozzle diameter
AC –accuracy class
SG –lock-up pressure class
SZ –class of lock-up pressure zone
Type –DS (differential strenght)
Temp. class –2 (-20°C ÷+60°C)
Regulator in failure –OPEN
pmax –maximum operating pressure
PS –allowable pressure
PSD –specific maximum allowable pressure
Lista simbola:
Wds –posebno područje podešavanja izlaznog pritiska
pds –izlazni pritisak regulatora
pdo –pritisak otvaranja –odušni ispusni ventil
ds–prečnik sedišta
AC –klasa tačnosti
SG –klasa pritiska zatvaranja
SZ –zona pritisaka zatvaranja
Tip –DS (differential strenght)
Temp. klasa –2 (-20°C ÷+60°C)
Regulator u otkazu - OTVOREN
pmax –maksimalni radni pritisak
PS –maksimalni dozvoljeni pritisak
PSD –specifični maksimalni dozvoljeni pritisak

GT-143-02 6
PILOT TYPE: 119 SPECIFICATION
Available size : DN8 (R1/4“)
Nominal pressure: PN100, ANSI600
! WARNING !
Design pressure (PS): 100 bar
Maximum operating pressure: 100 bar
Range of outlet pressure: 1 –75 bar
Temperature class: 2 (-20°C +60°C)
Maximum temperatures and pressures above mentioned should not be exceeded!
SPECIFIKACIJA PILOTA TIP: 119
Nazivne dimenzije: DN8 ( R1/4“)
Klasa pritiska: PN100, ANSI 600
! UPOZORENJE !
Projektni pritisak (PS): 100 bar
Maksimalni radni pritisak: 100 bar
Opseg izlaznog pritiska: 1 –75 bar
Klasa temperature: 2 (-20°C +60°C)
Navedene maksimalne temperature i pritisci ne smeju biti prekoračeni!
MARKING OF PILOT / OZNAČAVANJE PILOTA
The nameplate shall contain all basic informations about mentioned products. / Tablica regulatora mora
sadržati sve potrebne informacije o osnovnim karakteristikama pilota.
Table 3. / Tabela 3.
Symbol list see in regulator nameplate (Table 3.) / Lista simbola ista kao kod regulatora (Tabela 3.)

GT-143-02 7
SAFETY SHUT- OFF DEVICE TYPE: GT.BM.VNP.25.100-06(20,75).P.Z, GT.BM.VP.25.100-
06(20,75).P.Z, GT.BM.VNP.40.100-06(20,75).P.Z, GT.BM.VP.40.100-06(20,75).P.Z,
GT.BM.VNP.50.100-06(20,75).P.Z AND GT.BM.VP.50.100-06(20,75).P.Z SPECIFICATION
Available size: DN25, DN40, DN50
Nominal pressure: PN100, ANSI600
! WARNING !
Design pressure (PS): 100 bar
Maximum operating pressure: 75 bar
Safety shut- off device is installed on regulator with maximum operating pressure 75 bar.
Set range:
- 1 ÷ 75 bar (accuracy group AG 1)
Response time : ≤1s
Temperature class: 2 (-20°C +60°C)
SPECIFIKACIJA BLOKADNOG MEHANIZMA TIP: GT.BM.VNP.25.100-06(20,75).P.Z,
GT.BM.VP.25.100-06(20,75).P.Z, GT.BM.VNP.40.100-06(20,75).P.Z, GT.BM.VP.40.100-06(20,75).P.Z,
GT.BM.VNP.50.100-06(20,75).P.Z i GT.BM.VP.50.100-06(20,75).P.Z
Nazivne dimenzije: DN25, DN40, DN50
Klasa pritiska: PN100, ANSI600
Projektni pritisak (PS): 100 bar
Maksimalni radni pritisak : 75 bar
Blokadni mehanizam se instalira na regulator sa maksimalnim radnim pritiskom 75 bar. Maksimalni
radni pritisak blokadnog mehanizma je maksimalni izlazni pritisak iz regulatora.
Opseg pritisaka blokiranja:
- 1 ÷ 75 bar (klasa tačnosti AG 1)
Vreme odziva: ≤1s
Temperature class: 2 (-20°C +60°C)
! UPOZORENJE !

GT-143-02 8
SAFETY SHUT- OFF DEVICE TYPE: GT.BM.65.100, GT.BM.80.100, GT.BM.100.100 and
GT.BM.150.100 SPECIFICATION
Available size: DN65, DN80, DN100,DN150
Nominal pressure: PN100, ANSI600
! WARNING !
Design pressure (PS): 100 bar
Maximum operating pressure: 75 bar
Safety shut- off device is installed on regulator with maximum operating pressure 75 bar. Maximum
operating pressure for safety shut-off device is maximum regulator outlet pressure.
Set range:
- 1 ÷ 75 bar (accuracy group AG 1)
Response time : ≤1s
Temperature class: 2 (-20°C +60°C)
SPECIFIKACIJA BLOKADNOG MEHANIZMA TIP: GT.BM.80.16, GT.BM.100.16, GT.BM.150.16 I
GT.BM.200.16 i GT.BM.250.16
Nazivne dimenzije: DN65, DN80, DN100, DN150
Klasa pritiska: PN100, ANSI600
Projektni pritisak (PS): 100 bar
Maksimalni radni pritisak : 75 bar
Blokadni mehanizam se instalira na regulator sa maksimalnim radnim pritiskom 75 bar. Maksimalni
radni pritisak blokadnog mehanizma je maksimalni izlazni pritisak iz regulatora.
Opseg pritisaka blokiranja:
- 1 ÷ 75 bar (klasa tačnosti AG 1)
Vreme odziva: ≤1s
Temperature class: 2 (-20°C +60°C)
! UPOZORENJE !

GT-143-02 9
MARKING OF SAFETY SHUT-OFF DEVICE / OZNAČAVANJE BLOKADNOG MEHANIZMA
The nameplate shall contain all basic informations about mentioned products. / Tablica mora sadržati
sve potrebne informacije o osnovnim karakteristikama blokadnog mehanizma.
Table 4./ Tabela 4.
List of symbols:
Wdso - specific set range for over-pressure monitoring
Wdsu –specific set range for under-pressure monitoring
pdso –set point for over-pressure monitoring
pdsu –set point for under-pressure monitoring
Funct. class –A (closed in case of failure)
Type –IS (integral strenght)
Temp. class –2 (-20°C ÷+60°C)
pmax –maximum operating pressure
PS –allowable pressure
PSD –specific maximum allowable pressure
Ds –valve seat diameter
Lista simbola:
Wdso - područje podešavanja nadpritiska
Wdsu –područje podešavanja podpritiska
pdso –pritisak aktiviranja –gornji
pdsu –pritisak aktiviranja –donji
Funkc. klasa –A (u otkazu zatvoren)
Tip –IS (integral strenght)
Temp. klasa –2 (-20°C ÷+60°C)
pmax –maksimalni radni pritisak
PS –maksimalni dozvoljeni pritisak
PSD –specifični maksimalni dozvoljeni pritisak
Ds –prečnik sedišta
OVERPRESSURE PROTECTION
The recommended maximum allowable pressures are stamped on the regulator nameplate.
If actual version hasn´t a built-in safety shut-off device, some type of overpressure protection is needed.
The regulator should be inspected for damage after any overpressure condition.
ZAŠTITA OD PREVISOKOG PRITISKA
Preporučeni maksimalni dozvoljeni pritisci su naznačeni na tablici regulatora.
Ako regulator nema ugrađen blokadni mehanizam, mora se predvideti neka druga vrsta zaštite od
previsokog pritiska.
Posle svakog prekoračenja pritiska, potrebno je izvršiti pregled regulatora zbog mogućih oštećenja.

GT-143-02 10
TRANSPORT, PACKING AND HANDLING
Established transport and handling procedures shall be folowed to avoid any damage during transporting
and handling of those equipment. The packing for transportation of equipment are designed and shaped
to avoid damage to any part. After packing is open, check that no damage occured to any position. If
damage occured inform the suplier and keep original packing.
TRANSPORT, PAKOVANJE I RUKOVANJE
Prilikom transporta rukovoditi se uspostavljenim procedurama, kako bi se sprečila moguća oštećenja
opreme prilikom transporta. Kutije za transport su tako projektovane i oblikovane da se izbegnu bilo
kakva oštećenja prilikom transporta. Posle otvaranja, proveriti opremu i ukoliko se uoče oštećenja
obavestiti dobavljača. Originalno pakovanje sačuvati.
INSTALLATION
Only qualified person shall install or service a regulator.
! WARNING !
All means for venting have to be provided in the assemblies where the pressure equipment is
installed (according to EN 12186 and EN12279).
All means for draining have to be provided in the equipment installed before regulators and safety
shut-off devices (according to EN 12186 and EN 12279).
Before proceeding with installation, commisioning or maintence, operators must:
- examine the safety provisions applicable to the installation in which they must work
- obtain the authorisations necessery for working when so requested
- use the necessary means of individual protection
- ensure that the area in which they operate is fitted with the means of collective protection envisaged and
with the necessary safety indications
Before installating the regulator it is necessary to ensure that:
- clean out all pipelines and check that regulator is clean and is not damaged during transport
- that regulator can be fitted into the space provided
- the upstream and downstream piping is in the same level
- the inlet and outlet flanges are parallel and clean
- make shure that data on regulator plate is compatible with operating requirements
- make shure that arrow on regulators body and flow are in the same directions
Pressure regulators shall be instaled in non- seismic area and hasn´t to undergo fire and must be provided
with cathodic protection and electrical isolation.

GT-143-02 11
Recomended installation:
Picture 1. / Slika 1.
Installation / Ugradnja
Regulator can be mounted in other position if required (consult GasTeh personel for advice).
Before start-up regulator, impulse connections must be connected with the main pipeline. This
connections shoud be made using stainless steel or cooper pipe according to the size of the regulator.
MONTAŽA
Montažu mogu da vrše samo stručna i osposobljena lica. Pogledati sliku 1.
! UPOZORENJE !
Ventilacioni vodovi moraju biti obezbeđeni u sistemima gde se instalira gasna oprema (EN 12186 i
EN 12279)
Vodovi za odmuljenje moraju biti obezbeđeni na opremi pre regulatora i blokadnog
mehanizma ( EN 12186 i EN 12279).
Pre početka izvođenja montaže, pregleda ili održavanja, lice mora da:
- proveri sigurnosne uslove koji se odnose na instalaciju u kojoj treba da radi
- ukoliko je potrebno, pribavi sve dozvole za rad
- koristi neophodnu zaštitnu opremu
- obezbedi da prostor u kome se radi ima uređaje za opštu bezbednost i uređaje za sigurnosnu indikaciju
Pre montaže regulatora potrebno je obezbediti:
- očistiti cevovode, proveriti da li je regulator čist i da nije oštećen prilikom transporta
- da se regulator može postaviti na predviđeno mesto
- da su ulazni i izlazni cevovodi saosni
- da su ulazna i izlazna prirubnica paralelne i čiste
- proveriti podatke na tablici regulatora, da li se slažu sa zahtevanim radnim parametrima
- proveriti da li je smer proticanja gasa istog smera kao i strelica na telu regulatora
Oprema pod pritiskom mora biti instalirana na mestima neugroženim seizmičkom aktivnošću, ne sme biti
izložena požaru i mora biti obezbeđena električna izolovanost i katodna zaštita.
Regulator može biti montiran i u drugim položajima (konsultovati tehnička lica GasTeh-a).
Pre puštanja u rad regulatora i blokadnog mehanizma, impulsni vodovi moraju biti povezani sa
impulsnim priključcima na cevovodu. Impulsni vodovi treba da se izvedu cevima od nerđajućeg čelika ili
bakarnim cevima prema veličini regulatora..

GT-143-02 12
COMMISSIONING
After installation check that the inlet/outlet on/off valves , by-pass and other lines are closed.
The regulator and safety shut-off device is factory set at approximately the midpoint of the pressure
requested, so an initial adjustment may be required to give the desired results.
With proper installation completed, slowly open the inlet valve.
PUŠTANJE U RAD
Nakon instalacije, proveriti da li su ulazna/izlazna slavina, by-pass linije i ostale linije zatvoreni.
Regulator i blokadni mehanizam su fabrički podešeni na sredinu zahtevanog opsega pritisaka, tako da je
možda potrebno eventualno malo podešavanje da bi se ostvario zahtevani pritisak. Nakon uspešno
izvedene instalacije, polako otvoriti ulaznu slavinu.
ADJUSTMENT (See pilot drawing, Picture 3.)
Outlet pressure of regulator is setted on the pilot. To change the outlet pressure, remove the cover (08)
from regulating screw carier (05), unscrew the nut (13) and turn the regulating screw (06) clockwise to
increase outlet pressure or counter clockwise to decrease outlet pressure. Setting pressure monitor with a
test gauge downstream the regulator.
PODEŠAVANJE (Pogledati sliku pilota, Slika 3.)
Izlazni pritisak regulatora se podešava na pilotu. Za podešavanje izlaznog pritiska potrebno je prvo
skiniti poklopac (08) sa nosača regulacionog zavrtnja (05), odviti navrtku (13) i odviti ili zaviti
regulacioni zavrtanj (06). Okretanjem regulacionog zavrtnja u smeru kazaljke na satu dolazi do
povećanja izlaznog pritiska, dok okretanjem u suprotnom smeru, izlazni pritisak opada. Podešavanje
pritiska se prati na manometru iza regulatora.
DECOMMISSIONING
WARNING! To avoid personal injury resulting from sudden release of pressure, isolate the regulator
from all pressure before attempting disassembly and release trapped pressure from the regulator and
pressure line.
In case of disassembly of main pressure retaining parts for checks and maintance procedures, exernal and
internal tightnes tests have to be done according applicable codes.
ISKLJUČIVANJE
UPOZORENJE! Da bi se izbegle povrede radnika nastale neočekivanim povećanjem pritiska, potrebno
je regulator izolovati od svih mogućih pritisaka, i nakon toga ispustiti pritisak iz regulatora i linije.
Nakon demontaže glavnih delova regulatora koji su izloženi pritisku, potrebno je uraditi ispitivanje
nepropusnosti u skladu sa primenjenim standardima.

GT-143-02 13
CHECKS AND MAINTENANCE
WARNING! Maintenance should be carried out only by qualified, skilled personnel.
It is recommended that the regulator be periodicly checked in order to ensure its proper functioning. The
frequency of inspection/checks and replacement depends upon severity of service conditions and upon
applicable standards and regulations. Regulator and its pressure accessories are subjected to wear and
must be inspected periodicly and replaced as necessary. Before carrying out maintenance, be sure that no
gas under pressure is trapped in the regulator. First close inlet and outlet valve and then release gas from
the line by opening the vent line.
Maintenance operations do not require removal the body from the line.
When carrying out maintenance procedures, replace all rubber parts.
Regulator drawing and specifications are required to start with maintenance.
Checking regulator
Slowly close the outlet valve and check pressure with a test gauge downstream the regulator. If the
system is functioning properly, an increase in outlet pressure will be noticed due to lock-up pressure, after
which pressure will stabilize. If pressure value is constant, in range of lock-up pressure class (SG),
regulator is functioning properly. If outlet pressure increase, more than defined in lock-up pressure class
(AG), slowly close inlet valve and call service personel from GasTeh to carry out general maintenance of
regulator. For checking function of regulator, slowly close outlet valve, and open relief valve downstream
the regulator, and check pressure oscilating. If presure is constant, regulator is functioning properly. If
pressure value oscillates, slowly close inlet valve and call service personel from GasTeh to carry out
general maintenance of regulator.
General maintenance of regulator
General maitenance of regulator is possible in following order
(see regulator drawing-Picture 2.):
- remove all ermeto joint and remove all impulse pipe
- remove pilot (15) and choke valve (14)
- unscrew screws (26) and remove spring (31)
- remove screws (28) and washers (29) and remove diaphragm chamber (7)
- remove screw (23), washer (24) and remove the spring support (10)
- remove and check membrane (12)
- remove screws (21), washers (22), check seat (5) and O-ring (32)
- remove the plate with holes (6), unscrew the nozzle (3) and check the gasket (2)
- remove screws (25) and washers (27)
- remove the diaphragm chamber (4) and check the O-ring (35)
- remove the nut (18), washers (19) and screws (17), remove the SSV (16)
- check O-ring (34)
General maitenance of pilot is possible in following order (see pilot (1-16 bar) drawing - Picture 3.):
- remove the cover (08) from the regul. screw carrier (05)
- unscrew nut (13) and remove regulating screw (06)
- remove regulating screw carrier (05)
- remove ball (17), spring support (07) and spring (19)
- remove screws (24) and washers (15)
- remove spring housing (03)
- remove the screws (23) and remove the lower membrane housing (1)
- remove spring (20)

GT-143-02 14
- unscrew nuts (22), check diaphragms (14) and O-ring (18)
- unscrew rod (9) and check
- unscrew the nozzle (11)
- check the sealing surfaces on all disassembled parts
General maitenance of pilot is possible in following order (see pilot (16-40 bar)
drawing - Picture 4.):
- remove the cover (07) from the regul. screw carrier (05)
- unscrew nut (16) and remove regulating screw (06)
- remove regulating screw carrier (05)
- remove ball (24), spring support (15) and spring (25)
- remove screws (22) and washers (18)
- remove spring housing (03)
- remove screws (21) and remove pilot cover (1)
- remove spring (26)
- unscrew nuts (12), check diaphragms (4) and O-ring (17)
- unscrew the rod (9) and check
- unscrew the nozzle (8) and check
- check the sealing surfaces on all disassembled parts
General maitenance of pilot is possible in following order (see pilot (40-75 bar)
drawing - Picture 5.):
- remove the cover (18) from the regul. screw carrier (11)
- unscrew nut (16) and remove regulating screw (12)
- remove regulating screw carrier (11)
- remove ball (23), spring support (13) and spring (24)
- remove screws (22) and washers (19)
- remove spring housing (10) and cylinder (4)
- check O-ring (27, 30), back-up ring (29) and guide ring (28)
- remove screws (21) and remove pilot cover (1)
- remove spring (25)
- unscrew nut (12) and piston (5), check diaphragm (4)
- unscrew the rod (14) and check
- unscrew the nozzle (15) and check
- check the sealing surfaces on all disassembled parts
General maintenance of safety shut-off device is possible in following order (see safety shut-off
device drawing for dimension DN25 to DN50/ za dimenzije DN25 do DN50- Picture 6.):
(set range 1-10 bar)
- safety shut-off device is previously disassembled from regulator body
- remove the screws (10), check the pad unit (1) and replace as necessary
- unscrew rod thorn (8), remove the spring support (6) and remove the spring (32)
- remove cover (29), unscrew adjusting ring (21) and (22), and remove springs (35) and (36)
- remove the screws (42), remove flange SSV (4) and the inlet guide (5).
- remove the screws (42), remove upper housing (26)
- remove membrane assembly, check membrane (25)
- remove screw (45) and remove subassembly I
- unscrew outlet guide carrier (12) and remove outlet guide (3)
- remove the screws (44) and remove outlet guide carrier (11)
- remove retainer ring (30) and remove rod guide (17)
- remove rod (2)
- check gaskets and sealing surfaces on all disassembled parts

GT-143-02 15
General maintenance of safety shut-off device is possible in following order (see safety shut-off
device drawing for dimension DN25 to DN50/ za dimenzije DN25 do DN50- Picture 7.):
(set range 5-30 bar)
- safety shut-off device is previously disassembled from regulator body
- remove the screws (10), check the pad unit (1) and replace as necessary - (see pic. 6)
- unscrew rod thorn (8), remove the spring support (6) and remove the spring (32) - (see pic. 6)
- remove cover (13), unscrew adjusting ring (20) and (21), and remove springs (15) and (16) - (see pic. 7.)
- remove screws (42), remove flange SSV (4) and the inlet guide (5) - (see pic. 6)
- remove screws (25), remove pilot cover (2) and check membrane (8) - (see pic. 7.)
- remove screws (26), remove flange (3) - (see pic. 7.)
- remove screw (45) and remove subassembly I - (see pic. 6)
- unscrew outlet guide carrier (12) and remove outlet guide (3) - (see pic. 6)
- remove the screws (44) and remove outlet guide carrier (11) - (see pic. 6)
- remove retainer ring (30) and remove rod guide (17) - (see pic. 6)
- remove rod (2) - (see pic. 6)
- check gaskets and sealing surfaces on all disassembled parts
General maintenance of safety shut-off device is possible in following order (see safety shut-off
device drawing for dimension DN25 to DN50/ za dimenzije DN25 do DN50- Picture 8.):
(set range 25-75 bar)
- safety shut-off device is previously disassembled from regulator body
- remove the screws (10), check the pad unit (1) and replace as necessary - (see pic. 6)
- unscrew rod thorn (8), remove the spring support (6) and remove the spring (32) - (see pic. 6)
- remove cover (13), unscrew adjusting ring (20) and (21), and remove springs (15) and (16) - (see pic. 7.)
- remove screws (42), remove flange SSV (4) and the inlet guide (5) - (see pic. 6)
- remove screws (25) - (see pic. 7.)
- remove pilot cover (1) and check piston (2) and o-ring (3) - (see pic. 8.)
- remove screws (26), remove flange (3) - (see pic. 7.)
- remove screw (45) and remove subassembly I - (see pic. 6)
- unscrew outlet guide carrier (12) and remove outlet guide (3) - (see pic. 6)
- remove the screws (44) and remove outlet guide carrier (11) - (see pic. 6)
- remove retainer ring (30) and remove rod guide (17) - (see pic. 6)
- remove rod (2) - (see pic. 6)
- check gaskets and sealing surfaces on all disassembled parts
General maintenance of subassembly I of safety shut-off device (see subassembly drawing –
Picture 9.)
- remove reataining ring (09) and lever washer (08)
- remove lever (05)
- and unscrew lock carrier cover (06)
- remove spring housing (02) and rod (01)
- remove elastic washer (10) and check tooth (03)
- check spring (07) and all other parts for damages

GT-143-02 16
General maintenance of safety shut-off device is possible in following order (see safety shut-off
device drawing for dimension DN65 to DN150/ za dimenzije DN65 do DN150- Picture 11.):
- safety shut-off device is previously disassembled from regulator body
- unscrew lock nut (43)
- check pad unit (6) and replace if neccesary
- remove spring support (7) and remove trigger spring (35)
- remove pilot SSV (48), hand pusher (46), pusher (47) and limit switch (30)
- remove guide gear shaft (18) and remove gear shaft (17) with wheel (20) and wheel rod (21)
- unscrew screws (29) and elastic washers (40)
- remove gear carrier (9), extension (15), balance cylinder (10) and bal. cylinder nut (11)
- check O-ring (25), back-up ring (26) and guide ring (24)
- unscrew nut short (4) and nut (3), remove together SSV body (1) and guide (2)
- unscrew screw (42) and remove guide (2) from SSV body (1)
- remove retainer ring (39), washer (22) and remove key body (16)
- check balls (31), spacers (28)
- check all seals from removed parts
General maitenance of pilot safety shut-off device for dimension DN65 to DN150) (see pilot drawing
- Picture 12.):
(set range 1 –16 bar)
- remove cover (17) and O-ring (23)
- unscrew adjusting ring VP (19), remove spring support (16) and spring (21)
- unscrew adjusting ring NP (18), remove spring (20), spring carrier (11) and support plate (10)
- unscrew screws (33), washers (34) and remove spring housing (12)
- unscrew nut (9), check membrane (8) and O-ring (29)
- remove cap cover (7), check O-ring (28)
- remove cap (6), retainer ring (30), trigger ring support (5) and trigger spring (22)
- unscrew pusher guide (14) and remove pusher (13), check O-ring (27)
- remove membrane carrier (3), retainer ring (31) and pull out guide lock (2)
- check all seals from removed parts
General maitenance of pilot safety shut-off device for dimension DN65 to DN150) (see pilot
drawing - Picture 13.):
(set range 16 –75 bar)
- remove cover (18) and O-ring (27)
- unscrew adjusting ring VP (17), remove spring support (15) and spring (28)
- unscrew adjusting ring NP (16), remove spring (29), spring carrier (11) and spring support (8)
- unscrew screws (32), washers (34) and remove spring housing (10)
- check O-ring (21,26) and back-up ring (22)
- remove the lock mechanism (3), check the O-ring (21)
- remove retainer ring (35) and lock mechanism carrier (2)
- remove closer cover (12), O-ring (25) and button extension (9)
- unscrew closer (7) and screw (33), remove the button (6), trigger spring support (5) and spring (30)
- remove and check rod (4)
- unscrew the pusher guide (14), remove the pusher (13)
- check all seals from removed parts

GT-143-02 17
Reassembling
Reassemble parts by carrying out steps mentioned above in reverse order. Take care that:
- all seals are lubricated
- diaphragm are properly fitted in housing
- all screws are tightened
- check leaks with soapy water
Setting
After reassembling the equipment, set the outlet pressure in following order:
- install pressure gauge downstream of regulator
- set outlet pressure by rotating regulating screw (06) on pilot
- if necessary replace spring (19) (see Picture 3.)
- set safety shut-off device pressure
PREGLEDI I ODRŽAVENJE
UPOZORENJE! Održavanje mogu da izvode samo stručna i osposobljena lica.
Preporučuje se povremena provera rada regulatora kako bi se obezbedilo njegovo ispravno
funkcionisanje.
Učestanost pregleda i zamena delova zavisi od više uslova i primenjenih regulativa i standarda. Delovi
regulatora izloženi su habanju i moraju periodično biti kontrolisani i zamenjeni ukoliko je potrebno. Pre
početka kontrolisanja proveriti da regulator nije pod pritiskom. Zatvoriti ulaznu i izlaznu slavinu i preko
ispusnog voda isprazniti liniju.
Za operacije održavanja regulatora na terenu, regulator nije neophodno skidati sa linije.
Prilikom izvođenja održavanja potrebno je sve delove od gume zameniti novim.
Prilikom izvođenja održavanja potrebno je imati uputsvo za rukovanje sa crtežom regulatora i spiskom
sastavnih delova.
Pregled regulatora
Prilikom pregleda regulatora, polako zatvoriti izlaznu slavinu iza regulatora i kontrolisati vrednost
pritiska pomoću manometra iza regulatora. Ako je vrednost pritiska konstantna, i u okviru zatvorne grupe
(ZG), rad regulatora je ispravan. Ukoliko vrednost izlaznog pritiska raste izvan granice zatvorne grupe
(ZG), rad regulatora nije ispravan i potrebno je zatvoriti ulaznu slavinu pre regulatora. Regulator je
potrebno servisirati i u tom slučaju pozovite stručno osoblje iz GasTeh-a. Za proveru rada regulatora,
zatvorite izlaznu slavinu iza regulatora i pomoću odušne slavine posle regulatora, otvaranjem iste,
proveriti rad regulatora. Ukoliko je rad regulatora bez oscilacija, rad je ispravan. Ukoliko rad
regulatora ima oscilacije, regulator je potrebno servisirati i u tom slučaju pozovite stručno osoblje iz
GasTeh-a.
Održavanje regulatora
Održavanje regulatora se vrši sledećim redosledom (pogledati crtež regulatora – Slika 2.):
- skinuti sve hermeto priključke i impulsne cevi
- ukloniti pilot (15) i prigušnicu (14)
- skinuti vijke (26) i podloške (27) i ukloniti kućište opruge (8)
- proveriti O-prsten (33) i ukloniti oprugu (31)

GT-143-02 18
- skinuti vijke (28) i podloške (29) i ukloniti komoru membrane (7)
- odvrnuti vijak (23), podlošku (24) i ukloniti podmetač opruge (10)
- ukloniti i proveriti membranu (12)
- skinuti vijke (21), podloške (22), proveriti sedište (5) i O-prsten (32)
- ukloniti prestrujnu ploču (6), odvrnuti diznu (3) i proveriti zaptivač (2)
- skinuti vijke (25), podloške (27)
- ukloniti komoru membrane (4) i proveriti O-prsten (35)
- skinuti navrtku (18), podloške (19) i vijke (17), ukloniti blokadni mehanizam (16)
- proverti O-prsten (34)
Održavanje pilota (1- 16 bar)
Održavanje pilota se vrši sledećim redosledom (pogledati crtež pilota –Slika 3.):
- skinuti poklopac (08) sa nosača regualcionog zavrtnja (05)
- odviti navrtku (13) i skinuti regulacioni zavrtanj (06)
- skinuti nosač regulacionog zavrtnja (05)
- izvaditi kuglicu (17), sedište opruge (07) i oprugu (19)
- skinuti vijke (24) i podloške (15)
- skinuti kućište opruge (03)
- skinuti vijke (23) i ukloniti kućište membrane donje (1)
- ukloniti oprugu (20)
- odviti navrtke (22), proveriti membrane (14) i O-prsten (18)
- odviti trn (9) i proveriti da nije oštećen
- odviti diznu (11) i proveriti da nije oštećena
- proveriti zaptivne površive na svim rastavljenim delovima
Održavanje pilota (16- 40 bar)
Održavanje pilota se vrši sledećim redosledom (pogledati crtež pilota –Slika 4.):
- skinuti poklopac (07) sa nosača regualcionog zavrtnja (05)
- odviti navrtku (16) i skinuti regulacioni zavrtanj (06)
- skinuti nosač regulacionog zavrtnja (05)
- izvaditi kuglicu (24), sedište opruge (15) i oprugu (25)
- skinuti vijke (22) i podloške (18)
- skinuti kućište opruge (03)
- skinuti vijke (21) i ukloniti poklopac pilota (1)
- ukloniti oprugu (26)
- odviti navrtke (12), proveriti membrane (4) i O-prsten (17)
- odviti trn (9) i proveriti da nije oštećen
- odviti diznu (8) i proveriti da nije oštećena
- proveriti zaptivne površive na svim rastavljenim delovima
Održavanje pilota (40- 75 bar)
Održavanje pilota se vrši sledećim redosledom (pogledati crtež pilota –Slika 5.):
- skinuti poklopac (18) sa nosača regualcionog zavrtnja (11)
- odviti navrtku (16) i skinuti regulacioni zavrtanj (12)
- skinuti nosač regulacionog zavrtnja (11)
- izvaditi kuglicu (23), sedište opruge (13) i oprugu (24)
- skinuti vijke (22) i podloške (19)
- skinuti kućište opruge (10) i cilindar (4)
- proveriti O-prsten (27, 30), zaštitni prsten (29) i vodeći prsten (28)

GT-143-02 19
- skinuti vijke (21) i ukloniti poklopac pilota (1)
- ukloniti oprugu (25)
- odviti navrtku (12) i klip (5), proveriti membranu (4)
- odviti trn (14) i proveriti da nije oštećen
- odviti diznu (15) i proveriti da nije oštećena
- proveriti zaptivne površive na svim rastavljenim delovima
Održavanje blokadnog mehanizma
Održavanje blokadnog mehanizma za dimenzije DN25 do DN50 se vrši sledećim redosledom (pogledati
crtež blokadnog mehanizma –Slika 6, 7 i 8):
- blokadni mehanizam je prethodno skinut sa tela regulatora
- skinuti vijake (10), proveriti pečurku (1) i zameniti po potrebi
- odviti trn osovinice (8), skinuti podmetač opruge (6) i ukloniti oprugu (32)
- skinuti poklopac (29), odviti pritezače opruga (21) i (22), i izvaditi opruge (35) i (36)
- skinuti vijke (42), ukloniti prirubnicu blokade (4) i izlaznu vođicu (5)
- skinuti vijake (42),
- skinuti gornje kućište (26)
- skinuti membranski sklop, proveriti membranu (25)
- skinuti vijak (45) i skloniti podsklop I
- skinuti vijke (46,49), ukloniti točak (18, čauru (14) i ozubljeno vratilo (13)
- odviti pritezač izlazne vođice (12) i ukloniti izlaznu vođicu (3)
- skinuti vijke (44) i ukloniti nosač izl. vođice (11)
- skinuti seger (30) i ukloniti vođicu osovinice (17)
- skinuti osovinicu (2)
- proveriti zaptivke i zaptivne površive na svim rastavljenim delovima
Održavanje podsklopa I blokadnog mehanizma (pogledati crtež podsklopa I – Slika 9.)
- skinuti seger (09) i podlošku poluge (08)
- ukloniti polugu (05)
- skinuti poklopac nosača brave (06)
- skinuti kućište opruge (02) i trn (01)
- skinuti elastičnu čiviju (10) i proveriti zubac (03)
- proveriti oprugu (07) i proveriti oštećenost ostalih delova
Održavanje blokadnog mehanizma
Održavanje blokadnog mehanizma za dimenzije DN65 do DN150 se vrši sledećim redosledom
(pogledati crtež blokadnog mehanizma – Slika 11.):
- blokadni mehanizam je prethodno skinut sa tela regulatora
- odvrnuti samokočeću navrtku (43)
- proveriti pečurku (6) i zameniti po potrebi
- skinuti podmetač opruge (7) i oprugu okidanja (35)
- skinuti pilot blokade (48), ručni potiskivač (46), potiskivač (47) i krajnji prekidač (30)
- skinuti vođicu ozubljenog vratila (18) zatim ukloniti ozubljeno vratilo (17) sa okretačem (20) i trnom
okretača (21)
- skinuti vijke (29) i elastične podloške (40)
- skinuti nosač zupčanika (9) nastavak tela (15), balans cilindar (10) i navrtku balans cilindra (11)
- proveriti O-prsten (25), zaštitni prsten (26) i vodeći prsten (24)
- skinuti navrtku kratku (4) i navrtku (3), zajedno ukloniti telo blokade (1) i vođicu (2)
- skinuti vijak (42) i ukloniti vođicu (2) sa tela blokade (1)
Table of contents
Languages:
Other GasTeh Controllers manuals
Popular Controllers manuals by other brands

Zander Aachen
Zander Aachen ZX20T operating manual
Servomech
Servomech ATL 02 Installation, operation and maintenance manual

Neptronic
Neptronic BT100S Specification & installation instructions
MTT
MTT MS3714 user manual
Prolon
Prolon C1050 Series Hardware guide

ICM Controls
ICM Controls ICM2812ж ICM2812-KIT Installation, operation & application guide
