Gastro-Inox 400.101 User manual

User manual
400.101 – 400.102 – 400.103 – 400.104 – 400.109 –
400.110 – 400.201 – 400.202 – 400.203

1
!"#$%&'(&)'*+%*+,&
SAFETY &WARRANTY ......................................................................................................... 2
Inspection upon receipt ................................................................................................. 2
Safety .............................................................................................................................. 2
LEGAL PROVISIONS / REQUIREMENTS ............................................................................... 2
INSTALLATION .................................................................................................................... 3
Preliminary checks .......................................................................................................... 3
Connection with water supply ....................................................................................... 3
Connection with the drainage ........................................................................................ 3
Connection with the power supply ................................................................................ 3
OPERATION ........................................................................................................................ 4
Preparation ..................................................................................................................... 4
Filling of Detergent and Rinse Aid .................................................................................. 4
Starting the machine ...................................................................................................... 5
Draining .......................................................................................................................... 5
Shutting down the machine ........................................................................................... 6
MAINTENANCE ................................................................................................................... 6
TROUBLESHOOTING ........................................................................................................... 6
SPARE PARTS LIST ............................................................................................................... 8

2
-./0!1&23.44.5!1&
Inspection*upon*receipt*
Upon arrival of the package check if there is any visible damage or indications of rough hand-
ling that may be caused during transportation. In case that you spot any damages or you have
doubts that the package was abused during transportation, please abort the installation and
contact your supplier as soon as possible. Every washing machine before departure from our
premises is tested in order to ensure its proper function and it is accompanied by the
corresponding test report.
Safety*
This machine should be used only for the purpose that is intended, according to the operation
instructions described herein. It is not allowed to modify it in any way. In case that this
machine is used either not in compliance with the operation instructions or after technical
modifications, the manufacturer is not responsible for its good operation or possible
accidents.
CAUTION: The washing water is not potable!
Prior to the installation of the machine, please advise the label with its technical specifications
(it is mounted on the side of the machine) and check carefully if it is compatible with the power
supply network of your area. In any case that there is deviation, please abort the installation
procedure.
If the washing machine’s door is left accidentally open, a safety switch interrupts the washing
procedure. In case of overload or overheating of the pump, there is also a safety switch that
interrupts the power supply to the machine. That switch could be activated by the user as
soon as the problem is remedied.
The installation of this ware washing machine, as well as its maintenance, should be per-
formed by licensed technician according to the local regulations of your area and the herein
described instructions.
607.6&849:;-;95-&<&40=>;40?05!-&
Compliance with E.U. Regulations
This equipment complies with the requirements of Directives 2006/95/EU “on Low Voltage”
(LVD) and 2004/108/EU “on Electromagnetic Compatibility” (EMC) and carries the
Mark.
You can obtain a copy of the declaration of conformity from your supplier. This product com-
plies with the requirements of Directive 2002/95/EC OF THE EUROPEAN PARLIAMENT AND OF
THE COUNCIL of 27 January 2003 on the restriction of the use of hazardous substances in
electrical and electronic equipment and carries the following mark.

3
Waste disposal
According to the Directive 2002/95/EC OF THE EUROPEAN PARLIAMENT AND OF THE COUNCIL
of 27 January 2003 on the restriction of the use of certain hazardous substances in electrical
and electronic equipment (AHHE), the products and their parts covered by this directive
should not be disposed of with regular garbage but be returned to the point of sale or be
transferred to a recycling center for electrical and electronic appliances.
For further information address to the local authorities
;5-!.66.!;95&
Preliminary*checks*
• The installation should be performed by licensed technician according to the ins-
tructions of this manual and the legal regulations of your area.
• Be sure that the machine was not damaged during handling.
• Check carefully that the technical details of this ware washing machine (written on
the nameplate) are compatible with your network’s power supply.
• Prior using the washing machine for first time, clean it thoroughly with a conventional
detergent.
Connection*with*water*supply*
• Place the washing machine in the desirable place in sufficiently stable horizontal
ground.
• Be sure that the power supply is not connected.
• The water inlet and water outlet hoses that are required for the installation are in-
cluded in the package. Before connection you should rinse them.
• The water inlet hose should have a diameter of at least 16 mm and the connection
with the pipe ¾’’.
• The minimum water supply pressure should be 2 bar and the maximum 5 bar.
• In the water supply hose there should be installed a non-returning valve according
to DIN 1988
Connection*with*the*drainage*
• Connect the drainage of the washing machine with your network’s drainage.
Special care should be given so that the highest point of the flexible drainage hose is plac-
ed lower than 650 mm. Otherwise, reverse flow of the water could occur.
Connection*with*the*power*supply*
This machine works under specific power supply and voltage that are explicitly mentioned in
the nameplate of the product. Prior installation, please kindly check it.
The installation procedure should be performed by licensed technician.

4
9804.!;95&
This washing machine is intended only for cleaning dishes, plates, forks, knives etc. Be
careful in order to wash items suitable for dishwashing. Solid food residuals should be
removed from the items before washing them in the machine. For better results you could
soak the items for some time, especially if there is elapsed enough time after usage. Do not
use this machine for washing items that were in service / contact with acids, mineral oil,
grease, gasoline or colors.
Preparation*
Fill the baskets placing the glasses and cups with the opening facing down in the locations of
the basket that have the correct molding.
Plates should be stacked vertically in appropriate baskets without touching each other.
In any case avoid the overloading of the baskets.
Filling*of*Detergent*and*Rinse*Aid*
If the washing machine is equipped with detergent pump, then you should immerse the
corresponding hose in the detergent storage compartment. In each washing cycle, the
machine captures automatically the needed dosage. In case that the machine does not have
detergent pump, then as soon as the recommended temperature is accomplished (light
indicator off), you should fill manually the detergent directly into the dispenser.
The dishwashers have an automatic rinse aid dozer. Immerse the “RINSE AID” hose in the
rinse aid storage compartment. The dozer is adjusted from the manufacturer’s premises at its
maximum value and may be adjusted accordingly - depending on water hardness, how dirty
the dishes are, and the detergent used - following the successful installation of the
dishwasher.
Turning the adjustment screw clockwise, the flow is reduced (-), turning it counter- clockwise
the flow is increased (+). We recommend that you let the constructor to adjust it (or the
specialized personnel of the authorized local dealer who sold the appliance). Before you
perform these works, you should turn off the switch of the appliance or turn off the
corresponding switches so that no current flows, or turn off the power supply switch.
INDICATION: The dozer should not operate while dry, since it will loosen its suction properties.
It is necessary that you have filled the storage compartment before the appliance’s
installation, so that the dozer operates correctly during the first wash.
Do not use caustic products. If you do not follow this indication, you will not be covered by
the guarantee.
5
Starting*the*machine*
• Check that the suction filter, in the tank, has been placed in the correct position.
• Check that the overflow hose is inserted correctly in its inlet.
• Check that the overflow filter is mounted in the correct position.
• Close the door.
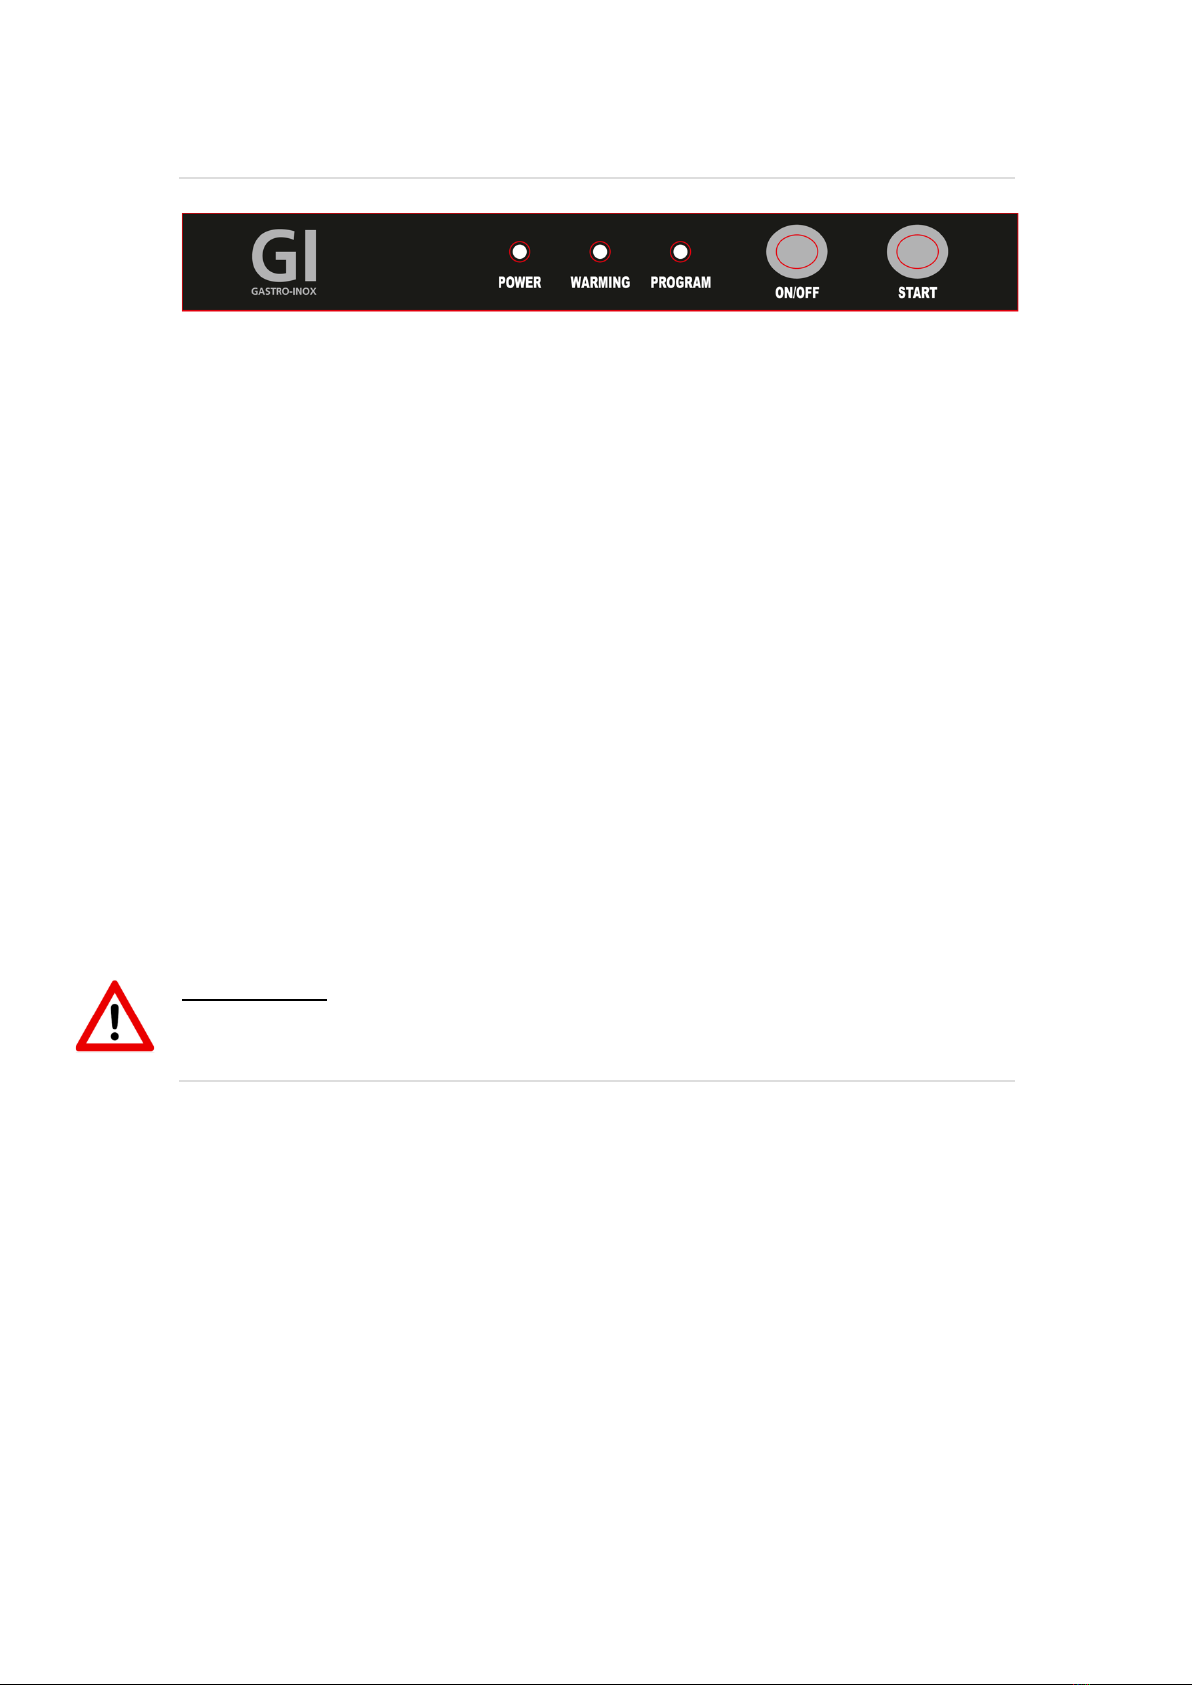
• Press ON/OFF Switch to turn on the machine.
• The dishwasher is automatically filled with water up to the set water level.
• The Indicator WARMING lights on, showing us that the heating process has started.
• When the water in the boiler and tank is heated, the LED WARMING lights off and.
• The dishwasher is ready for wash.
• The above mentioned warming up procedures will take approximately ~25 minutes
at the beginning of each day.
• Open the door. Insert the basket with the items (dishes, glasses, etc.). Before
inserting the basket with the items, be sure that all food residues have been
removed.
• Add the liquid detergent manually in the dispenser, unless the dishwasher has a
detergent pump. Check the level of the rinse aid and detergent storage
compartment.
• In order for the washing program to start, push the START Button.
• The LED PROGRAM lights on
• The washing program, lasting 2 mim. When the LED PROGRAM lights off the washing
cycle is finished, open the door and lift out the basket.
Important note: In case that the door is open accidentally before program is finished, the
washing stops. As soon as the door is closed again, the rest of the washing program continues.
Draining*
In order to drain the machine you should first of all turn off the power (Power Button).
• In case that the machine does not have draining pump, the draining is performed
by removing the overflow hose that is placed in the wash tank. Then, the water
will outflow through gravity force.
• In case that the machine is equipped with draining pump, then by pushing the
Power Button (with the door closed) the 2 minutes draining program is
performed.
Next, remove the filter and clean it carefully with fresh water. Rinse the wash tank for
removing any dirt / food residuals. Finally, reassembly the parts in reverse order. The machine
should never operate without filter.
It is advised when the machine is not working to leave it with the door half opened of full
opened, in order to avoid the presence of bad smells.

6
Shutting*down*the*machine*
In case that you want to shut down the machine, press the Power Switch Button. It is
recommended to clean the machine on a daily basis in order to ensure better performance
and trouble free operation.
?.;5!05.5@0&
DAILY MAINTENANCE OPERATION
• Turn off the power supply.
• Remove the overflow standpipe in order to empty the wash tank.
• Clean the washing compartment to remove the dirt residues.
• Remove and clean the pump filter.
• Place again the pump filter properly in its position.
• Place the overflow standpipe in position.
Warning: Before performing daily maintenance cleaning the Power Supply should be turned
off. The appliance should never be sprayed with water in the electrical elements or cleaned
using high pressure cleaning machine, because there is high potential of electrical shock.
!49>A60-B99!;57&
PROBLEM
CAUSE
REMEDY
The dishwasher does
not operate properly
Connection interruption
Check the connection
You have not turned the
switch of the appliance
ON
Turn the switch ON
Main switch / or fuse
has
not been activated / or
it
is faulty
Check the main switch /
or fuse
The switch of the
appliance is faulty
Refer to the authorized
local dealer who sold
the
appliance or directly to
the manufacturer
The water inlet valve is
faulty
The door is not closed
Close the door
You have not turned the
water supply on
Turn the supply on
The appliance operates,
but the switch LED does not
light on
The LED is faulty
Change the LED
7
Boiler heating does not
operate
Switch or main switch or
fuse has not been
activated
Check the switch of the
appliance and the main
switch or fuse
The safety thermostat
of
the boiler is faulty
Refer to the authorized
local dealer or the
manufacturer
The 93℃ thermal fuse
of
the boiler is faulty
Pressure regulator is
faulty
Refer to the authorized
local dealer or the
manufacturer
“Boiler heating” relay is
faulty
Boiler fuse is burned out
Refer to the authorized
local dealer or the
manufacturer
Boiler heating operates,
but LED does not turn on
Faulty LED
Change LED
Dispenser heating does
not operate
Switch N1 of the
appliance or main
switch
or fuse has not been
activated
Activate the
corresponding switch or
fuse
Boiler heating is open
Wait
The 85 ℃ thermal fuse
is faulty. The dispenser’s
fuse is burned out
The thermostat switch
of
60℃ heating is faulty
Refer to the authorized
local dealer or the
manufacturer
“Compartment heating”
relay is faulty
Dispenser’s heating
operates, but LED does not
turn on
Faulty LED
Change LED
Pump motor does not
operate
Main switch or fuse is
not activated. The door
is not closed.
Activate the main
switch
or fuse
Close the door
Main relay is faulty
Refer to the authorized
local dealer or the
manufacturer
Pump motor is faulty
Program selection
switch
is faulty
Motor operates, but
pump does not rotate
An object has jammed
the pump fin
Refer to the authorized
local dealer or the
manufacturer
Salts or detergent have
been petrified following
non-operation of the
appliance
Rotate the screw on the
backside of the motor,
until it rotates freely
Items do not dry
(dishes, glasses, etc.)
Compartment has no
drying aid
Insert drying aid to the
compartment

8
Drying valve is faulty
Refer to the authorized
local dealer or the
manufacturer
Program switch is faulty
Rinsing arms do not
rotate
Basket does not rotate
-8.40&8.4!-&6;-!&
In case that you need to order spare parts, please advise the following drawings for
specifying the parts that you need. When ordering, please mention the model of the washing
machine, the part number of the item that you need and the requested quantity for each.
www.gastro-inox.eu
This manual suits for next models
8
Table of contents
Other Gastro-Inox Industrial Equipment manuals

Popular Industrial Equipment manuals by other brands

JAUDT
JAUDT DS 6108 Translation of the original operating instructions

BIG KAISER
BIG KAISER EWE Reader operating instructions

Siemens
Siemens SINEMA Remote Connect operating instructions

SMC Networks
SMC Networks MHZ2-6C-M9PLS Operation manual

Team
Team SILK SX012 instruction manual

ABB
ABB HT567726 Operation manual


