Gastroback Design Oven Air Fry & Pizza User manual

www.gastroback.de
DESIGN OFEN
AIR FRY & PIZZA
Item No.42815 »Design Oven Air Fry & Pizza«
OPERATING INSTRUCTIONS
English
Deutsch
Model and attachments are subject to change!
READ AND OBSERVE INSTRUCTIONS
FOR USE! FOLLOW INSTRUCTIONS!

EN EN
2 3
TABLE OF CONTENTS
Important Safeguards ................................................................................ 6
General Safety Instructions.................................................................... 6
Important Safeguards for Electrical Appliances ......................................... 8
Hot Surfaces – Risk of Burns.................................................................. 9
Moving Parts.................................................................................... 11
Technical Specifications........................................................................... 11
Knowing your New Oven........................................................................ 12
Properties of Your New Oven................................................................... 14
Heating Elements within the Oven Compartment..................................... 16
3 Shelf Slots .................................................................................... 16
Separately Controlled Upper and Lower Heat........................................ 17
Convection and Air Fry Functions......................................................... 17
Display, Icons and Dials .................................................................... 18
Buttons Available on the Control Panel .......................................... 18
Icons of Programs and Functions .................................................... 19
Pre-Defined Programs and Functions ..................................................... 20
Default Settings of the Pre-Defined Programs ..................................... 20
Course of the Pizza Program ......................................................... 21
Pause Function ................................................................................. 22
Locking the Control Panel against Unintended Touch ............................... 23
Useful Accessories............................................................................. 23
Tips for Best Results................................................................................. 25
Special Notes for Baking Meat ........................................................... 27
Suited Baking Dishes ......................................................................... 27
Using the Rotisserie Spit ..................................................................... 28
First Use ............................................................................................... 28
Operation............................................................................................. 30
Preparing the Oven and Your Food...................................................... 31
Preparing the Rotisserie Spit ................................................................ 32
Fixing Food at the Rotisserie Spit .................................................... 32
Inserting the Rotisserie Spit ............................................................ 33
Selecting the Program........................................................................ 33
Checking and Changing the Settings .................................................. 34
Starting the Program.......................................................................... 35
Monitoring the Baking Process and Adapting the Settings ........................ 36
After Baking..................................................................................... 37
Solving Problems.................................................................................... 38
Care and Cleaning ................................................................................ 42
Replacing the Oven Lamp........................................................................ 43
Storage ................................................................................................ 45
Notes for Disposal.................................................................................. 46
Information and Service........................................................................... 46
Warranty.............................................................................................. 47
We attach a certain importance to your safety. Thus, we ask you to read all provided
instructions and information in this booklet carefully and completely, before you start
running the appliance. This will help you to know all functions and properties of your
new appliance. We especially ask you to adhere strictly to the safety information
mentioned in these instructions.

EN EN
4 5
DEAR CUSTOMER!
Your new electronically controlled Design Oven Air Fry & Pizza is a compact oven
that can be connected to a usual power outlet and operated on any heat-resistant
workspace – a real alternative to a common oven for baking smaller amounts.
What's more, the oven even provides an Air Fry function that is operating without
any cooking oil.
The oven provides the features of a state-of-the-art oven, which are familiar to you
via any common range. This includes even grilling via a rotisserie spit. Use one of
the pre-set, factory optimized programs for toasting, defrosting, baking pizza, and
making your own French fries from fresh potatoes without any additionaly fat. A gre-
at deal more is possible, when selecting the appropriate heat distribution via upper
and/or lower heat just as you are used to, when using your range. Due to the high
performance heating system and compact oven compartment, even high tempera-
tures will be met within 5 minutes. Take the advantage of the very fast respond to
your settings and the low energy consumption.
These instructions for use will inform you about the various functions and features and
make it easy to take pleasure in your new oven.
We hope that you will enjoy your new GASTROBACK® Design Oven Air Fry & Pizza.
Your GASTROBACK GmbH
IMPORTANT NOTE - PLEASE READ CAREFULLY -
BEFORE YOU USE THE DEVICE!
All GASTROBACK® products are intended for food processing of food products and
groceries. For reasons of health protection and hygiene, products that are used
on a daily basis or used only once, are not allowed to be returned. Check the
goods just as you would do in a retail store.
You only have to pay for a possible loss in value of the goods, if this loss of value
is due to a non-necessary for the examination of the nature, characteristics and func-
tion of the goods handling.
An unnecessary way to check the nature, characteristics and function of the goods
is the processing of food products or groceries into food and drinks.
If you have any questions about GASTROBACK® products, if your unit is not wor-
king properly straight away or if you need any accessories or spare parts for your
GASTROBACK® product please contact our customer service before returning.
GASTROBACK® Customer Service Hotline:
Phone: +49 (0) 4165 – 22 25 0
Monday to friday (except on holidays) from 8am to 4pm
E-Mail: [email protected]

EN EN
6 7
unplug the appliance. If any malfunction occurs, get in contact with an
authorized service centre for examination and/or repair.
• Do not use spare parts and accessories that are not recommended by
the manufacturer. Unsuited or damaged parts could break, melt, and/
or catch fire during operation, thus causing risk of injuries and damage
due to high temperature, fire, harmful substances, and electric shock.
• This appliance may be used or handled by persons with reduced physi-
cal, sensory or mental capabilities, or lack of experience and knowledge
(including children from 8 years on), if they have been given supervisi-
on and/or instruction concerning the use of the appliance by a person
responsible for their safety, and if they understand and consider the invol-
ved hazards. Even cleaning may not be performed by children without
supervision. Children must always be supervised to ensure that they
do not play with the appliance or any part of the appliance or the
packaging. Always keep the appliance where it is dry, frost-free, and
clean, and where children younger than 8 years cannot reach it.
• Operate the appliance on a well accessible, stable, level, clean, dry,
and suitable large table or counter that is resistant against heat, fat,
and water. The rear of the appliance shall be placed against a heat-
resistant wall. A protrusion at the rear of the housing ensures a mini-
mum of free space. For operation, leave at least 20cm of free space
on each side, to ensure sufficient ventilation and avoid damage due
to heat and hot steam. The appliance is not suitable for built-in ope-
ration in a cabinet or fitted kitchen.
• Do not place any clothes or tissue or other foreign objects under or
on the appliance during operation, to avoid risk of fire, electric shock
and overheating. The ventilation slits in the sides and rear of the hou-
sing may not be blocked. For operation, do not place the appliance
over a power cord or on the edge of the table or counter.
• The of the appliance is heated electrically. Do not place the appliance
or any part of it on or near hot surfaces (heater, gas burner, grill, range,
or oven). Do not place any hard and/or heavy objects on the appliance.
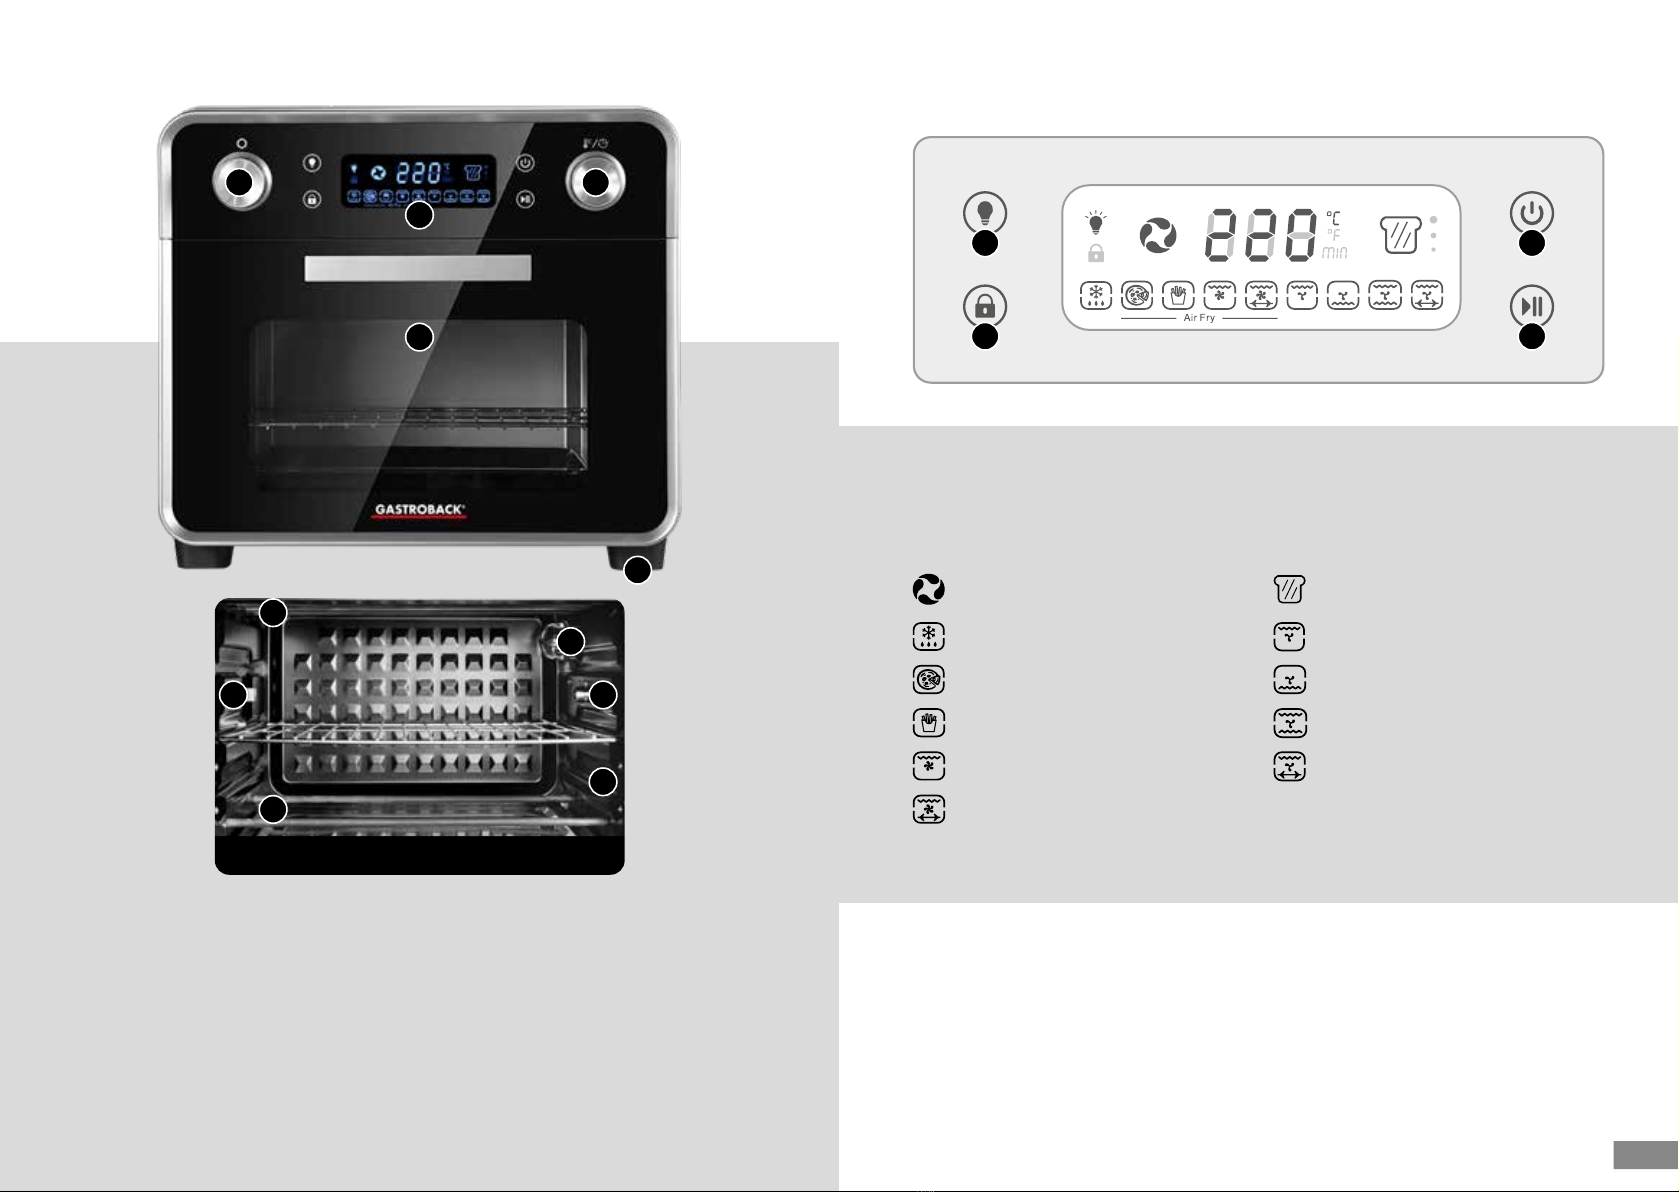
• Always ensure that the crumb tray is inserted correctly during operation.
• Do not use violence. Special care is necessary during operation and
IMPORTANT SAFEGUARDS
Carefully read all instructions given in this booklet before ope-
rating this appliance. These instructions are an essential part
of the appliance. Do not pass the appliance without this booklet to third
parties. Save all instructions for further reference.
Do not attempt to use or treat this appliance or any parts or accessories
in any other way or for any other than the intended use, described in this
booklet. Unintended use and especially misuse may cause severe injuries
and damage due to electric shock, moving parts, fire, and heat. Do not
use the parts of the appliance with any other device. There is no warranty
claim of the purchaser or liability to recourse of the manufacturer, if any
damage and injuries are caused by unintended use or improper treatment.
Do not attempt to repair the appliance or any parts of it on your own
(e.g. power cord). Please contact your vendor. If there are any uncertain-
ties or additional information is required, please feel free to contact the
GASTROBACK®Customer Care Center (phone: +49 (0)4165/22 25-0
GENERAL SAFETY INSTRUCTIONS
• Do not leave the appliance unattended, when it is connected to the
power supply! Always unplug the appliance for moving or cleaning
it and when it is not in use.
• This appliance is for household use only and NOT intended for use
in moving vehicles. Do not operate or store the appliance in humid or
wet areas or outdoors.
• Check the entire appliance regularly for proper operation (e.g. check
for distortion, excessively frayed or melted parts, cracks, leaks, corroded
pins of the power plug, over-heating). Do not operate the appliance,
when the appliance or any part of it is likely to be damaged, to avoid
risk of fire, electric shock, or any injuries to persons and/or damage.
The appliance or its parts are likely to be damaged, if the appliance has
been subject to inadmissible strain (e.g. moisture in the housing, over-
heating, mechanical or electric shock), or if there is any damage, or if
the appliance is not working properly. In case of any severe problem
during operation (e.g. smoke escaping from burnt food), immediately

EN EN
8 9
cleaning to avoid hazard of over-heating and electric shock and to avoid
damage to the heating elements. Do not scratch on the heating elements.
• Always unplug the appliance from the power outlet and let the appliance
cool down before cleaning or moving the appliance and before remo-
ving the crumb tray. Always clean the appliance thoroughly after each
use to avoid food baking on the surfaces and possibly catching fire.
• The oven compartment and the backing tray are equipped with a
non-stick coating. Do not use abrasive cleaners, metal scouring pads
or any hard and sharp objects (i.e. scraper, metal cleaning pads) for
cleaning to avoid damage to the surfaces. Do not place the appli-
ance or any part of it in an automatic dishwasher.
IMPORTANT SAFEGUARDS FOR ELECTRICAL APPLIANCES
Ensure that the voltage rating of your mains power supply corresponds to
the voltage requirements of the appliance (220- 240V~, 50/60Hz, at
least 16A). Always connect the appliance directly to a separately pro-
tected mains power supply wall socket with protective conductor (earth/
ground) connected properly. The installation of a residual current safety
switch with a maximum rated residual operating current of 30mA in the
supplying electrical circuit is recommended. If in doubt, contact your elec-
trician for further information.
• In various foreign countries, the specifications for power supplies are
subject to incompatible norms. Therefore it is possible that power sup-
plies in foreign countries do not meet the requirements for safe opera-
tion of the appliance. Thus, before operating the appliance abroad,
ensure that safe operation is possible.
• The appliance is not intended to be operated via an external timer or
separate remote-control system. Do not use any type of extension cord
or multi-socket outlet.
• Before operation completely unwind the power cord. The power cord
may never be knotted, twisted or squeezed. Do not pull or strain the
power cord. Do not let the plug or power cord hang over the edge
of the table or counter. Take care that no one will pull the appliance
by the power cord, especially when children are near. Always grasp
the plug to disconnect the appliance from the power outlet. Do not
touch the plug or appliance with wet hands, while the appliance is
connected to the power supply.
• Keep the power cord away from hot surfaces (e.g. exterior of the
appliance) or sharp edges. Do not place the appliance on a power
cord. If the power cord warms up during operation or is likely to be
damaged, it must be replaced by an authorised service centre. Do
not attempt to repair the power cord!
• Do not use the appliance in moist or wet areas. Do not place or
immerse the appliance or power cord in water or any other liquid.
Do not pour or spill any liquids on or in the oven or power cord to
avoid risk of fire and electric shock. When liquids are spilled on the
appliance, immediately unplug the appliance, dry the appliance, and
then leave it dry naturally for at least 1 day with the oven door open.
HOT SURFACES – RISK OF BURNS
This appliance is intended for cooking food. The heating elements within the
oven compartment are heated electrically and may reach very high tempera-
tures (red heat) during operation. Do NOT touch the heating elements with
your skin or any objects during operation and some time thereafter.
• During operation do not place any objects or tissue on or under the
appliance, to avoid risk of overheating. Before operation, always
ensure that there are no foreign objects (e.g. unsuited paper, pla-
stic containers, kitchen foil) in the oven compartment and remove all
accessories not in use.
• Do not insert oversized food or food wrapped in unsuited foil or
packed in unsuited containers, to avoid risk of intoxication, overhea-
ting, fire, electric shock, and damage. Do not operate the appliance
without the crumb tray inserted properly.
• Even the exterior of the oven and the oven door may become hot
during operation. For operation, do not place the appliance near
heat-sensitive objects. Metal surfaces could heat up, when the oven is
operated near or on them. Only touch the appliance at the operating
elements, while the appliance is in use or still hot.

EN EN
10 11
• Always leave the oven and its accessories cool down, before clea-
ning the oven, removing the crumb tray, or moving the oven. Pay
attention when handling hot dishes, hot oven accessories or hot food.
Use oven gloves for touching and/or moving hot parts. We recom-
mend to remove the insets and rotisserie spit via the provided handles.
• During operation and some time thereafter, always ensure that the
heating elements will not be touched by any food or other objects
(e.g. tin foil, spits, baking paper, baking dishes). to avoid risk of
overheating, fire, electric shock, and damage to the oven.
• During operation, hot air and hot steam may escape from the rim of
the oven door and venilation slits. This holds especially, when ope-
ning the oven door. Do not hold your hands, face and arms over the
appliance during operation and thereafter. Only use heat-resistant
containers (e.g. oven-proof glass, ceramics, or metal).
• Do not use airtight containers as food and air extend when heated. The-
refore the container may explode. Shortly after operation, only place
hot food and accessories (e.g. insets, pizza stone) on heat resistant sur-
faces. Leave your food cool down sufficiently, before consumption.
• Do not cover the crumb tray or any other parts of the oven with metal
foil or baking paper to avoid overheating, fire and electric shock. Do
not cook any food on the crumb tray.
• During operation keep the appliance in an appropriate distance to
furniture, walls, boards, curtains, table decoration and other inflam-
mable objects. Do not operate the appliance near inflammable liquids
(i.e. high-proof alcohol) or beneath any heat-sensitive or moisture-sen-
sitive materials or beneath boards or drop-lights to avoid damage
caused by steam, condensate or fire.
• Food can catch fire, when overheated! Always avoid to excessively
extend the appropriate cooking time and clean the oven after each
operation. Remove any residues of food, before using the oven again.
• Immediately unplug the appliance, if any severe problem occurs
during operation (e.g. overheating, fire). If food in the oven com-
partment starts smoking or catches fire, LEAVE THE OVEN DOOR
CLOSED to prevent oxygen from getting into the oven, leading to a
flashback and/or explosion. Leave the appliance cool down under
close supervision. Thereafter, carefully remove the burnt food and take
the appliance to an authorized service centre for examination and repair.
MOVING PARTS
• During operation, the rotor drive may move and turn the installed rotis-
serie spit. Do not touch the rotisserie spit with your hands or any foreign
objects (e.g. spoon, ladle, fork) during operation of the rotor to avoid
touching hot parts of the oven. Always activate the pause function via
the Start/Pause button, before checking the consistency of your food.
TECHNICAL SPECIFICATIONS
Model: 42815 Design Oven Air Fry & Pizza
Power supply: 220- 240 V ~, 50/60 Hz, 16A
Maximum power consumption: 1680W
Oven lamp: pin based lamp, G9, 25 W (plug socket!)
Length of power cord: approx.95 cm (38 inch)
Weight: approx.8.1 kg
Dimensions, housing: approx.395 mm x 374 mm x 357 mm
(width x depth x height)
Dimensions, oven compartment: approx.315 mm x 305 mm x 220 mm
(width x depth x height), approx. 21 litres
Oven functions: upper and/or lower heat, convection fan (2 levels), spit rotor
Temperature:
minimum: 55°C (130°F);
maximum: 200°C (390°F Air Fry) or 220°C (430°F normal);
steps of 5°C (10°F)
Baking time: 1 to 120 minutes
Certificates:
www.tuev-sued.de/ps-zert
These specifications may change without notice.

EN EN
12 13
KNOWING YOUR NEW OVEN
1 PROGRAM DIAL – Turn this dial for selecting the program.
2 SETTING DIAL – Turn here for selecting temperature and time.
3 DISPLAY AREA – Shows the time (minutes or seconds) and temperature (°C or °F).
4 OVEN COMPARTMENT
5 NON-SLIP RUBBER FEET
6 6 HEATING ELEMENTS 4 at the top and 2 at the bottom of the oven compartment. Can be activated separately for getting the desired heat distribution.
7 OVEN LIGHT – May be switched on and off at will via the light button.
8 SPIT HOLDER – For hanging in one end of the rotisserie spit
9 ROTOR DRIVE – Insert the rotisserie spit into this opening for coupling it to the motor.
10 3 SHELF SLOTS – For positioning your food within the oven compartment.
OVEN COMPARTMENT
1
2
5
3
4
6
7
8
9
10
6
11 LIGHT BUTTON – For switching the oven light on or off.
12 ON/OFF BUTTON – For switching the oven on or off.
13 CHILD LOCK BUTTON – Use this button for locking or unlocking the operating elements.
14 START/PAUSE BUTTON – Use this button for starting or interrupting the selected program.
KONSOLE
OPERATION ICON TOAST ICON
PIZZA-ICON
DEFROST ICON
FRIES-SYMBOL
UPPER HEAT AIR FRY ICON
AIR FRY ROTISSERIE ICON
UPPER HEAT ICON
LOWER HEAT ICON
UPPER AND LOWER HEAT ICON
NORMAL ROTISSERIE ICON
11 12
13 14
REMOVABLE CRUMB TRAY, GRILLING RACK, WIRE BASKET AND ROTISSERIE SPIT are dishwasher safe.

EN EN
14 15
NOTE
Usually, the display shows the baking time in minutes. However, with the toast
program selected, the unit of the baking time is switched to seconds automati-
cally, because the results when roasting bread may differ remarkably with several
seconds more or less.
• Pizza stone and pizza program: Use the ceramic pizza stone for baking your
self-made pizza. Place the pizza stone on the grilling rack and insert it in the
middle shelf. The dedicated pizza program is adapted to this type of use (see:
‘Pre-Defined Programs and Functions’).
NOTE
Normally, there is no need for preheating the oven. If you wish to preheat (e.g.
for preheating a baking dish or the pizza stone), use the acoustic signal, the oven
issues with the pizza programm as soon as the set temperature is reached. Take
3-5 minutes into account.
• Rotisserie spit and rotisserie programs: The rotisserie spit may be used for all
types of food, that can be fixed securely at the rotisserie spit and will not fall
apart during baking. You can use the rotisserie drive with both convection levels
(normal or Air Fry; see: ‘Tips for Best Results / Using the Rotisserie Spit’).
• Child lock: Use this feature for locking the operating elements against uninten-
ded touch (see: ‘Locking the Control Panel Against Unintended Touch’).
• Automatic shut-off: If the appliance is idle for more than 3 minutes (no program
is running, the pause function is activated, no buttons are pressed) the oven will
automatically switch back to standby mode: the control panel gets dark with
only the on/off button flashing. Any paused program will be cancelled com-
pletely. Due to this feature, you are ensured that the oven will not run on useless-
ly, if you have forgotten to switch it off.
PROPERTIES OF YOUR NEW OVEN
Your new Design Oven Air Fry & Pizza is heated electrically and may be connected
to a usual wall power outlet of a power supply meeting common standards (see:
‘Important Safeguards for Electrical Appliances’). Therefore, this oven does not need
any special electric installations.
• All features included: The Design Oven Air Fry & Pizza comes with all crucial
features and possibilities of a conventional “large” oven, making it easy to cook
almost all dishes you are used to prepare in the oven of your range.
• Special Air Fry feature and normal convection: The convection fan may be
operated with 2 speed levels.
– Select programs with normal convection for all common tasks.
– Select a program with high-speed convection (Air Fry) in combination with high
temperatures for performing modern, fat-free air frying. At low temperature,
you may use the over for drying food (see: ‘Convection and Air Fry Programs’).
• Efficient use of energy: Due to the small oven compartment and efficient laying
of the heating elements, this oven reaches even the highest temperature in an
astonishing short time (approx. 5 minutes) with remarkably lower energy con-
sumption. Therefore, the oven is saving energy, time, and money (see: ‘Heating
Elements within the Oven compartment’).
• Fast respond to temperature changes: You can change the temperature and
time settings whenever you like. The oven responds to an increased temperature
within some seconds. According to the small oven compartment, decreasing the
temperature will be effective too after a short time. As a consequence, you get
the full control on the baking process (see: ‘Heating Elements within the Oven
Compartment’).
• Upper and lower heat used separately or together: Simply select the appro-
priate program.
• Acoustic signals: Each entry via the sensor buttons is confirmed via a beep.
Additionally, crucial steps of the food preparation and operation of the oven are
indicated via acoustic signals.
– The pizza program issues a signal, when the set temperature is reached.
– The fries program indicates the half of the set baking time. Turn the food for
even browning.
– The end of each program is indicated via series of beeps.
• 4 pre-defined programs for special use: toasting, thawing frozen food, making
pizza and French fries.

EN EN
16 17
HEATING ELEMENTS WITHIN THE OVEN COMPARTMENT
Due to the smaller oven compartment and the differing design with the heating ele-
ments lying within the oven compartment, the Design Oven Air Fry & Pizza offers
some advantages to the usual oven of a range. Saving energy, time and money is
the outcome for you.
• The set temperature is reached within a few minutes, which makes preheating
unnecessary in most cases. What's more, when high temperatures are selected,
the heat radiation via the heating elements starts the baking process even after
a few seconds.
• Depending on the type and consistency of your food, the required baking time
and temperature are reduced remarkably.
• The reaction of the oven to changes of the settings (selection of upper and low-
er heat, temperature) is outstanding fast, therefore bringing the baking process
completely under your control.
3 SHELF SLOTS
You may select one of 3 shelf slots for the insets (baking tray, grilling rack, wire bas-
ket). Use this feature to place your food at the required position, depending on the
size of your food and the distribution of heat within the oven. The following table
holds some guidelines for selecting the optimum shelf slot.
IMPORTANT -Always ensure to leave sufficient distance to the heating elements:
approx. 3 cm; 1 1/5 inches; width of a teaspoon. When operating the oven at
high temperature, you should even leave a significantly larger distance..
CAUTION – The insets may fit directly below the top heating elements. DO
NOT operate the oven with the insets in this position to avoid overheating.
However, the wire basket may be inserted there but this is not recommended due
to the short distance to the top heating elements.
Shelf Slot Use for …
Top
Use it for grilling most slices of meats and toasting plain bread slices or thin sandwiches. Additio-
nally, insert the wire basket here for air frying and drying.
CAUTION: Keep in mind that some types of food rise during heating. Ensure to keep sufficient
distance to the top heating elements throughout the complete heating process. If in doubt, select
the middle shelf slot.
Middle
Best suited for most baking and cooking tasks, including reheating, defrosting, toasting, pizza,
and braising. Suitable for grilling or toasting some taller items (e.g. larger pieces of meat or meat
with fillings, shish kebab, vegetable spits, thick burgers). .
Bottom
The bottom shelf slot leaves plenty of height for cooking, reheating, and warming of any larger
items. Additionally, use this position for most types of roast and when cooking via upper heat only
(bottom heating elements deactivated).
CAUTION: DO NOT insert the wire basket into the bottom shelf slot, because it may touch the
bottom heating elements and therefore cause overheating and damage.
SEPARATELY CONTROLLED UPPER AND LOWER HEAT
There are 4 heating elements at the top and 2 heating elements at the bottom of
the oven compartment. Top and bottom can be operated separately. This way, the
heat distribution within the oven compartment can be controlled and adapted to the
requirements of your dishes. The convection fan realizes an even heat distribution
(see: ‘Convection and Air Fry Functions’).
NOTE
Especially when using high temperatures, an important part of the heat transfer is
carried out via direct thermal radiation from the heating elements. The convection
fan has no influence on this effect. Thus, despite of using the convection fan, it is
crucial to keep sufficient distance to the heating elements to get an even browning.
CONVECTION AND AIR FRY FUNCTIONS
The oven offers 2 convection fan speeds: In normal mode the convection fan is
working with reduced power for ensuring an even heat distribution within the oven
compartment.
The Air Fry programs activate the full power of the convection fan for solving special
and unusual tasks. This includes frying fresh food without any additional fat but just
with hot air. Frying freshly made potatoe stripes for getting French fries is a typical
usage.
Because the temperature and baking time are freely adjustable, even unusual tasks
are possible. For example: select a temperature of 55-80°C for drying fruit, vege-
tables, herbs, and more.

EN EN
18 19
DISPLAY, ICONS AND DIALS
The control area including the sensor buttons, program / function icons and dials is
covered via a smooth transparent sheet—without any grooves or gaps.
• As a default, the centre of the upper line of the control panel shows the set
temperature. During running, the actual temperature (pizza program) or the still
remaining baking time may be displayed.
• Via pressing the centre of the selection dial (right dial button) shortly, the display
is toggled between the temperature and baking time.
• With the temperature shown on the display, hold the right dial button pressed
for approx. 5 seconds to toggle the temperature unit between °C and °F.
• For selecting the desired program, turn the program dial (left one). The icon
of the currently selected program flashes and the preset default temperature is
shown on the display.
• Confirm the selected program via pressing the dial button of the program dial.
All other program icons get dark.
• With a program selection confirmed, you can set the temperature and bak-
ing time via turning the setting dial. The oven will always be working with the
values, shown on the display.
Buttons Available on the Control Panel
The sensor buttons on the control panel respond to a light touch. There is no need
for pressing them.
Button Function
Light button: Switches the lamp within the oven compartment on or off. The appropriate icon illuminates,
when the lamp is switched on. When in doubt, use this feature for checking the functioning of the oven lamp
(see: ‘Replacing the Oven Lamp’).
Lock button (child lock): Hold your finger on this button for approx. 3 seconds for locking or unlocking the
control panel against unintended touch. The lock icon illuminates or gets dark accordingly.
Note: While a program is running, in general, all buttons are available. Only the program dial (left) and setting
dial (right) are locked automatically (see: ‘Pause Function’). When using the child lock, the buttons are locked
too. The only exception is the lock button.
On/off button: When the oven is switched off (standby mode), this button flashes, while all other buttons
and icons on the control panel stay dark. Via touching this button, you can cancel any running program immedia-
tely and return to standby mode.
Start/pause button: Starts the currently selected programm with the settings shown on the display. While
a program is running, touching this button interrupts the program, keeping the oven waiting for further entries
(see: ‘Pause Function’ and ‘Operation / Starting the Program’). For resuming operation, touch the start/pause
button again.
Note: While the program is interrupted, the current settings of temperature and still remaining baking time are
kept but can be changed (right dial) without cancelling the program. When selecting another program (left dial),
the interrupted program is cancelled automatically.
Icons of Programs and Functions
Icon Meaning
Light icon: Illuminates, when the lamp of the oven compartment is on.
Lock icon: The operating elements are locked (child lock), when this icon illuminates.
Operation icon: The icon is animated, while a program is running.
Toast icon: The dots at the right side show the selected browning. The more dots illuminate, the darker is the
browning. Upper and lower heat are used.
Note: When activating the toast program, the baking time is shown in seconds and the entry “min” on the display
gets dark.
Defrost icon: Use this program for thawing frozen food. The temperature is fixed to 60°C.
Pizza icon: This program is adapted to baking pizza and uses the Air Fry function (high-speed convection) and
upper and lower heat. However, of course, you may use it for other similar tasks.
Note: The oven issues an acoustic signal, as soon as the set temperature is reached (see: ‘Pre-Defined Pro-
grams and Functions’). We recommend to use the pizza stone for pizza.
Fries icon: Select this program for making French fries from frozen pre-baked fries or fresh potatoes. This pro-
gram uses the Air Fry function and upper heat. Spread the potato stripes on the wire basket.
Note: When using this program, the oven issues an acoustic signal, as soon as half the baking time ran out.
This is the right moment for turning your food in the wire basket to get an even result.
Upper heat Air Fry icon: This program is suited for almost all tasks that require high-speed convection.
Air Fry rotisserie icon: This rotisserie program gives a crispy even crust for grilled food, which can be roasted
on the rotisserie spit (see: ‘Pre-Defined Programs and Functions’). Only the top heating elements are activated.
Upper heat icon: Only the top heating elements (4 heating rods) are activated with normal speed convection.
Lower heat icon: Only the bottom heating elements (2 heating rods) are activated with normal speed convection.

EN EN
20 21
Upper and lower heat icon: All heating elements (6 heating rods) are activated.
Normal rotisserie icon: Use this program for all common tasks using the rotisserie spit. Only the top hea-
ting elements are activated.
PRE-DEFINED PROGRAMS AND FUNCTIONS
The Design Oven Air Fry & Pizza comes with 10 pre-defined programs/functions. 4
programs offer optimized factory settings for the dedicated types of dishes and food:
toast, defrosting, pizza and French fries. Nonetheless, you can change these settings
just before starting the program. Alternatively, you can combine the functions of the
oven at your will by selecting the appropriate function: activation of the heating ele-
ments for upper and/or lower heat or usage of the rotisserie spit, and selection of
the speed-level of the convection fan (normal or Air Fry).
NOTE
Any changes of the pre-defined programs will be active only during the current run and
the oven will recall the factory settings again, whenever selecting the program again.
Default Settings of the Pre-Defined Programs
NOTE
For the dedicated tasks, we recommend to start with the default settings and adapt the-
se values to your liking when having experience with this oven. If you decide, that the
factory settings are not suitable for your dishes, you can adapt the setting to your needs
even during operation (see: ‘Operation / Checking and Changing the Settings’).
Program,
Function
Use it for … Recommen-
ded shelf
slot
Rotor Icon Fan Temperature
C / °F
Time
Toast
Slices of bread with
topping or filling also,
sandwiches, buns;
3 browning levels
top, middle,
bottom no normal 55- 220°C
(130- 430°F)
300, 350, 430
5- 600
seconds
Defrost Thawing frozen food middle,
bottom no normal
60°C
(140°F) not
adjustable
30 Min
1- 120 minutes
Pizza
Pizza and others;
on the pizza stone or
backing tray; generates
a crispy crust
middle no Air-Fry 55- 200°C
(130- 390°F)
10 Min
1- 60 minutes
Fries
French fries or potato
chips from pre-baked
fries or fresh potatoes;
other dishes; use the
wire basket
top no Air-Fry 55-200°C
(130-390°F)
18 Min
1- 60 minutes
Air Fry
upper heat
Universal use of the Air
Fry function
top, middle,
bottom no Air-Fry 55-200°C
(130-390°F)
20 Min
1- 60 minutes
Air Fry
rotisserie*
Grilling via the rotisserie
spit and Air Fry function
-/-
(Rotor) yes Air-Fry 55-200°C
(130-390°F)
35 Min
1- 60 minutes
Upper heat Universal use according
to your recipe**
top, middle,
bottom no normal 55-220°C
(130-430°F)
20 Min
1- 60 minutes
Lower heat Universal use according
to your recipe**
top, middle,
bottom no normal 55-220°C
(130-430°F)
20 Min
1- 60 minutes
Upper and
lower heat
Universal use according
to your recipe**
top, middle,
bottom no normal 55-220°C
(130-430°F
20 Min
1- 60 minutes
Rotisserie* Normal Grilling via the
rotisserie spit
-/-
(Rotor) yes normal 55-220°C
(130-430°F)
30 Min
1- 60 minutes
* Both rotor programs (for the rotisserie spit) only use the top heating elements.
** Please refer to the hints given in chapter ‘Tips for Best Results’.
Course of the Pizza Program
For baking pizza, we recommend to use the pizza stone in combination with the pro-
gram pizza. The pizza program is adapted to the pizza stone. However, of course
you may use the backing tray as well.
Place the pizza stone on the grilling rack and push the grilling rack into the middle
shelf slot. If you expect juices dripping from the pizza stone, you may push the bak-
ing tray into the bottom shelf slot to collect the juices, and therefore protecting the
bottom heating elements and crumb tray.

EN EN
22 23
• When the pizza program is started, the actual temperature within the oven com-
partment is shown on the display. The pizza programm is operated with the Air
Fry function and upper and lower heat.
• In general, it is not required to preheat the oven. If you wish to do so, you may
use the acoustic signal, issued when the set temperature is reached. The heating
process will take approx. 5 minutes (beginning at room temperature).
• After reaching the set temperature, the oven interrupts the running program auto-
matically. When preheating the oven, use this break for placing the prepared
pizza into the oven.
• After a break of 3 minutes, the oven resumes operation automatically (with Air
Fry function) and the count-down of the baking time (10 minutes) starts. In most
cases, manual intervention is not required.
PAUSE FUNCTION
You can interrupt operation at any time via the start/pause button (pause func-
tion). When paused, the cooking time stops, the heating elements keep switched off
and the rotisserie rotor stops.
• Use the pause function for inserting your food after preheating or checking your
food during baking.
• Temperature and baking time can be changed at will, while the program is
interrupted (see: ‘Operation / Monitoring the Baking Process and Adapting the
Settings’).
• When resuming operation via the start/pause button the oven will use any
new settings you made during interruption.
• The interrupted program will be cancelled in the following cases:
– You select another program via the program dial. Thereafter, you can set up
the new program (see: ‘Operation / Checking and Changing the Settings’).
– You touch the on/off button , for switching off the oven (standby mode).
– The program is interrupted with no entries made for more than 3 minutes. In
this case the oven switches off automatically and you cannot resume the inter-
rupted program. Switch on and set up the oven again.
LOCKING THE CONTROL PANEL AGAINST UNINTENDED TOUCH
When a program is running, both dials are ineffective automatically. Only the sensor
buttons on the control panel are available. Via the child lock, you may lock the on/
off button and start/pause button as well.
To lock or unlock the control panel: For locking the control panel, hold the lock but-
ton pressed for approx. 3 seconds. Repeat this action, for unlocking the buttons.
The lock icon is illuminated, when the child lock is activated.
USEFUL ACCESSORIES
Accessories required for using the various features of the oven are part of the ship-
ping list: baking tray, grilling rack, wire basket, rotisserie spit, and pizza stone.
Always ensure that the utensils used with the accessories do not touch the heating
elements (e.g. tin foil, baking paper, skewers, cords).
Accessory Use it for …
Baking tray
Baking: Bread and buns, cookies, pastry, yeast cake (without baking dish).
Roasting/Grilling: Pieces that may fall through the grilling rack and/or fall apart (e.g. fish); contact gril-
ling of thin slices; all types of food that may be baked within a grilling pan.
Note: Due to the non-stick coating, most types of food may be prepared directly on the baking tray. Alter-
natively, coat the baking tray with tin foil (e.g. for meat, fish) or baking paper (for cakes and cookies). For
contact grilling, you should use the bottom shelf slot and the program for lower heat only ( ). Preheat the
baking tray at 220°C (430°F). Warm up your food to room temperature, before placing it onto the hot baking tray.
Depending on the type and consistency of your food, you should empty surplus juices intermediately.
Grilling rack
Baking and Re-heating with the pizza stone, oven-proof baking dishes, or packs of thick tin foil: gratin, cake,
fish, pizza and other food, baked on a bottom of yeast dough. For pizza and the like, you may use the pizza stone.
Roasting and braising in oven-proof roasters or (with restrictions!) a cooking brick.
Grilling: all pieces that will not fall through the grid and do NOT fall apart during cooking. (e.g. meat, shish
kebab, sausage). Insert the baking tray below the grilling rack for catching droplets.
Note: For smaller pieces, you may use the wire basket. Place the baking dishes, roaster, pizza stone, or alu
pack directly onto the grilling rack and select a shelf slot that will ensure that the used vessel and food within
will keep a distance of at least 3 cm (1 1/5 inch) to the top heating elements. Sufficiently solid types of food
may be placed directly onto the grilling rack. However, in this case, do not forget to push the baking
tray into the bottom shelf slot for protecting the bottom heating elements and crumb tray
from droplets and crumbs. Cooking bricks must be soaked in water before usage. Heat the cooking
brick slowly in several steps. Otherwise, it may burst!

EN EN
24 25
Wire basket
Air Fry: Pieces of food that may be baked within a fryer (e.g. French fries, potatoe chips, pieces of meat,
or breaded cheese). Beachten Sie die Angaben in Ihrem Rezept.
Drying (dehydrating): Spread the pieces of your food separated from each other as far as possible.
Select a temperature of max. 80°C and use the Air Fry function ( ). Depending on the thickness, humi-
dity of your food, and selected temperature, the complete procedure may last for 6-10 hours.
Baking / grilling: All pieces, which are too small for the grilling rack, but do not fall apart.
Note: When using the Air Fry functions, spread your food evenly on the wire basket to ensure free air circu-
lation. When juices and crumbs may fall down (e.g. when air frying breaded meat or breaded cheese), insert
the baking tray in the bottom shelf slot.
Rotisserie
spit
This accessory is suited for all types of food of sufficient size that can be fixed securely to the rotisserie spit and
will not fall apart during baking (see: ‘Tips for Best Results / Using the Rotisserie Spit’).
Note: Only use food-safe and sufficiently heat-resistant cords (e.g. non-treated cotton, hemp, or linen) or food-
safe clamps and scewers.
Pizza stone
For use, place it onto the grilling rack. You may use it for baking pizza and other dishes; especially those that
consist of a yeast dough bottom with toppings.
Note: Depending on the desired consistency of the dough bottom, it may be useful to preheat the pizza
stone. The pizza program indicates the moment, when the set temperature is reached via an acoustic signal.
For special tasks, pre-defined programs are offered, providing a set of adjustments
(see: ‘Pre-Defined Programs and Functions’). Use the provided handles for removing
hot accessories from the oven—especially when baking at high temperatures. This
way, you can handle your food hygienically and safely, avoiding to get burnt at
hot parts.
Hook up the rim of the insets (baking tray, grilling rack, wire basket) with the tray
handle. Support the rotisserie spit by holding the hooked ends of the spit handle in
the grooves at both sides of the rotisserie spit.
CAUTION – The spit handle is only suited for moving the rotisserie spit. Do
NOT use it for the other accessories, because they may fall or tilt in this handle. To
avoid damage and injuries by hot parts, ensure to hook in the handles correctly.
Move the accessories with care and hold them level to avoid that the accessories or
the food may slip out. In any case, we strongly recommend to use oven gloves.
TIPS FOR BEST RESULTS
Due to the design of the oven and the convection functions (normal or high-speed
for Air Fry) the Design Oven Air Fry & Pizza heats with higher efficiency than a com-
mon oven. Therefore, your food can be baked within a shorter baking time and/or
at lower temperature.
• During your first tries, check the consistency of your food in time to avoid mis-
sing the optimum point and, if required, adapt the temperature accordingly (see:
‘Operation / Checking and Changing the Settings’).
• Your new oven reaches the set temperature in a shorter time than a common
oven. Beginning at room temperature and the convection fan running on Air Fry
speed, 100 °C is reached within 2 minutes and 200°C in approx. 5 minutes.
As a result in most cases, preheating the oven (stated in most recipes) is unne-
cessary. However, when entering the baking time, please consider the time, the
oven needs for reaching the set temperature.
• Depending on the type of food, even the baking time may be remarkably
shorter and/or a lower temperature may be set. You should check the done-
ness of your food remarkably earlier to avoid burning your food.
• Especially for recipes that demand very high temperature settings, you should
decrease your settings for this oven by at least 10-20°C compared with the
recommended values. In general:
– higher temperature settings lead to a darker browning with lower temperature
in the core.
– select a lower baking temperature for getting your food well-done with a ten-
der crust or lighter browning (e.g. cakes, gratin or chicken filets).
• The respond to any changes of the temperature setting is astonishingly fast.
When increasing the temperature, the new setting is reached within some
seconds. Lower temperatures are met in a short time too due to the small oven
compartment. Therefore, the consistency of your food can be controlled easily.
For example: you can brown cake, gratin, and meet after it is done via increa-
sing the temperature or switching to a programm with upper heat only. Depen-
ding on the type of food and the doneness, even a few minutes will do. Keep
an eye on it to avoid burning your food!
• Your recipe may require a preheated baking dish (e.g. when using a roaster or
cooking brick). However, do not forget to place your food into the ofen after
5-10 minutes to avoid useless energy loss. You may use the Air Fry function, for
getting a crispy crust.
• When baking your food in an oven, additional fat is not required. However,
for keeping the crust extra light, evenly coat the food via a little cooking oil. This

EN EN
26 27
holds especially, when using the Air Fry function. For coating, use a pastry brush
or pour a little cooking oil into a bowl, and toss your food therein.
• Always ensure to leave approx. 3 cm (1 1/4 inches, width of a teaspoon) of
free space to the heating elements. When operating the oven at high tempera-
ture (above 180°C/360°F), you should leave a larger distance. This holds for
dishes, spits and other utilities as well.
• At high temperature the baking process is speeded up at any parts that are near
the heating elements. Thus, selecting another shelf slot has a high influence on
the results (see: ‘Properties of Your New Oven / 3 Shelf Slots’). In general, the
crust will be more even with a larger distance to the heating elements.
• After a prolonged time of storage, your food may get dry and therefore the crust
gets brown quickly or even burns. Some types of fruit or vegetables can be soa-
ked in cold water for up to 30 minutes before baking. This may compensate
the loss of water during storage. If it is compatible with your recipe, add some
lemon juice to the water. Other types of food (e.g. fish) may be coated with
some cooking oil.
• When you prepared your food with a marinade or paste containing large
amounts of sugar or proteins, the crust may get brown quickly, when a high
temperature is set. In this case, it may be crutial for getting the desired results to
select a significantly lower temperature and increase the baking time. Supervise
the baking process closely.
• Due to the heat radiation of the heating elements, convection is usefull in any
cases. Therefore, the convection fan cannot be switched off. Adapt the settings
for your dishes accordingly. In most cases, you should decrease the temperature
by 20-30°C (40-60°F) in comparison to baking without convection.
• If food could drip during cooking (e.g. when using the grilling rack, wire basket,
or rotisserie spit), we recommend to insert the baking tray in the bottom shelf slot
for protecting the heating elements and crumb tray. It is easy to clean the baking
tray due to the non-stick coating. However, you may coat the baking tray with
tin foil or baking paper.
NOTE
If required, the baking tray and grilling rack can be pushed into the same shelf
slot simultaneously.
WARNING – Do not place any sheats of foil or paper directly onto the
heating elements or onto the crumb tray. This may cause overheating and fire!
SPECIAL NOTES FOR BAKING MEAT
• For closing the pores of meat and holding back the juices, when baking meat
within a baking dish (e.g. roaster, cooking brick), you should preheat the baking
dish within the oven at high temperature, before placing the meat in it. Alterna-
tively, sauté the meat in a frying pan from all sides, before baking.
• Meat should have room temperature, before you place it in the oven.
• The baking time of a piece of meat depends on the thickness, the type of meat,
and the oven temperature. You may use a cooking thermometer to always get
the same results. Penetrate the cooking thermometer into the thickest part of the
meat for checking the core temperature. The optimum core temperature is bet-
ween 65°C (150°F; rare) and 75°C (170°F; well done). Poultry should reach
a core temperature of 85 °C (190°F).
• The higher the temperature of the oven the more weight the roast will loose. With
normal convection, 130°C (°F) will do.
• If the roast has no crust or is still to light in colour at the outside after the desired
core temperature is reached you may turn up the temperature of the oven to 175-
200°C (350-410°F) and bake the meat for a few minutes. Keep an eye on the
browning process to avoid burning the crust. If required, you may use the Air
Fry function for this task too.
• When the meat is done you can keep it warm for 25-45 minutes by turning the
oven to 70°C (160°F).
SUITED BAKING DISHES
Baking dishes made of metal (aluminia, stainless steel), oven-proof glass, and fire-
proof ceramics or stoneware can be used in your oven. Please consider, that the
glaze or coatings of some baking dishes are not suited for high temperature usage.
Adhere to the manufacturer's instructions.
WARNING – Do not use any containers that could burst, melt, or become dis-
torted, to avoid hazard due to splinters, liquids running out, and harmful substances.
IMPORTANT - It may be possible to use a small cooking brick. However, cooking
bricks may burst, when heated up too fast or uneven. Therefore, when using
this oven, it is required to heat it up carefully in several steps and keep a larger
distance to the heating elements. If possible, insert the baking tray and the grilling
rack simultaneously in the bottom shelf slot to protect the cooking brick from the
heat radiation of the bottom heating elements. Then place the cooking brick on
the grilling rack.

EN EN
28 29
USING THE ROTISSERIE SPIT
You may use the rotisserie spit for all types of food of appropriate size that can be
attached securely to the spit and will not fall apart during baking, such as small parts
of poultry that will fit into the oven without getting too near to the heating elements
(e.g. chicken drumsticks).
• For using the rotor drive, you need to select a rotisserie program (Air Fry) or
(normal convection). You can change any settings of these programs at will.
• The distance to the heating elements must be at least 3 cm (1 1/5 inch, width
of a teaspoon). Attach your food to the rotisserie spit and fix it securely via the
provided clamps and/or other utilities. Ensure to use heat-resistant and non-trea-
ted natural cord (e.g. hemp) or heat-resistant and food-save clamps and skewers
(e.g. made of metal or wood).
• Please keep in mind that food may get loose during the baking process. Therefore,
keep the baking process under close supervision, when using a rotor program.
• When high temperatures are required, due to the special properties of the
Design Oven Air Fry & Pizza it may be better to select the temperature somewhat
lower than given in a recipe that is developed for a usual oven.
• When the crust is not as crispy as desired, although the core temperature is rea-
ched already, you may simply increase the temperature at the end of the baking
time for some minutes (see: ‘Operation / Monitoring the Baking Process and
Adapting the Settings’).
FIRST USE
WARNING – DO NOT let children play with the appliance, or any
part or accessory of it, or the packaging! The appliance may get hot even at
the exterior. During operation and shortly thereafter, only touch the appliance
at the operating elements.
Always hold the appliance at both sides at the bottom of the housing for moving
the appliance. DO NOT grasp the appliance at the power cord or oven door for
moving it. Always switch off the appliance (touch the on/off button , the control
panel gets dark), unplug the appliance and leave the appliance cool down before
moving or cleaning the appliance. Do not place the appliance or power cord in any
liquids or pour or spill any liquids in or on the appliance. Do not place the appliance
or any part of it in an automatic dishwasher.
Before switching on, always ensure that there are no foreign objects in the oven
compartment.
IMPORTANT - The heating elements may smoke slightly and give off a burnt smell,
when the oven is heated to high temperature for the very first time. This is entirely
safe and will stop after a few minutes. However, to avoid that your food will be
affected, we recommend heating up the empty oven for 20 minutes at 220°C,
before first use. Ensure good ventilation. If the burnt smell persists on later use,
clean the oven (see: ‘Care and Cleaning’). If the burnt smell persists stubbornly
even after thoroughly cleaning the appliance, return the appliance to an authorised
service centre for examination and repair.
1. Unpack the appliance and all accessories carefully and check, if there are any
parts damaged or missing. Keep the packaging until all parts have been found.
2. Carefully remove all shipping materials and promotional materials, but DO
NOT remove any warning labels or the model label. Especially ensure to
remove all foreign objects (e.g. packaging, promotional materials) from the
oven compartment.
3. Before first use and after a prolonged period of storage, clean the appliance
and its parts (see: ‘Care and Cleaning’).
WARNING – For operation, do not place the appliance in a cabinet or
board or under a board or drop light. Do not place the oven on / in / near any
hot surfaces to avoid overheating and risk of electric shock and fire. Do not place
any clothes or tissue or other foreign objects on or under the appliance during ope-
ration. Do not block the ventilation slits of the housing. Ensure to keep the appliance
in an appropriate distance (at least 1m) to any inflammable objects (e.g. curtains,
inflammable liquids). Additionally, keep a sufficient distance of approx. 20 cm to
any other objects and to the edge of the table or counter. However, if possible,
place the rear of the appliance directly against a heat-resistant wall (e.g. stonework).
4. Place the appliance on a suitable surface (see: ‘General Safety Instructions’). Ensure
that the ventilation slits in the housing are not blocked to avoid damage. Take all
accessories and foreign objects out of the oven compartment. Close the oven door.
5. Completely unwind the power cord and plug in the appliance into a suitable
wall power outlet (see: ‘Important Safeguards for Electrical Appliances’). A beep
sounds to indicate that the appliance is live. The control panel is illuminated com-
pletely for a moment. Thereafter the control panel gets dark again with the on/
off button flashing. The oven is now in standby mode.
6. Touch the on/off button . The buttons and display of the control panel illumi-
nate and the on/off button stops flashing.
7. Turn the program dial (left dial) until the icon flashes (upper and lower heat,
normal convection). The default temperature is shown on the display: 220°C.

EN EN
30 31
NOTE
During operation, the heating elements may reach red heat. This is normal an no
reason for concern.
8. Touch the start/pause button . The cooking time is shown on the display as
a count down and the oven light illuminates. The oven starts heating. As soon
as the count down reaches “0”, the oven switches off the heating elements auto-
matically, issues an acoustic signal and displays “End”.
9. Touch the start/stop button for switching off the oven and unplug. Open the
oven door and leave the oven cool down completely.
10. Wipe the oven compartment using a soft damp cloth (see: ‘Care and Clea-
ning’). With the oven door open, leave the oven dry naturally for approx. 30
minutes.
11. Thereafter, push the crumb tray with the bent edge orientated to the rear into the
bottom of the oven compartment below the bottom heating elements. Thereafter
the appliance is ready for use.
OPERATION
WARNING – Always ensure that the appliance and all its parts and accesso-
ries are out of reach of children younger than 8 years. Your new Design Oven Air
Fry & Pizza is intended for baking edible food. For this, the heating elements on top
and bottom of the oven compartment are heated electrically and may reach red heat.
The parts of the oven, including the exterior as well as the baking accessories used,
and the food can reach very high temperatures and therefore, even a light touch
with your skin may cause severe burns. Protect your hands with oven gloves and use
the provided handles to avoid burns and scalds.
Be careful when opening the oven door, because large amounts of steam and very
hot air could escape from the oven compartment. While handling your food, ensure
that liquids within the baking dishes are not spilled.
WARNING –Risk of Overheating: Do not cover the crumb tray or bot-
tom of the oven compartment with foil.
CAUTION – The oven compartment is equipped with a non-stick coating.
Do not use any spray-on non-stick coatings. Do not cut, scratch, or scrape in the
oven compartment. Ensure that the crumb tray is in place at the bottom of the oven
compartment before baking within the oven.
During operation: Do not leave the oven door open for a prolonged time! Do not
leave any foreign objects (e.g. unsuited foils, dishes, cooking utensils) in the oven
compartment, to avoid risk of fire, electric shock, burns, exposure to harmful sub-
stances and damage. Only use baking dishes that are suited for usage within an
oven (see: ‘Tips for Best Results / Suited Baking Dishes’). Always ensure that the uti-
lities used or pieces of food do not touch the heating elements.
IMPORTANT - You may cancel operation at any time you like via the on/off but-
ton (the control panel gets dark with only the on/off button flashing). Always
unplug the appliance, when it is not in use and before cleaning.
NOTE
A lot of recipes demand preheating the oven. The Design Oven Air Fry & Pizza
reaches the set temperature very quickly (approx. 5 minutes). At least with high
temperature settings, especially while heating up, an intense heat radiation is
generated some seconds after starting the program. Therefore, it may be useful to
avoid preheating the oven. Additionally, placing your food into the cold oven is
more comfortable. What's more, energy will be saved.
NOTE
You cannot change any settings, while a program is running. However, for making
any settings, interrupt the cooking procedure via the start/pause button (see:
‘Checking and Changing the Values’).
PREPARING THE OVEN AND YOUR FOOD
1. Preparing your food (see also: ‘Tips for Best Results’): Select the best suited
accessory (see: ‘Properties of Your New Oven / Useful Accessories’). Remove
any unedible parts and, in most cases, defrost frozen food. For this, you may
use the Defrost program of the oven. Place your food onto the accessory. Spread
smaller pieces evenly (e.g. French fries, buns or shish kebab).
2. Preparing the oven: Remove all not used accessories from the oven compart-
ment. Ensure that there are no foreign objects in the oven compartment. Ensure
that the crumb tray is inserted below the bottom heating elements.
WARNING –Food may catch fire when overheated! Food and cooking
dishes must always be kept in a distance of at least 3 cm (1 1/4 inches; width
of a teaspoon) to the heating elements. Please keep in mind, that food may swell
up, break up, or drip when heated. If in doubt, select another shelf slot.
3. Without preheating – the normal case: Select an appropriate shelf slot and push your
food into the oven compartment (see: ‘Properties of Your New Oven / 3 Shelf Slots’).

EN EN
32 33
– When droplets and crumbs may fall down during baking, insert the baking
tray in the bottom shelf slot.
– If you wish to use the rotisserie spit, then insert the prepared rotisserie spit in
the rotor drive and spit holder (see: ‘Preparing the Rotisserie Spit’).
4. Preheating for special cases: In most cases, preheating is required only, when
using any baking dishes or the pizza stone (see: ‘Properties of Your New Oven
/ Useful Accessories’). For preheating, push the required accessory into the oven
without your food (e.g. pizza stone or roaster on the grilling rack).
WARNING – Tin foil or baking paper may bend when heated and there-
fore touch the heating elements. DO NOT cover the crumb tray with tin foil or
baking paper to avoid risk of over-heating and short circuit! Do not operate the
oven with the oven door open!
5. Close the oven door.
6. Insert the power plug into a wall power outlet of an appropriate power supply.
Wait until only the on/off button flashes (standby mode).
7. Set-up the oven for your task (see: ‘Selecting the Program’).
PREPARING THE ROTISSERIE SPIT
CAUTION – The food, baked via the rotisserie spit should not be more than
approx. 15cm (approx. 6 inches) in length and approx. 10cm (approx. 6 inches)
in diameter. It should not protrude the rotisserie spit farther than 4-5 cm (max. 2
inches), to avoid that it may get too near to the heating elements. Additionally, it
may not even partly loosen during cooking to prevent that your food touches the
heating elements. Keep in mind, that some food may fall apart during baking (e.g.
fish). In general, this type of food is not suitable for baking via the rotisserie spit.
IMPORTANT - For your safety, the rotor programs ( and ) only activate the
top heating elements, avoiding that droplets and crumbs of your food burn to charcoal
on the bottom heating elements or even catch fire. Nevertheless, it is good advice to
insert the baking tray in the bottom shelf slot for catching droplets and crumbs.
Fixing Food at the Rotisserie Spit
IMPORTANT - Only use stainless steel and/or hear-resistant and food-save cords,
clamps, and skewers. Keep in mind that food will loose strength and may shrink
or puff-up, when heated.
1. Loosen the clamps of the rotisserie spit and pull down at least one clamp. The
clamps can be moved freely on the rotisserie spit after turning the screw on the
holder of the clamp counter-clockwise.
2. Penetrate the food (e.g. a piece of roast) via the rotisserie spit. Small, long
pieces (e.g. chicken drumsticks) may be attached with food-safe cords or ske-
wers. As far as possible, the rotisserie spit should be placed in the centre of the
food. Your food may not protrude the axis of the rotisserie spit no more than
6-7cm (approx. 3 inches). Leave sufficient free space at each end for fixing the
clamps of the rotisserie spit, because they will ensure that your food will turn with
the rotisserie spit, when the rotor is running.
3. Replace the clamps with the tips facing inwards and, for fixing your food, push the
clamps tightly to the food. However, do not use violence to avoid damage to the
clamps. Fasten the clamps by turning the screws on the holders of the clamps clockwise.
4. Bind loose parts (e.g. legs and wings) via suitable cords or use skewers for shish
kebab or roulades.
5. Via turning the rotisserie spit in your hand, ensure that all parts of your food are
fixed securely and do not stick out too far.
Inserting the Rotisserie Spit
NOTE
There are 3 grooves in the rotisserie spit. The large grooves are used for hooking
in the spit handle and the small groove at one end for fixing the rotisserie spit in
the spit holder at the left side of the oven.
6. Insert the rotisserie spit at an angle into the oven compartment with the left end
(2 grooves) slided carefully in above the middle shelf slot. While doing so, insert
the right side (1 groove) of the rotisserie spit into the opening of the rotor drive.
7. Lay the left side into the notch in the centre of the spit holder. Ensure that the
rotisserie spit is fixed securely and can not slip out.
SELECTING THE PROGRAM
The icon of the currently selected program is flashing and, the preset temperature of
the selected program is shown on the display (see: ‘Properties of Your New Oven
/ Pre-Defined Programs and Functions’). When switching on the appliance, the fries
program ( ) is selected always.
1. If required, turn the program dial (the left one) for selecting another program.
Select the program with the demanded combination of upper heat and lower

EN EN
34 35
heat (shown at the icons) and convection speed (normal or Air Fry). The area of
the Air Fry programs is marked at the control panel with “Air Fry”. The programs
shown outside the “Air Fry” area use normal convection.
2. You may start the selected program immediately via the start/pause button
(see: ‘Starting the Program’). Alternatively, set the temperature and baking time
first (see below).
CHECKING AND CHANGING THE SETTINGS
Various useful tips for setting the temperature and baking time are given in chapter
‘Tips for Best Results’.
NOTE
When the oven has been idle for approx. 3 minutes (no program running or the cur-
rent program is interrupted, no entries made), it switches back to standby mode. In this
case, all previously made settings will be lost (see: ‘Properties of Your New Oven’).
NOTE
When setting the temperature and baking time, you may go beyond the maximum
or minimum value. This way you can switch directly from maximum to minimum
and vice versa.
3. Press the centre of the program dial (left dial) for confirming the currently selected
program. The icon of the selected program stops flashing and all other program
icons get dark. Now, temperature and baking time can be changed.
4. Turn the selection dial (right dial) for setting the temperature in steps of 5°C
(10°F). You can set a value between 55°C (130°F) and 200°C (390°F; Air Fry
programs) or 220°C (430°F; normal convection). The only exception is the Defrost
program for thawing frozen food. This program is fixed to 60°C (140°F).
IMPORTANT - For toggling the temperature unit to °F and back, hold the centre of
the selection dial pressed for approx. 5 seconds, while the temperature is shown
on the display. The current unit is shown besides the temperature. When setting
the temperature, ensure that the correct unit is used.
5. Press the centre of the selection dial shortly for switching to the baking time.
6. Turn the selection dial for setting the baking time.
NOTE
Usually, the baking time is displayed in minutes. When a toast program is
selected, on the display, the unit entry “min” goes out and the unit of the browning
time for your toast is switched to seconds.
STARTING THE PROGRAM
WARNING – Even the exterior of the oven will get hot and steam could
escape from the oven door. During operation and for a time thereafter, only touch
the oven at the door handle and/or control panel. Use oven gloves and the pro-
vided handles for working on any part in the hot oven.
1. Press the start/pause button . The oven starts heating and the remaining baking
time is shown on the display as a count-down. The operation icon starts turning.
As soon as the program is started, the settings of the program are locked and the
dials are idle. For making any changes, you must interrupt the program (see: ‘Proper-
ties of Your New Oven / Pause Function’). The sensor buttons controlling the oven
light , child lock on/off and start/pause function are still available.
If required, you may engage the child lock (see: ‘Properties of Your New Oven /
Locking the Control Panel against Unintended Touch’).
NOTE
In any case, you should interrupt operation for inserting the rotisserie spit, because
the rotor drive does not stop, when the oven door is opened.
2. When the oven has been preheated: After approx. 5 minutes of preheating,
place your food into the oven or hang the rotisserie spit into the oven (see: ‘Pre-
paring the Rotisserie Spit’).
3. Depending on the selected program, the oven issues additional acoustic signals:
The pizza program indicates, when the set temperature is reached and stops
operation for approx. 3 minutes for inserting the pizza. Thereafter the program
continues automatically. The fries program indicates, when half of the baking
time is reached. This is the optimum moment for turning the food.
4. If required, check the consistency of your food in time. For this, we recommend
to interrupt the running program for deactivating the heating elements, convec-
tion fan, and rotor drive. With the program interrupted you can adapt the set-
tings according to the results, which are reached already (see: ‘Monitoring the
Baking Process and Adapting the Settings’).
5. When the set cooking time elapsed, the oven switches off the heating elements,
a beep sounds several times and “End” is shown on the display. After approx.
3 minutes without any entries, the oven switches back to standby mode automa-
tically and the control panel gets dark.

EN EN
36 37
MONITORING THE BAKING PROCESS AND ADAPTING THE SETTINGS
Especially, when using the oven for your first tries, you shoult check the consistency
of your food in time. For this, we recommend to interrupt the running program via
the pause function for deactivating the heating elements and convection fan (see:
‘Properties of Your New Oven / Pause Function’).
If you have the idea that your food may not reach the desired consistency via the cur-
rent settings, you can adapt the settings accordingly, while the program is interrupted
(see: ‘Tips for Best Results’). Use this feature for the following corrections:
– adapting the remaining baking time;
– increasing the temperature for a short time for getting a crispy crust;
– decreasing the temperature for getting the desired core temperature without bur-
ning the crust.
NOTE
If you wish to change the settings for upper and lower heat or convection, you
need to select another program. The interrupted program will be cancelled com-
pletely. If the program is interrupted and no entries are made within 3 minutes,
the oven will cancel the program completely and switch back to standby mode
automatically.
1. If you wish to interrupt the running program, touch the start/pause button . The
baking time is stopped and the heating elements and convection fan are deac-
tivated. All operating elements of the control panel are available again.
2. Check your food and make your settings (see: ‘Checking and Changing the Settings’).
3. If you wish to resume operation after interrupting the oven program, please do
not forget to continue the running program via touching the start/pause button
again. As soon as the program runs on, the control panel will be locked again.
4. If you wish to cancel the interrupted program completely, touch the on/off button
. The oven switches back to standby mode and the control panel gets dark. The-
reafter, there is no way to continue the oven program at the latest point of operation.
AFTER BAKING
CAUTION – Do not place any hot parts (e.g. food, accessories of the
oven) on surfaces sensitive to heat, water and/or fat. Keep a suitable dish,
tablet, or mat at hand.
NOTE
Perhaps, you should keep the oven switched on, for taking out your food, because
the oven light may be helpful for this task.
1. Ensure that a suitable surface is in reach for placing the hot accessory and food
on it. Pull on oven gloves. Keeping a sufficient distance to the oven, carefully
open the oven door.
2. Grilling rack, wire basket, or baking tray: Hook the tray handle onto the rim
of the accessory and pull it out of the oven. When heavy parts are on the acces-
sory (e.g. roaster, cooking brick, baking dishes made of stoneware), you should
hold the accessory with the other hand too for preventing it from tilting or slip-
ping out of the handle. Place the accessory with your food onto a heat-resistant
surface.
3. Rotisserie spit: Hook the spit handle on the grooves on both sides of the rotis-
serie spit. At the left side, carefully move the rotisserie spit up a little. Then pull it
outwards within the groove above the top shelf slot. This way, it will slip out of
the rotor drive at the right side.
NOTE
You may set up and start the oven again immediately, if you wish to cook another
portion. However, after a program is finished, all settings are set to the default
values and, if required, you need to enter your settings again.
4. If you do not wish to use the oven again, ensure to switch off the oven via the
on/off button (control panel is dark). Unplug the appliance.
5. With the oven door open, leave the oven cool down (at least 20 minutes).
Always clean the oven, crumb tray, and all used accessories after each use (see:
‘Care and Cleaning’), for avoiding that any residues of food carbonize on the
surfaces, when using the oven next time. Food may smoke and even catch fire
when burned to charcoal.
IMPORTANT - Do not leave the appliance connected to the power supply unne-
cessarily and unattendedly.

EN EN
38 39
SOLVING PROBLEMS
If any problems occur during operation, you will find solutions in this section.
Problem Possible Reason The Solution
Emergency stop required? - / - As an exception, immediately unplug the appliance.
The control panel remains
completely dark. The on/
off button is dark too.
The appliance is not live. Please, check:
– Is the appliance connected to the power supply?
– Is the used power outlet live? Connect a lamp.
– Unplug the appliance and check the power cord for any
type of visuable damage.
If in doubt, get in contact with your vendor.
You cannot insert the crumb
tray below the bottom
heating elements AND /
OR the oven door cannot
be closed, when the crumb
tray is inserted.
Wrong orientation of the
crumb tray.
Take out the crumb tray and insert it again in correct ori-
entation: The bend edge must face upwards and to the
rear of the appliance.
When the crumb tray is inserted correctly, it lies below
the bottom heating elements and the oven door
can be closed completely.
The appliance does not
respond to your entries,
although the display is
showing the temperature or
baking time.
A program is running. The
dials are locked.
Interrupt the running program (touch the start/pause but-
ton ). Alternatively, cancel the program and thereafter
switch on the oven again via the on/off button .
Thereafter, all operating elements on the control panel are
available again (see: ‘Operation / Monitoring the Baking
Process and Adapting the Settings’).
The child lock is active.
The lock icon is
illuminated.
Hold your finger for approx. 3 seconds on the lock button
(left side from the lock icon) for deactivating the
child lock. Thereafter, the on/off button and start/pause
button are available again.
Only the sensor buttons
do not respond.
Wipe the sensor buttons via a dry, clean and soft cloth. Rub a
droplet of water between your finger tips. Then try again.
You cannot set the desired
temperature according
to your recipe or the set
temperature is not kept by
the oven.
The desired Temperature
exceeds the temperature
range of the selected pro-
gramm.
The maximum temperature of the air fry programs is
200°C (390°F). The defrost programm is fixed to 60°C
(140°F). If required, select another program.
The wrong temperature
unit is selected.
Please consider, that it may be better to select an remar-
kably lower temperature for baking your dishes with this
oven than you are used to.
You cannot deactivated the
convection fan.
Only Air Fry (high speed)
and normal convection can
be used.
Adapt the settings to the usage of the convection fan. In
most cases, decrease the temperature by 20-30°C (40-
60°F; see: ‘Tips for Best Results’).
Problem Possible Reason The Solution
During the heating phase,
smoke builds up within
the oven compartment.
Very first heating:
The protecting substance
on the heating elements
vaporizes.
This is normal and no need for concern. The smoke stops
after some minutes of heating and will not occur again.
The protecting substance is non-toxic and harmless.
However, ensure good ventilation and clean the oven
compartment after the first heating (see: ‘First Use’).
Residues of food are on
the heating elements.
Food on the heating elements may catch fire!
Immediately switch off and unplug. Let the oven cool down.
Clean the oven compartment. Remove any splashes and
crumbs from the heating elements (see: ‘Care and Clea-
ning’). Thereafter heat the oven to the maximum tempera-
ture for some minutes and check, if the problem persists.
Your food is too near
to the heating elements
AND/OR crumbs or liquids
dropped onto the heating
elements during baking.
Switch off the oven, unplug and let the oven cool down.
Clean the oven compartment (see: ‘Care and Cleaning’)
– Before starting the oven, always ensure that your
food will remain in sufficient distance of at least 3 cm
(width of a teaspoon) to the heating elements during
the complete baking process.
– If the juices of your food could drip or crumbs may fall
down, you should use the baking tray in addition (see:
‘Tips for Best Results’).
The baking time and/or
temperature are set much
too high.
Your new oven solves a lot of tasks in much shorter time
and/or lower temperature than usual ovens. Additionally,
the set temperature will be reached within a few minutes
(see: ‘Tips for Best Results’). Therefore, on your first
tries, you should supervise any baking process closely.
– Check the doneness of your food in time (half of the
normal baking time) to avoid overheating and burning
your food.
– Select a lower temperature for reaching the desired
doneness in the core, before burning the crust.
This manual suits for next models
1
Table of contents
Other Gastroback Oven manuals
Popular Oven manuals by other brands

IKEA
IKEA OV10 instruction manual

Falcon
Falcon Classic Deluxe 110 Dual Fuel User's guide & installation instructions

Bosch
Bosch HBG7764.1B User manual and installation instructions

Jenn-Air
Jenn-Air ELS W105 Use & care manual

Amica
Amica ASC460SS instruction manual

NEFF
NEFF B27CR22 1B Series instruction manual