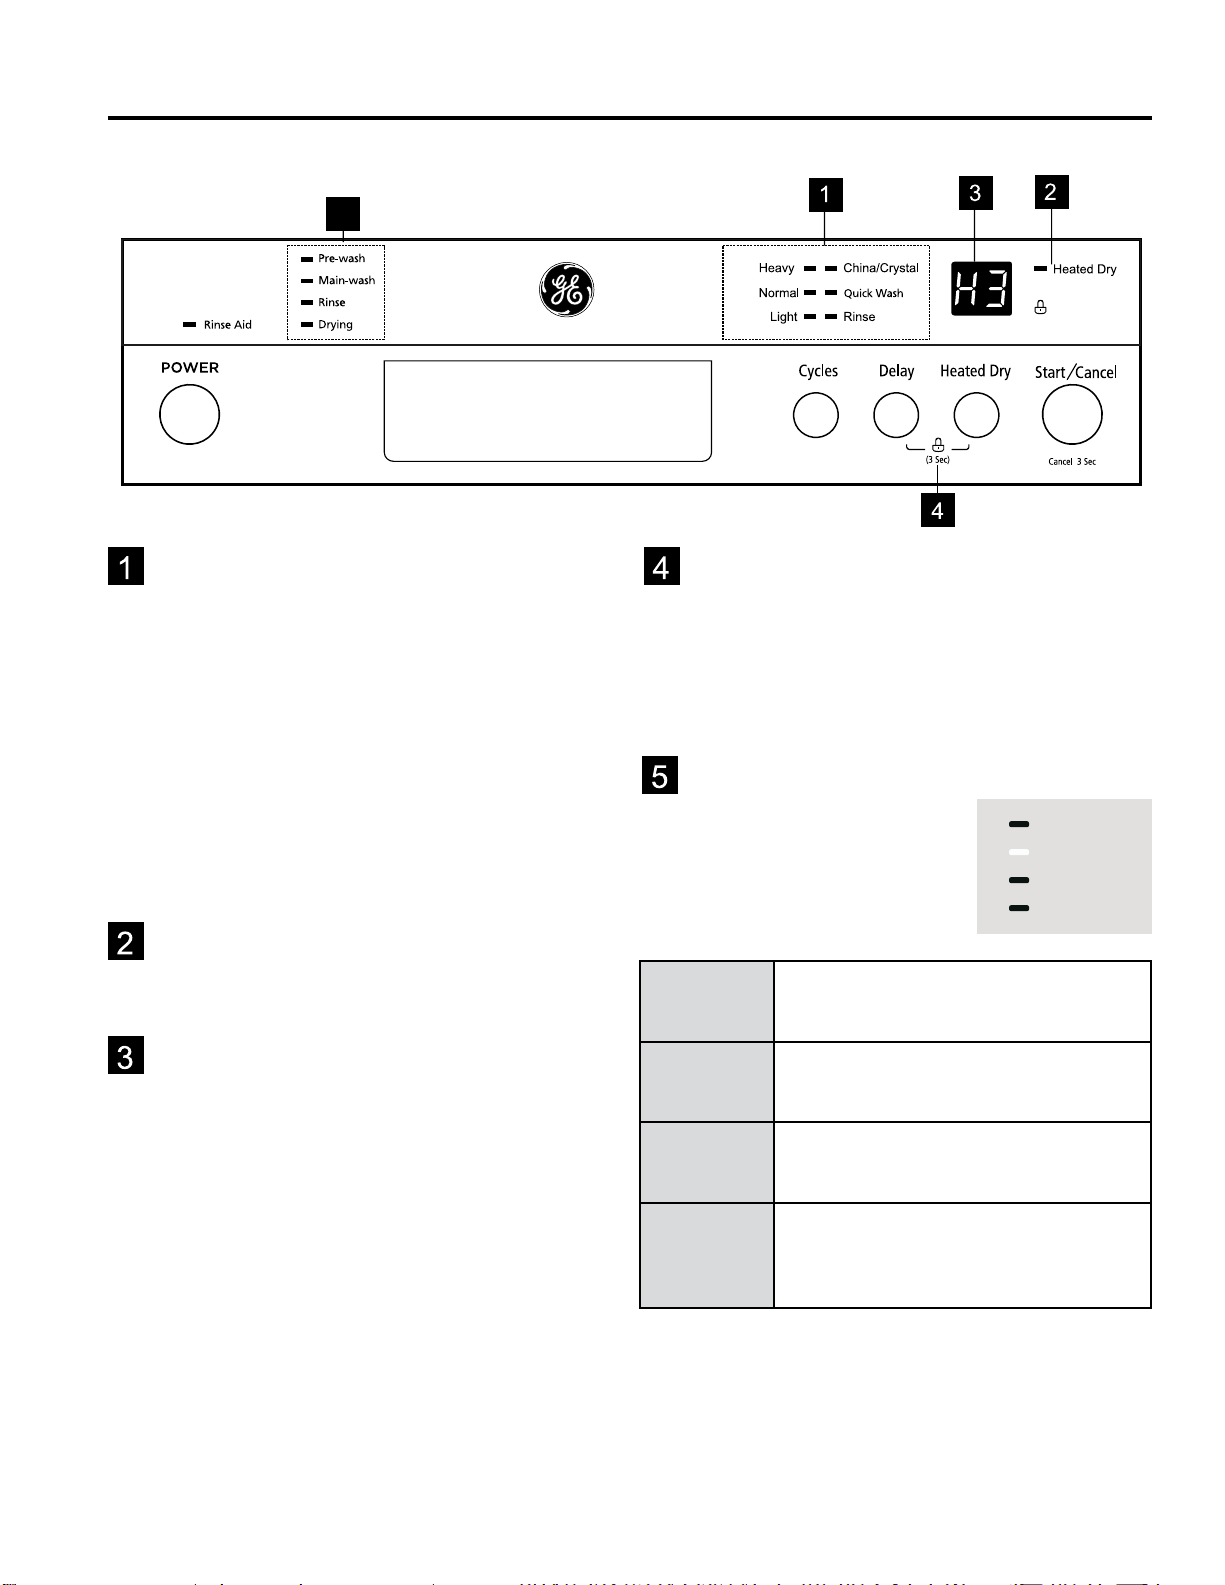
GE GBF 180 Series User manual

2
D
[ ]
1 PANTONE BLAC K C
2
3 A4, A4
4
80
6710024319
用户手册
GBF412SGMBB(WQP12-77M3)
(GE)加拿大
02

Write the model and serial
numbers here:
Model #_________________
Serial # _________________
You can find them on a label on
the tub wall just inside the door.
OWNER’S MANUAL
DISHWASHERS
29-6273 06-18 MC
SAFETY INFORMATION........... 4
USING THE DISHWASHER
Getting Started ......................... 6
Loading ...............................12
Dispensers .............................15
CARE AND CLEANING ............16
TROUBLESHOOTING TIPS........17
WARRANTY ........................21
CONSUMER SUPPORT ........... 22
GE is a trademark of the General Electric Company. Manufactured under trademark license.
GBF 180 Series
GBF 412-532 Series
MBF 422 Series
GBT 412 Series
GBT 632 Series
Includes Moffat Series
and GE®Series products
ENGLISH/FRANÇAIS
FRONT CONTROL MODELS TOP CONTROL MODELS

2
29-6273
THANK YOU FOR MAKING GE APPLIANCES A PART OF YOUR HOME.
Whether you grew up with GE Appliances, or this is your first, we’re happy to have you in the family.
We take pride in the craftsmanship, innovation and design that goes into every GE Appliances
product, and we think you will too. Among other things, registration of your appliance ensures that we
can deliver important product information and warranty details when you need them.
Register your GE appliance now online. Helpful websites and phone numbers are available in the
Consumer Support section of this Owner’s Manual. You may also mail in the pre-printed registration
card included in the packing material.

29-6273
3
WELCOME
Notes

4
29-6273
SAFETY INFORMATION
IMPORTANT SAFETY INFORMATION
READ ALL INSTRUCTIONS BEFORE USING THE APPLIANCE
READ AND SAVE THESE INSTRUCTIONS
WARNING For your safety, the information in this manual must be followed to minimize
the risk of fire, explosion, electric shock, and to prevent property damage, personal injury,
or death.
WARNING PROPER INSTALLATION AND MAINTENANCE
This dishwasher must be properly installed and located in accordance with the Installation Instructions before
it is used. If you did not receive an Installation Instructions sheet with your dishwasher, you can receive one by
visiting our Website at GEAppliances.ca.
■ Connectthedishwasher/appliancetoagrounded
metal, permanent wiring system; or run an
equipment-grounding conductor with the circuit
conductors and connect to the equipment-grounding
terminal or lead of the appliance.
■ Improperconnectionoftheequipment-grounding
conductor can result in a risk of electric shock.
Check with a qualified electrician or service
representative if you are in doubt whether the
appliance is properly grounded.
■ Disposeofdiscardedappliancesandshippingor
packing material properly.
■ Donotattempttorepairorreplaceanypartofyour
dishwasher unless it is specifically recommended in
this manual. All other servicing should be referred to
a qualified technician.
■ UseonlycordkitWG04F10796orhard-wireto
buildingelectrical.Failuretofollowthisinstruction,
could result in risk of fire and personal injury.
■ Tominimizethepossibilityofelectricshock,
disconnect this appliance from the power supply
before attempting any maintenance.
NOTE: Turning the dishwasher off does not
disconnect the appliance from the power supply.
We recommend having a qualified technician service
your appliance.
WARNING WHEN USING YOUR DISHWASHER, FOLLOW BASIC PRECAUTIONS,
INCLUDING THE FOLLOWING:
■ Usethisapplianceonlyforitsintendedpurposeas
described in this Owner’s Manual.
■ Useonlydetergentsorwettingagentsrecommended
for use in a dishwasher and keep them out of reach
ofchildren.Usingadetergentthatisnotspecifically
designed for dishwashers will cause the dishwasher
to fill with suds.
■ Locatesharpitemssothattheyarenotlikelyto
damage the door seal.
■ Loadsharpkniveswiththehandlesuptoreducethe
risk of cut-type injuries.
■ Donotwashplasticitemsunlessmarked
dishwashersafeortheequivalent.Forplastic
items not so marked, check the manufacturer’s
recommendations.
■ Donottouchtheheatingelementduringor
immediately after use.
■ Donotoperateyourdishwasherunlessallenclosure
panels are properly in place.
■ Donottamperwithcontrols.
■ Donotabuse,sitonorstandonthedoorordish
rack of the dishwasher.
■ Toreducetheriskofinjury,donotallowchildrento
play with, on or inside this appliance at any time.
■ Donotstoreorusecombustiblematerialsincluding
gasoline or other flammable liquids or vapors in the
vicinity of this or any other appliance.
■ Smallparts,suchasrackclipsandfilterretaining
posts,canbeachokehazardtosmallchildrenif
removed from the dishwasher. Keep out of reach of
small children.

29-6273
5
SAFETY INFORMATION
IMPORTANT SAFETY INFORMATION
READ ALL INSTRUCTIONS BEFORE USING THE APPLIANCE
WARNING WATER HEATER SAFETY
Undercertainconditions,hydrogengasmaybeproducedinawaterheaterthathasnotbeenusedfortwoormoreweeks.
HYDROGENGASISEXPLOSIVE.
If the hot water has not been used for two or more weeks, prevent the possibility of damage or injury by turning
onallhotwaterfaucetsandallowingthemtorunforseveralminutes.Dothisbeforeusinganyelectrical
appliance connected to the hot water system. This simple procedure will allow any built-up hydrogen gas to
escape. Since the gas is flammable, do not smoke, use an open flame, or use the appliance during this process.
CAUTION TO PREVENT MINOR INJURY AND PROPERTY DAMAGE
■ Duringorafterwashcycle,contentsmaybehotto
thetouch.Usecarebeforehandling.
■ Closesupervisionisnecessaryifthisapplianceis
usedbyornearchildren.Donotallowchildrento
play around the dishwasher when closing the door,
closing the upper rack, or while vertically adjusting
the upper rack due to the possibility of small fingers
being pinched.
■ Non-DishwareItems:Donotwashitemssuchas
electronic air cleaner filters, furnace filters and
paintbrushesinyourdishwasher.Damagetothe
dishwasher and discoloration or staining of the
dishwasher may result.
■ Loadlight-weight,plasticitemssotheydonot
become dislodged and drop to the bottom of the
dishwasher—they might come into contact with the
heating element and be damaged.
WARNING RISK OF CHILD ENTRAPMENT
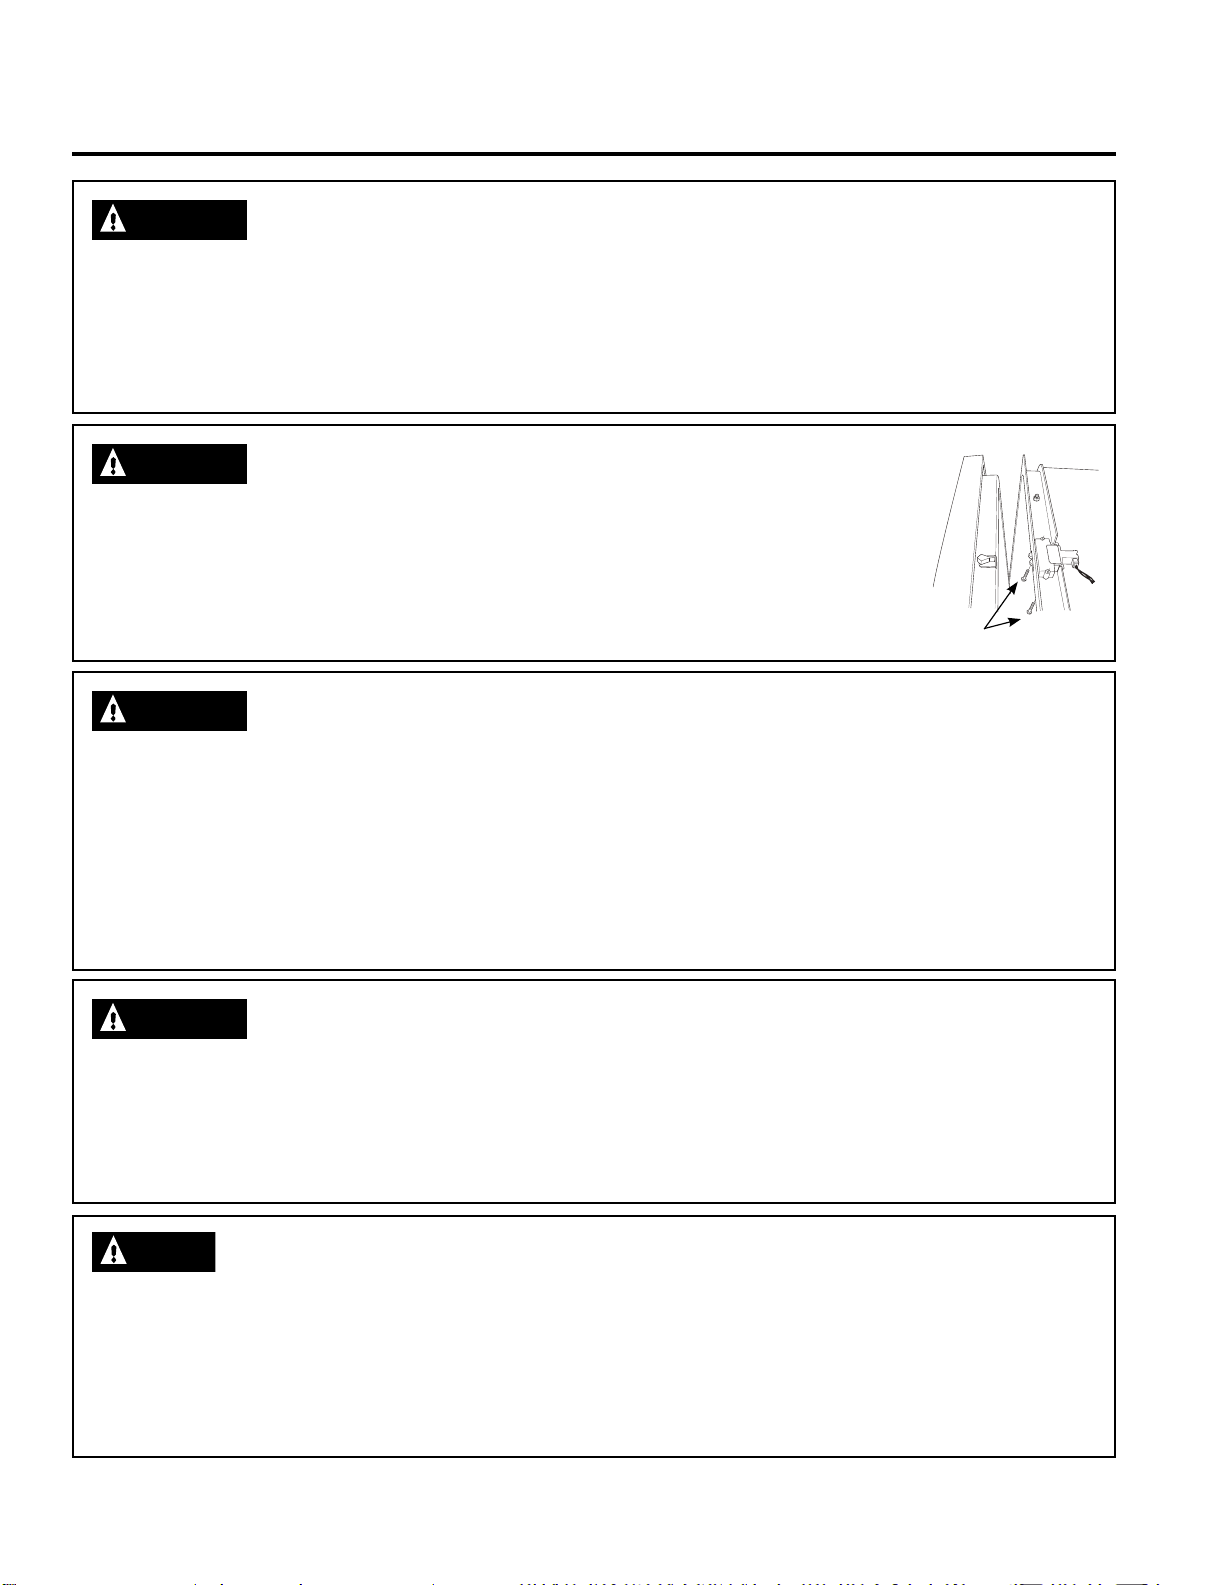
PROPERDISPOSALOFTHEDISHWASHER
Junked or abandoned dishwashers are dangerous…even if they will sit for “just a few days.” If you
are getting rid of your dishwasher, please follow the instructions below to help prevent accidents.
■ Donotallowchildrentoplaywith,on,orinsidethisoranydiscardedappliance.
■ Takeoffthedoorofthewashingcompartmentorremovethelatchbyremoving
the two screws from the latch receiver inside the tub (as shown). Two screws
CAUTION ELECTRICAL REQUIREMENTS
■ Thisappliancemustbesuppliedwith120V,60Hz,
and connected to an individual, properly grounded
branchcircuit,protectedbya15or20ampcircuit
breaker or time-delay fuse.
■ Iftheelectricsupplyprovideddoesnotmeetthe
above specifications, it is recommended that a
licensed electrician install an approved outlet.
■
Your dishwasher circuit should not be used for any
other appliance while the dishwasher is in operation as
the dishwasher requires the full capacity of the circuit.
READ AND SAVE THESE INSTRUCTIONS
■ Ifyourdishwasherisconnectedtoawallswitch,
ensure that the switch is on prior to use.
■ Ifyouchoosetoturnthewallswitchoffbetween
washcycles,allow5-10secondsafterturningthe
switch on before touching Start to allow the control
toinitialize.
■ Useonlypowder,Finish®Quantum®Automatic
Dishwashing Detergent, liquid detergents or rinse
agents recommended for use in a dishwasher and
keep them out of the reach of children. Finish®
Quantum®Automatic Dishwashing Detergent, and
Finish®Jet-Dry®Rinse Aid rinse agents have been
approved for use in all GE Appliances dishwashers.
NOTICE

629-6273
Getting started
USING THE DISHWASHER
CONTROL PANEL - Model GBF180 Series
Eco-
5
Wash Cycle Selections
Heavy. This cycle is for hard-to-clean, heavily soiled
dishes, pots, pans, and dishes.
Normal. This is standard program. It is for regularly
soiled dinner dishes or silverware.
Light. For lightly soiled loads, such as glasses,
crystal and fine china.
Quick-Wash. A shorter wash for lightly soiled loads that
do not need drying.
Rinse. Use for rinsing dishes glasses and silverware that
will not be washed right away.
Heated Dry
When the Heating Dry function is selected, the heater
will work during the drying process.
Functions
Delay. To delay the start of a selected cycle, press the
Delay Start pad until the desired delay time shows in the
LED display. You can delay the start for 1 to 24 hours.
To cancel the Delay Start option before the delay period
is over, press the Start/Cancel pad for 3-5 seconds.
Display window. This displays the remained hours
and minutes of the running cycle, delay hours and error
codes etc.
Start/Cancel. Select the washing program or Cancel the
washing program when the machine is working.
Child Lock
Press the Delay and Heated Dry buttons for 3
seconds the lock light will display on the LCD. No
buttons can be operated when the dishwasher controls
are locked. To cancel the Child Lock option, press the
buttons for 3 seconds, the lock light will no longer be
shown on the LCD and the dishwasher controls will be
unlocked.
Cycle progress indicator
These lights indicate how far
along the current wash cycle is,
while the dishwasher is
running.
Pre-wash
Main-wash
Rinse
Drying
Pre wash
When the dishwasher is in a Pre-wash
portion of the cycle, the Pre-wash lights
are illuminated.
Main wash
When the dishwasher is in a Main-wash
of the cycle, the Main-wash lights are
illuminated.
Rinse
When the dishwasher is in a Rinse
portion of the cycle, the Rinse lights are
illuminated.
Drying
When the dishwasher is in a Drying
portion of the cycle, the Drying lights are
illuminated, the Drying lights will turn off
after the cycle is ended.

29-6273 7
Getting started
USING THE DISHWASHER
CONTROL PANEL - Model GBF412 Series
5
Wash Cycle Selections
Heavy. This cycle is for hard-to-clean, heavily soiled
dishes, pots, pans, and dishes.
Normal. This is standard program. It is for regularly
soiled dinner dishes or silverware.
Light. For lightly soiled loads, such as glasses,
crystal and fine china.
Rinse. Use for rinsing dishes glasses and silverware that
will not be washed right away.
Heated Dry
When the Heating Dry function is selected, the heater
will work during the drying process.
Functions
Delay. To delay the start of a selected cycle, press the
Delay Start pad until the desired delay time shows in the
LED display. You can delay the start for 1 to 24 hours.
To cancel the Delay Start option before the delay period
is over, press the Start/Cancel pad for 3-5 seconds.
Display window. This displays the remained hours
and minutes of the running cycle, delay hours and error
codes etc.
Start/Cancel. Select the washing program or Cancel the
washing program when the machine is working.
Child Lock
Press the Delay and Heated Dry buttons for 3 seconds,
the lock light will display on the LCD.No buttons can be
operated when the dishwasher controls are locked.
To cancel the Child Lock option, press the buttons for
3 seconds, the lock light will no longer be shown on the
LCD and the dishwasher controls will be unlocked.
Cycle progress indicator
These lights indicate how far
along the current wash cycle is,
while the dishwasher is
running.
Pre-wash
Main-wash
Rinse
Drying
Pre wash
When the dishwasher is in a Pre-wash
portion of the cycle, the Pre-wash lights
are illuminated.
Main wash
When the dishwasher is in a Main-wash
of the cycle, the Main-wash lights are
illuminated.
Rinse
When the dishwasher is in a Rinse
portion of the cycle, the Rinse lights are
illuminated.
Drying
When the dishwasher is in a Drying
portion of the cycle, the Drying lights are
illuminated, the Drying lights will turn off
after the cycle is ended.

829-6273
Getting started
USING THE DISHWASHER
CONTROL PANEL - Model GBF532 Series
5
Wash Cycle Selections
Select the appropriate wash cycle depending on the soil
level of your dishes. After you select a cycle, the Cycle
On light for that cycle lights up. If you want to cancel the
selected cycle, press the selected cycle button again.
Pots and Pans. This cycle is for hard-to-clean, heavily
soiled dishes, pots, pans, and dishes.
Normal. This is standard program.For regularly soiled
dinner dishes or silverware.
Energy Saver. It is suitable to clean normally soiled
tableware and it is the most efficient program in terms
of it’s combined energy and water consumption for that
type of tableware.
China/Crystal. For lightly soiled loads, such as glasses,
crystal and fine china.
Quick-Wash. A shorter wash for lightly soiled loads that
do not need drying.
Rinse. Use for rinsing dishes glasses and silverware that
will not be washed right away.
Options
Sanitize. When the Sanitize function is selected,
the temperature of water will be maintained at 69°C
(156.2°F) max. The max temperature may not be
reached if the incoming water temperature is not correct.
Certified residential dishwashers are not intended for
licensed food establishments. WARNING: The sanitize
option is available with Heavy, Nomal and Light cycles.
Hi Temp. When the Hi Temp wash function is selected,
the temperature of the water will be maintained at 60°C
(140°F) max.
Heated Dry. When the Heated Dry function is selected,
the heater will work during the drying process.
Functions
Delay. To delay the start of a selected cycle, press the
Delay Start pad until the desired delay time shows in the
LED display. You can delay the start for 1 to 24 hours.
To cancel the Delay Start option before the delay period
is over, press the Start/Cancel pad for 3-5 seconds.
Display window. This displays the remaining hours
and minutes of the running cycle, delay hours and error
codes, etc.
Start/Cancel. Select or Сancel the washing program
when the machine is working.
Child Lock
Press Delay and Heated Dry buttons for 3 seconds,
the lock light will display on the LCD.No buttons can be
operated when the dishwasher controls are locked.
To cancel the Child Lock option, press the buttons for
3 seconds, the lock light will no longer be shown on the
LCD and the dishwasher controls will be unlocked.
Cycle progress indicator
These lights indicate how far
along the current wash cycle is,
while the dishwasher is
running.
Pre-wash
Main-wash
Rinse
Drying
Pre
wash
When the dishwasher is in a Pre-wash portion
of the cycle, the Pre-wash lights are illuminated.
Main
wash
When the dishwasher is in a Main-wash of the
cycle, the Main-wash lights are illuminated.
Rinse When the dishwasher is in a Rinse portion of
the cycle, the Rinse lights are illuminated.
Drying
When the dishwasher is in a Drying portion of
the cycle, the Drying lights are illuminated, the
Drying lights will turn off after the cycle is ended.

29-6273 9
Getting started
USING THE DISHWASHER
CONTROL PANEL - Model GBT412/632 Series
1 6 2
7
8 3 4 5
Power Button
Switch on / off the power by pushing.
Cycles Button
To select the program by pushing.
Options Button
To select a function after setting a program.
Delay Start Button
To set the delay start time, showing in the display
window as H01- H24.
Start/Cancel Button
When the program and options have been selected,
make sure the door is closed press the START/ CANCEL
button. To stop or reset the wash cycle, press the START/
CANCEL button, the dishwasher will stop washing.
Note: Once the Start button is pressed and the door is
closed, the dishwasher will start operating within a few
seconds.
Wash Cycle selections
Rinse Aid. When the indication lights are on, please refill
the detergent from the hole located on the dispenser.
Sanitized.
Clean.
Display - Wash Cycle selections
Auto. Auto sensing wash, lightly, or heavily soiled
crockery, with or with out dried-on food
Heavy. This cycle is for hard-to-clean, heavily soiled
dishes, pots, pans, and dishes.
Normal. For regularly soiled dinner dishes or silverware.
ECO. This is a standard program, suitable to clean
normally soiled tableware and is the most efficient
program in terms of combined energy and water
consumption for that type of tableware.
China/Crystal. For lightly soiled loads, such as glasses,
crystal and fine china.
90 mins. Lightly soiled plates and pans that need a
quick wash.
Speed. Shorter wash for lightly soiled loads that do not
need drying.
Rinse. Use for rinsing dishes glasses and silverware that
will not be wash right away.
Options
Heated Dry. When the Heated Dry function is selected,
the heater will work during the drying process.
Sanitize. When the”Sanitize”function is selected,
the temperature of water will be maintained at 69°C
(156.2°F) max. The max. temperature may not be
reached if the incoming water temperature
is not correct. Certified residential dishwashers are not
intended for licensed food establishments.
TIPS:The sanitize option is available with
Nomal, Heavy and Energy cycles.
Hi Temp. When the Hi Temp function is selected, the
temperature of the water will be maintained at 60°C
(140°F) max.

10 29-6273
Getting started
USING THE DISHWASHER
CONTROL PANEL - Model MBF422 Series
4
Wash Cycle Selections
Select the appropriate wash cycle depending on the soil
level of your dishes. After you select a cycle, the Cycle
On light for that cycle lights up. If you want to cancel the
selected cycle, press the selected cycle button again.
Heavy. This cycle is for hard-to-clean, heavily soiled
dishes, pots, pans, and dishes.
Normal. This is a standard program. For regularly soiled
dinner dishes or silverware.
Light. It is suitable to clean normally soiled tableware
and it is the most efficient program in terms of it’s
combined energy and water consumption for that type of
tableware.
Rinse. Use for rinsing dishes glasses and silverware that
will not be washed right away.
Heated Dry
When the Heated Dry function is selected, the heater
will work during the drying process.
Functions
Delay. To delay the start of a selected cycle, press the
Delay Start pad until the desired delay time shows in the
LED display. You can delay the start for only 2,4,8 hours.
To cancel the delay start option before the delay period
is over, press the Start/Cancel pad for 3-5 seconds.
Display window. This displays the remaining hours
and minutes of the running cycle, delay hours and error
codes, etc.
Start/Cancel. Select the washing program or Сancel the
washing program when the machine is working.
Child Lock
Press the Programs and Heated Dry buttons for
3 seconds the lock light will display on the LCD.No
buttons can be operated when the dishwasher controls
are locked. To cancel the Child Lock option, press the
buttons for 3 seconds, the lock light will no longer be
shown on the LCD and the dishwasher controls will be
unlocked.

Rinse Aid
Turns on when you need to add rinse aid.
Sanitized
Turns on when a sanitized cycle is choosed and the
temperature achieves 69℃( 156.2℉) . Turns off after
30 seconds when the door is opened.
Control Lock
Turns on when the control lock function is activate.
10 Screen.
This displays the remained hours and minutes of
the running cycle, delay hours and error codes etc.
Heavy
This cycle is for hard-to-clean, heavily soiled
dishes, pots, pans, and dishes.
Auto
Auto sensing wash, lightly, or heavily soiled
crockery, with or with out dried-on food
8.Wash Cycle Selections
Normal
This cycle is for regularly soiled dinner dishes
or silverware.
1 Hour wash
A shorter wash for lightly soiled loads that do not
need drying.
High Temp
When the "High Temp" function is selected,
the temperature of the water will be maintained
at 60℃(140℉) max.
9 tions.Op
Heated Dry
When the "Heated Dry" function is selected, the
heater will work during the drying process.
Sanitize
When the "Sanitize" function is selected, the
temperature of water will be maintained at
69℃(156.2℉) max. The max temperature may
not be reached if the incoming water temperature
is not correct. Certified residential dishwashers
are not intended for licensed food establishments.
Steam Prewash
Use for heavily soiled items. This option adds
additional time to the cycle time and is available
with the Auto, Heavy and Normal.
1.Power button
Press this button to turn on the dishwasher or hold
the button for 3 seconds to turn off the dishwasher
when the machine is on power.
2.Cycles button
Press this button to select the appropriate washing
program, corresponding indicator will be lit.
3.Options button
Press the button to select a function, corresponding
indicator will be lit.
4.Delay Start button
Press the Delay+ button to add the delay time or
press the Delay- button to decrease the delay time,
maximum 24 hours delay can be defined.
5.Control Lock button
This option allows you to lock the buttons on the
control panel, so children cannot accidently start the
dishwasher by pressing the buttons on the panel.
Only the Power button remains active.
To lock or unlock the buttons on the control panel,
press and hold the Delay+ button + Delay- button for
3 seconds simultaneously.
6.Start button
Start the washing program or pause the washing
program when the machine is working.
7.Wash Cycle Selections
11
29-6273
29-6273
Getting started
CONTROL PANEL - Model GBP420SSPSS/GBP534SSPSS/GBP534SGPWW Series
10 4 5 6398271

29-6273
12
Getting Started
Filter System
Your dishwasher has a
multiple Filter System.
In the System there
are three mesh filters.
It can separate soiled
water and clean water in
different chambers.
The multiple filter system
helps your dishwasher to
get better performance
with less water and less
energy.
USING THE DISHWASHER
Smart Wash System
Your dishwasher has a
Smart Wash System.
When a partial load of
lightly soiled dishes is
placed in the unit, a wash
cycle similar to a short
wash will automatically
be performed.
When a full load of heavily
soiled dishes is placed
in the unit, a heavy wash
cycle will automatically be
performed. It can determine
the type of cycle required
to clean the dishes and
will clean more efficiently
every time.
How your dishwasher cleans
Your dishwasher cleans by spraying a mixture of hot water and detergent through the spray arms against soiled
surfaces. The dishwasher fills with water covering the filter area. Water is then pumped through the multiple filter and
spray arms. Separated soil particles go down the drain as the water is pumped out and replaced with clean water.
The number of water fills will vary with the cycle being used.
Getting Started
1. Load the dishwasher (See Dish Preparation and Loading sections).
2. Add detergent (See Filling the detergent dispenser).
3. Add rinse aid (See Filling the rinse aid dispenser).
4. Select desired CYCLE (See Cycle Chart).
5. Select desired OPTIONS (See Control Panel). The indicator light above the pad will glow when selected.
6. Select desired Options (See Control Panel). The indicator light above the pad will glow when selected.
7. Run the hot water faucet nearest the dishwasher until the water is hot, then turn it off.
8. To start, press Start/Cancel (See Control Panel) and close the door within four seconds.
Note: Your dishwasher has the controls mounted in the front of the door. The door should be closed first if
you want to operate the machine.
Wash Cycle Selections
Cycle times are approximate and will vary with the options selected. Hot water is necessary to activate the detergent
and melt fatty food soils. An automatic sensor will check the incoming water temperature. If it is not at the appropriate
temperature the timer will delay the cycle to allow automatic water heating during the main wash.
When the Hi-Temp wash is selected an even higher temperature will be assured to handle heavier soil loads.

13
29-6273
USING THE DISHWASHER
Loading
Dish Preparation
Scrape away large pieces of food,
bones, pits, toothpicks, etc.
The continuously filtered wash system
will remove the remaining food
particles. Burned-onfoods should be
loosened before loading. Empty liquids
from glasses and cups.
Foodssuchasmustard,mayonnaise,
vinegar, lemon juice and tomato based
products may cause discoloration of
stainless steel and plastics if allowed to
sit for a long period of time.
Unlessthedishwasheristobe
operated at once it is best to rinse off
these food soils.
If the dishwasher drains into a
food disposer, be sure disposer is
completely empty before starting the
dishwasher.
Loading the Upper Basket
The upper basket is designed for cups, glasses, small plates, bowls and plastic items marked dishwasher safe, etc.
Forbestresults,placethebowls,cups,glasses,saucepanswithsoiledsurfacefacingdownortowardthecenter.
Tilt slightly for better drainage.
Loading the Bottom Basket
The bottom basket is designed to load plates, soup bowls, plates, saucers and cookware. The adjustable basket
spacewillallowyoutoloaditemswithamaximumheightof11inches(27.9cm).
Thefold-downtinsinthebottombasketmakeiteasytoloadthoseextralargeandhard-to-fititems.Thetinsmaybe
leftupfornormaluseorfoldeddownformoreflexibleloading.Folddownformorespacetoloadlargepotsorpans.
Make sure the loaded dishes do not interfere
with the rotation of the middle spray arm,
which is located at the bottom of the upper
basket.
(Check this by rotating the middle spray arm
by hand.)
Large items should be placed along the edge
so they do not interfere with the middle spray
arm rotation, and make sure they not prevent
the detergent dispenser from opening.
Large items should be turned so that the
inside faces downward, and make sure these
items do not interfere with the lower spray
arm rotation.

29-6273
14
USING THE DISHWASHER
Loading
Loading the Lower Basket
The lower basket has been especially designed for
dinner dishes, soup bowls, plates, pots, lids, casserole
dishes, and plates.
Loadlargeitemssuchaspansandpotsintothe
dishwasher so their open sides face downwards. We
recommend loading cups, stemware, and small plates
into the upper basket.
See the recommended loading patterns below.
8 Place Setting - GBF180 Series Only 10 Place Setting
Loading the Upper Basket
The upper basket has been designed for small plates,
mugs, glasses, and plastic items marked “dishwasher
safe”.Loadyourplatesintothedishwasherintwohalf
rows, so that the front of each plate faces the back of the
plate in front of it, and the open sides of the plates at the
center of the dishwasher face each other.
See the illustrations below.
Make sure the loaded dishes do not interfere with the
rotationofthenozzlewhichislocatedatthebottomof
theupperbasket.(Checkthisbyrotatingthenozzleby
hand.)
When loading dishes, pull the upper basket out
sufficiently so you can load it without striking the counter.
8 Place Setting - GBF180 Series Only 10 Place Setting

15
29-6273
USING THE DISHWASHER
Loading
Loading the Silverware Basket
The silverware basket can be divided into three
separate modules that can be used in both upper
and lower racks.
1 1 1 1 1 1 1 1
62 2 2 2 2 1
5 3 3 3 3 3 3 3 3 3 3 1
4 4 4 4 4 4 4 4 4 4 1
52 2 2 2 2 1
1 1 1 1 1 1 1 1
1 32 64 5
4 6
4 5
4
4
5
4
4
4
4
1 1 1 1 1 1
1 1 1 1 1 1
1
1
1
1
2 2 2 2
2 2 2 2
3
3
3
3
3
3
3
3
1. Spoons
2. Knives
3. Salad forks
4. Forks
5. Largespoons
6. Largeforks
In In
Modulesfor10placesettingmodels Modules for 8 place setting models
WARNING
1. Donotletitemsextendthoughbottom.
2. Be sure nothing protrudes though bottom of the basket or rack to block the lower spray arm.
Adding a Dish
Toaddorremoveitemsafterawashingcyclestarts:
1. Open door slightly and wait a few seconds until
wash action stops before completely opening.
2. Add the item.
3. Close the door firmly to latch within 4 secs, then
the cycle will resume automatically.
CAUTION
TO AVOID BURN INJURY:
Slightly open door and wait until spray arms and wash
action stop.
Hot water may splash out of dishwasher.
Failuretodosomayresultininjury.
Filling the Rinse Aid dispenser
Rinse aid greatly improves drying and reduces water
spots and filming.
Without rinse aid your dishes and dishwasher interior will
haveexcessivemoisture.
TheHeatedDryoptionwillnotperformaswellwithout
rinseaid.Therinseaiddispenser,locatednexttothe
Detergentcup,automaticallyreleasesameasured
amount of rinse aid during the last rinse.
If the rinse aid is low, the Rinse Aid light is illuminated
at the beginning and end of the cycle indicating that it is
time to refill.
Your dishwasher is designed to use a liquid rinse aid.
The use of rinse greatly improves drying performance after the final rinse.
Donotuseasolidorbar-typerinseaid.Undernormalconditions,therinseaidwilllastapproximately
one month. It is best to keep it full, but do not over fill.

29-627316
USING THE DISHWASHER
Dispensers
1. Open the detergent dispenser cap by pushing the detergent
dispenser release catch.
NOTE: The flap is always open at the end of a dishwashing cycle.
2. Add the recommended amount
of detergent to the main wash
detergent compartment.
3. Close the flap and then
press it down.
Filling the Rinse Aid dispenser
Your dishwasher has been designed to use liquid rinse aid only. Using a powdered
rinse aid will clog the reservoir opening and cause the dishwasher to malfunction.
Rinse aid improves the drying performance of the dishwasher.
Do not add regular detergent to the rinse aid reservoir.
1. Remove the rinse aid reservoir cap by rotating it counterclockwise.
2. Fill the rinse aid reservoir with rinse aid.
NOTE: Use the viewing port when filling the rinse aid reservoir.
Do not fill the reservoir above the full level indicator.
Excess rinse aid can over flow during the wash cycle.
3. Close the rinse aid reservoir cap by rotating it clockwise.

17
29-6273
USING THE DISHWASHER
Care and Cleaning
Keeping your dishwasher clean improves its performance, reduces unnecessary repairs, and
lengthens its life.
Cleaning the Exterior
It’sbesttocleanspillsontheoutsideofyourdishwasherastheyoccur.Useasoft,dampclothonthecontrolpanel
togentlywipeawayspillsanddust.Donotusebenzene,wax,thinner,chlorinebleach,oralcohol.
Thesematerialsmaydiscolortheinnerwallsandcausestains.Donotcleanthedishwasherbysprinklingwaterover
it and avoid letting water come into contact with any of the electrical parts.
NOTE: If your dishwasher has a stainless steel door panel, you can clean it with a stainless steel cleaner for
Home Appliances or a similar product using a clean, soft cloth.
Cleaning the Interior
Clean the interior of your dishwasher periodically to remove any dirt or food particles. Wipe the inside of the
dishwasher and the inner part of the door with a wet dishcloth. We recommend filling the detergent dispenser with
dish detergent, and then running the dishwasher empty periodically using either the Normal or Express 60 cycle
with the Sanitize option. This will keep your dishwasher clean.
If white spots and odor are still present in your dishwasher, run the Normal cycle with the dishwasher empty and
without detergent until it fl ushes. Then, interrupt the cycle and put an 8 ounce cup of white vinegar into the lower
basket. Close the dishwasher and let the cycle finish.
Do not remove the tub front seal (the long rubber seal enclosing the opening of the dishwasher).
Do not touch the HEATING ELEMENT during or immediately after use.
1. Turn off the
dishwasher.
2. Rotate the filter,
insert counter-
clockwise to
unfasten and
then detach the
filter insert.
3. Remove the fine filter
(flat, rectangular).
4. Remove any dirt
or other remains
from the filters,
and then rinse
them under
running water.
5. Reassemble the filters in the reverse
order of dissasembly, replace the filter
insert, and rotate clockwise to the
close arrow.
CAUTION: If the filter insert
is not closed properly, its
performance will be decreased.
Cleaning the Nozzles
Ifyourdishwasherdoesnotseemtobecleaningadequatelyorthenozzlesseemclogged,youcancleaneachofthe
nozzles.Whenremovingthenozzles,takecareastheymaybreak.
Lower nozzle
1. Checkwhetherthenozzleholesarecloggedbyfoodparticles.
2. Ifcleaningisneeded,removethenozzlebypullingitupwards.
3. Cleanthenozzle,andthenpushitbackintoplace.
4. Checkwhetherthenozzleisengagedcorrectlybyrotatingitbyhand.

29-6273
18
TROUBLESHOOTING TIPS
Troubleshooting tips ... Before you call for service
Problem Possible Cause What To Do
Start status indicator light
flashing (on some models)
The door was opened or the
cycle was interrupted.
PresstheStart pad once and close the door within 4
seconds to start the dishwasher.
Dishwasher BEEPS once
every minute (on some
models)
This is a reminder that your
dishwasher door has been left
open during operation. It will
continue beeping until you
press Start and close the door.
PressStart and close the door.
Beeping at the end of the
cycle (on some models)
This is normal. Dishwasher will
beep twice at the end of the
cycle.
To turn off the double beep indicator (or re-activate it if it
was previously turned off), press the Heated Dry pad 5
times within 3 seconds. A triple beep will sound to indicate
the end-of-cycle beep option has been turned on or off.
Dishes and flatware not
clean
Ultra-Fine Filter or Fine Filter is
clogged.
See the Care and Cleaning section.
Low inlet water temperature. Make sure inlet water temperature is correct (see the
USING THE DISHWASHER section). Turn on the hot
water faucet nearest the dishwasher, let run until the water
temperature stops rising. Then start the dishwasher and
turn off the faucet. This ensures the entering water is hot.
Select Wash Temp Boost if available.
Water pressure is temporarily
low.
Turn on a faucet. Is water coming out more slowly
than usual? If so, wait until pressure is normal before
usingyourdishwasher.Normalwaterpressuretothe
dishwashershouldbe20-120psi.
Air gap or disposer clogged. Clean the air gap or flush the disposer.
High drain loop or air gap not
installed.
Refer to the Installation Instructions for proper drain line
installation.
Improper rack loading. Make sure large dishware does not block the detergent
dispenser or the wash arms. See the Loading section.
When large utensils are placed in the silverware basket,
do not mount the basket on the door (on some models).
Instead, mount basket on the lower rack.
Poor performing detergent. UseahighlyrateddetergentsuchasFinish®Quantum®
Automatic Dishwashing Detergent.
Spots and filming on
glasses and flatware
Extremely hard water. UserinseagentssuchasFinish®Jet-Dry®Rinse Aid to
prevent spots and prevent new film build-up.
Ifwaterisextremelyhard,asoftenermayberequired.
Low inlet water temperature. Makesurewatertemperatureisatleast120°F(49°C).
Overloading or improper
loading of the dishwasher.
LoaddishwasherasshownintheLoading section.
Old or damp powder detergent. Makesuredetergentisfresh.Useahighlyrated
detergent such as Finish®Quantum®Automatic
Dishwashing Detergent.
Rinse agent dispenser empty.
Refill with rinse agent such as Finish®Jet-Dry®Rinse Aid.
Too little or low performing
detergent.
Make sure you use the proper amount of highly rated
detergent.
Cloudiness on glassware Combination of soft water and
too much detergent.
This is called etching and is permanent. To prevent this
from happening, use less detergent if you have soft water.
Wash glassware in the shortest cycle that will get it clean.
Low performing phosphate-free
detergent.
See A white film on glassware, dishware and the
interior in this TROUBLESHOOTING TIPS section.
Water temperature entering the
dishwasher exceeds 150°F (66°C)
Thiscouldbeetching.Lowerthewaterheater
temperature.

19
29-6273
Troubleshooting tips ... Before you call for service
TROUBLESHOOTING TIPS
Problem Possible Cause What To Do
Suds in the tub Wrong detergent. Useonlyautomaticdishwasherdetergentstoavoid
sudsing. Finish®Quantum®Automatic Dishwashing
Detergent has been approved for use in all GE
Appliances dishwashers.
To remove suds from the tub, open the dishwasher and
letsudsdissipate.PumpoutwaterbypressingStartand
closethedoor.Wait30seconds.Openthedoor,press
and hold Start for 3 seconds, and close the door. Repeat
if necessary.
Rinse agent was spilled. Always wipe up rinse agent spills immediately.
Detergent left in dispenser
cups
Dishes or utensils are blocking
the detergent cup.
Reposition the dishes, so the water from the lower spray
arm can flush the detergent cup. See the Loading
section. Reposition the tall utensils or heavy silverware
that may be keeping the dispenser cup door from
opening. See the Loading section.
Black or gray marks
on dishes
Aluminum utensils have rubbed
against dishes.
Remove marks with a mild, abrasive cleaner.
Dishes don’t dry Low inlet water temperature. Makesureinletwatertemperatureisatleast120°F
(49°C).
Select Heated Dry or Dry Boost.
UseWash Temp Boost.
Rinse agent dispenser is empty. Check the rinse agent dispenser and fill as required.
Additional drying time is
needed.
LeavedoorclosedaftertheCleanlightappearsto
allowthefantorunanadditional90minutes(onsome
models).
Note:Ifyouopenthedoor,thisfanextensionwillbe
cancelled.
Cycle selection. If using Light cycle which uses lower water temperature
and thus limited dry performance, switch to a different
cycle.
Cycle completion. Allowcyclestofullycomplete.SeeLongcycletimesin
this TROUBLESHOOTING TIPS section.
Long cycle times Dishwasher washes by
alternating mid and lower spray
arms.
Longercyclesarenormal.Forbestwashanddry
performance, let cycle complete.
Soil level. The turbidity sensor senses how much soil is on the
dishes. Heavy soiled dish loads will add more time to
thecycle.Thisisnormalfunction.Forbestwashanddry
performance, allow cycle to complete.
Control panel responded
to inputs but dishwasher
never filled with water
Door may not be completely
closed.
Make sure the door is firmly closed.
Water valve may be turned off. Make sure water valve (usually located under the sink) is
turned on.
Flood float may be stuck. RemoveUltra-Finefilterandlightlytapthepieceunder
the ultra fine filter that looks like a salt shaker. Replace
the filter
This manual suits for next models
9
Table of contents
Languages:
Other GE Dishwasher manuals

GE
GE GHDA300 Series User manual

GE
GE GLD2800V Manual

GE
GE ADT521PGFBS User manual

GE
GE Stainless Steel Tub Dishwashers User manual

GE
GE GLD5800P10BB User manual

GE
GE 206C1559P195 User manual

GE
GE PDWF500PBB - Profile Dishwasher With SmartDispense... Manual

GE
GE GSD1380 User manual

GE
GE GDF500-620 Series User manual

GE
GE HDB920 User manual