GE FUM21 Original instructions

GEAppliances.com
Owner’s Manual &
Installation Instructions
Food Freezers
245D1700P001 49-60725 07-14 GE
Safety Information ............ 2–3
Operating Instructions
Care and Cleaning ...............10-11
Defrosting Instructions
(for Manual Defrost Models)...........9
Features............................4-8
Starting the Freezer .................4-5
Installation Instructions
Preparing to Install the Freezer ..... 12
Troubleshooting Tips........13-15
Normal Operating
Characteristics.......................13
Consumer Support
Consumer Support......... Back Cover
Warranty............................ 16
Model number: _____________________
Serial number: _____________________
You can find them on a rating plate on
the upper left wall inside the freezer.
La section française commence à la page 17
La sección en español empieza en la página 33
Congelador
de alimentos
Manual del propietario
y instalación
Congélateur
d’aliments
Manuel d’utilisation
et d’installation
8SULJKW³0DQXDO'HIURVW
0RGHOV
)80
8SULJKW³1R)URVW0RGHOV
)8))8))8)

IMPORTANT SAFETY INFORMATION.
READ ALL INSTRUCTIONS BEFORE USING.
2
*($SSOLDQFHV:HEVLWH
)RUPRUHLQIRUPDWLRQRQ\RXUUHIULJHUDWRU·VRSHUDWLRQYLVLWwww.GEAppliances.comRU
FDOO*(&$5(6,Q&DQDGDYLVLWGEAppliances.caRUFDOO
This freezer must be properly installed and located in accordance
with the Installation Instructions before it is used.
Replace all parts and panels before operating.
Do not store or use gasoline or other flammable vapors and liquids
in the vicinity of this or any other appliance.
Because of potential safety hazards under certain conditions,
we strongly recommend against the use of an extension cord.
However, if you must use an extension cord, it is absolutely
necessary that it be a UL-listed (in the United States) or a CSA
certified (in Canada), 3-wire grounding type appliance extension
cord having a grounding type plug and outlet and that the
electrical rating of the cord be 15 amperes (minimum) and 120
volts.
To prevent suffocation and entrapment hazards to children,
remove the doors from any freezer before disposing of it or
discontinuing its use.
Do not allow children to climb, stand or hang on the door
handles or the shelves in the freezer. They could seriously injure
themselves.
Unplug the freezer :
• To disconnect power to the freezer. It cannot be turned off by
any setting on the control panel.
• To clean, replace a burned out light bulb, or make repairs.
Note: Repairs must be performed by a qualified Service
Professional.
Do not clean glass shelves or covers with warm water when they
are cold. Glass shelves and covers may break if exposed to sudden
temperature changes or impact, such as bumping or dropping.
Tempered glass is designed to shatter into many small pieces if it
breaks.
Keep fingers out of the “pinch point” areas; clearances between
the doors and between the doors and cabinet are necessarily
small. Be careful closing doors when children are in the area.
Do not touch the cold surfaces in the freezer compartment when
hands are damp or wet, skin may stick to these extremely cold
surfaces.
Do not refreeze frozen foods which have thawed completely.
In freezers with automatic icemakers, avoid contact with the
moving parts of the ejector mechanism, or with the heating
element that releases the cubes. Do not place fingers or hands
on the automatic ice making mechanism while the freezer is
plugged in.
This is the safety alert symbol. This symbol alerts you to potential hazards that can kill or hurt you and others. All
safety messages will follow the safety alert symbol and the word “DANGER”, “WARNING”, or “CAUTION”. These words are
defined as:
Indicates a hazardous situation which, if not avoided, will result in death or serious injury.
Indicates a hazardous situation which, if not avoided, could result in death or serious injury.
Indicates a hazardous situation which, if not avoided, could result in minor or moderate injury.
IMPORTANT SAFETY INSTRUCTIONS
To reduce the risk of fire, explosion, electric shock, or injury when using your
freezer follow these basic safety precautions:
IMPORTANT SAFETY INSTRUCTIONS
To reduce the risk of injury when using your freezer, follow these basic
precautions.
FREEZER SAFETY INFORMATION
WARNING
WARNING
DANGER
CAUTION
CAUTION

3
Installation Instructions GEAppliances.com
PROPER DISPOSAL OF YOUR OLD FREEZER
WARNING Suffocation and child entrapment hazard.
Remove freezer doors prior to disposal. Failure to do so can result in child entrapment which can lead
to death or brain damage.
Child entrapment and suffocation are not problems
of the past. Junked or abandoned refrigerators
are still dangerous even if they will sit for “just a
few days.” If you are getting rid of your old freezer,
please follow the instructions below to help prevent
accidents.
Before You Throw Away Your Old Freezer:
Take off the freezer door.
Leave the shelves in place so that children may not
easily climb inside.
Refrigerants
All refrigeration products contain refrigerants,
which under federal law must be removed prior
to product disposal. If you are getting rid of an old
refrigeration product, check with the company
handling the disposal about what to do.
IMPORTANT:
WARNING Explosion Hazard.
Keep flammable materials and vapors, such as gasoline, away from freezer. Failure to do so can result
in fire, explosion, or death.
Do not, under any circumstances, cut or remove the third (ground) prong from the power cord.
For personal safety, this appliance must be properly grounded.
The power cord of this appliance is equipped with a 3-prong
(grounding) plug which mates with a standard 3-prong
(grounding) wall outlet to minimize the possibility of electric
shock hazard from this appliance.
Have the wall outlet and circuit checked by a qualified
electrician to make sure the outlet is properly grounded.
Where a standard 2-prong wall outlet is encountered, it is your
personal responsibility and obligation to have it replaced with a
properly grounded 3-prong wall outlet. Do not use an adapter.
The freezer should always be plugged into its own individual
electrical outlet which has a voltage rating that matches the
rating plate.
A 115 Volt AC, 60 Hz, 15- or 20-amp fused, grounded electrical
supply is required. This provides the best performance and also
prevents overloading house wiring circuits which could cause a
fire hazard from overheated wires.
Never unplug your freezer by pulling on the power cord. Always
grip plug firmly and pull straight out from the outlet.
Repair or replace immediately all power cords that have
become frayed or otherwise damaged. Do not use a cord that
shows cracks or abrasion damage along its length or at either
end.
When moving the freezer away from the wall, be careful not to
roll over or damage the power cord.
CONNECTING ELECTRICITY
WARNING Electrical Shock Hazard.
Plug into a grounded 3-prong outlet.
Do not remove the ground prong.
Do not use an adapter.
Failure to follow these instructions can result in
death, fire, or electrical shock.
5($'$1')2//2:7+,66$)(7<,1)250$7,21&$5()8//<
SAVE THESE INSTRUCTIONS
INSTALLATION

About the operation of your freezer.
6WDUWLQJWKH)UHH]HU(OHFWURPHFKDQLFDORQVRPHPRGHOV
1Clean the inside of the freezer with a mild solution of baking soda and water (see &DUHDQG&OHDQLQJ).
2Connect cord to power outlet.
3Make sure the temperature control is set at 4.
4Allow freezer to operate for at least four hours before placing food inside.
Temperature Control
For safe food storage, allow 4 hours for the freezer to
cool down completely. The freezer will run continuously
for the first several hours. Foods that are already frozen
may be placed in the freezer after the first few hours of
operation. Unfrozen food should NOT be placed in the
freezer until it has operated for 4 hours. Allow several
hours after each one-step adjustment for the freezer
temperature to stabilize.
When loading the freezer, freeze only 3 pounds of
fresh food per cubic foot of space at a time. Distribute
packages evenly throughout the freezer. It is not
necessary to turn the control knob to a colder setting
while freezing food.
Turning the control to OFF stops the cooling process
but does not shut off power to the freezer.
4
Electromechanical Temperature Control
The electromechanical temperature control
is preset to give satisfactory food storage
temperatures. It is adjustable to provide a
range of temperatures. Allow several hours
for the temperature to stabilize between
adjustments.
The electromechanical temperature control is
inside the freezer.

GEAppliances.com
6WDUWLQJWKH)UHH]HU(OHFWURQLF7HPSHUDWXUH&RQWURO
RQVRPHPRGHOV
1Clean the inside of the freezer with a mild solution of baking soda and water (see &DUHDQG&OHDQLQJ).
2Connect cord to power outlet.
3Press “-” or “+” to reach desired temperature
4Press Set at when desired temperature is displayed.
5Allow freezer to operate for at least four hours before placing food inside.
Temperature Control
Sabbath Mode
For safe food storage, allow 4 hours for the freezer to
cool down completely. The freezer will run continuously
for the first several hours. Foods that are already frozen
may be placed in the freezer after the first few hours of
operation. Unfrozen food should NOT be placed in the
freezer until it has operated for 4 hours. Allow several
hours after each one-step adjustment for the freezer
temperature to stabilize.
When loading the freezer, freeze only 3 pounds of
fresh food per cubic foot of space at a time. Distribute
packages evenly throughout the freezer. It is not
necessary to turn the control knob to a colder setting
while freezing food.
Turning the control to OFF stops the cooling process
but does not shut off power to the freezer.
The Sabbath mode is a feature that disables portions
of the appliance and its controls in accordance with
observance of the weekly Sabbath and religious
holidays within the Orthodox Jewish community.
To turn Sabbath mode on, press and hold the “Options”
button and “+” button for 5 seconds, after which “Sb”
will be displayed on the control panel indicating that the
unit is in Sabbath mode. To exit Sabbath mode, press
and hold the “Options” button and “+” button for 5
seconds, after which the display will return to displaying
the set point of the unit.
In the Sabbath mode, the High Temp alarm is active for
health reasons. If a high temperature alarm is activated
during this time, for example due to a door left ajar,
the alarm will sound for about 10 minutes. The alarm
will then silence on its own and a “high temp” icon will
be displayed on the control panel. The high temp icon
will continue to display even if the door is closed until
Sabbath mode is exited and the icon reset.
For further assistance, guidelines of proper usage and
a complete list of models with the Sabbath feature,
please visit the web at http:\\www.star-k.org.
NOTE: While in Sabbath mode, neither the lights nor the
control panel will work until Sabbath mode has been
deactivated.
The unit stays in Sabbath mode after a power failure
recovery. It must be deactivated with the buttons on
the control panel.
5

About the operation of your freezer.
6
This electronic temperature control is located on the front of the
freezer door. The temperature is factory-preset to provide satisfactory
food storage temperatures. To adjust the temperature setting, press
-to decrease temperatures and +to increase temperatures. Allow
several hours for the temperature to stabilize between adjustments.
Temp Alarm
This electronic control has a temperature alarm feature. An
alarm will sound if the freezer temperature reaches unsafe
levels. To silence the alarm, push Set or any key on the control
panel.
Turbo Freeze
To enable Turbo Freeze, press Options until the indicator for
“Turbo Freeze” is highlighted and then press Set. The unit will
be in “Turbo Freeze” mode for 72 hours and the snow flake will
be highlighted. After the 72 hours is completed, “Turbo Freeze”
turns off automatically. The snowflake will turn off to show that
“Turbo Freeze” is off. To exit “Turbo Freeze” before the 72 hour
automatic shutoff, press Options until the indicator for “Turbo
Freeze” is highlighted and press Set. The snowflake will go off
showing that “Turbo Freeze” is not active.
Control Lock
To lock the controls, press Options
until the display reads “Lock
Controls” and then press Set. The locked indicator light will
be displayed. To unlock, press and hold Set for 3 seconds. The
indicator light will go off and the control panel will be unlocked.
Power Off
To turn the freezer off, press Options the display reads “Power Off”.
Press and hold Set for 3 seconds. When the freezer is off, the only
words illuminated will be “Power Off” and “Press & Hold” (referring to
the Set pad). To power back on, press and hold Set for 3 seconds. The
unit will then be in standby mode.
Power Fail
If your unit has lost power, the control panel will display “Power Fail”
and the number of hours that your unit has been without power up to
a maximum of 50 hrs once the power has been restored. The alarm
will sound until the condition is acknowledged by pressing Set
or any
other button on the control panel.
Door Ajar
If your door has been left open for more than 5 minutes, the control
panel will display “Door Ajar” and will sound an alarm until the door
has been closed or any button is pressed on the control panel. If a
button on the control panel has been pressed but the door has not
been closed, “Door Ajar” will continue to be displayed on the control
panel until the door has been closed.
High Temp Light
The high temperature light will illuminate until the freezer
reaches 23° F (-5° C) (safe zone) and the cabinet reaches the set
temperature.
C or F Setting
To change between C° or F°, press and hold the -and +pads at the
same time for 5 seconds.
Electronic Temperature Control
High Temp Light
Door Ajar Light Control Lock
Indicator
$ODUP2Ⱥ
Indicator Light
Turbo Freeze Light
Turbo Freeze
LQGLFDWRUVQRZÀDNH
Temp Indicator
for °F or °C
Power Fail
Indicator Light
Power Off Light
Lock Controls Light
Exit Light
Options
Pad Set Pad
Press & Hold Light
Increase PadDecrease Pad

GEAppliances.com
Key-Ejecting LockRQVRPHPRGHOV
The key for the spring-loaded lock is
automatically ejected–key will not remain in
lock in either the open or closed position.
.HHSWKHNH\RXWRIUHDFKRIFKLOGUHQDQG
DZD\IURPWKHIUHH]HU
Power-On LightRQVRPHPRGHOV
The Power-On Light indicates that the freezer is
properly connected to the electrical power.
The light glows even when the temperature
control is turned off.
Freezer ShelvesRQVRPHPRGHOV
The spacers (on some models) are used to
secure the shelves during shipping. Remove
and discard the spacers.
Slide-Out BasketRQVRPHPRGHOV
A slide-out basket provides separate storage
space for items that are difficult to store on
shelves. It is located at the bottom of the
freezer. To remove this basket, pull out and lift
up.
7
Interior Light
The interior light comes on when the freezer
door is opened. To replace the bulb, set the
temperature control to OFF and unplug the
electrical cord. Replace the bulb by unscrewing
it from the fixture. Replace with the same size
and wattage.
To replace LED bulbs use a flat head
screwdriver to remove the cover. Remove light
from connector and replace it with a new one.
Set light back in place and reinstall cover.
If new LED bulbs are needed, call GE Parts
and Accessories at 1.800.626.2002 or visit
GEApplianceParts.com. In Canada, call
1.800.661.1616 or go to GEAppliances.ca.
CAUTION Light bulbs may be hot.
Burned out bulbs may break when being
replaced.
Or

Adjustable Shelves
The adjustable shelves can be moved to
different levels within the freezer. To move the
shelf, grasp the shelf and push to either the
right or the left to disengage the ends of the
shelf from placement holes in the freezer. Tilt
the shelf to release the other side. To install the
shelf, reverse these directions.
Wire Shelf Placement Holes
About the operation of your freezer.
Adjustable Door BinsRQVRPHPRGHOV
The adjustable door bins provide flexible
storage space. The number of bins varies by
model.
Soft Freeze ZoneRQVRPHPRGHOV
The Soft Freeze Zone is specifically for foods
such as ice cream. It is designed to maintain a
higher temperature than the rest of the freezer.
Wire Shelf Bookend RQVRPHPRGHOV
Use these handy bookends to keep various
boxed items stored neatly in your freezer. To
adjust the location, simply unsnap the bookend
from the wire shelf and snap into the next
desired location.
8

9
In most climates, defrosting will be necessary
only about twice a year.
7RKDYH\RXUIUHH]HURSHUDWHPRVWHIILFLHQWO\
do not permit more than 1/2 ”(13 mm) of
frost to accumulate on the shelves.
To remove frost, scrape with a plastic or wood
spatula or scraper.
Do not use an ice pick or sharp-edged
instrument DVLWPD\GDPDJHRUVFUDWFKWKH
IUHH]HU
Do not use any electrical device in
defrosting your freezer.
For Complete Defrosting
1Turn the temperature control to OFF and
unplug the freezer.
2Remove all food and place it in corrugated
boxes, insulated bags, picnic coolers, etc.
Use towels and newspapers for insulation
as needed.
3With the door open, use pans of
hot water to speed loosening of frost.
Remove large pieces before they melt.
On models without a defrost drain, place
towels or newspapers on the freezer
bottom to catch the frost. The frost will
loosen and fall. Remove towels and/or
newspapers.
4Some Upright models have a hose adapter
and a drain hose behind the base grille
which carry the defrost water out from the
freezer. Remove the base grille; then
remove the drain plug and let the defrost
water drain into a pan.
To remove the base grille (on some
models), remove the two Phillips-head
screws and pull the grille away from the
freezer.
5Sponge excess water from the bottom of
the freezer as it collects to prevent
overflowing.
6After defrosting, clean the inside of the
freezer (see &DUHDQG&OHDQLQJ).
7Be sure to replace the drain plug and return
the drain tube to its position. Replace the
base grille.
8Plug in the freezer. Return the temperature
control to its previous position and return
food to the freezer.
WARNING )UHH]HUPXVWEHXQSOXJJHG
WRDYRLGHOHFWULFDOKD]DUGIURPSRZHUVRXUFH
ZKHQGHIURVWLQJXQLW
Defrosting instructions. IRU0DQXDO'HIURVWPRGHOVGEAppliances.com
Drain Hose

Care and cleaning of the freezer.
Cleaning Your Freezer
Outside. Protect the paint finish. The finish
on the outside of the freezer is a high quality,
baked-on paint finish. With proper care, it
will stay new-looking and rust-free for years.
Apply a coat of appliance polish wax when
the freezer is new and then at least twice a
year. Appliance polish wax also works well to
remove tape residue from freezer surfaces.
Keep the finish clean. Wipe with a clean cloth
lightly dampened with appliance polish wax
or mild liquid dishwashing detergent. Dry and
polish with a clean, soft cloth. Do not wipe the
freezer with a soiled dishwashing cloth or wet
towel. Do not use scouring pads, powdered
cleaners, bleach, or cleaners containing
bleach.
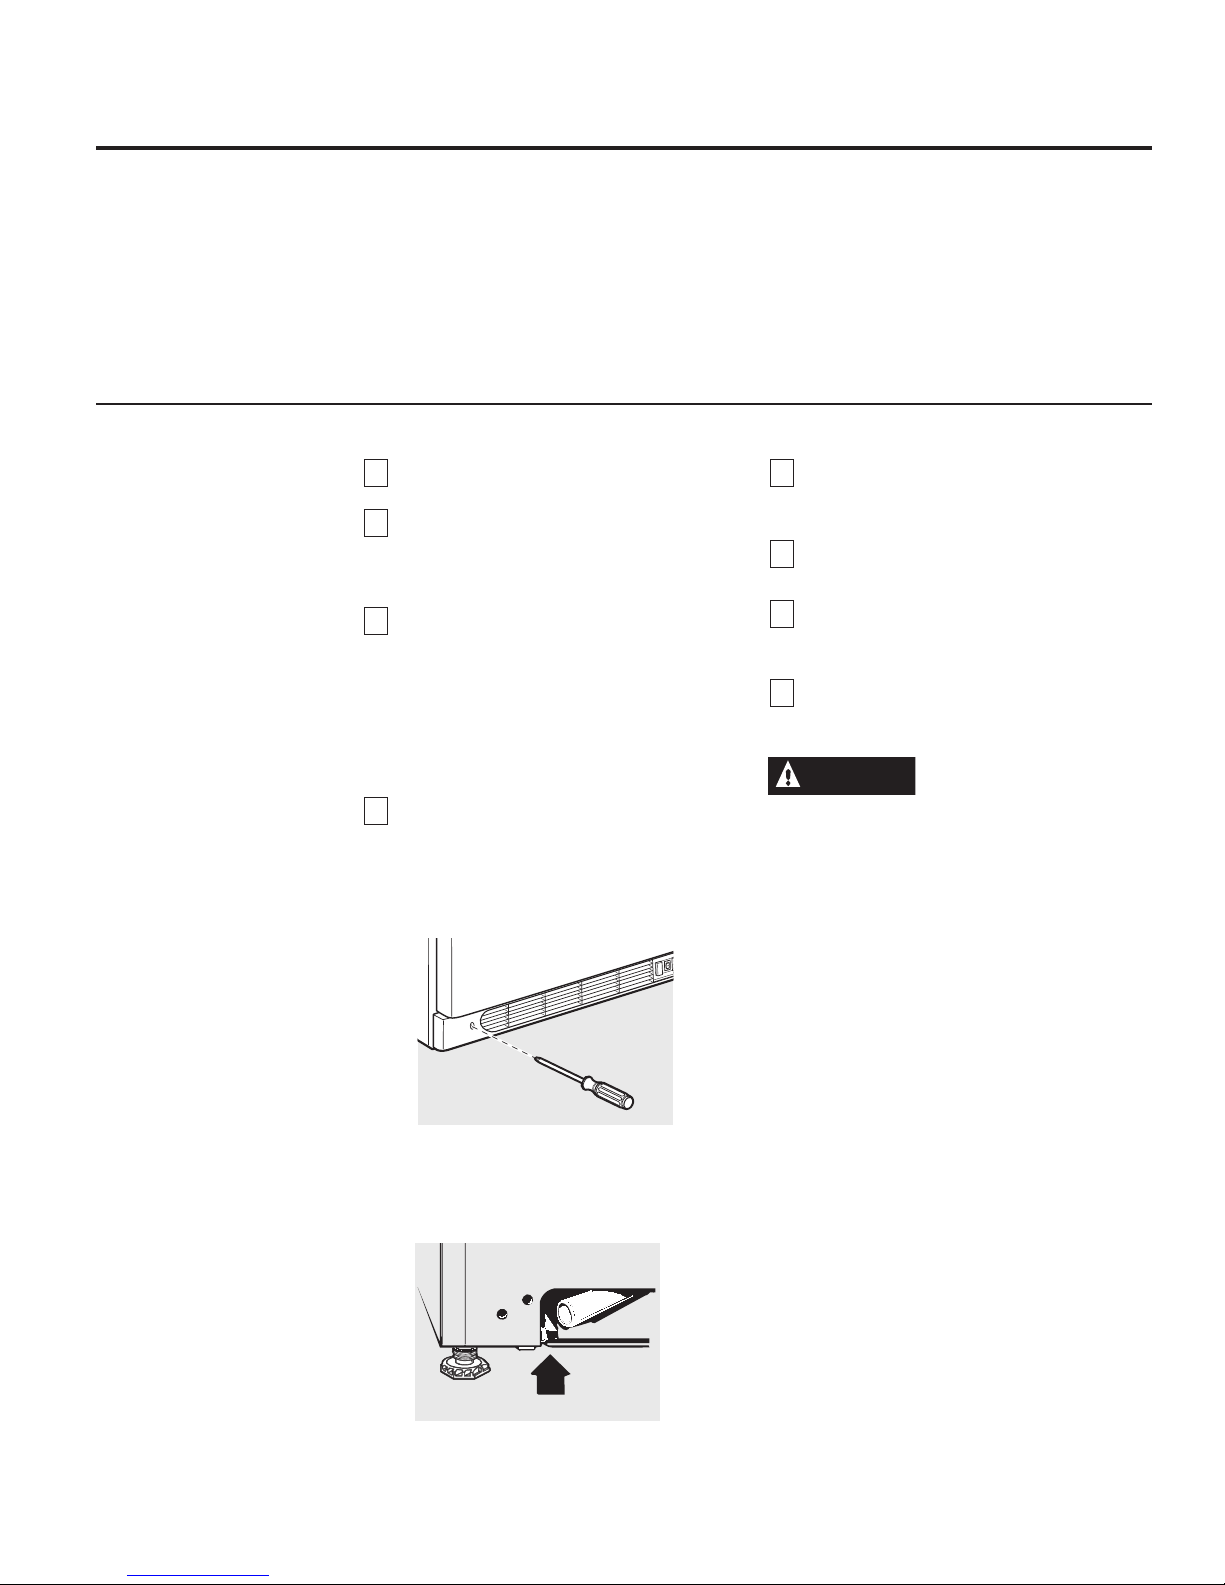
NOTICE: &DUHVKRXOGEHWDNHQLQPRYLQJ
WKHIUHH]HUDZD\IURPWKHZDOO$OOW\SHVRI
IORRUFRYHULQJVFDQEHGDPDJHGSDUWLFXODUO\
FXVKLRQHGFRYHULQJVDQGWKRVHZLWK
HPERVVHGVXUIDFHV
Inside. Clean the inside of your freezer at
least once a year. We recommend that the
freezer be unplugged before cleaning. If this
is not practical, wring excess moisture out of
sponge or cloth when cleaning in the vicinity
of switches, lights or controls.
Use warm water and baking soda solution–
about a tablespoon of baking soda to a
quart of water. Rinse thoroughly with water
and wipe dry. Do not use cleaning powders
or other abrasive cleaners. DO NOT wash
removable parts in a dishwasher.
An open box of baking soda in the freezer will
absorb stale freezer odors. Change the box
every three months.
CAUTION 'DPSREMHFWVVWLFNWRFROG
PHWDOVXUIDFHV'2127WRXFKLQWHULRUPHWDO
VXUIDFHVZLWKZHWRUGDPSKDQGV
Some upright freezers are frost-free and
defrost automatically, but should be cleaned
occasionally.
No DefrostingRQ1R)URVWPRGHOV
You never have to defrost your new No-Frost
freezer. It has been pre-set at the factory to
defrost itself automatically.
During defrosting, a slight noise may be noticed
if the door is opened while the freezer is in the
automatic defrosting cycle.
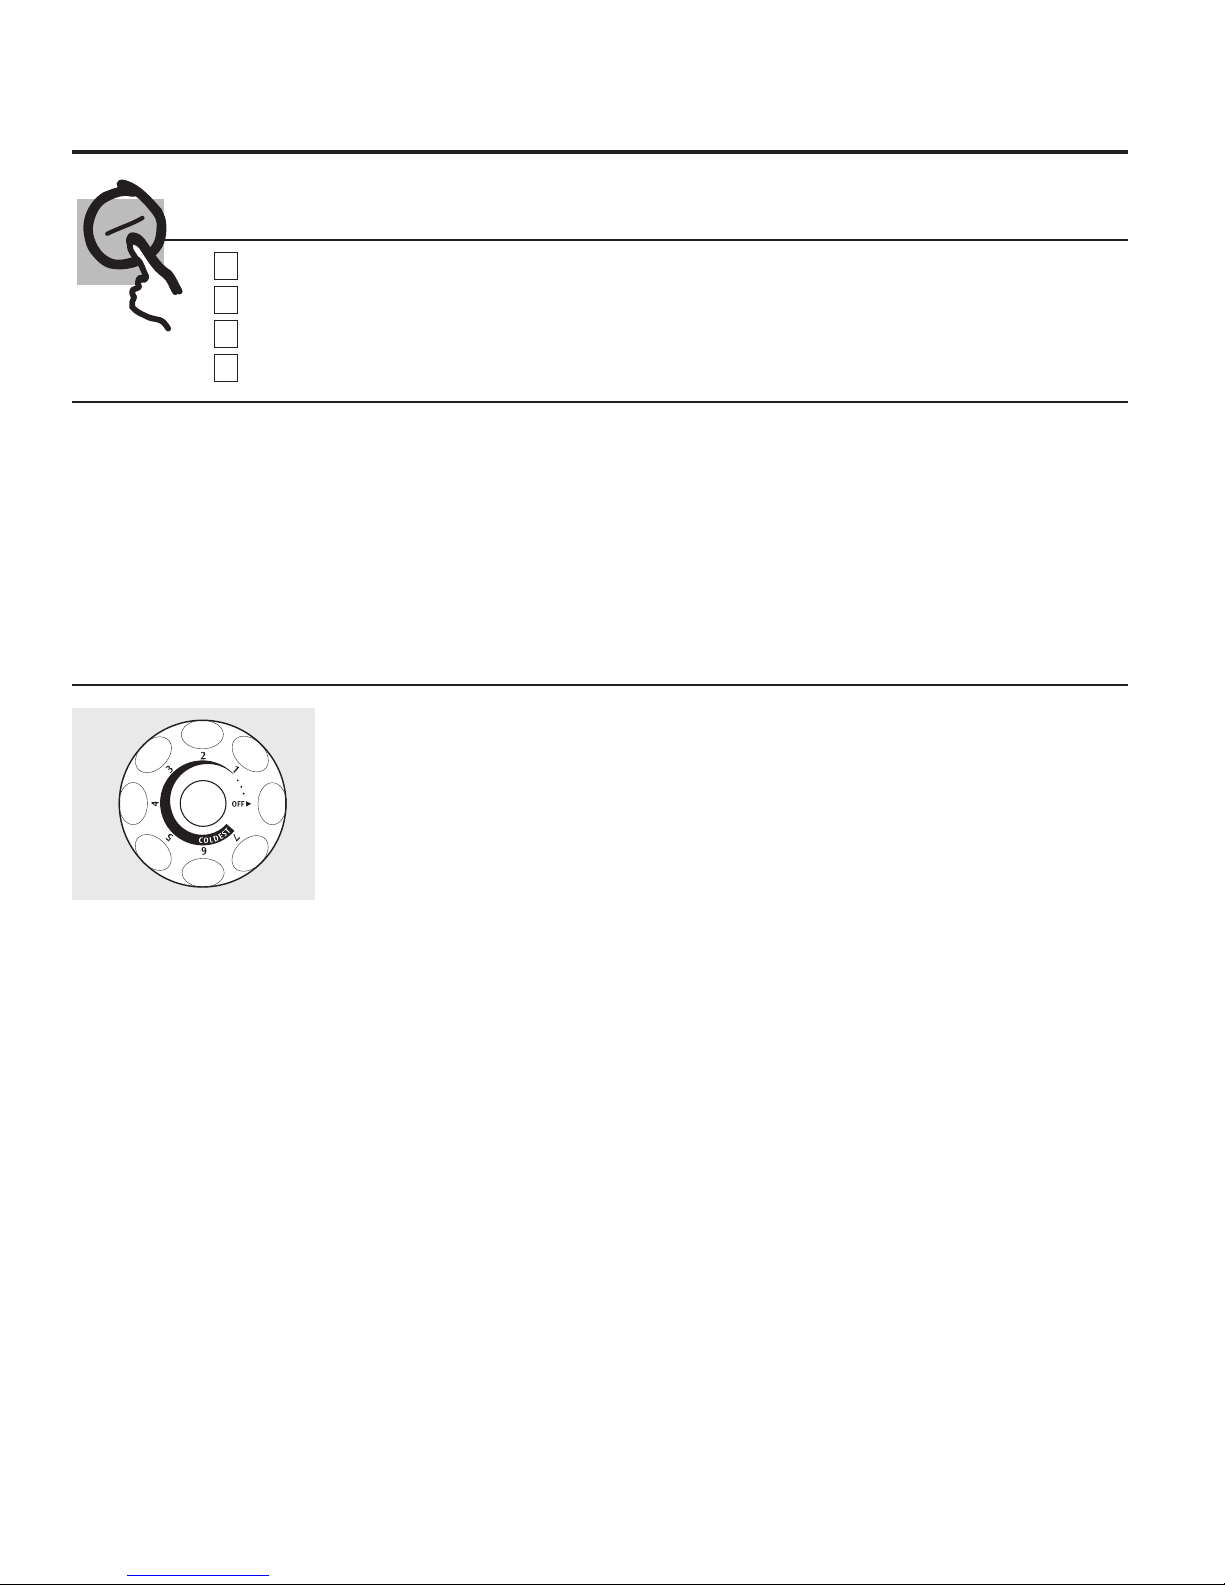
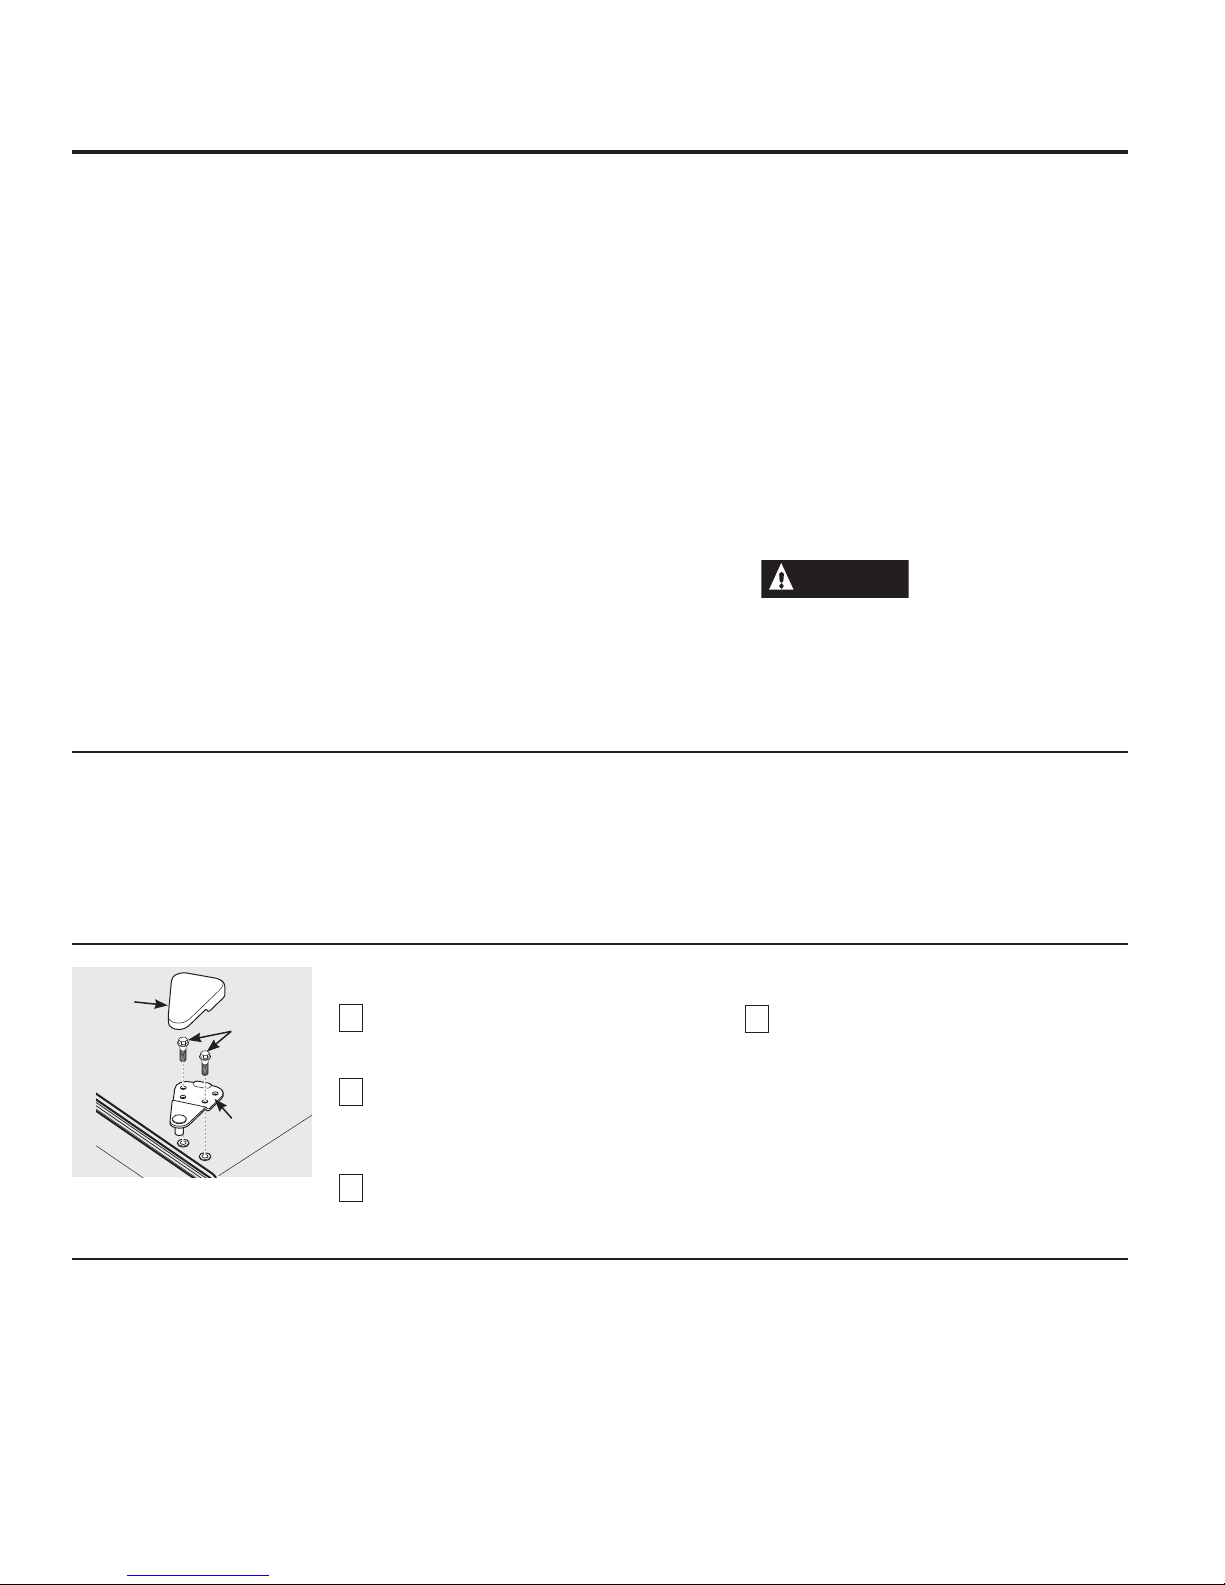
To Remove the Freezer DoorRQ1RQ(OHFWURQLF&RQWUROPRGHOV
1Remove the plastic hinge cover by either
lifting it off or folding it back (depending on
model).
2Remove the screws holding the hinge
to the top of the cabinet using a
screwdriver, 5/16” socket driver or wrench
(depending on model).
3Remove the top hinge from the cabinet and
lift the door up and off the lower hinge pin.
Set the door aside.
4Remove the two screws from the bottom
hinge.
To replace the doors, reverse the order of the
above instructions.
NOTICE: ,WLVYHU\LPSRUWDQWWKDWDOOKLQJH
VFUHZVDUHVHFXUHO\WLJKWHQHGWRHQVXUHDVHFXUH
DVVHPEO\DQGSUHYHQWKLQJHVOLSSDJH
RQVRPHPRGHOV
Hinge
Screws
Top
Hinge
Plastic
Hinge Cover
To Remove the Freezer DoorRQ(OHFWURQLF&RQWUROPRGHOV
The hinge screws are tamperproof. Please
have an authorized service technician
remove the door.
10

11
Care and cleaning of the freezer.GEAppliances.com
Preparing to Move
Disconnect the power cord plug from the
wall outlet. Remove foods, defrost (on Manual
Defrost models) and clean the freezer.
Secure all loose items such as grille and shelves
by taping them securely in place to prevent
damage.
Be sure freezer stays in upright position during
actual moving and during transportation. The
freezer must be secured during transportation
to prevent movement. Protect outside of
freezer with blanket.
In Case of Extended Power Failure
Keep freezer door closed. Your freezer will
keep food frozen for 24 hours provided warm
air is not admitted.
If freezer is out of operation for 24 hours or
more, add dry ice. Leave ice in large pieces.
Add more ice as required.
CAUTION +DQGOLQJRIGU\LFHFDQ
FDXVHIUHH]LQJRIWKHKDQGV³JORYHVRURWKHU
SURWHFWLRQLVUHFRPPHQGHG
If dry ice is not available, move food to a
IUR]HQIRRGORFNHUWHPSRUDULO\³XQWLOSRZHULV
restored.
Preparing for Vacation
To maintain freezer in operation during
vacations, be sure your house power is not
turned off. For sure protection of freezer
contents, you may want to ask a neighbor to
check the power supply and freezer operation
every 48 hours.
For extended vacations or absences, you may
prefer to move your frozen foods to a storage
locker temporarily. If your freezer is to be left
empty, disconnect power cord plug from wall
outlet. To prevent formation of odors, place
open box of baking soda in freezer and leave
freezer door open.
When the freezer is not operating, it can be left
in an unheated house or room without damage
to cabinet or mechanism.
The freezer should
be located in the
coolest area of the
room, away from heat-
producing appliances
or heating ducts, and
out of direct sunlight.
Let hot foods cool
to room temperature before placing in the
freezer. Overloading the freezer forces the
compressor to run longer. Foods that freeze
too slowly may lose quality or spoil.
Be sure to wrap foods properly, and wipe
containers dry before placing them in the
freezer. This cuts down on frost buildup inside
the freezer.
Freezer shelves should not be lined with
aluminum foil, wax paper or paper towels.
Liners interfere with cold air circulation,
making the freezer less efficient.
Organize and label food to reduce door
openings and extended searches. Remove as
many items as needed at one time, and close
the door as soon as possible.

Preparing to install the freezer.
Read these instructions completely and carefully.
)UHH]HU/RFDWLRQ
Your freezer should be conveniently located for
day-to-day use in a dry, well-ventilated room.
Do not install the freezer where the temperature will go
below 0°F or above 110°F, because it will not maintain
proper temperatures.
Be sure to install your freezer on a floor strong enough
to support it when it is fully loaded.
&OHDUDQFHV
On all models, allow 3” (76 mm) on top, back and sides
for proper air circulation.
Adjustable Legs
Legs at the front corners of the freezer should
be set so the freezer is firmly positioned on the
floor, and the front is raised just enough so the
door closes easily when opened about halfway.
Turn
right to
lower
Turn left
to raise
Unit Loading
NOTICE: 7RDOORZWKHGRRUWRFORVHDQGVHDO
SURSHUO\'2127OHWIRRGSDFNDJHVH[WHQGSDVW
WKHIURQWRIWKHVKHOYHV
Level Freezer
Use a carpenter’s level to level the freezer from
back to front. Adjust the plastic leveling feet in
front 1/2 bubble higher so the door closes easily
when left open.
12

13
Before you call for service…
7URXEOHVKRRWLQJ7LSV
6DYHWLPHDQGPRQH\5HYLHZWKHFKDUWVRQWKHIROORZLQJ
SDJHVILUVWDQG\RXPD\QRWQHHGWRFDOOIRUVHUYLFH
Problem Possible Causes What To Do
Freezer does not
operate or Power-On
Light is not on
Temperature control in OFF position. Move the control to a temperature setting.
Freezer is unplugged. Push the plug completely into the outlet.
The fuse is blown/circuit breaker is
tripped. Replace fuse or reset the breaker.
Freezer starts/stops
too frequently Door left open. Check to see if package is holding door open.
Too frequent or too long door
openings. Open the door less often.
Temperature control set too cold. See $ERXWWKHRSHUDWLRQRI\RXUIUHH]HU
Freezer operates too
long Door left open. Check to see if package is holding door open.
Too frequent or too long door
openings. Open the door less often.
Temperature control set too cold. See $ERXWWKHRSHUDWLRQRI\RXUIUHH]HU
Inadequate air circulation space
around cabinet. See 3UHSDULQJWRLQVWDOOWKHIUHH]HU
Room or outside weather is hot. It’s normal for the freezer to work harder under these
conditions.
Freezer has been disconnected
recently for a period of time. It takes 4 hours for the freezer to cool down completely.
Large amounts of warm or hot food
have been stored recently. Warm food will cause the freezer to run more until the
desired temperature is reached
Noisy operation or
cabinet vibrates Floor may be weak, causing freezer
to vibrate when compressor is on. Check to make sure freezer is located on solid floor and
adjust leveling legs as needed.
Cabinet is not positioned solidly on
floor. Adjust legs. See 3UHSDULQJWRLQVWDOOWKHIUHH]HUOr use shims
for uneven floor.
Freezer is touching the wall. Level freezer or move slightly. See /HYHO)UHH]HUV.
Normal operating characteristics. GEAppliances.com
7KHVHWKLQJVDUHQRUPDODQG
GRQRWLQGLFDWHDQHHGIRUVHUYLFH
A warm cabinet exterior as the refrigeration system transfers heat from the inside to the outside through the exterior
cabinet walls.
The sound of the high-efficiency compressor motor.
On No-Frost models, the sound of water dripping as it melts from the evaporator and escapes to the drain pan
during defrost cycle.
On No-Frost models, the sound of the fan circulating air within the interior of the cabinet providing a consistent
temperature throughout.

Problem Possible Causes What To Do
Freezer temperature too
warm Door left open. Check to see if package is holding door open.
Too frequent or too long door openings. Open the door less often.
Temperature control is set too warm. Turn control to a colder setting. Allow several
hours for the temperature to stabilize.
Large amounts of water or hot food
may
have been stored recently. Wait until the freezer has had a chance to reach
its selected temperature.
Freezer has been disconnected recently. Freezer requires 4 hours to cool down completely.
Foods defrosting Temperature control in OFF position. Move the control to a temperature setting.
Freezer is unplugged. Push the plug completely into the outlet.
The fuse is blown/circuit breaker is
tripped. Replace fuse or reset the breaker.
Door left open. Check to see if package is holding door open.
Too frequent or too long door openings. Open the door less often.
Freezer temperature too cold Temperature control set too cold. See $ERXWWKHRSHUDWLRQRI\RXUIUHH]HU
Moisture forms on outside of
cabinet Not unusual during periods of high
humidity. Wipe surface dry.
Door may not be seating properly,
causing cold air from inside the freezer
to meet warm moist air from the
outside.
See 3UHSDULQJWRLQVWDOOWKHIUHH]HU
Interior light does not work
(on some models) No power at outlet. Replace fuse or reset the breaker.
Freezer is unplugged. Push the plug completely into the outlet.
Light bulb burned out. Replace bulb.
Door won’t fully close by
itself Legs need adjusting. See 3UHSDULQJWRLQVWDOOWKHIUHH]HU.
Package holding door open. Move package to a different location.
Slow starting time after
being off Built-in overload protection. This is normal after being off.
Excessive frost buildup Door left open. Check to see if package is holding door open.
Too frequent or too long door openings. Open the door less often.
Not unusual during periods of high
humidity. Wipe surface dry.
Freezer external surface
temperature is warm The external freezer walls can be as
much as 30°F warmer than room
temperature.
This is normal while the compressor works to
transfer heat from inside the freezer cabinet.
Louder sound levels
whenever freezer is on Modern freezers have increased storage
capacity and more stable temperatures.
They require a high-efficiency
compressor.
This is normal. When the surrounding noise level is
low, you might hear the compressor running while
it cools the interior.
Higher sound levels when
compressor comes on Freezer operates at higher pressures
during the start of the ON cycle. This is normal. Sound will level off or disappear as
freezer continues to run.
Popping or cracking sound
when compressor comes on
Metal parts undergo expansion and
contraction, as in hot water pipes. This is normal. Sound will level off or disappear as
freezer continues to run.
Before you call for service…
7URXEOHVKRRWLQJ7LSV
6DYHWLPHDQGPRQH\5HYLHZWKHFKDUWVRQWKHIROORZLQJ
SDJHVILUVWDQG\RXPD\QRWQHHGWRFDOOIRUVHUYLFH
14

15
Problem Possible Causes What To Do
Bubbling or gurgling
sound, like boiling water
Refrigerant (used to cool freezer)
is
circulating throughout the
system.
This is normal.
Moisture forms on inside
freezer walls Weather is hot and humid,
which increases internal rate of
frost buildup.
This is normal.
Door may not be seating
properly. See 3UHSDULQJWRLQVWDOOWKHIUHH]HU
Door is kept open too long, or is
opened too frequently. Open the door less often.
Odors in freezer Interior needs to be cleaned. Clean interior with sponge, warm water and baking soda.
Foods with strong odors are in
the freezer. Cover the food tightly.
Before you call for service… GEAppliances.com
7URXEOHVKRRWLQJ7LSV
6DYHWLPHDQGPRQH\5HYLHZWKHFKDUWVRQWKHIROORZLQJ
SDJHVILUVWDQG\RXPD\QRWQHHGWRFDOOIRUVHUYLFH

16
Freezer Warranty.
Service trips to your home to teach you how to use
the product.
Improper installation, delivery or maintenance.
Failure of the product if it is abused, misused, or used for
other than the intended purpose or used commercially.
Loss of food due to spoilage.
Damage caused after delivery.
Replacement of house fuses or resetting of circuit breakers.
Damage to the product caused by accident, fire, floods
or acts of God.
Incidental or consequential damage caused by possible
defects with this appliance.
Product not accessible to provide required service.
What GE Will Not Cover:
For US Customers,DOOZDUUDQW\VHUYLFHSURYLGHGE\RXU)DFWRU\
6HUYLFH&HQWHUVRUDQDXWKRUL]HG&XVWRPHU&DUH®WHFKQLFLDQ7R
VFKHGXOHVHUYLFHRQOLQHKRXUVDGD\YLVLWXVDW*($SSOLDQFHV
FRPRUFDOO
*(&$5(63OHDVHKDYHVHULDOQXPEHUDQG
PRGHOQXPEHUDYDLODEOHZKHQFDOOLQJIRUVHUYLFH
In Canada, FDOO
For US Customers: This warranty is extended to the original purchaser and any succeeding owner for products
purchased for home use within the USA. If the product is located in an area where service by a GE Authorized
Servicer is not available, you may be responsible for a trip charge or you may be required to bring the product
to an Authorized GE Service location for service. In Alaska, the warranty excludes the cost of shipping or service
calls to your home.
Some states do not allow the exclusion or limitation of incidental or consequential damages. This warranty gives
you specific legal rights, and you may also have other rights which vary from state to state. To know what your
legal rights are, consult your local or state consumer affairs office or your state’s Attorney General.
Warrantor US: General Electric Company. Louisville, KY 40225
(;&/86,212),03/,(':$55$17,(6³<RXUVROHDQGH[FOXVLYHUHPHG\LVSURGXFWUHSDLUDVSURYLGHGLQ
this Limited Warranty. Any implied warranties, including the implied warranties of merchantability or
fitness for a particular purpose, are limited to one year or the shortest period allowed by law.
For the Period of: GE Will Replace
One Year
)URPWKHGDWHRIWKHRULJLQDO
SXUFKDVH
Any part of the freezer which fails due to a defect in materials or workmanship.
During the limited one-year warranty, GE will also provide, free of charge, all labor and related
service to replace the defective part.
For Customers in Canada: This warranty is extended to the original purchaser and any succeeding owner for
products purchased in Canada for home use within Canada. In-home warrant service will be provided in areas
where it is available and deemed reasonable by Mabe to provide.
Warrantor Canada: MC Commercial, Burlington, Ontario, L7R 5B6
6WDSOH\RXUUHFHLSWKHUH
3URRIRIWKHRULJLQDOSXUFKDVH
GDWHLVQHHGHGWRREWDLQVHUYLFH
XQGHUWKHZDUUDQW\

Mesures de sécurité .........18-19
Fonctionnement
Caractéristiques. . . . . . . . . . . . . . . . . . 26-28
Directives de dégivrage (modèles
à dégivrage non automatique).......23
Entretienetnettoyage...........20-22
Miseenmarcheducongélateur.....20
Installation
Préparatifs pour l’installation
ducongélateur...................... 29
Conseils de dépannage.....30-32
Caractéristiques normales
de fonctionnement. . . . . . . . . . . . . . . . . . . 30
Soutien au consommateur
Garantie ............................ 33
Soutien au consommateur ......... 34
Numéro de modèle : _____________
Numéro de série : _______________
Ils sont inscrits sur une plaque qui
se sur la paroi gauche supérieure à
l’intérieur .
Manuel d’utilisation
et d’installation
0RGqOHVYHUWLFDX[³
Dégivrage non
automatique :
FUM21
0RGqOHVYHUWLFDX[³6DQV
givre :
FUF14, FUF17, FUF20
17

0
18
MESURES DE SÉCURITÉ IMPORTANTES.
LISEZ D’ABORD TOUTES LES DIRECTIVES.
6LWH,QWHUQHWG·eOHFWURPpQDJHUV*(
Pour de plus amples informations sur le fonctionnement de votre réfrigérateur, consultez
le site www.electromenagersge.ca ou composez le 800.561.3344.
IMPORTANTES CONSIGNES DE SÉCURITÉ
Pour réduire le risque d’incendie, d’explosion, de choc électrique ou de blessures
lorsque vous utilisez votre congélateur, veuillez suivre ces consignes de sécurité :
AVERTISSEMENT
Ce symbole représente une alerte de sécurité. Ce symbole vous avise de dangers possibles pouvant causer la mort, des
blessures ou autres. Tous les messages de sécurité seront précédés du symbole d’alerte de sécurité ainsi que des mots « DANGER »,
« AVERTISSEMENT » ou « MISE EN GARDE ». Ces messages sont les suivants :
Signale une situation qui présente un danger imminent et qui, si elle n’est pas évitée, entraînera des bles
sures graves, voire la mort.
Signale une situation qui présente un danger imminent et qui, si elle n’est pas évitée, peut entraîner des
blessures graves, voire la mort. .
Signale une situation qui présente un danger imminent et qui, si elle n’est pas évitée, peut entraîner des
blessures mineures ou graves.
CONSIGNES DE SÉCURITÉ POUR LE RÉFRIGÉRATEUR
AVERTISSEMENT
DANGER
ATTENTION
Ce congélateur doit être correctement installé conformément aux
Consignes d’Installation avant toute utilisation.
Remettez toutes les pièces et panneaux en place avant d’utiliser
l’appareil.
Ne stockez pas ou n’utilisez pas d’essence ou d’autres vapeurs et
liquides inflammables à proximité de cet appareil ou de tout autre
appareil électroménager.
Nous déconseillons fortement l’utilisation d’une rallonge à cause
des risques potentiels dans certaines conditions. Cependant, si
l’utilisation d’un cordon prolongateur est nécessaire, ce dernier doit
obligatoirement être homologué UL (aux USA) ou CSA (au Canada),
à trois brins avec mise à la terre pour appareil électroménager et
doit être équipé d’une fiche et d’une prise femelle avec terre. Les
caractéristiques électriques du cordon prolongateur doivent être
de 15 ampères (minimum) et de 120 volts.
Pour éviter les risques d’asphyxie et d’enfermement pour les
enfants. Démontez les portes du congélateur avant de le mettre
au rebut ou d’interrompre son utilisation.
Ne laissez pas les enfants grimper, se mettre debout ou se
suspendre aux poignées de portes dans le congélateur. Ils
pourraient se blesser gravement.
Débranchez le congélateur :
• Pour mettre le congélateur hors tension. Ce dernier ne peut pas
être mis hors tension à partir du panneau de commande.
• Pour le nettoyer, remplacer une ampoule grillée ou effectuer des
réparations.
REMARQUE : Les réparations doivent être effectuées par un
professionnel qualifié.
Ne nettoyez pas les clayettes ou les couvercles en verre avec de
l’eau tiède quand ceux-ci sont froids. Les clayettes et couvercles
en verre peuvent se casser s’ils sont exposés à des changements
soudains de température ou si vous les cognez ou les faites
tomber. Le verre trempé est conçu pour se briser en petits
morceaux en cas de casse
Éloignez les doigts des parties du congélateur où l’on peut
facilement se pincer : les espaces entre les portes, et entre les
portes et les placards sont toujours étroits. Soyez prudent lorsque
vous fermez les portes en présence d’enfants.
Ne touchez pas les surfaces froides du congélateur lorsque vous
avez les mains humides ou mouillées. La peau risque d’adhérer à
ces surfaces extrêmement froides.
Ne recongelez pas les aliments surgelés qui ont complètement
dégelé.
Si votre congélateur est doté d’une machine à glaçons
automatique, évitez le contact avec les pièces mobiles du
mécanisme éjecteur, ou avec l’élément chauffant qui libère les
glaçons. Ne posez pas les doigts ou les mains sur le mécanisme de
la machine à glaçons automatique pendant que le congélateur est
branché.
IMPORTANTES CONSIGNES DE SÉCURITÉ
Respectez ces précautions de base pour éviter le risqué de blessures lorsque
vous utilisez votre congélateur.
ATTENTION

19
www.electromenagersge.ca
9(8,//(=/,5((768,95($77(17,9(0(17&(60(685(6
'(6e&85,7e
CONSERVEZ CES DIRECTIVES
MISE AU REBUT APPROPRIÉE DE VOTRE ANCIEN Congélateur
AVERTISSEMENT Un enfant risque de suffoquer ou d’y être emprisonné.
Démontez les portes du compartiment de réfrigération et du compartiment de congélation du
congélateur, avant mettre celui-ci au rebut. Le non-respect de cette recommandation peut entraîner
l’enfermement d’un enfant qui peut entraîner la mort ou des lésions cérébrales.
Les enfants pris au piège ou morts d’asphyxie sont
toujours d’actualité. Les réfrigérateurs et congélateurs
abandonnés sont toujours aussi dangereux, même
si on n’attend que «quelques jours» pour s’en
débarrasser. Si vous ne gardez pas votre ancien
congélateur, veuillez suivre les directives ci-dessous
afin de prévenir les accidents.
Avant de vous débarrasser de votre
ancien congélateur :
Démontez les portes.
Laissez les clayettes en place afin d’empêcher les
enfants de grimper à l’intérieur.
Réfrigérants
Tous les appareils de réfrigération contiennent des
réfrigérants qui, conformément aux lois fédérales,
doivent être enlevés avant toute élimination de
l’appareil. Si vous vous débarrassez de vieux
appareils de réfrigération, vérifiez, auprès de la
société qui s’occupe de leur élimination, ce que vous
devez faire.
IMPORTANT:
Ne coupez ni retirez en aucun cas la troisième broche (mise à la terre) de la fiche du cordon
d’alimentation. Pour votre sécurité, cet appareil doit être correctement mis à la terre.
Le cordon d’alimentation de cet appareil est muni d’une fiche
à 3 broches (mise à la terre) qui se branche dans une prise
murale ordinaire à 3 alvéoles (mise à la terre) pour réduire au
minimum les risques de chocs électriques.
Faites examiner la prise de courant et le circuit par un
électricien qualifié pour vous assurer que la prise est
correctement mise à la terre.
Dans le cas d’une prise biphasée, l’installateur a la
responsabilité et l’obligation de la remplacer par une
prise triphasée correctement mise à la terre. N’utilisez pas
d’adaptateur.
Le congélateur doit toujours être branché dans sa propre
prise de courant, dont la tension nominale est identique à celle
indiquée sur la plaque signalétique.
Une alimentation électrique à 115 volts CA, 60 Hz, avec
un fusible de 15 ou 20 ampères et une mise à la terre est
nécessaire. Ceci permet d’obtenir un meilleur rendement et
évite de surcharger les circuits électriques du domicile qui
risque d’occasionner un incendie en surchauffant.
Ne débranchez jamais le congélateur en tirant sur le cordon
d’alimentation. Saisissez fermement la fiche du cordon et tirez
droit pour la retirer de la prise.
Réparez ou remplacez immédiatement tout cordon effiloché
ou endommagé. N’utilisez pas un cordon fendillé ou présentant
des signes d’usure.
Lorsque vous déplacez votre congélateur du mur, faites
attention de ne pas le faire rouler sur le cordon d’alimentation
afin de ne pas l’endommager.
BRANCHEMENTS ÉLECTRIQUES
INSTALLATION
AVERTISSEMENT Risque d’explosion.
Conservez les matériaux et vapeurs inflammables tels que l’essence à l’écart de votre congélateur.
Une explosion, un incendie voire la mort pourrait en résulter.
AVERTISSEMENT Risque de choc électrique.
Branchez l’appareil dans une prise triple avec terre. Ne retirez pas la broche de terre.
N’utilisez pas d’adaptateur.
Le non-respect de ces instructions peut entraîner des risques d’incendies, des chocs électriques ou la mort.

20
Fonctionnement de votre congélateur.
5HVSHFWH]FHVSUpFDXWLRQVGHEDVHSRXUpYLWHUOHULVTXpGH
EOHVVXUHVORUVTXHYRXVXWLOLVH]YRWUHFRQJpODWHXU(sur certains modèles)
1Nettoyez l’intérieur du congélateur avec une solution de bicarbonate de soude et d’eau (voir la section (QWUHWLHQ
et nettoyage).
2Branchez le cordon d’alimentation dans une prise de courant.
3Assurez-vous que la commande de température est réglée sur 4.
4Laissez fonctionner le congélateur pendant au moins quatre heures avant d’y ranger des aliments.
Commande de température
Commande électromécanique de la température (certains modèles verticaux)
La commande électromécanique de la
température est préréglée pour fournir des
températures satisfaisantes de stockage des
aliments. Elle est réglable pour fournir une
gamme de température. Il est nécessaire
d’attendre quelques heures pour que la
température se stabilise entre deux réglages.
La commande électromécanique de la
température est située et à l’intérieur du
congélateur.
Pour un stockage sûr des aliments, laissez
complètement refroidir votre congélateur pendant 4
heures. Pendant les premières heures, le congélateur
fonctionnera en continu. Les aliments déjà congelés
peuvent être placés dans le congélateur après les
premières heures de fonctionnement. Les aliments
non congelés NE doivent PAS être placés dans
le congélateur avant que ce dernier n’ait été en
fonctionnement pendant 4 heures. Il est nécessaire
d’attendre quelques heures après chaque réglage
pour que la température du congélateur se stabilise.
Lorsque vous chargez le congélateur, ne congelez
pas plus de 3 livres (1,5 kg) d’aliments frais par
pied cube de capacité du congélateur. Distribuez
les paquets régulièrement dans le congélateur. Il
n’est pas nécessaire de positionner le bouton de
commande sur un réglage plus froid lorsque vous
congelez des aliments.
En réglant la commande sur OFF (éteint), la
congélation est arrêtée mais l’alimentation électrique
du congélateur n’est pas coupée.
This manual suits for next models
4
Table of contents
Languages:
Other GE Freezer manuals