GE Profile PVM9005 Series User manual

Write the model and serial
numbers here:
Model #_________________
Serial # _________________
You can find them on a label inside
the oven.
ESPAÑOL
Para consultar una version en
español de este manual de
instrucciones, visite nuestro sitio de
internet GEAppliances.com.
OWNER’S MANUAL
MICROWAVE OVEN
49-7000118 Rev. 0 04-20 GEA
PVM9005
GE is a trademark of the General Electric Company. Manufactured under trademark license.
SAFETY INFORMATION..........3
OPERATING INSTRUCTIONS
Controls ..............................6
Features..............................8
Power Levels ..........................8
Time Features .........................8
Sensor Features ......................12
Other Features .......................14
Microwave Terms .....................16
CARE AND CLEANING
Care and Cleaning ....................17
TROUBLESHOOTING
Things that are Normal ............... 20
CONSUMER SUPPORT
Limited Warranty .....................21
Optional Kits .........................22
Consumer Support ................... 24

249-7000118 Rev. 0
THANK YOU FOR MAKING GE APPLIANCES A PART OF YOUR HOME.
Whether you grew up with GE Appliances, or this is your first, we’re happy to have you in the family.
We take pride in the craftsmanship, innovation and design that goes into every GE Appliances
product, and we think you will too. Among other things, registration of your appliance ensures that we
can deliver important product information and warranty details when you need them.
Register your GE appliance now online. Helpful websites and phone numbers are available in the
Consumer Support section of this Owner’s Manual. You may also mail in the pre-printed registration
card included in the packing material.

49-7000118 Rev. 0 3
READ AND SAVE THESE INSTRUCTIONS
SAFETY INFORMATION
IMPORTANT SAFETY INSTRUCTIONS
READ ALL INSTRUCTIONS BEFORE USING THE APPLIANCE
WARNING To reduce the risk of burns, electric shock, fire, injury to persons, or exposure to
excessive microwave energy:
When using electrical appliances, basic safety precautions should be followed, including the following:
Ŷ 5HDGDOOLQVWUXFWLRQVEHIRUHXVLQJWKLVDSSOLDQFH
Ŷ 5HDGDQGIROORZWKHVSHFLILFSUHFDXWLRQVLQWKH
PRECAUTIONS TO AVOID POSSIBLE EXPOSURE
TO EXCESSIVE MICROWAVE ENERGY section on
page 5.
Ŷ 8VHWKLVDSSOLDQFHRQO\IRULWVLQWHQGHGXVHDV
described in this manual. Do not use corrosive
chemicals or vapors in this appliance. This oven is
specifically designed to heat, dry or cook food, and is
not intended for laboratory or industrial use.
Ŷ 7KLVPLFURZDYHPXVWRQO\EHVHUYLFHGE\TXDOLILHG
service personnel. Contact nearest authorized
service facility for examination, repair or adjustment.
INSTALLATION
Ŷ ,QVWDOORUORFDWHWKLVDSSOLDQFHRQO\LQDFFRUGDQFH
with the provided installation instructions.
ŶThis appliance must be grounded. Connect only
to properly grounded outlet. See “GROUNDING
INSTRUCTIONS” found on page 5.
Ŷ 7KLVPLFURZDYHRYHQLV(7/OLVWHGIRULQVWDOODWLRQ
over both gas and electric ranges.
Ŷ 7KLVXQLWLVVXLWDEOHIRUXVHDERYHJDVRUHOHFWULF
FRRNLQJHTXLSPHQW´RUOHVVZLGH
Ŷ Do not operate this appliance if it has a damaged
power cord or plug, if it is not working properly, or if it
has been damaged or dropped.
Ŷ .HHSFRUGDZD\IURPKHDWHGVXUIDFHV
ŶDo not let cord hang over the edge of the table or
counter
Ŷ 'RQRWLPPHUVHFRUGRUSOXJLQZDWHU
Ŷ 'RQRWFRYHURUEORFNDQ\RSHQLQJVRQWKH
appliance.
Ŷ 'RQRWVWRUHWKLVDSSOLDQFHRXWGRRUV'RQRWXVHWKLV
product near water—for example, in a wet basement,
near a swimming pool, near a sink or in similar
locations.
Ŷ 'RQRWPRXQWWKLVDSSOLDQFHRYHUDVLQN
TO REDUCE THE RISK OF FIRE IN THE CAVITY:
Ŷ Do not overcook food. Carefully attend appliance
when paper, plastic or other combustible materials
are placed inside the oven to facilitate cooking.
Ŷ 5HPRYHZLUHWZLVWWLHVDQGPHWDOKDQGOHVIURP
paper or plastic containers before placing them in
the oven.
Ŷ 'RQRWVWRUHDQ\PDWHULDOV,other than our
recommended accessories, in this oven when not in
use. Do not leave paper products, cooking utensils
or food in the cavity when not in use. Microwave
rack should be removed from oven when not in use.
Ŷ ,IPDWHULDOVLQVLGHWKHRYHQLJQLWHNHHSWKHRYHQ
door closed, turn the oven off and disconnect the
power cord or shut off power at the fuse or circuit
breaker panel.
Ŷ 'RQRWRSHUDWHWKHPLFURZDYHIHDWXUHZLWKRXWIRRGLQ
the oven.
TO REDUCE THE RISK OF BURNS:
Ŷ %HFDUHIXOZKHQRSHQLQJFRQWDLQHUVRIKRWIRRG8VH
pot holders and direct steam away from face and
hands.
Ŷ 9HQWSLHUFHRUVOLWFRQWDLQHUVSRXFKHVRUSODVWLF
bags to prevent build-up of pressure.
Ŷ %HFDUHIXOZKHQWRXFKLQJWKHWXUQWDEOHGRRUUDFNV
or walls of the oven which may become hot during
use.
Ŷ HOT CONTENTS CAN CAUSE SEVERE BURNS.
DO NOT ALLOW CHILDREN TO USE THE
MICROWAVE. Use caution when removing hot items.

449-7000118 Rev. 0
READ AND SAVE THESE INSTRUCTIONS
SAFETY INFORMATION
IMPORTANT SAFETY INSTRUCTIONS
READ ALL INSTRUCTIONS BEFORE USING THE APPLIANCE
WARNING Continued
OPERATING
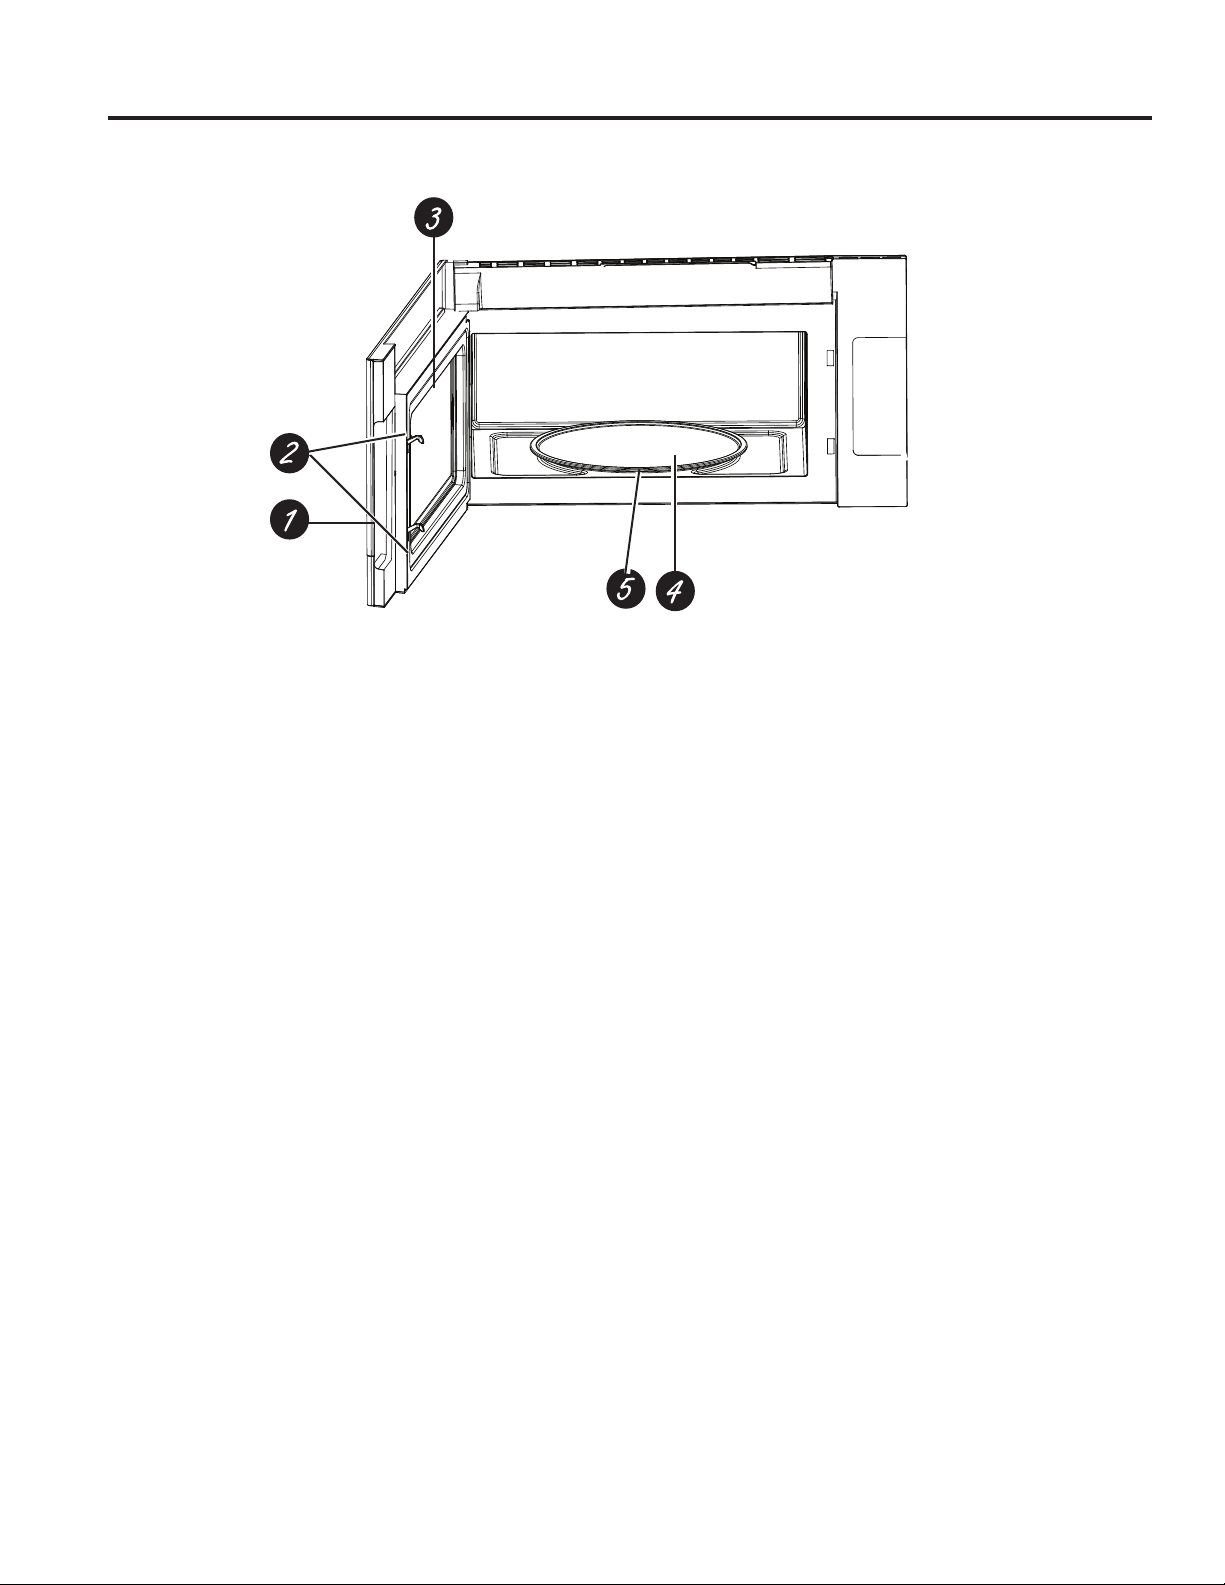
Ŷ 'RQRWRSHUDWHWKHRYHQZLWKRXWWKHWXUQWDEOHLQ
place. The turntable must be unrestricted so it can
turn.
Ŷ 0DNHVXUHDOOFRRNZDUHXVHGLQ\RXUPLFURZDYH
oven is suitable for microwaving. Most glass
casseroles, cooking dishes, measuring cups, custard
cups, pottery, or china dinnerware, which does not
have metallic trim or glaze with a metallic sheen can
be used in compliance with cookware manufacturers’
recommendations.
Ŷ 'RQRWVWRUHDQ\WKLQJGLUHFWO\RQWRSRIWKH
microwave surface when the microwave is in
operation.
Ŷ 6RPHSURGXFWVVXFKDVZKROHHJJVDQGVHDOHG
containers - for example, closed jars - are able to
explode and should not be heated in the microwave
oven.
Ŷ 'RQRWRYHUFRRNSRWDWRHV7KH\FRXOGGHK\GUDWHDQG
catch fire.
Ŷ 'RQRWFRYHUDQ\RWKHUSDUWRIWKHRYHQZLWKPHWDO
foil. This will cause overheating of the oven.
Ŷ &RRNPHDWDQGSRXOWU\WKRURXJKO\²PHDWWRDWOHDVW
DQ,17(51$/WHPSHUDWXUHRI)DQGSRXOWU\WRDW
OHDVWDQ,17(51$/WHPSHUDWXUHRI)&RRNLQJ
to these temperatures usually protects against
foodborne illness.
Ŷ 7KLVRYHQLVQRWDSSURYHGRUWHVWHGIRUPDULQHXVH
CLEANING
Ŷ .HHSWKHRYHQIUHHIURPJUHDVHEXLOGXS
Ŷ 'RQRWFOHDQZLWKPHWDOVFRXULQJSDGV3LHFHVFDQ
burn off the pad and touch electrical parts involving
risk of electric shock.
Ŷ :KHQFOHDQLQJVXUIDFHVRIGRRUDQGRYHQWKDW
come together on closing the door, use only mild,
nonabrasive soaps, or detergents applied with a
clean sponge or soft cloth. Rinse well.
SUPER HEATED WATER
Ŷ /LTXLGVVXFKDVZDWHUFRIIHHRUWHDDUHDEOHWR
be overheated beyond the boiling point without
appearing to be boiling. Visible bubbling or boiling
when the container is removed from the microwave
oven is not always present. THIS COULD RESULT
IN VERY HOT LIQUIDS SUDDENLY BOILING
OVER WHEN THE CONTAINER IS DISTURBED
OR A SPOON OR OTHER UTENSIL IS INSERTED
INTO THE LIQUID.
Ŷ 7RUHGXFHWKHULVNRILQMXU\WRSHUVRQV
'RQRWRYHUKHDWWKHOLTXLG
6WLUWKHOLTXLGERWKEHIRUHDQGKDOIZD\WKURXJK
heating it.
- Do not use straight-sided containers with narrow
necks.
- After heating, allow the container to stand in the
microwave oven for a short time before removing
the container.
- Use extreme care when inserting a spoon or other
utensil into the container.
VENT FAN
The fan will operate automatically under certain conditions.
Take care to prevent the starting and spreading of accidental
cooking fires while the vent fan is in use.
Ŷ Clean the underside of the microwave often. Do not
allow grease to build up on the microwave or the fan
filters.
Ŷ In the event of a grease fire on the surface units
below the microwave oven, smother a flaming pan
on the surface unit by covering the pan completely
with a lid, a cookie sheet or a flat tray.
Ŷ Use care when cleaning the vent fan filters.
Corrosive cleaning agents, such as lye-based oven
cleaners, may damage the filters.
Ŷ When preparing flaming foods under the microwave,
turn the fan on.
Ŷ Never leave surface units beneath your microwave
oven unattended at high heat settings. Boilovers
cause smoking and greasy spillovers that may ignite
and spread if the microwave vent fan is operating.
7RPLQLPL]HDXWRPDWLFIDQRSHUDWLRQXVHDGHTXDWH
sized cookware and use high heat on surface units
only when necessary.

49-7000118 Rev. 0 5
READ AND SAVE THESE INSTRUCTIONS
IMPORTANT SAFETY INSTRUCTIONS
READ ALL INSTRUCTIONS BEFORE USING THE APPLIANCE
SAFETY INFORMATION
PACEMAKERS
Most pacemakers are shielded from interference from electronic products, including microwaves. However,
patients with pacemakers may wish to consult their physicians if they have concerns.
GROUNDING INSTRUCTIONS
WARNING Improper use of the grounding plug can result in a risk of electric shock.
This appliance must be
grounded. In the event of an
electrical short circuit, grounding
reduces the risk of electric shock
by providing an escape wire for
the electric current.
7KLVDSSOLDQFHLVHTXLSSHGZLWKDSRZHUFRUGKDYLQJD
grounding wire with a grounding plug. The plug must
be plugged into an outlet that is properly installed and
grounded.
&RQVXOWDTXDOLILHGHOHFWULFLDQRUVHUYLFHWHFKQLFLDQLI
the GROUNDING INSTRUCTIONS are not completely
understood, or if doubt exists as to whether the
appliance is properly grounded.
If the outlet is a standard 2-prong wall outlet, it is
your personal responsibility and obligation to have it
replaced with a properly grounded 3-prong wall outlet.
Do not under any circumstances cut or remove the
third (ground) prong from the power cord.
Do not use an extension cord. If the power cord is too
VKRUWKDYHDTXDOLILHGHOHFWULFLDQRUVHUYLFHWHFKQLFLDQ
install an outlet near the appliance.
)RUEHVWRSHUDWLRQSOXJWKLVDSSOLDQFHLQWRLWVRZQ
electrical outlet to prevent flickering of lights, blowing
of fuse or tripping of circuit breaker.
PRECAUTIONS TO AVOID POSSIBLE EXPOSURE
TO EXCESSIVE MICROWAVE ENERGY
(a) Do Not Attempt to operate this oven with the
door open since open-door operation can result
in harmful exposure to microwave energy. It is
important not to defeat or tamper with the safety
interlocks.
(b) Do Not Place any object between the oven front
face and the door or allow soil or cleaner residue to
accumulate on sealing surfaces.
(c) Do Not Operate the oven if it is damaged.
It is particularly important that the oven door close
properly and that there is no damage to the:
(1) door (bent),
(2) hinges and latches (broken or loosened),
(3) door seals and sealing surfaces.
(d) The Oven Should Not be adjusted or repaired by
DQ\RQHH[FHSWSURSHUO\TXDOLILHGVHUYLFHSHUVRQQHO
Ensure Proper ground
exists before use.

49-7000118 Rev. 0
Throughout this manual, features and appearance may vary from your model.
1. Door Handle.
2. Door Latches.
3. Window with Metal Shield.
Screen allows cooking to be viewed while keeping
microwaves confined in the oven.
4. Removable Turntable.
Do not operate the oven in the microwave mode
without the turntable and turntable support seated and
in place.
5. Removable Turntable Support.
Do not operate the oven in the microwave mode
without the turntable and turntable support seated and
in place.
Controls
USING YOUR OVEN: Controls

49-7000118 Rev. 0 7
USING YOUR OVEN: Controls
Controls
You can microwave by time or with the sensor features. Not all features on all models.
Time Features
Press Enter
COOK TIME Amount of cooking time
DEFROST Weight or time
TIMER
POWER LEVEL 3RZHUOHYHOWR
ADD 30 SEC Starts immediately!
EXPRESS COOK Starts immediately!
Sensor/Convenience Features
Press Enter
AUTO COOK Press pad to select food
POPCORN
Start immediately
REHEAT Press pad to select food
POTATO
Start immediately
STEAM Press pad to select food
Cooking Controls
Check the Convenience Guide before you begin.
Cook
Time
Timer
On/Off Power
Level Set
Clock
Start
Pause
Cancel
Off
Add 30 Sec Chef Connect
On/Off
To Pair Hold 3 Sec
Sensor Cooking -
Defrost
Reheat
Popcorn
Auto
Cook
Potato Steam

849-7000118 Rev. 0
Changing the Power Level
Power
Level
Express Cook
08
5
2
7
4
1
9
6
3
Start
Pause
The power level may be entered or changed before or
GXULQJFRRNLQJ3RZHU/HYHOLVVHWIRU/HYHO+LJK
unless it is changed.
1. Press Power Level button.
2. Enter new power level by using the number pads or
press the Power Level button multiple times until you find
the level you want.
3. After you have selected the power level, wait five seconds.
The display will go back to the Cook Time screen.
4. Enter cooking time and press START.
OR
1. Press Cook Time button.
2. Enter your cooking time.
3. Press Power Level button.
4. Enter new power level by using the number pads or
press the Power Level button multiple times until you find
the level you want.
5. After you have selected the power level, wait five
seconds. The display will go back to the Cook Time
(Enter Time) screen.
3UHVV67$57
Variable power levels add flexibility to microwave cooking.
The power levels on the microwave oven can be compared
to the surface units on a range. Each power level gives
you microwave energy a certain percent of the time. Power
OHYHOLVPLFURZDYHHQHUJ\RIWKHWLPH3RZHUOHYHO
LVHQHUJ\RIWKHWLPH0RVWFRRNLQJZLOOEHGRQHRQ
+LJKSRZHUOHYHOZKLFKJLYHV\RXSRZHU3RZHU
OHYHOZLOOFRRNIDVWHUEXWIRRGPD\QHHGPRUHIUHTXHQW
stirring, rotating or turning over. A lower setting will cook
more evenly and need less stirring or rotating of the food.
Some foods may have better flavor, texture or appearance
if one of the lower settings is used. Use a lower power level
when cooking foods that have a tendency to boil over, such
as scalloped potatoes and some casseroles.
Rest periods (when the microwave energy cycles off) give
WLPHIRUWKHIRRGWR³HTXDOL]H´RUWUDQVIHUKHDWWRWKHLQVLGH
of the food. An example of this is shown with Power level
3—the defrost cycle. If microwave energy did not cycle off,
the outside of the food would cook before the inside was
defrosted.
Here are some examples of uses for various power levels:
+LJK)LVKEDFRQYHJHWDEOHVERLOLQJOLTXLGV
0HG+LJK*HQWOHFRRNLQJRIPHDWDQGSRXOWU\
baking casseroles and reheating.
0HGLXP6ORZFRRNLQJDQGWHQGHUL]LQJIRUVWHZV
and less tender cuts of meat.
/RZRURU'HIURVWLQJVLPPHULQJGHOLFDWH
sauces.
:DUP.HHSLQJIRRGZDUPVRIWHQLQJEXWWHU
NOTE: You can also change the power level during many
cooking modes by pressing the power level button entering
a valid power level.
Cook Time
Allows you to microwave for any time up to 99 minutes
and 99 seconds.
3RZHUOHYHO+,*+LVDXWRPDWLFDOO\VHWEXW\RXPD\
change it for more flexibility.
1. Press Cook Time.
2. Enter cooking time.
3. Press START.
Cooking will start when the countdown begins in the
display.
You may open the door during Cook Time to check
the food. Close the door and press START to resume
cooking.
Features
Time Features
USING YOUR OVEN
Cook
Time
Express Cook
08
5
2
7
4
1
9
6
3
Start
Pause

49-7000118 Rev. 0 9
Express Cook
7KLVLVDTXLFNZD\WRVHWFRRNLQJWLPHIRUPLQXWHV
Press one of the Express Cook pads (from 1 to 5) for 1
WRPLQXWHVRIFRRNLQJDWSRZHUOHYHO)RUH[DPSOH
press the 2 pad for 2 minutes of cooking time.
The power level can be changed as time is counting
down. Press POWER LEVEL and enter 1-10.
Add 30 Sec
You can use this feature two ways:
,WZLOODGGVHFRQGVWRWKHWLPHFRXQWLQJGRZQHDFK
time the pad is pressed.
,WFDQEHXVHGDVDTXLFNZD\WRVHWVHFRQGVRI
cooking time.
Steam Cook
Steam
Express Cook
08
5
2
7
4
1
9
6
3
Start
Pause
Use the STEAM feature to steam certain
preprogrammed foods.
1. Press STEAM button.
2. Enter the food type code you wish to steam. See
Cooking Guide for STEAM below for codes or check
the display for food types.
3. Place steamer bowl with water, salt (if necessary),
and food in the microwave with the steam vents on the
steamer bowl in the OPEN position.
4 Press START button to being cooking.
NOTE: The NordicWare Rice Cooker/Steamer Bowl
should be used for best cooking results.
Time Features
USING YOUR OVEN
Code Entry Food Amount Entry
1 Rice 1 - 1 cup white
2 - 1 cup brown
2 Asparagus 1 - 1 cup
2 - 2 cups
3 Broccoli 1 - 1 cup
2 - 2 cups
4 Brussel Sprouts 1 - 1 cup
2 - 2 cups
5 Carrots 1 - 1 cup
2 - 2 cups
&DXOLÀRZHU 1 - 1 cup
2 - 2 cups
7 Zucchini 1 - 1 cup
2 - 2 cups
Express Cook
5
24
13
Add 30 Sec

49-7000118 Rev. 0
Weight Defrost
Defrost
Express Cook
08
5
2
7
4
1
9
6
3
Start
Pause
The Defrost Weight/Time feature gives you two ways to
defrost food.
Press Defrost Weight/Time once for weight defrost or
twice for Time Defrost.
8VH:HLJKW'HIURVWIRUPHDWSRXOWU\DQGILVKXSWR
pounds. Use Time Defrost for most other frozen foods.
Weight Defrost automatically sets the defrosting times
and power levels to give even defrosting results for
meats, poultry and fish.
1. Press Defrost once.
8VLQJWKHFRQYHUVLRQJXLGHHQWHUIRRGZHLJKW)RU
example, press pads 1 and 2 for 1.2 pounds (1 pound,
3 ounces).
3. Press Start/Pause.
• Remove meat from package and place on microwave-
safe dish.
• When the oven signals, turn the food over. Remove
defrosted meat or shield warm areas with small pieces
of foil.
• After defrosting, most meats need to stand 5 minutes
to complete defrosting. Large roasts should stand for
DERXWPLQXWHV
Time Features
USING YOUR OVEN
If the weight of food is stated in pounds
and ounces, the ounces must be
converted to tenths (.1) of a pound.
Ounces Pounds
1–2 .1
3 .2
4–5 .3
6–7 .4
8 .5
9–10 .6
11 .7
12–13 .8
14–15 .9
Time Defrost
Defrost
Express Cook
08
5
2
7
4
1
9
6
3
Start
Pause
Time Defrost allows you to defrost for a selected length
of time. See the Defrosting Guide for suggested times.
1. Press Defrost twice.
2. Enter defrosting time.
3. Press Start/Pause.
At one half of selected defrosting time, turn food over
and break apart or rearrange pieces for more even
defrosting. Shield any warm areas with small pieces of
foil. The oven will continue to defrost if you don’t open
the door and turn the food.
Power level is automatically set at 3, but can be
FKDQJHG<RXFDQGHIURVWVPDOOLWHPVTXLFNO\E\UDLVLQJ
the power level after entering the time. Power level 7
FXWVWKHWRWDOGHIURVWLQJWLPHLQDERXWKDOISRZHUOHYHO
cuts the total time to approximately 1/3. However, food
ZLOOQHHGPRUHIUHTXHQWDWWHQWLRQWKDQXVXDO
A dull thumping noise may be heard during defrosting.
This is normal when oven is not operating at High power.
Defrosting Tips
)RRGVIUR]HQLQSDSHURUSODVWLFFDQEHGHIURVWHGLQ
the package. Closed packages should be slit, pierced
RUYHQWHG$)7(5IRRGKDVSDUWLDOO\GHIURVWHG3ODVWLF
storage containers should be partially uncovered.
)DPLO\VL]HSUHSDFNDJHGIUR]HQGLQQHUVFDQEH
defrosted and microwaved. If the food is in a foil
container, transfer it to a microwave-safe dish.
)RUPRUHHYHQGHIURVWLQJRIODUJHUIRRGVVXFKDV
roasts, use Defrost Weight. Be sure large meats are
completely defrosted before cooking.
)RRGVWKDWVSRLOHDVLO\VKRXOGQRWEHDOORZHGWRVLW
out for more than one hour after defrosting. Room
temperature promotes the growth of harmful bacteria.
• When defrosted, food should be cool but softened in all
areas. If still slightly icy, return to the microwave very
briefly, or let it stand a few minutes counts down.

49-7000118 Rev. 0 11
Time Features
USING YOUR OVEN
Defrosting Guide
Food Time Comments
Breads, Cakes
Bread, buns or rolls (1
piece) 1/4 min.
Sweet rolls (approx. 12 oz.) 2 to 4 min. Rearrange after half of time.
Fish and Seafood
)LOOHWVIUR]HQOE WRPLQ
Fruit
Plastic pouch—1 or 2 1 to 5 min.
R]SDFNDJH
Meat
Bacon (1 lb.) 2 to 5 min.
Place unopened package in oven. Let stand 5 minutes after defrosting.
)UDQNVOE 2 to 5 min. Place unopened package in oven. Microwave just until franks can be
separated. Let stand 5 minutes, if necessary, to complete defrosting.
Ground meat (1 lb.) WRPLQ Turn meat over after first half of time.
Roast: beef, lamb, veal,
pork 9 to 13 min. per lb. 8VHSRZHUOHYHO
Steaks, chops and cutlets 4 to 8 min. per lb. Place unwrapped meat in cooking dish. Turn over after first half of time
and shield warm areas with foil. After second half of time, separate pieces
with table knife. Let stand to complete defrosting.
Poultry
Chicken, broiler-fryer, cut up
(2 1/2to 3 lbs.) WRPLQ Place wrapped chicken in dish. Unwrap and turn over after first half of
time. After second half of time, separate pieces and place in cooking dish.
Microwave 2 to 4 minutes more, if necessary. Let stand a few minutes to
finish defrosting.
Chicken, whole (2 1/2to 3
lbs.) WRPLQ Place wrapped chicken in dish. After first half of time, unwrap and turn
chicken over. Shield warm areas with foil. To complete defrosting, run cool
water in cavity until giblets can be removed.
Cornish hen 7 to 13 min. per lb. Place unwrapped hen in oven breast-side-up. Turn over after first half of
time. Run cool water in cavity until giblets can be removed.
7XUNH\EUHDVWWROEV 3 to 8 min. per lb. Place unwrapped breast in microwave-safe dish breast-side-down. After
first half of time, turn breast-side-up and shield warm areas with foil.
Defrost for second half of time. Let stand 1 to 2 hours in refrigerator to
complete defrosting.

12 49-7000118 Rev. 0
Sensor Features
USING YOUR OVEN: 6HQVRU)HDWXUHV
Humidity Sensor
7KH6HQVRU)HDWXUHVGHWHFWWKHLQFUHDVLQJKXPLGLW\
released during cooking. The oven automatically adjusts the
cooking time to various types and amounts of food.
'RQRWXVHWKH6HQVRU)HDWXUHVWZLFHLQVXFFHVVLRQRQWKH
same food portion—it may result in severely overcooked
RUEXUQWIRRG%HVXUHWROHWWKHRYHQFRROGRZQIRU
minutes before starting the next sensor cook.
If food is under cooked after the countdown, use Cook Time
for additional cooking time.
• The proper containers and covers are essential for best
sensor cooking.
• Always use microwave-safe containers and cover them
with lids or vented plastic wrap. Never use tight-sealing
plastic covers - they can prevent steam from escaping
and cause food to overcook.
• Be sure the outside of the cooking container and the
inside of the microwave oven are dry before placing food
in the oven. Beads of moisture turning into steam can
mislead the sensor.
Reheat
The Reheat feature reheats servings of previously cooked
foods or a plate of leftovers.
1. Press REHEAT.
8VLQJWKHFRRNLQJJXLGHEHORZHQWHUIRRGFRGH)RU
example, 1 for Pasta.
3. Press START/PAUSE. The oven signals when steam is
sensed and the time remaining begins counting down.
Do not open the oven door until time is counting down. If
the door is opened before time is counting down 4 beeps
are emitted while the display will Scroll & Cycle “SENSOR
ERROR “ until CANCEL is pressed. The sensor cook
will be cancelled as well. If the Door is opened during the
counting down, close it and press START immediately.
After removing food from the oven, stir, if possible, to even
out the temperature. If the food is not hot enough, use
Cook Time to reheat for more time. Reheated foods may
have wide variations in temperature. Some areas may be
extremely hot.
It is best to use Cook Time for these foods:
• Bread products.
)RRGVWKDWPXVWEHUHKHDWHGFRYHUHG
)RRGVWKDWQHHGWREHVWLUUHGRUURWDWHGGXULQJUHKHDWLQJ
)RRGVFDOOLQJIRUDGU\ORRNRUFULVSVXUIDFHDIWHUUHKHDWLQJ
How to Change the Automatic Settings
7RUHGXFHWLPHE\
Press 1 after the feature pad.
7RDGGWRFRRNLQJWLPH
Press 9 after the feature pad.
&RRNLQJ*XLGHIRU5HKHDW)HDWXUH
Code Entry Food
1Pasta
2 Pizza
3 Plate
4 Soup
Popcorn Feature
To use the Popcorn feature:
1. Place the package of popcorn in the center of the
microwave.
2. Press POPCORN. The oven starts immediately.
Your popcorn bag may get stuck and stop rotating, but this
will not affect the cooking performance. Do not open the
door even if the bag is not rotating.
Using the vent function in combination with the popcorn
sensor feature may lead to over cooking.
How to Change the Automatic Settings
7RUHGXFHWLPHE\
Press 1 after the feature pad.
7RDGGWRFRRNLQJWLPH
Press 9 after the feature pad.
If food is undercooked after the countdown, use Cook Time
IRUDGGLWLRQDOFRRNLQJWLPH:HUHFRPPHQGVHFRQGVDQG
watch carefully.
Covered Vented
Dry off dishes so they don’t
mislead the sensor.

49-7000118 Rev. 0 13
Sensor Features
USING YOUR OVEN: 6HQVRU)HDWXUHV
Potato
To use the Potato feature:
1. Place the potato in the center of the microwave.
2. Press POTATO.
The oven starts immediately.
Do not open the oven door until time is counting down.
If the door is opened before time is counting down 4
beeps are emitted while the display will Scroll & Cycle
“SENSOR ERROR “ until CANCEL is pressed. The
sensor cook will be cancelled as well. If the Door is
opened during the counting down, close it and press
START immediately.
How to Change the Automatic Settings
7RUHGXFHWLPHE\
Press 1 after the feature pad.
7RDGGWRFRRNLQJWLPH
Press 9 after the feature pad.
Auo Cook
Auto
Cook
Express Cook
08
5
2
7
4
1
9
6
3
Start
Pause
Allows you to microwave food choices with sensor.
1. Press AUTO COOK button.
2. Enter the food type code. See Cooking Guide for
AUTO COOK below for codes or check the display for
food types..
3. Press START.
The oven signals when steam is sensed and the time
remaining begins counting down.
Do not open the oven door until time is counting down.
If the door is opened before time is counting down 4
beeps are emitted while the display will Scroll & Cycle
“SENSOR ERROR “ until CANCEL is pressed. The
sensor cook will be cancelled as well. If the Door is
opened during the counting down, close it and press
START immediately.
&RRNLQJ*XLGHIRU$XWR&RRN)HDWXUH
CODE
ENTRY
)22' COMMENTS
1 Chicken
2)LVK
3 Ground
Meat
4 Veggies Enter veggies type
)UHVK9HJJLHV
)UR]HQ9HJJLHV
3 Canned Veggies
How to Change the Automatic Settings
7RUHGXFHWLPHE\
Press 1 after the feature pad.
7RDGGWRFRRNLQJWLPH
Press 9 after the feature pad.

14 49-7000118 Rev. 0
Other Features
USING YOUR OVEN: 2WKHU)HDWXUHV
Cooking Complete Reminder
To remind you that you have food in the oven, the oven
ZLOOGLVSOD\³)RRGLV5HDG\´DQGEHHSRQFHDPLQXWH
until you either open the oven door or press Cancel/Off.
Set Clock
To change the time of day.
1. Press the Set Clock button. (The
microwave should not be running.)
2. Enter the appropriate time of day.
Clock is on a 12-hour scale.
3. Press Set Clock or Start to accept the time.
Control Lock-Out
You may lock the control panel
to prevent the oven from being
accidentally started during cleaning or
being used by children.
To lock or unlock the controls,
SUHVVDQGKROGWKH/2&.&21752/EXWWRQIRUWKUHH
VHFRQGV:KHQWKHFRQWUROSDQHOLVORFNHG/2&.('
will be displayed anytime a button or dial is pressed.
³&21752//2&.,621´ZLOOVKRZLQWKHGLVSOD\
Start/Pause
In addition to starting many functions, Start/Pause allows
you to stop cooking without opening the door or clearing
the display. Press Start/Pause again to restart the oven.
Turntable
)RUEHVWFRRNLQJUHVXOWVOHDYHWKHWXUQWDEOHRQ,WFDQ
be turned off for large dishes. Press TURNTABLE to turn
the turntable on or off.
Sometimes the turntable can become too hot to touch.
Be careful touching the turntable during and after
cooking.
Timer On/Off
Timer On/Off operates as a minute timer and can be
used at any time, even when the oven is operating.
1. Press Timer On/Off.
2. Enter time you want to count down.
3. Press Timer On/Off to start.
When time is up, the oven will signal. To turn off the
timer signal, press Timer On/Off.
NOTE: The timer indicator will be lit while the timer is
operating.
Set
Clock
Lock
Control
Hold 3 Sec

49-7000118 Rev. 0 15
Other Features
USING YOUR OVEN: 2WKHU)HDWXUHV
Vent Fan
The vent fan removes steam and
other vapors from surface cooking.
3UHVV9HQW)DQRQFHIRUORZIDQ
speed, twice for medium fan speed,
three times for high fan speed, four times for boost
speed or five times to turn the fan off
Surface Light
Press SURFACE LIGHT once for low
light, twice for high light or a third time
to turn the light off.
Note: If the microwave is working and
the vent fan is on Boost speed, the surface lights will be
turned to low light automatically.
Mute
The beeper sound level can be muted.
Press Mute On/Off.
Automatic Fan
An automatic fan feature protects the microwave from
too much heat rising from the cooktop below it. It
automatically turns on at low speed if it senses too much
heat.
If you have turned the fan on you may find that you
cannot turn it off. The fan will automatically turn off when
WKHLQWHUQDOSDUWVDUHFRRO,WPD\VWD\RQIRUPLQXWHV
or more after the cooktop and microwave controls are
turned off.
Clock Mode
You can change clock 12/24 hrs display mode.
1. Press Settings.
2. Press Express Cook pad 1.
3. Select 12hrs/24hrs.
1 - 12 hrs
2- 24 hrs
Settings
Settings
Settings allow to change the default settings of your
OTR.
1. Press the Settings pad. “SELECT SETTING ITEM 1 -
%((3(592/80(&/2&.02'(',63/$<
212))/,*+76<1&9(17)$16<1&
6<1&$8722))RU(;,7´ZLOOVFUROODQGUHSHDW
on display.
2. Select the item to change the settings. See below
tables for detail Guide
Vent
Fan
Code
Entry
Items for setting Level Entry
1 Beeper Volume 0XWH
1 - Low
2 - Normal
3 - Loud
Default is normal
2 Clock Mode KRXUV
1 - 24 hours
Default is 12 hours
3 Display
On/Off
2II
1 - On
Default is On
4Light Sync - Selects the light level at which the
surface lights will automatically turn on when
paired range’s burner is turned on. Select “Off”
to disable this feature. Surface light will turn on
manually.
2II
1 - Low
2 - High
Default is High
59HQW)DQ6\QF6HOHFWVWKHIDQVSHHGDWZKLFK
the vent fan will automotically turn on when paired
range’s burner is turned on. Select “Off” to disable
this feature. Vent fan will turn on manually.
2II
1 - Low
2 - Medium
3 - High
4 - Boost
'HIDXOWLV2))
Sync Auto Off - When the Light/Vent fan sync
mode is enabled (ON), this will automatically turn
2))WKHOLJKWIDQZKHQWKHUDQJHEXUQHUKDVEHHQ
turned off. Select the period of time the light/fan
will remain on until the microwave automatically
turns it off.
PLQXWHV
1 - 5 mintues
PLQXWHV
3 - 15 minutes
4 - Manual
Default is 15 minutes
7 Settings Exit

49-7000118 Rev. 0
Microwave terms
Arcing Arcing is the microwave term for sparks in the
oven. Arcing is caused by:
• the metal shelf being installed incorrectly and
touching the microwave walls.
• metal or foil touching the side of the oven.
• foil that is not molded to food (upturned edges
act like antennas).
• metal such as twist-ties, poultry pins, gold-
rimmed dishes.
• recycled paper towels containing small metal
pieces.
• the turntable ring support being installed
incorrectly.
Covering Covers hold in moisture, allow for more even
heating and reduce cooking time. Venting plastic wrap or
covering with wax paper allows excess steam to escape.
Shielding In a regular oven, you shield chicken breasts
or baked foods to prevent over-browning. When
microwaving, use small strips of foil to shield thin parts,
such as the tips of wings and legs on poultry, which
would cook before larger parts.
Standing Time When you cook with regular ovens,
foods such as roasts or cakes are allowed to stand
to finish cooking or to set. Standing time is especially
important in microwave cooking. Note that a microwaved
cake is not placed on a cooling rack.
Venting After covering a dish with plastic wrap, you vent
the plastic wrap by turning back one corner so excess
steam can escape.
USING YOUR OVEN
Other Features
Chef Connect
Chef Connect
On/Off
To Pair Hold 3 Sec
Use the Chef Connect feature for connecting your microwave to a
GE range to sync your vent fan, cooktop surface lights and clock
via
Bluetooth technology.
1. You must have a Chef Connect enabled range. To pair your
microwave for the first time, initiate the Chef Connect process
on the GE range. Refer to the range owner’s manual for
instructions
2. On the microwave, hold Chef Connect button for 3 seconds.
The Bluetooth icon on the display will start flashing as the
microwave starts to search and pair with your GE Range. The
icon will remain ON after pairing successfully.
If a GE Range is not found within 2 minutes during search
mode the microwave will stop searching and the Bluetooth
icon ZLOOWXUQ2))
On initial setup, the setup protocol will start.
If the Chef Connect feature is enabled the default settings are
as follows:
- Display clock sync: ON
- Auto cooktop light: ON (HIGH setting)
$XWRYHQWIDQ2))
- Auto off: 15 minutes
3. Select 1 to sync the surface lights to your GE range. It allows
the microwave surface lights to turn on at HIGH level
automatically when the paired range’s cooktop burner turns
on.
4. Select 1 to sync the vent fan to your GE range. This allows the
microwave vent fan to turn on at LOW speed automatically
when the paired range’s cooktop burner turns on.
Pairing is now complete, the Chef Connect feature is now on.
Note: If there is no sync option selected during set up, 5
minutes after icon turns on, the units will return to stand-by
mode.
After completing the setting per above steps, your microwaves
vent fan and cooktop light will be set to turn on automatically
when the cooktop burner is turned on. The cooktop and
range clock display will be syncd to display the same time.
The vent fan and cooktop light will be set to automatically turn
off 15 minutes after the cooktop burner is turned off.
If desired, the light, fan, and auto off settings can now be
FKDQJHGXVLQJVHWWLQJVRSWLRQVDQGUHVSHFWLYHO\
Press Chef Connect once to turn off and twice to re-connect.
The icon will illuminate when on.
In the case of an unintended disconnect such as lost power to
the microwave or range the connection will remain after power
UHVXPHG)RUYHU\VKRUWSRZHULQWHUUXSWLRQVWKHSRZHUPD\
need to be reset in order to reconnect

49-7000118 Rev. 0 17
Helpful Hints
An occasional thorough wiping with a solution of baking
soda and water keeps the inside fresh.
Be sure the power is off before cleaning any part of this
oven.
How to Clean the Inside
Walls, Floor, Inside Window, Metal and Plastic Parts
on the Door
6RPHVSDWWHUVFDQEHUHPRYHGZLWKDSDSHUWRZHO
RWKHUVPD\UHTXLUHDGDPSFORWK5HPRYHJUHDV\
spatters with a sudsy cloth, then rinse with a damp cloth.
Do not use abrasive cleaners or sharp utensils on oven
walls.
Never use a commercial oven
cleaner on any part of your
microwave.
Removable Turntable and Turntable Support
To prevent breakage, do not place the turntable into
water just after cooking. Wash it carefully in warm, sudsy
water or in the dishwasher. The turntable and support
can be broken if dropped. Remember, do not operate the
oven in the microwave mode without the turntable and
support seated and in place.
How to Clean the Outside
We recommend against using cleaners with ammonia
or alcohol, as they can damage the appearance of
the microwave oven. If you choose to use a common
household cleaner, first apply the cleaner directly to a
clean cloth, then wipe the soiled area.
Case
Clean the outside of the microwave with a sudsy cloth.
Rinse and then dry. Wipe the window clean with a damp
cloth.
Control Panel
Wipe with a damp cloth.
Dry thoroughly. Do not
use cleaning sprays, large
amounts of soap and water,
abrasives or sharp objects on
the panel—they can damage
it. Some paper towels can
also scratch the control panel.
Door Panel
Before cleaning the front door panel, make sure you
know what type of panel you have. Refer to the eighth
digit of the model number. “S” is stainless steel, “L” is
CleanSteel and “B”, “W” or “C” are plastic colors.
Stainless Steel (on some models)
The stainless steel panel can be cleaned with Stainless
Steel Magic or a similar product using a clean, soft cloth.
Apply stainless cleaner carefully to avoid the surrounding
plastic parts. Do not use appliance wax, polish, bleach or
products containing chlorine on Stainless Steel finishes.
Plastic Color Panels
Use a clean, soft, lightly dampened cloth, then dry
thoroughly.
Door Seal
It’s important to keep the area clean where the door
seals against the microwave. Use only mild, non-
abrasive detergents applied with a clean sponge or soft
cloth. Rinse well.
Bottom
Clean off the grease and dust on the bottom often. Use a
solution of warm water and detergent.
Care and Cleaning
T
u
r
n
t
o
S
e
l
e
c
t
P
r
e
s
s
t
o
E
n
t
e
r
Reheat
Timer
On/Off
Defrost
Weight/Time
Start
Pause
Cancel
Off
LockControls
Hold3Sec
Cook
Time
Set
Clock
Options Help
Surface
Light VentFan
Popcorn Beverage Microwave
Express
Warm Power
Level
Auto
Cook
Combination
FastBake
Convection
Roast
Turntable
Convection
Bake
T
u
r
n
t
o
S
e
l
e
c
t
P
r
e
s
s
t
o
E
n
t
e
r
Reheat
Timer
On/Off
Defrost
Weight/Time
Start
Pause
Cancel
Off
LockControls
Hold3Sec
Cook
Time
Set
Clock
Options Help
Surface
Light VentFan
Warm Power
Level
Auto
Cook
Combination
FastBake
Convection
Roast
Turntable
Convection
Bake
CARE AND CLEANING
T
u
r
n
t
o
S
e
l
e
c
t
P
r
e
s
s
t
o
E
n
t
e
r
Reheat
Timer
On/Off
Defrost
Weight/Time
Start
Pause
Cancel
Off
LockControls
Hold3Sec
Cook
Time
Set
Clock
Options Help
Surface
Light VentFan
Popcorn Beverage
Microwave
Express
Warm Power
Level
Auto
Cook
Combination
FastBake
Convection
Roast
Turntable
Convection
Bake

18 49-7000118 Rev. 0
Cooktop Light/Nite Light
Replace with a 120 volt, 50 watt (max.) halogen bulb.
See back cover for ordering online at
GEAppliances.com.
1. To replace the cooktop light/nite light, first disconnect
the power at the main fuse or circuit breaker panel,
or pull the plug.
2. Remove the screw from the side of the light
compartment cover and lower the cover until it stops.
3. Be sure the bulb is cool before removing. Break the
adhesive seal by gently unscrewing the bulb.
4. Screw in the new bulb, then raise the light cover and
replace the screw. Connect electrical power to the
oven.
Remove screw.
Care and Cleaning
Vent Fan
The vent fan has two metal
reusable vent filters.
Models that recirculate air
back into the room also use a
charcoal filter.
Reusable Vent Filters
The metal filters trap grease released by foods on the
cooktop. They also prevent flames from foods on the
cooktop from damaging the inside of the oven.
)RUWKLVUHDVRQWKHILOWHUVPXVWDOZD\VEHLQSODFHZKHQ
the hood is used. The vent filters should be cleaned
once a month, or as needed.
Removing and Cleaning the Filters
To remove, slide them to the
rear using the tabs. Pull down
and out.
To clean the vent filters, soak
them and then swish around
in hot water and detergent.
Don’t use ammonia or ammonia products because they
will darken the metal. Light brushing can be used to
remove embedded dirt.
Rinse, shake and let dry before replacing.
To replace, slide the filters into the frame slots on the
back of each opening. Press up and to the front to lock
into place.
T
u
r
n
t
o
S
e
l
e
c
t
P
r
e
s
s
t
o
E
n
t
e
r
Reheat
Timer
On/Off
Defrost
Weight/Time
Start
Pause
Cancel
Off
LockControls
Hold3Sec
Cook
Time
Set
Clock
Options Help
Surface
Light VentFan
Popcorn Beverage Microwave
Express
Warm Power
Level
Auto
Cook
Combination
FastBake
Convection
Roast
Turntable
Convection
Bake
Reusable vent filters
(on all models).
Charcoal filter
T
u
r
n
t
o
S
e
l
e
c
t
P
r
e
s
s
t
o
E
n
t
e
r
Reheat
Timer
On/Off
Defrost
Weight/Time
Start
Pause
Cancel
Off
LockControls
Hold3Sec
Cook
Time
Set
Clock
Options Help
Surface
Light VentFan
Popcorn
B
everage
Microwave
Express
Warm Power
Level
Auto
Cook
Combination
FastBake
Convection
Roast
Turntable
Convection
Bake
CARE AND CLEANING
Replacing the Oven Cavity Lamp
1. Disconnect power at the main fuse or circuit breaker
panel.
2. Remove the top grill by removing the two screws that
hold it in place.
3. Remove charcoal filter if present. NOTE: Charcoal
filter is an optional kit, you may not have one.
4. Press the retainer holding the lamp shield in place.
5. Pull the lamp shield out. Unscrew the light bulb out
DQGUHSODFHZLWKWKH99:LQFDQGHVFHQW
bulb. See back cover for ordering online at
geappliances.com
5HWXUQWKHODPSDQGODPSVKLHOGWRRULJLQDOSRVLWLRQ
and replace charcoal filter.
7. Replace the grill and 2 screws. Reconnect power to
the oven.

49-7000118 Rev. 0 19
Care and Cleaning
CARE AND CLEANING / TROUBLESHOOTING
Charcoal Filter
The charcoal filter cannot be cleaned. It must be
replaced. See back cover for ordering online at
GEAppliances.com.
If the model is not vented to the outside, the air will be
recirculated through a disposable charcoal filter that
helps remove smoke and odors.
The charcoal filter should be replaced when it is
QRWLFHDEO\GLUW\RUGLVFRORUHGXVXDOO\DIWHUWR
months, depending on usage). See Optional Kits page
22, for more information.
CHARCOAL FILTER REPLACEMENT
1. Unplug the microwave oven.
2. Remove the vent grille mounting screws.
3. Tip the grille forward, then lift out to remove.
4. Remove the charcoal filter.
5. Slide a new charcoal filter into place.
Slide the bottom of the vent grille into place.
Push the top until is snaps into place.
Replace the mounting screws
7. Plug in the microwave oven.
Troubleshooting Tips
Problem Possible Cause What To Do
Oven will not start A fuse in your home may be blown or the circuit breaker tripped. • Replace fuse or reset circuit breaker.
Power surge. • Unplug the microwave oven, then plug it
back in.
Plug not fully inserted into wall outlet • Make sure the 3-prong plug on the oven is
fully inserted into wall outlet.
Door not securely closed. • Open the door and close securely.
Control panel lighted, yet
oven will not start
Door not securely closed. • Open the door and close securely.
START/PAUSE button not pressed after entering cooking selection. • Press START/PAUSE.
$QRWKHUVHOHFWLRQHQWHUHGDOUHDG\LQRYHQDQG&$1&(/2))EXWWRQ
not pressed to cancel it.
3UHVV&$1&(/2))
&RRNLQJWLPHQRWHQWHUHGDIWHUSUHVVLQJ&22.7,0( • Make sure you have entered cooking time
DIWHUSUHVVLQJ&22.7,0(
&$1&(/2))ZDVSUHVVHGDFFLGHQWDOO\ • Reset cooking program and press START/
PAUSE.
CONTROL LOCKED
appears on display
The control has been locked. 3UHVVDQGKROG/2&.&21752/IRUDERXW
3 seconds to unlock the control.
Floor of the oven is warm
even when the oven has
not been used
The cooktop light is located below the oven floor. When light is on,
the heat it produces may make the oven floor get warm.
• This is normal.
You hear an unusual low-
tone beep
You have tried to change the power level when it is not allowed • Many of the oven’s features are preset and
cannot be changed.
Vent fan comes on
automatically
The vent fan automatically turns on to protect the microwave if it
senses too much heat rising from the cooktop below.
• This is normal.
Bluetooth
connection not paired
Power interruption may disrupt bluetooth connection 7U\WRUHFRQQHFWE\LQLWLDWLQJWKH&+()
CONNECT process on the GE Appliances
5DQJHWKHQKROGLQJWKH&+()&211(&7
button for 3 seconds on the
microwave. This will restart the pairing
process. If this does not work, unplug unit
or reset the circuit breaker to reset the
control.

49-7000118 Rev. 0
Troubleshooting Tips
Things That Are Normal With Your Microwave Oven
Steam or vapor escaping from around the door.
Light reflection around door or outer case.
Dimming oven light and change in the blower sound at
power levels other than high.
Dull thumping sound while oven is operating.
TROUBLESHOOTING TIPS
FEDERAL COMMUNICATIONS COMMISSION RADIO FREQUENCY
INTERFERENCE STATEMENT (U.S.A. ONLY)
7KLVHTXLSPHQWJHQHUDWHVDQGXVHV,60IUHTXHQF\HQHUJ\
and if not installed and used properly, that is in strict
accordance with the manufacturer’s instructions, may
cause interference to radio and television reception. It has
been type tested and found to comply with limits for ISM
(TXLSPHQWSXUVXDQWWRSDUWRI)&&5XOHVZKLFKDUH
GHVLJQHGWRSDUWRI)&&5XOHVZKLFKDUHGHVLJQHGWR
provide residential installation.
However, there is no guarantee that interference will not
RFFXULQDSDUWLFXODULQVWDOODWLRQ,IWKLVHTXLSPHQWGRHV
cause interference to radio or television reception, which
FDQEHGHWHUPLQHGE\WXUQLQJWKHHTXLSPHQWRIIDQGRQWKH
user is encouraged to try to correct the interference by one
or more of the following:
Ŷ5HRULHQWWKHUHFHLYLQJDQWHQQDRIWKHUDGLRRUWHOHYLVLRQ
Ŷ5HORFDWHWKH0LFURZDYH2YHQZLWKUHVSHFWWRWKH
receiver.
Ŷ0RYHWKHPLFURZDYHRYHQDZD\IURPWKHUHFHLYHU
Ŷ3OXJWKHPLFURZDYHRYHQLQWRDGLIIHUHQWRXWOHWVRWKDW
the microwave oven and the receiver are on different
branch codes.
The manufacturer is not responsible for any radio of TV
interference caused by unauthorized modification to this
microwave oven. It is the responsibility of the user to
correct such interference.
7KLVHTXLSPHQWKDVEHHQWHVWHGDQGIRXQGWRFRPSO\ZLWK
the limits for a Class B digital device, pursuant to part 15
RIWKH)&&5XOHV7KHVHOLPLWVDUHGHVLJQHGWRSURYLGH
reasonable protection against harmful interference in a
UHVLGHQWLDOLQVWDOODWLRQ7KLVHTXLSPHQWJHQHUDWHVXVHV
DQGFDQUDGLDWHUDGLRIUHTXHQF\HQHUJ\DQGLIQRWLQVWDOOHG
and used in accordance with the instructions, may cause
harmful interference to radio communications. However,
there is no guarantee that interference will not occur in a
SDUWLFXODULQVWDOODWLRQ,IWKLVHTXLSPHQWGRHVFDXVHKDUPIXO
interference to radio or television reception, which can be
GHWHUPLQHGE\WXUQLQJWKHHTXLSPHQWRIIDQGRQWKHXVHU
is encouraged to try to correct the interference by one or
more of the following measures:
Ŷ5HRULHQWRUUHORFDWHWKHUHFHLYLQJDQWHQQD
Ŷ,QFUHDVHWKHVHSDUDWLRQEHWZHHQWKHHTXLSPHQWDQG
receiver.
Ŷ&RQQHFWWKHHTXLSPHQWLQWRDQRXWOHWRQDFLUFXLW
different from that to which the receiver is connected.
Ŷ&RQVXOWWKHGHDOHURUDQH[SHULHQFHGUDGLR79
technician for help.
7RVDWLVI\)&&5)H[SRVXUHUHTXLUHPHQWVDVHSDUDWLRQ
GLVWDQFHRIFPRUPRUHVKRXOGEHPDLQWDLQHGEHWZHHQ
the antenna of this device and persons during device
operation.
To ensure compliance, operations at closer than this
distance is not recommended.
WARNING Any changes or modifications to this unit
not expressly approved by the party
responsible for compliance could void the user’s authority
WRRSHUDWHWKHHTXLSPHQW
Other manuals for Profile PVM9005 Series
1
Table of contents
Languages:
Other GE Microwave Oven manuals

GE
GE JES1145D User manual

GE
GE Spacemaker 164 D2092P127 User manual

GE
GE Appliances PEB1590 User manual

GE
GE JE1240L Use and care manual

GE
GE JX2127SH User manual

GE
GE JES1039BJ User manual

GE
GE JVM6175 User manual

GE
GE JVM2052 User manual

GE
GE JEB1860SMSS - Countertop Microwave Oven Manual

GE
GE JES0738DP Manual

GE
GE Spacemaker JVM150J User manual

GE
GE LVM1750SPSS User manual

GE
GE JE1160 User manual

GE
GE JE1350 User manual

GE
GE JES1634 User manual

GE
GE JVM1540 OTR User manual

GE
GE Spacemaker XL JVM1850 User manual

GE
GE PT7800DH2BB User manual

GE
GE JEM31BF - Spacemaker II Microwave Oven User manual

GE
GE PEB159C User manual