manuals.online logo
Brands
  1. Home
  2. •
  3. Brands
  4. •
  5. GE
  6. •
  7. Microwave Oven
  8. •
  9. GE JE1445G Installation instructions

GE JE1445G Installation instructions

Other GE Microwave Oven manuals

GE JES737 User manual

GE

GE JES737 User manual

GE Spacemaker JNM1541SPSS User manual

GE

GE Spacemaker JNM1541SPSS User manual

GE JES1344 User manual

GE

GE JES1344 User manual

GE JE1340 Use and care manual

GE

GE JE1340 Use and care manual

GE JE1237T Use and care manual

GE

GE JE1237T Use and care manual

GE SpacemakerXL JVM1320 User manual

GE

GE SpacemakerXL JVM1320 User manual

GE Spacemaker JVM1650 User manual

GE

GE Spacemaker JVM1650 User manual

GE JEM25 User manual

GE

GE JEM25 User manual

GE JX9152 User manual

GE

GE JX9152 User manual

GE WES1130 User manual

GE

GE WES1130 User manual

GE Spacemaker 350A4502P648 User manual

GE

GE Spacemaker 350A4502P648 User manual

GE JVM7195 User manual

GE

GE JVM7195 User manual

GE RVM1535DM User manual

GE

GE RVM1535DM User manual

GE JES0734PMRR User manual

GE

GE JES0734PMRR User manual

GE JES1033 User manual

GE

GE JES1033 User manual

GE JVM1431 User manual

GE

GE JVM1431 User manual

GE JVM7195 User manual

GE

GE JVM7195 User manual

GE 164D3370P211 User manual

GE

GE 164D3370P211 User manual

GE JE1160WD User manual

GE

GE JE1160WD User manual

GE 49-4562 User manual

GE

GE 49-4562 User manual

GE Advantium SCA1000 How to use

GE

GE Advantium SCA1000 How to use

GE JX827 User manual

GE

GE JX827 User manual

GE JKP90 User manual

GE

GE JKP90 User manual

GE JE1640 User manual

GE

GE JE1640 User manual

Popular Microwave Oven manuals by other brands

Sharp R-390D manual

Sharp

Sharp R-390D manual

PROFILO MD1000 instruction manual

PROFILO

PROFILO MD1000 instruction manual

Candy MIC 201 EX User instructions

Candy

Candy MIC 201 EX User instructions

PITSOS GMW3101B user manual

PITSOS

PITSOS GMW3101B user manual

Sears 5648744780 Use & care manual

Sears

Sears 5648744780 Use & care manual

BOMANN CB 1272 Instruction manual & guarantee

BOMANN

BOMANN CB 1272 Instruction manual & guarantee

Conrad Electronic 2372935 operating instructions

Conrad Electronic

Conrad Electronic 2372935 operating instructions

DAEWOO ELECTRONICS KOR-6L8K5S83 Operating instructions & cook book

DAEWOO ELECTRONICS

DAEWOO ELECTRONICS KOR-6L8K5S83 Operating instructions & cook book

DAEWOO ELECTRONICS KOR-1N5A9S Operating instructions & cook book

DAEWOO ELECTRONICS

DAEWOO ELECTRONICS KOR-1N5A9S Operating instructions & cook book

Daewoo KQG-6617G Operating instructions & cook book

Daewoo

Daewoo KQG-6617G Operating instructions & cook book

Samsung M1779 Owner's instructions

Samsung

Samsung M1779 Owner's instructions

Miele H6200BM(TB) Operating and installation instructions

Miele

Miele H6200BM(TB) Operating and installation instructions

Jocel JMO011480 instruction manual

Jocel

Jocel JMO011480 instruction manual

Sharp R-752M Operation manual with cookbook

Sharp

Sharp R-752M Operation manual with cookbook

Electrolux EVL8E00X user manual

Electrolux

Electrolux EVL8E00X user manual

STOVES Q900GRF DO User, installation & servicing instructions

STOVES

STOVES Q900GRF DO User, installation & servicing instructions

Daewoo KOR-6L0B3S Operating instructions & cook book

Daewoo

Daewoo KOR-6L0B3S Operating instructions & cook book

KitchenAid KCMS1555 Use and care guide

KitchenAid

KitchenAid KCMS1555 Use and care guide

manuals.online logo
manuals.online logoBrands
  • About & Mission
  • Contact us
  • Privacy Policy
  • Terms and Conditions

Copyright 2025 Manuals.Online. All Rights Reserved.

Howtoget
thebestfromYow
MicrowaveOVen
Contents
Adapter Plugs 13
Appliance Registration 2
Care &Cleaning 14
Control Panel 6
Cook ‘N Watch 8
Cooking Cm@ete %m~nder 5
Defrosting 12
Double Duty Shelf 4,5, 10, 11, 14
Extension Cords 13
Features ‘5
Grounding Instructions 13
Hold Time 7
Light Bulb Replacement ‘14
Microwaving Tips 2
Minute/Second Timer 7
Model and Serial Numbers 2
Precautions 3
Problem Solver 15
Program Cooking 6
ReDair Service 15
Safety Instructions 3,4
Temmxa~m Cook 9
Temperature Probe 5,6,9, 14
Time Cook 8
Warranty Back Cover
UseandCareof
model
JE1445G
The electric output
ofthis microwaveoven
ismwatts.
—
m
~
YourDirect Line to General Electric
The GE Answer Cend 800.626.2~
GE NERALO ELECTRIC
Help us help you...
Before using your oven,
read this book carefully.
It is intended to help you operate
and maintain your new microwave
oven properly.
Keep it handy for answers to your
questions.
If you don’t understand something
or need more help, write (include
your phone number):
Consumer Affairs
General Electric Company
Appliance Park
Louisville, KY 40225
Write down the model
and serial numbers.
You’ll find them on alabel inside
the oven.
These numbers are also on the
Consumer Product Ownership
Registration Card that came with
your microwave oven. Before
sending in this card, please write
these numbers here:
Model Number
Serial Number
Use these numbers in any
correspondence or service calls
concerning your microwave oven.
Be sure your microwave
oven is registered.
It is important that we know the
location of your microwave oven
should aneed occur for adjustments.
Your supplier is responsible for
registering you as the owner.
Please check with your supplier to
be sure he has done so; also send in
your Consumer Product Ownership
Registration Card. If you move, or
if you are not the original purchaser
please write to us, stating model
and serial numbers. This appliance
must be registered. Please be certain
that it is.
Write to:
General Electric Company
Range Product Service
Appliance Park
Louisville, KY40225
If you received a
damaged oven...
Immediately contact the dealer (or
builder) that sold you the oven.
Save time and money.
Before you request service ...
check the Problem Solver on page 15.
It lists causes of minor operating
problems that you can correct yourself.
Optional Accessories
Available at extra cost from your
General Electric supplier.
JX15G Installation Kit converts
this oven to abuilt-in wall oven.
All These Things Are Normal with Your Microwave Oven:
●Steam or vapor escaping from ●Dull thumping sound while
around the door. oven is operating.
●Light reflection around door or sSome TV-Radio interference
outer case. might be noticed while using your
●Dimming oven light and change microwave oven. It’s similar to the
in blower sound may occur while interference caused by other small
operating at power levels other appliances and does not indicate a
than high. problem with your oven.
Microwaving Tips
●Make sure all cookware used n
your microwave oven is suitable for
microwaving. Most glass casseroles,
cooking dishes, measuring cups,
custard cups, pottery or china
dinnerware which does not have
metallic trim or glaze with ametallic
sheen can be used. Some cookware
is labeled “suitable for rnicrowaving~’
If you are unsure, use this dish test:
Measure 1cup water in aglass cup.
Place in oven on or beside dish.
Microwave 1-1%minutes at HIGH. If
water becomes hot, dish is microwave
safe. If dish heats, it should not be
used for microwaving.
●Paper towels, wax paper, and
plastic wrap can be used to cover
dishes in order to retain moisture
and prevent spattering.
●Some microwaved foods require
stirring, rotating, or rearranging.
Check your cookbook.
●Steam builds up pressure in foods
which are tightly covered by askin
or membrane. Pierce potatoes, egg
yolks and chicken livers to prevent
bursting.
2
PRECAUTIONS
TO AVOID
POSSIBLE
EXPOSURE TO
EXCESSIVE
MICROWA~
ENERGY
(a) Do Not Attempt to operate this
oven with the door open since
open door operation can result in
harmful exposure to microwave
energy. It is important not to
defeat or tamper with the safety
interlocks.
(b) Do Not Place any object
between the oven front face and
the door or allow soil or cleaner
residue to accumulate on sealing
surfaces.
(c) Do Not Operate the oven
if it is damaged. It is particularly
important that the oven door close
properly and that there is no
damage to the:
(1) door (bent)
(2) hinges and latches (broken or
loosened)
(3) door seals and sealing surfaces.
(d) The Oven Should Not be
adjusted or repaired by anyone
except properly qualified service
personnel.
IMPORTANT
SAFETY INSTRUCTIONS
Read all instructions before using this appliance.
When using electrical appliances
basic safetyprecautions shouldbe
followed,including the following:
WARNING-To reduce
the risk of bums, electric shock,
fire, injury to personsor exposure
to excessivemicrowaveenergy:
●Usethis appliance only for its
intended use as described in this
manual.
●Readand followthe specific
“PRECAUTIONSTO AVOID
POSSIBLEEXPOSURE TO
EXCESSIVEMICROWAVE
ENERGY” at I&.
●This appliance must be grounded.
Connectonlytoproperlygrounded
outlet. See “GROUNDING
INSTRUCTIONS”on page 13.
cFor best operation, plug this
appliance into its own electrical
outlet, to preventflickering of
lights, blowingof fise or tripping
of circuit breaker.
●Install or locate this appliance
only in accordance with the
provided installation instructions.
.Be certiin to place the front
surfaceofthe doorthreeinchesor
more back from the countertop
edge to avoid accidental tipping
ofthe appliance in normal usage.
●Do not cover or block any
openingson the appliance.
●Do not use outdoors.
●Do not immerse power cord or
plug in water.
cKeeppowercord awayfrom
heated surfaces.
cDo not let powercord hang over
edgeoftable or counter.
●Do not operate this appliance
if it has adamaged power cord or
plug, if it is not working properly,
or if it has been damaged or
dropped.
●See door surface cleaning
instructions on page 14.
●This appliance should be
serviced only by qualified service
personnel. Contact nearest
authorized service facility for
examination,repair or adjustment.
●As with any appliance, close
supervision is necessary when
used by children.
—.... -
●To reduce the risk of fire in
the oven cavity:
–Do not overcookfood. Carefully
attend appliance if paper, plastic,
or other combustible materials are
placed inside the ovento facilitate
cooking.
—Removewire twist-ties from
paper or plastic bags before
placing bag in oven.
—Donot use your microwave
ovento dry newspapers.
–Paper towels, napkins and
wax paper. Recycledpaper
products can contain metal flecks
which may cause arcing or ignite.
Paper products containing nylon
or nylon filaments should be
avoided, as they may also ignite.
–Do not operate the oven while
empty to avoid damage to the
oven and the danger of fire. If
by accident the ovenshould run
empty aminute or two, no harm
isdone. However,try to avoid
operating the ovenempty at all
times—it savesenergy and
prolongs the life ofthe oven.
3
IMPORTANT SAFETY INSTRUCTIONS(continued)
—Donot pop popcorn in your
microwaveovenunlessin aspecial
microwavepopcorn accessory or
unlessyouuse popcornlabeledfor
use in microwaveovens.
–Do not overcook potatoes.
They could dehydrate and catch
fire, causingdamageto your oven.
–If materials inside ovenshould
ignite,keep ovendoor closed,
turn ovenoff, and disconnect
power cord, or shut offpower at
fuse or circuit breaker panel.
cSome products such as whole
eggs and sealed containers-for
example, closed glassjars—may
explode and should not be heated
in this oven.
●Avoidheating baby f~d in
glassjars, even without their lids;
especially meat and eggmixtures.
cDon’t defrost frozen beverages
innarrowneckedbottles(especially
carbonatedbeverages).Even if the
container is opened, pressure
can build up. This can cause the
container to burst, resulting in
injury.
●Use metal only as directed in
-—-—..
Coom-wk. —
TV dinners maybe microwaved
in foil traysless than 3/4”high;
removetop foil coverand return
tray to box. When usingmetal in
the microwaveoven, keep metal
(other than metal shelf) at least
1inch away from sides of oven.
●Cmting utensilsmaybecome
hot because of heat transferred
from the heated food. Potholders
maybe needed to handle the
utensil.
●Sometimes, the oven floor can
become too hot to touch. Be
careful when touching the floor
during and after cooking.
.FindsCookedinliquids(such
as pasta) may tend to boil over
morerapidlythan fbodscontaining
less moisture. Should this occur,
referto page 14forinstructionson
howtocleanthe insideofthe oven.
●Thermometer—Do not
use athermometer in foodyou
are microwavingunless the
thermometer is designed or
recommended for use in the
microwaveoven.
●Removethe temperature probe
horn the ovenwhen not in use. If
youleavethe probe insidetheoven
withoutinsertingitinfoodorliquid,
and turn on microwaveenergy,it
can create electrical arcing in the
ovenand damage ovenwalls.
●Plastic utensils-Plastic utensils
designed for microwavecooking
are very useful, but should be .
used carefully. Even microwave
plastic may not be as tolerant of
overcookingconditionsasam glass
or ceramic materials and may
softenor char if subjected to short
periods ofovercooking. In longer
exposure to overcooking,the f~
and utensils could ignite. For
these re~sons: 1)Use microwave
plasticsonlyand use them in strict
compliance with the utensil
manufiicturer’srecommendations.
2) Do not subjectempty utensilsto
microwaving.3) Do not permit
children to use plastic utensils
without complete supervision.
●When cooking pork follow
our directions exactly and always
cook the meat to an internal
temperature of at least 170”F.This
assures that, in the remote
possibility that trichina maybe
present in the meat, it will be
killed and meat willbe safeto eat.
●Boiling eggs is not
recommended inamicrowave
oven.Pressure can build up
inside the egg yolkand maycause
it to burst, resulting in injury.
sFoods with unbroken outer
“skin” such as potatoes, sausages,
tomatoes, apples, chicken livers
and other giblets, and eggyolks
(see previous caution) should be
pierced to allow steam to escape
during cooking.
●%oilat)le” cooking pouches
and tightly closed plastic bags
shouldbe slit, pierced or vented
as directed in cookbook. If they
are not, plastic could burst during
or immediately after cooking,
possibly resulting in injury. Also,
plasticstoragecontainersshouldbe
at leastpartiallyuncoveredbecause
they form atight seal. When
cooking with containers tightly
coveredwithplastic wrap, remove
coveringcarefidlyand direct steam
awayfrom hands and face.
.Spontimus boiling—Under
certain special circumstances,
liquids may start to boil during or
shortly after removal from the
microwaveoven. Toprevent burns
from splashing liquid, stir the
liquid briefly before removingthe
containerfromthemicrowaveoven.
.Use of the DOUBLE DUTYTM
shelf accessory.
—Removethe shelf from oven
when not in use.
–Do not store or cook with shelf
on floor ofoven. Product damage
mayresult.
–Use pot holders when handling
the shelf and utensils. They may
be hot.
—Donot use microwavebrowning
dish on shelf. The shelf could
overheat.
–Be sure that the shelf is
positioned properly inside the
ovento prevent product damage
(see page 10).
SAVETHESE
INSTRUCTIONS
4
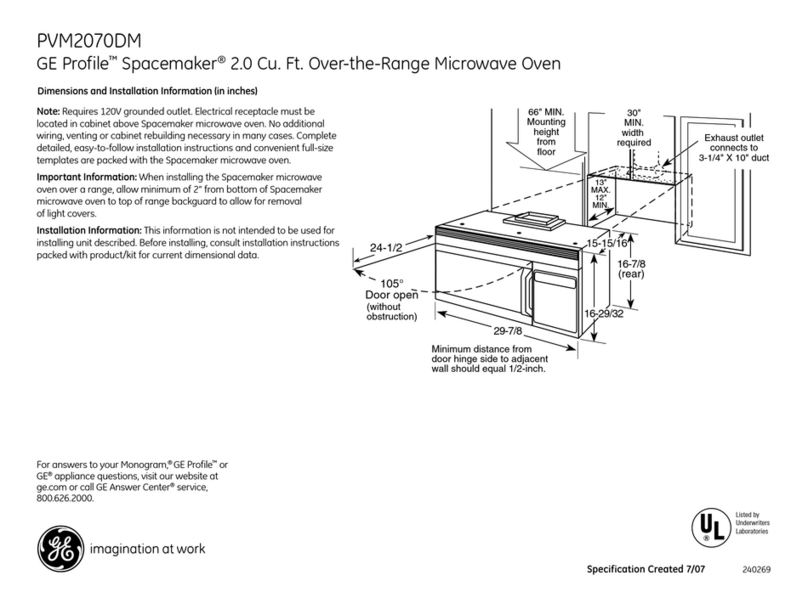
Features of YourOven
Cooking Complete Reminder
(For COOK ‘NWATCH, TIME COOK
and DEFROST cycles)
To remind you that you have food in the
oven, the oven will beep once aminute
until you either open the oven door or
touch the CLEAR/OFF pad.
I--T=-d;:, .
diu
,’ 4—1
u
::
..
:.
:.
:,
YJ
d!
I
1/ ‘lo
1. Door Handle. Pull to open door.
Door must be securely latched for
oven to operate.
2. Door Latches.
3. Viewing Window with Metal
Shield. Metal screen permits
viewing of foods and keeps
microwaves confined inside oven.
4. Oven Vent.
5. Model and Serial Numbers.
6. Oven Interior Light. Turns on
when the door is opened or when
the oven is operating.
7. MICROTHERMOMETERT”
Temperature Probe. Use with
TEMP COOK/HOLD function
only.
8. Receptacle for Temperature
Probe. Temperature probe must be
securely inserted into receptacle
when using TEMP COOK/HOLD.
9. DOUBLE-DUTYT” Shelf.
Lets you microwave several foods
at once. (See Safety Instructions
and pages 10and 11for special
instructions. )When this shelf is not
in use. please remove from the oven.
10. Touch Control Panel and
Display. See next page for
instructions.
5
YourTouch Control Panel
The Touch Control Panel allows
you to set the oven controls
electronically with the touch
of afinger. It’s designed to be
easy to use and understand.
1. DISPLAY. Displays time of da~
time or temperature during cookin
functions, power level being used,
cooking mode and instructions.
2. TIME COOK I&11.
Microwave for apreset amount of
time using automatic Power Level
10(or change power level after
entering cooking time. See page 8.
3. MIN/SEC TIMER. This
feature uses no microwave energy.
Itfunctions as either akitchen
timer, as aholding period after
defrost or as adelay timer before
time or temperature cooking. (See
page 7.)
4. NUMBER PADS. Touch these
pads to enter cooking, defrosting
time. time of day, temperature or
power level.
5. POWER LEVEL. Touch this
pad before entering another power
ievel number if you want to change
from automatic Power Level 10
(HIGH) for cooking or Power
Level 3(LOW) for defrosting.
,.AUTO STARR /1’hWsSJfUUtO
program your oven to begin- cookin
tit apreset time of day—up to a
12-hour delay. (See page 9.)
7. MIN. Use with number pads to
enter whole minutes. For example
for 4minutes touch 4and MIN.
e- -0.
-0I
-@
--@
8. MANUAL DEFROST. Gentle
thawing at automatic Power Level 3
(LOW). (If desired, you may
change power level after entering
defrosting time. See page 12.)
9. TEMP COOK/HOLD. Use the
temperature probe to cook by using
apreset temperature. Once oven
reaches preset temperature, it
switches to HOLD setting and
maintains that temperature until
you touch the CLEAR/OFF pad.
(See page 9.)
10. CLOCK. Touch this pad to
enter time of day or check time
of day while microwaving. To set
clock, first touch CLOCK pad and
then enter time of day. For example,
if time is 1:30, touch number pads
1, 3and Oand 1:30 will appear in
display. Then touch START pad. To
reset or change time, simply repeat
above process.
11. COOK ‘N WATCH. Use this
pad for short term cooking. The
oven automatically turns off after
3minutes. (See page 8.)
12. CLEAR/OFF. When touched,
it shuts off the oven and erases all
settings (except time of day).
13. START. After all selections are
made, touch this pad to start the oven.
—-...- -=----- .. -----
“PROBE” Appears
On Display:
●Probe has been forgotten when
TEMP COOK/HOLD function
is being used.
QProbe is not securely seated in
oven wall receptacle.
Program Cooking
Use your Touch Control Panel to
Temp Cook/Hold using your choice
of temperature, Manual Defrost,
Time Cook and Cook ‘N Watch
using your choice of power levels
from 1(lowest) to 10(highest),
time kitchen tasks with the
Min/Sec Timer, and set the clock.
Create your own programs to suit
your individual cooking style. For
example: use the Min/Sec Timer to
delay the start of Temp Cook/Hold
or Time Cook I&II, or program
ahold time between Defrost and
Time Cook I&II. (See page 7.)
Set Time Cook I&II for atwo-stage
program using different times and
power levels. (See page 8.)
How to Use the Minute/Second Timer
The MIN/SEC TIMER has three
timing functions:
cIt operates as aminute timer.
●It can be set to delay cooking.
●It can be used as ahold setting
after defrosting.
The MIN/SEC TIMER operates
without microwave energy.
How to Time a3-Minute
Phone CaU
1. Touch MIN/SEC TIMER pad.
The display shows :0 and “ENTER
TIME” flashes.
2. Touch number pads 3and MIN
(for 3minutes and no seconds).
Display shows 3:00 and “TIME:’
3. ThJch START Display shows .
.. . time counting down.
4. When time is up, oven signals,
flashes “End~’ and display shows
time of day.
Programming aHOLD
TIME
The Minute/Second Timer can also
be used to program “hold time”
between microwave cooking
functions. The time can range from
one second to 99 minutes and 99
seconds. AHOLD, or “standing”
time may be found in some of your
own recipes or cookbook.
Programming Delayed
Cooking
To delay cooking up to 99 minutes
and 99 seconds, touch TIME COOK
I&II or TEMP COOK/HOLD and
enter cook time or temp. Touch
MIN/SEC TIMER and enter
number of minutes to delay cooking.
Touch START. Timer will count
down to zero and cooking will
begin. When delaying temperature
cooking, be sure probe is in food
before pressing START.
How to Defrost, Hold and
Time Cook
Let’s say you want to defrost afrozen
casserole for 15minutes, hold for
10minutes and then Time Cook for
25 minutes. Here’s how to do it:
Step 1: Take casserole from freezer
and place in oven.
Step2:Touch MANUAL DEFROST.
The display shows :0 and
“POWER 37 “ENTER DEF
TIME” flashes. ----
Step 3: Touch pads 1,5, and MIN
for 15minutes defrosting time. 15:00
appears on display. (Defrosting is
automatically set on power level 3
but can be changed by touching the
POWER LEVEL pad and the
desired power level,)
Step 4: Set standing or hold time
by touching MIN/SEC TIMER.
The display shows :0 and “ENTER
TIME” flashes.
Step 5: Touch 1,0 and MIN to hold
for ten minutes. 10:00 appears on
display and “TIME” flashes.
Step 6: Touch TIME COOK I&11
pad. The display shows :0 and
“POWER 10~’““ENTER COOK
TIME” flashes,
7
Step ‘ZTouch 2, 5and MIN for
twenty-five minutes of cooking time.
“COOK TIME” flashes and 25:00
and “POWER 10” appear on display.
Step8: Touch START. “DEF TIME”’
and 15:00 counting down show
on display. As each function is
automatically performed oven
display shows instructions entered
and the function.
Step 9: When time is up, the oven
signals and flashes “End~’
.. . ... - - - - .“=-.-= -.-
Questions and Answers ‘“
Q. What will happen if I
accidentally reverse my defrost.
hold and cook instructions?
A. The oven will automatically
rearrange your program. Defrost ing
will always come first, then hold.
and then the cooking function.
Q. Can Idefrost and hold onlv?
.
A. Yes. Sometimes you may only
want to defrost afood, hold it. and
cook it later. All you need to do is
program in Defrost and amount of
time. Then program Hold and the
amount of time. Be sure to put the
thawed dish in the refrigerator
promptly.
NOTE: Let foods remain at room
temperature only as long as safe.
Times will vary.
Q. Iprogrammed my oven for a
specific defrosting time but it
defrosted longer than necessary.
What happened?
A. When instructions conflict.
the oven carries out the last
instruction. You may have set the
oven to Defrost for 4minutes.
Hold/Time for 2minutes. and then
Defrost for 6minutes. In this case.
the oven would Defrost for 6minutes
and Hold/Time for 2minutes.
Cooking byTime
TIME COOK I&II allows you
to microwave for apreset amount
of time using automatic power
level 10 (HIGH), or change power
level automatically.
Power level 10(HIGH) is
recommended for most cooking,
but you may change this for more
flexibility. See your cookbook.
To become better acquainted with
time cooking, make acup of coffee
by following the steps below,
Step 1: Fill acup 2/3 full of
water and add 1teaspoon of instant
coffee and stir to dissolve. Use a
cup that has no metal decoration
and is microwave safe (refer to
Microwaving Tips on page 2).
Place cup in oven and close door.
Step 2: Touch TIME COOK I&II
pad. Display shows :0 and “PO~R
10? “ENTER COOK TIME” flashes.
Step 3: Select your time. Touch
1and MIN pad for one minute.
Display shows 1:00 and “POWER
10~’“COOK TIME” flashes.
If another power level is desired,
touch POWER LEVEL pad and
desired number, although Power
Level 10(HIGH) is preferred for
this cup of coffee.
Step 4: Touch START. “COOK
TIME:’ “POWER 10~’and time
counting down show on display.
Step 5: When time is up, the oven
signals and flashes “End~’ Oven,
light and fan shut off.
Step 6: Open the door.
Using the Time Cook II
Feature
With the Time Cook 11feature, you
can set two time cooking functions
within one program. This would
be ideal if you desired to change
power levels during your cooking
operations.
The following is an example of how
to change power levels using Time
Cook II.
Step 1: Repeat Steps 1,2 and 3.
Step 2: Touch TIME COOK I&II.
Step 3: Set your time.
Step 4: To change the power level,
touch POWER LEVEL pad and
-dckxi ntmbcr fur tie-wpowdevel.
Step 5: Touch START.
Step 6: “POWER 10” is displayed
and “COOK TIME I“ counts down.
Step ZAt the end of “COOK
TIME I“ the next selected power
level is displayed and “COOK
TIME II” is shown counting down.
Step 8: When time is up, the oven
signals and flashes “End~’ The
oven, light and fan shut off.
Step 9: Open the door.
Cook ‘N Watch
The Cook ‘N Watch feature is a
short-term cooking program which
automatically turns the oven off
after 3minutes. It’s ideal for
melting cheese on food or other
quick cooking operations where
you want to stop cooking at just
the right time.
To Use Cook ‘N Watch
Step 1: Touch COOK ‘N WATCH.
“COOK ‘N WATCH” and
“POWER 10” are displayed
and “START” flashes.
Step 2: Touch START. “COOK ‘N
WATCH” and time counting up to
3minutes are displayed. Power
level 10is automatically set in
oven but another power level can
be selected.
Step 3: Open the door or touch the
CLEAR/OFF pad to stop cooking.
The oven will automatically signal,
flash “End” and shut off at the end
of 3minutes.
Questions and Answers
Q. Iset my oven for the time
called for in the recipe, but at the
end of the time allowed, my food
wasn’t done. What happened?
A. Since house power varies due
to time or location many Time
Cook recipes give you atime range
to prevent overcooking. Set the
oven for minimum time, test the
food for doneness, and cook your
food alittle longer, if necessary.
Q. Itouched the number pads
and selected my power level. When
-1 tGuthed sTAxT;however, my “ “
oven didn’t come on. Why not?
A. The TIME COOK I&II pad
must be touched before setting the
number pads or else your oven will
not begin cooking.
Q. Iwant to cook on apower
level other than HIGH. What do
Ineed to do?
A. To change the power level,
touch the POWER LEVEL pad.
“ENTER POWER’ flashes on the
display panel. Enter new number.
Q. Can Iinterrupt my Time
Cook function to check the food?
A. Yes. To resume cooking,
simply close the door and press
the START pad. The timer must be
reset for cooking to resume unless
time is remaining on timer. .
8
Cooking byTemperature
.-
Internal temperature is the best
test of doneness for many foods.
Use TEMP COOK/HOLD to
cook a variety of foods to the
desired finished food temperature.
The TIME COOK I&II setting
is recommended for battem,
doughs, frozen foods and foods
which are diftlcult to cook
precisely with the probe.
“TEMP COOK/HOLD” takes the
guesswork out of cooking because
the oven automatically switches
to “Hold” setting afier reaching
the preset food temperature and
maintains that temperature for up to
one hour or until you touch the
CLEAR/OFF pad.
Note: Oven automatically switches
to “Hold-when preset &“od-“
temperature is reached.
The Temperature Probe
.-—.
SENSOR HANDLE
TWO POSITION CABLE
CLIP END
The temperature probe is afood
thermometer that gauges the
internal temperature of the food; it
must be used when using “TEMP
COOK/HOLDV Atwo position
clip attaches to the side of adish to
help keep the probe in position
when temperature cooking foods
such as chili or soup. To use the
probe properly, follow directions
below.
Place tender beef roasts (up to 3lbs.)
on trivet in microwave-safe dish.
Insert probe into the center meaty
area not touching bone or fat. Make
sure the handle does not touch the
food or top or sides of the oven.
Cover with wax paper.
Poultry, pork or ham roasts need no
trivet. Add 1/2 cup water to roast
dish. cover with wax paper. Insert
probe into center meaty area.
rf
Step 6: When 125”F. is reached, the
oven will sound and display “HOLD:’
The oven will then hold the
temperature.
Step 1Touch the CLEAR/OFF
pad to stop the cycle.
Step 8: Remove probe and food
from the oven.
cookingTips
●Use alower power level: it will
heat more evenly even though
requiring more time.
.Be sure frozen food has been
completely defrosted before inserting
probe. Probe may break off if used
in frozen foods.
Place meat in oven with probe to the
right. Insert cable end of probe
firmly into receptacle on oven wall.
How to Temp Cook aRolled
Beef Rib Roast to Medium
Step 1: Insert temperature probe
and attach probe securely in oven
wall. Close the door.
Step 2: Touch TEMP COOK/
HOLD. The display panel shows
“F” and “POWER 10~’“ENTER
TEMP” flashes.
Step 3: Touch 1,2,5 for 125°F.
“TEMP” and “POWER 10” show
on display.
Step 4: Touch POWER LEVEL
pad. “ENTER POWER” flashes.
Touch 5for medium power.
Step 5: Touch START. If internal
temperature of the roast is less than
80”F., display will show “COOL’
or if temperature is 80”F. or above,
display shows temperature counting
up.
emrfowds kmseiy fi3rTrmi!mrre-“
control and quick, even heating.
How to Use Auto Start
The Auto Start feature allows you
to program your oven to begin
cooking at apreset time of day—
up to a12-hour delay.
To Use Auto Start
Step 1: Touch AUTO START pad
(instead of START pad).
Step 2: Enter the time you want the
oven to start. (Be sure your microwave
oven clock shows the correct time
of day.)
Step 3: Enter cooking program.
Step 4. Touch START pad. Oven
automatically starts at desired time.
Questions and Answers
Q. Why did “PROBE” flash after
Itouched the START pad?
A. “PROBE” will flash if you
don’t seat the cable end of the probe
securely into the receptacle in the
oven wall or if you touch the TEMP
COOK/HOLD pad and forget to use
the probe.
Q. Can Ileave my probe in the
oven if it’s not inserted in food?
A. No, if it touches the oven wall,
you may damage the oven.
How to Use the Double Duty’”Shelf
●Do not store or cook with
shelf on floor of oven. Product
damage may result.
●Use potholders when handling
metal shelf and cookware. The~
may belot.
●Do not store microwave
browning dish on metal shelf.
The wire shelf is specifically
designed for added capacit~heating
and reheating in your microwave
oven. Now more than one food may
be heated or reheated and ready to
serve at the same time.
When microwaving with the oven
shelf, some techniques will differ
from the cookbook which came
with your oven. It is important to
arrange foods properly (shown on
the next page). Cookware size is
important; select from among the
suggestions below. Also, food size
should be considered; foods over
4inches high, or 3%pounds are not
recommended for shelf cooking.
Batters and dough foods and also
uncooked foods which need to be
prepared from scratch should be
cooked without the oven shelf,
following cookbook directions.. ... ..
Use pot holders when handling
foods heated together with your
oven shelf, esp~cially when heating
larger amounts of food. Extra steam
generated from multiple food
cooking may make cookware hotter
than with regular microwaving.
Cookware for Shelf
Heating and Reheating
Before placing food in the dishes,
check to see that they will fit
together on or under the shelf. Also,
be sure cookware is microwave safe.
Cookware for heating or reheating
include 1cup measuring cup, 9x5x3-
inch loaf dishes or 9-inch pie plates.
Leftovers may be placed in small
individual ceramic or plastic bowls
or divided plates.
I
Use wax paper or plastic wrap
instead of lids on casseroles. Lids
may add too much height to dish.
Positioning the Shelf
To position the DOUBLE DUTYTM
shelf, tip the back slightly and fit the
shelf support guides onto thesupport
guides located on each side of the
oven in the rear.
Next, lower the front until the shelf
support guides fit onto the support
guides located at each side of the
oven in the front.
When the shelf is properiy
positioned, you should be able to
read the plastic tab that says FRONT
THIS SIDE UP. The shelf should fit
snugly in place, be level and not
touch the back wall of the oven.
If arcing occurs when using the
shelf to cook more than one food
at the same time, turn the oven
off. Make sure the shelf is
positioned right-side-up on
all four shelf supports and
not touching oven walls.
10