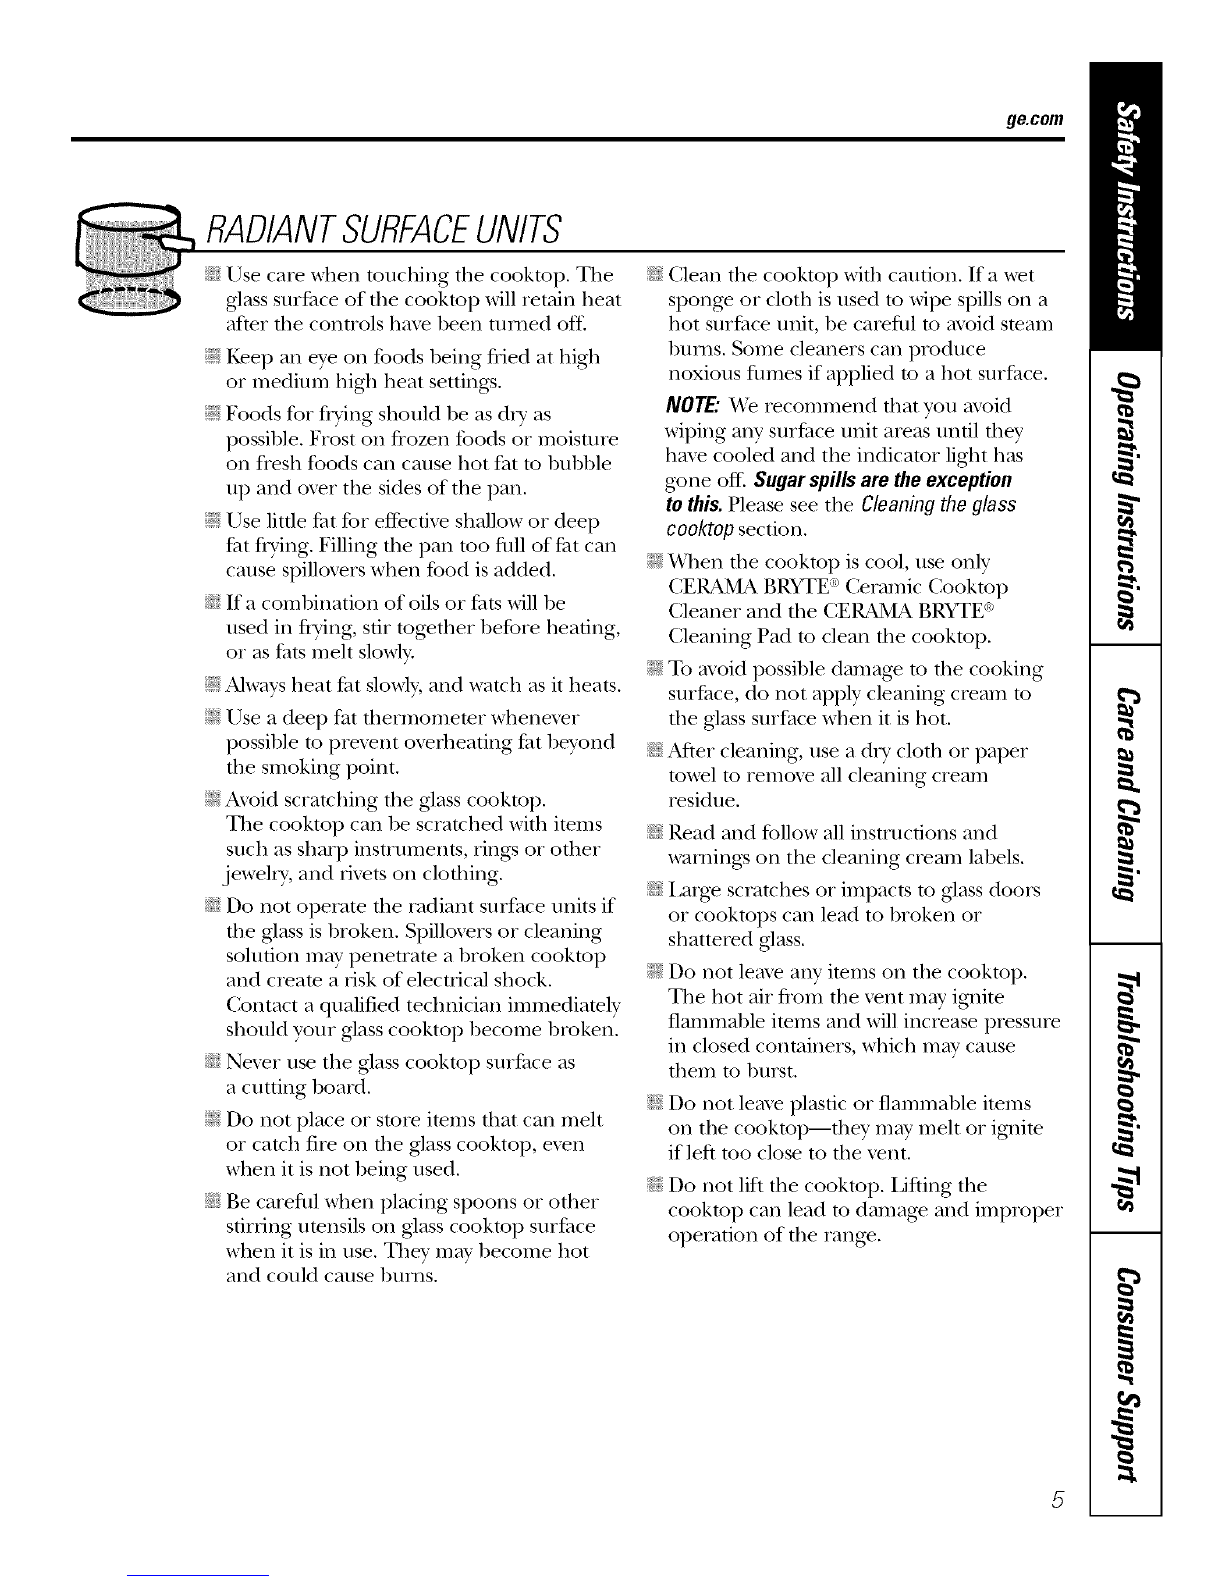
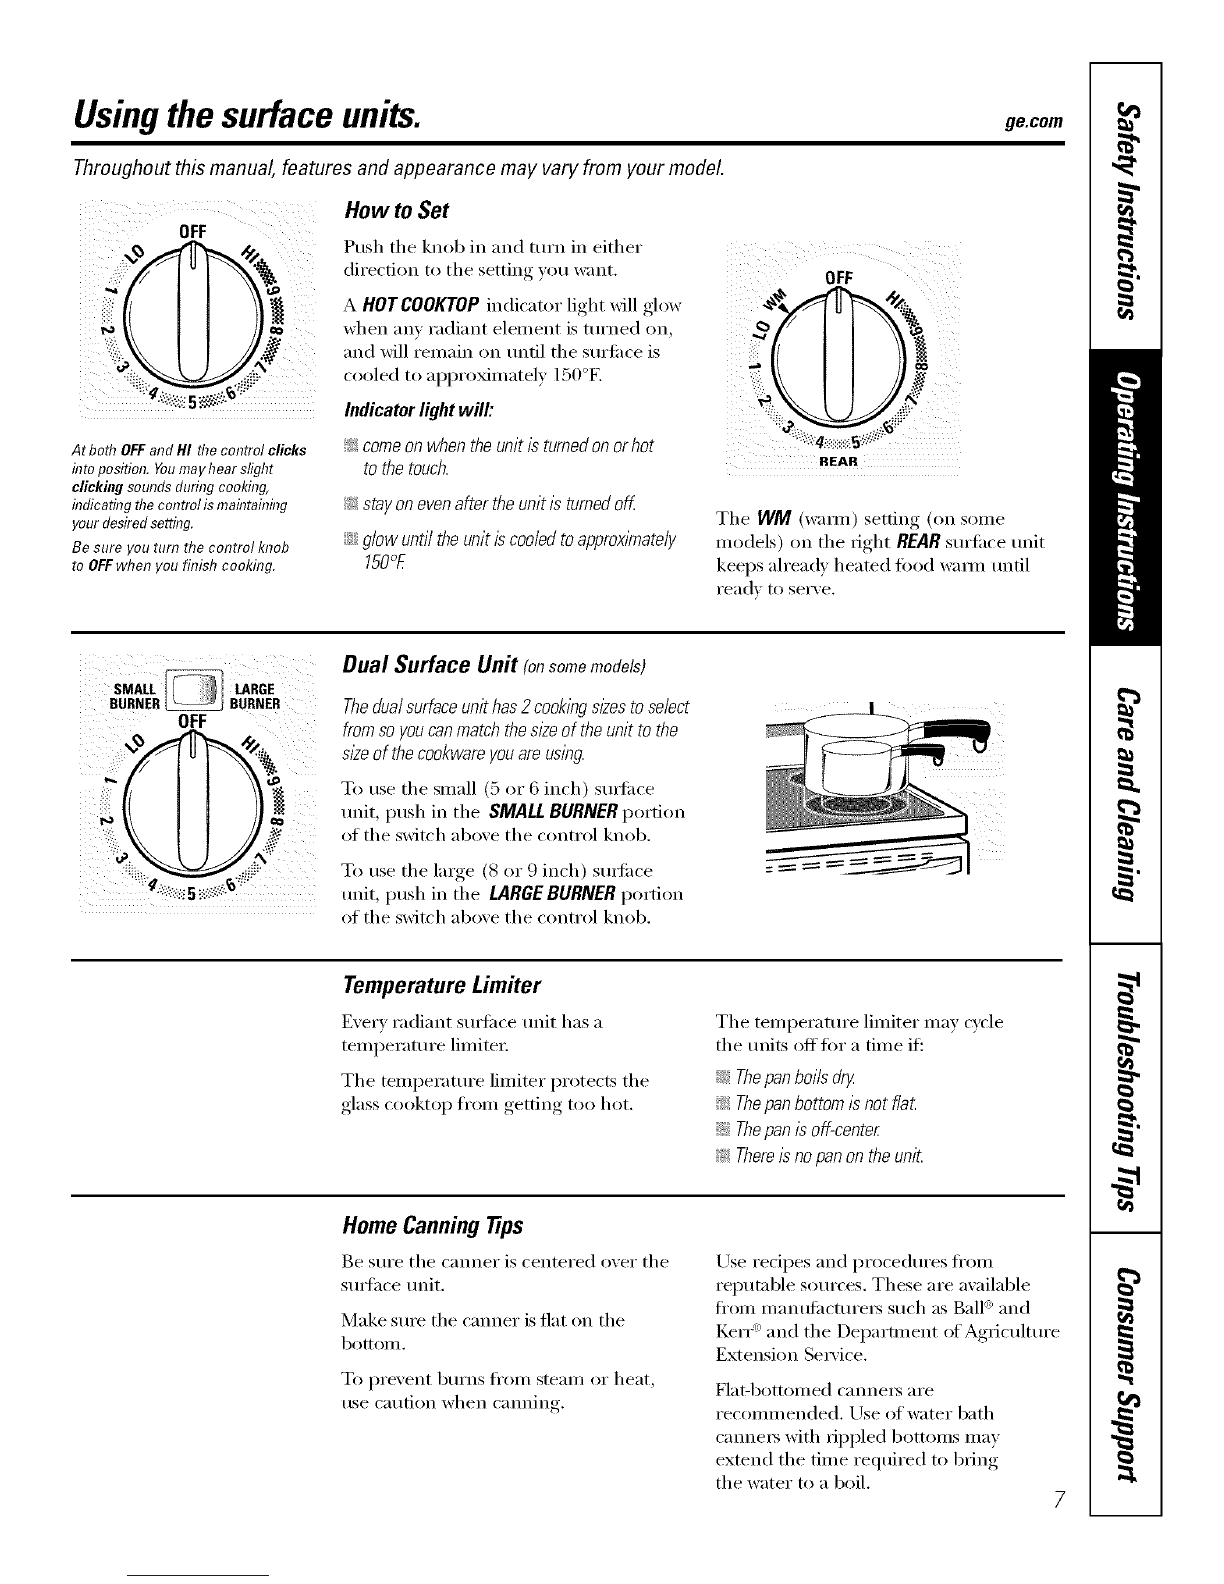
manuals.online logo
Brands
  1. Home
  2. •
  3. Brands
  4. •
  5. GE
  6. •
  7. Range
  8. •
  9. GE JBS55 User manual

GE JBS55 User manual

ge.com
op,,,,
Safety Instructions ......... 2-0
Operating Indructions
(',lock and Timer ............. 14
Oven .................... l 0-I 7
Power Outag_ .............. 11
Sabbath Feanlre ............. 16
Special Feanues ............. 15
Thermostat ................. 17
Surfi_ce Units .............. 7-9
Care and Cleaning
Conuol I4mobs .............. 18
Glass Cooktop ............ 99, 93
IJft-Off ()yen Door . .......... 90
Light ...................... 91
()yen Interior . .............. 19
Shelves ..................... 91
Storag_ Drawer Removal ...... 91
Troubleshooting Tips ..... 24-26
Accessories ................. 27
Consumer Support
Consumer Suppo_l ..... Back Cover
Product Registration ........ 29, 30
V¢ananty ................... 31
jgs55
Write the model and serial
numbers here:
Model #
Serial #
You can lind them on a label
behind the storage drawer on
the ti'ont of the range ti_ame.
49-80369 11-05JR
IMPORTANTSAFETYINFORMATION.
READALLINSTRUCTIONSBEFOREUSING.
m
For your safety, the information in this manual must be followed to minimize the risk of fire,
electric shock, or to prevent property damage, personal injury, or loss of life.
WARNINGANti-TIPDEVICE
All ranges can tip and injury could result.
Toprevent accidental tipping of the range, attach it to the wall and floor by installing the Anti--tip
device supplied.
If the Anti--tip device supplied with the range does not fit this application, use the universal Anti--17p
device WB2X7909.
Tocheck if the device is instated and engaged properly, remove the kick panel or storage drawer
and inspect the rear leveling leg. Make sure it fits securely into the slot.
If you pull tile range out from tile wall %r any reason, make sure tile device is properly
engaged when you push the rang_ back against the wall. If it is not, there is a possible iisk of
tile rang_ tipping oxer and causing i,_j/uT if you or a child stand, sit or lean on an open door
Please refer m the Anti-Tip device infounation in this manual. Failure m take this precaution
could Iesult ill tipping of the rang_ and i,)jm>
IMPORTANTSAFETYNOtiCE
The California Safe Drinking Water and Toxic Enforcement Act requires the Governor of California to
publish a list of substances known to the state to cause cancer, birth defects or other reproductive
harm, and requires businesses to warn customers of potential exposure to such substances.
2
ge.com
SAFETYPRECAUTIONS
When using electrical appliances, basic safety precautions should be followed, including the following:
_; Use dfis appliance only for its inmnded
pm])ose as desclibed in this ()wner's
Manual.
_?_::Be sure your appliance is properly
irrstalled and grounded by a qualified
irrstaller ira accordance with the provided
irrstallation irrstructions.
_;;Have die irrsmller show you dte location
of dte circuit breaker or fltse. Mark it %r
easv reference,
;_i:,:Do trot atmmpt to repair or replace any
part of your rang_ unless it is specifically
recommended in this manual. All other
servicing should be referred to a qualified
mchnician.
;_i:,:Before perfol_ning aW service, disconnect
the range power supply at dm household
distribution panel by removing the fl]se or
switching off"the circuit breaken
_?{:_Do trot lem> children alone--children
should trot be left alone or unattended in
an area where air appliance is in use. They
should nex>r be allowed to sit or stand on
any part of the appliance.
;f; Do not allow anyone to climb, stand or
hang on the door, storage drawer or
cooktop. They could damage the rang>
arrd ex_n tip it ox_t, causing sex.re
personal ironic'.
\It WARNING!
ii_{iiiii
may penetrate a broken control panel and create a risk of electrical shock. Contact a qualified
technician immediately should your glass control panel become broken.
_;:Do not store flammable materials in
air ox>n or near the cooktop.
CaUTlON: temsofinterestto
children should not be stored in cabinets
abo_e a range or on tire backsplash of a
rang_---<;hildren climbing on the range
to reach imms could be seriously injured.
_{:_Never wear loose-fitting or hanging
gv_nnents while using fire appliance.
Be carefitl when reaching fbr items stored
over tire range. Hammable material could
be ignited if brought in contact with hot
surface units or heating elements and may
cause se\_re burns.
_7_;:Use only di T pot holders--moist or damp
pot holders on hot sur/2aces m W result in
bnlIlS flom smam. Do trot let pot holders
touch hot sur/2ace units or heating
elements. Do not use a towel or oflter
bulky cloth in place of pot holders.
_;:Do not use wamr on grease fires. Nexer
pick up a flaming pan. Turn fl_e corruols
off'. Smother a flaming pan on a surtZace
unit 1)yco\etJng the pan completely with
a well-fitting lid, cookie sheet or fiat ua>
Use a multi-pui1)ose dt T chemical or
foam-type fire extinguisher
Flaming grease outside a pan can be put
out 1)yco_>ring it with baking soda or;
if available, 1)yusing a muld-puq)ose di T
chemical or foam-type rite extinguisher.
Flame in the oven can be smothered
completely by closing the oven door arrd
tui_ning tire oven off or 1)y using a multi-
pni])ose dlT chemical or foam-type fire
extinguishei:
3
IMPORTANTSAFETYINFORMATION.
READALLINSTRUCTIONSBEFOREUSING.
WARNING'!
SAFETYPRECAUTIONS
_t_;For your safely, hexer use your appliance
for warming or heating tile room.
_?{:_Do not let cooking grease or other
flammable matelials accumulate in or
near the range,
Do not touch tim sur/_ace units, file
heating elements or fl_e inmrior surface
of the oven. These surfiu:es may be hot
enough to hum even though they are
dark in coloi; During and after use, do not
touch, or let clofl_ing or oilier flammable
mamrials contact fl_e sur/_ce units, areas
nearby flae sur/_ace units or any intexior
area of file oxen; allow sufficient time for
cooling first.
Potentially hot surfaces include the
cooktop, areas facing the cooktop, oxen
xent opening, suiJCaces near the opening,
crevices around the oven door.
REMEMBER:The inside suiiCace of die o_en
may be hot when tile door is opened.
Do not store or use combustible mamfials,
gasoline or other flammable vapors and
liquids in tile vicinity of this or any other
appliance.
_{_:Kee I) the hood and grease filters clean
to maintain g_od xenting and to moid
grease fires.
;_i:,:Teach children not to play with the
controls or any other part of tile range.
_{_:Ahvays kee I) dish towels, dishcloths, pot
holders and other linens a safe distance
fiom your range.
_{:_Ahvays kee I) wooden and plastic utensils
and canned tbod a safe distance fiom
your range.
J; Always kee I) combustible wall coxerings,
curtains or drapes a safe distance fiom
your range.
COOKMEATANDPOULTRYTHOROUGHLY...
Cookmeat andpoultry thoroughly--meat toat least an INTERNALtemperatureof 160°Fandpoultry to atleast
an INTERNALtemperatureof 180°ECookingto thesetemperaturesusuaflypretectsagainst foodboreeillness.
RADIANTSURFACEUNITS
Use proper pan size--select cookware having flat bottoms large enough to cover the surface unit
heating element. The use of undersized cookware will expose a portion of the surface unit to direct
contact and may result in ignition of clothing. Proper relationshJ _of cookware to surface unit will
also improve efficiency.
q_{_;Nexer leme tile surface units unattended
at high heat settings, Boiloxers cause
smoking and greasy spilloxers that may
catch on fire.
J; Only certain types of glass, glassAeramic,
earthenware or other glazed containers
are suitable for cooktop service; others
may hreak because of tile sudden chang_
in temperature.
_{_To minimize the possihilitv of burns,
ignition of flammahle mamrials and
spillage, the handle of a container
should be turned toward the cenmr of
file range without exmnding oxer nearhv
surface units.
_{_Always turn tile surface units off hefore
removing cookware.
J; When preparing flaming foods under
file hood, mm the/_an on.
4
ge.com
RADIANTSURFACEUNITS
_{;_Use care when touching the cooktop. The
glass sur£_ce of tile cooktop will retain heat
after the controls haw been turned off.
E:,IKee I) an eye on foods being flied at high
or medium higtl heat settings.
;f; Foods for flTing should be as &w as
possible. Frost on flozen tbods or moisnne
on fresh foods can cause hot tk_tto bubble
tlI) and ox>r tile sides of tile pan.
E:,IUse little Pat for efl_cdve shallow or deep
Pat flTing. Filling the pan too flfll of fat can
cause spillovers when food is added.
_{;_If a combination of oils or/cats will be
used in flTing, stir tog>ther hefore heating,
or as fhts melt slowly.
;f; Always heat/cat slowly, and watch as it heats.
E:,IUse a deep fat d_ermomemr whene_er
possible to prex_nt oveflleafing fl_t beyond
tile smoking point.
E:,IAvoid scratching the glass cookmp.
Tim cookmp can be scratched wifll imms
such as sharp insuuments, rings or other
jeweh T, and fix>ts on cMthing.
qT_;:Do not operate the radiant surface units if
file glass is hroken. Spillovers or cleaning
solution may penetrate a broken cooktop
and c_eate a risk of elecuica] shock.
Contact a qualified technician immediately
should your glass cooktop hecome broken.
_{;_Nexer use tile glass cookmp sni_tce as
a cutdng hoard.
_f):,iDo not place or store imms fllat can melt
or catch fire on rim glass cooktop, exen
when it is not being used.
_{;_Be careflll when placing spoons or other
sorting utensils on glass cookmp sur/cace
when it is in use. They m W become hot
and could cause burrls.
_{;;Clean tile cooktop with cauuon. If a wet
sponge or cloth is used to wipe spills on a
hot sur£ace unit, be careflfl to axoid steam
bunls. Some cleaners can produce
noxious flnnes if applied m a hot sm/cace.
NOTE,"_'e recommend that you avoid
wiping any sni/cace unit areas until fllev
haxe cooled and the indicator light has
g_ne off'. Sugarspills are the exception
to this.Please see the C/oaning the glass
cooktop section.
;_i:,:_A]len the cooktop is cool, use only
CERAMA BRYTE _ Ceramic Cooktop
Cleaner and the CERAMA BRYTE _°
Cleaning Pad to clean the cooktop.
E:,:To avoid possihle damage to the cooking
sni/cace, do not apply cleaning cream to
the glass surface when it is hot.
_;:After cleaning, use a di T cloth or paper
rowel m remoxe all cleaning cream
residue.
_?{:_Read and fbllow all instructions and
warnings on tile cleaning cream labels.
_{:_Larg> scratches or impacts to glass doors
or cooktops can lead to broken or
shattered glass.
;_i:,:Do not leave any imms on tile cooktop.
Tile hot air flom the x_nt m W ignite
flammable imms and will inclease pleSSnle
in closed containers, which m W cause
fllem to burst.
E:,:Do not leaxe plastic or flammable imms
on the cooktop---fl)ey may melt or ignite
if left too close to rim xent.
_t{;:Do not lilt the cooktop, i3fling the
cooktop can lead to damag_ and improper
operauon of tile range.
5
IMPORTANTSAFETYINFORMATION.
READALLINSTRUCTIONSBEFOREUSING.
WARNING'!
OVEN
Stand away from the range when opening the oven door. Hot air or steam which escapes can cause
bums to hands, face and/or eyes.
_{;_Do not heat unopened tbod containers.
Pressure could build up and the container
could burst, causing an it)ira T.
_fi:,iKee I) the oven xent unobstructed.
_)i:_Kee I) the oven flee flom grease buildup.
_?{:_Place the oxen shelf in d_e desired position
while tile oxen is cool. If shehes must he
handled when hot, do not let pot holder
contact tile heating elements.
E:,:When using cooking or roasting bags in
tile oxen, follow the manufacturer's
directions.
Do not use the oxen to dry newspapers.
If oxerheated, they can catch on fire.
Do not use the oven for a storage area.
hems stored in an oxen can ignite,
Do not leme paper products, cooking
utensils or food in the oxen when not
in rise,
Do not use aluminum foil to line oxen
bottoms, except as suggested in this
manual. Improper installation of
ahm/inum tbil may resu]t in a risk of
electric shock or fire.
_fi:,iPulling o/lt the shelf to file stop-lock is a
convenience in lifting heax_' foods, It is also
a precaution against buins flom touching
hot sur/_aces of tile door or oxen walls.
READANDFOLLOWTHISSAFETYINFORMATIONCAREFULLY.
SAVETHESEINSTRUCTIONS
Usingthesurface units, ge.com
Throughout this manual, features and appearance may vary from your model.
How to Set
OFF
I/ ////
Push tile knob in and turn in either
direction to tile setting _ou want.
Atboth OFFand HI the control clicks
flTtoposition. Youmayhear slight
clickingsoundsduring cooking,
flTdicatingthe controlis maflTtahTflTg
yourdesiredsetting.
Be sure you turn the control knob
to OFFwhen you finish cooldng.
AHOT COOKTOP indicator light will glow
when am radiant element is tin'ned on,
and will remain on until tile sm'/i_ce is f
cooled to approximatel,_ 150°E :::_
Indicatorlight will'..: ....
OFF
!i_:come on when the un/t /s turned on or hot
to the touch. REAR
!i_:stayonevenaftertheunit/s turnedoff
ij_::glowuntiltheunitiscooledtoapproximately
150°E
Tile WM (warn/) setting (on solne
models) on tile fight REARsm'fi_ce refit
keeps ah'eady heated tood wam_ tmtil
ready to serve.
SMALL LARGE
BURNER_BURNER
OFF
Dual Surface Unit (onsomemodels)
Thedualsurface unit has2 cookingsizes toselect
from so youcanmatch the size of the unit to the
sizeof the cookware youareusing.
To use tile small (5 or 6 inch) suitilce
unit, push in tile SMALL BURNER portion
of tile switch above tile control knob.
To use tile large (8 or 9 inch) SUltilce
refit, push in tile LARGE BURNER portion
of tile switch aboxe tile control knob.
Temperature Limiter
Every radiant smti_('e refit has a
temperature limited:
Tile temperature limiter protects tile
glass cooktop fl'om getting too hot.
Tile temperatm'e limiter may cycle
the milts offfin" a time if:
iJi_;Thepanbollsdr_z
!i_:Thepan bottom/s not f/aL
iJi_Thepan/s off-center
!i_:There/s nopan on the uni_
Home Canningtips
Be sure tile canner is centered over tile
smthce unit.
Make sm'e tile cromer is flat on tile
bot[oI/l,
To i)re\'ent blli'ns fl'om steam or heat,
use caution when camfing.
Use redpes and procedm'es fl'om
reputable sources. These are available
fl'om mantdi_ctm'e_s such as Ball '_and
Kerr _and tile Department of Agficultm'e
Extension Se_'ice.
Hat-bottoiiled c_lililei_ aI'e
recommended. Use of water bath
cmme_ with _ippled bottoms may
extend the time reqtfired to bring
tile water to a boil.
Usingthesurface units.
Throughout this manual, features and appearance may vary from your model.
Wok Cooking
Werecommendthatyouuseonlya flat-bottomed
wok.Theyareavailableat yourlocalretailstore.
Do not use woks that have support rings.
Do not use rotlnd bottoi/l woks.
Y)m could be seriously burned if tile
wok tipped oxei:
Use only flat-bottomed woks.
The following &formation will help you choose cookwara which will give good performance on glass cooktops.
About the radiant surface units...
Never cook direct y o/7me glass.
Always use cookware.
Always place thepan in thecenter of
the surface unit you are cooking on.
Tile radiant cooktop teatm'es heating
traits beneath a smooth glass smtime, il_
NOTE."Ashght odoris normalwhen a new
cooktopisusedforthef, sttime.It,scausedbytheheatingofnewpartsandinsulatingmaterials
andwill disappearina shorttl_ne.
NOTE."Onmodelswith/i)ht-co/oredg/ass
cooktops,itisnormalforthecookingzonesto
changecolorwhenhotorcodingdown.Thisis
temporaryandwi//disappearastheglasscoo&
toroomtemperature.
Tile smtilce trait will cycle on and off to
maintain veto" selected control setting.
It is safe to place hot cookware on tile
glass surti_ce even when tile cooktop
is cool.
Even after tile surfi_ce traits are tin'ned
off, tile glass cooktop retains enough
heat to continue cooking. To avoid
overcooking, i'elllOVe i)_liIS ][i'Olil tile
surfilce units when tile food is cooked.
Avoid placing anything on tile surface
trait tmfil it has cooled completely:
Do not slide cookware across the
cooktop because #can scratch the
glassIthe glass is scratch-resistant,
not scratchproof.
_; Waterstains(mineraldeposits)areremovable
usingthecleaningcreamorfurl-strengthwhite
wnegar
;;Ji::Useof windowcleanermayleavean
iridescentfilmonthecooktop.Thecleaning
creamwillremovethisdiscoloration.
_Don'tstoreheavyitemsabovethecooktop.
If theydropontothecooktop,theycancause
damage.
;;J_::Donotusethesurfaceasa cuttingboard
8
Selectingtypesofcookware, ge.com
Checkpans for flat bottoms by
using a straight edge.
Pans with rounded, curved, ridged
or warped bottoms are not
recommended.
StainlessSteel:
recommended
Aluminum:
heavy wel_?ht recommended
Good conductivib'. _Muminun_ residues
sometimes appear as scratches on the
cooktop, but can be removed if cleaned
immediatelv. Because of its low melting
point, thin weight ahuninum should not
be tlsed.
CopperBottom:
recommended
Col)per may leave residues which ('_111
appear as scratches. Tile residues can be
removed, as hmg as tile cooktop is
cleaned immediatel> However, do not let
these pots boil dry: Overheamd metal can
bond to glass cooktops. AI_ overheated
COl)per bottom pot will leave a residue
that will pemmnently stain the cooktop
if not rein eyed immediatelv.
Porcelain Enamel-CoveredCastIron:
recommended
_s long as tile cookware is covered
completely with porcelain enamel, this
cookware is recommended. Caution is
i'ecoi/llllended [Dr cast iron cookwai'e
that is not completely covered with
smooth porcelain enamel, since it may
scratch the glass ceramic cooktop.
Glass-Ceramic:
usable,butnotrecommended
Poor pe_fimnance. May scratch tile
StlI5[il ce,
Stoneware:
usab/e,butnotrecommended
Poor pex_fimnance. May scratch tile
StlI5[il ce.
9
Usingtheovencontrols.
Throughout this manual, features and appearance may vary from your model.
OVEN CONTROLS
0
e
OvenControl,ClockandTimerFeaturesandSettings
oBAKE/7-EMPRECALLPad 0
Touch tiffs pad to select the bake flmcfion.
BAKE Light
Iqashes while in edit mode--)ou can chang_
the o\re[] temperatm'e at this point. (;lo_s
when the o\en is in bake mode.
OSTART/ONPad
N]tlst be touched to start aI]} cooking.
Shows the time of dm men temperatm'e,
and the times set tor the timer or automatic
oven operations. The display will show PRE
wlfile preheating. _,_]_en the oven reaches
the selected temperature, the oven control
will beep and the display will show the o_,en
teml)erature.
If "F- and anumberor letter" flashin the displayand the
ovencontrol sl_?nals,this indicatesa functionerrorcode.
If youroven was set fora tlknedovenoperation and
apower outage occurred,the clockand aftprogrammed
functionsmust be raseL
Thetime of day wi// flash in the displaywhen there has
beenapower outage.Resetthe c/ocl_
Teuc# the CLEAR/OFFpad. Allow the oven tocool for
onehour Put the ovenbackinto operation.If the function
errorcoderepeats, disconnectthepower to the rangeand
ca//for service.
KITCHEN TIMER ON/OFF
or TIMER ON/OFFPad
Touch tiffs pad to select tile timer teatm'e.
Then press ÷and -pads to at!just time.
TIMERLight
Hashes _hile in edit mode--y_)u can changv
the set time at this point. Glo_:s _hen the
timer has been activated. Flashes again _hen
the time has run out tmtil the control is reset.
CLOCK Pad
To set tile clock, press tiffs pad twice and
then press tim +and -pads. Tim time of
day will flash in tim display when tim oven
is fiI_t turned oil.
OVENLIGHT ON/OFFPad
Touch tiffs pad to mrn tim oven light on
oI" off.
-Pad
Short taps to tiffs pad will decrease tile time
or temperatm'e by small amotmts. Touch
and hold the pad to decrease the time or
temperatm'e by larger amotmts.
+ Pad
Short taps to tiffs pad will increase tim time
or temperatm'e by small amotmts. Touch
and bold tim pad to increase tile time or
temperatm'e by laxger amotmts.
lO
ge.com
OvenControl Clockand TimerFeaturesandSettings
0CLEAR/OFFPad
Touch this pad to cancel ALL oven
operations except the clock and tiinei:
BROIL HI/tO Pad
Touch this pad to select the broil flmction.
BROIL Light
Flashes while in edit mode--you can switch
fl'om HI to tO BROILat this point. Glows when
the oven is in broil mode,
Power Outage
Ira flashingt#ne/sin the display,youhaveexpenenceda
power fa#ure.Resetthe clock. To reset the clock, touch the CLOCKpad. Enter
the correct time of day by touching the +or -
pads. Touch the START/ONpad.
11
Usingtheoven.
Toavoid possible bums, place the shelves in the desired posifion before you turn the oven on.
[]
%
The oven has 6 shelf positions.
Before you begin...
The shelves have stop-h)cks, so that \dlen
placed correctl} on file shelf supports (A
through F), they will stop betore coming
completely out, and will not tilt.
When placing and x_modng cook\_are,
pull tim shelf out to the bump on file shelf
support.
Toremove a shelf, pull it to_md you, tilt file
ti'ont end up and pull it out.
Toreplae,e, place the end of the shelf
(stop-locks) on tim support, tilt up dm fl'ont
and push file shelf in.
CAUTION:Whenyouare,usingthesheffin thebwest
positionCA),youwill needtousecautionwhenpulling
theshelfout.Werecommendthatyoupufftheshelf
outseveralinchesandthen,usingtwopotholders,puff
theshelfoutbyholdingthesidesofit. Theshelfislow
andyoucouldbeburnedif youplaceyourhandin the
middleof theshelfandpuffaftthewayout.Bevery
carefulnot toburnyourhandonthedoorwhenusing
theshelfintheIowestpositionCA).
_iiiii
[]
How to Set the Oven for Baking or Roasting
Yourovenisnotdesignedforopen-doorcooking.
[] Touch the BAKE pad.
] Touch the 4.or- pads until the
desired temperature is displa?ed.
[] Touch die START/ONpad.
]'tie o',en will start automatically; The displa}
will sbo_ PREwhile px_beating. _]len the
o\en reaches the selected mmperamre, the
oven control will bee}) several times and the
<fispla}will sho_ the oven temperature.
TochangetheoventemperatureduringBAKEcycle,
touchtheflAKE padandthenthe4.or- padstoget
thenew temperature.
[] (.:beck food for doneness at minimum
nine on recipe. Cook longer if necessa*>
[] Touch tim CLEAR/OFFpad when baking
is finislmd and then rel;qo\e the food
t]'orli tim oven.
TypeofFood Shelf Position
Frozenpies(oncookiesheet) D
Angelfoodcake A
Bundtorpoundcakes CorD
Biscuits,muffins,brownies, CorD
cookies,cupcakes,
layercakes,pies
Casseroles CorD
Turkey A
/.4i/1111/ \\X\_ Vz
Center baking pans in flTeoven.
Preheating and Pan Placement
Preheat tim o\en if tim recipe calls for it.
Preheating is neces.sarx for good results \dlen
baking cakes, cookies, pastr> and breads.
TheDisplaywillshow"PRE"whilepreheating.When
theovenreachestheselectedtemperature,theoven
controlwillbeepandthedisplaywillshowtheoven
temperature.
Baking resuhs will be better if baking pans are
cenmred in tile o_en as much as possible. If
baking with more than one pan, place tile
pans so each has at least 1 to 1½" of air space
around it./1 baking tour cake layers at the
same time, })lace t\_o layers on rack B and t\_o
laxex:son rack D. Stagger pans on the rock so
one is not directly abo\e the other
Cut slits in flTefoiljust like flTegrid.
12
Aluminum Foil
Nevercovertheovenbottomwithaluminumfoil
_,_mcan use aluminum foil to line a broiler
pan and broiler grid. Howe_ec you must
mold the fbil tigh@ to the g_Jd and cut slits in
itjust like the grid.
>duminum foil ma_ also be used to catch a
spill{_er To do so, place a small sheet of tbil
on a lo*ver shelf sexeral inches belo*_ the toed.
Ne_er entirely cover ashelf wi/h aluminum
toil. This will disturb the heat circulation and
*_sult in poor baking.
Leave the door open to the broil
stop position. The door stays open
by itself, yet theproper temperature
is maflTtaflTedf17the oven.
ge.com
How to Set the Oven for Broiling
[] Place the meat or fish on a broiler
grid in a broiler pan (not supplied
with the _ )
I'a n _e
[] Follow suggested shelf positions in
the BroilingGuide.
If yourrangeisconnectedto208 volts,raresteaks
maybe broiledbypreheaflbg thebroiler and
posifionlbg theovenshelf oneposition higher
Use LO Broil to cook toods such as
poultx}, or thick cuts of meat thoroughly
without oxePbrowning them.
[] Touch the BROILHI/tO pad once for
HI Broil.
To change, to i,O Broil, touch the
BROILHI/tO pad again.
[] Touch the START/ON pad.
[] _,_q/ell broiling is finished, touch the
CLEAR/OFFpad.
The size, weight, thickness,
starting, teml)erature
and yore" preference
of doneness will attect
broiling times. This guide
is based on meats at
refrigerator, tern I)erature
1The {LS. i)@mh_g_t o/
lg_'icult*m, sa)s "/¢a_, bee/L*
/*o/mhn 1mryo*l should h_*owthai
zool,'i_.g i! to on/3 I401" m_'m_s
some Hod poAoni_ go_7.4*mism*
m(Osm'_ ize. "(Sounv: _e 1.'ood
Bvoh. }2m_Kitcl,#_ (;uigh,. USDA
t_J_alu_, 1985.)
Theoven has 6shelf positions.
Bruiting Guide
Food
GroundBeef
Beef Steaks
Raret
Medium
Well Done
Rarer
Medium
Well Done
Chicken
Bakery Product
Bread (toast)
English Muffin
LobsterTails
FishFillets
Salmon
Steaks
Fillets
HamSlices
(precooked)
Pork Chops
Well Done
LambChops
Medium
Well Done
Medium
Well Done
Quantityand/
orThickness
1lb. (4patties)
I/2 to a/4"thick
4 Ibs.(12patties)
3/4to 1" thick
1to 11/2 Ibs.
11/2"thick
2 tO 21/2 Ibs.
1whole cut up
2to 21/zIbs.,
split lengthwise
Breast
2to 4 slices
2(split)
2-4
1lb. (V4to I/z" thick)
2(1" thick)
2{I/2ff to 3/4_z thick)
I/2ffthick
1" thick
2(I/Z' thick)
2(I" thick) about 1lb.
2(1" thick) about 10
to 12oz.
2(11/_"thick)about 1 lb.
Shelf
Position*
F
E
E
D
D
E
C
C
E
F
E
E
D
D
D
D
E
E
E
E
First Side
Time(min,)
13
15
6
8
10
10
15
2O
25
25
3
3-4
18_0
10
10
6
8
10
15
7
10
9
14
Second Side
Time (rain.)
8
4
6
8
8
10 12
20
25
15
1
Do not
turn
oveE
6
8
10
15
4
9
6
10
Comments
Space evenly.
SteakslessthanV4"
thick aredifficult
tocookrare.
Slashfat.
Brusheachsidewith
meltedbutter.
Broil skin-side-down
first.
Spaceevenly.Place
Englishmuffins cut-
side-upandbrush
with butter if desired.
Cutthrougl_backof
slleii. Spreadopen.
Brushwith melted
butter beforebroiling
andafter half of
broilingtime.
Handleandturnvery
carefully.BrushwiLl1
lemonbutterbefore
andduringcooking,
if desired.
Turncarefully.Donot
turn skinsidedown.
Slashfat.
Slashfat.
_Seeilhlstrafion for descriptionof shelfpositions 13
Usingthe clock andtimer.
Not all features are on all models.
Make sure the clock is set to flTe
correct time of day.
To Set the Clock
The clock must be set to the correct time
of day tot tile autonmtic oxen tinting
flmcfions to work properly: Tile time of
da} cannot be changed during a dela}ed
cookin o" c_cle.
[] Touch the CLOCKpad twice,
[] T°uch the ÷°r -I)ads"
If the + or - pads are not touched within
one ininute after _,ou touch the CLOCK
pad tile displm rexerts to tile original
setting, If this hal)pens, touch tile CLOCK
pad twice and reenter the time of din.
[] Touch the START/ON pad until the
time of day shm_s in tile display. This
ente_ tile time and starts tile clock.
Tocheckthetimeofdaywhenthedisplayis
showlbgotherinformation,simplytouchthe
CLOCKpad Thet/meofdayshowsuntilanother
padistouched
ToTurn Off the Clock Display
It you have several clocks in wmr kitchen,
vou may wish to ttlYn off tile time of day
clock display on pmr range.
[] Touch tile CtOCKpad once to turn
off tile time of day display: _Mthouoh
you will not be able to see it, the
clock maintains tile correct dine
of dav.
[] Touch tile CtOCKpad twice to recall
the clock display.
Thetimer is a minute timer only.
TheCLEAR/OFFpad does not affect
the time_
To Set the Timer
ThetlYnerdoesnot control oven operations.
Themaximumsetting on the timer is 9hours
and59minutes.
[] Touch tile KITCHEN TIMER ON/OFF
pad.
[] Touch tile ÷or-pads tmfil tile
}lIllO/lnt of tiIlle veil _V}IIIt shows in
tile display. Tile maxim um time that
can be entered in minutes is 59.
Times more than 59 minutes should
be changed to hom_ and minutes.
If youmakea mistake, touchtheKITCHEN
TIMER ON/OFFpadand beginagain.
[] Touch tile START/ON pad. Tile time
will strut counting down, although
the display does not change until
one Ininute has passed.
[] X&hen the timer reaches :00, the
cmmol will beep 3 times fi)llowed b)
one beep e\'e_T 6 seconds tmtil the
KITCHEN TIMER ON/OFFpad is
touched.
To Reset the Timer
If tile display is still showing tile time
remaining, you may change it by touching
tile KITCHEN TIMER ON/OFF pad, then
touching tile ÷ or-pads tmtil tile time
you want apl)ea_ in tile display.
If tile remaining time is not in tile display
(clock, start time or cooking time are in
the display), recall the remaining time by
touching tile KITCHEN TIMER ON/OFFpad
and then touching tile ÷ or -pads to
entei" tile new til//e Veil w}lnt.
/4
ToCancel the Timer
Touch the KITCHEN TIMER ON/OFF
pad twice.
Special featuresofyourovencontrol ge.com
Yournew touch pad control has additional features that you may choose to use. The following are the features and
how you may activate them.
Thespecial feature modes can only be activated while the display is showing the time of day. They remain in the
control's memory until the steps are repeated.
When the display shows your choice, touch the START/ONpad. Thespecial features will remain in memory after
a power failure.
NOTE: The Sabbath feature and the Thermostat Adjustment feature are also Special Features, but they are
addressed separately in the following sections.
12Hour Shut-Off
Withthisfeature,shouldyouforgetandleavethe
ovenon,thecontrolwillautomaticallyturnoffthe
ovenafter 12hoursduringbakbgfunctionsor
after3hoursduringabroilfunction.
if you wish to mrn OFFthis ligature, follow
the steps belong:
Touch the BAKEand BROILHI/LO
pads at the same time fi:,r 3 seconds
tmtil the display sho_:s SF.
[] Touch the CLOCKpad. The display
will show ON (12 hour shut-off).
Touch the CLOCKpad repeatedly
tmtil the display sho_:s OFF(no
shut-off).
[] Touch the START/ON pad to acfix _te
the no shut-off and leaxe the control
set in this special ti_atm'es mode.
15
"'-'----usingthe SabbathFeature.(onsomemodels)
(Designed for use on the Jewish Sabbath and Holidays)
The Sabbath feature can be used for baking/roasting only. It cannot be used for broiling.
NOTE."The oven light comes on automatically (on some models) when the door is opened and goes off when the
door is closed. Thebulb maybe removed. See the OvenLight Replacement section. Onmodels with a light switch
on the control panel, the oven light may be turned on and left on.
@
%
When the display shows Dthe
oven is set f17Sabbath. When the
display shows D C the oven is
baiting/roasting.
How to Set for Regular Baking/Roasting
NOTE: Tounderstandhow theoven control works,
practice usingregularbaking (non-Sabbath)before
entering Sabbathmode.
Make surethe clockshows thecorrect time of day
and theoven is off
]"['ou(h and hold both the BAKE and
BROIL HI/LO pads, at the same time,
until tl'L('disl)l_ly shows SE
] "[;at) the CLOCKt)ad until SAb al)t)ears
in the disl)la }.
] Tou(h the START/ON pad and D will
al)l)ear in the display.
] Tou(h the BAKE t)ad. No signal will
b(! gJx (_1/.
] The t)reset starting ten/t)erattu:e ',,,rill
mltomaticallv be set to 55(). ° "[:a1)the +
or -pads to increase or (te(rea_,e die
teml)eramre in 25 ° increments. The
temperature (_m be set between 170 °
and 550. ° No siglml or teml)enm_re
will be giv('n.
[_ "['()rich the START/ON t)ad.
] ktier a random delayl)efiod of
apl)roxim_tel'y 30 seconds t() 1 mimlw,
D C will appear in the disl)lay indi(adng
that the o\en is baking/r(msting, l/D C
doesn't appear in the dist)lm!, start ag_fin
at Step 4.
To a(!just the o\en temt)e_m_re, touch the
BAKEt)ad and tap the +or -t)ads to increase
or (tecrea_,e the teml)erature in 25 °
increments. Touch il_e START/ONtrad.
NOTE:The CLEAR/OFFt)ad is acdv(' during the
Sabl)ath tbat m:e.
ii ii
iiii i
How to Exit the Sabbath Feature
[]
[]
[]
Touch the CLEAR/OFFt)ad.
It"d_e oven is cooking, W_`,i|t))l" _t l'_tlldOlll
delay period of _l)t)roximatel'_ 30
se(on(ts to 1 minute, mldl only D is in
the dist)lay.
Touch and hold both the BAKE and
BROIL HI/LO t)ads, at the same time,
tmtil die display SI_()_rSSE
I_] Tap the CLOCK pad tmtil ONor OFF
Ill _q)l)em:s in the disl)la } ON in(ti(_lles
tl'mt the oven will mitom_ti(allv tttrn
oil a/icr 12 hem's. OFFindicatcs that
the ov(,n will not automatically mrn o//i
See the Special Features section Jar m_
explanation of the 12Hour Shut-Off
t(,_`,t tll?e.
[] "lbu(h the START/ON trod.
NOTE:fro power outage occurred while theoven was
in Sabbath, the oven will automatically turn off and stay
off even when thepower returns. Theoven control
must bereset.
76
Adjust the oven thermostat--Do it yourself! ge.com
Youmay find that your new oven cooks differently than the one it replaced. Use your new oven for a few
weeks to become more familiar with it If you still think your new oven is too hot or too cold, you can adjust
the thermostat yourself.
Do not use thermometers, such as those found in grocery stores, to check the temperature setting of your oven.
These thermometers may vary 20-40 degrees.
NOTE" This adjustment will not affect the broiling or the self-cleaning temperatures. Theadjustment will be
retained in memory afier a power failure.
%
@
To Adjust the Thermostat
[] Touch tile BAKEand BROILHI/LO
pads at the saine tiine fi)r 3 seconds
until the display shows SF
[] Touch the BAKEpad, Atw(_(ligit
nmnber shox_s in tile display:
[] The oxen temperatm'e can be
a(!justed ul) to (+) . :I_ hotter or (-)
35°F cooleL Touch the 4-pad to
increase the temperatm'e in 1-degree
inci'eiilents.
Touch tile -pad to decrease tile
temperatm'e in 1-degree increments,
[] _._/en )ou haxe made tile
a(!i ustment, touch tile START/ONpad
to go back to the time of (la) disl)la ).
Use VO/li" ()_,en as vo/i would
noi_/llal]_.
NOTE:Thisadjustmentwilinotaffectthebroiling
temperatures.It wiiiberetainedinmemoryaftera
powerfailure.
Thetype ofmargarine will affect bakingperformanc!!
Most recipes for baking have been developed using high-fat products such as butter or margarine (80% fat). If you
decrease the fat, the recipe may not give the same results as with a higher-fat product.
Recipe failure can result ff cakes, pies, pastries, cookies or candies are made with Iow-fat spreads. Thelower the fat
content of a spread product, the more noticeable these differences become.
Federal standards re(ltlire l)roducts labeled "margarine" to contain at least 80% lilt by weight. Ixmqilt spreads,
on tile other hand, contain less tilt and more water: Tile high moisture conmnt of these spreads aftects tile
texttlre and flavor (ff baked goods. For best restllts with w_ur old fil\'o_ite redpes, rise margarine, btltter or
stick spreads contnining at least 70% vegetnble oil.
17
Careandcleaningoftherange.
Be sure all controls are off and all surfaces are cool before cleaning any part of the range.
If your range is removed for cleaning, servicing or any reason, be sure the anti-tip
device is reengaged properlywhen the range is replaced. Failure to take this
precaution could result in tipping of the range and cause injury.
How toRemoveProtectiveShippingFilmand Packaging Tape
Carefully grasp a corner of tile protective
shipping film with your finge_ and slowly
peel it fl'om tile appliance sm_i_ce. Do
not use any shaq) items to remove tile
fihn. Relnove all of tile fihn bed)re using
tile appliance fin" tile fiI_t time.
To aSStlI'e 11o (]amage is dolle to tile
finish of tile product, tile safest way to
remove tile adhesive fl'om packaging
tape on new appliances is an application
of a household liquid dishwashing
deteigent. Apply with a soft cloth and
allow to soak.
NOTE:Theadhesivemustberemovedfromaft
parts.Itcannotberemovedifit isbakedon.
Control Knobs
Thecontrolknobsmay be removedfor easier
cleaning.
Make sm'e tile knobs are in tile OFF
positions and pull them straight off' tile
stems fin" cleaning.
Tile knobs can be cleaned in a
dishwasher or tile}' may also be washed
with soap and water Make sm'e tile inside
of tile knobs are dry befin'e replacing.
Replace tile knobs in tile OFFposition to
ensure proper placement.
Painted Surfaces
Painted sm'fi_ces include tile sides of tile
range and tile (looi; top of control panel
and tile drawer fl'ont. Clean these with
soap and water or a vinegar and water
sohltion.
Do 1lot rise co111111ercial ovell clealleiN_
cleaning pow(lei_, steel wool or haI_h
abrasives on any painted stmfi_ce.
Control Panel
It's a good idea to wipe tile control panel
after each use of tile oven. Use a damp
cloth to clean oi" rinse. For cleaning, use
mild soap and water oi" a 50/50 solution
of vinegar and water For rinsing, use
clean watei: Polish dry with a soft cloth.
Do 1lot rise abI"asive cleallsers_ stroilg
liquid cleanei_, plastic scorning pads or
oven cleanei5 on tile control panel--
they will damage tile finish.
Oven Vent
Theoven ventis locatedbehind the n)ht rear
surfaceunit
This area could become hot (hwing
oven use.
It is II0IIllaI J0I" steal/l to COllie otlt
of tile vent, and moisture may collect
m_derneath it when tile oven is in use.
Theventisimportantforproperaircirculation.
Neverblockthisvent
18
ge.com
Porcelain Oven Interior
With l)roper care, the porcelain enanlel
finish on the inside el the oven--top,
botton/, sides, back and inside ot the
dool_will stay ne>looking tor yeal_.
I,et the oven cool betore cleaning, h'e
reconlnlend that you wear rubber gloves
when deaning the oven,
Soap and water will nom/ally do the
job. Hear)' spatteling or spillovel_ nlay
require {'leaning with a n/ild abrasive
cleanel: Soap-filled scouting pads
nlav also be used.
Donot allow foodspills with a high sugaror acid
content(suchas tomatoes,sauerkraut,fruitjuices
orpie filling) toremain on thesurface. Theymay
causea duffspot evenafter cleaning.
Household anlnlonia lnav nlake the
deaningjob easiei: Place 1/2 cup ill
a shallow glass or pottel y container ill
a cold oven overnight. The amnlonia
fiunes will help loosen the burned-on
grease and fi)od.
If necessai'} _,you ii/ay rise an (Nell cleanei:
F()ll()w the package directi()ns.
_: 12onot sprayoven cleaneron the electn?a/
controlsand switchesbecauseit couldcausea
shortcircuit and result in sparkingor fl7e.
::Ji::Donot allow a film from thecleaner to build up
on the temperaturesensor--it couldcause the
oventoheat improperly.{Thesensoris located
at the top of the oven.)Carefullywipe the
sensorclean after each ovencleaning,being
carefulnot tomove thesensoras a changein
its positioncould affect how theoven bakes.
::J_::Donot sprayany ovencleaneron theoven
door,handlesor any exteriorsurfaceof the
oven,cabinetsor painted surfaces. Thecleaner
candamagethesesurfaces.
Stainless Steel Surfaces (onsomemodels)
Do not usea steel wool pa& #will scratch
the surface.
To clean the stainless steel SUlti_ce,
use waml suds)' water or a stainless steel
cleaner or polish. Mways wipe the SUltace
ill the direction of the grain. D}llow the
cleaner instructions for cleaning the
stainless steel SUl'ti_ce.
To inquire about i)urchasing stainless
steel api)liance cleaner or polish, or to
find the location of a dealer nearest you,
please call our toll-flee nun/ber:
National Parts Center 1.800.626.2002
ge.com
19
Careand cleaning ofthe range.
i
The gasket is designed with a gap at the
bottom to allow for proper air circulation.
Do not rub or clean the door gasket--
it has an extremely low resistance to
abrasion.
If you notice the gasket becoming worn,
frayed or damaged in any way or if it
has become displaced on the door,
you should have it replaced.
Cleaning the Oven Door
Toclean the inside ofthe door:
7_ Soap and water will nommlly do the
job. Hem 3' spattering or spillove_ may
require cleaning with a mild abrasive
cleane_: Soap-filled scotwing pads may
also be used.
Donot allow food spills with a hl_zhsugar oracid
content(suchas tomatoes,sauerkraut,fruitjuices
orpie filling) toremain on the surface. Theymay
causea duffspot evenafter cleaning.
Ifnecessan/youmay usean ovencleaner Follow
thepackagedirections.
iJi::Clean the inside of the oven window
with a mild non-scratching cleaner and
a damp cloth.
Toclean the outside of the door:
iJi::Use soap and water to thoroughly
clean the top, sides and front of the
oven dora: Rinse well. Ybu may also
use a glass cleaner to clean the glass on
the outside ot the door. Do not let
water drip into the vent openings.
Z: Spillage of marinades, fl'uit
juices, toillato sauces add basting
materials c(mtaining acids may cause
discoloration and sh(mld be wiped up
immediately. When sure_ce is cool,
clean and _inse.
!;>Do not use oven cleaners, cleaning
powde_ or hm_h abrasixes on the
outside of the dora:
i,:i2:
Pullhingelocksdowntounlock.
iii i ii i_I
Removalposition
Lift-Off Oven Door
Thedoorisveryheavy.Becarefulwhen
removingandlifting thedoor.
Donotlift thedoorbythehandle.
Toremovethe door:
[] Fully open the dora:
[] Pull the hinge locks down toward
the door fl'ame, to the tmlocked
position. A tool, such as a small
fiat-blade screwdriver; may be
required.
[] Fimfl_,_<,raso,l both sides of the door
at the top.
[] Close door to the door remoxal
position, which is haltwm between
the broil stop position and fidly
closed.
[] I,ifl door up and out tmfil the hinge
am] is clear of the slot.
Toreplace the door:
[] Fimfl_,_<,raso,tboth sides of the door
at the top.
] XAqtl]the Bottom Hingearm
door at the edgeof
Sallle angle sl0t
as the
I'eIllO\;ll position,
seat the
indentation of
the hinge am]
into the bomm] edge ot the hinge
slot. The notch in the hinge am]
must be hilly seated into the bottom
ot the slot.
[] Fully open the doo_: If the door will
not fully open, the indentation is
not seated correcflv in the bottom
edge of the slot,
[] Push the hinge locks up against the
front fl'ame of the oxen ca\iU to the
locked position.
Hinge
10ck
Hinge
arm
Push hinge locks up to lock.
[] Close the oven doo_:
20

Other manuals for JBS55

2

Other GE Range manuals

GE JM250DF1WW User manual

GE

GE JM250DF1WW User manual

GE Artistry ABS45DFBS User manual

GE

GE Artistry ABS45DFBS User manual

GE CleanDesign JBP62BMWH Manual

GE

GE CleanDesign JBP62BMWH Manual

GE JMW8GR User manual

GE

GE JMW8GR User manual

GE JGBP89DEMWW User manual

GE

GE JGBP89DEMWW User manual

GE JB390G Installation instructions

GE

GE JB390G Installation instructions

GE JCBS630 User manual

GE

GE JCBS630 User manual

GE JSP46 User manual

GE

GE JSP46 User manual

GE JBP23 User manual

GE

GE JBP23 User manual

GE JGBP36 Original instructions

GE

GE JGBP36 Original instructions

GE PGB930 User manual

GE

GE PGB930 User manual

GE PS968SPSS User manual

GE

GE PS968SPSS User manual

GE JSP42CKCC Manual

GE

GE JSP42CKCC Manual

GE XL44 JGBP79 User manual

GE

GE XL44 JGBP79 User manual

GE P2B940SEFSS User manual

GE

GE P2B940SEFSS User manual

GE JCBS55 User manual

GE

GE JCBS55 User manual

GE JD630DF1WW User manual

GE

GE JD630DF1WW User manual

GE Profile PB905STSS Manual

GE

GE Profile PB905STSS Manual

GE Profile JDP47WFWW User manual

GE

GE Profile JDP47WFWW User manual

GE EGR2000 Original instructions

GE

GE EGR2000 Original instructions

GE JGBS14PCFWW User manual

GE

GE JGBS14PCFWW User manual

GE JGBP35GXH Original instructions

GE

GE JGBP35GXH Original instructions

GE JDP36BWWH User manual

GE

GE JDP36BWWH User manual

GE JGBP32GEL User manual

GE

GE JGBP32GEL User manual

Popular Range manuals by other brands

Whirlpool WEG750H0H owner's manual

Whirlpool

Whirlpool WEG750H0H owner's manual

Viking RDSCD230 use and care manual

Viking

Viking RDSCD230 use and care manual

Thermador PRD304GHC Use and care guide

Thermador

Thermador PRD304GHC Use and care guide

LG LDE4415ST owner's manual

LG

LG LDE4415ST owner's manual

Hotpoint RGB528PENWW specification

Hotpoint

Hotpoint RGB528PENWW specification

Frigidaire GMOS1968AF Getting started

Frigidaire

Frigidaire GMOS1968AF Getting started

KitchenAid Architect Series II KERS505X Dimension Guide

KitchenAid

KitchenAid Architect Series II KERS505X Dimension Guide

Frigidaire FEFB67BH Factory parts catalog

Frigidaire

Frigidaire FEFB67BH Factory parts catalog

Baumatic PCC9120SS Insrtruction manual

Baumatic

Baumatic PCC9120SS Insrtruction manual

Samsung NE595R0ABBB/AA user manual

Samsung

Samsung NE595R0ABBB/AA user manual

KitchenAid KDRS807SSS - 30 Inch Dual Fuel Range installation instructions

KitchenAid

KitchenAid KDRS807SSS - 30 Inch Dual Fuel Range installation instructions

Smeg COS905GX manual

Smeg

Smeg COS905GX manual

Frigidaire FCRG305LAFB Use & care guide

Frigidaire

Frigidaire FCRG305LAFB Use & care guide

Kuhn Rikon HOTPAN 30740 instructions

Kuhn Rikon

Kuhn Rikon HOTPAN 30740 instructions

Estate TGS325VB installation instructions

Estate

Estate TGS325VB installation instructions

AMERICANA AGBS300 Owner's Manual & Installation Instructions

AMERICANA

AMERICANA AGBS300 Owner's Manual & Installation Instructions

Frigidaire Gallery Premier FGEF3077K Specifications

Frigidaire

Frigidaire Gallery Premier FGEF3077K Specifications

Giorik Unika 900 TE740E Installation and operating instructions

Giorik

Giorik Unika 900 TE740E Installation and operating instructions

manuals.online logo
manuals.online logoBrands
  • About & Mission
  • Contact us
  • Privacy Policy
  • Terms and Conditions

Copyright 2025 Manuals.Online. All Rights Reserved.