geda grill Odin 95 User manual

geda grill
USER’S MANUAL
Odin 95

geda grill
WARNING!
CARBON MONOXIDE POISONING
The symptoms of carbon monoxide poisoning:
headache, dizziness, weakness, nausea, vomiting,
sleepiness, and confusion. Carbon monoxide reduces
the blood’s ability to carry oxygen. Low blood oxygen
levels can result in loss of consciousness and
sometimes death.
See a doctor if you or others develop cold- or flu-like
symptoms while cooking or in the vicinity of this
appliance.
Carbon monoxide is especially toxic to mother and child
during pregnancy, infants, the elderly, smokers, and
people with blood or circulatory system problems, such
as anemia or heart disease.
Only use your geda grill outside!
Never use flammable liquids to start or restart a fire in
this appliance. Keep all such liquids well away from this
grill when in use.
CAUTION!
READ ALL INSTRUCTIONS BEFORE INSTALLING AND USING THE APPLIANCE
Please read this entire manual before installation and use of this geda pellet grill. Failure to follow these
instructions could result in property damage, bodily injury, or even death.
Cooking with a geda hardwood pellet grill will bring many years of enjoyment. Your new geda grill is designed
and engineered in Germany to make outdoor cooking easier, while giving you optimal performance with the
most extrodinary-flavored food.
As with all grills and cooking appliances, anytime you burn a material (whether it be wood, gas, or charcoal),
organic gases are formed during the cooking process. One gas that can be particularly harmful in concentrated
quantities is carbon monoxide. In an outdoor, open-air environment, carbon monoxide should naturally
dissipate and not harm you.

geda grill
WARNING!
Assemble and operate the geda grill only per the instructions in this Owner’s manual.
This grill is intended for outdoor use only!
Never use heating fuel pellets in the geda grill.
Only use geda hardwood grill pellets to avoid any damage to the grill.
During and after use, many parts of this grill can become very hot and cause burns if not handled with
care.
The geda grill should not be left unattended.
The geda grill should not be moved while in use.
The geda grill should not be moved until completely cooled down.
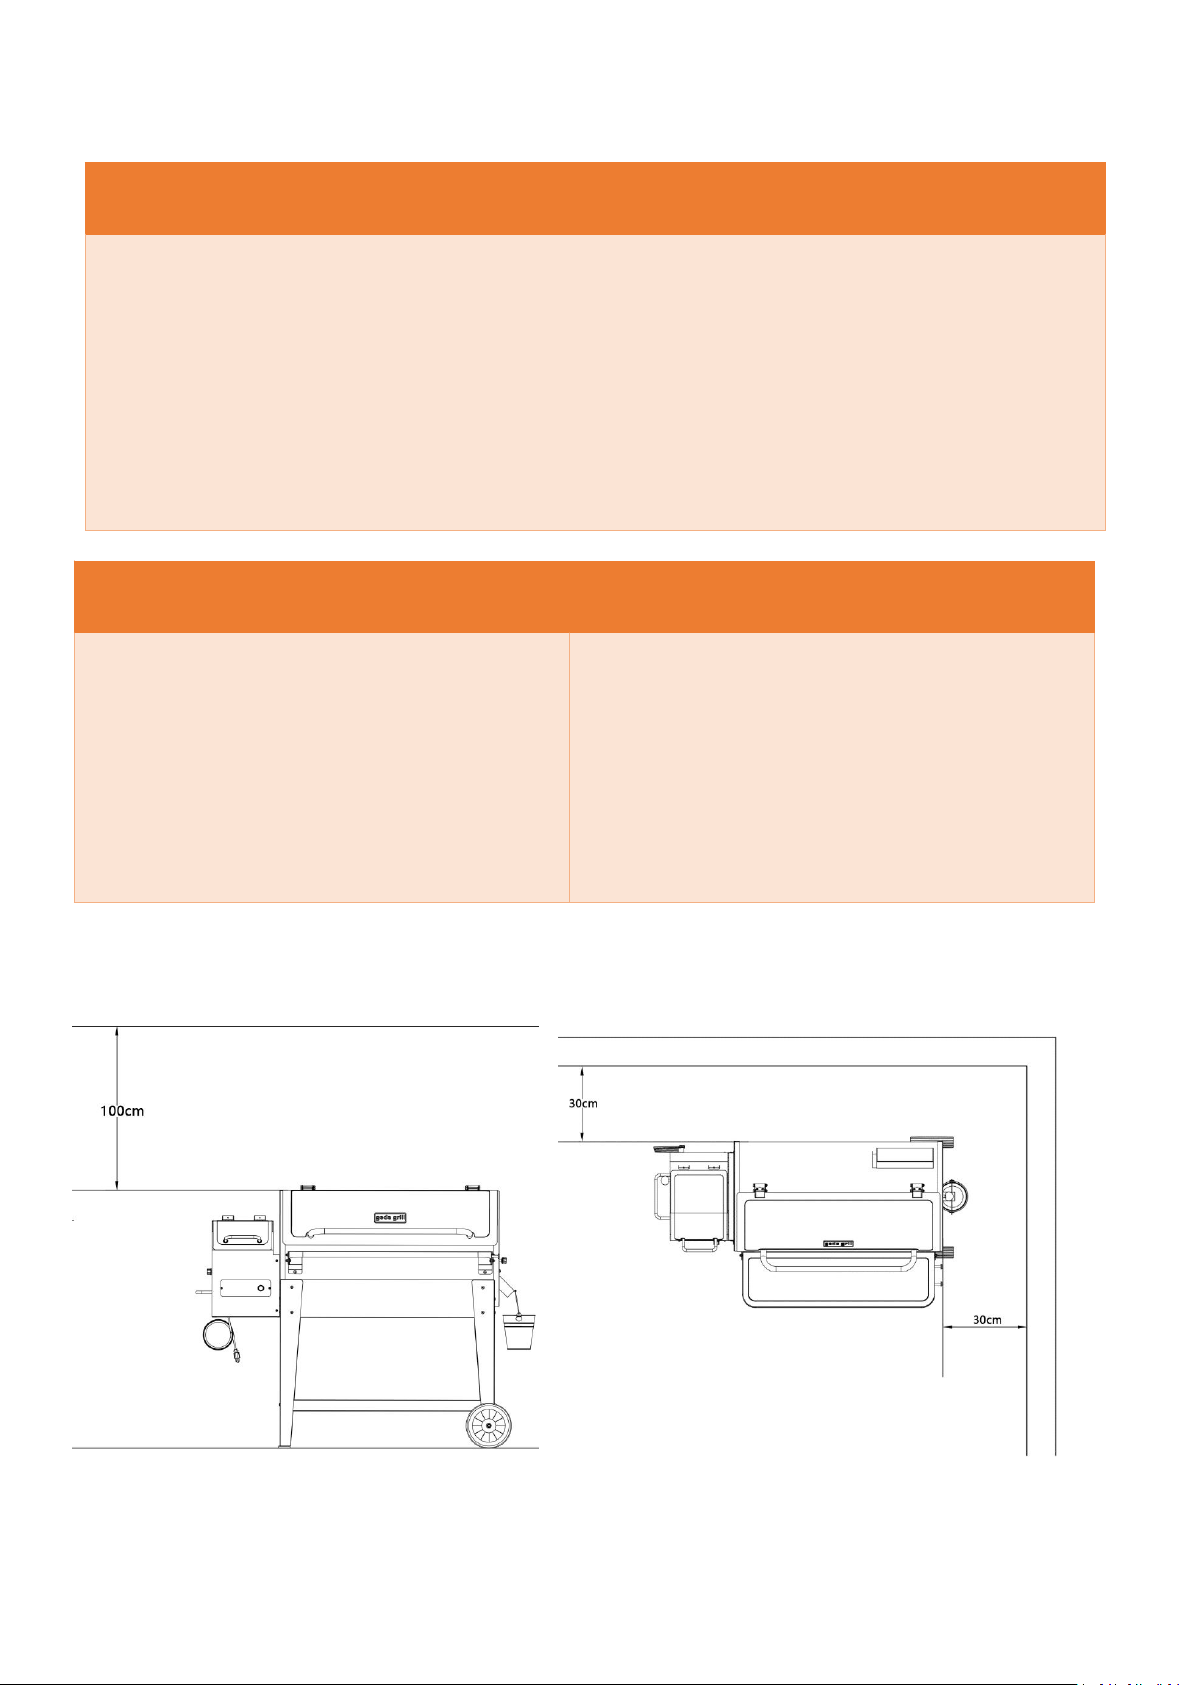
Maintain a safety distance of at least 30cm to any wall or obstacle.
Maintain a safety distance of at least 100cm to any overhead ceiling.
Should not be operated by children under 18 years of age.
Never use gasoline, alcohol or any other lighter fluid to start or restart the the fire.
Animals or children should keep a distance of 100cm from the grill.
Before starting the geda grill, make sure it’s in good condition.
Do not alter the geda grill in any way.
Do not start or operate the geda grill until it’s completely assembled and all screws are securely
tightened.
Do not store any flammables within 30cm of the geda grill or on the storage shelf.
Do not operate the geda grill without the grease bucket in place.
Do not put anything heavier than 10kg on the front shelf.
Do not operate the grill during the influence of alcohol or drugs.

geda grill
Grill parts

geda grill
Grill parts
Item
Description
Qty/Set
Item
Description
Qty/Set
1
Chimney
1
19
Hopper Bottom Plate
1
2
Chimney Slider
1
20
High Leg
2
3
Grill Handle
1
21
Short Leg
2
4
Grill Lid
1
22
Wheel Axle
1
4,1
Probe Rubber Plug
1
23
Storage Plate 95
1
4,2
Heat Insulation Band
1
24
Pellet Discharge Plate
1
5
Grill Lid Hinge
2
25
Pellet Discharge Lever
1
5,1
Silicone Lid Stopper
2
26
Pellet Discharge Knob
1
6
Grill Barrel 95
1
27
Air Shaft
1
7
Shelf Front 95
1
28
Auger
1
8
Shelf Front Hinge
2
29
Fire Pot
1
9
Warming Grate 95
1
30
Fire Pot Sheet
1
10
Grill Grate
2
31
Wheel
2
11
Grease Tray 95
1
32
Auger Motor
1
12
Direct Fire Shield
1
32,1
Auger Motor Fan
1
12,1
Direct Fire Lever 95
1
33
Air Ventilation Motor
1
12,2
Fire Shield Locking Splinter
1
33,1
Air Ventilation Fan
1
12,3
Duroplast Ball 40mm
1
34
Hot Rod
1
12,4
Lever Stopper Washer
1
35
Temerature Probe
1
13
Left Cylinder
1
36
Power Cord 2,5 m
1
13,1
Right Cylinder
1
37
Controller Board
1
14
Hopper Body
1
38
Grease Bucket
1
15
Hopper Lid
1
39
Geda Logo
1
16
Hopper Handle
1
40
Tool Hook
2
17
Hopper Lid Hinge
2
55
High Leg Foot
2
18
Hopper Grate
1

geda grill
Assemble your Odin 95 grill
Item
Discription
Qty
Size
Shelf Front 95
1
Shelf Front Hinges
2
Storage Plate 95
1
High Leg
2
Short Leg
2
Wheel Axle
1
Wheel + Wheel Cap
2
Grill Handle
1
Hopper Handle
1
Warming Grate 95
1
Grill Grates
2
Direct Fire Lever, Duroplast ball, Locking
splinter, Lever Washer
1
Direct Fire Shield
1
Grease Tray 95
1

geda grill
Grease Bucket
1
Elastic Gasket
4
M4 Countersunk Bolt
2
8mm
M6 Hexagon Bolt
30
20mm
M6 Hexagon Bolt
4
30mm
M6 Hexagon Step Bolt
4
14mm
M6 Cap Nut
4
M6 Flange Nut
14
M12 Locknut
2
Rubber Gasket
4
15mm
Hex Allen Key
1
M6 Gasket
30

geda grill
Assembly steps Odin 95
1.
2.
M6 Flange Nut (4)
M6 Hexagon Bolts 20mm (8)
High Leg
Storage Plate 95
M6 Hexagon Bolt 30 mm (2)
Rubber Gasket 15mm (2)
M6 Gasket (8)
M6 Hexagon Bolt 20mm (2)

geda grill
3.
4.
Short Leg
M6 Hexagon Bolt 20mm (10)
High Leg Foot
M6 Hexagon Bolt 30mm (2)
Rubber Gasket 15mm (2)
M6 Gasket(12)
M6 Flange Nut (8)
Wheel Axle
Wheel
M12 Locknut (2)

geda grill
5.
6.
Grill Handle
M6 Hexagon Bolt 20mm (2)
M4 Countersunk Bolt 8mm(2)
M6 Hexagon Bolt 20mm (6)
Shelf Front Hinges
M6 Gasket (6)
Hopper Handle

geda grill
7.
8.
9.
Elastic Gasket (4)
M6 Cap Nut (4)
M6 Hexagon Step Bolt 14mm (4)
Shelf Front 95
Duroplast Ball 40 mm
Direct Fire Shield
Direct Fire Lever 95
Fire Shield Locking Splinter
Grease Tray 95
Grease Bucket
Hopper Grate
Warming Grate 95
Grill Grate
M6 Gasket(2)

geda grill
First Startup Instruction
Remove the grill grate, warming grate, direct fire shield, shield lever and drip tray from
inside the grill.
Connect the power cable to a power outlet of 240V
Make sure that the hopper is clean from unwanted objects and fill the hopper with
genuine geda hardwood pellets.
Press the “ON/OFF” button on the control board and set the temperature dial to Smoke.
Hold down the “Feed” button to feed pellets through the auger and into the fire pot.
When pellets start falling into the firepot, a fire will start.
Hold the “ON/OFF” button down until the display becomes dark. The fan will continue to
run for a few minutes.
Wait until the grill has cooled down, then put back the grill grate, warming grate, direct
fire shield, shield lever and the drip tray into the grill.
Season your grill
1. Turn the temperature dial to Smoke and start your grill.
2. Let the grill run with open lid for 2 minutes.
3. Close the lid, set the temperature dial to High and let it run for another 45 minutes.
Normal Grill Startup
1. Turn the temperature dial to Smoke and press the ON/OFF button.
2. Let the grill run with open lid for 2 minutes.
3. Close the lid, and set the temperature dial to any desired temperature setting.
WARNING!
For best results and flavor, always use genuine geda wood pellets. Never use
heating fuel pellets in the grill. Clean the grease tray and fire shield frequently to
reduce the possibility of a grease fire.

geda grill
Pellet Clean-out
1. Put a bucket behind your hopper, under the pellet discharge door.
Pellet clean-out door
2. Pull the pellet discharge lever all the way out.
Pellet discharge lever

geda grill
Clean your geda grill
1. Make sure your grill is cooled down.
2. The grill should be powered off and the power cord disconnected.
3. Remove the warming grate, grill grate, direct fire lever, direct fire shield and grease tray.
4. Use a vacuum cleaner to get rid of all the ash inside the grill.
ATTENTION!
Before vacuuming, make sure that the ashes are completely cold and no more embers are present.
Grease-collection channel
Removal of fat residues:
1. Make sure the grill is cool and disconnected from the mains.
2. Remove the warming grate, grill grate, direct fire lever, direct fire shield and grease tray from the
grill.
3. Use a spatula or similar tool to scrape off the grease tray and the direct fire shield and wipe it off
with a paper towel or a damp cloth.

geda grill
4. Use the same method to clean the grease-collecting channel on the right cylinder side, as well as
the drainage pipe and the grease bucket.
5. Reconnect the power cord and start your grill.
Geda Grill Control Board Introduction
The Control Panel
Button Functions
POWER BUTTON
Press the POWER BUTTON to power ON the geda grill. Once connected to a power source and the
POWER BUTTON is pressed, the digital LCD screen will light up.
Press and hold the button for 3 seconds to turn the grill OFF, which activates the grill’s Shutdown
Cycle.
FEED

geda grill
Feed pellets into the fire pot.
Pressing and holding the feed button will activate an extra feed of pellets to the fire pot.
Release “FEED” to stop feeding pellets.
DISPLAY
The LCD screen is used as the information center for your inputs. The LCD screen will display your
current cooking temperature, desired cooking temperature and the temperature of the probe(s) if
connected. If only 1 probe is connected, only one reading will be displayed.
PROBE- P1 and P2:
The “P1” and “P2” are used to insert probes to detect internal temperature of chosen food. Once
probes are connected, the food temperature would be displayed under P1 and P2 on the display.
TEMPERATURE DIAL
The temperature settings of the grill start from SMOKE, 90°C, 105°C, 120°C, 135°C, 150°C, 175°C,
205°C, 230°C, 245°C to HIGH.
SMOKE
this setting is used for smoking foods at an average temperature of 85°C. This setting will produce
large amounts of smoke.
90°C, 105°C, 120°C, 135°C, 150°C, 175°C, 205°C, 230°C, 245°C to HIGH. At those settings, the auger
motor is running, and feeds pellets into the fire pot according to set temperature.

geda grill
HIGH
allows the grill to use its full power and can reach temperatures up to 260°C or higher on a geda grill
using geda hardwood pellets.
Auger keeps running, fan is on and hot rod is OFF.
GRILL ELECTRIC SYSTEM
Inputs:
Input 1 - 250V 2A 50 Hz
Input 2 - Probes- P1 and P2
Input 3 - RTD
Outputs:

geda grill
Output 1 - Hot Rod (230V 200W)
Output 2 - Auger Motor (230V 20W)
Output 3 - Fan Motor (230V 20W)
Output 4 - Probe and grill temperature display
OPERATION FLOW
Step 1.
The power cord is connected. At this point, LCD screen is turned on and will flash 3 times, then the
LCD display is powered off.
Motor, fan and hot rod are kept off.
Step 2.
Press ON/OFF button, which powers the grill on. LCD display will turn on and the grill will begin its
Startup Cycle.
Motor, fan and hot rod will automatically activate during Startup Cycle.
The whole Startup process takes 6 minutes. If the grill is successfully ignited, it would
automatically begin it’s Running Cycle.
STARTUP
After the initial Startup Cycle begins, the temperature dial can be adjusted without
resetting the Startup Cycle.
1. The hot rod heats up within 6 minutes.
2. The auger motor runs a total time of 3,5 minutes.
3. The fan runs for 6 minutes.
At the end of the Startup Cycle, the RTD sensor would automatically run a temperature check inside
of the grill. The startup process is successful if the temperature is increased by more than 20°C or the
temperature exceeds 55°C. If the grill fails the Startup process, it will automatically restart from step
1.
The geda grill will attempt the startup cycle a total of 4 times. If any of the following temperature
changes accurse: grill temperature is increased by 20°C or internal temperature reaches 55°C the grill
will start its Running Cycle. If the grill fails to start the Running Cycle after 4 attempts, the display will
show “Er2”.
The auger motor, fan and hot rod will shut down automatically.
Step 3.

geda grill
Use the temperature dial to set desired temperature of the grill. At the end of the Startup Cycle, the
grill will automatically begin its Running Cycle.
The motor, fan and hot rod are will run according to set temperature.
Running Cycle
Fan is always on, auger is running in algorithm of PID according to set temperature, hot rod is
deactivated)
The display will show the actual temperature inside the grill and the probe temperature in P1 and/or
P2 if probes are connected at all times.
Automatic Re-Light
At any time during operation, would the grill temperature drop below 55°C for 10 minutes, the
Digital Control Center will activate the Automatic Re-Light mode. This mode will re-activate the
Startup Cycle, and all its features.
If it fails, the display will show “Er3”.
The “Re-Light” mode aids in ensuring that a small fire is maintained during use in lower temperatures.
It also helps to re-light a fire that may have gone out when going from an extremely HIGH
temperature to LOW temperature. If it fails to ignite, the display will show Er3.
Shutdown Cycle
If the ON/OFF button is pressed down for 3 seconds the grill will activate its
Shutdown Cycle. The fan will be kept on to let the fire burn out and to cool down
the grill. After 5 minutes the grill control system will do an automatic temperature
check. If the temperature is below 55°C the grill fan will stop and the grill will shut
down completely.
During the Shutdown Cycle - the display, Auger motor and Hot rod will be OFF.
Fan will be ON.
Err Information
1. Er1: Grill RTD fails to connect to the control board.
2. Er2: Startup Cycle fails.
3. Er3: Auto re-light fails.
4. ErH: The temperature inside the grill exceeds 315°C.

geda grill
2-YEAR WARRANTY
In addition to the statutory guarantee, Geda garden and home GmbH guarantees that this barbecue
will not be defective in material and workmanship under normal use and maintenance for a period of
two years from the date of purchase. Should complaints still be made, Geda garden and home GmbH
will provide the defective components as replacements free of charge.
This warranty does not cover the parts that are worn out or consumed during normal use. It does not
include labor costs, for the determination or replacement of defective parts and their shipping costs.
Geda garden and home GmbH is not liable for consequential damages under this guarantee. The
warranty is excluded if the device is not assembled or operated in accordance with the user’s manual
supplied with this device or if this device or components is resold or passed on, if accessories or fuels
that are not compatible with this device are used. We also do not warrant if the equipment is used
for commercial or gastronomic purposes or is not used as intended or is not properly maintained.
For processing a warranty claim, Geda garden and home GmbH will require proof of purchase date.
You should keep your proof of purchase or invoice safe with this certificate.
Extended warranty to 3 years
We grant you one additional year warranty if you visit and upload your proof of purchase as a photo
or scanned document on our homepage: www.geda-grill.de within the first 6 months after
purchasing date. We can then ensure that all necessary documents are available for a warranty case.
Table of contents
Popular Grill manuals by other brands

Princess
Princess 104020 Dinner4Two Pure instruction manual

Coleman
Coleman 9941 Instructions for use

Jula
Jula Axley 004331 operating instructions

George Foreman
George Foreman GR18SBTMR owner's manual

Char-Broil
Char-Broil TRU Infrared Patio Bistro 12601713 Assembly guide

CONTINENTAL EDISON
CONTINENTAL EDISON AN-152P Instruction booklet