GEMHD SEE875 User manual

XSEE875
SEE875 External Varifocal (TVI/AHD/CVI) & Analogue with IRs
Email: support@Gem-HDCCTV.com 1 Last Revised 21/05/2018
SEE875(B/W) External Varifocal Bullet Camera (2.8 ~ 12mm) Lens
The SEE875 has multi format HD modes for TVI, AHD, CVI and CVBS
and a separate BNC for CVBS* (analogue) use.
Special Features
The SEE875 cameras produce exceptional quality images using a 2.1 MegaPixel
1/2.9” sensor providing HD 1080P resolution.
The SEE875 is a multi-format HD camera with TVI, AHD, CVI and CVBS mode
selection and in addition a separate analogue output (CVBS) on a separate BNC lead.
* Additional CVBS output available if using HD, but only one CVBS if not.
In HD-TVI mode the cameras have the Coaxitron Control facility for changing the
OSD menu specifications via the DVR or remote network connection, or via the
camera joystick.
This camera has a dual flat glass plate to reduce IR reflection.
Features:
Multi format TVI/AHD/CVI/CVBS
plus separate BNC for CVBS*
2.1 MegaPixel sensor
3 MegaPixel 1080P/700TVL (CVBS)
2.8 ~ 12mm lens
3 x 3rd Gen. IR LEDs up to 50m range
Privacy masking & Motion Detection
Metal body IP66 rated
Wide Dynamic Range
Sens-Up for improved night vision
Made in shiney white and shiney black
Contents:
SEE875(W/B) bullet camera 2.8~12mm
Metal adjustable sun screen
Metal Deep Base for storing connectors
Allen Keys x2
Mounting screws x 4
Wall plugs x4
Deep Base securing screw x 1
Flat metal key for adjusting zoom/focus
Felt adhesive gasket for deep base
Instruction Manual

XSEE875
SEE875 External Varifocal (TVI/AHD/CVI) & Analogue with IRs
Email: support@Gem-HDCCTV.com 2 Last Revised 21/05/2018
Mounting the Camera
The cables can be routed through the deep base centre hole, through the channel in the deep base or
through the cut-out in the camera base when not using the deep base. Use the self-adhesive felt
gasket to reduce moisture ingress and provide a better seal when attaching to brick work.
Before attaching camera to wall etc., and using the deep base, test fit the deep base to the camera
base by lining up the double line on the deep base with the small triangle on the camera base. Note
that there are slots on the deep base so alignment is when the two parts lock together by twisting as
denoted by the “Open” and “Close” stamped on the camera base.
.
Now you can fit the deep base using the three mounting screws and the wall plugs.
The camera is an external camera for mounting on a wall, flat surface or under a lintel and has
three directional movement using adjustable swivel joints. The connection cables with the
attached menu controller can be stored in the deep base. Use the Allen keys for unlocking the
swivel joints.
Adjusters

XSEE875
SEE875 External Varifocal (TVI/AHD/CVI) & Analogue with IRs
Email: support@Gem-HDCCTV.com 3 Last Revised 21/05/2018
Powering the Camera
The SEE875 draws 12V DC 500mA when IRs are on, and power consumption is rated at 6 watts. It
should be noted that extra headroom is required when the camera is first powered up so we
recommend connecting it to a 12v DC regulated minimum 700mA power supply. The camera is
provided with a fly lead with a mini power 2.1mm DC socket. The camera is polarity sensitive so
connections must be correctly made.
Connecting the camera to control equipment
The dome camera comes with a fly lead for power, TVI/AHD/CVI/CVBS selected BNC video
output plus a second analogue (CVBS) video output on a separate BNC lead. Connect the HD
camera to control equipment via a female BNC-BNC lead. When using a co-ax type cable such as
RG59 or similar, the outer braid of the co-ax provides the “0V GROUND” connection and the inner
core provides the “Video” connection. The separate analogue (CVBS) output is primarily available
for setup purposes but can be used for viewing via an analogue monitor. Note that you cannot use
both analogue outputs together but can view one analogue and one HD.
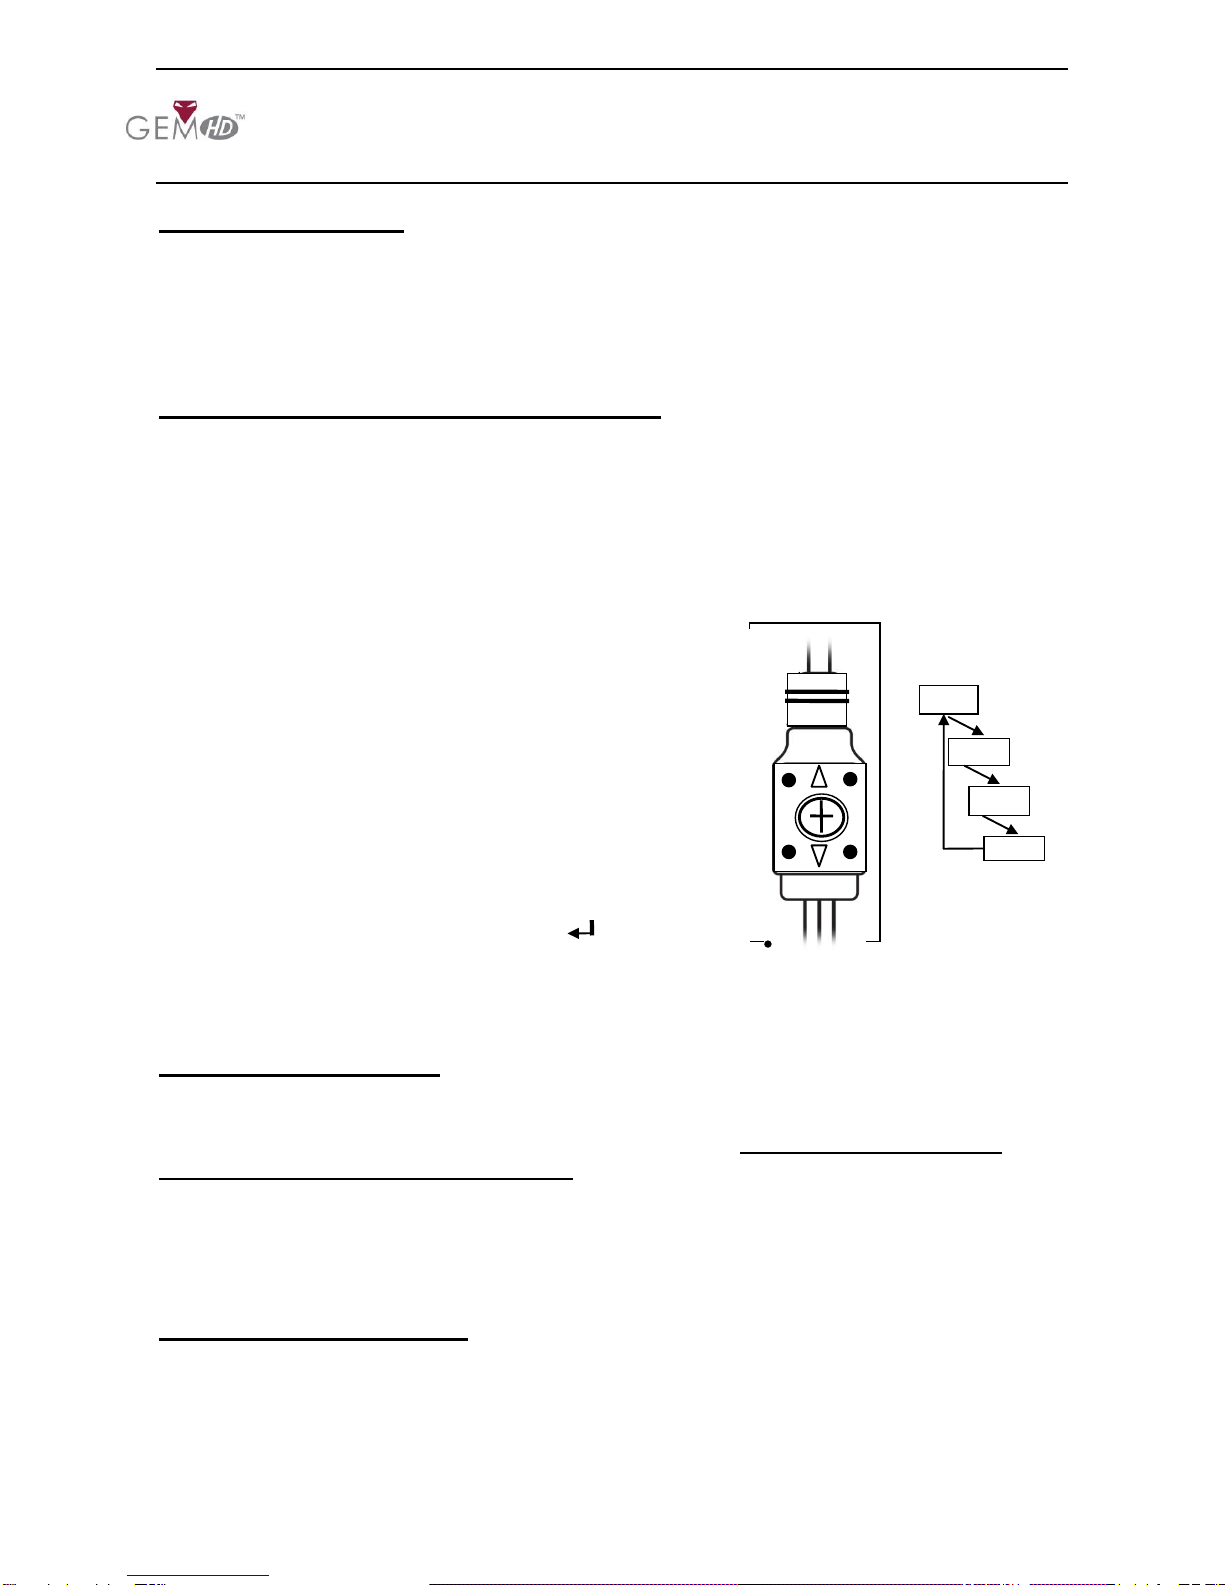
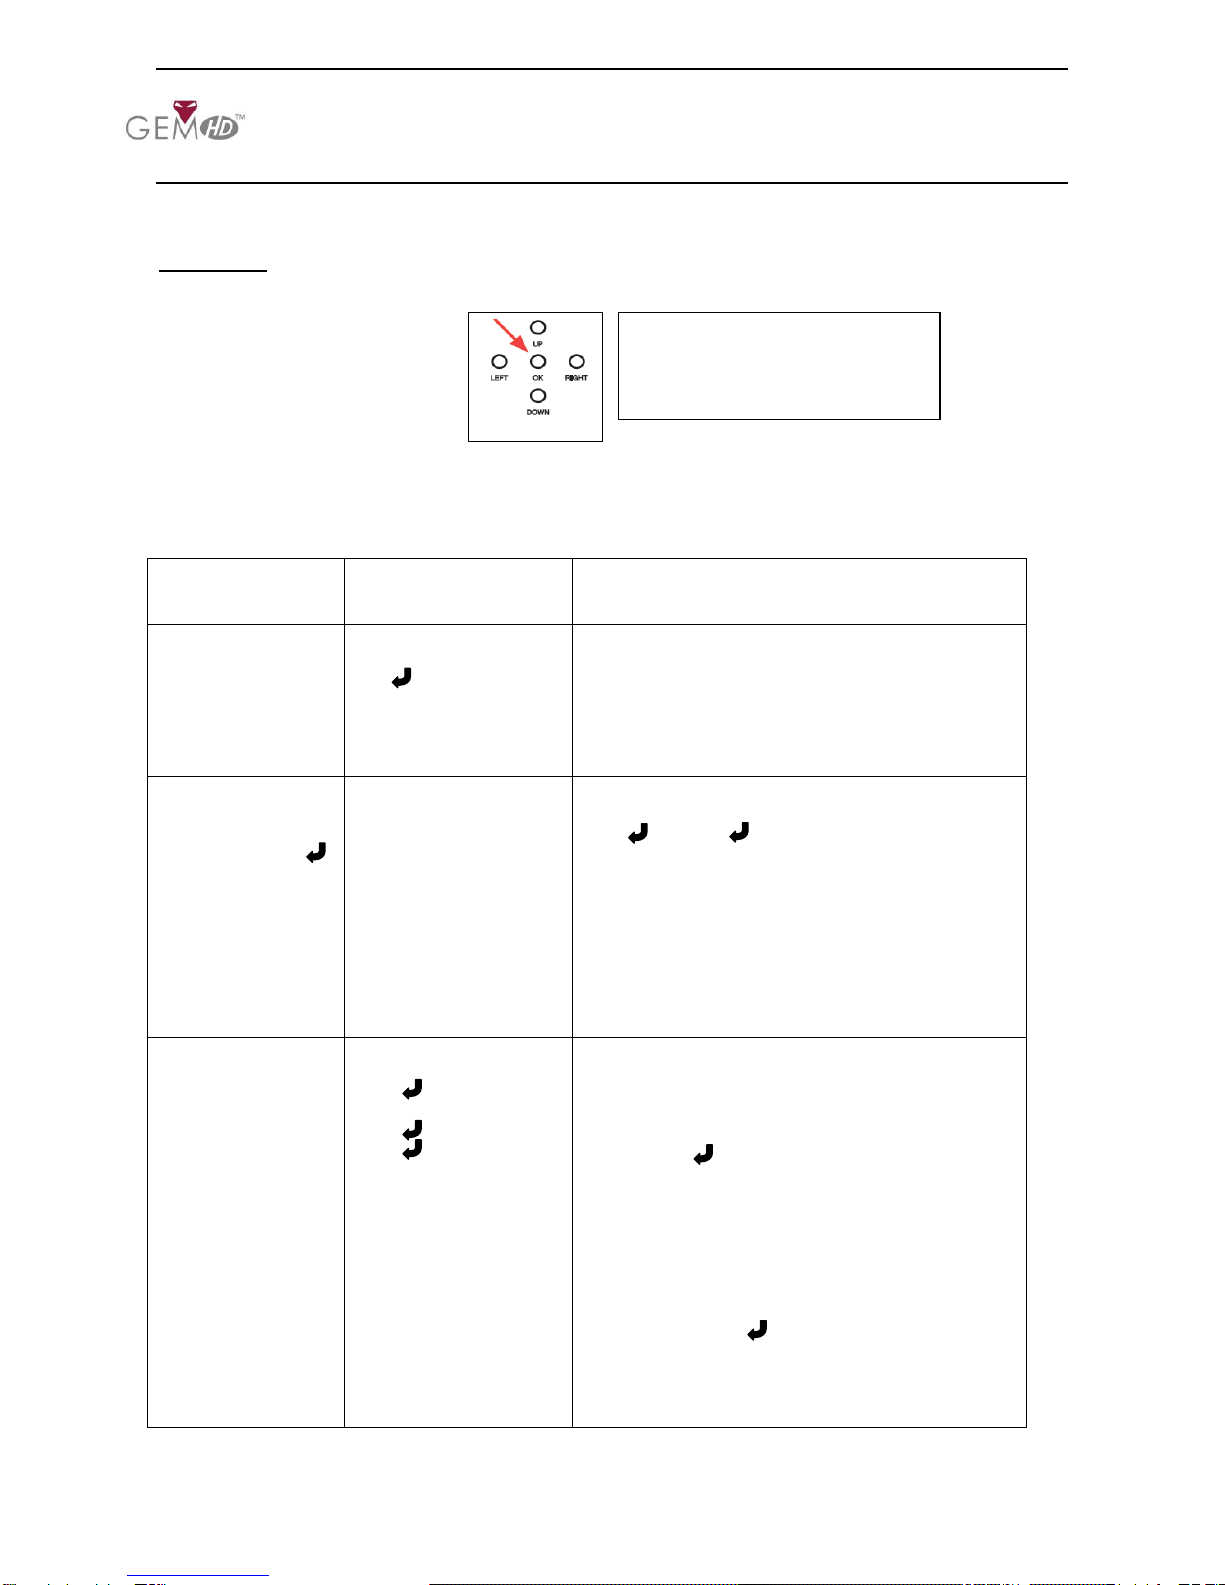
switch cycle
When you are in correct format, press the joystick button in, momentarily, if you wish to access the
menu.
Manual Zoom and Focus
This camera has a 2.8 ~ 12mm vari-focal lens and is adjusted manually. There are two adjusters on
the lens and they are marked Zoom and Focus. Note that you need to first remove the black covers
with the flat metal key provided, by unscrewing anti-clockwise. Note that turning the black
covers does not adjust the zoom and focus. Underneath the black covers are the actual zoom and
focus controls. Adjust the Zoom first using the metal key provided, and when all areas of the picture
viewed are captured albeit out of focus, adjust the Focus to get sharpest picture. There is a digital
correction for sharpness in the camera menu. Only use this, when the best optical picture is acquired
first.
Improve Night time picture
Recommend setting brightness to 75% and Sense-Up to x2 in Exposure menu and set Day&Night
to Auto rather than External. Note that this will not always provide best results but is worth trying
first.
These cameras can be viewed in TVI, AHD, CVI and CVBS.
First power the camera up when it is connected to a monitor or
DVR and monitor, and see if the required format displays a
colour picture. If not, press the joystick button in and not
down, for 3 seconds. Repeat until picture displays in colour and
is sharp. (Note that picture may be in b/w in low light levels or
the cellophane lens cover has not been removed).
Alternatively if you use the menu, you can change the camera
format in the menu:
Example - Change camera format to TVI:
<System> <Output> <MAIN OUTPUT ANALOG OUT0
<System> <Output> <ANALOG OUT0 TVI
TVI
AHD
TVI
CVI
CVBS

XSEE875
SEE875 External Varifocal (TVI/AHD/CVI) & Analogue with IRs
Email: support@Gem-HDCCTV.com 4 Last Revised 21/05/2018
Menu Access via TVI DVR using Coaxitron
Access to the camera menu is via the menu buttons on the camera or via the Up the Co-ax
connection. Access by the menu buttons is described below. To use the Up The Coax connection,
this can be accessed using the PTZ menu in the MEGA TVI or MAX TVI DVRs using the
AlienTVI(Coaxitron) protocol. This protocol is generally set in the PTZ Settings menu as default
but if not, select using the following:
Enter the DVR Menu, click on Video, PTZ and select the channel number of the TVI camera
connected to the DVR. Then click on PTZ Settings and select AlienTVI(Coaxitron) and click
OK.
Use the directional arrows to move up and down or left or right to select options.
Now click on the PTZ button at the bottom of the screen and a full screen picture will be
displayed with the PTZ control menu. Click on the IRIS+ button to display menu

XSEE875
SEE875 External Varifocal (TVI/AHD/CVI) & Analogue with IRs
Email: support@Gem-HDCCTV.com 5 Last Revised 21/05/2018
OSD Menu
The SEE875 has an on screen display menu. This can be accessed using the joystick on the camera.
Alternatively use the TVI DVR PTZ menu as detailed in “Menu Access via DVR” above.
The following menu display is shown:
IRIS
ELC
ALC
Electronic Light Control –overall brightness of picture
Auto light compensation –measures peak light levels
FOCUS ADJ
OFF
ON
Focus Area Wide / Narrow / Middle (Def Wide)
Disp Tone (Display Tone 0 Low, 1 Medium , 2 High
Disp H_Pos 0 ~ 60 Horizontal Position (Def 2)
Disp V_Pos 0 ~ 34 Vertical Position (Def 12)
Disp H_Size 0 ~ 60 Horizontal Size (Def 2)
Disp V_Size 0 ~ 34 Vertical Size (Def 14)
Return
EXPOSURE
BRIGHTNESS
SHUTTER
SENS-UP
AGC
RETURN
0 ~ 20 (Def 10)
Auto / Manual / / Flicker
Normal /Deblur (Def Auto)
Manual-
1/25,1/50,1/100,1/200,1/400,1/800,1/1600,1/3200,
1/6400,1/12800,1/25600 (Def 1/25)
Flicker
Off /x2/x4/x8/x16/x32 (Def Off)
0 ~ 10 (Def 10)
BACKLIGHT
OFF
HLC
BLC
WDR
SPECIAL NOTE:
IF USING WDR YOU
WILL LOSE ANY CVBS
CONNECTION
Level 1 ~ 20 / Color –
BLK/Customise/WHT/YEL/CYN/GRN/MAG/RED/BLU
H-Pos –V-Pos –H-Size –V-Size - Return
Normal / ROI (Region of Interest)
ROI –
Window Zone 0 ~ 3
Window Use ON / OFF
H-POS 320
V-POS 180
H-SIZE 512
V-SIZE 432
Return
Weight –Low / Middle / High (Def Middle)
Return
Press the centre button straight down
(see arrow) to enter the menu and use
Left, Right, Up and Down to move
through and amend menu settings.

XSEE875
SEE875 External Varifocal (TVI/AHD/CVI) & Analogue with IRs
Email: support@Gem-HDCCTV.com 6 Last Revised 21/05/2018
DAY&NIGHT
EXTERNAL
AUTO
COLOUR
B&W
IR LED Off / On (IRs cannot be switched off)
Anti-Sat. 1 ~ 20 Default 10 (Not used when IRs off)
Extern S/W Low / High
D->N Level 1 ~ 20 Default 13
N->D Level 1 ~ 20 Default 7
Delay –Low / Middle / High - Return
IR LED Off / On (IRs cannot be switched off)
Anti-Sat. 1 ~ 20 Default 10 (Not used when IRs off)
AGC Threshold 1 ~ 20
AGC Margin 1 ~ 20
Delay –Low / Middle / High - Return
IR LED Off / On (IRs cannot be switched off)
Anti-Sat. 1 ~ 20 Default 10 (Not used when IRs off)
Return
COLOR
AWB Auto
Color Gain 1 ~ 20
(Default 13)
Return
AUTOext / Preset (Push)
Color Gain 1 ~ 20 Default 13
Return
MANUAL
C-Temp 5000K / 8000K / 3000K
R-Gain 1 ~ 20 (Default 10)
B-Gain 1 ~ 20 (Default 10)
Return
DIGITAL NOISE
REDUCTION
DNR
Off / Low / Middle / High
IMAGE
SHARPNESS
GAMMA
MIRROR
FLIP
ACE
DEFOG
PRIVACY
RETURN
CVBS / CVI / TVI / AHD - 1 ~ 10 TVI Default 4
0.55 / 0.65 /0.75 / 0.45
Off / On
Off / On
Off / Low / Middle / High (Adaptive Colour &
Contrast Enhancement)
Off / On Mode –Auto / Manual
Level - Low / Middle / High
Off / On Zone Num (0 ~ 15) / Zone Disp Off /On
H-Pos / V-Pos / H-Size / V-Size /
Y-Level (1 ~ 20) / CR Level (1 ~ 20)
CB Level (1 ~ 20) / Return
TRANS (0 ~ 3)
Return

XSEE875
SEE875 External Varifocal (TVI/AHD/CVI) & Analogue with IRs
Email: support@Gem-HDCCTV.com 7 Last Revised 21/05/2018
MOTION
OFF / ON
Det Window
Window Zone 0 ~ 3
Window Use On/Off
Det H-Pos <nn> <nn> value = position
Det V-Pos <nn> <nn> value = position
Det H-Size <nn> <nn> value = size
Det V-Size <nn> <nn> value = size
Return
Det Tone 0 ~ 4
MDRect Fill On/Off
Sensitivity 0 ~ 10 (Default 5)
Motion OSD On/Off
Text Alarm On/Off
Signal Out Off/On
Return
SYSTEM
OUTPUT
FRAME RATE
FREQUENCY
COM.
IMAGE RANGE
FULL / COMP / USER
COLOR SPACE
AUDIO MIC
COLOR BAR
LANGUAGE
CAM TITLE
RESET ON(Push)
Return
Main Output Analog Out 0 / Out 1
Analog Out 0 TVI/AHD/CVI / Analog Out1 CVBS
Y Gain 0 ~ 32 Def 16 / Y Gain not used
CB Gain 0 ~ 32 Def 12 / CB Gain not used
CR Gain 0 ~ 32 Def 12 / CR Gain not used
Position 0 ~ 256 Def 128 / Position not used
Burst Freq 0 ~ 256 Def 128 / Burst Freq not used
Burst Gain 0 ~ 128 Def 69 / Burst Gain not used
UCC Select0 8 Byte (Do not change this)
720 EX Off/ On
UCC Select1 not used
Exit
1080 25P
50Hz / 60Hz
COM
Cam ID 0 ~ 255 Default 0
Baudrate 2400 / 4800 / 9600 / 57600 / 115200
Set Done On (push)
Return
FULL / COMP / USER
Offset 0 ~ 32 (Default 16)
Return
IMAGE RANGE
Offset 0 ~ 32 (Default 16)
Return
HD-CbCr / YUV / SD-CbCr
(Not Used)
Off / On
ENG / CHN / CHN(S) / JPN / KOR
Off / Right Up / Left Down
(Use up or down to select character and
left or right to select position)
Hold down Iris+ button for 3 seconds
EXIT
Press IRIS + to exit

XSEE875
SEE875 External Varifocal (TVI/AHD/CVI) & Analogue with IRs
Email: support@Gem-HDCCTV.com 8 Last Revised 21/05/2018
Menu Description
The following menu description gives more in depth information about the menu options. In some
instances recommendations are made to hopefully enhance the results. However every installation
will be different and there will occasions when alternative solutions may be more suitable.
IRIS
ELC
ALC
Electronic Light Control –measures overall brightness
Auto light compensation –measures peak light levels
ELC Electronic Light Control –measures overall brightness of picture and applies to manual iris lens
ALC Auto light compensation –measures peak light levels and applies to auto iris lens which this camera has.
Recommendation is to set ELC
FOCUS ADJ
OFF
ON
Focus Area Wide / Narrow / Middle (Def Wide)
Disp Tone (Display Tone 0 Low, 1 Medium , 2 High
Disp H_Pos 0 ~ 60 Horizontal Position (Def 2)
Disp V_Pos 0 ~ 34 Vertical Position (Def 12)
Disp H_Size 0 ~ 60 Horizontal Size (Def 2)
Disp V_Size 0 ~ 34 Vertical Size (Def 14)
Return
Focus Area Middle / Wide / Narrow Select to create a focus box
In the camera menu you can enter the Focus Adjust option and select and area for best focus result
by creating a box (Wide, Middle or Narrow) to select the required area for focusing. These 3 bars
means sharpness, from left to right means from low frequency to high frequency, or from wide
range to narrow range sharpness. Green stands for the former highest sharpness, Yellow stands for
the present highest sharpness. Note that this is a setup aid for manual focusing and only applies
when manual vari-focal lenses are used . Ensure option is switched off after setup.
Disp Tone 0 / 1 / 2 (Alter brightness of focus aid)
Disp H _ Pos (Set horizontal position of Focus Box)
Disp V _ Pos (Set vertical position of Focus Box)
Disp H _ Size (Set horizontal size of Focus Box)
Disp V _ Size (Set vertical size of Focus Box)
RETURN
Return to Main Menu

XSEE875
SEE875 External Varifocal (TVI/AHD/CVI) & Analogue with IRs
Email: support@Gem-HDCCTV.com 9 Last Revised 21/05/2018
EXPOSURE
BRIGHTNESS
SHUTTER
SENS-UP
AGC
RETURN
0 ~ 20 (Def 10)
Auto / Manual / / Flicker
Normal /Deblur (Def Auto)
Manual-
1/25,1/50,1/100,1/200,1/400,1/800,1/1600,1/3200,
1/6400,1/12800,1/25600 (Def 1/25)
Flicker
Off /x2/x4/x8/x16/x32 (Def Off)
0 ~ 10 (Def 10)
BRIGHTNESS 1 ~ 20 (Default = 10)
Use this setting to increase brightness by opening camera iris. Useful for improving night time
viewing by using in conjunction with the Sens-Up option. However be aware to consider possible
effects when there is strong sunlight in summer that if setting brightness to high it may cause the
picture to white out.
Recommendation is to set brightness to 15.
SHUTTER Auto / Manual
1/25,1/50,1/100,1/200,1/400,1/800,1/1600,1/3200,1/6400,1/12800,1/25600,
Flicker
Shutter speed changes allow you to freeze moving objects without ghosting but reduce the amount
of available light the faster the shutter operates. At night the slower the shutter speed the more light
is available. The Flicker option sets the shutter speed at 1/250 that synchronises with fluorescent
tubes so that the pulsing effect is minimised.
Recommendation is to leave this in Auto.
SENSUP Off /x2/x4/x8/x16/x32
The SensUp option allows the shutter speed to be reduced allowing additional light to be captured.
Increasing brightness helps night time viewing (see BRIGHTNESS setting above). If set too high
and SensUp is slowing shutter speed down to a lower speed than any movement speed, ghosting can
occur.
Recommend that SensUp is switched to x2 or greater but higher settings can cause ghosting.
AGC 1 ~ 20 (Default = 10)
For better performance in low light conditions the AGC (Automatic Gain Control) can be increased.
This has the effect of making the picture brighter but it may also add more noise as it amplifies all
aspects of the video signal. Snowy pictures can be caused when SensUp levels are increased.
Recommend AGC is decreased below 10 if Sensup is set. Set to 9 if SensUp x2.
RETURN
Return to main menu.

XSEE875
SEE875 External Varifocal (TVI/AHD/CVI) & Analogue with IRs
Email: support@Gem-HDCCTV.com 10 Last Revised 21/05/2018
BACKLIGHT
OFF
HLC
BLC
WDR
SPECIAL NOTE:
IF USING WDR YOU
WILL LOSE ANY CVBS
CONNECTION
Level 1 ~ 20 / Color –
BLK/Customise/WHT/YEL/CYN/GRN/MAG/RED/BLU
H-Pos –V-Pos –H-Size –V-Size - Return
Normal / ROI (Region of Interest)
ROI –
Window Zone 0 ~ 3
Window Use ON / OFF
H-POS 320
V-POS 180
H-SIZE 512
V-SIZE 432
Return
Weight –Low / Middle / High (Def Middle)
Return
Backlight Compensation when set, can balance light levels during day and night so that light hitting
objects viewed, is evenly spread across the picture. There are three options HLC, BLC and WDR
that can be selected.
HLC
(High Level Backlight Compensation)
Level 1 ~ 20 / Mode –All Day / Night Only
HLC is high level backlight compensation that will darken a bright area e.g car headlights. This can
be set for all day or night only. The lower the level the more compensation is applied. Note that
using the night option may be best as daytime pictures generally give a more even spread of light
apart from sunlight issues.
Recommend only to use on Night Only if bright lights are causing complete video loss.
BLC
(Backlight Compensation)
H-Pos –V-Pos –H-Size –V-Size
BLC is the standard setting for low level light differences. Select an area where BLC is required.
Using the H-Pos (Horizontal Position) and V-Pos (Vertical Position) followed by H-Size
(Horizontal Size) and V-Size (Vertical Size) create a box where light balancing is required.
WDR
(Wide Dynamic Range) Normal / ROI (Region of Interest) / Weight –Low / Middle / High
WDR is used for surveillance applications where there is a large difference in foreground and
background light levels. Without the option switched on, views by cameras looking through
windows may not give good reproduction outside. Also where there are areas of shadow and bright
sunlight, the WDR option helps to balance light levels. ROI provides an option to create up to 4
areas using WDR rather than applying to the whole picture.
Recommend using WDR where balancing light levels in warehouses or large buildings is
difficult. Also helps when light is entering a window or door entrance.
Return
Return to main menu

XSEE875
SEE875 External Varifocal (TVI/AHD/CVI) & Analogue with IRs
Email: support@Gem-HDCCTV.com 11 Last Revised 21/05/2018
DAY&NIGHT
EXTERNAL
AUTO
COLOUR
B&W
IR LED Off / On (IRs cannot be switched off)
Anti-Sat. 1 ~ 20 (Not used when IRs off)
Extern S/W Low / High
D->N Level 1 ~ 20 Default 13
N->D Level 1 ~ 20 Default 7
Delay –Low / Middle / High - Return
IR LED Off / On (IRs cannot be switched off)
Anti-Sat. 1 ~ 20 (Not used when IRs off)
AGC Threshold 1 ~ 20
AGC Margin 1 ~ 20
Delay –Low / Middle / High - Return
IR LED Off / On (IRs cannot be switched off)
Anti-Sat. 1 ~ 20 (Not used when IRs off)
Return
Day & Night menu controls light settings and predominantly provides options for using the
cameras’ Infra-Red facilities. There are four sub-options namely External, Auto, Colour and Black
& White. The option to switch off IRs is not available in this camera.
EXTERNAL
This option does not use the internal CDS sensor to measure the available light. With cameras using
their own IR light source, this option can give the best results. Note that this option has a manual
adjustment for setting IR switch on according to lux level from day to night and from night to day,
plus an option for applying a delay factor. This stops switching until a pre-determined lux level
remains constant.
Recommend to try this option if Auto does not give required results.
AUTO
The standard Auto function uses the internal CDS to measure available light. This uses AGC
(Automatic Gain Control) and Anti Saturation to measure picture quality before switching which is
used in conjunction with a pre-determined time interval when lux levels remain constant.
Recommend to try this option if poor night time pictures occur.
COLOUR
This option will remain in colour mode day and night. There are no sub menu settings. This will
only be applicable when light levels at night allow the camera to continue working at 4 lux or
higher.
B&W
When this option is selected the camera will remain in black and white mode, day and night.
The only sub menus available are Anti Saturation.
Return
Return to main menu.

XSEE875
SEE875 External Varifocal (TVI/AHD/CVI) & Analogue with IRs
Email: support@Gem-HDCCTV.com 12 Last Revised 21/05/2018
COLOR
AWB Auto
Color Gain 1 ~ 20
(Default 13)
Return
AUTOext / Preset (Push)
Color Gain 1 ~ 20 Default 13
Return
MANUAL
C-Temp 5000K / 8000K / 3000K
R-Gain 1 ~ 20 (Default 10)
B-Gain 1 ~ 20 (Default 10)
Return
This feature automatically adjusts the colour settings in the camera to match the type of light
available, so that white and other colours appear as natural as possible.
AUTO
This option automatically sets white balance.
AUTOext
This option is generally used to set white balance when camera is used externally.
PRESET(Push) Press IRIS+ or joystick centre button down
This option allows you to set white balance using current light levels. Settings will only change
when you press IRIS+ or joystick centre button down.
MANUAL
Use this option to manually balance light levels. Note that the manual option is used for a static
light environment and generally suitable for cameras installed indoors using constant artificial light.
C-Temp 5000K / 8000K / 3000K
R-Gain 1 ~ 20 (Default 10) Sets Red Gain
B-Gain 1 ~ 20 (Default 10) Sets Blue Gain
Return
RETURN
Return to main menu
DIGITAL NOISE
REDUCTION
DNR
Off / Low / Middle / High
DNR Off / Low / Middle / High
Digital Noise Reduction is generally applied when the Sens-Up feature is used to improve night
time views in low light conditions. Using the Sens-Up option slows the shutter speed but this
increases noise and causes grainy picture effects. DNR helps to minimise this effect. The options
low, medium and high, apply different levels of noise reduction and therefore have to be tested to
gain the best result as light levels will be different at every site and location.
Recommend to leave off even when Sense-Up is on and if grainy picture is created then test
starting at low, and leave camera on the best setting.

XSEE875
SEE875 External Varifocal (TVI/AHD/CVI) & Analogue with IRs
Email: support@Gem-HDCCTV.com 13 Last Revised 21/05/2018
IMAGE
SHARPNESS
GAMMA
MIRROR
FLIP
ACE
DEFOG
PRIVACY
RETURN
CVBS / CVI / TVI / AHD - 1 ~ 10 TVI Default 4
0.55 / 0.65 /0.75 / 0.45
Off / On
Off / On
Off / Low / Middle / High (Adaptive Colour &
Contrast Enhancement)
Off / On Mode –Auto / Manual
Level - Low / Middle / High
Off / On Zone Num (0 ~ 15) / Zone Disp Off /On
H-Pos / V-Pos / H-Size / V-Size /
Y-Level (1 ~ 20) / CR Level (1 ~ 20)
CB Level (1 ~ 20) / Return
TRANS (0 ~ 3)
Return
IMAGE
The Image menu covers a variety of options including sharpness, mirror, defog, shading and
privacy masking facilities.
Sharpness (1~ 10 for CVBS / CVI / TVI / AHD)
Depending on the camera format selected, the format/s will be in dark type for adjustment.
The sharpness control is done by digital correction and the best way to set this option is to set level
to maximum of 10, then flick back to 1, to see the difference. Then adjust to display sharpest picture
without displaying heavy black lines around subjects. Only use after the best setting optically is
achieved using the camera focus control.
Gamma 0.55 / 0.65 / 0.75 / 0.45 (Default 0.55)
Gamma correction controls and adjusts the overall brightness of an image.
Recommend trying each option and select best quality picture
Mirror Off / On
This option changes a left handed view to a right handed view if switched on.
Flip Off / On
This option turns a view upside down. This option is generally used with the Mirror function.
ACE Off / Low / Middle / High
Adaptive Colour & Contrast Enhancement (ACE) is an automated option for adjusting colour and
contrast as light levels changes through the day. Low, middle or high options are available.
Recommend setting option to Low
DEFOG Off / On
Mode –Auto - Level - Low / Middle / High
Manual - Level - Low / Middle / High
The defog option can be used to improve the captured image in poor weather conditions such as
smog, fog or smoke. Three levels of optimisation can be applied, low, middle or high. This option
is useful to stabilise rapid fluctuating light levels.
Recommend setting this option to On

XSEE875
SEE875 External Varifocal (TVI/AHD/CVI) & Analogue with IRs
Email: support@Gem-HDCCTV.com 14 Last Revised 21/05/2018
PRIVACY Off / On
Zone Num (0 ~ 15) This function allows the creation of up to 16 coloured
areas to be created to provide privacy masking.
Zone Disp Off /On The Zone Display allows you to switch on and off the
zone number.
H-Pos / V-Pos / H-Size / V-Size
Each area can be positioned using the H-Pos (horizontal position), VPos (vertical position) and
sized using the H-Size (horizontal size) and V-Size (vertical size) options. The Zone Display allows
you to switch on and off the zone number.
Y-Level (1 ~ 20)
CR Level (1 ~ 20)
CB Level (1 ~ 20)
The Y-Level is the colour hue for privacy masking and the CR Level (Chrominance Red) and CB
Level (Chrominance Blue) are used to create the required colour.
The pictures below show an area that has been masked, before and after.
TRANS (0 ~ 3) Set the transparency level of the masked areas.
RETURN
Return to main menu

XSEE875
SEE875 External Varifocal (TVI/AHD/CVI) & Analogue with IRs
Email: support@Gem-HDCCTV.com 15 Last Revised 21/05/2018
MOTION
OFF / ON
Det Window
Window Zone 0 ~ 3
Window Use On/Off
Det H-Pos <nn> <nn> value = position
Det V-Pos <nn> <nn> value = position
Det H-Size <nn> <nn> value = size
Det V-Size <nn> <nn> value = size
Return
Det Tone 0 ~ 4
MDRect Fill On/Off
Sensitivity 0 ~ 10 (Default 5)
Motion OSD On/Off
Text Alarm On/Off
Signal Out Off/On
Return
MOTION Off / On
The motion option when switched on allows you to create up to four areas in the picture and as
motion is detected in these areas, the areas will be displayed with red moving boxes.
DET WINDOW Enter to select window number
Window Zone 0 ~3
Window Use On / Off
Det H-Pos <nn> Set horizontal position
Det V-Pos <nn> Set vertical position
Det H-Size <nn> Set horizontal size
Det V-Size <nn> Set vertical size
Each area can be positioned using the H-Pos
(horizontal position), VPos (vertical position) and
sized using the H-Size (horizontal size) and V-Size
(vertical size) options.
Return
DET TONE 0 ~ 4 Sets the background tone to enable the motion detect
area to be more or less prominent.
MDRECT FILL On / Off Allows the switching on or off of the selected zone
SENSITIVITY 0 ~ 10 Sets the sensitivity of the motion detection
MOTION OSD On / Off Switch Motion On Screen Display on or off
TEXT ALARM On / Off Switch Motion Text Alarm on or off.
Return

XSEE875
SEE875 External Varifocal (TVI/AHD/CVI) & Analogue with IRs
Email: support@Gem-HDCCTV.com 16 Last Revised 21/05/2018
SYSTEM
OUTPUT
FRAME RATE
FREQUENCY
COM.
IMAGE RANGE
FULL / COMP / USER
COLOR SPACE
AUDIO MIC
COLOR BAR
LANGUAGE
CAM TITLE
RESET ON(Push)
Return
Main Output Analog Out 0 / Out 1
Analog Out 0 TVI/AHD/CVI / Analog Out1 CVBS
Y Gain 0 ~ 32 Def 16 / Y Gain not used
CB Gain 0 ~ 32 Def 12 / CB Gain not used
CR Gain 0 ~ 32 Def 12 / CR Gain not used
Position 0 ~ 256 Def 128 / Position not used
Burst Freq 0 ~ 256 Def 128 / Burst Freq not used
Burst Gain 0 ~ 128 Def 69 / Burst Gain not used
UCC Select0 8 Byte (Do not change this)
720 EX Off/ On
UCC Select1 not used
Exit
1080 25P
50Hz / 60Hz
COM
Cam ID 0 ~ 255 Default 0
Baudrate 2400 / 4800 / 9600 / 57600 / 115200
Set Done On (push)
Return
FULL / COMP / USER
Offset 0 ~ 32 (Default 16)
Return
IMAGE RANGE
Offset 0 ~ 32 (Default 16)
Return
HD-CbCr / YUV / SD-CbCr
(Not Used)
Off / On
ENG / CHN / CHN(S) / JPN / KOR
Off / Right Up / Left Down
(Use up or down to select character and
left or right to select position)
hold down Iris+ button for 3 seconds
The SYSTEM menu provides a number of general facilities. These include selecting the correct
camera format, setting a camera identification number and baud rate for RS485 connection,
resolution mode, frame rate and colour standard, language, test colour bar, camera title and camera
reset option.
OUTPUT Main Output Analog Out 0 /1 (Out 0 = HD Out 1 = CVBS)
Analog Out 0 TVI (Select TVI / AHD / CVI)
Y Gain 0 ~ 32 Default 16 Yellow Gain
CB Gain 0 ~ 32 Default 12 Blue Gain
CR Gain 0 ~ 32 Default 12 Red Gain
Position 0 ~ 256 Default 128 Position
Burst Freq 0 ~ 256 Default 128 Burst Frequency
Burst Gain 0 ~ 128 Default 69 Burst Gain
UCC Select0 8 Byte (Do not change this)
720 EX Off/ On
UCC Select1 not used
Exit

XSEE875
SEE875 External Varifocal (TVI/AHD/CVI) & Analogue with IRs
Email: support@Gem-HDCCTV.com 17 Last Revised 21/05/2018
Analog Out1 CVBS / TVI / Off
Analog Out1 CVBS
Return
FRAME RATE 1080 25P / 720 25P / 720 (Crop) 50P (Select camera frame rate)
Sets the camera output mode. 1080P is default.
FREQ 50Hz / 60Hz (Cycles per second)
COM. Cam ID 1 (Set ID number in camera between 0 and 255)
Baud Rate 2400 / 4800 / 9600 / 57600 /115200
Set Done (Press Iris+ button)
Return
IMAGE RANGE Full / Comp / User
Offset 1 ~ 32 (Default = 16)
Return
COLOR SPACE HD-CbCr (High Definition Chrominance Blue and Red)
YUV (Allows grayscale adjustment (Y= luminance UV= colour)
SD-CbCr (Standard Definition Chrominance Blue and Red)
AUDIO MIC Not used
COLOR BAR Off / On (Useful for testing camera colour quality)
LANGUAGE ENG / CHN / CHN(S) / JPN / KOR (Select language required)
CAM TITLE Off / Right Up / Left Down (Enter camera title)
(Use up or down to select character and left or right
to select position) Hold down Iris+ button for 3 seconds
RESET ON(Push) Press IRIS+ or joystick centre button down
Return
EXIT
SAVE
CANCEL
Press IRIS + to exit
Press IRIS + to cancel and exit without saving

XSEE875
SEE875 External Varifocal (TVI/AHD/CVI) & Analogue with IRs
Email: support@Gem-HDCCTV.com 18 Last Revised 21/05/2018
SEE875 Camera Specifications
Sensor
2.19 MP sensor
Video Outputs
TVI, AHD, CVI & Analogue
Resolution 1080p
1920(H) x 1080(V) @ 30fps
Independent CVBS
CVBS 700TVL separate output *
HD distance
Stnd BNC 75ohm cable up to 500m
IR Power
3x Third Gen. IR LEDs up to 50m
Lens
2.8 ~ 12mm varifocal lens 3 MPX
Operating Temp.
-10°C ~ +50°C
Min.Illumination
Colour 0.5 Lux @ F2.0, AGC On
Power/Current
12vDC 500mA IRs On - 700mA PSU
Mounting
Wall, lintel, flat surface
Mirror/Flip
Off / On
Menu
OSD direct and via coaxitron
Backlight
HLC, BLC, WDR, Off
WDR
Wide Dynamic Range option
Dimensions
80(W) x 76(D) x150mm (L)
S/N Ratio
≥ 52dB (AGC Off)
Build
All metal construction
Colour
SEE875B (black) SEE875W(white)
IP Rating
IP66
NiteDevil
Sens-Up option included
Noise Reduction
2DNR and 3DNR low/mid/high
Privacy Masking
16 areas for Privacy Masking
AGC
Automatic/Selectable
ACE
Auto Colour Enhancement option
Motion Detection
On/Off 4 detection zones
* ONLY ONE ANALOGUE OUTPUT DISPLAYS AT ANY TIME
All specifications are approximate. GemHD-CCTV.com reserves the right to
change any product specification or features without notice. Whilst every effort
is made to ensure that these instructions are complete and accurate, GemHD-
CCTV.com cannot be held responsible in any way for any losses, no matter
how they arise, from errors or omissions in these instructions, or the
performance or non-performance of the camera or other equipment that these
instructions refer to.
Table of contents