4
3
Read all the sections of this booklet and follow all the instructions carefully.
Read all the sections of this booklet and follow all the instructions carefully.Read all the sections of this booklet and follow all the instructions carefully.
Read all the sections of this booklet and follow all the instructions carefully.
Before using y
Before using yBefore using y
Before using your rotisserie
our rotisserie our rotisserie
our rotisserie & convection
& convection& convection
& convection oven/toaster
oven/toaster oven/toaster
oven/toaster
▲Before using your toaster oven with rotisserie & convection for the first time, be sure to:
1. Read all of the instruction included in this manual.
2. Make sure that the oven is unplugged and the Timer control is in the “OFF” position.
3. Wash all the accessories in hot, soapy water or in the dishwasher.
4. Thoroughly dry all accessories and re-assemble in oven, plug oven into outlet and you are ready to use your new
toaster oven.
5. After re–assembling your oven, we recommend that you run it at the highest temperature (250℃) on the toast
function for approximately 15 minutes to eliminate any packing residue that may remain after shipping. This will
also remove all traces of odor initially present.
Please Note: Initial start-up operation may result in minimal smell and smoke (about 15
minutes). This is normal and harmless. It is due to burning of the protective
substance applied to the heating elements in the factory.
Using your
Using your Using your
Using your central
central central
central convection
convection convection
convection & rotisserie
& rotisserie& rotisserie
& rotisserie
About Central Convection Cooking
Convection cooking combines hot air movement by means of a fan with the regular features (broil, bake and toast).
Convection cooking provides faster cooking in many cases than regular radiant types of toaster oven. The fan gently
makes the air to cycle in the cavity, quickly browning, crisping. It produces more even heat all over the food by air
movement, so that food cooks/bakes/broils evenly versus the normal ovens hot and cold spots. The convection
feature allows cooking/baking at stable temperatures, which can cook the food more evenly. Central convection
makes the air movement same in the direction of rotisserie, which speeds up the cooking procedure and the food
cooked more evenly and got brown quickly.
Using your rotisserie and convection oven
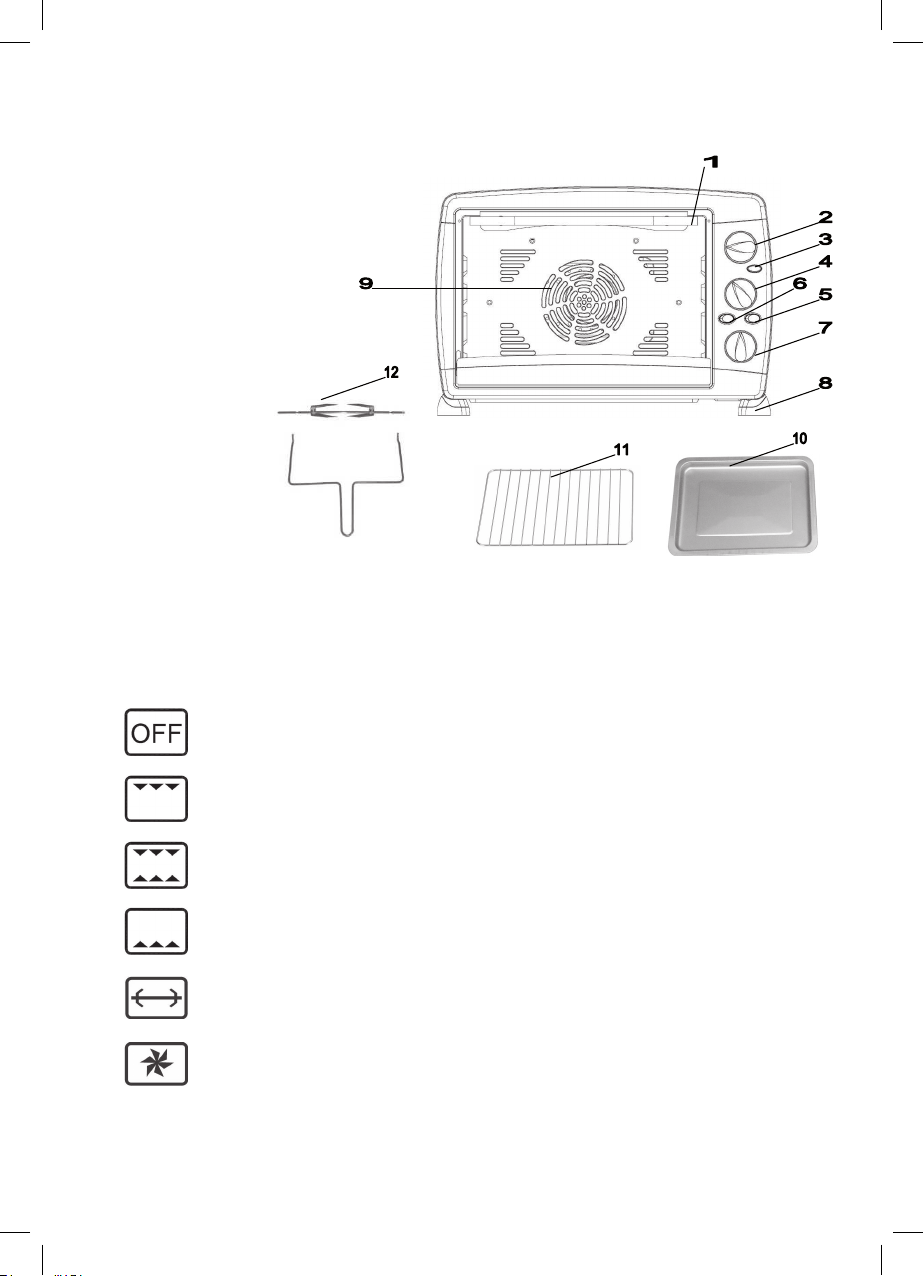
Please familiarize yourself with the following oven functions and accessories prior to first use:
●Temperature Control: choose the desired temperature from 100℃
℃℃
℃to 250℃
℃℃
℃for baking broiling or toasting.
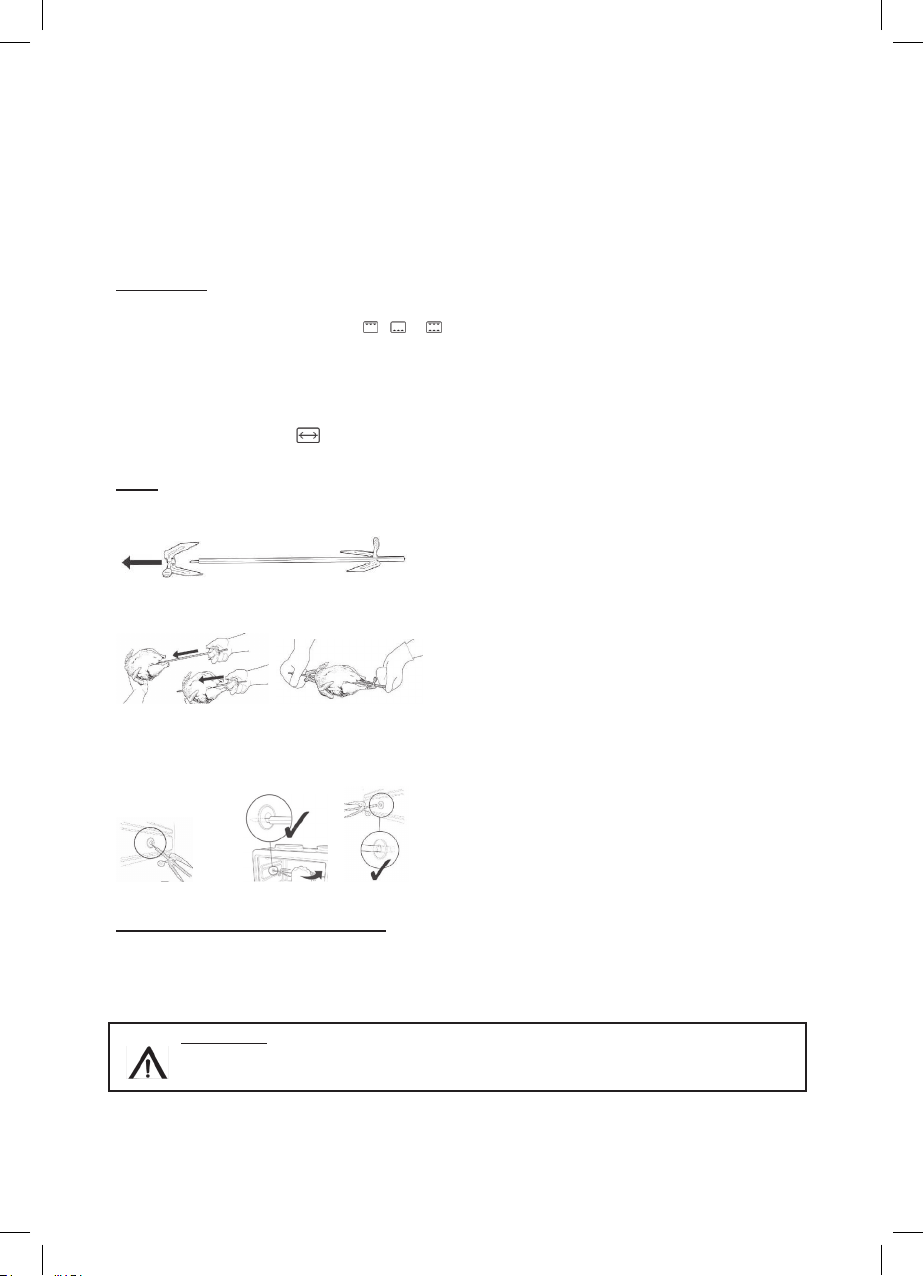
●Four stages switch heating selector: Off/upper/ lower /upper + lower
.
□
□□
□Broil: For broiling fish, steak, poultry, pork chops, etc. (upper heating)
□
□□
□Toast: For bread, muffins, frozen waffles, pizza ,etc. (upper & lower heating )
□
□□
□Bake: For cakes, pies, cookies, poultry, beef, pork, etc. (lower heating)
●Timer Control:
When you turn activate the timer segment of the control, turn the knob in clockwise and turn in anticlockwise to set
the cooking time. The timer also has a bell rings at the end of the programmed time.
●Rotisserie Control: The Rotisserie will not work until you turn on the switch .
□
□□
□You can turn on or off the rotisserie by controlling that switch.
□
□□
□Rotisserie can combine with all heating sectors. So you can select the heating selector to roast your food
according to the food cooked level.
□
□□
□You can stop the rotisserie when the food rotated to specific position to combine the heating selector you want to
make the food more brown and more crispy. Special attention is need in case the food is overcooked or even burnt.
3
Read all the sections of this booklet and follow all the instructions carefully.
Read all the sections of this booklet and follow all the instructions carefully.Read all the sections of this booklet and follow all the instructions carefully.
Read all the sections of this booklet and follow all the instructions carefully.
Before using y
Before using yBefore using y
Before using your rotisserie
our rotisserie our rotisserie
our rotisserie & convection
& convection& convection
& convection oven/toaster
oven/toaster oven/toaster
oven/toaster
▲Before using your toaster oven with rotisserie & convection for the first time, be sure to:
1. Read all of the instruction included in this manual.
2. Make sure that the oven is unplugged and the Timer control is in the “OFF” position.
3. Wash all the accessories in hot, soapy water or in the dishwasher.
4. Thoroughly dry all accessories and re-assemble in oven, plug oven into outlet and you are ready to use your new
toaster oven.
5. After re–assembling your oven, we recommend that you run it at the highest temperature (250℃) on the toast
function for approximately 15 minutes to eliminate any packing residue that may remain after shipping. This will
also remove all traces of odor initially present.
Please Note: Initial start-up operation may result in minimal smell and smoke (about 15
minutes). This is normal and harmless. It is due to burning of the protective
substance applied to the heating elements in the factory.
Using your
Using your Using your
Using your central
central central
central convection
convection convection
convection & rotisserie
& rotisserie& rotisserie
& rotisserie
About Central Convection Cooking
Convection cooking combines hot air movement by means of a fan with the regular features (broil, bake and toast).
Convection cooking provides faster cooking in many cases than regular radiant types of toaster oven. The fan gently
makes the air to cycle in the cavity, quickly browning, crisping. It produces more even heat all over the food by air
movement, so that food cooks/bakes/broils evenly versus the normal ovens hot and cold spots. The convection
feature allows cooking/baking at stable temperatures, which can cook the food more evenly. Central convection
makes the air movement same in the direction of rotisserie, which speeds up the cooking procedure and the food
cooked more evenly and got brown quickly.
Using your rotisserie and convection oven
Please familiarize yourself with the following oven functions and accessories prior to first use:
●Temperature Control: choose the desired temperature from 100℃
℃℃
℃to 250℃
℃℃
℃for baking broiling or toasting.
●Four stages switch heating selector: Off/upper/ lower /upper + lower
.
□
□□
□Broil: For broiling fish, steak, poultry, pork chops, etc. (upper heating)
□
□□
□Toast: For bread, muffins, frozen waffles, pizza ,etc. (upper & lower heating )
□
□□
□Bake: For cakes, pies, cookies, poultry, beef, pork, etc. (lower heating)
●Timer Control:
When you turn activate the timer segment of the control, turn the knob in clockwise and turn in anticlockwise to set
the cooking time. The timer also has a bell rings at the end of the programmed time.
●Rotisserie Control: The Rotisserie will not work until you turn on the switch .
□
□□
□You can turn on or off the rotisserie by controlling that switch.
□
□□
□Rotisserie can combine with all heating sectors. So you can select the heating selector to roast your food
according to the food cooked level.
□
□□
□You can stop the rotisserie when the food rotated to specific position to combine the heating selector you want to
make the food more brown and more crispy. Special attention is need in case the food is overcooked or even burnt.
Before using your rotisserie & convection oven/toaster
Using your central convection & rotisserie