Genee World iQ-Pad User manual

Using the iQ-Pad
learning response system
with ClassComm software
Quick set up guide
Leaders in learning technology

Minimum system requirements:
• Processor:PentiumIII450MHzprocessor(1gigahertz(GHz)Pentiumprocessorrecommended)
• Memory:256MB(512MBoraboverecommended)
• Display:800x600,256colours(Recommended:1024x768highcolour,32-bit)
• CDROMDrive:4xorfaster
• HDD:300MBfreeharddrivespaceforbasicinstallation–500MBharddrivespacerequiredfor
curriculumsamplecontent
• Microsoft.NetFramework2.0(includedininstaller)
• Microsoft®PowerPoint2003orabove
• AdobeFlashplayerversion9(includedininstaller)
• OperatingSystem:WindowsXP,WindowsVistaandWindows7Compatible
Quick set up guide
for iQ-Pad learning
response systems using
ClassComm software

What’sinthecase
iQ-PadLearning
ResponseSystem
Studenthandsets
Theseareusedbystudents
tosendresponses
Teacherhandset
Usedbytheteacher
tocontrolthe
presentation
SoftwareCDwith
QuickSetUpGuide
USBcable BatteriesReceiver
Step 1

iQ-PadsuseAAbatteries(seeimage2).
Preparethehandsets
1. iQ-Pad battery cover being removed
3. Battery cover being screwed on2. Batteries being inserted
Step 2

Preparethehandsets
PleaseensurethatthereceiverisdisconnectedbeforeyouinserttheClassCommInstallationCD.
• IftheCDdoesnotauto-run,youwillneedtomanuallyrun“ClassComm.exe”byexploringtheCD
contents(Fig1)
Fig. 1 – ClassComm CD Contents
TheClassCommInstallationMenuScreenwillopenasshownbelow.
• SelectClassComm Installationfromtheoptions.
• Followtheonscreenwizardinstructionstoinstallthesoftware.
• Duringinstallationthefollowingscreenwillappear(overthepage).
ClassComm
Installation
Menu Screen
ClassCommsoftwareinstallation
Step 3

ClassCommcanbeinstalledinEDUCATIONALmodeorCORPORATEmode.Thecoredierence
betweenthetwomodesofinstallationistheterminologyusedthroughouttheapplication.
EducationalmodeusesSTUDENT,TEACHER,CLASSandTEST.CorporatemodeusesPARTICIPANT,
PRESENTER,GROUPandEVENT.Themodeselectedfromthisscreencanbechangedlaterfrom
withintheClassCommsoftware.
Also,ClassCommhasanInterfaceEditorthatcanbeusedtofurthercustomisetheClassComm
softwarewithyourorganisationspreferredterminology–SeeClassCommHelp > Advanced
Functionalities > Interface Editorfordetails.ForthepurposeofthisQuickSetupGuide,
educationalmodeterminologywillbeused.
ThemainClassCommsoftwareinstallationisnowcomplete.
Note–Donotlaunchthesoftwareatthisstage.Followthroughthis
guidetocompletion.
ClassCommsoftwareinstallation(continued)

• ThereissomeoptionalsamplecontentthatcanbeinstalledforusewiththeClassCommsystem.
Thisstepwilladdcomplete,mappededucationalcontentforusewiththeClassCommsystem.
• FromtheClassCommInstallationMenuScreen,selecttheSample Contentbutton.
• Followtheon-screenwizardinstructionstoinstalltherequiredsamplecontent.
• WhenthemainClassCommsoftwareislaunched,thesamplecontentwillbeinstalledintothe
Resourcesarea.
Samplecontentinstallation(optional)
Step 4

InstallthePowerpointplug-in(SlideMapper)
Note–YouwillneedMicrosoft®Powerpoint®2003oraboveinstalledon
yourPCbeforeyouinstalltheplug-in
• ThePowerPointPlug-inorSlideMapper
isautilitythatisaddeddirectlyintoyour
Microsoft®PowerPoint®application.Itallows
for the mapping of your presentations within
PowerPoint.Themappingprocessassigns
questiondatatoyourslides(Example:True/
False,MultipleChoice,Numericandsoon)
• FromClassCommInstallationMenuScreen,
selectthePowerPoint Plug-inbutton.
• Followtheonscreeninstructionstoinstallthe
PowerPointPlug-in(SlideMapper)module.
• TheSlideMapperwillappearasshownbelow
withinMicrosoftPowerPoint®
Slide Mapper
within PowerPoint
Step 5

Connectthereceiverandtesthandset
communicationwithinClassComm
ConnecttheClassComm
receivertoanavailableUSB
portonthePC.AredLED
willlightupinthereceiver.
• Atthisstage,thePCwillautomaticallydetectthereceiverandcongurethedriversaccordingly.
NOTE–ThereceiverdriversareinstalledduringtheClassCommsoftwareinstallationdescribed
inSTEP3–CLASSCOMMSOFTWAREINSTALLATIONofthisguide.Itisimportanttoinstall
ClassCommsoftwarebeforeattachingthereceiver.
• LaunchtheClassCommsoftwareby
clickingtheiconfromthedesktoporfrom
Start > All Programs > ClassComm.
• Amessageinthebottom-leftarea
oftheClassCommsoftwarewill
appearstatingthatthereceiver
hasconnectedsuccessfully.
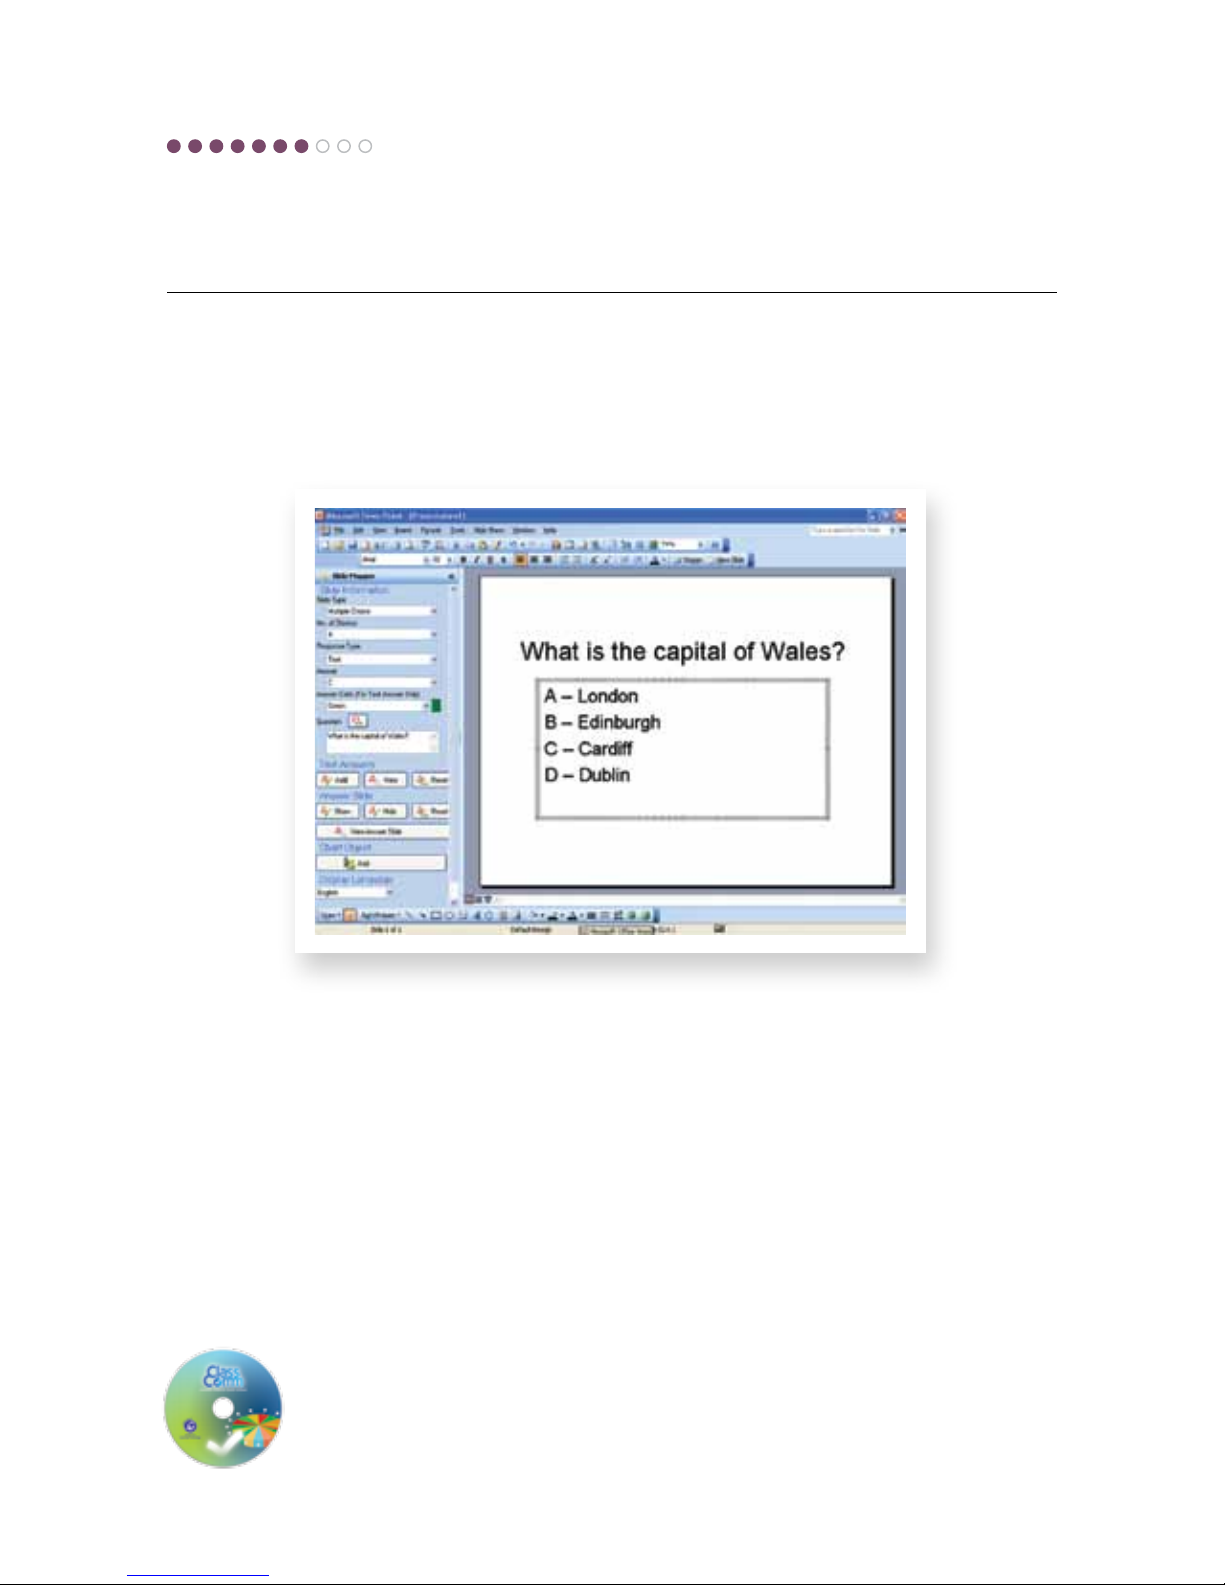
• ClickontheCommunicationtab
withinClassComm.Thiswill
displaythecommunicationgrid
asshownbelow.Turnonthe
handsetsandpressanykey
followedbythesendkey.
Thecorrespondinghandset
IDwilllightupinthegrid.
Thesoftwareisnowinstalledandthehardwareisconguredcorrectly
andhasbeentestedinthecommunicationareaofClassComm.
Step 6

• OpenablankPowerPointPresentationandaddaquestionwith4choicesasshowninthe
examplebelow.
• SelectthefollowingoptionsfromtheSlideMappertomatchtheinformationontheslide
• SlideType:MultipleChoice
• ResponseType:Text
• Answer:Selectthecorrectanswerchoice
• AnswerColour:Green
• Question:Cutandpastethequestiontextfromtheslidehere
• TextAnswers:Fromtheslide,highlightthecorrectanswerandclicktheAddbutton.
Say“Yes”totheconrmationmessagethatappears.
That’sit!Thebasicslidefunctionalityhasbeensetasmultiplechoicewith4textlabelchoices(A-D)
andthecorrectanswertobehighlightedingreenwhentheteacherrevealstheanswerduringa
presentation.Repeattheabovestepsasnecessaryandsavethepresentation.
FormoreinformationonthedierentquestiontypesandSlide
Mapper,consulttheClassComm User Guide(Seesectionon
AddingandmappingaPowerPointPresentation)
Creatingapresentation
Step 7

AddthepresentationintoClassCommresources
• FromwithintheClassCommRESOURCESarea,gotoFile > New > New Activity > New
PowerPoint Activity.
• FromtheNewActivitywindow,clicktheBrowsebuttontonavigatetothepresentationcreatedin
STEP7andclickOK.
• ThepresentationwillnowappearintheRESOURCEStreestructurewiththumbnailviewsofallthe
questionslides.
Step 8

Atthispoint,ClassCommwillminimiseandthePowerPointactivitywillopenreadyforresponses.
UsetheTeacherhandsetorPresentationToolbartocontrolthepresentation.TheResponsebar
showstheQuestiontype,numberandnumberofresponses.Navigatethroughthepresentationand
whencompleted,theslideshowwillautomaticallyendandtheresultssaved.
Runthepresentation
1. EnterthePRESENTATIONareaofClassComm
2. ChecktheExisting Class Presentation option
3. ChecktheRecord Assessment option
4. ChecktheAnonymous login option
5. EnteraClass Name(otherdetailsareoptional)
6. PresstheSavebutton
7. AskstudentstoswitchONthehandsets.TheHandsetareawillshowa
countofActiveHandsets.
8. Clickonceontheresourcetopresentwith
9. ClickonPresent Activity.
1
2
3
4
5
6
7
8
9
Step 9

Toggleresponsebar
formatbetweenstandard
cellviewandpercentage
barview.
Replaythequestion
Navigatequestionslides
Playgame(ifselectedin
presentationarea)
Navigatethechartviews
‘Pickstudent’function
Formoreinformationonrunningapresentation,consultthe
ClassComm User Guide(SeesectiononRunningaPresentation)
Runthepresentation(continued)
Startrecordingofhandset
responses(takestudent
responses)
Stoprecordingofhandset
responses
Endpresentation
Show/HideAnswer
Showresultscharts
Decreaseopacity/full
opacity/increaseopacity
oftheresponsebar
Show/hidethe
presentationtoolbar

Onceapresentationhasbeenfullycompletedandstopped,theClassCommsystemallowsyouto
viewreportsandchartsforassessmentpurposes.
Reports
1. ClickontheREPORTS
button
2. Selectthetypeof
presentation that you
wishtoviewreports
for(Inthiscaseitis
“Anonymous”)
3. SelecttheReport Type
fromtheavailable
options
4. EntertheReport
Settings from the
drop-downoptionsthat
matchtheclassand
presentation that you
presentedandsaved.
5. ClicktheGenerate
Reportbutton(enables
when report settings
havebeencorrectly
entered)todisplaythe
selectedreportinthe
right-pane.
1
2
3
4
5
Step 10

Responsesystemset-upexample1:
Conference settings
‘Wehavethreeprofessionalconferencescomingupwith40delegatesateach.IhaveasetofGenee
iQ-Padsandashortseriesofpre-prepared,mainlymultiple-choice,questionsfromwhichIwantto
gatherdatatoanalysefeedback.Whatisthebestwaytosetup?’
1. CheckthatClassCommisin‘Corporate’
modebygoingtoSettings > Application
mode(youwillhavetorestartClassCommto
activatethissetting).
2. Afteryouhavechosenyourresourceslides,
go to the Presentationwindow.
3. SelectRecord Assessmenttokeepresults
andpublishdata.
4. SelectAnonymous Logintogatheroverall
responseswithoutidentifyingindividual
handsets.
5. EnteraGroup Name andclickonSave.
6. Selectanyotheroptionsofyourchoosing
from the Test Settingswindowsuchas
Participant Feedback or Single Response.
7. SavetheseasyourDefault Settingreadyfor
therepeatconferences.
8. ClickonPresent Activity to start the
presentation.
1
2
3
4
5
6
78

Responsesystemset-upexample2:
Company group training programme
1
2
3
4
5
6
7
9
‘WearecarryingoutHealth&Safetytrainingwithgroupsofouremployees.Itisimportantthatwe
haverecordsofindividualattainmentsothatweknowwhowillbecompetentinparticularwork
situations.Whatisthebestwaytosetup?’
1. CheckthatClassCommisinthecorrectmodefor
you(educationorcorporate)bygoingtoSettings
> Application mode(youwillhavetorestart
ClassCommtoactivatethissetting).
2. Afteryouhavechosenyourresourceslides,goto
the Presentationwindow.
3. SelectRecord Assessmenttokeepresultsand
publishdata.
4. SelectAd Hoc PresentationandNew Group to
buildthegroupparticipantlist.
5. ClickonCapture Namesandaskparticipantstotext
intheirnamesusingthehand-sets.Whenallhave
doneso,clickonStop CaptureandDone.
6. EnteraGroup NameandclickonSave.(ifthis
groupstaysthesame,youcanrecallitforfurther
assessmentstobeaddedtotheparticipants’data).
7. Selectanyotheroptionsofyourchoosingfrom
the Test SettingswindowsuchasParticipant
Feedback or Single Response.
8. SavetheseasyourDefault Settingreadyforrepeat
sessions.
9. ClickonPresent Activitytostartthepresentation.

1How do I change the Handset IDs?
Tochangethehandsetid,usethefollowingstepsinsequence:
Keepthe‘/’keypressedforafewsecondsuntila‘?’appearsonthedisplayscreen.
Ifthe‘/’alsoappearsonthedisplayscreen,theneraseitusingthe‘del’key.
Type1234onthekeypadandpressthe“Delta”or“Chart”keyifusingtheTeacherhandset.
‘ID=’willbedisplayedonthescreen.
Enterthehandsetidyouwanttobeallocatedtothehandsetinthreedigitformat.Forexample,
tosetthehandsetidto1,enter001onthekeypad.
Note:Handsetidmustbebetween“000”and“255”excluding“126”and“206”.
Pressthe“Delta”keyagain.Handsetidwillbesettothenumberentered.Thiscanbeconrmed
bycheckingthenumberbeingdisplayedintheupper-rightcornerofthehandsetscreen.
2How do I reset the handsets?
Useasharp,pointedobjecttopressthesmallbuttonlocatedonthebackofthehandset.Use
thiswhenhandsetwillnotmapcorrectly,freezesorwithchargingproblems.
3What is “Mapping” handsets? When do I need to do this?
EachreceiverhasauniqueIDasshownonthereceiverIDlabel.Allhandsetsarelockedinto
communicatingwithareceiver.Ifyouwanttolockahandsettoworkwithadierent/new
receiveryoumustpressandholddownthe“?”keyuntilthehandsethasmapped.Thiscantake
severalseconds.Whenyouseetheup/downarrowsashingonthehandsetLCD,thehandset
islockedtothenewreceiver.Pleasenotethatwhenlockinghandsetsthedistancebetween
handsetandreceivershouldbeaapprox50-75mm.
4What technology does the response system use and what is
the range?
ThesystemusesRFwithoperatingfrequencybands2405MHzto2485MHz(2.4GHz).
Themaximumtransmissionrangeis50m.
5How many handsets can be used per receiver?
Currently253perreceiver.
FAQ

6How do I transfer a mapped presentation between
computers without re-mapping?
WhenyoumapaPowerPointPresentationandsaveit,anassociatedXMLlewillalsobe
createdandsavedtothesamelocationastheoriginalPowerPointle.TheXMLlecontainsall
themappingdata.Whentransferringmappedpresentations,boththePowerPointleandthe
XMLmustbetransferredtogethertoretainmappingdata.
Aquickwaytotransfermapped,PowerPointactivitiesistouseClassComm’sbuiltinImport/
ExportFeature.WheninresourcesareaofClassComm,selectthepresentation/soryellow
folderyouwishtoexportandgotoImport/Exportfromthetopmenubar.Selectthe
presentationtoexportfromthenewwindowthatopensandchoosethelocationtosave
theexportedleto.Thelewillexportinazippedleformat.Thiszippedlecanthenbe
importedintoClassCommonothercomputers.
7Can I install and run ClassComm from a Server across a
network?
Currently,ClassCommisadesktopapplicationdesignedtobeinstalledandrunfromaTeacher/
presenterPC.Itcannotberuncentrallyfromaserver.AnMSIversionofClassCommisavailable
foreasydeploymentacrossanetwork.
Pleasecontacttechnical@geneeworld.comforfurtherdetails.
8The handsets are not talking to the receiver. What do I do?
• EnsurethatthereceiverisconnectedviaUSBcabletoanavailableUSBportandhasared
LEDshowing.
• OpentheClassCommsoftwareandensurethatitstates“4greceiverconnected”inthe
bottom-leftoftheapplication
• Ensurethatthehandsetsareswitchedonandcharged.
• ChecktheID#symbol–Ifitisblinkingthenthehandsetisnotmappedtothereceiver–Hold
downthe?keywithin50-75mmofconnectedreceivertomapit.
• Resetthehandsetfromtheresetswitchonthebackandre-maptothereceiver.
Pleasecontacttechnical@geneeworld.comiftheproblempersists.
FAQ

Support
Free technical helpline
Tel:08703861900EXT4
Email:technical@geneeworld.com
Website: www.geneeworld.com
3yearswarranty

Genee World
PO Box 3256
Wolverhampton
WV3 0LA
Sales Tel: 0870 386 1900
Fax: 0870 405 0188
Email: enquiries@geneeworld.com
Web: www.geneeworld.com
Leaders in learning technology
Other manuals for iQ-Pad
1
Table of contents