General Life Biotechnology BENECHECK GLU User manual


TABLE OF CONTENTS
Chapter 1
BeneCheck GLUPLUS Glucose Monitoring System
1.1
Introduction...........................................................................................................1-2
1.2
Contents of the Kit................................................................................................3
1.3
Labelling and Informations...............................................................................4
1.4
System Components
Meter..........................................................................................................................5-6
Test Strips....................................................................................................................7
Code Strip....................................................................................................................8
Chapter 2
Setting-up the Meter
2.1
Installing/Replacing the Batteries........................................................9-10
2.2
Set the Year/Month/Day/Hour...........................................................10-11
Set the Minute/Unit of Temperature.......................................................12
2.3
Coding the Meter..........................................................................................13-14
2.4
Control Test......................................................................................................15-19

1
Chapter 1 BeneCheck GLUPLUS Glucose Monitoring System
1.1 Introduction
Thank you for choosing BeneCheck GLUPLUS Glucose Monitoring System. The
BeneCheck GLUPLUS Glucose Monitoring System is designed by General Life
Biotechnology Co., Ltd and marketed all over the world.
The BeneCheck GLUPLUS Glucose Monitoring System provides you with accurate,
plasma-calibrated results based on electrochemical sensor technology and the
superior capillary sampling. The BeneCheck GLUPLUS Glucose Monitoring System
requires only a small amount of blood, the blood glucose level is precisely
calculated and displayed in few seconds.
Intended Use :
The BeneCheck GLUPLUS Glucose Monitoring System is designed to measure the
blood glucose levels in whole blood. The test strips are for testing outside the body (
in vitro diagnostic use ). It should be used only for testing blood glucose with fresh
capillary whole blood samples. The system is suitable for diabetics to monitoring
their blood glucose at home by themselves and also can be used at clinical sites
by healthcare professionals to test the blood glucose levels of patients.
Chapter 3
How to Perform a Blood Glucose Test
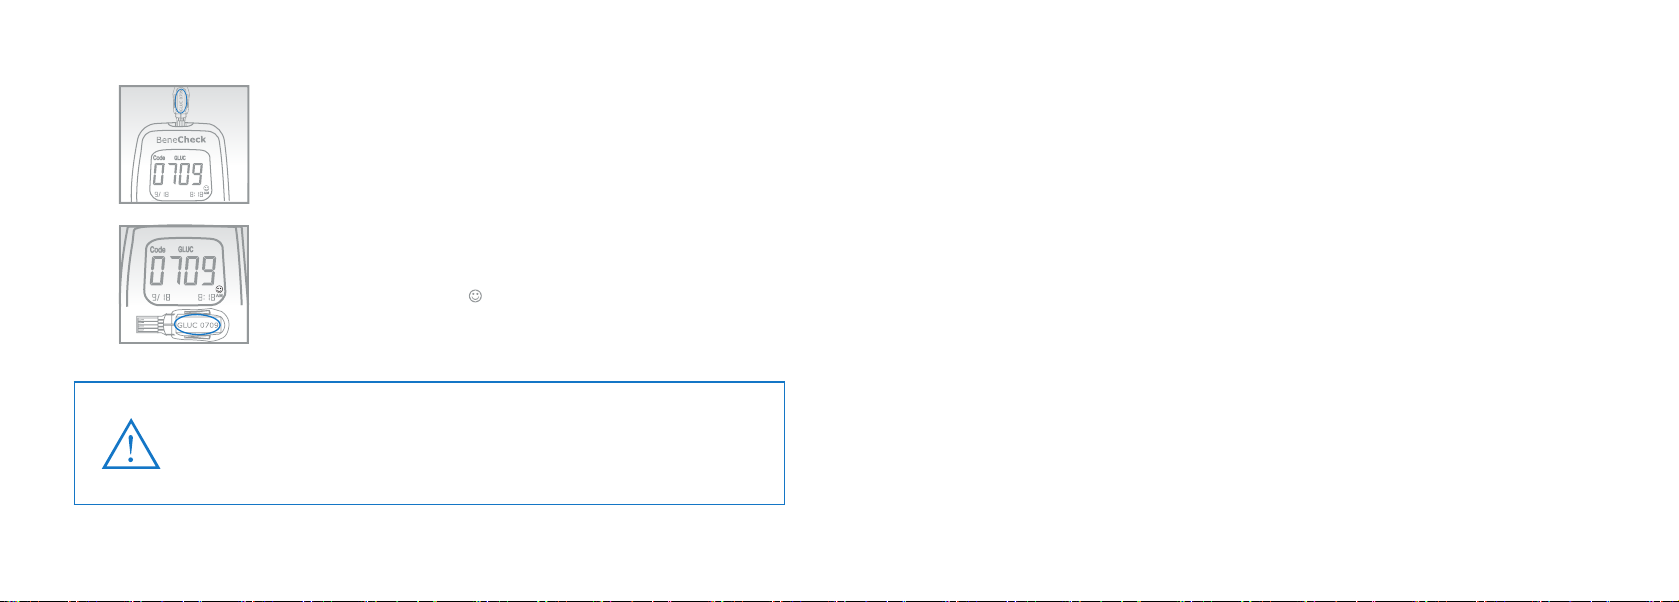
3.1
Before Testing.................................................................................................20-22
3.2
Perform the Blood Glucose Test.........................................................23-24
3.3 Care after the Test......................................................................................24-25
Chapter 4
Meter Memory Function.............................................26-27
Chapter 5
Storage and Handling of Meter and Strips.........................28
Chapter 6
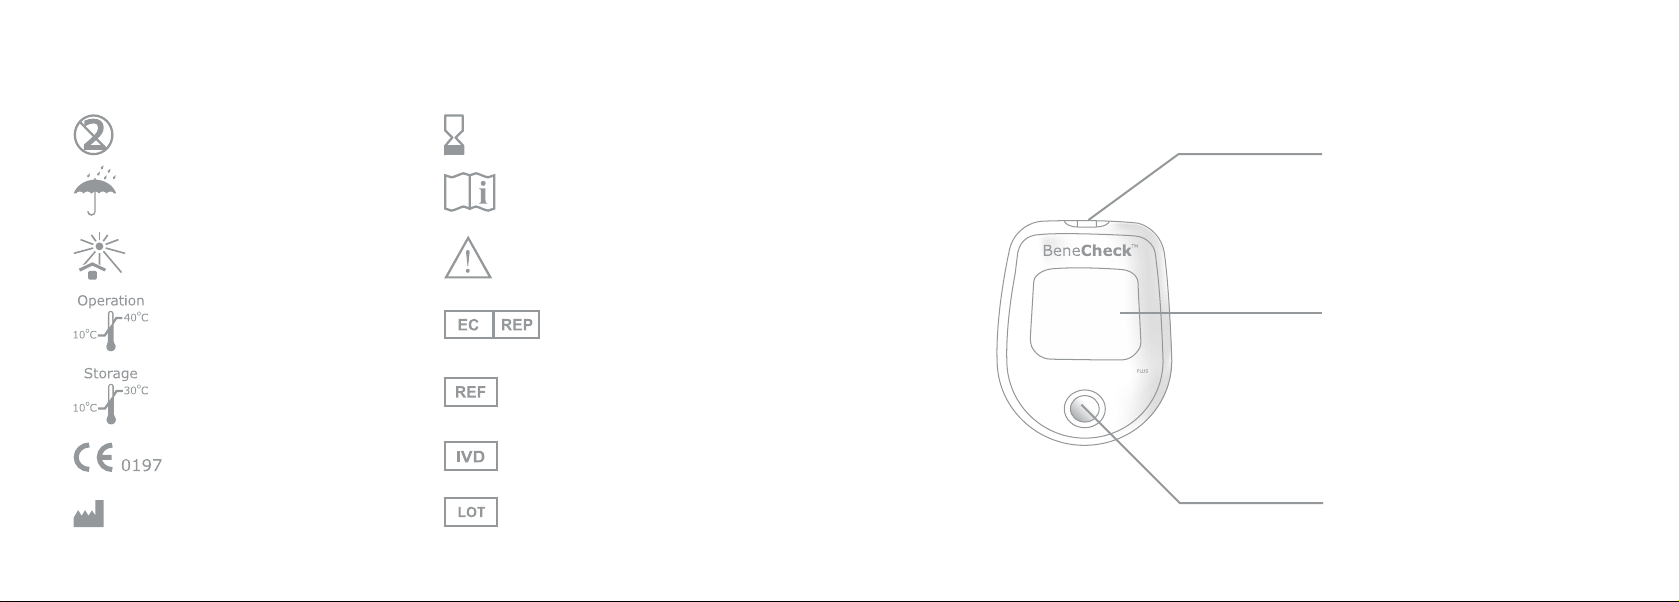
Icon and Alert Tones......................................................29
Chapter 7
Error Message and Trouble Shooting............................30-32
Chapter 8
Specications...............................................................33
Chapter 9 Limitations...............................................................34-36

2
3
1.2 Contents of the Kit
Please check the whole package for the BeneCheck GLUPLUS Glucose Monitoring
System. The system may include some of the following items (please check the
system outer box for detail) :
Item No. Description Quantity
PD-G001-2 BeneCheck GLUPLUS Glucose Meter 1
PD-A041 BeneCheck GLUPLUS Glucose Test Strip (vial) 1
PD-A020 Code Strip for Glucose 1
PP-E081 BeneCheck GLUPLUS Glucose User’s Manual 1
PP-E019 BeneCheck GLUPLUS Glucose Test Strip Instruction 1
PD-A019 Kit Carrying Bag 1
PD-A015 Lancing Device 1
PD-A018
Lancets (pack)
(Manufacturer : For detail information, please refer to
inside package. )
1
Optional :
(
not included in the standard kit package, please contact your
local distiubutor for ordering.
)
BeneCheck GLUPLUS Glucose Control Solution
PD-F004
The BeneCheck GLUPLUS Glucose Monitoring System is calibrated using venous
plasma with calibrators which were referenced to the following standards and
method.
Test Standard Method
Glucose NIST SRM965 ID/MS
Please read the entire USER’S MANUAL carefully before using the BeneCheck
GLUPLUS Glucose Monitoring System to test your blood glucose levels. This USER’S
MANUAL guides you through the operation procedures with illustrated directions
and help you nd the required informations.
WARNING :
Please carefully read the instructions in this USER'S MANUAL and become familiar
with the test procedures before using the system to test blood glucose level. User
should do the quality check and consult with a diabetic healthcare professional
before doing any important medical decision.

4
5
1.4 System Components
Meter ( Front Side )
GLU
Test Port :
Where you insert the test
strip for test.
LCD Screen :
for display of operating
information and test
results.
Front Button :
for on/off and memory
mode operation.
1.3 Labelling and Informations
Caution, consult
accompanying documents
Do not re-use
Keep dry
Operation temperature
limitation
In-vitro diagnostic
Lot number
CE certi cation
Read instructions
Storage temperature
limitation
Use by
EU Representative
Catalogue number
(Product number)
Manufactured by
Keep away from sunlight

6
7
TOSHIBA
LIT HIU MB ATTERY
CR2032
3V
J
A
P
A
N
0197
PLUS Glucose Meter
Model : PD-G001-2
General Life Biotechnology Co., Ltd.
5F, No.240, Shinshu Road,
Shin Juang City, T a ipei, 242 T a iwan
Battery : CR2032 X 1
BeneCheck
Doc No. 10-RN01-L- 48A
Electronic Contact Bars :
Insert this end of the test strip into the
Test Port of the meter to activate it.
Sample Inlet :
The inlet where the whole blood or control solution
is drawn in. When a blood sample or control solution
touches this end, the sample will be sucked into
the reaction zone automatically. The sample is not
necessary full the window circle of the strip.
Test Strip
Battery Cover Lid :
Lift upward while replacing
the battery.
Battery Cover :
For covering the battery.
Battery :
3V lithium battery(CR2032)
Reset Button :
For setup and reset of
the meter.
Tag :
Display information about
the meter.
Meter ( Back Side )
Screw :
For holding the meter
together, do not open or
disassemble the BeneCheck
GLUPLUS Glucose meter.
BeneCheck

8
9
Chapter 2 Setting-up the Meter
2.1 Installing/Replacing the Batteries
A 3-volt lithium battery (CR2032) is included in the meter package. Use only
3V lithium batteries. Do not use or replace the battery with different types of
batteries. Doing so will damage the electronics of the meter.
Instructions :
1.
0197
PLUS Glucose Meter
Model : PD-G001-2
General Life Biotechnology Co.,Ltd.
5F,No.240, Shinshu Road,
Shin Juang City,T a ipei, 242 T a iwan
Battery : CR2032 X 1
BeneCheck
DocNo. 10-RN01-L - 48A
Hold the meter with one hand, slightly lift the back cover lid
to open the back cover.
2.
0197
PLUS Glucose Meter
Model : PD-G001-2
General Life Biotechnology Co., Ltd.
5F,No.240, Shinshu Road,
Shin JuangCity, T a ipei,242 T a iwan
Battery : CR2032 X1
BeneCheck
DocNo. 10-RN01-L - 48A
Insert a new battery in the meter with the “+” side facing
up, you will hear a “beep” sound which indicates that meter
is on.
Code Strip ( Front View )
Contact Bar :
Insert this end into
the Test Port of the
meter.
Code Number
Test Mode:
GLUC - Glucose
Test Mode

10
11
Set the Year
1.
Press the front button to advance one year until you get a
correct year number.
2.
After you set the desired year number, press the back setting
button again; the meter then enters into month setting.
Set the Month
1.
Press and release the front button until the correct month
appears.
2.
Press the setting button and the day segment will start blinking.
Set the Day
1.
Press and release the front button until the correct day appears.
2.
Press the setting button and the hour segment starts blinking.
Set the Hour
1.
Press and release the front button until the correct hour
appears.
2.
Press the setting button and the minute segment starts blinking.
3.
0197
PLUS Glucose Meter
Model : PD-G001-2
General Life Biotechnology Co., Ltd.
5F,No.240, Shinshu Road,
Shin JuangCity, T a ipei,242 T a iwan
Battery : CR2032 X 1
BeneCheck
DocNo. 10-RN01-L - 48A
Please back the cover onto the meter.
4.
TOSHIBA
LITHIUMBATTERY
CR2032
3V
J
A
P
A
N
PLUS Glucose Meter
Model : PD-G001-
General Life Biotechnology Co.
5F, No.240, Shinshu R
Shin Juang City, T a ipei, 242
Battery : CR2032 X 1
Bene
Replacing Battery
●
Remove the back cover lid.
●
Gently pulling backward on the battery ejection tab, and
battery will dislodge from the battery chamber.
●
Remove the old battery with a new battery, and close the
back cover lid.
2.2 Set the Year/Month/Day/Hour/Minute/Temperature unit
After a battery is installed in the meter for the rst time
(as described in 2.1),
the
meter goes into setting mode automatically.
The directions to setting mode.
Open the battery cover (on the back of the meter), press the setting button then
a number such “08” will blink on screen, which means Year.

12
13
Set the Minute
1.
Press and release the front button until the correct minute
appears.
2.
Press the setting button and the Measurement unit (mg/dL or
mmol/L) starts blinking.
Set the Measurement Unit
1.
Press and release the front button to select the unit of measure
mg/dL or mmol/L .
2.
Press the setting button once to nish the setting and turn off
the meter automatically.
2.3 Coding the Meter
The BeneCheck GLUPLUS Glucose Meter should be coded before testing with
BeneCheck Glucose Test Strips for the first time, or every time a new box of
BeneCheck Glucose Test Strips is used. Each vial of test strips has an assigned
code number. The code strip is packaged with the test strip in order to calibrate/
code the meter. Every time a test strip is inserted, please be sure to check the
code number appearing on the screen is the same as the code number marked on
the test strip vial.
Directions :
1. Check the code number on the code strip is the same as the
code number on the test strip vial.
2. Insert code strip into the test port of the meter.

14
15
3. Wait for the code number to appear on the screen.
4.
Make sure the code number on the screen is the same as
the code number on the code strip.
Remove the code strip. “ ” should appear on the screen,
indicating that the meter has been coded successfully.
Cautions :
If “E-C” appears on the screen after removing the code strip, there
may be a problem with the code strip. Perform the coding again, and
if “E-C” continues to appear, please contact the original dealer or
supplier for service.
2.4 Control Test
A control solution is used to check the performance of the BeneCheck GLUPLUS
Glucose Monitoring System, including BeneCheck GLUPLUS Glucose Meter,
BeneCheck GLUPLUS Glucose Test Strip, and the user’s operating skill. The system
performs adequately if the control test result falls within the indicated control
range listed on the test strip vial.
The system should be checked
●
When you get the meter for the rst time or begin using a new vial of test strip.
●
When you suspect that the meter or the test strips are not working properly.●
●
Any time the blood glucose test results are not consistent with how you
feel, or any time you think your results are not accurate.
●
Any time you drop or bump the meter.
●
Upon the advice of the healthcare professional.

16
17
Directions :
1.
Insert a test strip and immediately cover the vial to keep
the other test strips in dry condition. The meter will turn on
automatically.
2.
After “CH” and “ ” appear on the screen, the
ambient temperature and code number will follow. Be
careful to make sure the code number is the same as the
code number marked on test strip vial.
3. A blood drop symbol “ ” blinking on the screen means
the system is ready for sample loading.
4.
Please shake well and discard the rst three drops of control
solution, then drop some control solution onto a clean
surface.
5.
Touch the sample inlet of the test strip to the drop of control
solution until the meter sounds a “beep”. The screen will
display a countdown.

18
19
Note :
●
Do not reuse the test strips.
●
Newly opened vial of control solution and test strips must be marked with the
opening date.
●
Close the test strip vial lid tightly after use.
●
Do not use BeneCheck GLUPLUS Glucose Monitoring System to do any test until
you can get the control test result falls within the range listed on the test strip
vial.
●
If the test results fall outside the control range, please refer to Chapter 7 for
trouble shooting.
6.
4
.
3
-
6
.
5
7
8
-
1
1
7
The screen will display the control test results after count
down. Compare the results to the control range listed on the
test strip vial.

20
21
Chapter 3 How to perform a Blood Glucose Test
3.1 Before Testing
Please follow the step-by-step instructions to ensure accurate test results.
Materials required to perform a blood glucose test include :
●
BeneCheck GLUPLUS Glucose Meter
●
BeneCheck GLUPLUS Glucose Test Strip
●
Lancing Device / Lancet
●
Tissue or cotton ball with 75% ethanol for wiping blood sampling area
after test, or simply wash hands with soap and water thoroughly before
and after test for disinfection.
Directions :
1. Take a test strip and immediately cover the vial to keep the
other test strips in dry condition.
2.
Fully insert the contact bar of the test strip into the test port
of the meter. The meter will turn on automatically.
3.
After “ CH ” and “ ” appear on the screen, the code
number will follow.
4.
Check the code number on the screen is the same as the
one on the test strip vial. If not, remove the test strip and
recode the meter.

22
23
Note :
●
The blood glucose test must be performed within 3 minutes, otherwise
the meter will be turned off automatically. If turned off, remove and
re-insert the test strip to do the test again.
●
Test strips cannot be reused. If a used test strip is inserted, a warning
message “ E-U ” will display on the screen. Always use new test strips.
●
If the wrong end of the test strip is inserted, or if the test strip is inserted
backwards the meter will not activate.
Warning :
● Lancet cannot be reused.
● Please always use certi ed lancets to ensure safety.
3.2 Perform the Blood Glucose Test
Directions :
1.
Insert the BeneCheck GLUPLUS Glucose Test Strip and take a
blood sample according to the instructions for lancing device
in the system.
2.
Touch the sample inlet of the test strip to the drop of blood
sample until the meter sounds a “beep” that means the
sample is drawn into the strip successfully.
3. The screen will display a countdown. After countdown the
screen will display the glucose results.

24
25
Note :
●
Please complete the test procedures within 3 minutes or the meter will
automatically turn off.
● Do not apply the blood sample on the test strip anywhere other than the
sample inlet.
●
Do not apply the blood sample to a same test strip twice, it will cause
inaccurate test results.
3.3 Care after the Test
Directions :
1.
Follow the instructions for lancing device to treat and discard the used
disposable lancet into an appropriate sharps or biohazard container.
2.
After performing a test, remove the test strip and meter will automatically
turned off.
3.
Record the test result and date in your personal diabetes diary.
Note :
● Please check your system performance regularly or when you suspect your test
result is inaccurate.
●
Dropping, bumping or other violent impact may damage the meter or cause
malfunction.
●
Do not u se the me ter in an e nv ironm ent wi t h poss ible ma gneti c,
electromagnetic, and radioactive interferences.
Warning :
● Do not disassemble the meter for any reason.
●
Please follows local regulations to discard used test strips and
lancets.
●
Used test strips, lancets and any other materials which have
been in contact with blood should be treated as potential
biohazards. If a user has an infectious disease, the used test
strips and other materials could be sources of infection.

26
27
Chapter 4 Meter Memory Function
The BeneCheck GLUPLUS Glucose Meter automatically stores up to 360 records, both
blood glucose test results and control test results, each time a test is performed.
It also provides you with 7-, 14-, 21- and 28-day averages of the blood glucose
test results.
The memory counts up from M01 through M360. Please follow these directions to
recall stored test results.
Directions :
1.
Make sure that no test strip is inserted in the meter.
2.
Press the “Front Button” once to turn the meter on. A full display will appear on
screen after a short “beep” sound.
3.
Press the “Front Button” once again before the code number appears. The 7-day
average ( 7 DAY.A ) will display on the screen.
4.
Followed by 14-, 21- and 28-day average when press the “Front Button”
repeatedly.
5.
After the 28-average, the latest stored result M01 appears on the screen.
The memory number increases progressively each time the button is pressed
till M360.
6.
To turn the meter off, press the “Front Button” for over 5 seconds and the meter
will make a long “beep” sound. The meter will also automatically shut down
after
1 minute.

28
29
Chapter 5 Storage and Handling of Meter and Strips
Due to sensitive to heat and humidity, the performance of test strips may be
affected by improper storage and handling. Please store the test strips and meter
carefully according to the specications listed in Chapter 8.
Note:
1.
Store the meter, code strip, test strips and control solution at room
temperature. Do not expose them beyond the range described in Chapter 8.
2.
Do not freeze or refrigerate the meter and strips.
3.
Keep the meter clean by wiping the exterior of the meter with a tissue or lint-
free cloth.
Chapter 6 Icon and Alert Tones
6.1 lcon on the Screen
The vivid and clear information
icons on the screen are helpful
and convenient. In addition
to providing accurate blood
glucose test results, the
icon design on the screen are
easy to understand at a glance
and will save you the effort
of carrying the User’s Manual
for reference.
6.2 Alert Tones
●
Normal Alert Sound : a short “beep”
●
Warning Alert Sound : 5 short “beeps”
●
Turning On/Off Alert Sound : a long “beep”
Code Number lcon
Strip Loading lcon
Result Area
Battery lcon
Temperature lcon
DAY
Average lcon
System Check Icon
Memory Number lcon
Blood Loading lcon
Unit lcon
mode icon

30
31
Chapter 7 Error Message and Trouble Shooting
Message Cause Solution
E-0 There may be a problem
with the meter or code
strip.
Reload the code strip. If the problem
persists, please contact the dealer
for service.
E-9 Th e t es t s tr i p ma y be
removed after applying
blood to the absorbent
hole.
Review the instructions and try again
with a new test strip.
Please don't remove the strip before
the test is completed.
E-A There is a problem with
the meter.
Review the instructions and try again
with a new test strip.
If the problem persists,please
contact the dealer for service.
E-b The power of the battery is
too low to run a test.
Replace the battery at once.
Message Cause Solution
E-C
Usage of the code strip
was inserted improperly,
damaged, or incorrect.
Check that the code number on the
meter display matches the code
number on the test strip vial. Code
the meter or retest as necessary. If
the error message appears again,
please contact the dealer for service.
E-t &
Tm Sign
The temperature was
below or above the system
operating range.
Repeat the test after the meter
and the test strip have reached the
temperature within the operating
range.
EU
It could be caused by a used
test strip or a temporary
or permanent electronic
problem.
Repeat the test with a new test strip.
If the error message appears again,
please contact the dealer for service.

32
33
Chapter 8 Specications
System Accuracy
: ± 20% at glucose level ≥ 75 mg/dL (4.17 mmol/L)
Test Sample
:Capillary whole blood
Measuring Time
:Less than 10 seconds
Measuring Range : 20- 600 mg/dL (1.1 - 33.3 mmol/L)
Sample Volume : ≥ 0.7 µL
Strip Storage Condition : 10 - 30˚C
Operation Temperature
: 10 - 40˚C
Relative Humidity
: Less than 95%
Memory
: 360 test results
Battery Type
:One 3V (CR2032) lithium battery
Battery Life
: Approximately 1,000 tests
Dimensions
: 61*77*19 mm
Weight
:About 47g (batteries not included)
Message Cause Solution
Hi 1.Blood glucose level is
higher than 600 mg/dL.
2
.Test strip has problem.
1.
Review the instructions and try
again with a new test strip.
2.
Check the test strip vial to make sure
that it is not marked beyond the
expiration date.
Lo 1.Blood glucose level is
lower than 20 mg/dL.
2.Test strip has problem.
1.
Review the instructions and try
again with a new test strip.
2
.
Check the test strip vial to make sure
that it is not marked beyond the
expiration date.

34
35
Chapter 9 Limitations
Please observe the following limitations for obtaining accurate results of
BeneCheck GLUPLUS Glucose Monitoring System :
●
Hematocrit (Hct) percentage may affect test result. If Hct levels less than
30% may cause incorrect high measurement results and Hct levels greater
than 55%
may cause incorrect low measurement results. Please consult your
medical professionals if you do not know your Hct level.
● The test strips react with only D-glucose and do not react with other sugars
which may be present in blood.
●
Use only fresh capillary nger whole blood. Do not use serum or plasma.
●
BeneCheck Glucose Test Strips may be used at altitude up to 10,000 feet
without an effect on test results.
Additional Information for Healthcare Professionals :
●
When venous whole blood is used for the test, it can be collected into
heparin-containing test tubes winthin 30 minutes after drawing. The results may
be 7% lower than a capillary sample.
●
Interferences : Acetaminophen, uric acid, ascorbic acid, dopamine,
gentistic acid, ibuprofen, methyl DOPA, salicylate, tetracycline, tolazamide,
tolbutamide (when at physiological or therapeutical levels) do not signicantly
affect the results.
●
Patients undergoing oxygen therapy may yield false results.
●
In situations of decreased peripheral blood ow, examples would include but are
not limited to severe dehydration, in shock, or in a hyperosmolar state (with or
without ketosis), hypertension, the test results may be false.
●
BeneCheck Glucose Test Strips are plasma calibrated, testing with serum or
plasma sample will give false results.
Table of contents