GE GE200 User manual


1
Preface
GE and the GE logo are trademarks of
General Electric Company and are used
under license by Bionime Corporation, NO.
100, Sec. 2, Daqing Street, South District,
Taichung City 40242 Taiwan
Manufacturer
BIONIME CORPORATION
NO.100, Sec. 2, Daqing Street , South
District Taichung City, Taiwan 40242
Made in Taiwan
Thank you for selecting the GE200 Blood Glucose Monitoring System. This manual provides all the information you
need to operate this product for accurate test results. Please read this entire manual before you start any testing.
For people living with diabetes, it is important to regularly monitor blood glucose levels to effectively reduce
complications from the disease. The easy-to-use GE200 Blood Glucose Monitoring System provides accurate, reliable
test results to help you better manage your diabetes.
The GE200 Blood Glucose Monitoring System is designed for in vitro diagnostic use only (for single patient use and
self-testing only). Testing requires only a small amount of fresh capillary whole blood from either the fingertip, palm
or forearm.
The GE200 Blood Glucose Monitoring System is manufactured and supported by Bionime Corporation. If you have
any questions or concerns, please contact the toll
free at . We will make every effort to assist you.
Auto-Control Medical Distribution and Customer Service Center
800-964-8434
Copyright © 2011 Bionime Corporation. All Rights Reserved Worldwide
Distribution and Customer Service in Canada by
Auto Control Medical
www.autocontrol.com
6695 Millcreek Drive, unit 6,
Mississauga, On L5N 5R8,
Toll-free: 1-800 964-8434

Preface
3
2
Caution
- Before using the GE200 Blood Glucose Monitoring System to test your blood glucose, please read all of the
instructions and conduct all of the tests including the quality control test (Refer to page 37).
- Please perform the quality control test regularly to make sure the test results are accurate.
- The GE200 Blood Glucose Meter can only be used with GE200 Blood Glucose Test Strips. Other brands’ test strips
should not be used under any circumstances. The use of other brands’ strips may give inaccurate results.
- The GE200 Blood Glucose Monitoring System is intended for in vitro diagnostic use only. The GE200 Blood Glucose
test results using fresh capillary whole blood samples from the fingertip, palm and forearm are calibrated to be the
equivalent to that of plasma testing.
- The GE200 Blood Glucose Monitoring System is intended for self-testing. It should not be used to diagnose diabetes
mellitus.
- If the GE200 Blood Glucose Meter and Test Strips are exposed to a substantial change in temperature, please wait
30 minutes before measurement.
- Follow all environmental protection regulations when disposing of batteries.
-The GE200 Blood Glucose Meter will be set as mmol/L by default when sold in Canada. If meter display shows
“mg/dL” during setting or test, please contact
Use of the wrong unit of measurement may cause incorrect treatment.
Auto Control Medical Distribution and Customer Service Center
at 1-800 964-8434.
The GE200 Blood Glucose Monitoring System is a personal blood glucose monitoring system to be used for self-
testing only. It is not recommended for multiple patients.
The GE200 Blood Glucose Monitoring System is intended to be used for the quantitative measurement of glucose in
fresh capillary whole blood samples drawn from the fingertips, forearm or palm. The GE200 Blood Glucose
Monitoring System is intended for self-testing outside the body ( in vitro diagnostic use) by people with diabetes at
home as an aid to monitor the effectiveness of diabetes control. The GE200 Blood Glucose Monitoring System should
not be used for diagnosis of, or screening for diabetes or for neonatal use.
A healthcare professional should be contacted when Customer Service is not available.
Please forward your warranty card:
Auto Control Medical
6695 Millcreek Drive, unit 6,
Mississauga, On L5N 5R8,
Toll-free: 1-800 964-8434

Caution
5
4
Caution
Sample Size Example 0.75µL 1.0 1.5µL 2.0µLµL 3.0µL
- Avoid contact with dripping or splashing liquids.
- The minimum blood sample size to test using the GE200 Blood Glucose Monitoring System is 0.75µL: ( )
Blood sample size above 3.0µL might contaminate the test strip port and the meter.
Blood sample size below 0.75µL may cause an inaccurate result or may prevent a meter reading. An Er4 reading will
be displayed if the sample size is too small. In this case, repeat the test with a new test strip.
Important Safety Notes:
- The GE200 Blood Glucose Meter and Lancing Device are for single patient use. Do not share them with
anyone including other family members.
- All parts of the kit are considered biohazardous and can potentially transmit infectious diseases, even after
following the cleaning and disinfecting procedures. Please refer to the section "Cleaning and Disinfecting
Procedures" on page 47.
- Users should wash their hands thoroughly with soap and water before and after handling the meter,
lancing device, or test strips.

Table of Contents
7
6
Table of Contents
About the Blood Glucose Monitoring System
The Blood Glucose Monitoring System..................................... ................................... .........8
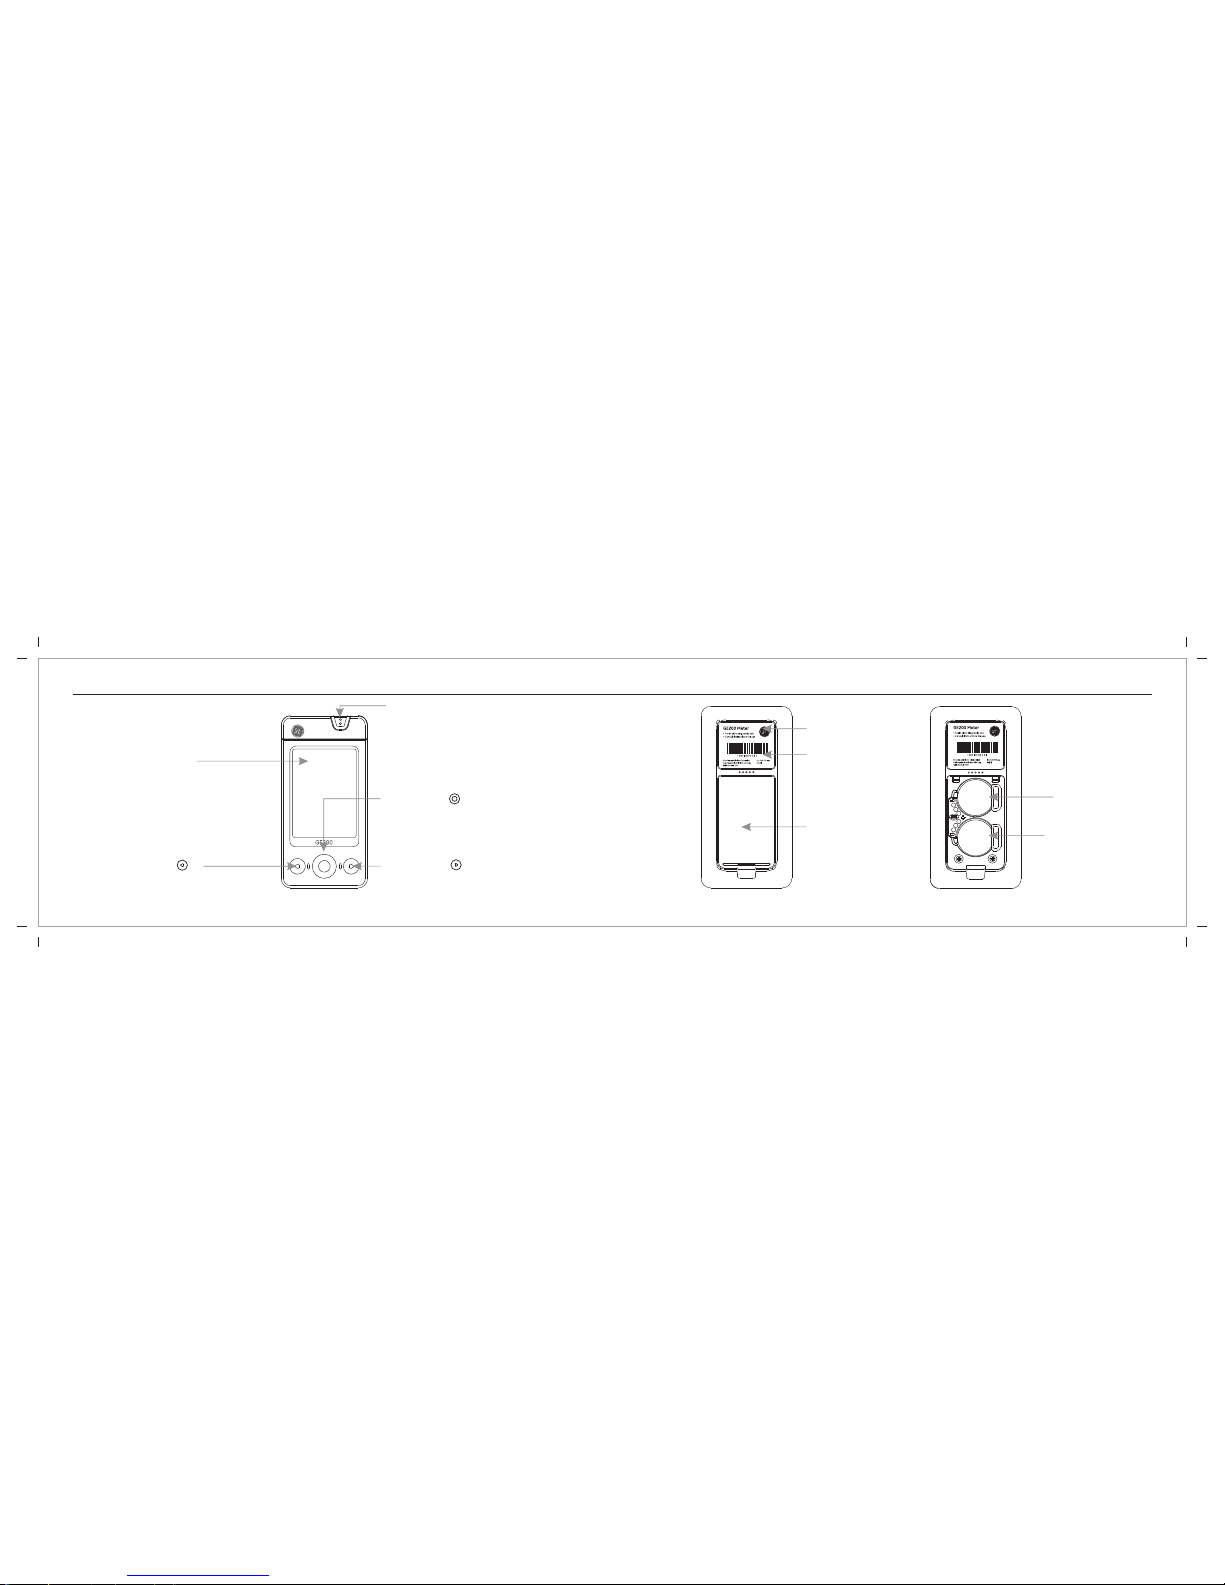
The GE200 Blood Glucose Meter....................................................................................................................... ..........................10
The GE200 Blood Glucose Test Strip................................................................................................................................... .......14
Before Testing
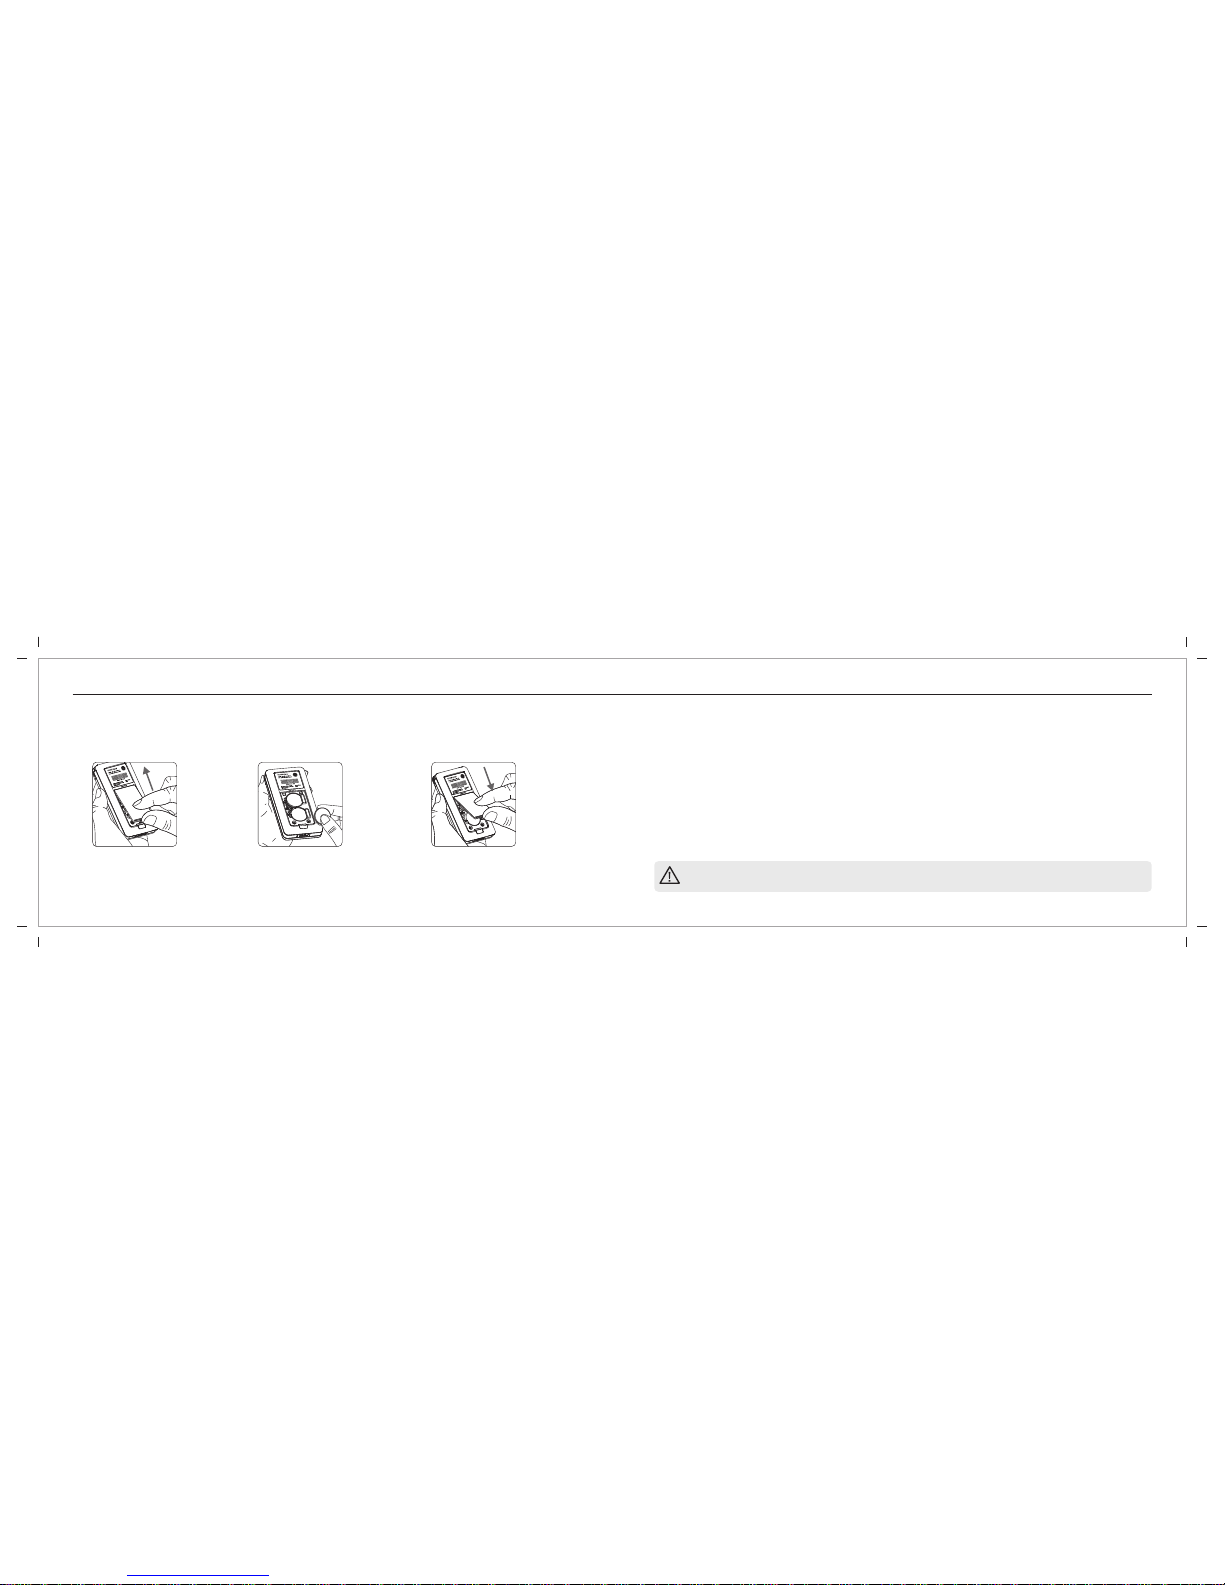
Meter Activation and Battery Change............................................................................................................................. ........16
Setting Up Your Meter - Setting the Date, Time and Volume........................................................................ .................18
Turning On/Off the Meter........................................................................................................................................... .....................22
Turning On/Off the Backlight................................................................................................................................ ........................23
Handling the GE200 Blood Glucose Test Strip.......................................................................................... ............................24
Testing Procedure
Getting Ready for Testing........................................................................................................................................ .......................26
Performing a Blood Glucose Test............................................................................................. ...............................................27
Alternative Site Testing........................................................................................................ ............................................................32
View Window Appearance................................................................................................... ........................................................34
Understanding Test Results and Messages..................................................................... ......................................................35
GE200
GE200 .............................................................................. .........
................................................
................................................
................................................
................................................
................................................
................................................
................................................
................................................
...................................................
................................................
.................................................
................................................
Quality Control
About Quality Control Testing........................................................................................................... ...........................................37
Performing a Quality Control Test............................................................................... ..........................................................40
Understanding Control Test Results................................................................................... ..................................................42
Test Memory
Recalling Test Results........................................................................................................ ..........................................................43
Recalling Average Test Results...................................................................................................... .........................................44
Caring for Your Meter.............................................................................................................................. .....................................46
Cleaning and Disinfecting Procedures............................................................................................. ..................................47
Error Messages and Troubleshooting................................................................................................ .................................51
Limitations................................................................................................................................................ ...........................................55
Specifications............................................................................................................................................... ......................................56
Warranty........................................................................................................................................................ ......................................58
Customer Service................................................................................................................................................................. ............59
Expected Blood Glucose Values Without Diabetes.......................................................................................... ................60
Component Manufacturer Information.......................................................................................................... .......................61
Log Book.......................................................................................................................................................................... .....................62
Warranty Card...................................................................................................................................................................... .............77
Emergency Card.................................................................................................................................................... ...........................79
.................................................
.....................................................
.....................................................
.....................................................
.....................................................
.....................................................
......................................................
......................................................
..................................................
..................................................
..................................................
..................................................
..................................................
..................................................
..................................................
..................................................
..................................................

9
8
The GE200 Blood Glucose Monitoring System The GE200 Blood Glucose Monitoring System
10*
53 *
2
6 *
1
4 *
7 *
8 *
9 *
Contents
Your GE200 Blood Glucose Monitoring System consists of several items. Please identify each item, learn its name and how
it is used.
Below are the items included in your GE200 Blood Glucose Monitoring System:
1. Getting Started Guide
2. User's Manual (includes Log Book, Warranty Card, Emergency Card )
3. GE200 Blood Glucose Test Strip Package Insert *
4. GE200 Control Solution Package Insert *
5. GE200 Blood Glucose Meter ( with 2 CR2032 batteries installed )
6. GE200 Blood Glucose Test strips ( 10/25 pcs )*
7. GE200 Control Solution *
8. GE Lancing Device *
9. Clear Cap *
10. Disposable Sterile Lancets ( 10 pcs ) *
11. Carrying Case ( not shown )*
12. Instruction for the lancing device ( not shown )*
(available as: Normal (Level 2) and High (Level 4))
If you want to purchase optional items, please contact Auto Control Medical Distribution and Customer Service Center
at 1-800 964-8434.

11
10
The GE200 Blood Glucose Meter The GE200 Blood Glucose Meter
Left Button ( )
Main Button ( )
Display Window
Test Strip Port
Right Button ( )
Product name
Battery Cover
Meter Serial Number
Backlight Battery
Meter Battery

13
12
The GE200 Blood Glucose Meter The GE200 Blood Glucose Meter
Indicates a test result stored in memory
Indicates a test result not included into the average
results of the meter
Indicates a control solution test result
Unit of test result
Test result
Warns when the batteries are low or must be replaced
Indicates when to apply the blood sample
Test strip
Blinks when strip is not compatible with your meter or if a
strip is inserted incorrectly.
Current date under time mode or testing date under
memory mode
Warns when the operational temperature limit is
exceeded during testing
Indicates the time in 12H format
Displays current time or testing time
under memory mode
under time mode
Manufacturing use only
Indicates the average of the test results

15
14
The GE200 Blood Glucose Test Strip The GE200 Blood Glucose Test Strip
Hold here to
insert test strip
into meter.
Sample Port
Apply blood/control solution here.
Noble Metal Electrodes
Electrochemical sensor
View WIndow
Electrode Contacts
The GE200 Blood Glucose Meter can only be used with GE200 Blood Glucose Test Strips and GE200 Control Solution.
The use of other test strips or control solutions can lead to incorrect results.
PRECAUTION
- Close the GE200 Blood Glucose Test Strip vial immediately after removing a test strip.
- Do not reuse GE200 Blood Glucose Test Strips.
- Do not use expired GE200 Blood Glucose Test Strips.
- When you open a new vial of GE200 Blood Glucose Test Strips, record the date on the vial. Discard the vial
of test strips after 4 months from opening.
- Store the GE200 Blood Glucose Test Strip between 39-86°F ( or 4-30°C) and in a location
(< 90% relative humidity). Do not expose to direct sunlight or heat.
- If the GE200 Blood Glucose Meter and Test Strips are exposed to a substantial change in temperature,
please wait 30 minutes before measurement.
- For detailed information, please refer to the GE200 Blood Glucose Test Strip Package Insert.

17
16
Meter Activation and Battery Change
1. Turn the
over. Press and slide
the battery cover to open.
GE200 Blood Glucose
Meter CAUTION
- Please follow the local regulation to properly discard a used battery.
3. Slide the battery cover back until
it snaps into place.
2. Install the batteries. Be sure to
put the batteries in the correct
direction (polarity (+) facing up).
Your Blood Glucose Meter comes with two CR2032, 3volt, batteries installed. Two new batteries will provide
power to perform approximately 1000 tests under normal use. Press the main button or insert a strip to activate your
meter.
GE200
4. The GE200 Blood Glucose Meter
5. Press any button to exit the self-test and enter Setting Mode.
will enter Self-Testing Mode automatically when replacing the battery (all symbols
will appear on the screen).
6. You must set the time and date when replacing the battery. See Chapter “Setting Up Your Meter - Setting the Date,
Time, and Volume" on page 18. Test results are still stored in the memory.

19
18
Setting Up Your Meter - Setting the Date, Time and Volume Setting Up Your Meter - Setting the Date, Time and Volume
2)
3)
1)
NOTE
- Use the Left and Right buttons to select your setting data and press the main button to confirm each
selection. After confirming all of the settings, you will return to the Time Mode.
You can enter the Setting Mode two ways.
1. Replace the Battery
2. With Battery Inserted
After removing the battery, press the main button several times until there is no signal on screen, then follow the
battery installation steps to replace battery. The GE200 Blood Glucose Meter will perform a self-test. Press the
main button to exit the self-test and enter the Setting Mode.
Press the main button to turn on the GE200 Blood Glucose Meter. Hold down the main button for 7 seconds. During
this time the screen will go blank until you hear a beep. After the beep, the meter will turn on into the Setting
Mode. The display screen will show setting data.
1. Year setting
With the year format blinking
Press the Main button to confirm. Once the year is confirmed, the Month Setting will appear.
2. Month setting
With the month blinking, press the Left or Right button until you see the current month. Press
the Main button to confirm. Once the month is confirmed, the Day Setting will appear.
3. Day setting
With the day blinking, press the Left or Right button until you see the current day. Press the
Main button to confirm. Once the day is confirmed, the Time Setting will appear.
, press the Left or Right button until you see the current year.

21
20
Setting Up Your Meter - Setting the Date, Time and Volume
5) 6)
4a) 4b) 7a) 7b)
4. Time format 12/24H selection
With the time format blinking, press the Left or Right button to switch
between 12H and 24H. Press the Main button to confirm. Once
confirmed, the Hour Setting will appear.
5. Hour setting
With the hour blinking, press the Left or Right button until you see
the current hour. Press the Main button to confirm. Once the hour is
confirmed, the Minute Setting will appear.
6. Minute setting
With the minutes blinking, press the Left or Right button until you see
the current minute. Press the Main button to confirm. Once the
minute is confirmed, the Volume Setting will appear.
NOTE
-
will leave setting mode and power off automatically.
If you do no change any settings during Meter Set-up for over 2 minutes, the GE200 Blood Glucose Meter
7. Volume Setting
With the volume blinking, press the Left or Right button to turn the
volume on or off. Press the Main button to confirm and finish the
settings.

23
22
Turning On / Off the Meter Turning On/ Off the Backlight
1. How to turn on the GE200 Blood Glucose Meter
Press the Main button or Insert a test strip.
2. Manual Power off
To power off the GE200 Blood Glucose Meter, press and hold the Main button for 4 seconds.
3. Auto Power off
The GE200 Blood Glucose Meter will power off automatically after 2 minutes if no buttons are pressed or no strip is
inserted.
1. Turn on the backlight
Press and hold the Main button for 2 seconds.
2. Manually turn off the backlight
With the backlight on, press and hold the Main button for another 2 seconds.
3. Auto shutoff
The GE200 Blood Glucose Meter backlight will turn off automatically after 10 seconds if no buttons are pressed.

25
24
Handling the GE200 Blood Glucose Test Strip Handling the GE200 Blood Glucose Test Strip
1
2
3
1
3
2
How to handle the GE200 Blood Glucose Test Strip.
Inserting the GE200 Blood Glucose Test Strip:
1. Hold the GE200 Blood Glucose Test Strip between your thumb and middle finger with the view
window " " facing up.
2. Put your forefinger on the side of the strip as shown.
3. Insert the GE200 Blood Glucose Test Strip into test strip port until it clicks and firmly stops.
Removing the GE200 Blood Glucose Test Strip:
1. Hold the GE200 Blood Glucose Test Strip as shown.
2. Rotate the GE200 Blood Glucose Test Strip counterclockwise and pull up simultaneously.
3. Take the GE200 Blood Glucose Test Strip out of the test strip port.
Please follow your local regulations and discard used strips properly.

27
26
Getting Ready for Testing Performing a Blood Glucose Test
PlungerBase
Lancet carrier
Release button
Depth adjustable cap
2
1
34
56
Before performing a blood glucose test, prepare the items below :
- GE200 Blood Glucose Meter
- GE200 Blood Glucose Test Strips
(Please check the expiration date on the test strip vial. Do not use
expired test strips)
- GE Lancing device
- Sterile lancet
- Alcohol swab (optional)
1. Hold the depth adjustable cap in one hand and hold the base with the other hand.
Bend the cap down. When a gap appears between the cap and base, pull the cap
and base in opposite directions.
2. Pull off the depth adjustable cap.
3. Insert a new disposable lancet firmly into lancet carrier.
4. Twist off and set aside the protective cover of the disposable lancet.
5. Replace the depth adjustable cap.
6. Choose a depth of penetration by rotating the top portion of the depth adjustable
cap until your desired setting is visible in the window. Settings are based on skin
type " " for soft or thin skin; " " for average skin; " " for thick or
calloused skin.

29
28
Performing a Blood Glucose Test
78
910
11
13
15
14b
12
7
14a
14c
7. Hold the base in one hand and pull on the plunger with the other hand. The device
will be cocked. Release the plunger and it will automatically move back to its
original position near the base.
8. Wash your hands with warm soapy water and dry thoroughly.
9. Take one GE200 Blood Glucose Test Strip from the vial. Close the vial cap
immediately.
10. Insert the strip into the test strip port of the GE200 Blood Glucose Meter with the
view window facing up.
11. Once the strip is inserted, all symbols will appear on your meter display and will be
accompanied by a beep (if volume is turned on).
12. A blood drop icon will appear on the display window and will be accompanied by
a beep (if volume is turned on). Apply the blood sample within 2 minutes.
13. Place the lancing device against your fingertip and press the release button.
14. Touch and hold the blood drop to the edge of sample port until the view window
is filled with blood. If the view window is not completely filled with blood the test
will not start. If the blood sample was insufficient, discard the test strip and
repeat with a new GE200 Blood Glucose Test Strip.
15. Countdown Mode will begin on the display window. After 5 seconds, your test
result will appear.
NOTE
- The GE200 Blood Glucose Meter will automatically detect the Code number
on the strip. You do not have to check the Code number on the meter display
and strip vial.

31
30
Performing a Blood Glucose Test Performing a Blood Glucose Test
18
16
1
2
17
19
16. Pull off the depth adjustable cap. Without touching the
used disposable lancet, insert the lancet tip into the
protective lancet cover.
17. Hold the release button in one hand (see picture 17, step
1) and pull on the plunger with the other hand (see
picture 17, step 2) to safely eject the used disposable
lancet.
18. Discard the used disposable lancet into an appropriate
puncture-proof or biohazard container.
19. Replace the depth adjustable cap after finishing the test.
CAUTION
- Do not apply your blood drop to the sample port on the strip until you see the " " appear. The GE200
Blood Glucose Meter is performing an internal test and will display " " and " " if you apply blood too
soon. If this occurs, please repeat the test with a new test strip.
- Record the opening date of a new test strip vial. Discard the vial of test strips 4 months after opening.
- Always keep the metal contacts of the test strip port clean. If any dust or impurities are
present, please clean with a small, soft brush.
- The GE200 Blood Glucose Monitoring System and GE Lancing Device are intended for single
patient use only. Do not share these devices with anyone, including other family members.
- All parts of this kit are considered biohazards and can potentially transmit infectious diseases,
even after you have performed the cleaning and disinfecting procedure.
- Users should wash hands thoroughly with soap and water after handling the meter, lancing device, and test
strips.
- Please refer to the section "Cleaning and Disinfecting Procedures"on page 47 for cleaning and disinfecting
instructions.

33
32
Alternative Site Testing
Palm
Forearm
Pressing for
a few seconds
Releasing
button
CAUTION
- Test results may vary if blood samples are taken from different sites or under certain conditions where
glucose levels are changing rapidly such as: following a drink, a meal, an insulin dose or exercise. In these
cases, only the fingertip should be used.
- DO NOT test on the palm or forearm if you are testing for hypoglycemia (Low blood glucose).
- Fingertip samples can show the rapid change in glucose faster than palm or forearm samples.
- Consult your healthcare professional before sampling from your palm or forearm.
- Since the blood flow in the forearm and palm is slower than in the fingertip, use the clear cap provided
with the GE Lancing Device when testing sites other than fingertip.
- If you use the normal lancing device for your palm or forearm, the blood sample may not be sufficient for
meter operation.
- Periodically compare the test system to a laboratory test system that is known to be well maintained and
monitored by a healthcare provider.
Alternative site testing: palm or forearm blood sampling
- To perform alternative site testing, install the clear cap for your GE Lancing Device.
( For detailed information, refer to the instruction manual for the GE Lancing Device. )
- To increase the blood flow, massage the intended puncture area of your palm or
forearm for a few seconds.
- Immediately after massaging the intended puncture area, press and hold the lancing
device with the clear cap against palm or forearm.
- Press the release button.
- Continue holding the lancing device against your palm or forearm and gradually
increase pressure for a few seconds until the blood sample size is sufficient. (DO NOT
test on the palm or forearm if you are testing for hypoglycemia (Low blood glucose).

34 35
Understanding Test Results and Messages
View Window Appearance
Insufficient blood sample Sufficient blood sample
Make sure your blood sample covers the whole area of
the view window to get an accurate test result. An
insufficient blood sample will result in an error message
("Er4"). If this occurs, repeat the test with a new test strip.
CAUTION
- Check the expiration date printed on the strip vial every time you use a test strip. Do not use expired GE200
Blood Glucose Test Strips.
- Use each GE200 Blood Glucose Test Strip immediately after removing it from the vial.
- Do not reuse GE200 Blood Glucose Test Strips.
- Do not perform testing immediately after moving from one ambient temperature to another (e.g. after coming
indoors from the outside). Allow 30 minutes for the temperature of the meter and the test strips to equilibrate.
- Apply the blood sample only on the sample port of the test strip.
Blood glucose test results are shown on the GE200 Blood Glucose Meter as mmol/L.
If your blood glucose result is unusually high or low, or if you question your test results, repeat the test with a new
GE200 Blood Glucose Test Strip.
You can also run a Quality Control Test with the GE200 Control Solutions to check your GE200 Blood Glucose Meter
and GE200 Test Strip (Refer to “Performing a Quality Control Test” on page 40) .
If the test result still remains unusually high or low, contact your healthcare professional immediately.
If you are experiencing symptoms that are not consistent with your blood glucose test results and you have made
sure to follow all instructions in this manual, contact your healthcare professional immediately.
Follow local regulations or consult your health care provider for appropriate disposal of used test strips and lancets.

37
36
About Quality Control Testing
Understanding Test Results and Messages
Control Solution Range:
Example of Control Solution Range printed on
your test strip vial label.
Control Solution Range mmol/L
Normal (Level 2):
High (Level 4):
4.9-6.7
13.8-18.8
The Meter displays results between
If the test result is below 1.1 mmol/L, “ ” will appear on the screen. Please repeat your test
with by a new test strip.
If you still get a “ ” result, contact your healthcare professional.
If the test result is above 33.3 mmol/L, “ ” will appear on the screen. Please repeat your
test again with a new test strip.
If you still get a “ ” result, contact your healthcare professional.
GE200 Blood Glucose 1.1 and 33.3 mmol/L. What is a Quality Control Test ?
To ensure proper monitoring function, it is necessary to regularly perform a quality control test.
Use one of the GE200 Control Solutions when testing your GE200 Blood Glucose Monitoring System in the Control
Solution Mode. If the test result is within the Control Solution Range printed on the strip vial label, the GE200 Blood
Glucose Monitoring System passes the Quality Control Test and your GE200 Blood Glucose Monitoring System is
working properly.
NOTE
- If you want to purchase Level 2 (Normal) control solution, please contact the
toll free at
Auto Control Medical
Distribution and Customer Service Center at 1-800 964-8434 1-800 964 8434.
Other manuals for GE200
2
Table of contents
Other GE Blood Glucose Meter manuals
Popular Blood Glucose Meter manuals by other brands

Abbott
Abbott FreeStyle InsuLinx owner's booklet

Accu-Chek
Accu-Chek AIVIVA EXPERT Getting started guide

ForaCare
ForaCare Diamond PRIMA owner's manual

HOMEDIAGNOSTICS
HOMEDIAGNOSTICS TRUE2go owner's booklet

NIPRO Diagnostics
NIPRO Diagnostics TrueResult Twist owner's manual

AgaMatrix
AgaMatrix Presto owner's guide