Genesys cx33 User manual

1
CX33
EN - USER MANUAL
DE –BEDIENUNGSANLEITUNG
PL - INSTRUKCJA OBSŁUGI
CZ - NÁVOD K POUŽITÍ
SK - NÁVOD NA POUŽITIE
RO –MANUAL DE UTILIZARE

2
GENESIS CX33 –USER MANUAL - EN
I. KEYBOARD
INSTALLATION
1. Connect keyboard to the USB port, for first time usage wait around 15 seconds
until drivers will be installed.
2. Keyboard is ready for use.
II. MOUSE
INSTALLATION
1. Connect mouse to the USB port, for first time usage wait around 15 seconds
until drivers will be installed.
2. To set the programmable buttons and DPI settings you need to download and
install the latest software version from our website www.genesis-zone.com,
3. Open the installation folder, double click the icon setup.exe.
4. Follow the instruction to install the program.
5. When the installation has been completed successfully the icon at taskbar will
be displayed.
6. Double click the icon to pop up setting interface.
BASIC SETTINGS
Basic settings tab allows you to assign individual functions to each button.
1. Each button can be set individually by click on list of programmable buttons,
after this action the pop-up window will show available functions which can be
selected by left click.
2. Select required function and click “Apply” to save the settings.

3
Single Key
This function allows you to
assign any button from the
keyboard. Click on “Single
key”, when the pop-up
window will come out press
any button on keyboard which
you want to assign e.g. “Ctrl”,
then click “OK” to finish and
close the window. Click
“Apply” to save settings.

4
Fire Key
This function allows you to assign any button from your keyboard/mouse as a “Fire
key”.
1. To set “Fire key” click on the list of programmable buttons and then select “Fire
key”.
2. When pop-up window will come out select required button which you want to
assign e.g. “A”. In the pop-up window you can also set the speed and number of
how many times you want to use fire key by single button press.
3. Click “OK” to finish and close the window, then click “Apply” to save the
settings.
Combo Key
This function allows you to assign combination of buttons from your keyboard or
mouse. Click on “Combo Key”, when the pop-up window will come out select
required combination of buttons which you want to assign e.g. “Ctrl+A+Alt”, then
click “OK” to finish and close the window. Click “Apply” to save settings.

5
DPI settings
Gaming software allows you to predefine up to four DPI
profiles, which can be switched “on the fly” using the DPI
button. Each profile can be set individually in “Basic
Settings” tab. In these settings you can also set backlight
color, backlight mode and resolution 250 –4000 DPI. Click
“Apply” to save the settings.
Report Rate
To set report rate (polling rate) select “Basic Settings” tab and choose one of 4 options
(125Hz, 250Hz, 500 Hz, 1000 Hz), then click “Apply” to save the settings.

6
ADVANCED SETTINGS
Macro and profile editor
Adding a macro
To add a macro click “Advanced Settings” and enter name of macro in box “Macro
name”, e.g. “1”. Click “New” and then “Start recording”. Use the keyboard to enter a
combination of buttons which you want to assign into this macro, e.g. “Shift+A+B”,
click “Stop recording” to finish recording. Enter a number in box “Loop times” to set
how many times macro should be used after single button press. Click “Confirm” to
finish and close the window.
Select macro
To select macro click “Basic settings”
tab and then click on box “Macro Key”.
In pop-up window select the name of
previously recorded macro. Select one of
three options on the right and then click
“OK” to finish and close the window.
Then Click “Apply” to save the settings.

7
System settings
In this settings you can adjust mouse moving
speed, scrolling speed and double click speed. To
set these functions go to “Advanced settings” and
select required speed for each function. Then
Click “Apply” to save the settings.
GENERAL INFORMATION
Non-authorized repairs or taking the device to pieces make the warranty void and
may cause the product damage.
Do not use the product in low and high temperatures and in the dusty atmosphere.
Safe product, conforming to the EU requirements.
This product is made in accordance with RoHS European standard. The standard
was issued in order to decrease the amount of the electronic and electrical waste
emitted into the atmosphere.
The WEEE symbol (the crossed-out wheeled bin) indicates that this product in not
home waste. You protect the environment when you recycle hazardous waste
appropriately. In order to get detailed information about recycling this product
please contact your retailer or a local authority.
Visit our web site to get more information: www.genesis-zone.com

8
GENESIS CX33 –BEDIENUNGSANLEITUNG - DE
I. TASTATUR
INSTALLATIONSVORGANG
1. Die Tastatur an einen USB-Port anschließen. Beim ersten Anschluss circa 15
Sekunden abwarten, bis die Treiber vollständig installiert sind.
2. Tastatur ist betriebsbereit.
II. MOUSE
INSTALLATIONSVORGANG
1. Die Mouse an einen USB-Port anschließen. Beim ersten Anschluss circa 15
Sekunden abwarten, bis die Treiber vollständig installiert sind.
2. Für die programmierbaren Tasten und der DPI-Einstellungen müssen Sie
herunterladen und installieren die neuste Software-Version von unserer
Internetseite: www.genesis-zone.com.
3. Den Installationsordner öffnen und die Datei setup.exe doppelt anklicken.
4. Folgen Sie den Anweisungen, um die Software zu installieren.
5. Nach einer erfolgreichen Installation erscheint ein Symbol auf der Taskleiste.
6. Das Symbol doppelt anklicken, um das Einstellungsfenster zu öffnen.
GRUNDEINSTELLUNGEN
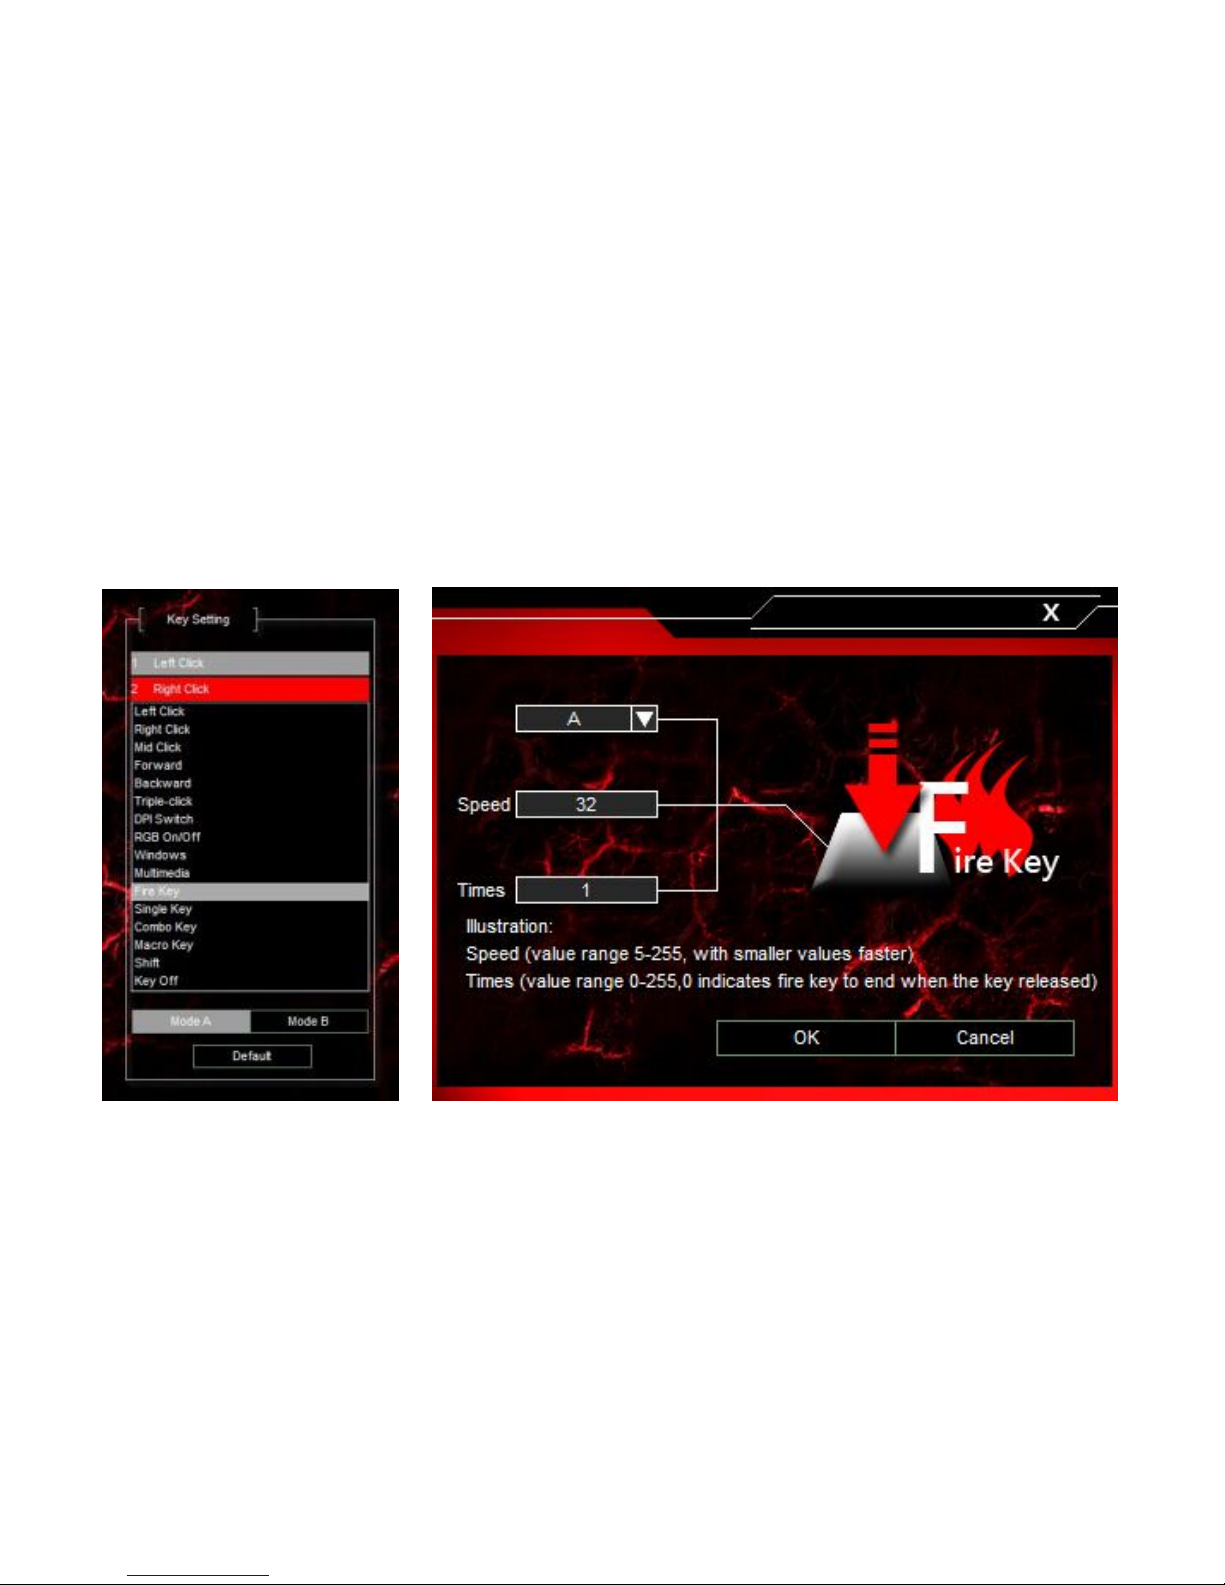
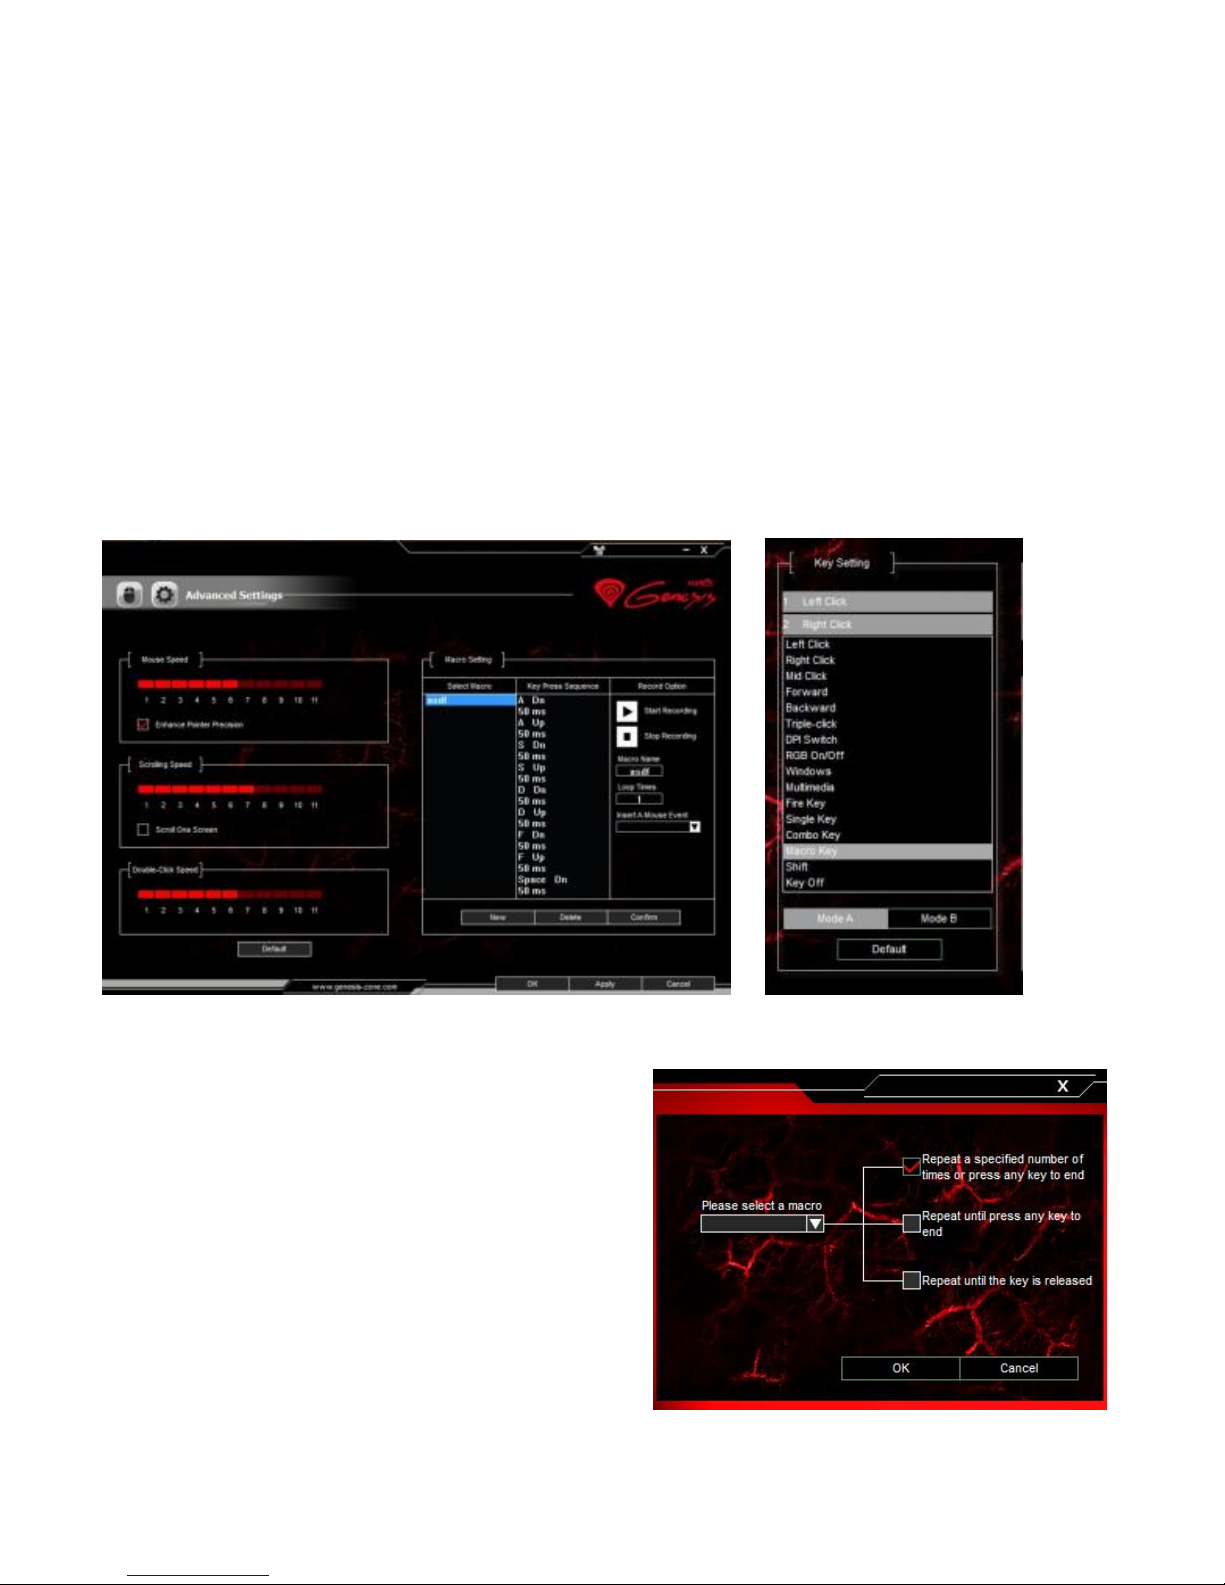
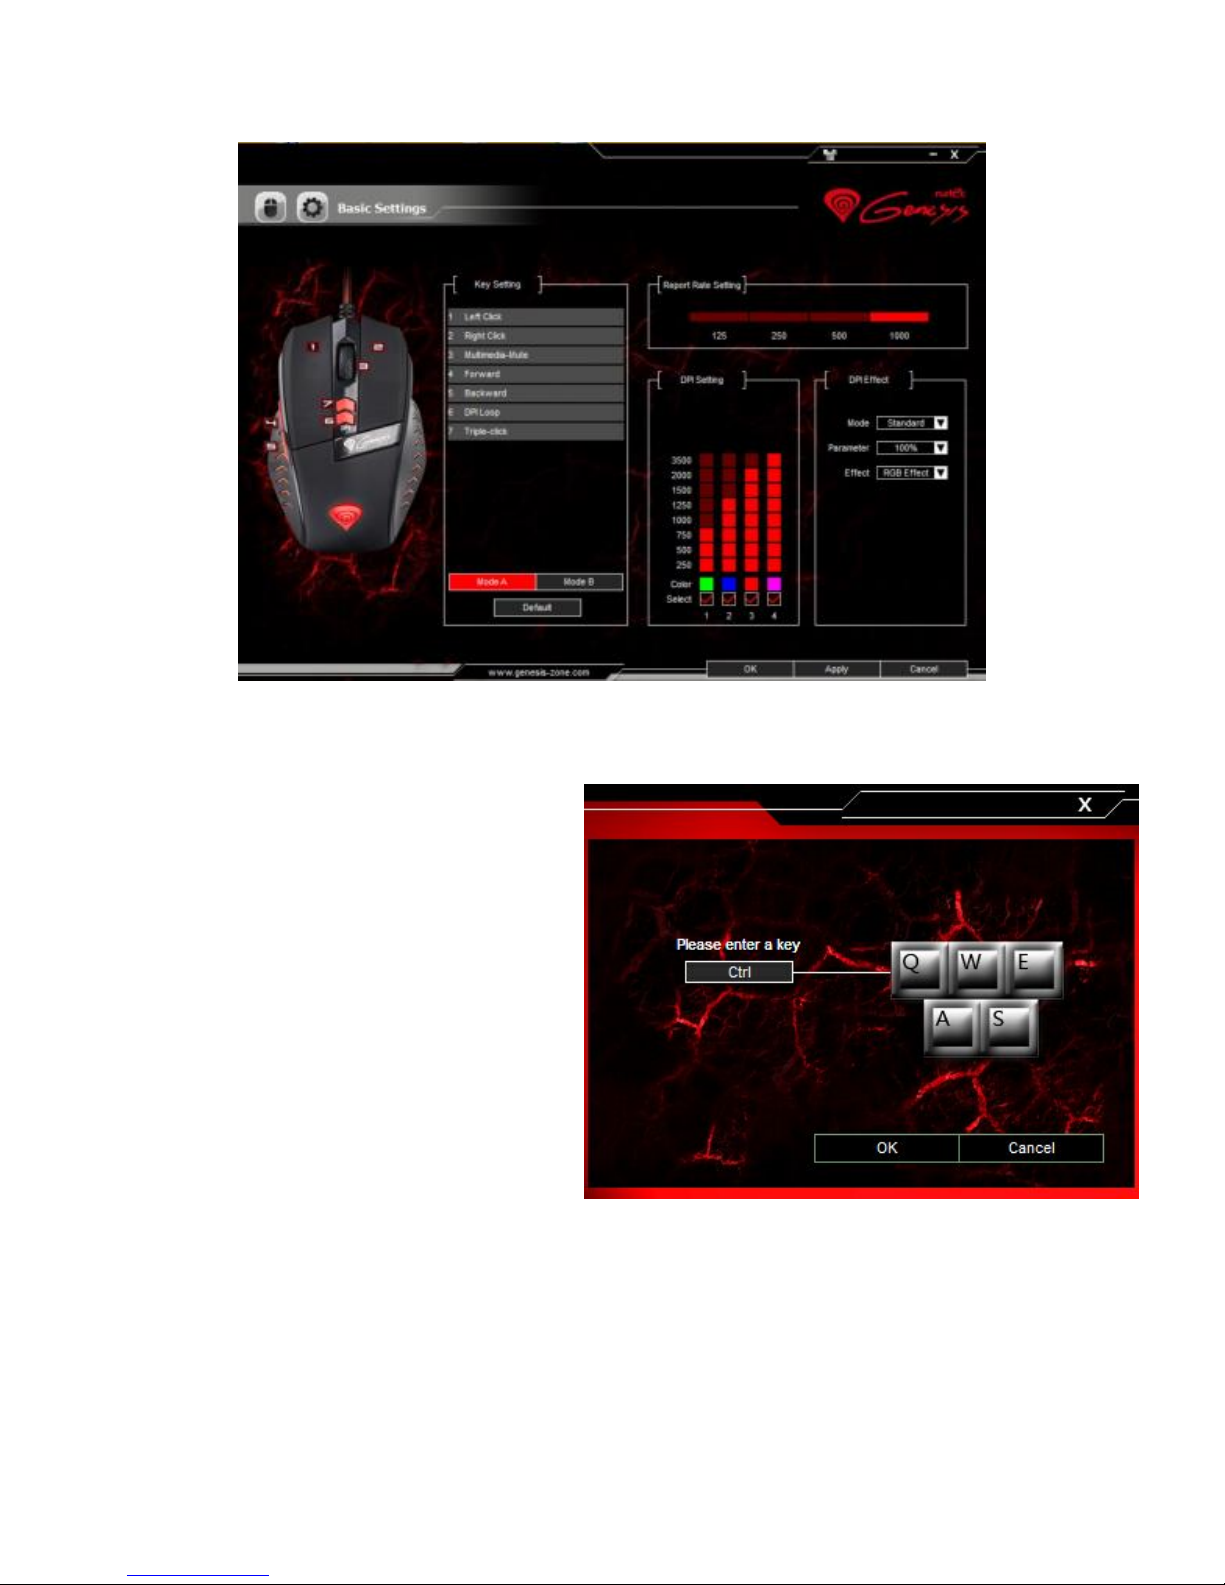
Mithilfe des Grundeinstellungsreiters kann der User jeder Maustaste eine bestimmte
Funktion zugeordnen.
1. Jede Taste kann individuell eingestellt werden. Zuerst das entsprechende
Tastensymbol in der Liste der programmierbaren Tasten anklicken. Ein Fenster
mit verfügbaren Optionen wird angezeigt, die mit linker Maustaste angewählt
werden können.
2. Die gewünschte Funktion anwählen und mit der Schaltfläche "Übernehmen"
bestätigen; die Einstellungen werden gespeichert.

9
Single Key
Mit dieser Funktion kann eine
beliebige Tastaturtaste zugeordnet
werden. Die Schaltfläche "Single
Key" zuerst anklicken: Ein
Dialogfenster erscheint, dann die
gewählte Taste, die man zuordnen
möchte auf der Tastatur betätigen.
Anschließend die Schaltfläche
"OK" anklicken, um abzuschließen.
Die Schaltfläche "Übernehmen"
betätigen, um die Einstellungen zu
speichern.

10
Fire Key
Mit dieser Funktion kann eine beliebige Taste an der Tastatur/ Maus als die
„Feuertaste” definiert werden.
1. Für die Zuordnung der "Feuertaste" zuerst die Liste der programmierbaren
Tasten öffnen und dann die "Fire key" wählen. In dem Fenster eine beliebige
Tastatur-/ Maustaste anwählen, der die Feuerfunktion zugeordnet werden soll,
z.B. "A". In dem angezeigten Fenster können auch die Geschwindigkeit und die
Anzahl der Schüsse nach einmaliger Betätigung der Feuertaste eingestellt
werden.
2. Die Schaltfläche "OK" anklicken, um abzuschließen und anschließend
"Übernehmen" betätigen, um die Einstellungen zu speichern.
Combo Key
Mit dieser Funktion können Kombinationen von Tastaturtasten zugeordnet werden.
Die Schaltfläche "Combo Key" betätigen. Wenn das Fenster erscheint, die
Kombination von Tasten, die gewünscht ist, wie z.B. "Strg+A+Alt" auswählen,
eintragen und anschließend auf "OK" klicken, um abzuschließen. Die Schaltfläche
"Übernehmen" anklicken, um die Einstellungen zu speichern.

11
DPI-Einstellungen
Mit der Software können bis zu vier DPI-Profile konfiguriert
werden, die "laufend" mit der DPI-Taste umgeschaltet werden
können. Jedes Profil kann - je nach Bedarf - in dem Reiter
"Grundeinstellungen" eingestellt werden. Hier können auch
die Farbe und die Hintergrundbeleuchtung sowie Auflösung
250 - 4000 DPI eingestellt werden. Anschließend die
Schaltfläche "Übernehmen" anklicken, um die Einstellungen
zu speichern.
Signalrate
Für die Einstellung der Signalrate den Reiter "Grundeinstellungen" wählen und eine
von vier Optionen einstellen (125Hz, 250Hz, 500 Hz, 1000 Hz). Anschließend die
Schaltfläche "Übernehmen" anklicken, um die Einstellungen zu speichern.

12
ERWEITERTE EINSTELLUNGEN
Makros- und Profileditor
Ein Makro hinzufügen - Um ein Makro hinzufügen, zuerst den Reiter "Erweiterte
Einstellungen" anwählen, den Namen des Makros in das Feld "Makroname" eintragen,
z.B. "1". Die Schaltflächen "Neu", anschließend "Aufnahme starten" betätigen, um mit
dem Hinzufügen eines neuen Makros fortzufahren. Mit der Tastatur die Kombination
von Tasten eingeben, die diesem Makro zugeordnet werden sollten, wie z.B.
"Einfg+A+B", die Taste "Aufnahme stoppen" betätigen. Eine Zahl im Feld
"Loop-Zahl" eintragen, um einzustellen, wie oft das Makro nach der Betätigung der
Taste wiederholt werden soll. Anschließend die Schaltfläche "Bestätigen" anklicken
um abzuschließen.
Makros auswählen
Um ein Makro auszuwählen, zuerst den
Reiter "Grundeinstellungen" wählen,
anschließend die Schaltfläche "Macro Key"
anklicken. In dem angezeigten Fenster
einen Namen für das vorher aufgenommene
Makro definieren. Eine von drei Optionen
rechts auf der Seite markieren,
anschließend die Schaltfläche "OK"
betätigen, um abzuschließen. Anschließend
die Schaltfläche "Übernehmen" anklicken,
um die Einstellungen zu speichern.

13
Systemeinstellungen
In diesen Einstellungen kann die
"Mausgeschwindigkeit", die Geschwindigkeit des
vertikalen Scrollens "Scrolling-Geschwindigkeit"
sowie der Zeitabstand zwischen zwei Klicks
„Double-Click Speed” eingestellt werden. Zu den
"Erweiterten Einstellungen" gehen, um diese
Größen einzustellen und für jede Funktion eigene
Geschwindigkeit zu wählen. Anschließend
"Übernehmen" anklicken, um die Einstellungen
zu speichern
WICHTIGE HINWEISE
Die unerlaubte Zerlegung des Geräts führt zum Verlust der Garantieansprüche und kann
Beschädigung verursachen.
Das Produkt nicht in heißer, kalter, verstaubter oder feuchter Umgebung einsetzen.
Diese Produkt ist auf Übereinstimmung mit den Anforderungen einer EU-Richtlinie.
Diese Produkt wird in Übereinstimmung mit der RoHS Direktive hergestellt. RoHS ist
eine Richtlinie der EU mit dem Ziel gesundheits- und umweltschädliche Substanzen in
elektronischen Geräten zu reduzieren.
Das Symbol der durchgestrichenen Mülltonne bedeutet, dass dieses Produkt nicht mit
dem unsortierten Hausmüll entsorgt werden darf – Sie sind daher dazu verpflichtet, es an
einer offiziell ausgewiesenen Sammelstelle für Elektrogeräte abzugeben. Informationen
zu Sammelstellen in Ihrer Nähe erhalten Sie bei örtlichen Behörden, Wertstoffhöfen oder
dem Geschäft, in dem Sie dieses Produkt erworben haben. Die separate Sammlung und
Verwertung alter Elektrogeräte verhindert, dass darin enthaltene Stoffe die Gesundheit
des Menschen und die Umwelt gefährden.
Für weitere Informationen besuchen www.genesis-zone.com

14
GENESIS CX33 –INSTRUKCJA OBSŁUGI - PL
I. KLAWIATURA
INSTRUKCJA INSTALACJI
1. Podłącz klawiaturę do portu USB, w przypadku pierwszego podłączenia należy
zaczekać około 15 sekund aż do całkowitego zainstalowania sterowników.
2. Klawiatura jest gotowa do użycia.
II. MOUSE
INSTRUKCJA INSTALACJI
1. Podłącz mysz do portu USB, w przypadku pierwszego podłączenia należy
zaczekaćokoło 15 sekund aż do całkowitego zainstalowania sterowników.
2. Do ustawienia przycisków programowalnych i rozdzielczości DPI należy
pobrać i zainstalować najnowszą wersje oprogramowania z naszej strony
internetowej www.genesis-zone.com.
3. Otwórz folder instalacyjny i następnie kliknij dwukrotnie na ikonę setup.exe.
4. Postępuj zgodnie ze wskazówkami, aby zainstalować oprogramowanie.
5. Gdy instalacja zostanie zakończona pomyślnie, na pasku zadań wyświetli się
ikona oprogramowania.
6. Kliknij dwukrotnie na ikonę by wyświetlić interfejs z ustawieniami.
USTAWIENIA PODSTAWOWE
Zakładka ustawień podstawowych pozwala na przypisanie poszczególnych funkcji do
każdego przycisku.
1. Każdy przycisk można ustawić indywidualnie przez kliknięcie na liście
programowalnych przycisków, po kliknięciu pojawi się okno z dostępnymi
funkcjami, które można wybrać lewym przyciskiem myszy.
2. Wybierz żądaną funkcję i kliknij przycisk "Zastosuj", aby zapisać ustawienia .

15
Single Key
Funkcja ta pozwala na przypisanie
jednego dowolnego przycisku
klawiatury. Kliknij na "Single
key", gdy pojawi się okno,
naciśnij dowolny przycisk, który
chcesz przypisać np. "Ctrl".
Następnie kliknij "OK", aby
zakończyć i zamknąć okno.
Kliknij "Apply", aby zapisać
ustawienia.

16
Fire Key
Funkcja ta pozwala na przypisanie dowolnego przycisku klawiatury/myszy jako
„przycisk strzału”.
1. Aby ustawić "przycisk strzału", kliknij na listę programowalnych przycisków i
następnie wybierz "Fire key". Gdy pojawi się okno, wybierz dowolny przycisk
klawiatury/myszy, który chcesz przypisać np. "A". W wyskakującym oknie
można również ustawić prędkość i liczbę, ile razy chcesz użyć „przycisk
strzału” przez jedno naciśnięcie przycisku .
2. Kliknij przycisk "OK", aby zakończyć i zamknąć okno, i następnie kliknij
przycisk "Apply", aby zapisać ustawienia.
Combo Key
Funkcja ta pozwala na przypisanie kombinacji przycisków klawiatury. Kliknij na
"Combo Key", gdy pojawi się wyskakujące okno, wybierz kombinację przycisków,
które chcesz przypisać np. "Ctrl+A+Alt", i następnie kliknij "OK", aby zakończyć i
zamknąć okno. Kliknij "Apply ", aby zapisać ustawienia.

17
Ustawienie DPI
Oprogramowanie pozwala przypisać do czterech profili DPI,
które mogą być zmieniane "w locie" za pomocy przycisku
DPI. Każdy profil można ustawić wedlug swoich potrzeb w
zakładce "Basic Settings". W ustawieniach tych można także
ustawić kolor i tryb podświetlenia oraz rozdzielczość 250 -
4000 DPI . Następnie naciśnij "Apply ", aby zapisać
ustawienia.
Report Rate
Aby ustawić szybkość raportowania wybierz zakładkę "Basic settings" i wybierz jedną
z czterech opcji (125Hz, 250Hz, 500 Hz, 1000 Hz). Następnie naciśnij "Apply", aby
zapisać ustawienia.

18
USTAWIENIA ZAAWANSOWANE
Edytor makr i profili
Dodawania makra
Aby dodać makro wejdż w zakladkę "Advanced settings" i wprowadź nazwę makra w
polu "Macro name", np. "1". Naciśnij przycisk "New" a następnie "Start recording",
aby rozpocząć dodawanie makra. Użyj klawiatury, aby wprowadzić kombinację
przycisków, które chcesz przypisać do tego makra, np. "Shift + A + B", naciśnij
przycisk "Stop recording", aby zakończyć nagrywanie. Wpisz liczbę w polu "Loop
times", aby ustawić ile razy makro powinne być zastosowane po jednym naciśnięciu
przycisku. Kliknij "Confirm" , aby zakończyć i zamknąć okno.
Wybieranie makr
Aby wybrać makro, wejdż w zakładkę
"Basic settings" a następnie kliknij na
pole " Macro Key ". W wyskakującym
oknie wybierz nazwę wcześniej
nagranego makra. Zaznacz jedną z trzech
opcji po prawej stronie a następnie
naciśnij "OK", aby zakończyć i zamknąć
okno. Następnie naciśnij " Apply", aby
zapisać ustawienia.

19
Ustawienia systemowe
W ustawieniach tych można dostosować
prędkość ruchu myszy „Mouse Speed”, prędkość
pionowego przewijania „Scrolling Speed” i
odstęp czasu pomiędzy dwoma kliknięciami
„Double-Click Speed”. Aby ustawić te funkcje
przejdź do "Advanced settings" i wybierz żądaną
prędkość dla każdej funkcji. Następnie naciśnij
przycisk " Apply", aby zapisać ustawienia.
UWAGI OGÓLNE
Nieautoryzowane próby rozkręcania
urządzenia powodują utratę gwarancji i mogą spowodować uszkodzenie produktu.
Nie używaj produktu w gorącym, zimnym, zakurzonym bądź zawilgoconym
otoczeniu.
Produkt bezpieczny, zgodny z wymaganiami UE.
Produkt wyprodukowany zgodnie z europejską normą RoHS. Jej celem jest
zmniejszenie ilości substancji niebezpiecznych, przenikających do środowiska z
odpadów elektrycznych i elektronicznych
Użycie symbolu WEEE (przekreślony kosz) oznacza, że niniejszy produkt nie
może być traktowany jako odpad domowy. Zapewniając prawidłową utylizację
pomagasz chronić środowisko naturalne. W celu uzyskania szczegółowych
informacji dotyczących recyklingu niniejszego produktu należy skontaktować się z
punktem sprzedaży detalicznej, w którym dokonano zakupu, lub organem władzy
lokalnej.
Więcej informacji na stronie: www.genesis-zone.com

20
GENESIS CX33 –NÁVOD K POUŽITÍ - CZ
I. KLÁVESNICE
INSTALACE
1. Připojte klávesnici do USB portu počítače, při prvním připojení je třeba počkat
asi 15 sekund, dokud se nainstalují ovladače .
2. Klávesnice je připravena k použiti.
II. MYŠ
INSTALACE
1. Připojte myš do USB portu počítače, při prvním připojení je třeba počkat asi 15
sekund, dokud se nainstalují ovladače .
2. Chcete-li nastavit programovatelná tlačítka a DPI rozlišení je třeba stáhnout a
nainstalovat nejnovější verzi softwaru z naši webový stránky
www.genesis-zone.com.
3. Otevřete instalační složku a poté klikněte dvakrát na soubor setup.exe.
4. Pro úspěšnou instalaci softwaru postupujte podle pokynů.
5. Jestli byla instalace úspěšně dokončena, na hlavním panelu se zobrazí ikona
herního softwaru.
6. Klikněte na ikonu pro zobrazení nastavení.
ZÁKLADNÍ NASTAVENÍ
Záložka základních nastavení vám umožňuje přiřadit jednotlivé funkce ke každému
tlačítku.
1. Každé tlačítko je možné nastavit individuálně kliknutím na seznam
programovatelných tlačítek, po této akci vyskakovací okno zobrazí dostupné
funkce, které lze vybrat levým tlačítkem myši.
2. Vyberte požadovanou funkci a klikněte na tlačítko "Apply" pro uložení
This manual suits for next models
1
Table of contents
Languages:
Other Genesys Computer Accessories manuals