German pool REF-265 User manual

2-Door Built-In Refrigerator
嵌入式雙門雪櫃
REF-265
Please read these instructions and warranty information carefully
before use and keep them handy for future reference.
在使用之前請詳細閱讀「使用說明書」及「保用條款」,並妥為保存。
即時網上登記保用
Online Warranty Registration
使 用 說 明 書US E R M A N U A L

P.3
請即進行保用登記﹗
有關保用條款細則,請看本說明書最後一頁。
Please register your warranty information now!
For Warranty Terms & Conditions,
please refer to the last page of this user manual.
感謝購買本產品。
為了讓使用效果達到最佳,請您在使用本產品前仔細閱讀本說明書。
每一件產品在出廠前都通過了質檢,請放心使用。
相信您在使用過程中會得到滿意的體驗。
• 本產品符合歐盟電器安全標準。
• 通過全面細緻的測試以證明其安全性和可靠性。
• 使用前,請仔細閱讀使用說明書的注意事項。
• 產品的不規範使用可能引起危險,尤其是兒童。
• 接通電源前,請檢查交流電源與銘牌上的電源是否一致。
• 請勿隨意丟棄可回收利用的包裝材料。
• 請在合適的回收點進行回收。
• 根據相關法律規定,電器所接通的交流電源必須有效接地。
• 必須嚴格遵守使用注意事項。

P.4 P.5
注意事項
出於用電安全考慮,本產品接通的交流電源必須有效接地。如有疑慮,請聯繫合資格技術人員進行電源
檢查。
為確保電器的安全使用,請遵守以下規定:
• 請勿用濕的手或腳觸碰本產品。
• 請勿拉扯電源線把插頭拔出。
• 請勿把機器置於潮濕環境下。
• 請勿讓兒童在無監管的狀態下使用本產品。
• 請勿用濕手插入或者拔出電源。在清潔與維護之前,確保電源已斷開,或者交流電源的總開關已
關閉。
• 如出現任何故障,關閉機器但不要擅自進行維修。
本產品遵從2002/96/EC歐盟指令和WEEE指令。用戶應確保本產品被正確棄置處理,防止造成對健康和
環境有害的後果。
貼在產品上的標誌 和附帶檔表示本產品在使用壽命結束後要送到授權的電子產品回收中心,根據
當地法規進行收回,不能像普通生活廢物一樣處理。
目錄
注意事項 05
產品描述 07
安裝說明 08
電氣連接 13
冷藏室的使用 14
急凍室的使用 16
除霜 21
清潔與保養 22
故障檢修 24
保用條款 51
P.6 P.7
注意事項 產品描述
警告!本產品內有雪種R600a(含異丁烷)且絕緣泡沫塑料內含有易燃氣體,在使用壽命結束
後,請根據零售商或當地機構的指引,把機器妥善運送到當地廢品回收中心。
警告!安裝時需考慮該產品的氣候類別。產品的氣候類別在銘牌上已注明。如周圍溫度不超
出氣候類別的溫度範圍,機器可正常運行。
警告!確保雪櫃的通風口和內置組件沒有被堵塞。
警告!如機器將長期不作使用,如假期,必須斷開電源,清空、清潔乾淨並保持雪櫃乾燥。
警告!請勿損壞冷卻循環系統。
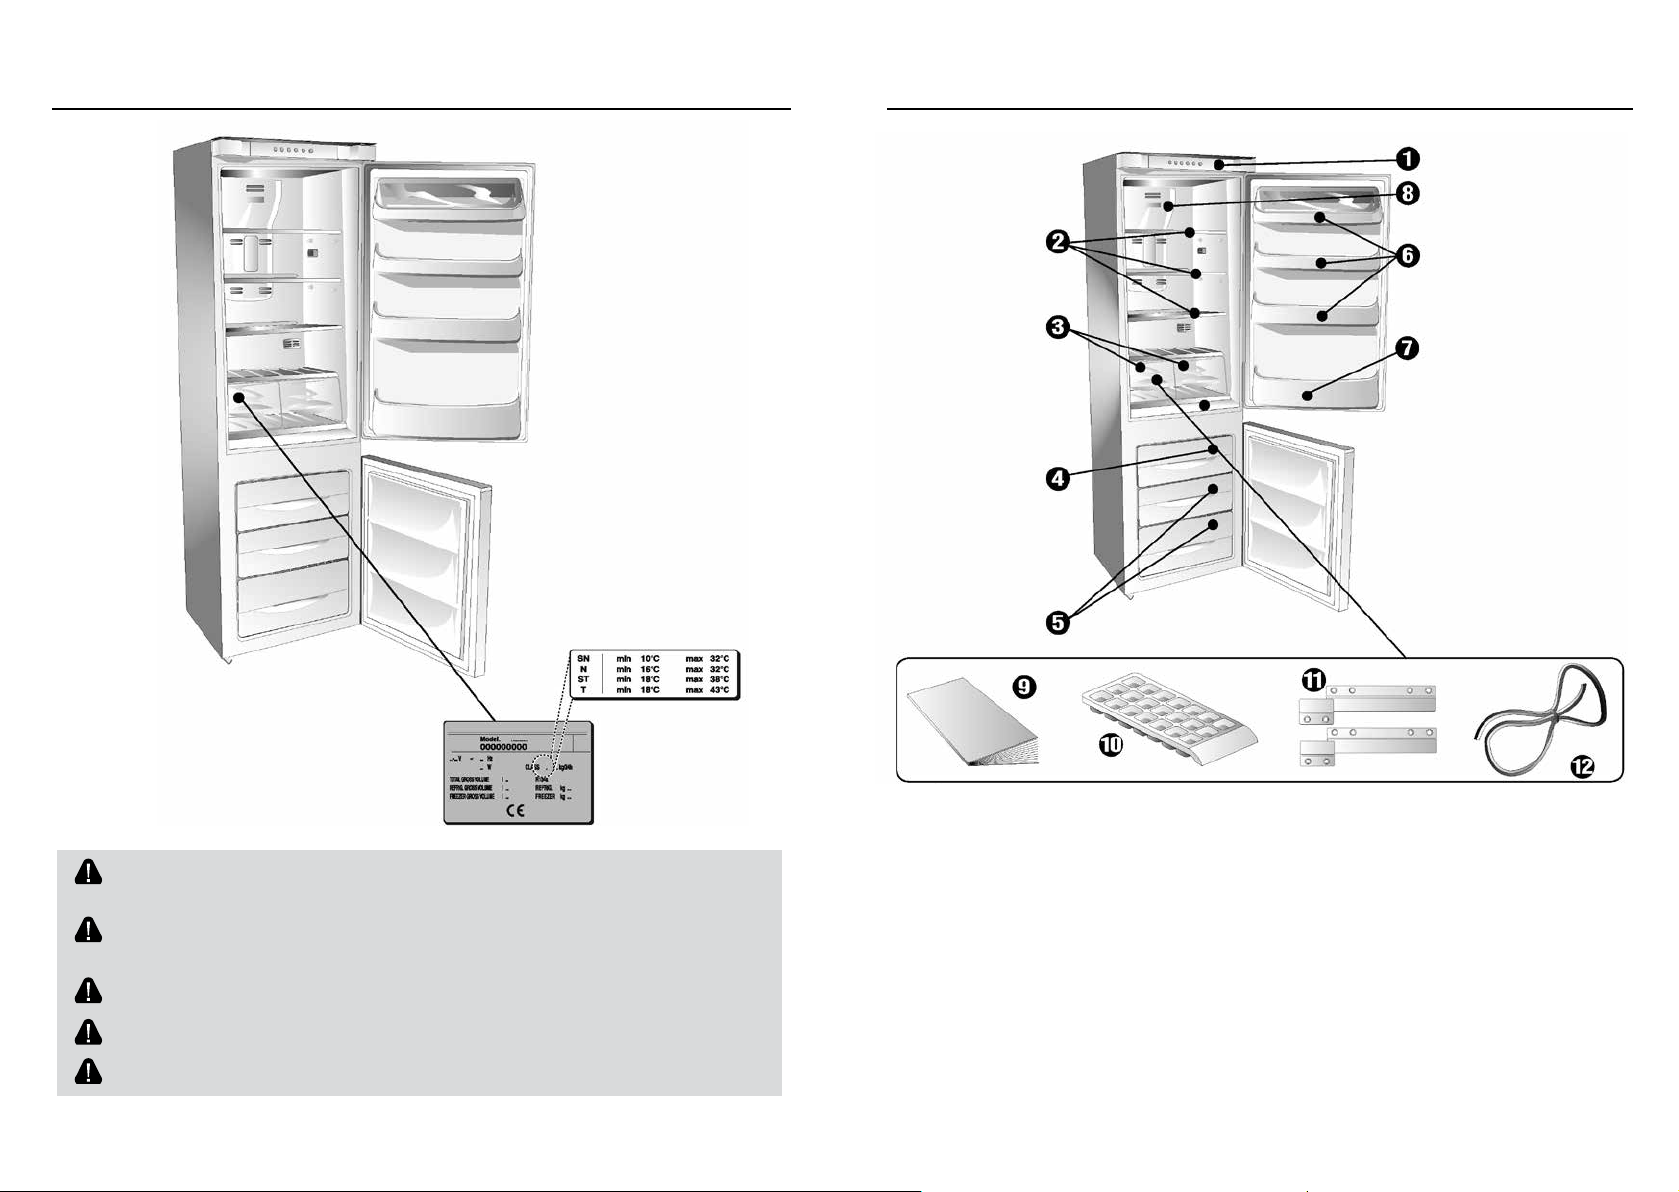
雪櫃是用於冷凍儲藏食物的大型生活電器。
該產品的承重結構由鋼板構成,鋼板經過特別處理並帶靜電塗層,可防止操作失誤帶來的損害,
以及長時間保持外觀嶄新。特選保溫材料確保內部溫度穩定並讓儲藏空間達到最大。可拆卸放置
架使內部空間可用於儲藏各種食物。
1 恒溫器
2 可拆卸放置架
3 蔬果儲藏盒(帶可拆卸放置架)
4 新鮮食品急凍抽屜
5 急凍抽屜
6 放置架
7 儲瓶架
8 照明燈
9 說明書
10 製冰盒
11 開門裝置
12 密封圈
P.8 P.9
拆除運輸保護裝置
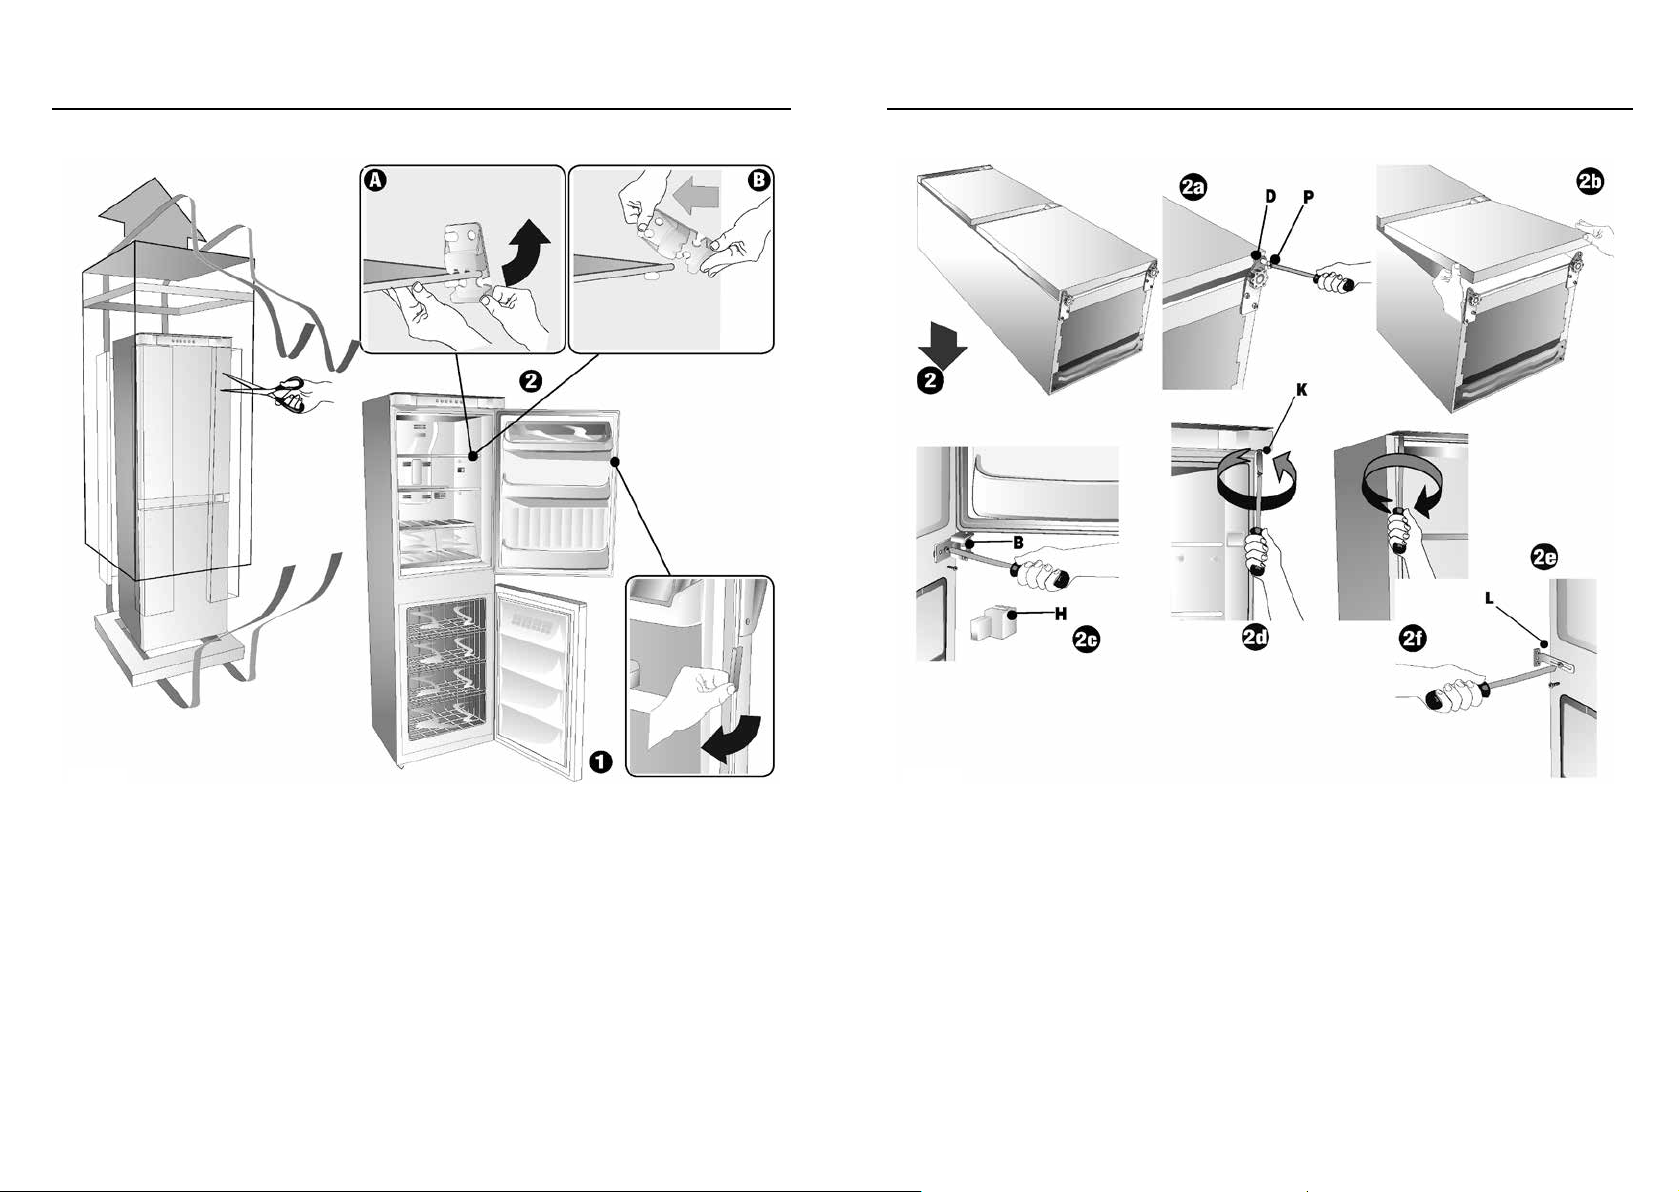
拆開產品包裝後,檢查產品是否完好。
如產品出現任何損壞,請於到貨後24小時內聯繫銷售商。
1 拆除用於保護門密封圈的保護裝置。該保護裝置旨在運輸過程中保護門密封圈。為使門密封圈正常
工作,必須拆除保護裝置。拆除時,輕輕拉住一端向外旋轉。
2 拆除玻璃放置架鎖緊裝置。這些塑膠裝置能確保放置架在運輸過程中固定不動。根據以下步驟拆除
放置架的鎖緊裝置:
A. 握緊並旋轉塑膠鎖緊裝置,使其從放置架內旋出。
B. 把裝置向外拉出。
重置開門方向
1 電器開封後,檢查電壓是否與銘牌上的電壓一致。
2 如開門方向符合您的要求,請轉到第三點。否則,把鉸鏈安裝在相反的方向。反轉開門方向時,請
平放雪櫃。為防止壓碎冷凝管或損壞壓縮機,請使用墊片。
2a 拆除鉸鏈鎖P和限位器D。
2b 卸載下方的門。
2c 滑出鉸鏈蓋H,拆除中間鉸鏈B ,上方的門可自由活動。
2d 拆除上鉸鏈鎖K,並安裝在門對面的位置。
2e 拆除中間支撐裝置L。
2f 重新固定上方的門。
安裝說明 安裝說明
P.10 P.11
安裝說明 安裝說明
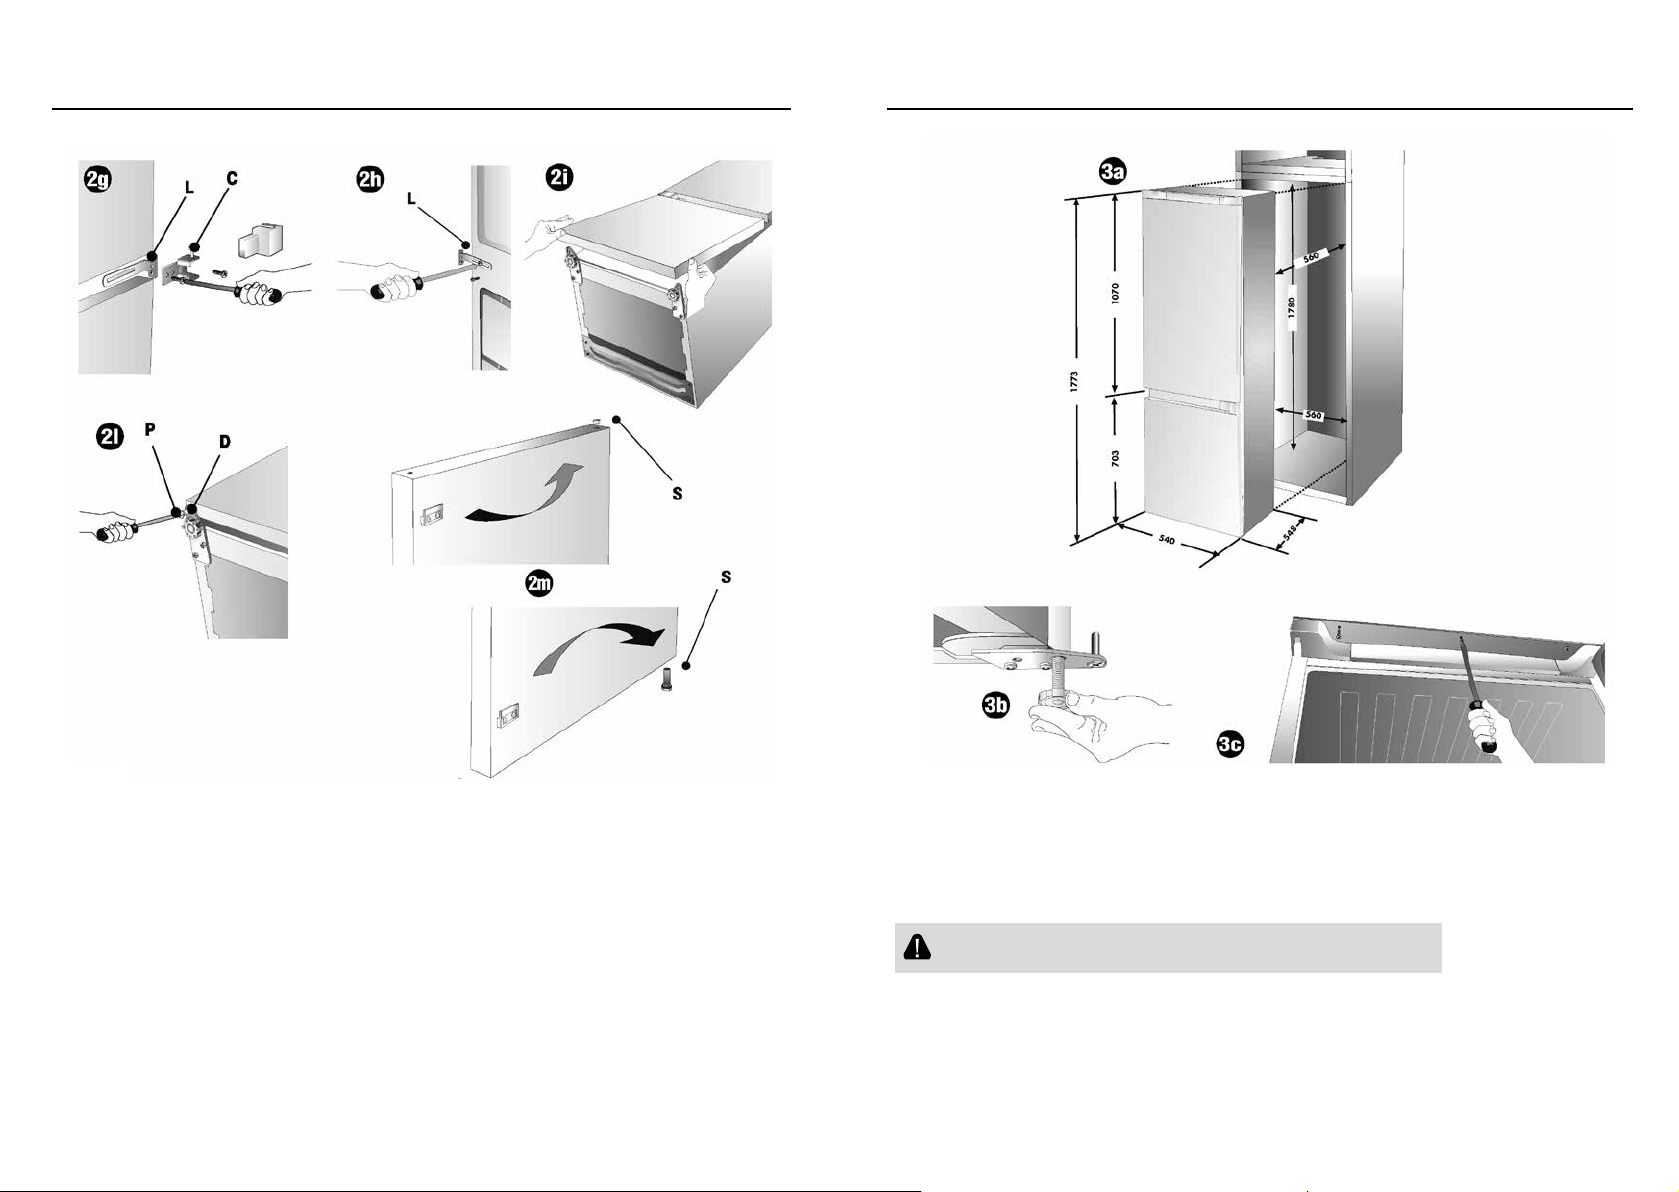
安裝注意事項:
A 請勿安裝在靠近熱源(如加熱器,散熱器,炊具等)或者直面陽光的地方。
B 自動除霜過程中,確保排水的後牆與排水通道接通。
C 放置好雪櫃後,通電前靜置一小時左右。
D 放置食物前,請確保雪櫃正常運作。
警告!請勿把雪櫃安裝在靠近熱源的地方,並預留5厘米以上的間隙。
嵌入式安裝
3 高櫥櫃的尺寸應與圖示的數據相符。
3a 把雪櫃開門的一邊貼在櫥櫃的側板上,確保雪櫃外邊緣距離櫥櫃邊緣53mm。
3b 調整雪櫃腳的高度,直到雪櫃不與櫥櫃頂板接觸。
3c 用附送的螺釘,把雪櫃上部固定在已鑽孔的面板上。
2g 把鉸鏈C和支撐裝置L安裝在左邊(安裝結束後必須把鉸鏈蓋H重新裝好)。
2h 把中間支撐裝置L重新安裝在右邊。
2i 重新安裝好下方的門。
2l 插入鉸鏈鎖P和限位器D。
2m 拆除開/關門裝置S並把它重新安裝在門的對面。

P.12 P.13
檢查交流電源是否與產品底部銘牌上的電源一致。
如交流電源插座不是有效接地,或電源插頭不適用於交流電源,請聯繫專業技術人員。
請勿使用適配器或延長線,以免造成過熱或引發火災。
警告!雪櫃必須接地。
若設備已通過不合適的不可重接插頭連接電源,應拆下並更換新的插頭。應棄置不合適的插頭。將不
合適的插頭插入13A的插座時容易引起觸電危險。若使用不可重接插頭或13A的可拆線插頭(BS1363),
則應配備經A.S.T.A批准的15A(BS1362)保險絲。若使用其他型號插頭,請按照以下方法進行接線:
黃綠雙色線或綠色電線接地(接入”E”或 標誌處)。
藍色或黑色電線與零線”N”連接。
啡色或紅色電線與火線”L”相連。
安裝說明 電氣連接
3d 用特製的支架把雪櫃中部固定在櫥櫃壁上。
3e 把兩個底部墊腳安裝在櫥櫃底部的孔內。
3f 請使用隨機附送的塑膠接頭墊條。
3g 檢查開門器“A”安裝在開門方向的對面,否則,拆除並安裝在另一邊。
3h 把導引裝置B安裝在雪櫃門上,固定好第一個孔使之可旋轉,調整位置與開門器A扣合。
3i 用另外兩個螺釘固定好開門器“B”,至此導引裝置被固定,隨雪櫃門一起運動。
黃綠雙色線接地 13A 保險絲
藍色線為零線
啡色線為
火線
線夾

P.14 P.15
冷藏室使用 冷藏室使用
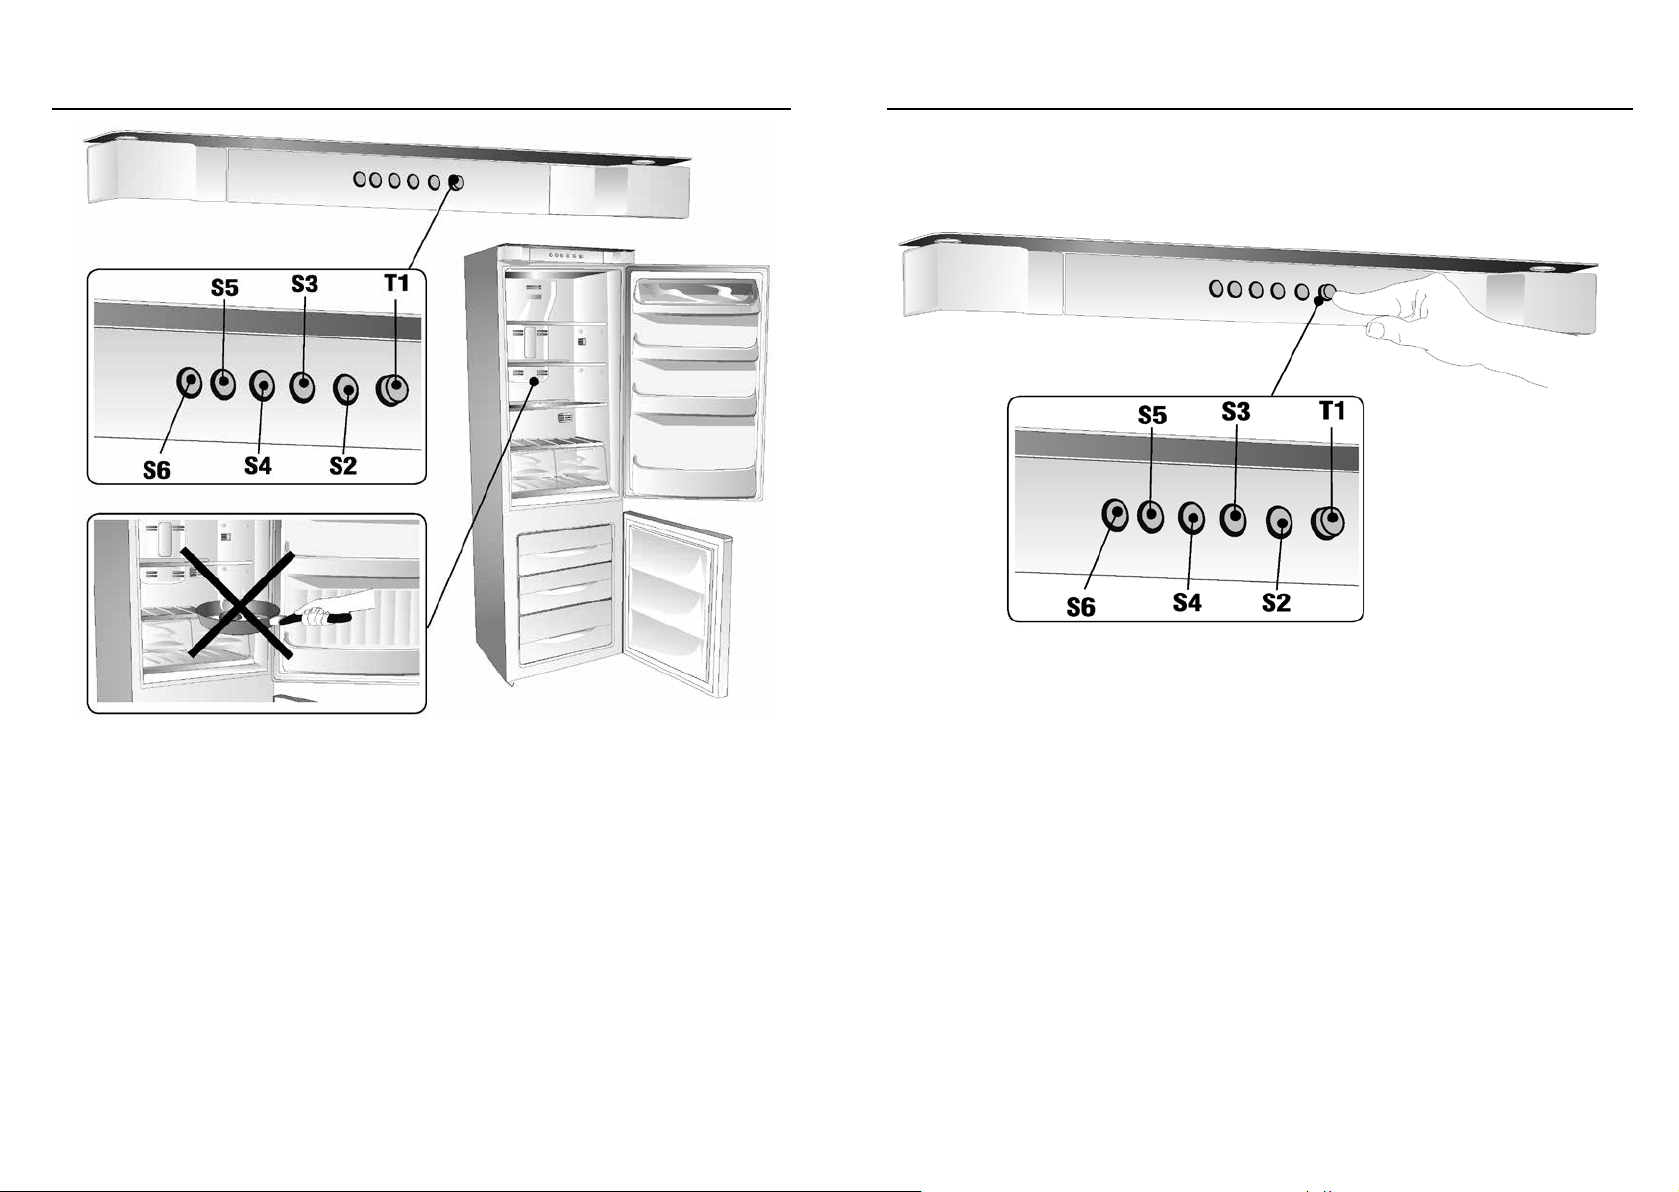
控制面板
1 按鈕:
-開/關
-溫度控制
-超強製冷開機
2 綠燈最低位置
連接雪櫃電源
確保電源電壓與銘牌上標識的額定電壓相符,主電源插頭已接地。
警告!關閉設備並即時重新開機時,壓縮機10分鐘後方才啟動,屬於正常現象。
雪櫃的啟動及控制
接上雪櫃主電源後,若綠色LED燈(S2)(最低位置)不亮,表明雪櫃已經關閉。
按T1按鈕至少0.5秒以啟動雪櫃。按T1按鈕至少4秒即可關閉雪櫃。
雪櫃啟動後,綠色LED指示燈(S2)(最低位置)亮起。急凍室溫度過高時紅色LED燈(S6)(警報信
號燈)閃爍,當急凍室溫度達-12°C時指示燈自動熄滅。
產品描述
產品分兩部分:
• 儲藏新鮮食物和飲品的冷藏室(上部)
• 用於長期冷凍食品(下放置架)或冷凍新鮮食品(上放置架)的冷凍室(下部)
啟動雪櫃前
請根據清潔章節的指引清潔內部放置架及配件。
3 綠燈中間位置
4 綠燈最高位置
5 黃燈超強製冷模式
6 紅燈故障報警功能(冷凍)
P.16 P.17
急凍室使用
溫度設定及控制:可選擇3種不同溫度,綠色LED燈(S2-S3-S4)顯示選擇溫度。更改溫度時,按下
T1按鈕,每次按下後亮著的LED燈熄滅,下一指示燈閃爍4秒,順序為S2-S3-S4-S5。
LED燈閃爍時,新設定溫度被保存。長按T1按鈕至黃色LED燈(S5)常亮可啟動“超強製冷”模式。
設備有記憶功能,停電或斷開電源插頭時仍會保存使用者所設定的溫度。
注意:
• 請於放置架間及雪櫃後壁保留一定空間,以確保空氣流通。
• 放置食物時應避免緊貼儲存室後壁。
• 請勿將溫熱食物放入雪櫃。
• 液體應保存於密封容器內再放入雪櫃。
無霜系統保證溫度恒定,急凍效率更高。冷藏室防潮設計及強勁的空氣循環將加快食物風乾,因此
建議所有食物應用密閉容器儲存。
急凍室使用
急凍室自動啟動
急凍室啟動約三小時後可達至急凍食品所需的理想溫度。
“超強製冷”功能設定
按下T1按鈕直至黃色LED燈S5亮起,“超強製冷”功能,啟動。
該功能於啟動27小時後將自動取消,但可隨時按T1按鈕以重新激活該功能。“超強製冷”模式下,
冷凝器將工作65分鐘,休息25分鐘。
溫度警報
急凍室溫度超過-12℃時(如溫度達到-11°C)發出警報,同時紅色LED燈(S6)閃爍。.
可能原因:
• 儲存的食物過多(見儲存方法)
• 雪櫃門沒有關好
• 曾經停電
• 設備故障
P.18 P.19
急凍室使用
注意:
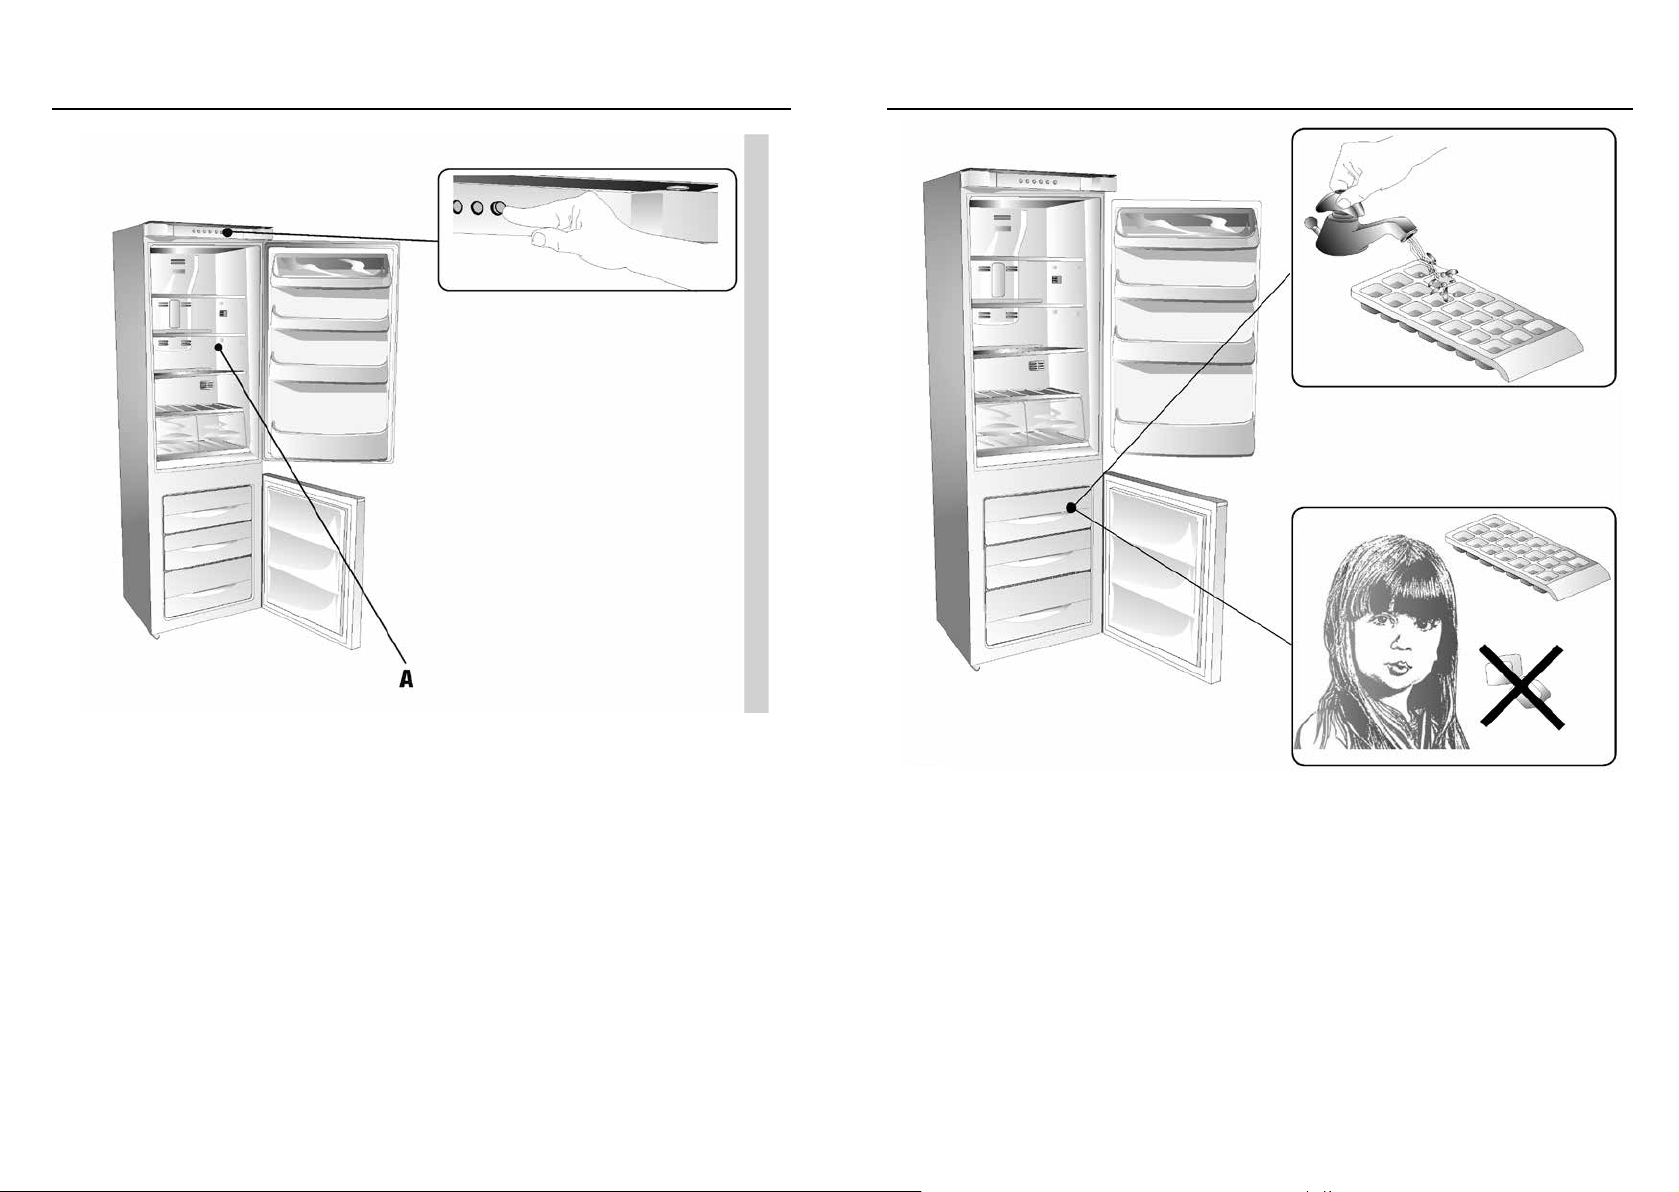
使用者可拆下雪櫃上方三層儲存架A,保留最下方的儲存架即可最大限度利用儲存空間。
重要提示
• 請勿將開始變壞的食物放置於雪櫃內。
• 儲存時間不應超過有效期。
急凍室除霜
急凍室的除霜功能會自動開啟,用戶不須做任何操作。
急凍室使用
建議:
• 請勿將剛從雪櫃取出的冰塊或凍糖果放入口腔內,避免導致冷燙傷。
• 請勿將飲料及類似的裝有液體的容器放入急凍室內。
• 高溫的食物應放置至常溫方可放入急凍室儲存。
儲存急凍食品
由於各種食品性質不同,因此急凍食品的有效期難以準確預計。
安全起見,食用前請仔細查閱包裝上的有效期。
製作冰塊
將冰塊盤放3/4水,放入急凍室抽屜內即可。
建議:
請確保急凍食品包裝完整,沒有潮濕或膨脹。若出現上述情況則表明急凍產品已經開始變壞。
已經開始解凍的食物應避免重新結凍。
急凍食品的存放時間不應超過食品包裝上的有效期。
Table of contents
Other German pool Refrigerator manuals


