GetPro DG01 User manual

INSTALLATION MANUAL
Build For Luxury Life

Laminated glass is a type of mostsafety glass, which is produced by bonding two or more layers of tempered glasses
together with a plastic interlayer. The interlayer can keeps the layers of glass bonded into one piece even when broken,
the pieces do not disperse or breaking up into large sharp pieces,keep the same shape as usual, leaving the surface
clean and smooth , avoid injury accidents.
THIS MODEL BUILD BY LAMINATED GLASS!
What is the LAMINATED GLASS?
Laminated glass also can resist the continuous attack of hammer, wood cutting knife and other weapons, and can also
resist the penetration of bullets for quite a long time, so its security is extremely high. In Europe and The United States,
laminated glass is normally used when there is a possibility of human impact or where the glass could fall if shattered
and also for architectural applications. Typically use for Skylight glazing and vehicles windshields. In geographical areas
requiring hurricane-resistant construction, laminated glass is often used in exterior storefronts,curtain walls, balcony
guardrail, and windows.
Where Will Use Laminated Glass In Our Daily Life?
GETPRO® is the first company who use laminated glasses for shower door. A lot of injury accidents happened every year
because of the glass door broken before installation or during using. Therefore, our team do a lot of tests for this part
and final chose the laminated glass make our shower doors. As you may know, 95% part is glass in one set of shower
door, only 5% is hardware. So the safety of glass is the most important thing for this product.
What We Care?
GETPRO® shower door not only safety, but also beautiful and stylish. We can customized your own style. You not only can
choose any color silks or textiles bonded inside it, but also can send us your lovely any pictures, we can print inside it.
The color can keep for long life and will not fade away. Therefore, please contact us anytime if you want your own style!
Hoping you enjoy our safety shower door with elegant style.
What You Get?
Do Not Return Product to the Store. Contact GETPRO®
service team with any questions
1

PREPARATION
Prior to installation, examine all boxes and packages for shipping damage and compare piece count with your packing
slip. After opening all boxes and packages, read this introduction carefully.
Check that all of the needed parts are included in the package by marking all the components on the “HARDWARE
LISTING”. If the unit has been damaged, has a finishing defect, or has missing parts, please contact our customer
servicedepartment within 5business days of the delivery date. Please note that GETPRO® will not replace any dam-
aged products or missing parts free of charge after 5business days or if the product has been installed. Feel free to
contact GETPRO® if you have any questions and please provide a purchase order #, name or other proof of purchase
to help identify the original order.
Follow all recommendations and requirements as shown in the installation instructions.
Perform a thorough inspection of the glass and all parts for any damage prior to installation. Any damage to laminated glass
can cause breakage.
Do Not install damaged glass!
Do Not install or operate a shower or tub door if the glass has chipped corners, slivered edges or is otherwise damaged. Do Not
install or operate a shower or tub door that has been dropped or banged into a hard surface such as tile, marble or glass.
CAUTION: Contact with any hard surface can damage laminated glass and cause it to shatter.
This product uses laminated glass. Glass cannot be cut after it has been tempered. Do Not attempt to cut laminated glass.
GETPRO® Laminated Glass Shower doors, Tub doors, Inline panels, and Return panels can shatter due to improper handling or
lack of maintenance. Conduct periodic inspections of glass and all parts for possible damage, missing or loose parts.
Always wear proper safety equipment such as: safety goggles, work gloves and appropriate footwear during the installation
process.
WARNING. Risk of leakage and/or damage. Follow all instructions regarding the application of silicone sealant or caulk. Allow
24 hours for the sealant to cure before the initial use of the shower or tub product. Follow the silicone manufacturer’s recommen-
dations regarding the use of their product.
Thoroughly read these instructions before installing or using this product.
Leave this manual for the end-user of the product.
WARNING: TO AVOID THE RISK OF DAMAGE OR INJURY
GETPRO® reserves the right to alter, modify or redesign products any time without prior notice for product improvement and
customer experience. Please refer to the model’s web page on getprohome.com for the latest technical drawings, installation
manuals, warranty information or additional product details.
This product should be installed by someone familiar with the construction requirements for this type of project and the care
necessary for the safe installation and operation of the product.
The safety of any installation is the responsibility of the installer.
Professional installation recommended. (All Models)
Professional installation required.
To prevent damage or serious injury, Do Not lean against the installed panel/door/glass.
To prevent damage or serious injury: Do Not attempt to lift or move a heavy lite of glass alone. Use an assistant and/or a profes-
sional grade glass suction cup.
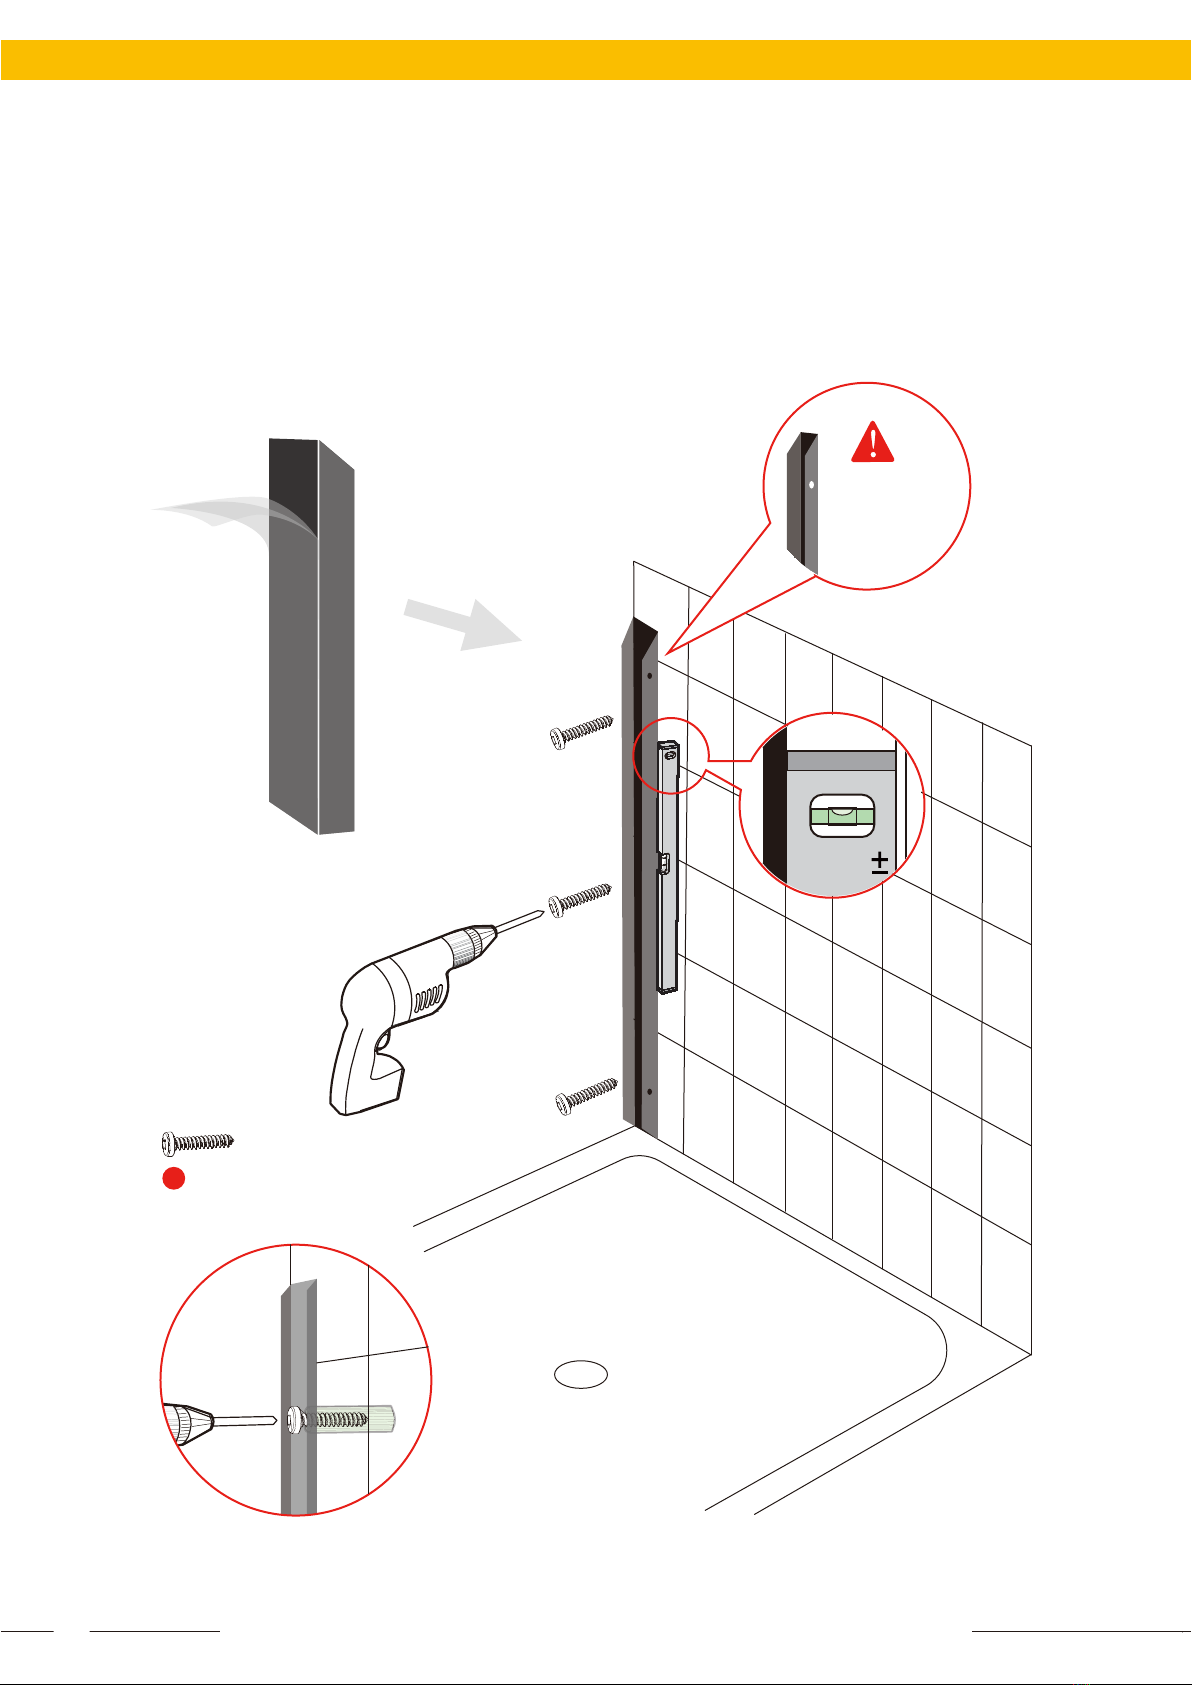
The installation of some models may require drilling down into the threshold. Contact the manufacturer of the base, tub, or
threshold material with any questions regarding the drilling of holes into their product.
All drawings in this installation manual are for illustrative purposes only and are not drawn to scale.
IMPORTANT
2

1/4" & 1/8" Drill Bits Phillips ScrewdrivePower Drill levelPencil
MalletSilicone Tape Measure Safety Goggles Allen Key
TOOLS REQUIED/OUTILS REQUISTOOLS REQUIED
HARDWARE LIST
ITEM
1
QTY
2
3
4
5
6
7
1
1
NAME
Stationary Glass
U-Channel / Vertical wall rail
Wall Anchor
D01 Screw Sleeve
D01 Screw cover
Screw ST4*35
Screw M4*10
4
4
3
3
3
REFERENCE IMAGE
3

Either side
can be installed
L R
Build for Luxury Life
This model is reversible for right or left-hand panel installation. The right-hand panel
installation is shown as an example throughout this manual. For the left-hand panel
installation, simply begin on the opposite wall and reverse the orientation of the steps
shown.
TIP
Inline panel installation
Model Specific Preparation
REQUIRED
!
1/2” (12.7mm)
Out-of-Plumb
Adjustment on the
Vertical U-Channel
Only; Verify
threshold and walls
with a level
Threshold must be
level
5/8”(15.8mm)
minimum
threshold
!
Threshold must be level
5/8” (15.8mm)
minimum
threshold
0mm
4

Inside
Vertical wall rail
must be level
1
Step
2x1
Build for Luxury Life
Please keep
the hole
face inside
0mm
5

Build for Luxury Life
Marking the holes for drilling
Drill the hole using drill bit and insert wall anchors
2
Step
3
Step
3x3
.
Inside
6

Build for Luxury Life
Tear off the wall-side part protective file,
Secure the screw for the U-channel
4
Step
4x3
0mm
Please keep
the hole
face inside
Inside
Wall
7

Wall
Stationary
Glass
Build for Luxury Life
Wall
5
Step
Slowly slide the panel glass into the vertical U-channel from up to down
Please keep
the hole
face inside
Stationary
Glass
Inside
Stationary
Glass
8

Build for Luxury Life
Secure the screw, and cover all
the bolts with the decorative caps.
6
Step
5x2
x2
6
x2
7
5
6
Inside
9

Build for Luxury Life
24h
7
Step
Apply good quality mildew-resistant silicone to the
entire exterior and interior perimeter glass panel
where meets the wall and along the threshold.
Allow 24 hours for the silicone to fully cure before
using the shower.
Don’t forget to tear all the protective films after you
complete the installation.
Allow 24 hours for the silicone to fully
cure before using the shower
Waterproof Silicone
Inside
10

Table of contents
Popular Plumbing Product manuals by other brands

Sterling Plumbing
Sterling Plumbing Shower Receptor 72161100 Specification sheet

Glacier bay
Glacier bay HD67459W-0308D2 Installation and care guide

Hans Grohe
Hans Grohe 50001 Series Assembly instructions

MEFE
MEFE CAT 67913 installation manual

Glacier bay
Glacier bay 873-W427H2 quick start guide

Moen
Moen 84470 installation instructions

Tres
Tres Slim Exclusive 20261302 manual

Brizo
Brizo R65700 manual

Laufen
Laufen Palomba 8.1180.3 manual

Spectrum
Spectrum Pfister Brea LF-042-BR Maintenance & Care Guide

Oras
Oras Electra 6660 Installation and maintenance guide

Hans Grohe
Hans Grohe Vivenis sBox 75444 Series Instructions for use/assembly instructions