Gevi GEGCE006-U User manual

ELECTRIC CONTACT GRILL
INSTRUCTION MANUAL
GEGCE006-U

IMPORTANT SAFEGUARDS
Read all instructions.
Do not touch hot surfaces. Use handles or knobs.
Before using, always check that the electrical rating of the
power socket corresponds to that of the machine.
To protect against fire, electric shock and injury to persons, do
not immerse cord, plug, or the grill in water or other liquid.
If the supply cord is damaged, it must be replaced by the
manufacturer, its service agent or similarly qualified persons in
order to avoid a hazard.
Close supervision is necessary when any machine is used by or
near children.
Unplug from outlet when not in use and before cleaning. Allow
to cool before putting on or taking off parts, and before cleaning
the machine.
Do not operate any machine with a damaged cord or plug or
after the machine malfunctions, or has been damaged in any
manner. Return machine to the nearest authorized service
facility for examination, repair or adjustment.
The use of accessory attachments not recommended by the
machine manufacturer may result in fire, electric shock or
injury to persons.
1.
2.
3.
4.
5.
6.
7.
8.
9.
When using electrical machines, basic precautions should always
be followed, including the following:
Dear Gevi customer
Gevi have focused on creating perfect home appliances
for our customers. In the past few years, it has taken us
time for lots of researches and many prototypes to
achieve our goal. We would like to give you different using
experience. Thanks for purchasing our Gevi products, you
could search from our official website if you would to learn
more our product information.
If you want FAQs and more information, here’s how we
can connect via WhatsApp !

Do not use outdoors.
Do not let cord hang over edge of table or counter, or touch hot
surface.
Do not place on or near a hot gas or electric burner, or in a
heated oven.
Extreme caution must be used when moving an machine
containing hot oil or other hot liquids.
To disconnect, turn off any control, then remove plug from wall
outlet.
Do not use machine for other than intended use.
The machine must not be used by an external timer or remote
control system. Don’t use an accessory not recommended by
the manufacturer.
Don’t wrap food with plastic film, polythene bags or metal foil.
You’ll damage the grill and may cause a fire hazard. Don’t
leave food to cool on the grill. Remove food while hot.
Don’t use metal or sharp utensils on the grill. They’ll damage
the non-stick cooking surface. Use wooden or plastic spatulas
or tongs.
This machine is not intended for used by persons (including
children) with reduced physical, sensory or mental
capabilities, or lack of experience and knowledge, unless they
have been given supervision or instruction concerning use of
the machines by a person responsible for their safety.
10.
11.
12.
13.
14.
15.
16.
17.
18.
19.
Children should be supervised to ensure that they do not play
with the machine.
WARNING: charcoal or similar combustible fuels must not be
used with this machine.
CAUTION-‘hot surface’. The machine generates heat and
escaping steam during use. Take proper measures to prevent
injury, burn or fire.
Never transport the machine with handle.
This machine is intended to be used in household and similar
applications such as:
‒ Staff kitchen areas in shops, offices and other working
environments;
‒ Farm houses;
‒ By clients in hotels, motels and other residential type
environments;
‒ Bed and breakfast type environments
The machine is not intended to be operated by means of an
external timer or separate remote-control system.
Save these instructions.
20.
21.
22.
23.
24.
25.
26.

KNOW YOUR BARBEQUE GRILL
CONTROL PANEL
CONTROL PANELDESCRIPTION
OPERATION DESCRIPTION:
● INITIAL USE
● ASSEMBLE THE ROASTING TRAYS
clamps near the hinge and push down the front end of tray with a
little force to snap the tray into place. Then close the grill, just pull
the handle toward you directly.
Unpack the package, take out all the accessories and clean them
according to the section of “CLEAN AND MAINTENANCE”.
Normally, the grill is opened at an angle of 105 degree .The top
roasting tray can be level with the bottom roasting tray to create a
large cooking surface and assemble the top roasting tray. First
open the grill to a angle which is less than 105°, then push the
pushing knob upward with the other hand and hold the handle
with one hand to open the grill to 180°. Insert the trays into the
Plug the cable power plug.
Press the power on key to start the machine: the LED screen
lights up the food category display. Press power switch button
and LCD screen will display and show food function.
The whole menu on the panel is displayed in white . Rotate the
dial knob to select the menu function you want. After the menu
function is selected, its pattern changes from white to blue.
Press the OK button to start, and the selected menu pattern
will be permanently lit in blue, other menu patterns will not
1.
2.
3.
Electrical parameters: 120V ~ 60Hz 1800W
Left pole
Release Button of
upper cooking plate Right Pole
handle
LED display screen
ON/OFF button OK button Dial knob
upper cooking
plates
lower cooking
plates
180°angle
button Switch Chicken Sausage Red meat Fish Panini
Burge Defrost Flat open OK button Dial knob

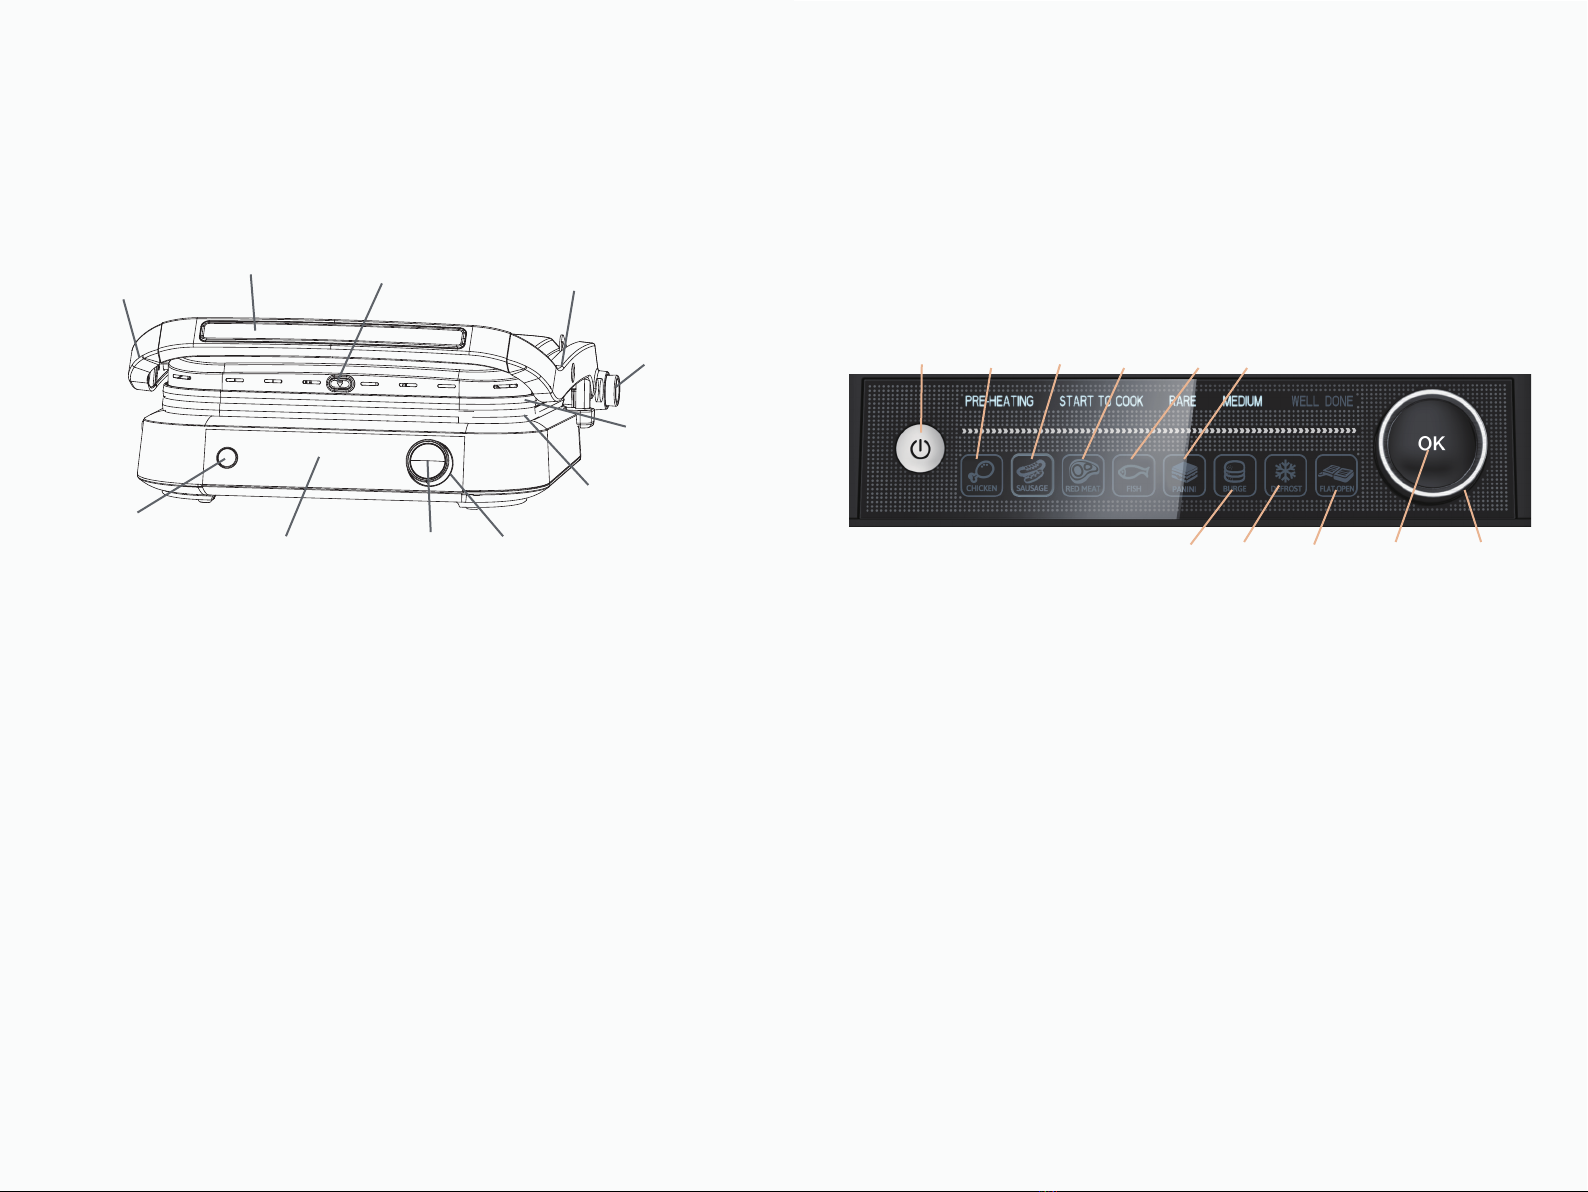
be lit. At the same time, the progress bar will start to flash to
show you the maturity of the food. For example, when the
“ Pre-Heating” progress is working, it will flash and after it is
completed, it will stop flash and stay on. The following
progress “Start-to-Cook” will continue to flash as the previous
one and so on.
After the machine reaches the preheat temperature, it will
sound BIBIBIBI 5 tone to remind user the preheat finish, can be
ready to put food on it. When the user put food and close upper
cover. the machine can detect the food thickness within 5s and
confirm the heating time according to the food thickness
automatically.
With the continuous heating of the machine, its food gradually
matures, and the progress bar will gradually run from “Rare” to
“Medium” to “Well done” and there will sound BIBIBIBIBI 5
tone for each maturity of food. The user can judge the maturity
of the food according to the performance. (Only the “Red
Meat” function will have 1 tone to indicate that other functions
will not prompt)
When the food is fully cooked the “Well done” pattern will stay
on,the machine will sound BIBIBIBI 5 tone to remind the user
that the food can be taken out. At the same time ,the machine
will send out BIBIBI 3 tone to stop heating and automatically
shut down.
4.
5.
6.
Flat Open mode: press switch button, dial knob choose Flat
Open button and then OK button.Then,the machine start
general grill meat pattern. Flat Open mode can work on the
status of cover open.
7.
Open the machine on 180°and lie flat(only use for general
grilled meat pattern).
Press power switch button to start working.
Press Flat Open mode and OK confirmation button. machine
start to preheat and it will stop heating once the cooking plate
reaches setting temperature. User can put food on it to bake.
The machine open on 105°or 180°angle can not use the smart
mode.
1.
2.
3.
4.
GRIDDLE

For best results, lightly coat the cooking plates with a little
cooking oil or cooking spray.
Close up the plates when preheating. After the preheating is
done, if you do not lift up the upper plate to put in food, the
machine in the intelligent mode will automatically turn off
after a few minutes, but in manual mode, the machine has no
detection function so it will keep running for about two hours
till the machine turns off automatically.
When the food is cooked, use the handle to open the lid.
Remove the food with a plastic heat-resistant spatula. Never
use metal tongs or a knife as these can cause damage to the
non-stick coating of the cooking plates.
There is beep sound for “RARE” and “MEDIUM” only when you
use beef function. And for other functions, there only is beep
sound for “WELL DONE”.
Smart mode is only available when the machine cover is
closed.
Smart mode status can have warning sound to remind user put
food on machine once preheating finish. If user do not put
food, the warning sound will remind after 5min and remind
again after another 2 min.Then auto power-off.
1.
2.
3.
4.
5.
6.
The whole machine starts timing by pressing the power button.
After 2 hours ,it will automatically cut off power. If need to be
reused ,it needs to press the power again to start the whole
machine.
7.
NOTE:

CLEAN AND MAINTENANCE
STORAGE
Before cleaning, disconnect the grill and let it cool down
completely.
NOTE: The grill is still very hot. It will take quite a while to cool
down.
Press down release button and take apart the roasting trays.
After disassembling the trays, wash the roasting trays in warm
soapy water or in a dishwasher. Dry the roasting trays before
replacing them on the grill.
Remove the upper and lower drip trays with gloves, empty the
drip tray into a heat-proof bowl, rinse them in warm soapy
water or in the top rack of the dishwasher and then dry them
thoroughly.
NOTE: before removing the drip box, make sure the
temperature of oil or oil residues in the drip box must be lower
than 40℃, otherwise it may burn person for high temperature.
Wipe other surfaces of the grill with a clean damp cloth. Use a
paper towel moistening with a little cooking oil to remove the
stubborn stain.
1.
2.
3.
4.
5.
Reassemble the roasting trays into grill.
● Do not immerse the machine into water or other liquid.
● Do not use harsh or abrasive cleanser or solvent.
● Never use scourers, wire wool or soap pads.
6.
Before storing the grill, make sure the grill is clean and dry
thoroughly.
Close the grill. And rest it flatly.
Store the grill in a cool dry area out of the reach of children. The
grill can not be rested vertically.
1.
2.
3.
This product contains no user serviceable parts.
Refer service to qualified service personnel.
ENVIRONMENT FRIENDLY DISPOSAL
You can help protect the environment!
Please remember to respect the local
regulations: hand in the non-working
electrical equipments to an appropriate
waste disposal center.
Table of contents
Popular Grill manuals by other brands

KitchenAid
KitchenAid 720-0954GA (LP) Installation Instructions and Use & Care Guide

GrillMe
GrillMe Sydney user guide

Landmann
Landmann Perfect Sear 4.0 instructions

G3 Ferrari
G3 Ferrari GALACTIC GRILL user manual

Davis & Waddell
Davis & Waddell DES0266 Important safety instructions

Flama
Flama 4421FL instruction manual