Geyser GEYSER SYSTEMS HOT PORTABLE SHOWER & CLEANING... User manual

user’s manual
GEYSER SYSTEMS
HOT PORTABLE SHOWER & CLEANING SYSTEM

1

READ INSTRUCTIONS CAREFULLY:
Read and follow all instructions. Place instructions in a safe place for future
reference. Do not allow anyone who has not read these instructions to operate
this product. Use this product only as directed.
You are responsible for your own safety and the safety of those in your group.
This manual is not intended to replace your good judgment.
CONTENTS
PARTS LIST ...............................................................................................
WARNINGS ..............................................................................................
OPERATING PRECAUTIONS ...............................................................
OPERATING INSTRUCTIONS ..............................................................
SPECIFICATIONS .....................................................................................
TROUBLESHOOTING .............................................................................
MAINTENANCE & CARE ........................................................................
LIMITED WARRANTY .............................................................................
PARTS LIST
1. Geyser
2. 16 ft 12V Power Cord
3. 5 ft Hose Line
4. 1 ft Yellow Replaceable Scrub
* Additional replacement scrubs (green, yellow, pink) can be purchased from an authorized retailer.
2
3-4
4
5-11
12
13
14
14
2

WARNING:
• Vehicle engine must be running at all times when operating.
• Do not operate near vehicle exhaust.
• Do not use when the vehicle is in motion.
• Operate on a at surface and secure to keep upright.
• Do not operate on slippery or uneven surfaces.
• Hose line and power cord are a suocation, tripping, and/or tangle hazards.
• Do not use under the inuence of any substances that impair judgment.
• Do not suspend the Geyser above the head when operating.
• Keep this product, hose line, cord, and it’s accessories out of reach of children aged 12 years
and younger.
• Do not allow children to use without adult supervision.
• Do not tamper or modify this product, hose line, power cord, or accessories.
• Do not operate around sharp objects.
• Do not submerge the Geyser in water.
• Do not attempt to cut or splice electrical cord or hose line.
• Do not stick anything through the holes inside the water container.
• Do not tamper with components at the bottom of the water container.
• Contains components that may be a choking hazard for children or animals.
• Do not pull excessively on the scrub or hose line.
• Close black switch cover after operating Geyser to protect switch and avoid accidental
activation.
• Do not leave the Geyser plugged in and unattended.
• Do not operate in the rain or during thunderstorms.
• Do not activate pump or heating mode without properly securing the lid.
• Use one scrub per person or object.
HEATER & HOT WATER WARNINGS:
• Water temperature over 131° F (50°C) can cause scalding.
• Children, disabled, and elderly are at higher risk of being scalded.
• Unscrew lid and feel water before starting pump mode.
• Unscrew lid and feel water after someone else has prepared the water for you.
• Do not allow children to use heating system or pour boiling water without adult supervision.
• Immediately unplug the power cable or ip switch to“OFF”if the Geyser is empty and the red
“HEATING WATER”light is on.
3

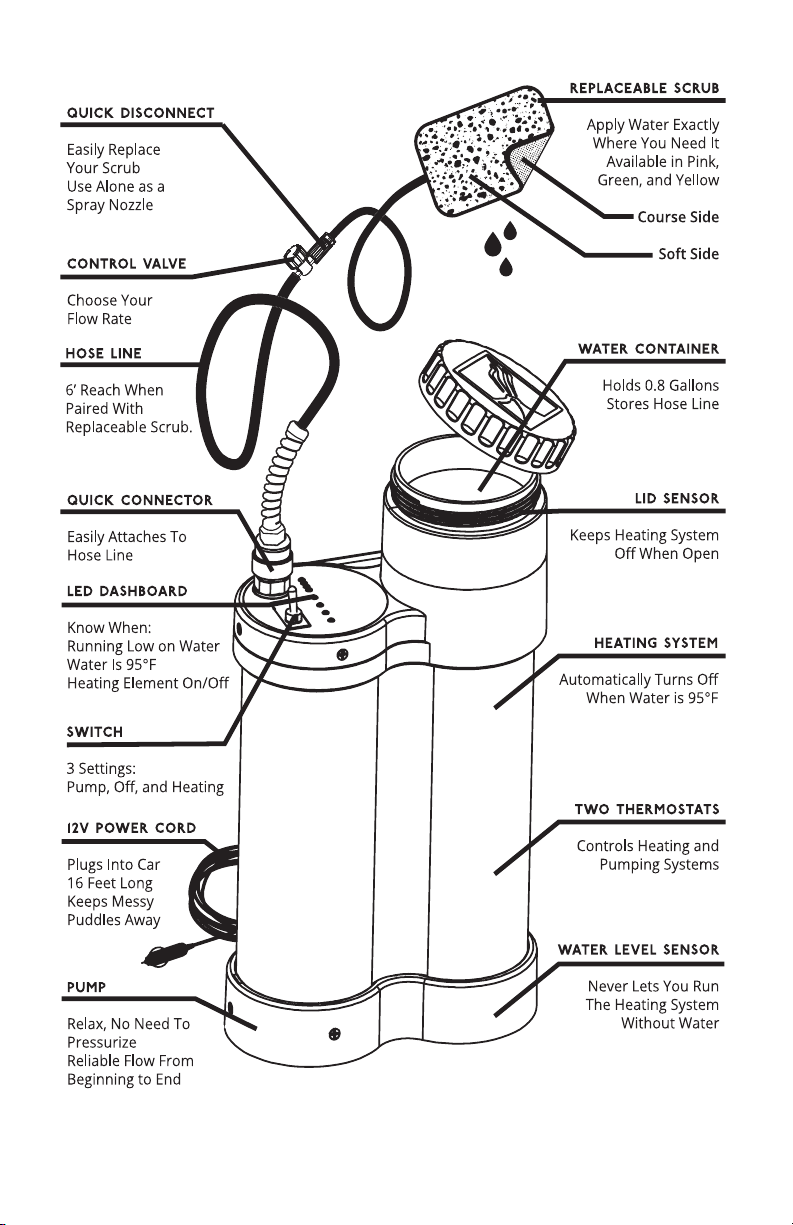
EXTERNAL GAS STOVE HEATING WARNINGS:
• Review stove instructions or manual before operating stove or any other alternative product
for heating water.
• Do not use a gas operated stove inside the vehicle or in an enclosed space.
• Use proper ventilation when operating a stove.
OPERATING PRECAUTIONS:
• Only operate with 12V DC battery source and vehicle engine on
(do not drain vehicles starter battery).
• Do not use with solar panels. This can cause insucient pumping or heating performance.
• Only use potable water. Other liquids damages the pump and voids warranty.
• Do not add soap directly into the water container.
• Do not use to cook meals or warm bags (ie: baby breast milk) inside the Geyser.
• Do not drink from scrub, hose line, or water container.
• Do not run the Geyser with only boiling water. This damages the pump and may lead
to severe burns.
• Wear protective, non slip footwear.
• Operate on a non-slip surface.
• After opening the lid, conrm that the red“HEATING WATER”light is o before
touching water.
• Care should be exercised around the black control valve along hose line. Scratching or eye
injury can occur.
• Use caution when placing the scrub down to avoid dirt, debris, and dirty surfaces.
• Using scrub and/or soap on face can cause water, soap, and debris to get into eyes and may
cause irritation.
• Check the cleanliness of the connection point of the accessories and hose line before
attaching another scrub or accessory.
• Use one scrub per person or object.
• Only use mild soap with the scrub.
• Do not add sediment, debris, rocks, or other items in the Geyser or scrub.
• Keep the Geyser and all accessories away from re or hot objects.
• Dripping water from the scrub or Geyser can cause slip hazard.
• Disconnecting or connecting the hose line from the yellow hose connector may cause
momentary leaking water (especially if pump mode is left on).
• Do not pull the hose with excessive force. This may damage the ttings and may cause leaks.
• Do not store the Geyser in extreme hot or cold temperatures.
• Do not microwave or dishwash Geyser or accessories.
• Feel and test both sides of the scrub prior to using.
• Prevent the pump from running without water for more than 60 seconds.
4

Attaching Scrub To Hose Line
1. Make sure control valve at the end of the
hose is in the o position (clockwise).
2. Align the arrows of the scrub connector to the end of the control valve.
3. Push together until the two arrows meet.Twist the end of the control valve quarter turn
counterclockwise until locked.
OPERATING INSTRUCTIONS
5

1. Turn Geyser o before detaching hose line.
2. Twist the end of the control valve quarter
turn clockwise until unlocked.
3. Align the arrows of the scrub connector
and control valve.
4. Pull apart the scrub and control valve.
5. Place scrub in reusable storage bag to
prevent debris between uses.
6. Follow maintenance and care steps in
recommendations (page 14).
Detaching Scrub From Hose Line
6

Preparing The Geyser System
1. Place Geyser on a at, non-slip surface.
2. Turn the vehicle’s engine on.
3. Connect the power cord to a 12V socket
in vehicle.
4. Conrm LED on power cord’s plug is on.
5. Lift black switch cover to expose switch.
6. Conrm the switch is in the“OFF”position
before connecting Geyser to power.
7. Connect the power cord to the Geyser.
8. Conrm that the lower green“POWER ON”
light is on.
9. Unplug the power cable immediately
if the Geyser is empty and the red
“HEATING WATER” light is on.
10. Insert and press the gray end of the
hose line into the Geyser’s yellow hose
connector until you feel/hear an
audible click.
11. Gently tug on the hose to check the
connection is secure.
12. Twist the yellow hose connector
counterclockwise from the unlocked to
locked position.
13. Attach the scrub to the control valve
(see instructions on page 5).
14. Unscrew the lid from the top of the
water container.
7

15. There are two options for heating water. For the faster heat time using an external gas stove,
goto step 16. For heating with the Geyser’s heating system, goto step 24. For a cold shower,
goto step 34.
Heating Water With External Heating Stove:
16. Fill the water container with cold water rst (use table for general guidelines).
Note: Adding boiling water rst will disable pump and prevent from accidentally scalding user.
What To Do When “PUMP OFF TOO HOT” Light Is On? Refer to step 54.
17. Boil approximately 1 liter of water on an external stove.
18. Pour the boiling water into the water container after
adding cold water. Fill below the black portion near the
top of the water container. Do not overll the water
container to prevent overow.
Note: It may take over 30 seconds for the thermostat
temperature sensor to register the new temperature of the
water and turn on the “95 F” light on the dashboard.
Note: Due to the nature of the thermostat, 95°F sensor can
be activated between 90°F - 101°F.
19. Conrm the“PUMP OFFTOO HOT”light is o.
If the light is on, go to step 54.
20. With caution, put your hand in the water to feel the
temperature of the water before beginning your shower.
21. If water is too hot or cold then continue pouring more hot
or cold water until the desired temperature is achieved.
Do not overll the water container to prevent overow.
22. If the water is too hot or cold and water container is full,
then dump some water out and away from the power cord.
Go back to step 21 until desired water temperature is achieved.
23. Skip to step 38 and start your shower.
50°F 1.5 L 1.5 L
60°F 2.25 L .75 L
75°F 2.5 L .5 L
8

Heating Water With
Internal Heating System
24. Pour water into the water container. Fill
below the black portion inside and near
the top of the water container.
25. Screw the lid to the top of the water
container.
26. Conrm that the green“LID SECURED”
light is on.
27. Conrm that the blue“LOW WATER WHEN
BLINKING”is o.
28. Conrm that the red“PUMP OFF TOO HOT”
is o.
29. Flip the switch to“HEAT”mode to start
heating your water.
Note: Heating system will not turn on if
there is not enough water in the container.
30. Conrm that the red“HEATING WATER”
light is on.
31. Wait for approximately 15 to 45 minutes
for water to heat (depending on the initial
temperature and quantity of water).The
heating system will automatically shut o
once the water is approximately 95°F and
the“95 F”light is on.
32. Conrm that the red“95 F”light is on and
the“HEATING WATER”light is o.
33. Conrm the“PUMP OFFTOO HOT”light
is o.
34. Skip to step 38 and start your shower.
Cold shower
35. Pour 3 liters (0.8 gallons) of water into
the water container. Fill below the
black portion near the top of the water
container.
36. Screw the lid to the top of the water
container.
37. Conrm the red“PUMP OFF TOO HOT”light
is o.
9

Starting Your Shower
38. Conrm the red“PUMP OFF TOO HOT”
light is o .
39. Check the control valve is o by turning
completely clockwise.
TIP: Add non-lathering soap to scrub.
TIP: Wear non-slip ip ops to not get
feet dirty.
40. Flip the switch to“PUMP”mode.
TIP: Start washing from your head to feet.
TIP: For washing long hair, disconnect the
scrub and spray from the control valve.
41. Slowly turn the control valve
counterclockwise until you feel the rst
click and the pump making an audible,
repetitive sound. The water is at the
lowest ow and up to 15 minutes.
42. Start enjoying shower.
43. To increase the ow of water, turn the
control valve counterclockwise until you
feel the second or third click. The pump
will beat faster and disperse more water.
TIP: Slowly turn the control valve
counterclockwise until you reach an
optimal ow.
44. You will likely have approximately half a
container of water left. To conserve water,
you can use the other half for another
person or gear. Otherwise, use the highest
ow rate to nish your shower with the
most refreshing experience! To obtain the
highest ow rate, turn the control valve
counterclockwise until you feel the knob
stop. The pump will run continuously and
empty the Geyser in less than one minute.
45. The blue “LOW WATER WHEN BLINKING”
light forewarns when the Geyser is low on
water.
46. The Geyser is out of water when the pump
starts gurgling.
47. After the pump starts gurgling, continue
running the pump for 15 seconds with the
control valve open.This removes excess
water.
48. Flip the switch to the“OFF”position.
10
4 ow settings:
• First Click - Low Flow - approx. 15 mins
• Second Click - Medium Flow - approx. 7 mins
• Third Click - High Flow - approx. 4 mins
• Fully Open - approx. 1 min

49. Flip the black switch cover over switch.
TIP: This protects switch and prevents
accidental heating mode.
50. Twist yellow hose connector clockwise to
the unlocked position.
51. Detach hose by sliding down the yellow
sides of hose connector.
52. Unplug Geyser and power cord.
53. Follow maintenance and care steps in
recommendations (page 14).
What To Do When “PUMP
OFF TOO HOT” Light Is On?
54. If“PUMP OFF TOO HOT”is on, then DO NOT
test water temperature with your hands.
55. Carefully dump some hot water out and
away from the power cord.
56. Add cold water until water temperature is
below 87°F and“PUMP OFF TOO HOT”light
is o.
Note: It may take over 30 seconds after
adding cold water for the thermostat sensor
to enable pump operation.
11

SPECIFICATIONS
Model Geyser System with
Internal Heating System
Washing Time 1 Minute At Highest Flow
15 Minutes At Lowest Flow Rate
Modes Pump, O, Heat
Electrical Requirements
Voltage Requirements 12V DC
Pumping Current Requirements 2.5 - 3.1 Amps*
Heating Current Requirements 9.8 Amps**
Heating Rate 0.8° F Per Minute
Heat Time 15 - 40 Minutes***
Temperature Ranges
For Safe Pump Operation 35° - 112°F
Shuts-O Heating System 90° - 101°F
Disables The Pump 113° - 133°F and above
Weight 8 lbs (3.6 kg)
Dimensions 6 X 9 X 16 in (15 x 23 x 41 cm)
Volume 0.8 Gallons (3 Liters)
12
POLARITY SPECIFICATION
* Prolonged usage in pump mode with vehicle engine o can drain starter battery
** Operate heat mode with engine on when plugged into vehicle 12V DC socket
*** Depending on initial water temperature

TROUBLESHOOTING
Problem Solution
“95 F” temperature light or the
“PUMP OFF TOO HOT” light
doesn’t turn o
Dump all hot water out and add
cold water.
Geyser doesn’t power on Check the LED light at power
cord’s plug is on.
Check power cord is connected to
the Geyser.
Conrm power cord’s plug is fully
seated into power socket and
vehicle engine is on.
“HEATING WATER” light is on and
water container is empty
Immediately ip switch to“OFF”
position.
Otherwise, disconnect Geyser
from the power source. Contact
customer support.
Small debris gets into water
container
Do not activate the pump. Spray
water container with water and
turn upside down.
Pump isn’t delivering adequate
water
Remove scrub, fully open control
valve, ll water container, and run
pump with potable water. You
may have a clogged scrub or hose.
Test by replacing scrub or blowing
through hose line.
Pump is not running Conrm LED at power cord’s plug
is on and vehicle engine is on.
Hose line doesn’t disconnect from
hose connector
Conrm yellow hose connector is
rotated clockwise and in unlocked
position.
13

Do not attempt to repair or alter this product, power cable, or accessories.
Service must only be done by an individual authorized by Geyser Systems. If
you have any questions about these instructions, your product, replacement
parts or repairs, please contact customer support: +1 (831) 264-0019
support@geysersystems.com
MAINTENANCE AND CARE RECOMMENDATIONS
Geyser System:
• Clean the outside of the Geyser with a damp cloth. Do not scour.
• Leave the valve completely open before and while storing the hose. This
prevents damage due to mold, mildew, and freezing in extreme cold
temperatures.
• Clean and dry the inside of the water container with a cloth. Do not add
soap directly into the water container.
Scrub Maintenance and Care:
• Rinse scrub of all debris and wring out excess water.
• Allow the scrub to completely dry before placing it in any container or air
tight bag.
• Do not microwave or clean in the dishwasher.
• Do not boil scrub in boiling water.
Storage:
• Do not leave water in the Geyser or hose line. To ensure all water is
removed, leave the control valve completely open and run the pump for
15 seconds. Remove the lid and tip Geyser upside down to ensure all water
is out.
• Do not leave in extreme cold or hot temperatures.
• To use the water container for storage, dump all remaining water and wipe
completely dry before placing any dry accessories in the water container.
LIMITED WARRANTY
Tampering or modifying product, power cord, hose line, or accessories immediately voids warranty.
Geyser Systems warrants its appliances and accessories to be free from defects in material, manufacturing,
and workmanship. The Geyser is under warranty for 1 year from the date of purchase, excluding scrub
or accessories. Geyser Systems will repair or replace the Geyser free of charge if returned with proof of
purchase and proven to be defective within the warranty period. Customers are responsible for charges
when shipping product to Geyser Systems. Geyser Systems reserves the right to make changes at any time,
without notice or obligation, in colors, specications, accessories, materials and models. Please contact
customer support: +1 (831) 264-0019 support@geysersystems.com
14

WARNING - PROP 65
This product contains a chemical known to
the State of California to cause cancer
Table of contents
Other Geyser Plumbing Product manuals
Popular Plumbing Product manuals by other brands

newform
newform O'RAMA 68410 instructions

Beurer
Beurer FC 72 Instructions for use

Sterling
Sterling 11400 Installation and care guide

newform
newform TOTAL THERAPY 676 instructions

Voda Plumbingware
Voda Plumbingware Proline VPLN600 installation instructions

Spectrum Brands
Spectrum Brands Pfister Port Haven GT31-TD Quick installation guide