GGM gastro SD.15 User manual

1
CUTTER MIXER
Kasap Tip Dik Buzdolapları
CONTENTS
A GENEREAL INFORMATION Page 2
A1 PRODUCT DESCRIPTION Page 3
A2 TECHNICAL INFORMATION Page 3
A3 TRANSPORTATION Page 4
A4 UNPACKING Page 4
B INSTALLATION Page 4
C SAFETY INSTRUCTIONS Page 5
D OPERATION Page 6
E CLEANING & MAINTENANCE Page 8
F TROUBLESHOOTING Page 9
G SPARE PART LIST- EXPLODING DRAWINGS Page 10
H ELECTRIC CIRCUIT SCHEMA Page 15

2
CUTTER MIXER
Kasap Tip Dik Buzdolapları
A GENERAL INFORMATION
Before installing the appliance, read operation and maintenance instructions
carefully.Wrong installation and part changing may damage the product or may cause
injury on people.These are not in our company’s responsibility to damage the
appliance intentionally,negligence,detriments because of disobeying instructions and
regulations,wrong connections.Unauthorized intervention to appliance invalidates the
warranty.
1. This instruction manual should be kept in a safe place for future reference.
2. Installation should be made in accordance with ordinances and security rules of
that country by a qualified service personnel.
3. This appliance has to be used by trained person.
4. Please turn off the appliance immediately in the event of malfunction or failure.The
appliance should be repaired only by authorized service personnel.Please demand
original spare part.

3
CUTTER MIXER
Kasap Tip Dik Buzdolapları
A1 PRODUCT DESCRIPTION
*Professional Cutter Mixer,that provides high efficiency has been designed to be used in
industrial kitchens.
Product Code
Dimensions (mm)
Weight (kg)
Packaging
Dimensions (mm)
SD.07
640x615x1045
60
390x660x1130
SD.09
718X684X1245
70
750X750X1285
SD.15
380x623x512
46
410x660x650
A2 TECHNICAL INFORMATION
Product
Code
Capacity
(lt)
Tank
Dimensions
(mm)
Power
(Kw)
Operating
Voltage
(V)
Cable
(mm²)
Fuse
(A)
SD.07
20
293x293
1,5-2,5
380
5x1,5
32
SD.09
50
400X400
3,5-5,5
380
5X1,5
32
SD.15
15
290x220
0,60-0,90
380
5x1,5
32

4
CUTTER MIXER
Kasap Tip Dik Buzdolapları
A3 TRANSPORTATION
*This appliance can be moved by hand from area to area.Do not crash and drop the appliance
while transporting.
A4 UNPACKING
*Please unpack the package according to the security codes and ordinances of current
country and get rid from the pack.Parts which contacts with food are produced by stainless
steel.All plastic parts are marked by material’s symbol.
*Please check that all the parts of appliance had come completely and if they are damaged or
not during the shipping.
B INSTALLATION
*Please place the product to straight and sturdy ground,please take necessary steps against
possibility of overturn.
*Technician who will serve for installation and service for the appliance must be professional
on this subject and must have installation and service licenses by the company.
*Connection to Electric Power Supply must be done by authorized person .
*Please be sure that the voltage connected to appliance must be equal with the voltage which
is on appliance’s label.
This appliance must be connected to an earthed outlet in accordance with safety rules
and standards.
*Appliance’s earthing must be connected to earthing line on panel which is nearest to electric
installation.
*Connection to the main fuse and leak current fuse must be done in accordance with the
current regulations.
!
5
CUTTER MIXER
Kasap Tip Dik Buzdolapları
C SAFETY INSTRUCTIONS
*Do not use the appliance in insufficient lighted place.
*Do not touch the moving attachments while the appliance operates.
*Do not install the appliance in the presence of flammable or explosive materials.
*Do not operate the appliance when the machine is empty.
*Do not load so less or more than appliance’s capacity.
*Do not attempt to use the appliance without suitable protective equipments.
*Because of any reason if there is a fire or flame flare where the appliance is
used,turn off all gas valves and electric contactor switch quickly and use fire
extinguisher .Never use water to extinguish the fire.
*All the damages because of not having earthing connection will not be on
warranty.
*Do not put your hands into the cutting tank while the appliance is operating.
!
!
!
!
!
!
!
6
CUTTER MIXER
Kasap Tip Dik Buzdolapları
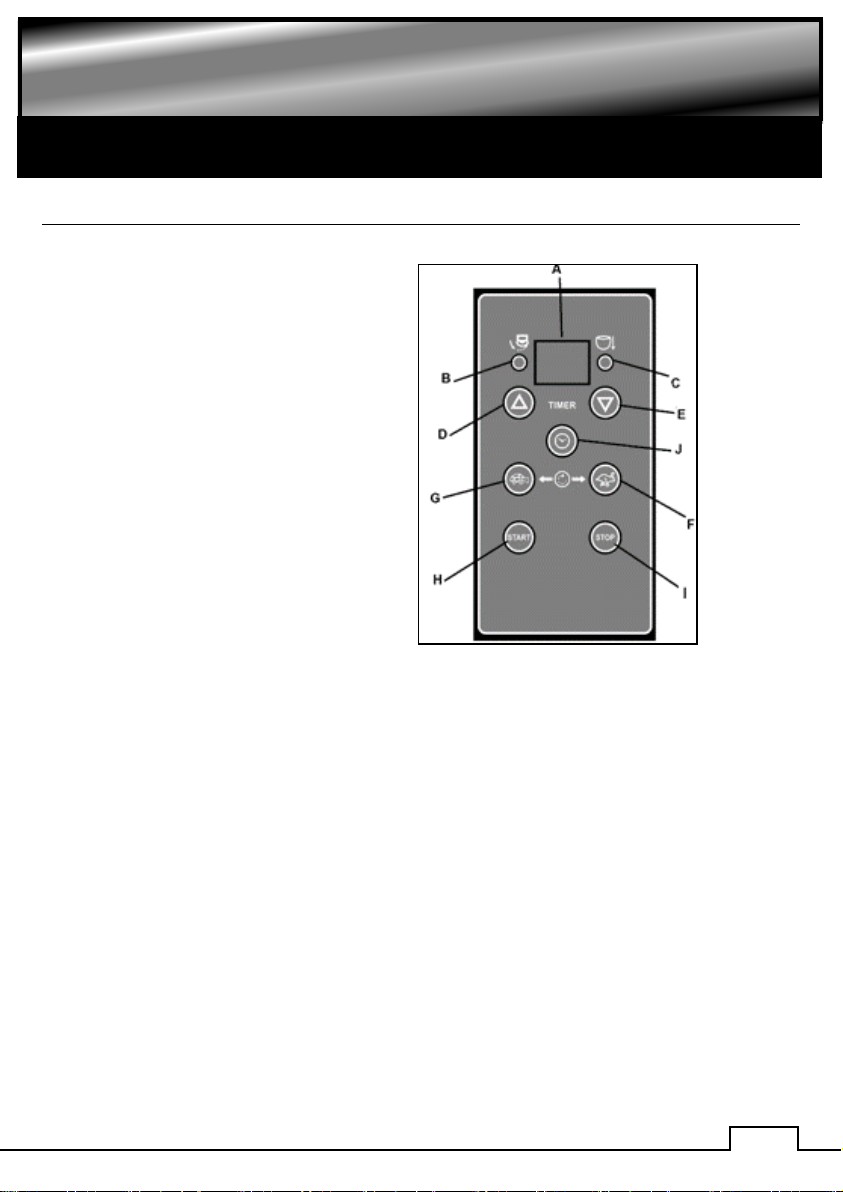
D OPERATION
*Control Panel;
A: Digital Indicator
B: Lid is opened error
C: Bowl error
D-E : Speed setting
F-G : Timer setting
H: Start switch
I : Stop switch
J: Stop time
SD.07-SD.09
*Operating;
•Before operating the appliance,clean the blade and tank with wet cloth and dry.
•Provide the ducts on cutting blades to pass on to the shaft.
•Open the appliance’s upper lid and fill the materials into the vegetable tank.
•Press START button to operate the appliance.
•If the appliance operates with 380 V,while plugging during first operation ,pay attention to
be operated on the direction of arrow.
•If it is wanted to add material without opening the lid while the appliance is working,solid
materials can be added through lid space after dividing into small pieces.
•For adjusting the speed of the mixer,press (G) for low and press (F) for high.
•Press ‘’timer’’ button to set desired time using the buttons up/down. When time
expires,the appliance will stop.
•Turn off the timer to operate the appliance pressing stop button.
•In order to take off the materials ,first open the lid and unsettle the cutting blade.Careen
the bowl by turning the overturning handle to down.
•After taking off the materials,provide the bowl to be in vertical position by lifting bowl
handle up.
•After the operation completed,unplug the power supply.

7
CUTTER MIXER
Kasap Tip Dik Buzdolapları
*Control Panel;
A: Digital Indicator
B: Lid is opened error
C: Bowl error
D-E : Speed setting
F-G : Timer setting
H: Start switch
I : Stop switch
J: Stop time
SD.15
*Operating;
•Before operating the appliance,clean the blade and tank with wet cloth and dry.
•Provide the ducts on cutting blades to pass on to the shaft.
•Open the appliance’s upper lid and fill the materials into the vegetable tank.
•Press START button to operate the appliance.
•If the appliance operates with 380 V,while plugging during first operation ,pay attention to
be operated on the direction of arrow.
•If it is wanted to add material without opening the lid while the appliance is working,solid
materials can be added through lid space after dividing into small pieces.
•For adjusting the speed of the mixer,press (G) for low and press (F) for high.
•Press ‘’timer’’ button to set desired time using the buttons up/down. When time
expires,the appliance will stop.
•Turn off the timer to operate the appliance pressing stop button.
•In order to take off the materials ,first open the lid and unsettle the cutting blade.Careen
the bowl by turning the overturning handle to down.
•After taking off the materials,provide the bowl to be in vertical position by lifting bowl
handle up.
•After the operation completed,unplug the power supply.
•

8
CUTTER MIXER
Kasap Tip Dik Buzdolapları
E CLEANING & MAINTENANCE
➢CLEANING AND MAINTENANCE AFTER EVERY USE
•Clean outer surface of appliance,tank and cutting blade with hot water and then dry.
•Always turn off the appliance and disconnect from the power supply before cleaning.
•Do not use abrasive cleaning chemicals as these can leave harmful residues.
•Do not clean the appliance by spraying water directly,otherwise electric motor may
get damaged.
➢PERIODIC CLEANING AND MAINTENANCE
•Maintenance should be done by qualified person.
•Get the periodic maintenance of the appliance once in every 15 days.
•The Cutter Mixer requires low maintenance (Motor and ball bearings are lubricated ).
•Maintenance of appliance’s contactor should be done by compressed air according
to frequency of use.
•Maintenance of cutting blade ;
- Grind the blade with aqueous grinding wheels without disrupting blade angle.

9
CUTTER MIXER
Kasap Tip Dik Buzdolapları
F TROUBLESHOOTING
THE APPLIANCE DOESN’T OPERATE
1. Check if the appliance is plugged in.
2. Check the electrical connections and
voltage.
3. Check the bowl’s lid.
THE APPLIANCE IS NOISY
1. Check the cutting blades.
2. Check that if there is material
accumulated in the tank.
3. If the motor is noisy,stop it and call
authorized service.
THE APPLIANCE STOPPED
1. The appliance can stop due to low
voltage.In this situation check the
voltage
2. If the appliance is overloaded,turn off
the appliance and allow to cool down by
taking off some materials from bowl
ERROR MESSAGE(SD.07-SD.09)
E3: Bowl error
ERROR MESSAGE(SD.15)
E1: Motor error
E3: Bowl error
•If Cutter Mixing is not done at suitable quality
•If any function of security doesn’t work
➢Do not use the appliance.
*If these problems are still going on,contact with our authorized service.

10
CUTTER MIXER
Kasap Tip Dik Buzdolapları
G SPARE PART LIST- EXPLODING DRAWINGS
11
CUTTER MIXER
Kasap Tip Dik Buzdolapları
G SPARE PART LIST- EXPLODING DRAWINGS
PRODUCT CODE:SD.07
NO
PRODUCT NAME
P.CODE
1
LID
Y.SD.07.001
2
BOWL RUBBER
Y.SD.07.002
3
BLADE
Y.SD.07.003
4
BALL BEARING (4904)
Y.SD.07.004
5
MAGNET
Y.SD.07.005
6
BOWL
Y.SD.07.006
7
LOCK LATCH
Y.SD.07.007
8
SCRAPER PLASTIC
Y.SD.07.008
9
BOWL STOPPER PLASTIC
Y.SD.07.009
10
BOWL BOTTOM PLASTIC
Y.SD.07.010
11
BLADE FIXATION
Y.SD.07.011
12
BOWL PLATFORM
Y.SD.07.012
13
SHAFT PLASTIC
Y.SD.07.013
14
SEAL (35*52*10)
Y.SD.07.014
15
SEAL (30*47*7)
Y.SD.07.015
16
MOTOR
Y.SD.07.016
17
MOTOR SAFETY
Y.SD.07.017
18
HINGE PIN
Y.SD.07.018
19
TURNOVER HANDLE PLASTIC
Y.SD.07.019
20
HINGE
Y.SD.07.020
21
TURNOVER HANDLE
Y.SD.07.021
22
BLADE HANDHOLD
Y.SD.07.022
23
FLAKE
Y.SD.07.023
24
SHORT SHAFT
Y.SD.07.024
25
PANEL
Y.SD.07.025
26
BIG SHAFT BEARING
Y.SD.07.026
27
SMALL SHAFT BEARING
Y.SD.07.027
28
BASE FRAME
Y.SD.07.028
29
SWITCH
Y.SD.07.029
30
FEET
Y.SD.07.030
31
SENSOR
Y.SD.07.031
32
BLADE BODY ALUMINIUM
Y.SD.07.032
33
THIN BLADE BODY
Y.SD.07.033
34
THICK BLADE BODY
Y.SD.07.034
35
BLADE GROUP
Y.SD.07.035
36
SEGMAN (471-25)
Y.SD.07.036
37
MOTOR SHAFT
Y.SD.07.037
38
LONG SHAFT
Y.SD.07.038
39
THERMIC
Y.SD.07.039
40
CONTACTOR DİLEM 09-30-10
Y.SD.07.040
41
LID HINGE
Y.SD.07.041
42
BEARING BLOCK BOTTOM CASTING
Y.SD.07.042
43
SEAL (20*37*10)
Y.SD.07.043
44
BOWL BOTTOM PIN
Y.SD.07.044

12
CUTTER MIXER
Kasap Tip Dik Buzdolapları
G SPARE PART LIST- EXPLODING DRAWINGS
PRODUCT CODE:SD.09
NO
PRODUCT NAME
P.CODE
1
LID
Y.SD.09.001
2
BOWL RUBBER
Y.SD.09.002
3
BLADE
Y.SD.09.003
4
BALL BEARING (6806)
Y.SD.09.004
5
MAGNET
Y.SD.09.005
6
BOWL
Y.SD.09.006
7
LOCK LATCH
Y.SD.09.007
8
SCRAPER PLASTIC
Y.SD.09.008
9
BOWL STOPPER PLASTIC
Y.SD.09.009
10
BOWL BOTTOM PLASTIC
Y.SD.09.010
11
BLADE FIXATION
Y.SD.09.011
12
BOWL PLATFORM
Y.SD.09.012
13
SHAFT PLASTIC
Y.SD.09.013
14
SEAL (45*62*10)
Y.SD.09.014
15
SEAL (40*55*10)
Y.SD.09.015
16
MOTOR
Y.SD.09.016
17
MOTOR SAFETY
Y.SD.09.017
18
HINGE PIN
Y.SD.09.018
19
TURNOVER HANDLE PLASTIC
Y.SD.09.019
20
HINGE
Y.SD.09.020
21
TURNOVER HANDLE
Y.SD.09.021
22
BLADE HANDHOLD
Y.SD.09.022
23
FLAKE
Y.SD.09.023
24
SHORT SHAFT
Y.SD.09.024
25
PANEL
Y.SD.09.025
26
BIG SHAFT BEARING
Y.SD.09.026
27
SMALL SHAFT BEARING
Y.SD.09.027
28
BASE FRAME
Y.SD.09.028
29
SWITCH
Y.SD.09.029
30
FEET
Y.SD.09.030
31
SENSOR
Y.SD.09.031
32
BLADE BODY ALUMINIUM
Y.SD.09.032
33
THIN BLADE BODY
Y.SD.09.033
34
THICK BLADE BODY
Y.SD.09.034
35
BLADE GROUP
Y.SD.09.035
36
SEGMAN (471-40)
Y.SD.09.036
37
MOTOR SHAFT
Y.SD.09.037
38
LONG SHAFT
Y.SD.09.038
39
THERMIC
Y.SD.09.039
40
CONTACTOR DİLEM 09-30-10
Y.SD.09.040
41
LID HINGE
Y.SD.09.041
42
BEARING BLOCK BOTTOM CASTING
Y.SD.09.042
43
SEAL (30*42*7)
Y.SD.09.043
44
BOWL BOTTOM PIN
Y.SD.09.044
13
CUTTER MIXER
Kasap Tip Dik Buzdolapları
G SPARE PART LIST- EXPLODING DRAWINGS

14
CUTTER MIXER
Kasap Tip Dik Buzdolapları
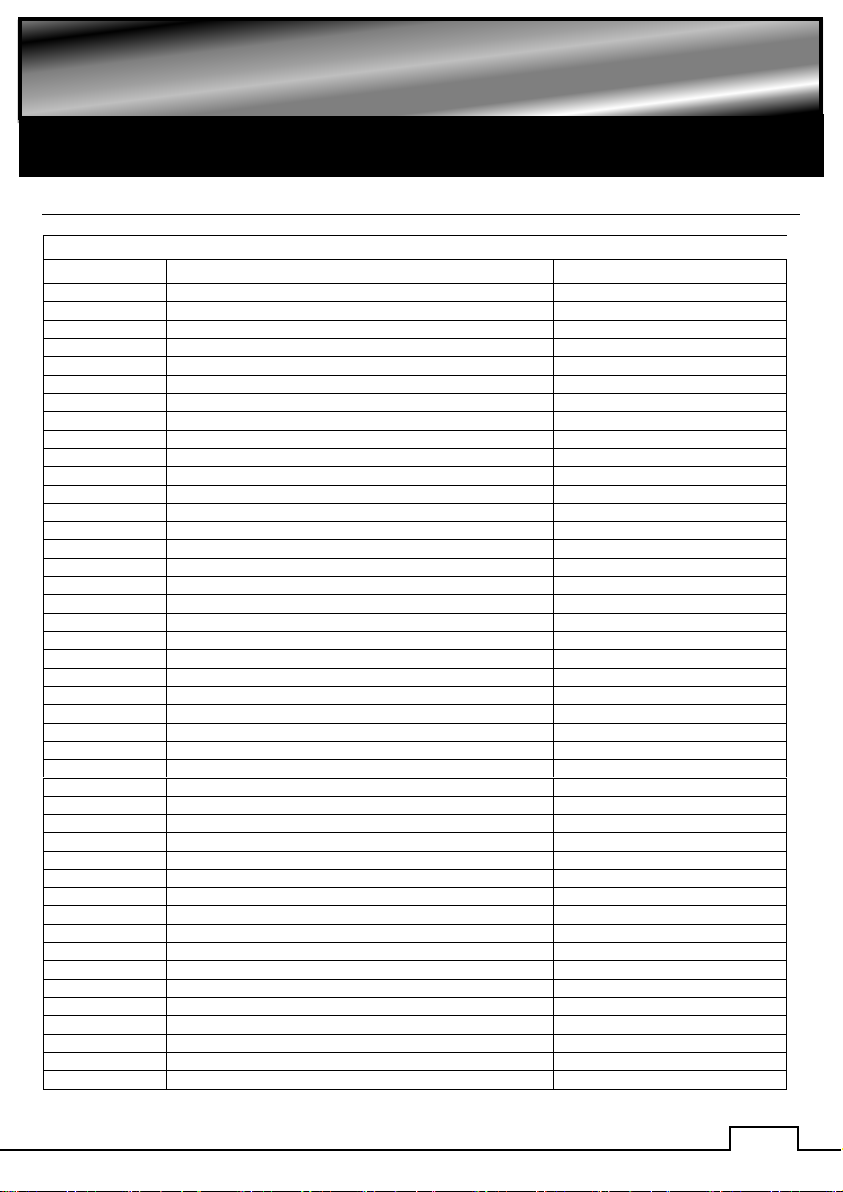
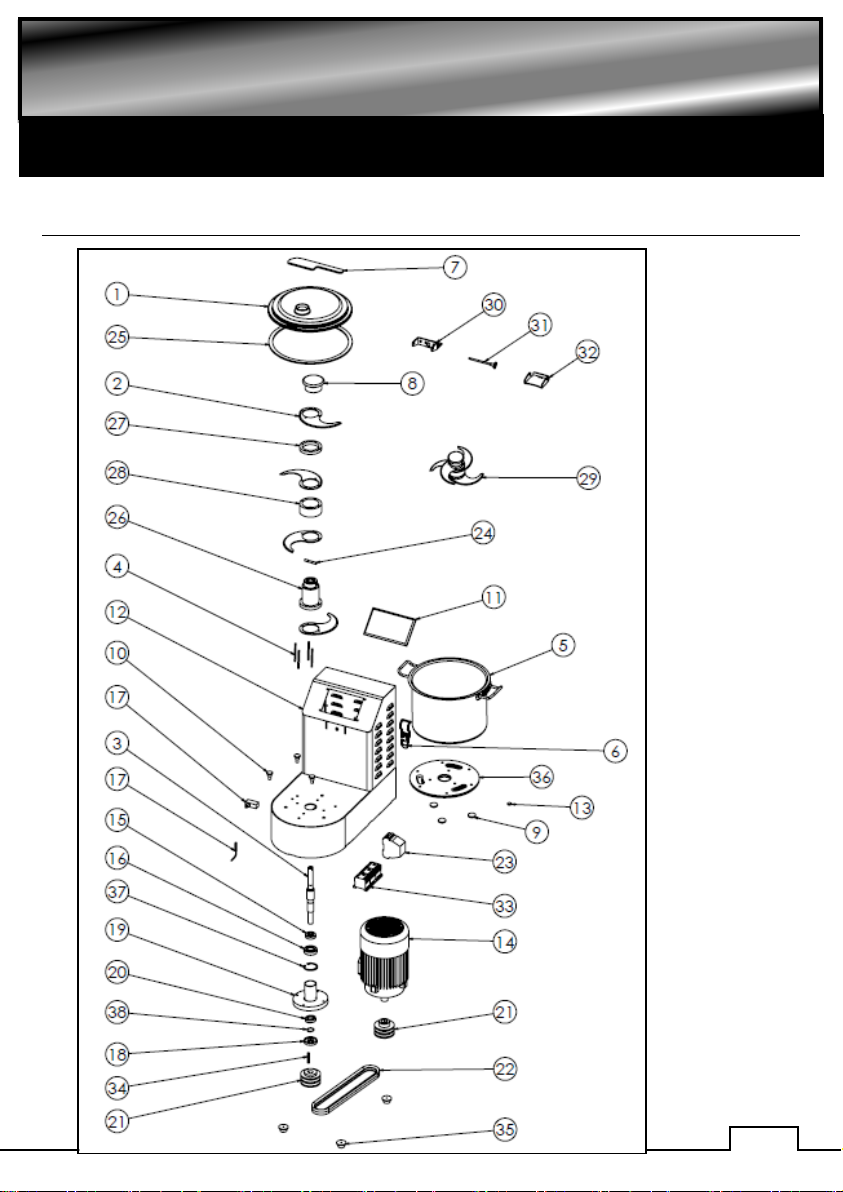
G SPARE PART LIST- EXPLODING DRAWINGS
PRODUCT CODE:SD.15
NO
PRODUCT NAME
P.CODE
1
LID
Y.SD.15.001
2
BLADE
Y.SD.15.002
3
BEARING BLOCK SHAFT
Y.SD.15.003
4
BLADE FIXATION
Y.SD.15.004
5
BOWL
Y.SD.15.005
6
LOCK LATCH
Y.SD.15.006
7
SCRAPER PLASTIC
Y.SD.15.007
8
BLADE HANDHOLD
Y.SD.15.008
9
BOWL STOPPER PLASTIC
Y.SD.15.009
10
BOWL BOTTOM PIN
Y.SD.15.010
11
PANEL
Y.SD.15.011
12
BASE FRAME
Y.SD.15.012
13
MAGNET
Y.SD.15.013
14
MOTOR
Y.SD.15.014
15
SEAL (20*42*10)
Y.SD.15.015
16
BALL BEARIBG (6004)
Y.SD.15.016
17
SENSÖR
Y.SD.15.017
18
SEAL (25*52*10)
Y.SD.15.018
19
BEARING
Y.SD.15.019
20
BALL BEARING (6205)
Y.SD.15.020
21
BEARING BLOCK PULLEY
Y.SD.15.021
22
BELT (13X850)
Y.SD.15.022
23
THERMIC
Y.SD.15.023
24
PIN
Y.SD.15.024
25
PAN RUBBER
Y.SD.15.025
26
ALUMINIUM BLADE BODY
Y.SD.15.026
27
THIN ALUMINIUM BLADE
Y.SD.15.027
28
THICK ALUMINIUM BLADE
Y.SD.15.028
29
BLADE GROUP
Y.SD.15.029
30
BODY HINGE SHEET METAL
Y.SD.15.030
31
HINGE SHAFT
Y.SD.15.031
32
LID HINGE SHEET METAL
Y.SD.15.032
33
CONTACTOR DİLEM10
Y.SD.15.033
34
WEDGE
Y.SD.15.034
35
FEET
Y.SD.15.035
36
BOWL BOTTOM PLASTIC
Y.SD.15.036
37
SEGMAN (472-52)
Y.SD.15.037
38
SEGMAN (471-25)
Y.SD.15.038
15
CUTTER MIXER
Kasap Tip Dik Buzdolapları
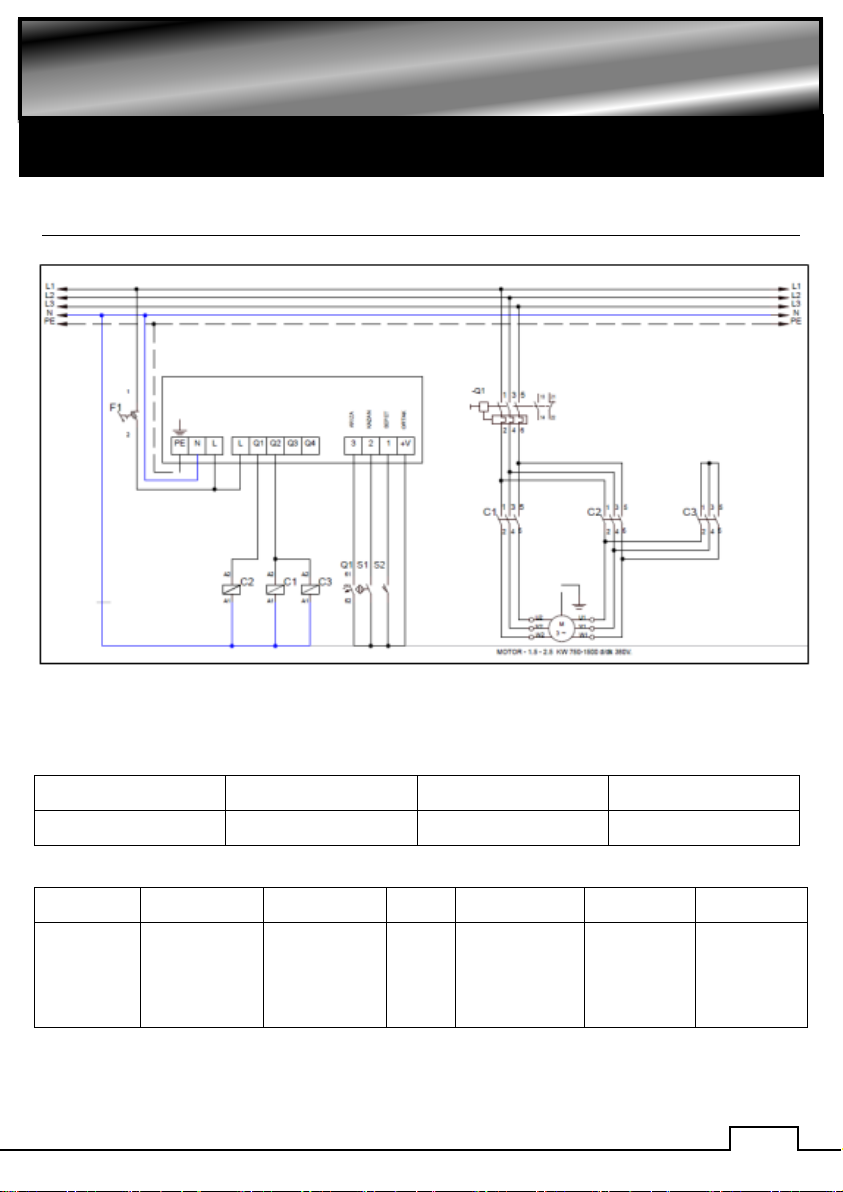
H ELECTRIC CIRCUIT SCHEMA
PRODUCT CODE
POWER (KW)
RPM
VOLTAGE
SD.07
1,5/2,5
750/1500
380
Q1
C2
C3-C4
M
S1
S2
F1
Motor
Safety
Relay
2.Speed
Contactor
1.Speed
Contactor
Motor
Bowl
Magnetic
Sensor
Basket
Magnetic
Swich
Control
Panel
Fuse 1X4A
16
CUTTER MIXER
Kasap Tip Dik Buzdolapları
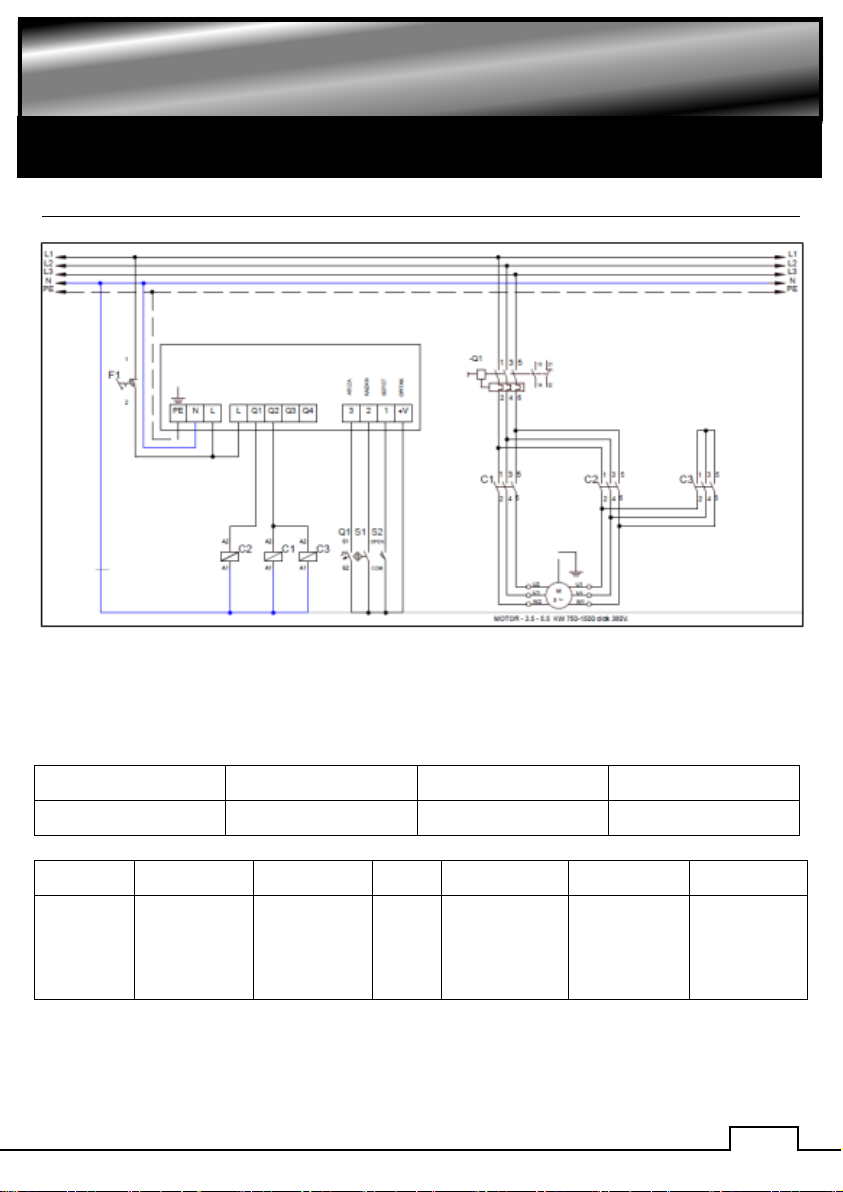
H ELECTRIC CIRCUIT SCHEMA
PRODUCT CODE
POWER (KW)
RPM
VOLTAGE
SD.09
3,5/5,5
750/1500
380
Q1
C2
C3-C4
M
S1
S2
F1
Motor
Safety
Relay
2.Speed
Contactor
1.Speed
Contactor
Motor
Basket
Magnetic
Sensor
Bowl
Magnetic
Swich
Control
Panel Fuse
1X4A

17
CUTTER MIXER
Kasap Tip Dik Buzdolapları
H ELECTRIC CIRCUIT SCHEMA
PRODUCT CODE
POWER (KW)
RPM
VOLTAGE
SD.15
0,60/0,90
750/1500
380
Q1
C2
C3-C4
M
S1
S2
F1
Motor
Safety
Relay
1.Speed
Contactor
2.Speed
Contactor
Motor
Bowl
Magnetic
Sensor
Basket
Magnetic
Swich
Control
Panel Fuse
1X4A
This manual suits for next models
2
Table of contents


