Giani Cucina GCCG-103 User manual

InstructionManual
Model Reference: GCCG-103
IM-GCCG-103060913
2 Portion Contact Grill
InstructionManual
I
M
-
GCCG-103060913
2 Portion Contact Grill

Congratulations on choosing to buy a Giani Cucina product. All products brought to you by
Giani are manufactured to the highest standards of performance and safety.
We hope you enjoy using your purchase for many years to come.
Safety Instructions
There is a risk of fire and electrical shock with all electrical appliances, which may cause injury
or death so please follow the instructions carefully:
• Do not touch the plates during or after the Contact Grill has been in use. Use the handles
provided
• To protect against risk of electric shock, do NOT immerse the cord, plug or cooking unit in water or
any other liquid
• Close supervision is necessary when any appliance is used around children
• Unplug from the outlet when not in use and also before cleaning. Allow to cool before putting on or
taking off any parts and also before cleaning the appliance
• Do not operate the Contact Grill if it is damaged or shows signs of malfunction. In order to avoid the
risk of electric shock, never try to repair the Contact Grill yourself. Seek professional help to ensure the
correct repairs have been made
• The use of accessory attachments is NOT recommended by the manufacturer for this product, as it
may result in electrical shock, fire, or risk of injury
• This product is NOT to be used outdoors or for commercial purposes
• Do NOT let the power cord hand over the edge of the counter/table, or be in contact with hot
surfaces
• Do NOT place on or near a hot gas or electric burner OR heated oven
• Do NOT intend to operate by means of an external timer or separate remote control system
• Extreme caution is advised when moving the appliance. Ensure the Contact Grill is NOT hot and is
not plugged in
Components
67
1
2
4
58910
3
11
1. Handle
2. Decorative Panels
3. Upper Housing
4. Hinge Release Lever
5. Upper Nonstick Plate
6. Bottom Nonstick Plae
7.Thermostat Knob
8. Ready Light (Green)
9. Power Light (Red)
10. Oil Tray
11. Bottom Housing
2

Before First Use
• Read all instructions carefully and keep them for future reference
• Remove all packaging
• Clean the Cooking Plates by wiping them with a sponge or damp cloth
DO NOT IMMERSE THE UNIT AND DO NOT RUN WATER DIRECTLY ON TO THE CONTACT GRILL
• Dry with a cloth or paper towel
• For best results, lightly coat the cooking plates with a little cooking oil or cooking spray
Notice: When your Contact Grill is heated for the first time, it may emit a slight odor or even smoke.
This is normal with many heating appliances. This does not affect the safety of your appliance.
How to Use
• Set the Contact Grill Temperature Control to your desired setting. At first, try a setting in the max.
You may later adjust it according to your preferences
• Close the Contact Grill and plug it into the wall outlet, you will notice that the power and ready light
will come on, indicating that the Contact Grill has begun preheating
• It will take approximately 5 minutes to reach your desired baking temperature, once reached the
ready light will go off
• Open the Contact Grill and carefully place your desired food on the bottom cooking plate. Be careful
if using your bare hands. We recommened you use a spatula, tongs or something similar
• Close the Contact Grill and the ready light will go on again
• Cook your desired food to suit your own individual taste, ensure all meat is cooked thoroughly. The
ready light may go off, adjust the time to suit your needs
• When food is cooked, use the handle to open the lid. Remove food with the help of a spatula, tongs
or something similar
Notice: When using a device to take food on and off the cooking plate, ensure not to damage the
Non-Stick coating of the plates. Especially if using a metal device.
• Once you are finished with the Contact Grill, disconnect the plug from the outlet and leave open until
cool. Wipe down with a damp cloth to remove any residue
Use as an Open Grill
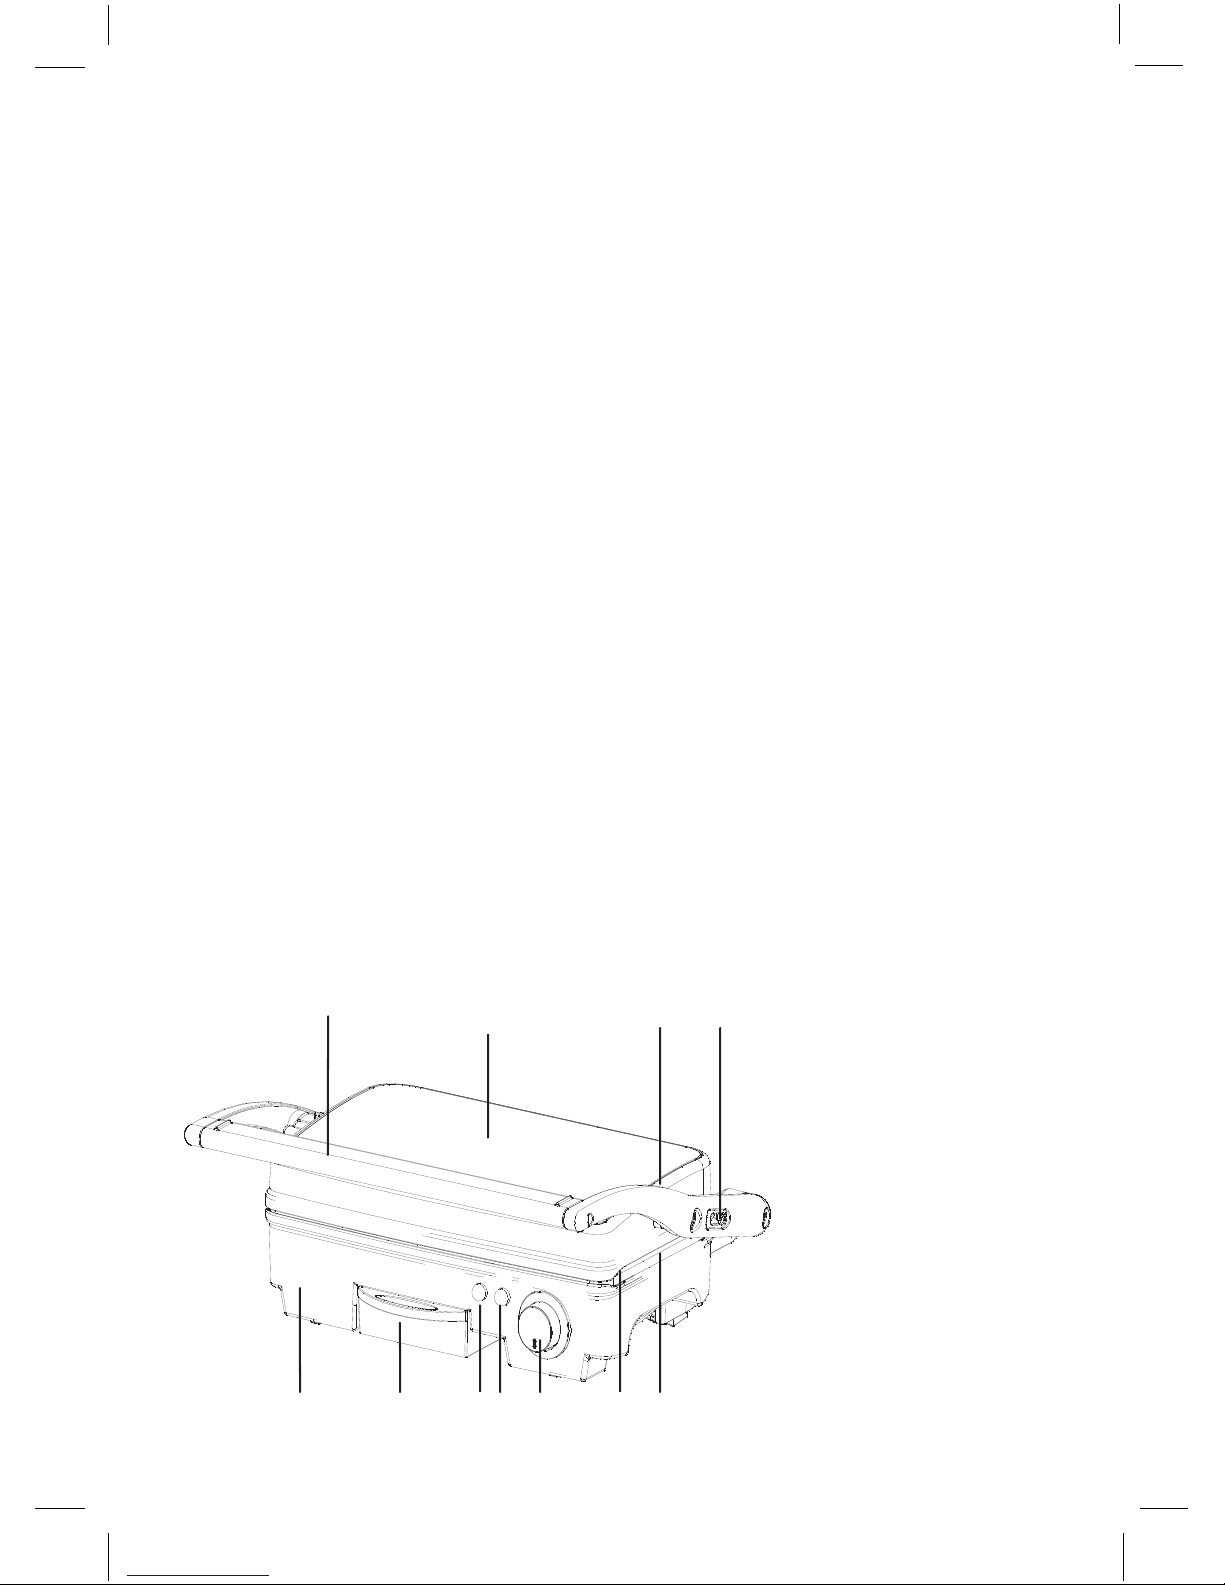
• Place the Contact Grill on a clean, flat surface where you intend to cook. The Contact Grill can then
be lay out flat. To achieve this, locate the Hinge Release lever on the right ‘arm’ of the Contact Grill (see
image below)
• Slide the lever towards you and push back the handle until the cover rests flat on the counter. (The
Contact Grill will stay in this position until you lift the handle and cover to return it to the closed
position)
• The Upper Plate should now be level with the Lower Plate, lining up to create a larger cooking
surafce
• Use the Contact Grill as an open grill to cook burgers, steaks, poultry, fish and vegetables. (we do
not recommend cooking meat that contains bones, as this will NOT cook evenly on an open grill)
3

• Cooking on the open grill is the most versatile method of using the Contact Grill as you have double
the space needed for cooking
• You have the option of cooking different types of foods on the two separate Cooking Plates without
combining their flavours. The open position also accomodates different cuts of meat so you can cook
each piece to your liking
Cleaning and Care
• Always unplug the Contact Grill and allow it to cool before cleaning. The unit is easier to clean when
slightly warm. There is no need to disassemble the Contact Grill before cleaning. Never immerse the
Contact Grill in water or place in a dishwasher
• Wipe the Cooking Plates with a warm, damp cloth to remove food residue. For harder to remove
residue, use detergent and clean with a non-abrasive scouring pad
• Do not use any cleaning aids that can scratch or damage the non-stick coating
• Do not use metal utensils to remove residue as this will damage the non-stick coating
• Wipe the outside of the Contact Grill with a damp cloth only.
• Remove and empty the tray after each use and wash the tray in warm, soapy water. Avoid the use
of scouring pads or harsh detergents, as they may damage the surface
• Rinse and dry thoroughly with a clean, soft cloth.
Storage
• Always unplug the Contact Grill before storage
• Always make sure the Contact Grill is cool and dry before storing
• The power cord can be wrapped around the botton of the base for storing
4

Disposal
This marking indicates that this product should not be disposed of with other house-
hold wastes throughout the EU. To prevent possible harm to the environment or
human health from uncontrolled waste disposal, recycle it responsibly to promote
the sustainable reuse of material resources.
This appliance complies with the requirements of the EMC Directive
2004/108/EC and LVD Directive 2006/95/EC
Giani Limited - SK2 6RH
2011/65/EU
Table of contents
Other Giani Grill manuals
Popular Grill manuals by other brands

TEFAL
TEFAL EASY GRILL CUISINE CB230012 manual

Berghoff
Berghoff K 1024A-KC3 Installation & operating instructions

Outback
Outback OUTBACK TROOPER 359 Assembly and Assembly and operating instructions

Fuego
Fuego F21C Quick assembly guide

cecotec
cecotec Rock'nGrill 1500 Rapid instruction manual

George Foreman
George Foreman GP200RED owner's manual