Gibson GDFA10DGSWD User manual

USE & CARE GUIDEDISHWASHER
GDFA10DGSWD I GDFA10DGSSD
GDFA14DGSWD I GDFA14DGSSD
MADE IN CHINA

2
Thank you for choosing Electrolux
In this manual, you will nd all necessary information for your safety
and the proper use of your Dishwasher. Read all the instructions
before using the appliance and save this guide for future reference. I
Please keep your invoice. The warranty is only valid upon presentation at
the Electrolux Authorized Service.
The identification label, which includes important information like code,
model, and manufacturer, among others, will be used by the Electrolux
Authorized Service if your Dishwasher requires repair. So, do not remove it
from its location.
Environment tips
This appliance can not be treated as domestic waste, it should be delivered
for disposal to a recycling system of electrical and electronic appliances
that complies with the local legislation.
Table of Contents
Environment tips 2
Safety 3
Feature Overview 6
Installation 7
Operating Instructions 12
Cleaning and maintenance 26
Errors codes 29
Solutions to common problems 30
Technical specications 33
Wiring diagram 34
Warranty 38
CUSTOMER
SERVICE

3
Safety
This appliance is not intended for use by persons (including children) with reduced physical,
sensory or mental capacities, or by persons with lack of experience and knowledge, unless
they have received instructions regarding the use of the appliance, or they are under the
supervision of a person responsible for their safety. Children should be supervised to ensure
that they are not playing with the appliance.
Keep the packaging material of the Dishwasher out of the reach of children.
Do not allow your appliance to be handled by children, even when it is off.
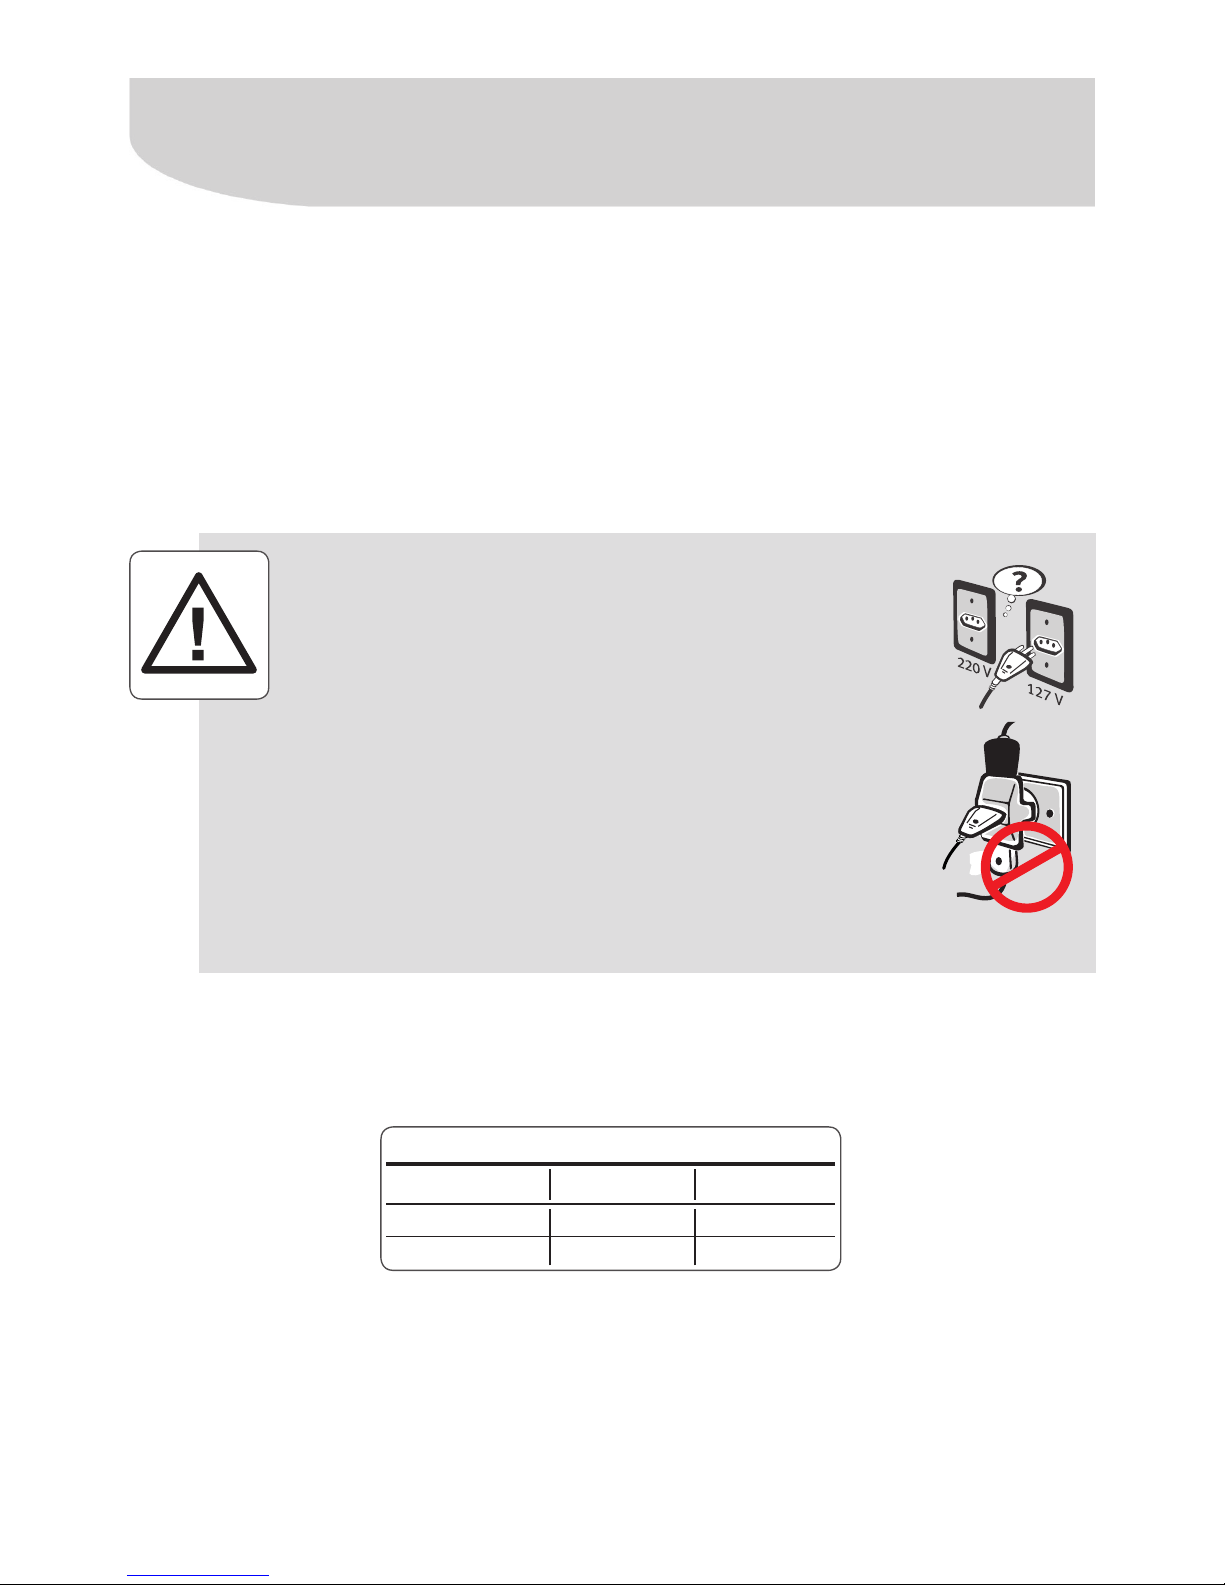
WARNING!
If in doubt about grounding, contact with a qualied electrician and
do not modify the plug of the power cable (supplied with the unit) in
case it doesn't fit in the outlet. Ask an electrician to install a grounded
outlet, in accordance with the local requirements.
Keep children away from detergents, rinse aids, and the door of the
Dishwasher, since there might be residues of detergent inside the
appliance.
Keep young children away from the Dishwasher to avoid they play
with the appliance.
The detergents for dishwasher are highly alkaline and may be very
dangerous if ingested. Avoid contact with skin and eyes and keep
children away from the Dishwasher when the door is open.
Do not leave the door of the Dishwasher open, to avoid the risk of
tipping of the appliance or stumbling on it.
Before discarding a Dishwasher, remove the door to prevent children
becoming trapped inside of the product.
Disconnect electrical power to dishwasher and remove the plug from the outlet before
cleaning or servicing. Do not pull on the power cord. If the power cord is damaged, it
must be replaced by Authorized Service, in order to avoid risks.
The power cord must not be excessively bent or pressed during the installation. The power
cord of this appliance should not be changed.
This appliance must be grounded. In case of malfunction or failure, grounding reduces the risk
of electric shock. This appliance has a power cable with an equipment grounding conductor
and a grounding pin. The plug must be connected to a properly grounded electrical outlet
in accordance with the local standards
Grounding Section.
A defective connection of the equipment-grounding conductor can cause a risk of
electric shock.
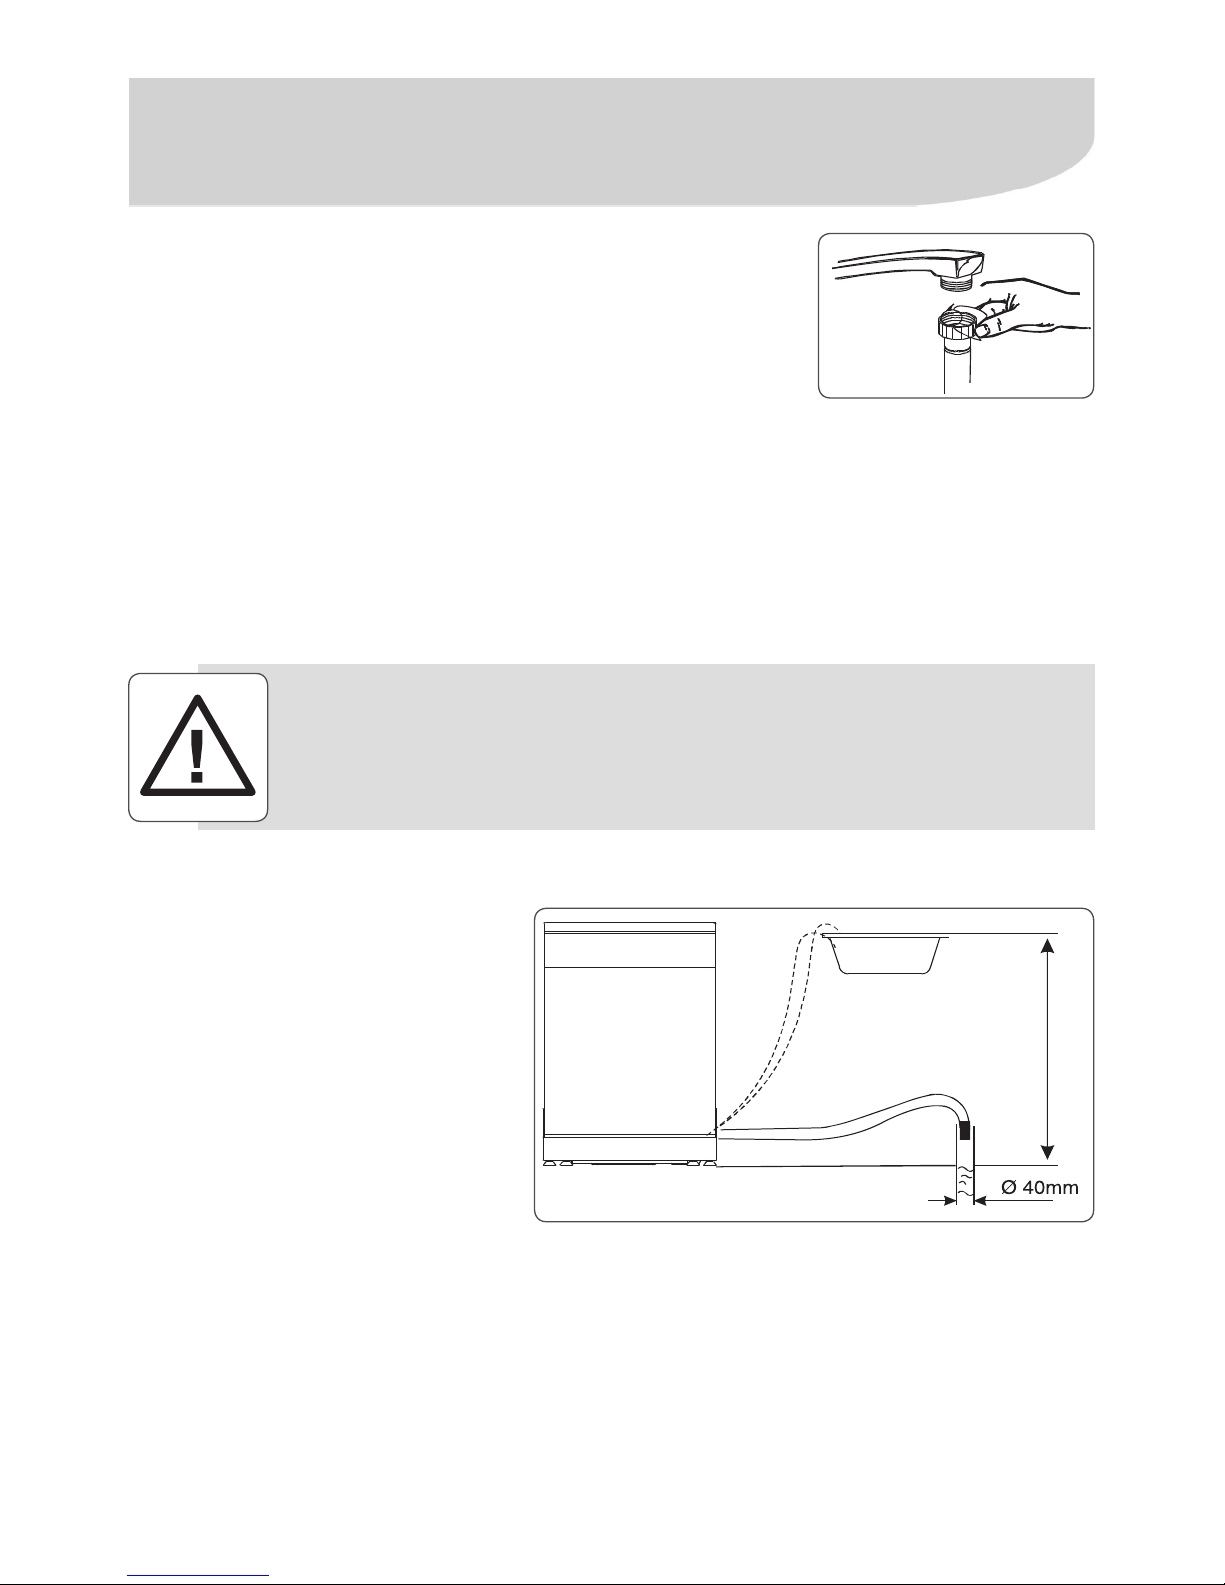
The unit must be connected to the water network using new hoses. Old hoses should not
be used or reused.

4
WARNING!
Do not damage and do not sit or lean on the door and racks of the
Dishwasher.
The inner surface of the bottom becomes very hot during and after
washing, due to the built-in heating resistance. Avoid touching in this
area and wait 30 minutes for cooling. Do not leave plastic objects in
contact with this area.
Do not place heavy objects on the door when it is open, as this may
cause the Dishwasher to tip over to the front.
WARNING!
Do not wash plastic items unless marked Dishwasher Safe. Check
manufacturer recommendations for plastics which cannot be washed
in dishwashers.
Knives and other sharp items should be loaded in the basket with the
handles up or placed in an horizontal position.
Safety
The maximum inlet water pressure is 1 MPa (approx. 100 mca).
The minimum inlet water pressure is 0.04 MPa (approx. 4 mca).
When you are putting the dishes to be washed, place sharp objects in a way that will not
damage the door seal.
Check if the detergent dispenser is empty at the end of the wash cycle.
Use only detergents and rinse aids specic for dishwashers. Never use soap to
wash clothes or detergent for manual dish-washing in your Dishwasher. Keep these
products out of the reach of children.

5
Safety
WARNING!
HYDROGEN GAS IS EXPLOSIVE.
Under certain conditions, hydrogen gas may be produced in a hot
water system that has not been used for two weeks or more.
If hot water system has not been used for such a period, before using
dishwasher, turn on all hot water faucets and let water ow from
each for several minutes. This will release any accumulated hydrogen
gas.
Because hydrogen is ammable, do not smoke or use any type of
ame during this procedure.
If there are residues of detergent and/or rinse aid on the dishes, either
by malfunction of the appliance, early stop of the washing cycle or too
much detergent, remove the dishes and clean them with running water
until any excess detergent and/or rinse aid is removed. The ingestion
of these products may be harmful to health. For more information,
please check the labels of cleaning products used in the dishwasher
and contact their manufacturers.

6
FRONT VIEW REAR VIEW
Upper Spray Arm
Silverware Basket
Upper Rack
Water Distribution Pipe
Bottom Rack
Detergent and rinse aid dispenser
Glass Shelves
Lower Spray Arm
Filters
Power Cable
Water inlet hose connector
DRAIN HOSE
Levelling feet
Feature Overview

7
Before you begin the installation, carefully read all the following
information. They will help you perform the installation and ensure
that the Dishwasher is installed correctly and safely. Keep this Guide
in a place with easy access for future reference.
Any electrical work required to install this appliance should be
performed by a qualied electrician.
Installation
Completely remove the packaging before placing in the Dishwasher.
If possible, position the Dishwasher next to a faucet and a drain.
Appliance dimensions (in mm)

8
Positioning the Dishwasher
Position the appliance at the intended place. The back side should face the wall behind the
appliance and the sides the adjacent closets and walls. To make the installation easier, both
inlet water and drain connections can be positioned to the left or right side.
Levelling
The correct levelling of the appliance is important to its operation.
1 Place a bubble level on the unit to make sure that it is
levelled.
2 When you are levelling the Dishwasher, be careful not to
let it tip over.
3 The angle should not be greater than 2o.
Installation
Cabinet dimensions (in mm)

9
Connection of the drain hose
Connect the drain hose to the Dishwasher, making sure that it is well t to avoid leaks.
Check if the drain hose is not kinked
or dented.
Place the other end of the drain hose
into a drain pipe with a minimum
diameter of 40 mm, or let it stand on
tank, avoiding that the hose is bent
or twisted. Use the special curve
provided with the appliance.
The free end of the hose must be at a
maximum height of 100 cm and must
not be immersed in water.
How to drain excess water from hoses
If the tank height is greater than 100 cm from the oor, the excess water in the hoses cannot
be drained directly into the tank.
It will be necessary to drain excess water from hoses into a container lower than the tank.
Connection of the cold water supply
Connect the hose of cold water supply to a faucet adapter with
¾” male thread, and make sure that there is no leak.
If the water hoses are new or have not been used for a long
period of time, let the water ow to ensure that the water comes
out clean and without impurities.
Connection of hot water
As long as the temperature does not exceed 50 °C, the water supply to the Dishwasher can
also be connected to a hot water line (centralised system, heating system).
In this case, the time of the wash cycle will be shorter.
Due to constructive restrictions of the machine, if the temperature exceeds this limit for a
certain period of time the door can open by itself.
The connection to the hot water line should be made in accordance with the same procedures
as the connection to the cold water supply.
Close the faucet after use.
Installation
Maximum 100 cm

10
Installation
Extension
If you need to install an extension, this should be similar to the drain hose.
The extension should not be greater than 4 metres; otherwise, it may reduce the efciency
of the washing.
Electrical connection
For your safety, have an electrician you trust who check the condition of the electrical network
of the location where the Dishwasher will be installed and, for more information, contact the
Electrolux Authorized Service.
Make sure that the voltage value in the household corresponds to the one stated on the
identication label. Check also if the electrical system supports the maximum current stated
in the manual. Only then put the plug of the power cord into the outlet, which must be
properly grounded.
* The voltage levels of the power with which this appliance operates are set out
in “Procedures for the Distribution of Electricity in the National Electric System
(PRODIST)” of the ANEEL (National Agency of Electric Power).
If the power supply of the appliance is outside the limits shown in the table Allowable
Voltage Variation, ask the electric utility company the adequacy of the levels of voltage
and install a voltage regulator (stabilizer) with power equal to or higher than 2000 VA.
Before connecting, check if the voltage of the outlet
where the appliance will be connected is equal to that
indicated on the label located next to the plug (on
the power cord) or on the identication label of the
Dishwasher.
Connect your Dishwasher to a dedicated power outlet,
do not use extension cords, or type “T” connectors
(Benjamin).
This type of connection can cause overload in the
electrical network, affecting the operation and resulting
in accidents.
Do not cut or remove, under any circumstances, the
grounding prong of the plug on the power cord.
Allowable Voltage Variation*
Voltage (V) Minimum (V) Maximum (V)
127 116 133
220 201 231

11
If the outlet in which the appliance will be connected is not appropriate
for the plug, replace the socket rather than using an adapter, as this
may cause overheating and re.
Make sure that the power outlet is properly grounded before using the
appliance.
Installation
If there is, at the place of installation, voltage variation outside the specied limits
(see the above mentioned table) or frequent drops in the power supply, the unit may
suffer changes in its functions.
Your unit has a 20 A plug, with Ø 4.8 mm pins.
Please be advised that the plug of the power cord of this appliance complies with the new
standard established by the NBR 14136, the Brazilian Association of Technical Standards –
ABNT, and by the Ministerial Decree no. 02/2007, of Conmetro.
Thus, if the outlet of your household is still in the old standard, we recommend its replacement
and adaptation to the new standard NBR14136, by an electrician you trust.
The benets of the new standard on the outlet are:
• Increased security against risk of electric shock at the moment of connecting the plug in
the socket;
• Improvement in the connection between the plug and the outlet, reducing the possibility of
a bad electrical contact;
• Reduction of energy losses.
We remember, also, that to take advantage of the advancement and the security of the
new standardization, it is necessary the grounding of the outlet, in accordance with the
applicable local standard
In case of doubt, consult a professional in this area.
The outlet or the switch used for the connection of the power cord must stay in a place of
easy access during installation.
During the installation, check the position of the power cord. Keep the power
cable away from the walls of the Dishwasher.
Circuit breakers
It is mandatory the installation of an exclusive circuit breaker for the Dishwasher. It is
recommended to use a 16A circuit breaker.
The installation location of the circuit breaker should be near the appliance (approximately
5 metres).
If the distance is greater than 5 metres, ask an electrician you trust to do the correction.

12
How to Use It
Indicator of empty
compartment:
This indicator will ash on the
panel to indicate when the
compartment of liquid rinse
aid must be relled. After the
compartment is relled, the
indicator switches off.
During a washing cycle, this
indicator stops blinking and
remains lit in the panel.
Display:
Displays the total time
of the cycle or the time
selected for the option
Delay Start.
Locked panel indicator:
Lights up on the panel to
indicate that the panel is
locked in order to prevent
the accidental changing of
the programming.
Indicator
of the
option to
Sanitize
Indicator of
the option to
Delay Start
Button
Start/Pause
Extra options:
2 extra options are
available for the
washing: Delay Start
and Sanitize.
Washing cycles:
This Dishwasher has 6 washing options:
Auto, ECO, Intensive, Glass, Quick Wash,
and Pre Wash. To select a cycle, simply tap
on the its button.
When a cycle is selected, the button of the
cycle remains lit and the display shows
the factory-set default time. For the Auto
cycle, the display will show “-:--” and the
time will only appear after the wash cycle
is started.
On/OFF button:
Switches the
Dishwasher on
and off. Press
the button for 3
seconds to cancel
the wash cycle and
switch the machine
off.
Control panel

13
Load racks.
To start the washing, press the Start/Pause button.
Select an Extra Option, if necessary.
Select the desired Wash Cycle.
Fill the detergent dispenser.
Fill the rinse aid dispenser, if necessary.
How to Use It
Follow the steps described on the following pages to place the Dishwasher in
operation:

14
Loading racks
How to Use It
To obtain the best performance from your Dishwasher, follow the instructions below.
Upper Rack
Use the upper rack to wash more light and delicate kitchenware, including glasses, tea/
coffee cups and saucers, dishes, small bowls and shallow pots (lightly soiled).
Place the dishes so that they do not move with the water jet.
The loading follows the standard EN 50242.
1 Cups
2 Saucers
3 Glasses
4 Big bowl
5 Small bowl
GDFA10DGSWD/GDFA10DGSSD
GDFA14DGSWD/GDFA14DGSSD GDFA14DGSWD/GDFA14DGSSD

15
WARNING!
Make sure silverware and other items do not block the Spray Arm
rotation.
How to Use It
Folding the supports for the dishes or saucers
The tines may be folded down or removed when they are not necessary.
Adjusting the height of the upper rack
Pull the lever and position the rack by moving it up or down as you need.

16
How to Use It
Bottom Rack
We recommend that you use the bottom rack to wash the largest items, which are more
difcult to clean, such as pots, pans, lids, dishes and bowls, as shown in the gure below.
Load, preferably, the dishes and lids on the side of the rack to prevent the arm spray from
getting stuck.
• Pots and bowls must always be placed face down.
• The deep pots should be supported to allow the water to drain.
• The fold-down tines in the rack might be lowered to allow larger pots or a larger amount of
items to be placed.
1 Medium bowl
2Dessert plates
3Dinner plates
4Soup plates
5Oval platter
6 Small bowl
7Saucers
The loading follows the standard EN 50242.
GDFA10DGSWD/GDFA10DGSSD GDFA10DGSWD/GDFA10DGSSD
GDFA14DGSWD/GDFA14DGSSD GDFA14DGSWD/GDFA14DGSSD

17
WARNING!
Do not obstruct the opening area of the dispenser.
How to Use It
1 Tablespoon
2Fork
3 Knife
4Tea spoon
5Dessert spoon
6Kitchen spoon
7 Kitchen fork
8Ladle
Silverware Basket
Silverware should be loaded in the silverware basket separately from each other in the
appropriate positions. Make sure the silverware is not nested, as it might make washing
more difcult.
GDFA10DGSWD/GDFA10DGSSD
GDFA14DGSWD/GDFA14DGSSD

18
Should not be washed in dishwasher:
• Cutlery with handles in wood, china or mother-of-pearl.
• Non heat-resistant plastic utensils.
• Old cutlery with glued details that are not heat resistant.
• Nested cutlery or dishes.
• Tin or copper utensils.
• Steel utensils with rusty spots.
• Wooden platters.
• Utensils in synthetic bres.
Can be washed in the dishwasher with certain restrictions:
• Some types of glass can become cloudy after a few washes.
• Utensils in silver and aluminium tend to discolour during washing.
• Varnished moulds can weaken if washed frequently in a dishwasher.
Installation
Notes:
• Do not place in dishwasher items dirty with cigarette ashes, wax, lacquer or paint.
• When buying new tableware, make sure they can be washed in a dishwasher.
• Do not overload your dishwasher. There is space for 10 services in models GDFA10DGSWD/
GDFA10DGSSD and 14 services in models GDFA14DGSWD/GDFA14DGSSD.
• Do not load the dishwasher with the items which are not recommended for this type of
washing. This is important to get good washing results and to not waste energy.
• Before loading the items in the dishwasher, remove the larger residue of food and the
excess burned-on foods from the pots.
• Place concave items, such as cups, glasses, pots, etc., with the opening facing down to
prevent water build-up.
• Utensils and cutlery should not be overlapped.
• To avoid damage to glasses, do not touch each other.
• To avoid injuries, do not place sharp knives in a vertical position. Put them in the upper
rack, horizontally.

19
The detergent dispenser must be lled just before the start of each wash cycle, according to
the instructions in the table of the “Wash Cycles” on page 20. For more soiled dishes a larger
amount of detergent is needed.
To ll the dispenser for the main washing, press the latch of the
cover of the dispenser and open the cover. Fill in with the amount
of soap (powder or tablets) indicated in the table “Wash Cycles”.
When you are using tablets, place the tablet(s) in the main wash
dispenser and close the cover.
The cover of the dispenser opens automatically to release the
detergent.
Using the right detergent
Use only detergents designed for use in a dishwasher. Other
types of detergent can cause excessive foaming.
Keep the detergent in a cool, dry place. Do not place the detergent in the compartment until
the dishes are ready to be washed.
Follow the recommendations of manufacturers of detergents as to dosage and storage, as
indicated on the packaging of the detergent.
Filling the detergent dispenser
Place the detergent only when using the Dishwasher, otherwise it
could get damp and not dissolve completely.
Remember: you should adjust the amount of detergent starting with
small amounts, until you nd the right amount.
WARNING! Dishwasher detergent is corrosive! Keep it out of the reach
of children.
How to Use It
The detergent dispenser has a compartment for the main washing and another for the pre-
wash, as indicated in the gure below.
*Add the detergent over
the closed lid.
Detergent for
main wash Detergent for
pre-wash*
Latch

20
Filling the compartment for liquid rinse aid
Use only liquid rinse aid for dishwashers. Never ll the dispenser
of liquid rinse aid with any other substances (for example, liquid
detergent) as this may damage the appliance.
Be careful not to pour too much rinse aid, as this may cause too much
foam. Clean up any residue with a damp cloth.
Do not forget to close the compartment before you close the door of
the Dishwasher.
How to Use It
Liquid rinse aid
Liquid rinse aid is released during the nal rinse to
prevent the formation of water droplets on dishes, that
may cause stains and scratches. The liquid rinse aid
also helps the drying, causing the water to drain from
the dishes.
The compartment for the liquid is located inside the
appliance, against the door, next to the detergent compartment. To ll the compartment,
open the cap and pour the liquid rinse aid into the compartment until the level indicator is
totally black. The volume of the compartment of the liquid rinse aid is approximately 110 ml.
Filling the compartment for liquid rinse aid
1oTo open the compartment, turn the cap and remove it.
2o Pour the liquid rinse aid in the compartment, taking care not to put too much liquid.
3o Replace cap and turn it clockwise until the markings on the cap become aligned with the
arrows.
LOCKED COVER
Arrows in the compartment
UNLOCKED COVER
Markings on the cap
This manual suits for next models
3
Table of contents
Other Gibson Dishwasher manuals
Popular Dishwasher manuals by other brands

Gaggenau
Gaggenau GI 204-130 Operating instruction

Technika
Technika TDX8SS-5 instruction manual

Asko
Asko D3122XL Brochure & specs

Winterhalter Gastronom
Winterhalter Gastronom GS 8 operating instructions

Range
Range AT 900 Installation, use and maintenance

Whirlpool
Whirlpool GU2800XTVB - 24" Wide Dishwasher Energy guide