manuals.online logo
Brands
  1. Home
  2. •
  3. Brands
  4. •
  5. Gibson
  6. •
  7. Dryer
  8. •
  9. Gibson GDE336RHS0 User manual

Gibson GDE336RHS0 User manual

15
AIR FLUFF
NO HEAT
AUTO DRY
REGULAR
HIGH HEAT
COOL DOWN
30
COOL DOWN
15
60
75
30
45
MORE DRY
TIMED DRY
KNITS/DELICATES
LOW HEAT
OFF
LESS DRY
START
Printed in U.S.A. P/N131920700(9912)
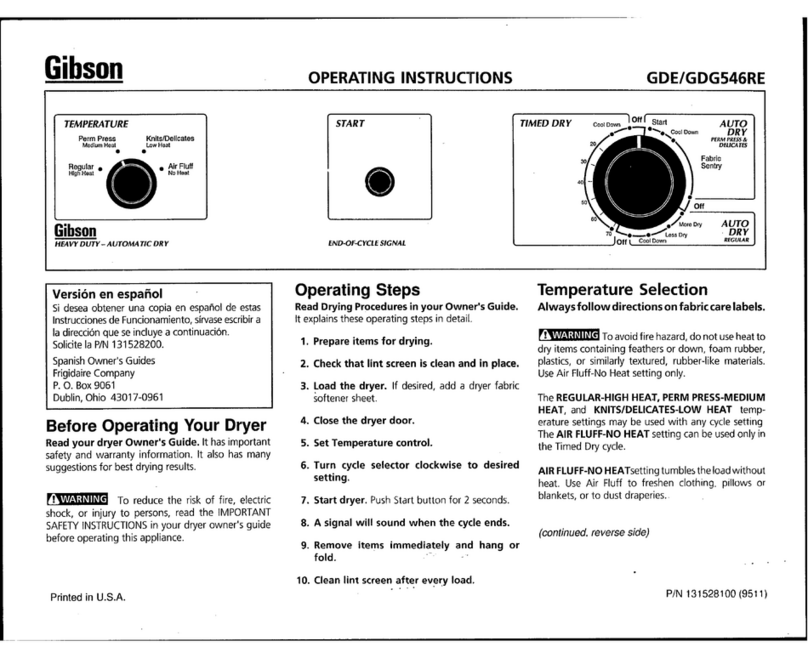
Cycle SelectionCycle Selection
Cycle Selection
Always follow directions on fabric care labels.Always follow directions on fabric care labels.
Always follow directions on fabric care labels.
To avoid fire hazard, do not use
heat to dry items containing feathers or down,
foamrubber,plastics,orsimilarlytextured,rubber-
like materials. Use Air Fluff-No Heat setting only.
Turn cycle selector clockwise to desired cycle
and setting. Each cycle ends with a cool down
period. The heat automatically turns off and the
load continues to tumble for 5-10 minutes. This
reduces wrinkling and makes items easier to
handle during unloading.
Drying time varies depending on size and
dampness of load, weight and fabric type. Room
temperature and humidity, type of installation
and electrical voltage can also affect drying time.
(continued, reverse side)
Versión en españolVersión en español
Versión en español
Si desea obtener una copia en español de
estasInstruccionesdeFuncionamiento,sírvase
escribir la dirección que se incluye a
continuación.
Solicite la P/N 131920800.
Spanish Owner's Guides
Frigidaire Company
P. O. Box 212378
Augusta, Georgia 30917
BeforBefor
BeforBefor
Before Operating Ye Operating Y
e Operating Ye Operating Y
e Operating Your Drour Dr
our Drour Dr
our Dryeryer
yeryer
yer
Read your dryer Owner's Guide.Read your dryer Owner's Guide.
Read your dryer Owner's Guide. It has
important safety and warranty information. It
alsohasmanysuggestionsforbestdryingresults.
To reduce the risk of fire, electric
shock,orinjurytopersons,readtheIMPORTANT
SAFETY INSTRUCTIONS in your dryer owner's
guide before operating this appliance.
OPERAOPERA
OPERAOPERA
OPERATING INSTRUCTIONSTING INSTRUCTIONS
TING INSTRUCTIONSTING INSTRUCTIONS
TING INSTRUCTIONS
Operating StepsOperating Steps
Operating Steps
Read Drying Procedures in your Owner'sRead Drying Procedures in your Owner's
Read Drying Procedures in your Owner's
Guide.Guide.
Guide.Guide.
Guide.Itexplains these operatingstepsin detail.
1.1.
1.1.
1. Prepare items for drying.Prepare items for drying.
Prepare items for drying.Prepare items for drying.
Prepare items for drying.
2.2.
2.2.
2. Check that lint screen is clean and in place.Check that lint screen is clean and in place.
Check that lint screen is clean and in place.Check that lint screen is clean and in place.
Check that lint screen is clean and in place.
3.3.
3.3.
3. Load the dryer.Load the dryer.
Load the dryer.Load the dryer.
Load the dryer. If desired, add a dryer fabric
softenersheet.
4.4.
4.4.
4. Close the dryer door.Close the dryer door.
Close the dryer door.Close the dryer door.
Close the dryer door.
5.5.
5.5.
5. Turn cycle selector clockwise to desiredTurn cycle selector clockwise to desired
Turn cycle selector clockwise to desiredTurn cycle selector clockwise to desired
Turn cycle selector clockwise to desired
setting.setting.
setting.setting.
setting.
6.6.
6.6.
6. Startdryer.Startdryer.
Startdryer.Startdryer.
Startdryer.PushStartbuttonfor2secondsorturn
the START knob clockwise to ON and hold for 1-
2 seconds and release.
7.7.
7.7.
7. At end of cycle, remove items immedi-atelyAt end of cycle, remove items immedi-ately
At end of cycle, remove items immedi-atelyAt end of cycle, remove items immedi-ately
At end of cycle, remove items immedi-ately
and hang or fold.and hang or fold.
and hang or fold.
8.8.
8.8.
8. Clean lint screen after every load.Clean lint screen after every load.
Clean lint screen after every load.Clean lint screen after every load.
Clean lint screen after every load.
P/N131920700(9912)
Energy Saving TipsEnergy Saving Tips
Energy Saving Tips
• Keep the lint screen clean and exhaust the
dryer correctly.
• Sort laundry properly and select proper
temperature and cycle settings. Choose an
automatic dry cycle whenever possible for
accurate drying time.
• Dryonlyfullloads.Singleitemsandsmallloads
usually take longer to dry.
• Avoid overloading, adding wet items to a
partially dry load, and overdrying.
• Dry one load after another to take advantage
of a warm dryer.
• Opening the door needlessly causes warm air
to escape, which prolongs drying time.
• Ifpossible, use the dryer on low humidity days.
• Install the dryer in an area where the room
temperature is at least 45°F (7°C).
Timed Dry Knits/Delicates-Low HeatTimed Dry Knits/Delicates-Low Heat
Timed Dry Knits/Delicates-Low Heat
This cycle provides up to 75 minutes of drying
time at low heat for permanent press, knit and
delicate items.
Air-Fluff No HeatAir-Fluff No Heat
Air-Fluff No Heat
This cycle provides up to 30 minutes of tumbling
without heat. Use Air Fluff to freshen clothing,
pillows or blankets or to dust draperies. Heat-
sensitive items such as plastics, foam rubber or
similarly textured rubber-like materials or items
containing feathers or down should be dried
onlyonly
onlyonly
only with the Air Fluff cycle.
Cycle SelectionCycle Selection
Cycle Selection (continued)(continued)
(continued)(continued)
(continued)
Auto Dry Regular-High HeatAuto Dry Regular-High Heat
Auto Dry Regular-High Heat
This cycle is recommended for regular and
permanent press items that can be tumble dried
at high heat. Drying time is determined
automatically.
• For items requiring more drying time, set cycle
selector on MORE DRYMORE DRY
MORE DRYMORE DRY
MORE DRY.
• For items requiring less drying time, set cycle
selector on LESS DRYLESS DRY
LESS DRYLESS DRY
LESS DRY.
When the items are dry, the heat automatically
turns off and the load is tumbled for
approximately 10 minutes without heat.
15
AIR FLUFF
NO HEAT
AUTO DRY
REGULAR
HIGH HEAT
COOL DOWN
30
COOL DOWN
15
60
75
30
45
MORE DRY
TIMED DRY
KNITS/DELICATES
LOW HEAT
OFF
LESS DRY
START

Other Gibson Dryer manuals

Gibson P/N 131883600 (9907) User manual

Gibson

Gibson P/N 131883600 (9907) User manual

Gibson GDE546RE User manual

Gibson

Gibson GDE546RE User manual

Gibson 131627900 User manual

Gibson

Gibson 131627900 User manual

Gibson DE27S6-V User manual

Gibson

Gibson DE27S6-V User manual

Gibson DE24P2 series User manual

Gibson

Gibson DE24P2 series User manual

Gibson DG27A7-X User manual

Gibson

Gibson DG27A7-X User manual

Gibson Stackable Dryer User manual

Gibson

Gibson Stackable Dryer User manual

Popular Dryer manuals by other brands

AEG T8DEM842E user manual

AEG

AEG T8DEM842E user manual

Electrolux Professional TE1120 user manual

Electrolux Professional

Electrolux Professional TE1120 user manual

Danby DCD5505W owner's manual

Danby

Danby DCD5505W owner's manual

Beko DH 8736 RX0 user manual

Beko

Beko DH 8736 RX0 user manual

Siemens WT4HY790GB Installation and operating instrictions

Siemens

Siemens WT4HY790GB Installation and operating instrictions

Conair 100 user guide

Conair

Conair 100 user guide

Fisher-Price DH9060P installation guide

Fisher-Price

Fisher-Price DH9060P installation guide

LG DLEX5780 E Series owner's manual

LG

LG DLEX5780 E Series owner's manual

WMF KUCHENminis Snack to go operating manual

WMF

WMF KUCHENminis Snack to go operating manual

Maytag MD-24 Use & care guide

Maytag

Maytag MD-24 Use & care guide

Bosch WTG864L7SN Installation and operating instructions

Bosch

Bosch WTG864L7SN Installation and operating instructions

Kenmore 110.66132*410 Use & care guide

Kenmore

Kenmore 110.66132*410 Use & care guide

AEG TR959M7SC user manual

AEG

AEG TR959M7SC user manual

Maytag 4KMEDX505BW0 installation instructions

Maytag

Maytag 4KMEDX505BW0 installation instructions

Sterling SDA 1000-5100 Series user guide

Sterling

Sterling SDA 1000-5100 Series user guide

INDA AV473B Mounting instructions

INDA

INDA AV473B Mounting instructions

AEG LAVATHERM T97689IH user manual

AEG

AEG LAVATHERM T97689IH user manual

Beko DX82NW user manual

Beko

Beko DX82NW user manual

manuals.online logo
manuals.online logoBrands
  • About & Mission
  • Contact us
  • Privacy Policy
  • Terms and Conditions

Copyright 2025 Manuals.Online. All Rights Reserved.