Gibson 216805800 User manual

2
mmmmmmmmmm 2
Instructions ....... 3
First Steps ............................. 4
Setting
the Temperature Control ............. 5
Freezer Optional Features ....... 5 - 6
Care and Cleaning ................ 6 - 7
Power Failure/Freezer Failure ....... 8
Avoid Service Checklist ........ 9 - 10
Warranty ......................... 11 - 12
READ AND SAVE THESE INSTRUCTIONS P/N216805800 (0104)

Product Registration Theinformation contained in this Owner's Guide will instructyou on how to properly
operate and carefor your product, Pleaseread through the information contained in
your literature pack to learn more about your new appliance.
Record Your Model and Serial Numbers
Record the Model No, and Serial No, of this freezer in the space provided below.
Model No.
Serial No.
Register Your Product
The self-addressed PRODUCTREGISTRATIONCARD (shown left) should be filled in
completely, signed and returned to Electrolux Home Products,
ThisOwner's Guide provides operating instructions for your model. Useyour freezer only asinstructed in this
Owner'sGuide.
Energy Saving Ideas • The freezer should be installed in coolest area of the room, away from heat
producing appliances or heating ducts, and out of direct sunlight.
• Let hot foods cool to room temperature before placing in freezer. Overloading
the freezer forces the compressor to run longer. Foodsthat freeze too slowly may
lose quality or spoil,
• Besure to wrap foods properly and wipe containers dry before placing them in
the freezer. This cuts down on frost build-up inside the freezer.
• Freezershelves and baskets should not be lined with aluminum foil, wax paper,
or paper toweling. Liners interfere with cold air circulation, making the freezer
lessefficient,
• Organize and label food to reduce door openings and extended searches.
Removeasmany items asneeded at one time, and close door assoon aspossible.
o 200I White Consolidatedindustries,Inc.
All rightsreserved. 2

Important Safety
Instructions
Proper Disposal of Your
Refrigerator/Freezer
Risk of child entrap-
ment. Child entrapment and
suffocation are not problems of the past.
Junked or abandoned refrigerators or
freezer are still dangerous--- even if they
will sit for "just a few days." If you are
getting rid of your old refrigerator or
freezer, please follow the instructions
below to help prevent accidents.
BEFORE YOU THROW AWAY YOUR
OLD REFRIGERATOR/FREEZER:
r!,w-'_ ;!_II_[€
_Remove doors. _-_
%eave shelves in
place so children
may not easily
climb inside. _'!_'I-'_:l_II_[_
Avoid fire hazard or
electric shock. Do not usean extension
cord or an adapter plug. Do not remove
any prong from power cord.
Gmundingtype
wallreceptacTDoil= not under
any circumstances
cut, remove,
or bypass
the grounding pron_
_from thisplug. i
Power supply
cord with 3-prong
grounding plug
Read all instructions before using this freezer.
For Your Safety
Do not store or usegasoline or other flammable vapors and liquids in the vicinity of
this or any other appliance, Read product labels for flammability and other
warnings.
Child Safety
•Destroy carton, plastic bags, and any exterior wrapping material immediately
after the freezer is unpacked. Children should never use these items for play.
Cartons covered with rugs, bedspreads, plastic sheets or stretch wrap may
become airtight chambers and can quickly cause suffocation.
• A child might suffocate if he crawls into a freezer to hide or play. Remove
the door of a freezer when not in use, even if you plan to discard the
freezer. Many communities have laws requiring you to take this safety
precaution.
• Removeand discard any spacersusedto secure the shelvesduring shipping. Small
objects are a choke hazard to children. S_
Electrical Information
These guidelines must be followed to ensure that safety mechanisms in the
design of this freezer will operate properly.
•Refer to the serial plate for correct electrical rating, The appliance power
cord isequipped with athree-prong grounding plug for protection against shock
hazards. It must be plugged directly into its own properly grounded three-prong
receptacle, protected with a 15 amp time delay fuse or circuit breaker. The
receptacle must be installed in accordance with the local codes and ordinances.
Consult a qualified electrician. Receptacles protected by Ground Fault Circuit
Interrupters (GFCI)are NOT RECOMMENDED. DO NOT usean extension cord
or adapter plug.
• If voltage varies by 10 percent or more, freezer performance may be affected.
Operating the freezer with insufficient power can damage the motor. Such
damage isnot covered under the warranty. If you suspect your household voltage
is high or low, consult your power company for testing.
• To prevent the freezer from being turned off accidentally, do not plug unit into
an outlet controlled by a wall switch or pull cord.
• Do not pinch, knot, or bend power cord in any manner.
Other Precautions
• Never unplug freezer by pulling on power cord. Always grip plug firmly, and pull
straight out from receptacle.
• Turning control to OFFturns off the compressor, but does not disconnect power
to other electrical components.
3

First Steps
3" AIR SPACE
Installation
CRA11NG
DISCARD TrlE (4) CRATING
_REWS AND (2) WOOD BASES
Unpackingand Leveling - Upright Freezers
,oP
HINGE
UPRIGHT FREEZER D_R ADJUSTMENTS
Upright FreezerDoor Removal
Before starting the freezer, follow these important first steps:
Installation
•Choose a place that is near a grounded electrical outlet.
• The freezer should be located where surrounding temperatures will not exceed
110°F (43°C). Temperatures of 32°F (0°C) and below will NOT affect freezer
operation. Additional compressor heaters are not recommended.
•AIIowspace around the unit for good air circulation. Leavea 3 inch (75 mm) space
on all sides of the freezer for adequate circulation.
Leveling
Thefreezer must haveall bottom corners resting firmly on asolid floor. Thefloor must
be strong enough to support afully loaded freezer. NOTE: It isVERYIMPORTANTfor
your freezer to be levelin order to function properly. Ifthe freezer isnot leveledduring
installation, the door may be misaligned and not close or seal properly, causing
cooling, frost, or moisture problems.
To Level Upright Unit:
After discarding crating screws and wood base, use a carpenter's level to level the
freezer from front-to-back. Adjust the plastic leveling feet in front, 1/2 bubble higher,
so that the door closeseasily when left halfway open.
To Level Chest Unit:
If needed, add metal or wood shims between feet pads and floor.
Cleaning
• Wash any removable parts, the freezer interior, and exterior with mild detergent
and warm water. Wipe dry. DO NOT USE HARSH CLEANERS ON THESE
SURFACES.
• Do not use razor blades or other sharp instruments, which can scratch the
appliance surface when removing adhesive labels. Any glue left from the tape can
be removed with a mixture of warm water and mild detergent, or touch the
residue with the sticky side of tape already removed. DO NOT REMOVE THE
SERIAL PLATE.
Upright Freezer Door Removal
If door must be removed:
1. Lift up plastic hinge cover and fold back.
2. Use aPhillips@ screwdriver to loosen and retighten the screws on the top hinge
to insure a secure assembly and prevent hinge slippage.
3. Remove the top hinge from cabinet and lift door off the lower hinge pin.
4. After door is removed, remove the two screws from the bottom hinge.
5. To replace door, reverse above order.
I_1_ TOallow door to
close and seal properly, DO NOT let
food packagesextend past the front
of shelves.
Shelf Front
4

Setting the
Temperature Control
Cool Down Period
• Forsafe food storage, allow 4 hours for freezer to cool down completely. The
freezer will run continuously for the first several hours. Foods that are already
frozen may be placed in freezer after the first few hours of operation. Unfrozen
foods should NOT be loaded into freezer until freezer has operated for 4 hours.
•When loading freezer, freeze only 3 pounds of fresh food percubic foot of freezer
space at one time. Distribute packages to be frozen evenly throughout the
freezer. It isnot necessaryto turn control knob to a colder setting while freezing
food.
Temperature Control
The temperature control islocated inside the freezer on upright models, and on
the left outside wall on chest models. Thetemperature isfactory preset to provide
satisfactory food storage temperatures. However, the temperature control is
adjustable to provide a range of temperatures for your personal satisfaction. If a
colder temperature isdesired, turn the temperature control knob toward COLD-
ESTand allow several hours for temperatures to stabilize between adjustments.
Freezer Optional
Features
OFF
FREEZE
)N TEMP_ ALARM /
J
TempAlarm - Upright Freezers
NOTE: Your freezer may have some, or all of the features listed below.
Become familiar with these features, and their use and care.
Rapid Freeze
Rapidfreeze allows you t o lower your freezer's temperature t o the lowest possible
temperature bypushing the switch to ON.Formaximum benefit, rapid freeze should
be selected 24 hours before placing a large quantity of unfrozen food into the
freezer. Food should then be spread throughout the freezer compartment to speed
upthefreezing process. Rapidfreeze must be manuallyturnedoff bypushingthe
switch to OFF.(This will return the compressor to the normal operating mode.)
Power On Light
The Power On Light indicates that the freezer is properly connected to electrical
power. The light glows even when the temperature control isturned to OFF. If
the light goes out, refer to "Freezer does not run" in the Avoid Service Checklist.
Temp Alarm (audible only or audible with warning light)
This feature is designed to provide a warning of possible malfunction. If the
temperature of the food risesto a level unsafe for long-term storage, the buzzer will
sound. Thered light will alsoglow on models soequipped. TheTemp Alarm feature
operates on household electricity. If power fails, the alarm will not perform. An ON/
OFFswitch allows you to deactivate the Temp Alarm when not wanted. Thefreezer
isshipped with Temp Alarm inthe OFFposition. After freezer hasrun approximately
4 hours, the red light, if equipped, will go off. Then you may activate the Temp
Alarm without the alarm sounding.
To activate the Temp Alarm, pressthe eraser end of a pencil, or a freezer key into
the hole marked ON, moving the rocker switch. To deactivate the Temp Alarm,
press the OFFswitch.
If the alarm sounds, be sure freezer is properly leveled, and the door closes freely,
and sealsproperly. Ifyou suspect atechnical malfunction, call an authorized servicer
immediately.
Slide-Out Basket (upright models)
The Slide-Out Basket, located atthe bottom of the freezer provides separate storage
space for items that are difficult to store on freezer shelves. To remove basket, pull
out, and lift up,
5

Freezer Optional
Features (continued)
FtUNGER
PowerDefrost Plun_r -Chest Freezers
\
_nger
Power Defrost - Upright Freezers
Slide-Aside Basket
Tilt-Out Shelf
Juice Can Rack (upright models)
The Juice Can Rackon the freezer door isspecially ridged to store juice cans and
prevent them from rolling out of the shelf.
Security Lock with Pop-Out Key
This security lock fastens the door snugly, ensuring stored food issecure. To lock or
unlock the freezer, pushthe key into the lock and turn, The key pops out of the lock
after it has been turned,
Interior Light
The light comeson automatically when the door isopened, Toreplace the light bulb,
turn the temperature control to OFFand unplug the electrical cord, Replacethe old
bulb with a bulb of the same wattage,
Adjustable Shelf (upright models)
This shelf can be moved to one of two positions. Lift the shelf up and out to move
to the desired position,
Power Defrost
The Power Defrost feature will defrost freezer in a fraction of the time usually
required. To defrost, remove all food, and follow these steps.
1, Pull out Power Defrost Plunger. Leavedoor open while defrosting. (Closing
freezer door will push in plunger and power defrost will be turned off.)
2. Push Power Defrost Plunger in to restart freezer after defrosting is completed.
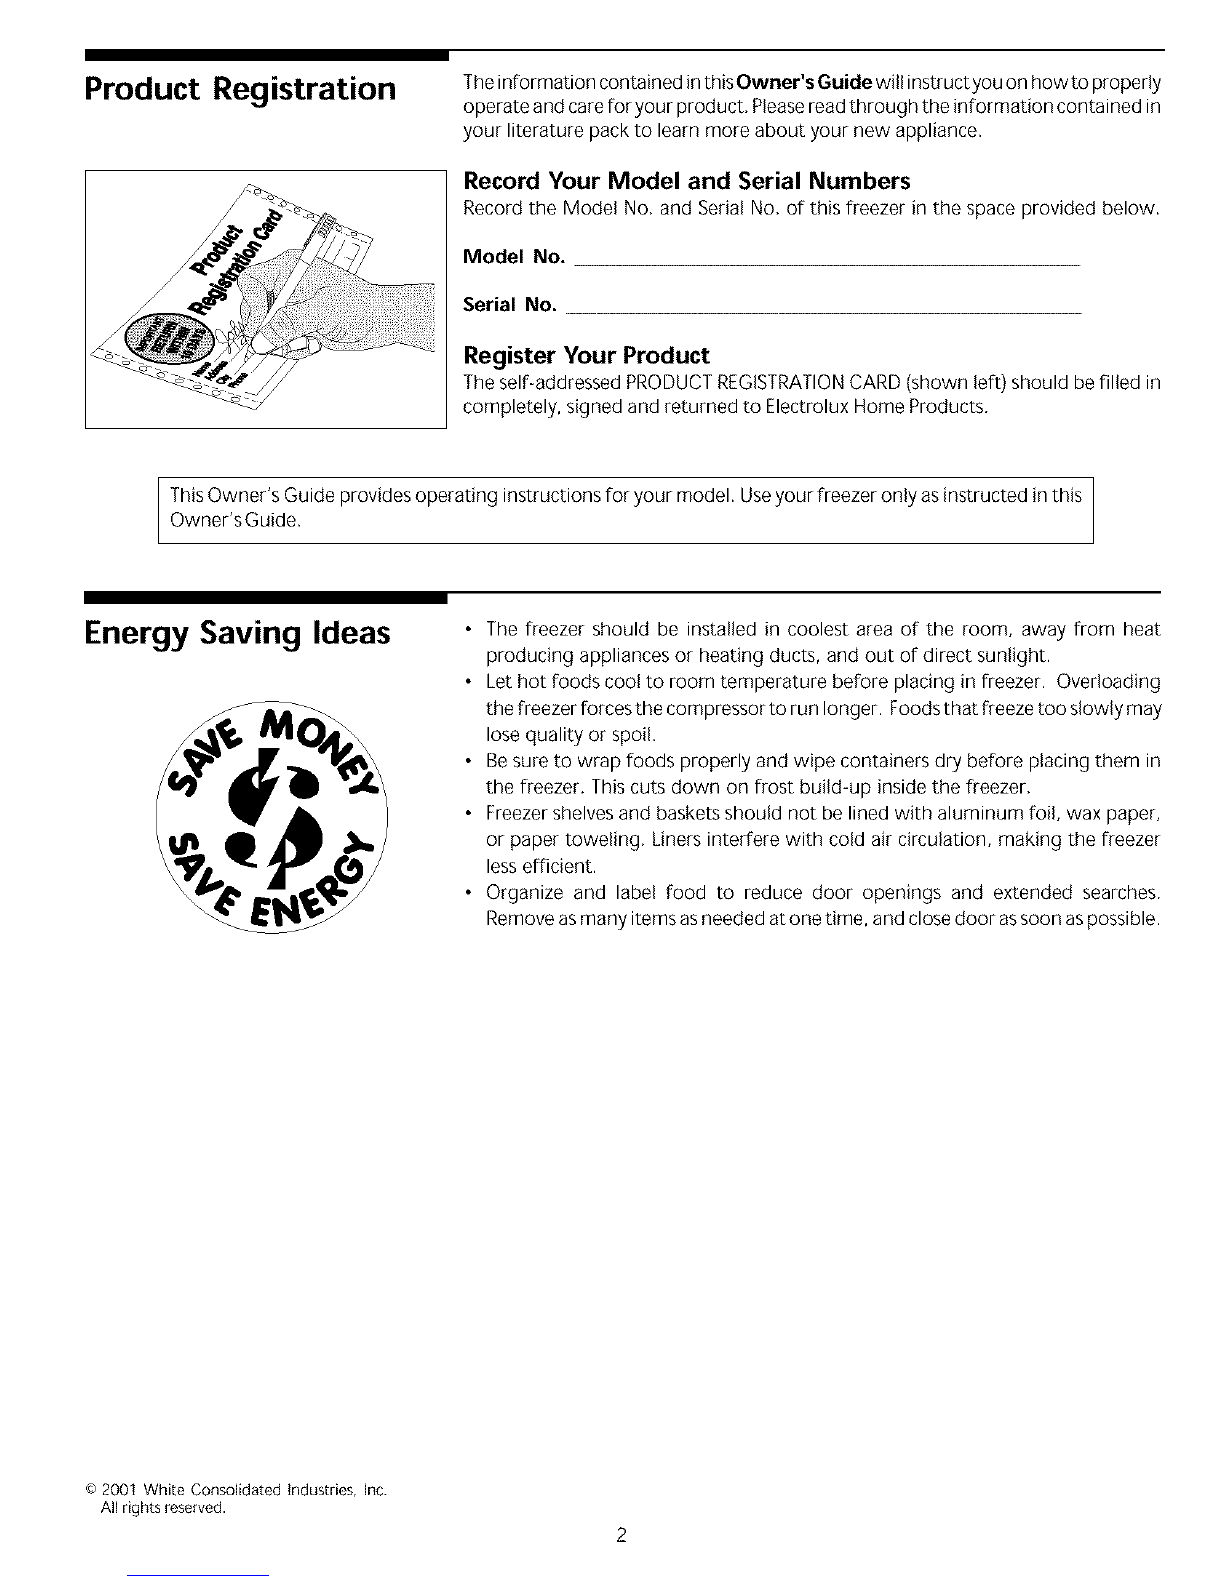
Defrost Drain
The defrost drain provides a method of draining the water during defrosting and
cleaning, See "Defrosting" in Care and Cleaning Section,
Slide-Aside Basket (chest models)
This basket helps organize odd-shaped items. To reach other packages in the
freezer, slide the basket aside or lift out,
Divider/Drain Pan (chest models)
The Divider/Drain Pan doubles asa convenient storage area and servesasa shallow
drain pan when defrosting. To remove, lift pan straight up out of the supports, and
out of the chest.
Fast Freezing Shelves (upright models)
These shelves contain cooling coils to freeze foods quickly and allow cold air to
constantly circulate throughout the freezer. Do not use sharp metal objects such as
ice picks or scrapersto clean the shelves. Thiscould damage the shelvesand reduce
their cooling ability. These shelves are not adjustable.
Tilt-Out Shelf
Thisshelf islocated inside ont hefl-eezerdoor and provides additional storage space.
To access and item, tilt top or "basket" shelf down.
Drop Front Shelf (Upright Models)
The Drop Front Shelf, located at the bottom of the freezer, provides a separate
compartment for small irregular shaped items or large, bulky items. Lift the shelf
front up and out to remove,
Care and Cleaning
Damp objects stick to
cold metal surfaces.Donottouch interior
metal surfaceswith wet or damp hands.
Some upright freezers arefrosbfree and defrost automatically, but should becleaned
occasionally. Beforecleaning or defrosting, unplug the power cord from the electrical
outlet.
Between Defrostings
To avoid frequent defrosting, occasionally use a plastic scraper to remove frost.
Scrape with a pulling motion. Never use a metal instrument to remove frost.
6

Care and Cleaning
(continued)
dre 1
DRAINPLUG Figure 2
DEFROST
DRAIN PLUG
Figure3
Defrosting
It is important to defrost and clean freezer when 1/4 to 1/2 inch of frost has
accumulated. Frost maytendto accumulate faster on upper part offreezerdueto
warm, moist air entering freezer when door is opened. Remove food and leave
door open when defrosting freezer.
• On upright modelswith adefrost drain (Figure1),remove drain plug on the inside
floor of the freezer by pulling straight out. Toaccessexternal drain tube on models
with a base panel, first remove the two screws from the base panel. Locate the
drain tube near the left center under the freezer. Placea shallow pan under the
drain tube. Defrost water will drain out. Check panoccasionally sowater does not
overflow. A 1/2 inch garden hose adapter can be usedto drain the freezer directly
into a floor drain. If your model is not equipped with an adapter, one can be
purchased at most hardware stores. Replace the drain plug when defrosting and
cleaning are completed. If the drain is left open, warm air may enter freezer.
•On chest models with a defrost drain, place a shallow pan or the Divider/Drain
Pan(some models) beneath the drain outlet (Figure2).A one half inch garden hose
adapter can be usedto drain the freezer directly into a floor drain (Figure 3). Ifyour
model isnot equipped with an adapter, one can be purchased at most hardware
stores. Pull out the drain plug inside the freezer, and pull off the outside defrost
drain plug (Figure 4). Defrost water will drain out. Check pan occasionally sowater
does not overflow. Replace the drain plugs when defrosting is completed.
•On models without a defrost drain, place towels or newspapers on the freezer
bottom to catch the frost, The frost will loosen and fall, Remove towels and/or
newspapers.
• Ifthe frost issoft, remove itby using a plastic scraper. Ifthe frost isglazed and hard,
fill deep pans with hot water and place them on the freezer bottom. Close the
freezer door. Frost should soften in about 15 minutes. Repeat this procedure if
necessary.
Cleaning the Inside
After defrosting, wash insidesurfacesofthe freezer with asolution oftwotablespoons
of baking soda in one quart (1.136 litres) warm water. Rinseand dry. Wring excess
water out of the sponge or cloth when cleaning in the area of the controls, or any
electrical parts,
Wash the removable parts and door basket with the baking soda solution mentioned
above, or mild detergent and warm water. Rinse and dry. Never use metallic
scouring pads, brushes, abrasive cleaners, or alkaline solutions on any surface. Do
not wash removable parts in a dishwasher.
Cleaning the Outside
Wash the cabinet with warm water and mild liquid detergent. Rinsewell and wipe
dry with a clean soft cloth, Replace parts and food,
7

Care and Cleaning
(continued)
If leaving freezer door1
open while on vacation, make certain/
that children cannot get into th_
freezer and become entrapped. J
Vacation and Moving Tips
Short Vacations: Leavethe freezer operating during vacations
or lessthan three weeks.
Long Vacations: If the freezer will not be used for several
months, remove all food and unplug the power cord. Clean
and drythe interior thoroughly. To prevent
odor and mold growth, leave the freezer door open slightly,
blocking it open if necessary.
Moving: Disconnect the power cord plug from the wall outlet.
Removefoods, then defrost, and cleanthe freezer. Secureall
looseitems such asbasepanel, baskets, and shelvesbytaping
them securely in place to prevent damage.
In the moving vehicle, secure freezer in an upright position,
and secure to prevent movement. Also protect outside of
freezer with a blanket, or similar item.
Power Failure/
Freezer Failure
Do not open freezer door
unnecessarily if freezer is
off for several hours.
If a power failure occurs, frozen foods will stayfrozen for at least 24 hours if the
freezer iskept closed. If the power failure continues, pack seven or eight pounds of
dry ice into the freezer every 24 hours. Look in the Yellow Pagesunder "Dry Ice,"
"Dairies," or "Ice Cream Manufacturers" for local dry ice suppliers. Always wear
gloves and usecaution when handling dry ice.
If the freezer has stopped operating, see "Freezer does not run" in the Avoid
Service Checklist Section or this manual. If you cannot solve the problem, call an
authorized servicer immediately.
If the freezer remains off for several hours, follow the directions above for the useof
dry iceduring a power failure. If necessary,take the rood to a local locker plant until
the freezer isready to operate. Look in the Yellow Pagesunder "Frozen FoodLocker
Plants."
8

Avoid Service Checklist
OCCURRENCE
FREEZERDOES NOT RUN
Before calling for service, review this list. It may save you both time and
expense. This list includes common occurrences that are not the result of
defective workmanship or materials in this appliance.
SOLUTION
This freezer must not be plugged into a circuit that has ground fault interrupt. If you are
unsure about the outlet, have it checked by a certified technician.
Temperature control is in the OFF position. See Setting the Temperature Control Section.
Freezer may not be plugged in, or plug may be loose. Be sure plug is tightly pushed into
electrical outlet.
House fuse has blown, or circuit breaker has tripped. Check/reset circuit breaker, or replace
fuse with 15 amp. time delay fuse.
Power outage. Check house lights. Call local electric company.
Freezer runs too much or too long. Room or outside weather is hot. It is normal for the fleezer to work harder under these
conditions.
Freezer had recently been disconnected for a period of time. Freezerrequires 4 hours to cool
down completely.
Large amounts of warm or hot food have been stored recently. Warm food will cause the
fleezer to run more until the desired temperature is reached.
Door iskept open too long or too frequently. Warm air enters the freezer every time the door
is opened. Open the door less often.
Freezer door may be slightly open. See Occurrence "Door Problems."
Temperature control isset too cold. Turn the control knob to awarmer setting. Allow several
hours for the temperature to stabilize.
Freezer gasket isdirty, worn, cracked, or poorly fitted. Clean or change gasket. Leaksin the
door seal will cause fleezer to run longer in order to maintain desired temperature.
Temperatures inside the freezer are Temperature control is set too cold. Turn the control to a warmer setting. Allow several
too cold. hours for the temperature to stabilize.
Temperatures inside the freezer are
too warm. Temperature control is set too warm. Turn the control to a colder setting. Allow several
hours for the temperature to stabilize.
Door is kept open too long or is opened too frequently. Warm air enters the freezer every
time the door is opened. Open the door less often.
Door may be open slightly. See Occurrence section "Door Problems."
Large amounts of warm or hot food might have been stored recently. Wait until the freezer
has had a chance to reach its selected temperature.
Temperature of external freezer
surface is warm.
SOUND AND NOISE
Louder sound levels whenever
freezer is on.
Freezer has recently been disconnected for a period of time. Freezer requires 4 hours to cool
down completely.
The exterior fleezer walls can be as much as 30°F warmer than room temperature. This is
normal while the compressor works to transfer heat flom inside the fleezer cabinet.
Modern fleezers have increased storage capacity and more even temperatures. They
require a high efficiency compressor. When the surrounding noise level is low, you might
hear the compressor runninq while it cools the interior.
Louder sound levels when compressor Freezer operates at higher pressures during the start of the ON cycle. This is normal. Sound
comes on. will level off or disappear as freezer continues to run.
Popping or cracking sound when
compressor comes on. Metal parts undergo expansion and contraction, as in hot water pipes. This is normal. Sound
will level off or disappear as freezer continues to run.
9

OCCURRENCE
SOUNDAND NOISE(cont'd)
Bubbling or gurgling sound, like water
boiling.
SOLUTION
Refrigerant (used to cool freezer) is circulating throughout the system. This is normal.
Vibrating or rattling noise. Freezer is not level. It rocks on the floor when it is moved slightly. Level the unit. Refer to
"Leveling" in the First Steps Section.
Floor is uneven or weak. Freezerrocks on the floor when it is moved slightly. Be sure floor
can adequately support freezer. Levelthe freezer by putting wood or metal shims under part
of the freezer.
Freezer istouching the wall. Relevelthe freezer or move freezer slightly. Refer to "Leveling"
in the FirstSteps Section.
WATER/MOISTURE/FROST
INSIDE FREEZER
Moisture forms on inside freezer walls. Weather is hot and humid, which increases internal rate of frost build-up. This is normal.
Door is slightly open. See Occurrence "Door Problems."
WATER/MOISTURE/FROST Door is kept open too long, or isopened too frequently. Open the door less often.
OUTSIDE FREEZER
Moisture forms on outside of Door isslightly open, causing the cold air from inside the freezer to meet warm moist air from
freezer, outside. See "Door Problems" in the Occurrence Section.
ODOR IN FREEZER
DOOR PROBLEMS
Door will not close.
LIGHT BULB IS NOT ON
Interior needs to be cleaned. Clean interior with sponge, warm water, and baking soda.
Foodswith strong odors are in the freezer. Cover the food tightly.
Freezerisnot level. It rocks on the floor when it is moved slightly. This condition can force the
cabinet out of square and misalign the door. Refer to "Leveling" in the First Steps Section.
Floor isuneven or weak. Freezerrocks on the floor when it is moved slightly. Level the floor
by using metal or wood shims under the freezer or brace floor supporting the freezer.
Light bulb is burned out. Follow directions under "Interior Light" in the Freezer Features
Section.
No electric current is reaching the freezer. See Occurrence "Freezer Does Not Run."
10

GIBSON FREEZERPLATINUM ADVANTAGE WARRANTY
Your Gibson product is protected by this warranty (United States)
WARRANTY THROUGH OUR AUTHORIZED SERVICERS, THE CONSUMER WILL BE RESPONSIBLE FOR:
PERIOD WE WILL:
FULLTWO-YEAR Two years from Payall ccstsfor repaidngorreplacingany padsof this Costs of service calls that are listed under NORMAL
WARRANTY odginal purchase date appliance whichproveto be defectivein materialsor RESPONSIBILITIESOFTHECONSUMER,*
workmanship.
LIMITED3'_-51" Thirdthroughfifth Repairor replaceany partsintheSealedRefrigerapen Diagnosticcostsand anyremoval,transportationand
YEARWARRANTY yearsfromoriginal System (compressor, condenser, evaporator, dr_erand reinslallationcosts,whichare required becauseofservice
(Sealed System) purchasedate tubing)whichproveto bedefectiveinmaladalsor Costsforlabor,partsandtransportation otherthanwithrespect
workmanship, and provide the tabortoinslallsuchpart tothe SealedRefrigeration System
LIMITED 6t*-f 0 _ Sixth through tenth Providea replacement for anycompressor,which Diagnostic costsandanyremoval,transportation and
YEARWARRANTY yearsfromoriginal provesto bedefectiveinmaterialsor workmanship, reinslallapencosts,whichare required becauseofservice
(Compressor Only) purchasedate Costsforlabor,partsandtransportation otherthanthecostof
the replacement compressoritself
Time periods listed Alloftheprovisionsofthefull andlimitedwarranties Costsofthelacboician'stravelto thehomeandanycostsfor
above aboveandtheexclusionslistedbelOWapply, pickupanddelivery oftheappliance required beca/=seof
service.
LIMITED
WARRANTY
(Applicable to the
State of Alaska)
THREE*YEAR
LIMITED FOOD
SPOILAGE PLAN
During the first three
years from original
purchase date.
if food loss results because of defects in materials or workmanship di_dng the time periods listed above, and appiies to the
limilattons slated in the normal responsibilities of the consumer listed below, Electrolux will reimburse the consumer for
the actual food spoilage loss in excess of $5,00 per occurrence, but not to exceed acumulative maximum
payment of $155.0& provided the food losses:
A) Are reported and the food shown to any Electrolux authorized sewicer within 24 hours of the discovery of the loss.
a) Ale not occasioned by either the manual disconnection of the electpeai power within the premises of the owner or a
generai power failure.
C) Occur even t hoi=gh the owner exercised reasonable care and diligence to save food per suggestions furnished wiLh
the appliance
Your appliance is warranted by Electrolux Home Products North America, a division of White Consolidated Industries Inc. We authorize no person
to change or add to any of our obligations under this warranty. Our obligations for service and parts under this warranty must be performed by us
or an authorized Electrolux Home Products North America servicer.
*NORMAL
RESPONSIBILITIES
OFTHECONSUMER
EXCLUSIONS
IF YOU NEED
SERVICE
This warranty applies only to products in ordinary household use, and the consumer is responsible for the
items listed below:
1. Proper use of the appliance in accordance with instructions provided with the product.
2. Proper installation by an authorized servicer in accordance with instructions provided with the appliance and in
accordance with all local plumbing, electrical and/or gas codes.
3. Proper connection to a grounded power supply of sufficient voltage, replacement of blown fuses, repair of loose
connections or defects in house wiring.
4. Expenses for making the appliance accessible for servicing, such as removal of tdm, cupboards, shelves,etc.
which are not a part of the appliance when it was shipped from the factory.
5. Damages to finish after installation.
6. Replacement of light bulbs and/or fluorescent tubes (on models with these features).
This warranty does not cover the following:
1. CONSEQUENTIAL OR INCIDENTAL DAMAGES SUCH AS PROPERTY DAMAGE AND INCIDENTAL
EXPENSES RESULTING FROM ANY BREACH OF THIS WRITTEN OR ANY IMPLIED WARRANTY.
NOTE: Some states do not allow the exclusion or limitation of incidental or consequential damages, so this
limitation or exclusion may not apply to you.
2. Service calls which do not involve malfunction or defects in workmanship or material, or for appliances not in
ordinary household use. The consumer shall pay for such service calls.
3. Damages caused by services performed by servicers other than Electrolux Home Products North America or
its authorized servicers; use of parts other than genuine Electrolux Home Products parts; obtained from persons
other than such servicers; or external causes such as abuse, misuse, inadequate power supply or acts of God.
4. Products with original serial numbers that have been removed or altered and cannot be readily determined.
Keep your bill of sale, delivery slip, or some other appropriate payment record. The date on the bill establishes the
warranty period should service be required. If service is performed, it is in your best interest to obtain and keep all
receipts. This written warranty gives you specific legal rights. You may also have other rights that vary from state to
state. Service under this warranty must be obtained by contacting Electrolux Home Products:
This warranty only applies in the 50 states of the U.S.A., and Puerto Rico. Product features or specifications as described or illustrated are subject
to change without notice. All warranties are made by Electrolux Home Products North America, a division of White Consolidated Industries Inc.
01-G-FR-O2 (Rev. 03/2001)
USA
800.944°9044
Electrolux Home Products North America
P.O. Box 212378
Augusta, GA 30917
11

FREEZERWARRANTY (CANADA)
Your freezer is protected by this warranty
WARRANTY THROUGHOUR AUTHORIZEDSERVICERS, THECONSUMERWILLBE RESPONSIBLEFOR:
PERIOD WEWILL:
FULLONE-YEAR Oneyearfromodgtaal Payall costsfor repairing or replacing any pads of this Costs of service calls that are listed under NORMAL
WARRANTY purchasedate appliance whichprove to be defectivein materialsor RESPONSIBILITIESOFTHECONSUMER,*
workmanship.
LIMITED 2N°-5f* Second through fifth Repairor replace any paUs in theSeatadRefrigeration Diagnostic costsandanyremoval,transportationand
YEARWARRANTY yearsfromodgtaai System (compressor, condenser, evaporator, drierand reinstattationcosts,whichare required becauseofservice
(Sealed System) purchasedate tubing)whichprovetobe defectivein materialsor Costsforlabor,partsandtransportationotherthanwithrespect
workmanship, and provide the labortoinstallsuchpart. totheSealedRefrigeration System
LIMITED 6_-f0 r_ Sixth through tenth Providea replacement for anycompressor,which Diagnostic costsandanyremoval,transportationand
YEARWARRANTY yearsfromoriginal provesto bedefectiveinmaterialsor workmanship reinstattationcosts,whichare required becauseofservice
(Compressor Only) purchasedate COStsforlabor,partsandtransportationotherthanthecostof
the replacement compressoritself
Time periods listed Alloftheprovisionsofthefull andlimitedwarranties Costsofthetechnician'stravelto thehomeandanycostsfor
above aboveandtheexclusionslistedbelowapply pickupand delivery oftheappliance required becauseof
service.
LIMITED
WARRANTY
(Applicable to the
State of Alaska)
THREE-YEAR
LIMITED FOOD
SPOILAGE PLAN
During the first three
years from odgtaai
purchase date.
If food lOSS results because of defects in materials or workmanship dpang the time pedods listed above, and applies to the
limitations stated in the normal responsibilities of the consumer listed below, Eleetrolux will reimburse the consumer for
the actual food spoilage loss in excess of $5,SS per occurrence, but not to exceed a cumulative maximum
payment of $f go.P0, provided the food losses:
A) Are reported and the food shown to any Electrolux authorized servicer within 24 hours of the discovery of the loss
a) Ale not occasioned by either the manual disconnection of the etac_cal power within the premises of the owner or a
generai power failure
C) Occur even though the owner exercised reasonable care and diligence to save food per suggestions furnished with
the appliance
Your appliance is warranted by Electrolux Home Products North America, a division of WCl Canada Inc. We authorize no person to change or add
to any of our obligations under this warranty. Our obligations for service and parts under this warranty must be performed by us or an authorized
Electrolux Home Products North America servicer.
*NORMAL
RESPONSIBILITIES
OFTHECONSUMER
EXCLUSIONS
IF YOU NEED
SERVICE
This warranty applies only to products in ordinary household use, and the consumer is responsible for the
items listed below:
1. Proper use of the appliance in accordance with instructions provided with the product.
2. Proper installation by an authorized servicer in accordance with instructions provided with the appliance and m
accordance with all local plumbing, electrical and/or gas codes.
3. Proper connection to a grounded power supply of sufficient voltage, replacement of blown fuses, repair of loose
connections or defects in house wiring.
4. Expenses for making the appliance accessible for servicing, such as removal of tdm, cupboards, shelves,etc.
which are not a part of the appliance when it was shipped from the factory.
5. Damages to finish after installation.
6. Replacement of light bulbs and/or fluorescent tubes (on models with these features).
This warranty does not cover the following:
1. CONSEQUENTIAL OR INCIDENTAL DAMAGES SUCH AS PROPERTY DAMAGE AND INCIDENTAL
EXPENSES RESULTING FROM ANY BREACH OF THIS WRITTEN OR ANY IMPLIED WARRANTY.
NOTE: Some states do not allow the exclusion or limitation of incidental or consequential damages, so this
limitation or exclusion may not apply to you.
2. Service calls which do not involve malfunction or defects in workmanship or material, or for appliances not in
ordinary household use. The consumer shall pay for such service calls.
3. Damages caused by services performed by servicers other than Electrolux Home Products North America or
its authorized servicers; use of parts other than genuine Electrolux Home Products parts; obtained from persons
other than such servicers; or external causes such as abuse, misuse, inadequate power supply or acts of God.
4. Products with original serial numbers that have been removed or altered and cannot be readily determined.
Keep your bill of sale, delivery slip, or some other appropriate payment record. The date on the bill establishes the
warranty period should service be required. If service is performed, it is in your best interest to obtain and keep all
receipts. This written warranty gives you specific legal rights. You may also have other rights that vary from state to
state. Service under this warranty must be obtained by contacting Electrolux Home Products:
Your appliance is warranted by Electrolux Home Products North America, a division of WCl Canada Inc. Product features or specifications as
described or illustrated are subject to change without notice.
Canada
866.213,9397
Electrolux Home Products North America
6150 McLaughlin Road
Mississauga, Ontario
L5R 4C2
12

appareil...2
,,,,,,,,,,,,,,,,,,.,,,,,2
nes de s_curit_ ............... 3
Avant de mettre votre
cong_lateur en marche .............. 4
R_glage de la commande
de temp_raturel ....................... 5
Caract_ristiques
du cong_lateur. .................... 5 - 6
Entretien et nettoyage ............ 6 - 7
Panne de courant/panne
de cong_lateur ........................ 8
Liste de contr61e anti-panne .... 9 - 10
Garantie .......................... 11 - 12
LIRE ET CONSERVER CES INSTRUCTIONS
216805800(0104)

Enregistrement de
I'appareil Lesinformations contenues dans ce manuel vous permettront d'installer et
utiliser votre congelateur en route securite. Veuillez life attentivement ces
informations.
Inscrivez les numeros de modele et de s_rie
Inscrivez ci-dessous le numero do modele et celui de serie de ce congelateur.
N° de modele
N° de serie
Enregistrez votre appareil
LaCARTED'ENREGISTREMENT(montree egauche) dolt etre remplie completement,
plus signee et retourne 8 Electrolux Home Products.
Votre guide de I'utilisateur contient desdirectives specifiques 8 votre appareil. N'utilisez votre congelateur que
suivant lesinstructions.
Conseils pour
economiser I'energie
Placez le congelateur dans I'endroit le plus frais de la piece, a distance de tout
appareil produisant de la chaleur ou des conduits de chauffage, et _ I'abri de la
lumiere,
• Avant de ranger les aliments chauds dens le congelateur, laissezles refroidir e
latemperature de la piece, Une surcharge du congelateur oblige le compresseur
fonctionner plus Iongtemps. Les aliments qui congelent trop lentement
risquent de perdre de leur saveur ou de perir.
Afin de limiter la condensation e I'interieur de votre appareil, enveloppez
correctement les aliments et essuyez les recipients event de les disposer dans
le congelateur,
• Lesclayettes ne devraient pasetre recouvertes de papier aluminium, papier cire
ou essuie-tout, Ces revetements entravent la circulation de I'air froid, ce qui
diminue I'efficacite du congelateur,
• Rangez correctement lesaliments et etiquetez-les pour reduire lesouvertures de
votre appareil et les recherches prolongees. Sortez en meme temps de votre
congelateur tousles aliments dont vous avez besoin et refermez le aussitOt.
o 200I White Consolidated industries, Inc.
Tous droits reserves.

Importantes mesures
de s curit
Mise au rebut appropiee
dude votre appareil
Les jeunes
enfants peuvent s'enfermer a I'interieur
de I'appareil et suffoquer. Ces risques
sont bien reels. Les congelateurs mis au
rebut ou non utilises presentent toujours
un danger meme s'ils ne sont entreposes
"quepourquelquesjours". Sivousvous
debarrassez de votre ancien congelateur
veuillez suivre les
instructions ci-dessous pour eviter tout
risque d'accident.
AVANT DEVOUSDEBARASSERDEVOTRE
ANCIEN APPAREIL:
l'l__,\Ti_;i i [-:_q=1,',I=1,_I
_Retirer les pontes.
%aisser les
clayettes en place
pour eviter que
les enfants ne
puissent entrer
facilement
8 I'interieur.
rI'_,Vi d;i i[L'_q=1_v,I=1_I
Fl_..\vl =1;i i [_q-qd,v,I=1_I ATTENTION: Pour
eviter tout risque de feu ou d'electrocution.
Ne pas utiliser de rallonge electrique ou
d'adaptateur. N'enlever aucune des
broches de la fiche d'alimentation.
Prise murale mise
la terre
Nejamais couper, ]
enlever ou mettre
hors circuit la broche
de mise bla terre de
cette fiche. J
Cordon d'alimentation
muni d'une fiche a trois
broghes avec mise _ I_ terre
Avant d'utiliser votre cong_lateur, veuillez lire attentivement
routes les instructions contenues dans ce manuel.
Pour votre s_curit_
N'entreposez et n'utilisez aucun produit inflammable (essenceou autres produits
inflammables) 8 proximite de cet appareil ou de tout autre appareil electrique, Lisez
attentivement les etiquettes pr_cisant les risques d'inflammabilit_ et les dangers
d'utilisation des produits.
S_curit_ des enfants
• Detruisez le carton, lessacs plastiques et tout autre materiau d'emballage
immediatement apres le deballage du congelateur. Ne laissez pas lesenfants
jouer avec ces articles. Lesemballages recouverts de revetement en tissu, en
mousse ou en plastique, ou encore de materiaux extensibles risquent de ne pas
laisser passer d'air et d'asphyxier,
•Un enfant peut s'_touffer s'il se cache ou joue dans un cong_lateur.
Enlevez la porte d'un cong_lateur non utilis_, rn_rne sivous d_cidez de
lejeter. Les lois applicables dans de nombreuses collectivites vous obligent
respecter cette mesure de securite.
• Retirez etjetez routes les entretoises employees pour fixer lesetageres pendant
I'expedition, Lespetitis objets sont un risque d'obstruction aux enfants,
Informations concernant le branchement
_lectrique
Veuillez suivre attentivement les instructions ci-dessous afin d'assurer le
bon fonctionnement des m_canismes de s_curit_ de votre cong_lateur .
•Correct _lectrical classement se trouve sur la plaque signaletique. Le
cordon de I'appareil est muni d'une fiche 8 trois broches avecraisea la terre pour
eviter les decharges electrique, Elledolt etre branchee directement dans une prise
murale raise 8 la terre, 8 trois alveoles, protectee d'un fusible temps-retarde 8 15
amperes ou d'un interrupteur, Laprisedoit etre installee conformement aux codes
et aux reglements Iocaux. Consultez un electritien qualifie, Lesprises avec un raise
terre fault circuit interrupteur NESONTPAS RECOMMENDEES.N'utilisez PA$
de cordon prolongateur ni de fiche d'adaptation,
• Sila tension variede 10 pour cent ou plus, le fonctionnement de votre congeleteur
risque d'etre affecte, L'usage de congelateur avec un courant insufficant puisse
endommager le moteur, Un tel dommage n'est pas couvert sous la garantie, Si
vous soup¢onnez que la tension est elevee ou basse, communiquez avec le
personnel 8 votre compagnie d'electricite,
• Afain que le congelateur ne soit paspar accident debranche, ne le branchez pas
dans Line prise commandee par un interrupteur mural ou un cordon de tirage,
• Evitez absolument de pincer, tordre ou nouer le cordon d'alimentation,
Autres precautions
Ne debranchez jamaB le congelateur en tirant sur le cordon d'alimentation,
Saisisseztoujours fermement la fiche et sortez-la de la prise en tirant droit vers
VOUS,
En mettant Hnterrupteur du congelateur en position "OFF" (ARRET),vous ne
coupez pas I'alimentation des composants electriques, mais seulement celle du
compresseur.
3

Pour bien commencer
Degagement de 75 mm (3 po)
25 mm
(1 po)
Installation
Deballage et raise 8 niveau- modeles verticaux
V]S
CHARN[ERE
SUPERIEURE_
COUVRE
CHARNIEREEN
PLAST_QUE
ADJUSTEMENTSDELAPORTEDUCONG£LATEURVERT_CAL
ENLEVEMENTDELAPORTEDUCONGELATEURVERTICAL
Avant de mettre en marche votre congelateur, veuillez suivre les
instructions ci-dessous:
Installation
• Placezvotre congelateur presd'une prisemise a la terre,
• Placez votre congelateur 8 un endroit 00 les temperatures ambiantes ne
depasseront pas 43°C (110° F), Des temperatures inferieures 80°C (32°F)
n'affecteront pasle fonctionnement de votre appareil, L'utilisation d'un mecanisme
de chauffage supplementaire pour le compresseur n'est pas recommandee,
• Laissezun espacede75 mm (3 pouces)de chaque cote du congelateur pour assurer
une bonne circulation de I'air.
Mise _niveau
Lesquatre coins inferieurs de congelateur doivent reposerfermement sur un plancher
solide, Leplancher dolt etre assezresistant pour supporter le poids du congelateur
rempli, NOTE: II est TRESIMPORTANTpour votre congelateur d'etre nivele afin de
fonctionner bien. Silecongelateur n'est pasnivelependant I'installation, la porte peut
etre non alignee, ne ferme pas,ou ne scelle bien, causant des problemes de reffoidir,
geler, ou d'humidite,
Mise bniveau de module vertical:
Apres avoir jete la base de bois et les vis d'emballage, utiliser un niveau du
charpentier pour niveler lecongelateur du devant ale dos. Ajuster lespiedsen matiere
plastique qui nivellent dans le devant, 1/2 bouillonne plus haut, pour que la porte
ferme facilement quand elle est partiellement ouverte.
Mise bI'horizontale des modules horizontaux:
Au besoin, ajouter des cales de metal ou de bob entre lessocles des pattes et le
plancher,
Nettoyage
• Nettoyezroutes lespiecesamoviblesainsique I'interieur et I'exterieur du congelateur
avecdel'eautiedeetundetergentdoux, SechezaI'aided'unchiffon, NEPASUTILISER
DE DETERGENTABRASIF SUR CESSURFACES.
Pour enlever les etiquettes adhesives, n'utilisez pas de lame de rasoir ou autre
instrument tranchant risquant de rayer le fini, Enlevez la colle restant a l'aide d'un
melanged'eau tiede et de detergent doux ou aveclecote adhesif de I'etiquette enlevee,
NE PAS ENLEVERLA PLAQUE SIGNALI_TIQUE,
D_pose de la porte (modUlesverticaux)
Pourenleverlaporte:
1. Soulevezle couvre-charniereen plastique et rabattez-le,
2,A I'aided'un tourneviscriciforme (Phillips),desserrezpuisresserrezlesvisdelacharniere
superieurepour que I'ensemblesoit bienfixe et que lacharniere ne glissepas,
3, Enlevezla charnieresuperieureet sortezla porte de I'axede charniereinferieure,
4, UnefOBla porte enlevee,enlevezlesdeux visde la charniereinferieure,
5, Pourremettre la porte en place, inversezlesetapesci-dessus,
Pourque
a porte fermeet scelle bien.NE PASI_sser
las paquetsd'aliment_endent au dem
des clayettes.
Loinquelesdayettes
4

R glage de la
temperature
P_riode de refroidissement
• Pour assurer une bonne conservation des aliments, laissez le congelateur fonctionner,
pendant 4 heures. Au debut lecongelateur fonctionne constamment ettout seulpendant
quelques heures. Lesaliments dej8 congeles peuvent etre places dansle congelateur apres
quelque heurs d'operation. Lesaliments non-congeles ne doivent pas etre placesdans le
congelateur qu'apres 4 heures d'operation.
• Quand vous remplissez le congelateur, congelez seulement 3 livresd'aliment frais par pied
cubique d'espace du congelateur. Distribuez les paquets egalement darts le congelateur.
Ce n'est pas necessaire de regler le bouton de commande 8 "plus froid" pendant le
processus de congelation.
Commande de temperature
Lacommande de temperature est situee _I'interieur du congelateur (modeles verticaux)
ou sur la paroi exterieure gauche (modeles horizontaux). L'appareil a ere preregle en
usine afin d'assurer une temperature adequate de rangement de la nourriture. Vous
pouvez toutefois regler la commande de temperature selon vos besoins. Si vous desirez
une temperature plus ffoide, tournez le bouton de commande vers COLDEST(LEPLUS
FROID)pub attendez quelques heures, afin que la temperature se stabilise.
Caract ristiques du
cong lateur
OFF
RAPID FREEZE
OFF O_ TEMP_ ALARM /
J
Alarme - ModUles Verticaux
REMARQUE: Selon le modt_le, votre cong_lateur peut n'avoir que certaines des
caract_ristiques _num_r_es ci-dessous. Prenezconnaissance de ces caract_ristiques
et familiarisez-vous avec leur utilisation et leur entretien.
Surg_lation
Lasurgelation vous permet de baisser la temperature de votre congelateur au niveau la
plus baspossible en mattant lecommutateur de surgelation sur "ON "(MARCH E).Chosissez
ce reglage 24 heures avant de placer la nourriture darts lecongelateur. Dispersez la norriture
dans tout le congelateur pour accelerer la surgelation. Pour arreter la surgelation, mettez le
commutateur sur "OFF"(ARRET).
T_moin de fonctionnement
Letemoin de fonctionnement indique quevotre congelateur est correctement branche. Ce
temoin reste allume meme lorsque Iacommande de temperature est 8 l'arrCt. Si le temoin
s_eteint`re_rtez-v_us_arubrique``Lec_nge_ateurnef_ncti_nnepas_ de_a_istedec_ntr_e
anti-panne.
Alarme (sonore uniquement ou sonore avec un voyant lumineux)
L'alarme sedeclenche en casde mauvais fonctionnement de votre congelateur. Eneffet, si
la temperature interieure du congelateur augmente et atteint un niveau critique pour une
Iongueconservation desaliments, I'alarmesonorese meten marche. Enoutre, sur lesmodeles
qui en sont equipes, un voyant lumineux rouge s'allume. L'alarme fonctionne grSce
I'instalIation electrique domestique ; ainsi, en cas de coupure de courant, celle-ci ne se
dec_encherapas. Uninterru_teurMarche_Arr¢t(,`_N__FF__)_ermetd_activer_udeneutra_iser
I'alarme. Lecongelateur est livre avec I'alarme neutralisee (position "OFF"). Sur lesmodeles
quien sont equipes, levoyant lumineux rouge disparait apres que lecongelateur airfonctionne
environ 4 heures. Vous pouvez alors mettre I'alarme en position de marche ("ON") sansque
celle-ci sedeclenche.
Pouractiver I'alarme, ilsuffit d'enfoncer lagommesituee en boutd'un crayon 8 papier ou une
c_ede c_nge_ateur dans ___ri_ce designe par ,`_N ___P_urdesactiver __a_arme_i_su_it de_resser
I'interrupteur marque "OFF".
Sil'alarme sedeclenche, assurez-vous que le congelateur est de niveau, et que la porte est
correctement fermee. Sivouz suspectez un mauvais fonctionnement de l'appareil, appelez
immediatement un r@arateur qualifie.
Panier coulissant (modbles verticaux)
Lepanier arnovible ssitue au fond du congelateur vous permet de stocker s@arement les
aliments difficiles 8 placer sur les etageres du congelateur. Pour enlever le panier du
congelateur, soulevez le puis retirez-le.
I_tagi_re _jus de fruit (modUlesverticaux)
L'etagere ajus de fruit dans la porte du congelateur est con_ue tout specialement pour le
rangement des boites dejus de fruit congele, les empechant de rouler hors de I'etagere.
5

Caract ristiques du
cong lateur (suite)
J
commande
Bouton de commande du degivrage rapide
-modeles horizontaux
_- BOUTONDEC(_MMANDE
x
Degivrage rapide - modeles verticaux
Panier coulissant de cote
Etagere se retirant en s'indinant
Serrure de s_curite b ressort
La serrure de securite permet la fermeture hermetique de votre congelateur et donc une
parfaite conservation des aliments qui y sont contenus. Pour verrouiller ou deverrouiller le
congeiateur, enfoncez la de dans laserrure et tournezda. La cle sort automatiquement de
la serrure une fob qu'elle a ere tournee.
I_clairage interieur
La lampe s'allume automatiquement a I'ouverture de la porte. Pour remplacer I'ampoule,
tournez lacommande detemperature sur <<OFF>>(Arret) etdebranchez lecordon d'alimentation.
Remplacez I'ampoule par une autre de meme puissance.
Clayette ajustable (surlesmodblesverticaux)
La dayette ajustable peut etre placee a deux niveaux differents. Soulevez la dayette pub
retirezda du congelateur pour la placer a I'endroit desire.
Degivrage rapide
Ledegivrage rapide sert a degivrer lecongelateur pendant la flaction de temps normalement
necessaire.Pourdegivrer, videz le eongelateur eompletement, et pousuivez cesinstructions:
1. Tirez sur le bouton de la commande de degivrage rapide. Laissezla porte ouverte Iors du
degivrage. (Lafermeture de la porte du congelateur enfonce le poussoir et stoppe le
degivrage rapide.)
2. Appuyez sur le bouton de la commande de degivrage rapide pour remettre en marche le
congelateur apres le degivrage.
Vidange de I'eau de degivrage
Cette caracteristique de votre congelateur permet 8 I'eau de s'ecouler lots du degivrage et
du nettoyage. Voyez la section "Degivrage" dans le chapitre "Entretien et Nettoyage'.
Panier coulissant de cote (sur les modbleshorizontaux)
Ce panier permet de ranger des articles de formes diverses. Pour atteindre d'autres paquets
places darts le congelateur, faites coulisser le panier de cote ou soulevezde.
Compartiment/reservoir de vidange
Le compartiment/rese_voir de vidange permet d'entreposer les aliments et serf aussi de
recipient profond pour recueillir I'eau du degivrage. Pour enlever le compartiment/reservoir
de vidange du congelateur, soulevezde et tirezde vers vous.
Clayettes de congelation rapide (sur les modblesverticaux)
Ces clayettes comportent des serpentins de refioidissement pour congeler rapidement et
permettre a I'air froid de circuler en continu darts le congelateur. Ne vous servez pasd'objet
metallique pointu comme des pics a glace ou des grattoirs pour nettoyer ces clayettes. Vous
dsquedez de les endommager et de reduire leur capacite a refroidir. Ces clayettes ne sont
pas reglables.
Etagere se retirant en s'inclinant
Cette etagere est situee a l'interieur, sur la porte du bac a congelation et permet
un rangement supplementaire. Pour avoir acces a un article, inclinez le dessus de
I'etagere "panier" vers le bas.
Panier Soulevable
Ce partier permet de ranger des articles de formes diverses. Pour atteindre d'autres
paquets darts le congelateur, coulissez le panier de cote ou soulevez-le.
Entretien et nettoyage q
Les objets humides /
collent aux surfaces metalliques froides. Ne /
pas toucher ces surfaces avec les mains /
humides. ]
Certains congelateurs verticaux sont sans givre et se degivrent donc automatiquement. IIfaut
cependant les nettoyer de temps a autre. Avant de decongeler ou de nettoyer, debranchez
le cordon de la prise.
Entre les degivrages
Poureviterle degivragefrequent,enlevezde tempsa autre legivrea I'aided'un grattoir en
plastique. Grattezen remontant. Nevousse_vezjamaisd'instrumentmetallique.
6

Entretien et nettoyage
(suite)
BCHON
DE
DEVIDANGE Schema 2
ADAPTATEUR
DETUYAU
/
BOUCIJON
DEVLDANGE
Schema 3
D_givrage
IIest important de degivrer et de nettoyer lecongelateur des que les parois sont recouvertes
de 6a 12 mm (1/4 a 1/2 pouce) de givre. L'ouvelture de la porte ou du couvercle laisseentrer
de Fair humide et tiede dans le congelateur, cequi entraine une accumulation plus rapide du
givre sur la partie superieure de Fappareil. Enlevez les aliments et laissez la porte ou le
couvercle ouvert Iors du degivrage.
•Sur les modeles verticaux avec systeme devidange de l'eau dedegivrage (Figure 1),enlever
le bouchon de vidange au fond du congelateur en le tirant directement. Pouracceder au tuyau
de vidange exterieur sur les modeles munis d'un panneau inferieur, vous devez au prealable
retirer ce panneau inferieur fixe au congelateur par deux vis. Le tuyau de vidange est situe
pres du centre gauche sous lecongelateur. Placezun recipient creuxsous letuyau de vidange.
L'eau du degivrage va s'y ecouler. Verifiez de temps a autre que Feau ne deborde pas. Un
demi-pouce adaptateur de tuyau dejardin peut etre utilise pour vidanger le congelateur
directement darts un egout. Sivotre modele n'est pasequipe avec un adaptateur, celui peut
etre achete a la plupart des magasins de materiel. Remettez le bouchon en place Iorsque le
degivrage et le nettoyage sont termines. Si le bouchon de vidange est reste ouvert, de Fair
chaud peut entrer darts le congelateur.
•Sill" les modules horizontaux avec systeme de vidange de Feau de degivrage, placez
un recipient creux ou le compartimendreservoir de vidange (fourni avec certains modeles)
sous Forifice de vidange (schema 2). Vous pouvez vidanger le congelateur directement darts
un drain de plancher (schema 3) a I'aide d'un adaptateur de tuyau dejardin de mesure 1,27
centimetre (un demi-pouce). Si votre modele n'est pas muni d'un adaptateur, vous pouvez
vous en procurer un aupres de votre quincailler. Enlevez le bouchon de vidange situe a
I'interieur du congelateur et celui situe a I'exterieur de Fappareil (schema 4). L'eau du
degivrage va s'ecouler. Verifiez de temps a autre que Feau ne deborde pas. Remettez en
place les bouchons de vidange une fois le degivrage termine. Sivotre modele n'est pas muni
d'un adaptateur, vous pouvez vous en procurer un aupres de votre quincailler.
•Sur les mod_les non _quip_s d'un tuyau de vidange, placez des sewiettes ou
desjournaux au fond du congelateur pour retenir le givre. Legivre vase detacher et tomber.
Enlevez les serviettes et/ou lesjournaux.
• Sile givre n'est pas durci, enlevez-le a Faide d'un grattoir plastique. S'il est dur et brillant,
remplissez de profonds recipients avec de Feau chaude et placez-les au fond du congelateur.
Fermezle congelateur. Legivre devrait seramollir en 15 minutesenviron. Au besoin, repetez
cette derniere operation.
Nettoyage de I'int_rieur du cong_lateur
Apres le degivrage, nettoyez les surfaces hlternes du congelateur avec une solution
composeededeuxcuilleresa soupedebicarbonatedesoudedans 1Iitred'eautiede. Rincez
et sechez. Essorezbien votre chiffon ou votre eponge pour nettoyer autour des cornmandes
ou des pieces electriques.
Lavez les pieces amovibles et lejoint de la porte avec une solution de bicarbonate de soude
commeci-dessus, oududetergentdouxdiluedansdeFeautiede. Rincezet sechez. N'utilisez
jamais de tampon a recurer metallique, de brosse, de produit nettoyant abrasif ou de solution
alcaline sur une surface du congelateur, quelle qu'elle soit. Ne mettez pas les parties
amovibles de votre congelateur darts un lave-vaisselle.
Nettoyage de I'exterieur du congelateur
Nettoyez I'exterieur de votre congelateur avec un detergent Iiquide doux dilue darts de I'eau
tiede. Rincezbien et sechezavecun linge propreet doux. Remettez en place tousles elements
du congelateur et replacez-y les aliments.
7

Entretien et nettoyage
(suite)
Si le congelateur
est laisse ouvert pendant la dur_e des
vacances, assurez-vous que des enfants ne
puissent pas s'enferrner _I'interieur.
Conseils de vacances et de d_m_nagement
Vacances de courte duree: Laissezle congelateur fonctionner pendant des conges de une
a trois semaines.
Vacances de Iongue duree: Si le congelateur n'est pas utilise pendant plusieurs mois,
enlevez tousles aliments et debranchez le cordon d'alimentation. Nettoyez et sechez
I'interieur soigneusement. Laissezla porte ou lecouvercle legerement ouvert en le bloquant
au besoin, afin d'empecher toute moisissure et odeur.
En eas de deraenagernent: Debranchez le cordon d'alimentation. Enleveztous lesaliments,
degivrez le congelateur et nettoyez-le. A I'aide de ruban adhesif, attachez lespieces amovibles
au congelateur pour empecher tout dommage. Darts le vehicule de demenagement, le
congelateur doit etre darts une position verticale et dolt etre cale de fa_on 8 empecher tout
mouvement. Couvrez I'exterieur du congelateur avec une couverture ou autre a_ticlesimilaire.
Protegez aussi I'exterieur du congelateur avec une couverture, ou quelque chose semblable.
Panne de courant/
panne du cong lateur
Ne pas ouvrir inutilement la porte
du congelateur en cas de panne
prolongee de courant ou de votre
congelateur.
En cas de panne de courant, les aliments resteront congeles au moins 24 heures si le
congelateur reste ferme. Encasde panne prolongee, placez trois ou quatre kilos (sept ou huit
livres) de glace seche darts le congelateur toutes les 24 heures. Cherchez darts les pages
jaunes les fournisseurs de glace seche sous les rubriques <<Glaceseche>>,<<Laiteries>>ou
<<Fabricantsde creme glacee>>. Po_tez toujours des gants et soyez prudent Iors de la
manipulation de glace seche.
Silecongelateur s'est arr¢te de fonctionner, reportez-vous a la rubrique "Le congelateur
ne fonctionne pas" dans la liste de contrOle antFpanne. Si vous ne pouvez resoudre le
probleme, appelez immediatement un reparateur qualifie.
N'ouvrez pas le congelateur inutilement. Si le congelateur ne fonctionne pas pendant
plusieurs heures, suivez les instructions cFdessus traitant de I'utilisation de glace seche. Au
besoin, apportez vosaliments darts un depot frigorifique Iocaljusqu'a ce que le congelateur
soit repare. Reportez-vous a la rubrique "EntrepOts ffigorifiques pour aliments congeles" des
pagesjaunes.
8
Table of contents
Languages:
Other Gibson Freezer manuals

Gibson
Gibson GFU21M6AW1 User manual

Gibson
Gibson GFC09M3AW1 User manual

Gibson
Gibson GFU21M6AW7 User manual

Gibson
Gibson CFU09M2HW1 User manual

Gibson
Gibson GFU14F3AW3 User manual

Gibson
Gibson GFC15M4AW5 User manual

Gibson
Gibson GFU17M4GW1 User manual

Gibson
Gibson GFU1764FWA User manual

Gibson
Gibson GFU09M2AW7 User manual

Gibson
Gibson GFU14F3HW3 User manual
Popular Freezer manuals by other brands

Beko
Beko CDA 659 F Installation & operation instructions

Electrolux
Electrolux EUC2509 Instruction book

Bühler technologies
Bühler technologies EGK 10 Brief instructions

Zanussi Electrolux
Zanussi Electrolux ZEF 90 W 1 Instruction booklet

Zanussi
Zanussi ZFU19400WA user manual

Whirlpool
Whirlpool EH120F Use & care guide