7
Care and Cleaning
(continued)
Figure1
G08D0005
Figure4
G08D0004
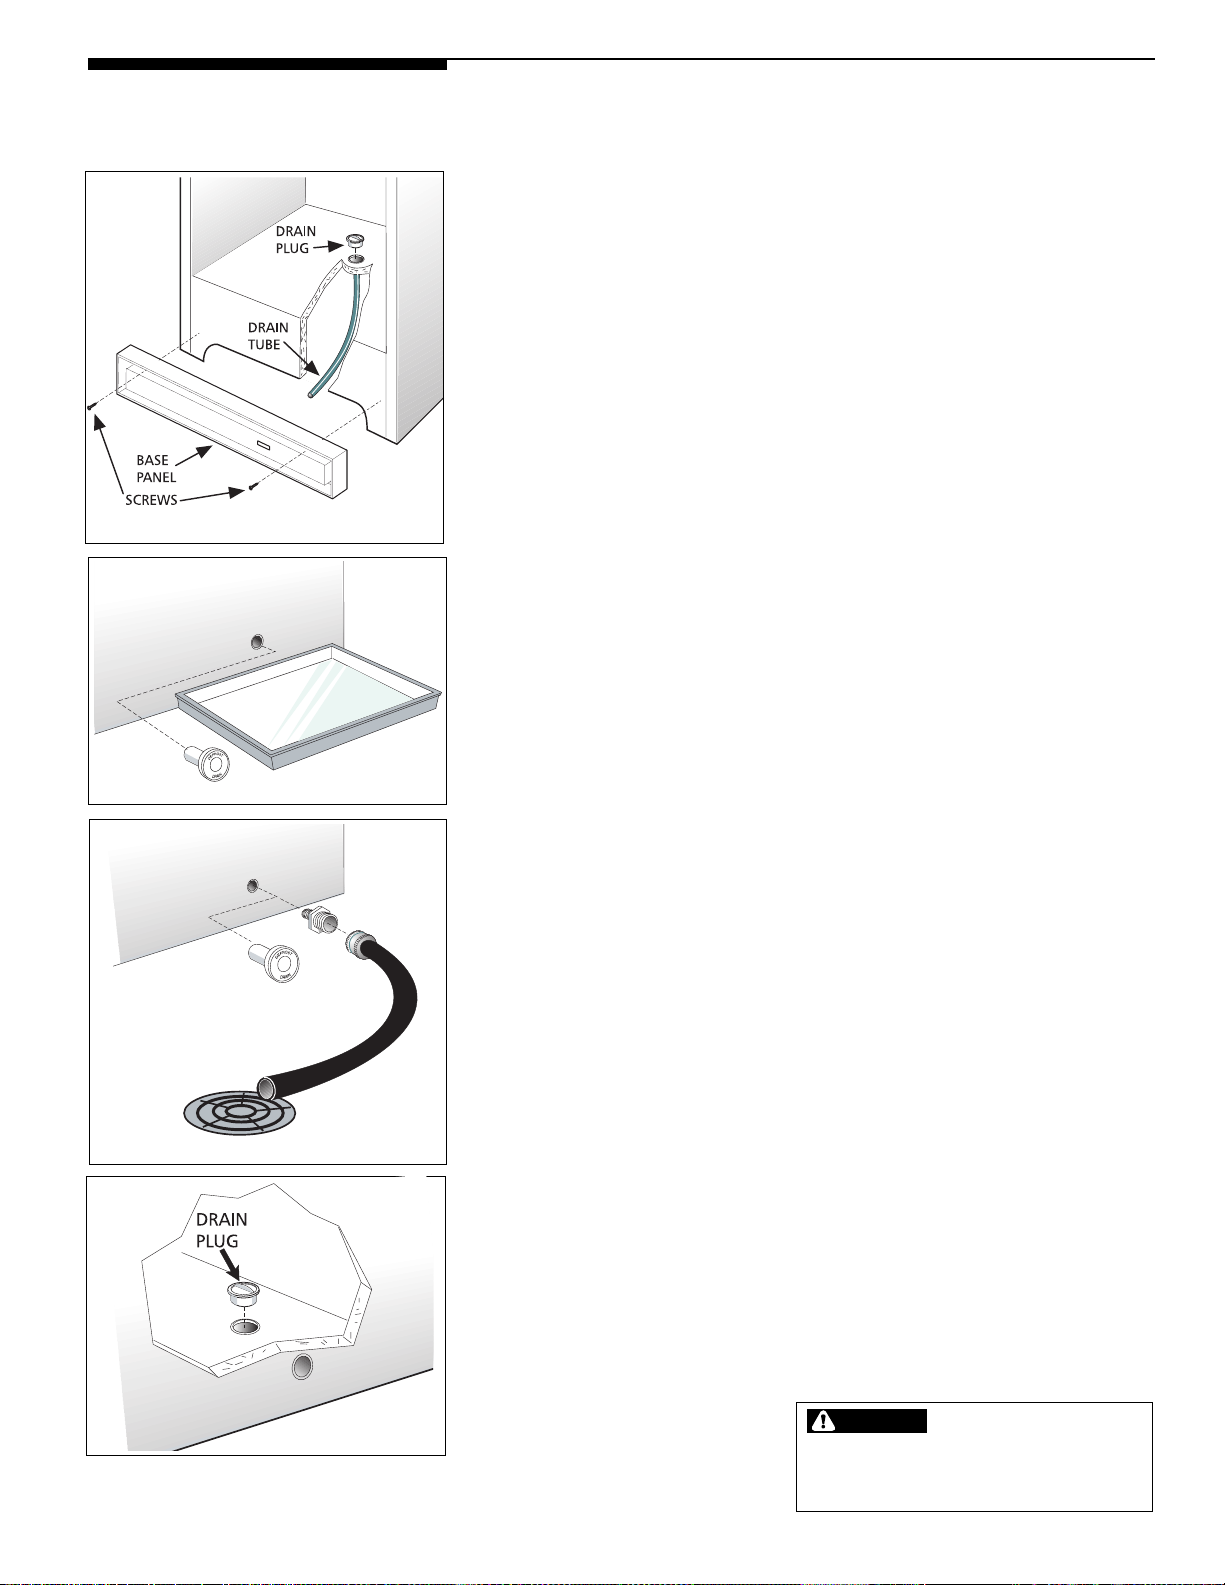
Defrosting
It is important to defrost and clean freezer when 1/4 to 1/2 inch of frost has
accumulated. Frostmay tend to accumulate faster on upper part of freezer due to
warm, moist air entering freezer when door is opened. Remove food and leave
door open when defrosting freezer.
•On upright models with a defrost drain (Figure 1), remove drain plug on the
insidefloorofthefreezerbypullingstraightout.Toaccessexternaldraintubeon
modelswitha base panel,firstremove the twoscrewsfromthe base panel. Locate
thedraintubeneartheleftcenterunderthefreezer.Placeashallowpanunder
thedraintube.Defrostwaterwilldrainout. Checkpanoccasionallysowaterdoes
notoverflow. Replacethedrain plugwhendefrostingandcleaning arecompleted.
Ifthedrain isleftopen, warmairmay enterfreezer.
•On chest models with a defrost drain, place a shallow pan or the Divider/Drain
Pan (some models) beneath the drain outlet (Figure 2). A one half inch garden
hoseadaptercanbeusedtodrainthefreezerdirectlyintoafloordrain(Figure3).
If your model is not equipped with an adapter, one can be purchased at most
hardwarestores.Pulloutthedrainpluginsidethefreezer,andpullofftheoutside
defrostdrainplug(Figure4).Defrostwaterwilldrainout.Checkpanoccasionally
sowater doesnotoverflow.Replacethedrainplugs whendefrosting iscompleted.
•On models without a defrost drain, place towels or newspapers on the freezer
bottom to catch the frost. The frost will loosen and fall. Remove towels and/or
newspapers.
• Ifthefrostissoft,removeitbyusingaplasticscraper.Ifthefrostisglazedandhard,
fill deep pans with hot water and place them on the freezer bottom. Close the
freezerdoor.Frostshouldsoften inabout 15minutes. Repeat this procedure if
necessary.
Cleaning the Inside
After defrosting, wash inside surfaces of the freezer with a solution of two
tablespoonsofbakingsodainonequart(1.136litres)warmwater.Rinseanddry.
Wring excess water out of the sponge or cloth when cleaning in the area of the
controls,oranyelectricalparts.
Wash the removable parts and door basket with the baking soda solution
mentioned above, or mild detergent and warm water. Rinse and dry. Never use
metallicscouringpads,brushes,abrasivecleaners,or alkaline solutions on any
surface. Do not wash removable parts in a dishwasher.
Cleaning the Outside
Wash the cabinet with warm water and mild liquid detergent. Rinse well and wipe
drywithaclean soft cloth. Replacepartsandfood.
Vacation and Moving Tips
ShortVacations: Leavethefreezeroperatingduringvacationsofless than three
weeks.
Long Vacations: Ifthe freezerwillnot beusedfor severalmonths,removeallfood
and unplug the power cord. Clean and dry the interior thoroughly. To prevent
odor and mold growth, leave the freezer door open slightly, blocking it open if
necessary.
Moving: Disconnect the power cord plug from the wall outlet. Remove foods, then
defrost,andcleanthefreezer. Securealllooseitemssuchasbasepanel,baskets,
and shelves by taping them securely in place to prevent damage. In the moving
vehicle,secure freezerinanupright position,andsecure topreventmovement.
Alsoprotectoutsideoffreezerwithablanket,orsimilaritem.
If leaving freezer door
open while on vacation, make certain
that children cannot get into the
freezer and become entrapped.
WARNING
Figure2
G08D0003
Figure3
G08D0002