Gira 2320 Series User manual
Operating instructions
IP flush-mounted radio
2320 ..
Gira
Giersiepen GmbH & Co. KG
Elektro-Installations-
Systeme
Industriegebiet Mermbach
Dahlienstraße
42477 Radevormwald
Postfach 12 20
42461 Radevormwald
Deutschland
Tel +49(0)21 95 - 602-0
Fax +49(0)21 95 - 602-191
www.gira.de
info@gira.de
Safety
These instructions are an integral part of
the product and must remain with the end
customer.
Accessories
• Speaker for the IP flush-mounted radio
(Item no. 2282 ..)
Intended use
• Playback of internet radio stations via
connected speakers or speakers for
mobile devices, operation of a Sonos
music system
• Possible to operate and programme
using a mobile end device (smartphone
or tablet) via Bluetooth with the Gira
System 3000 app
• Installation in DIN 49073 device box
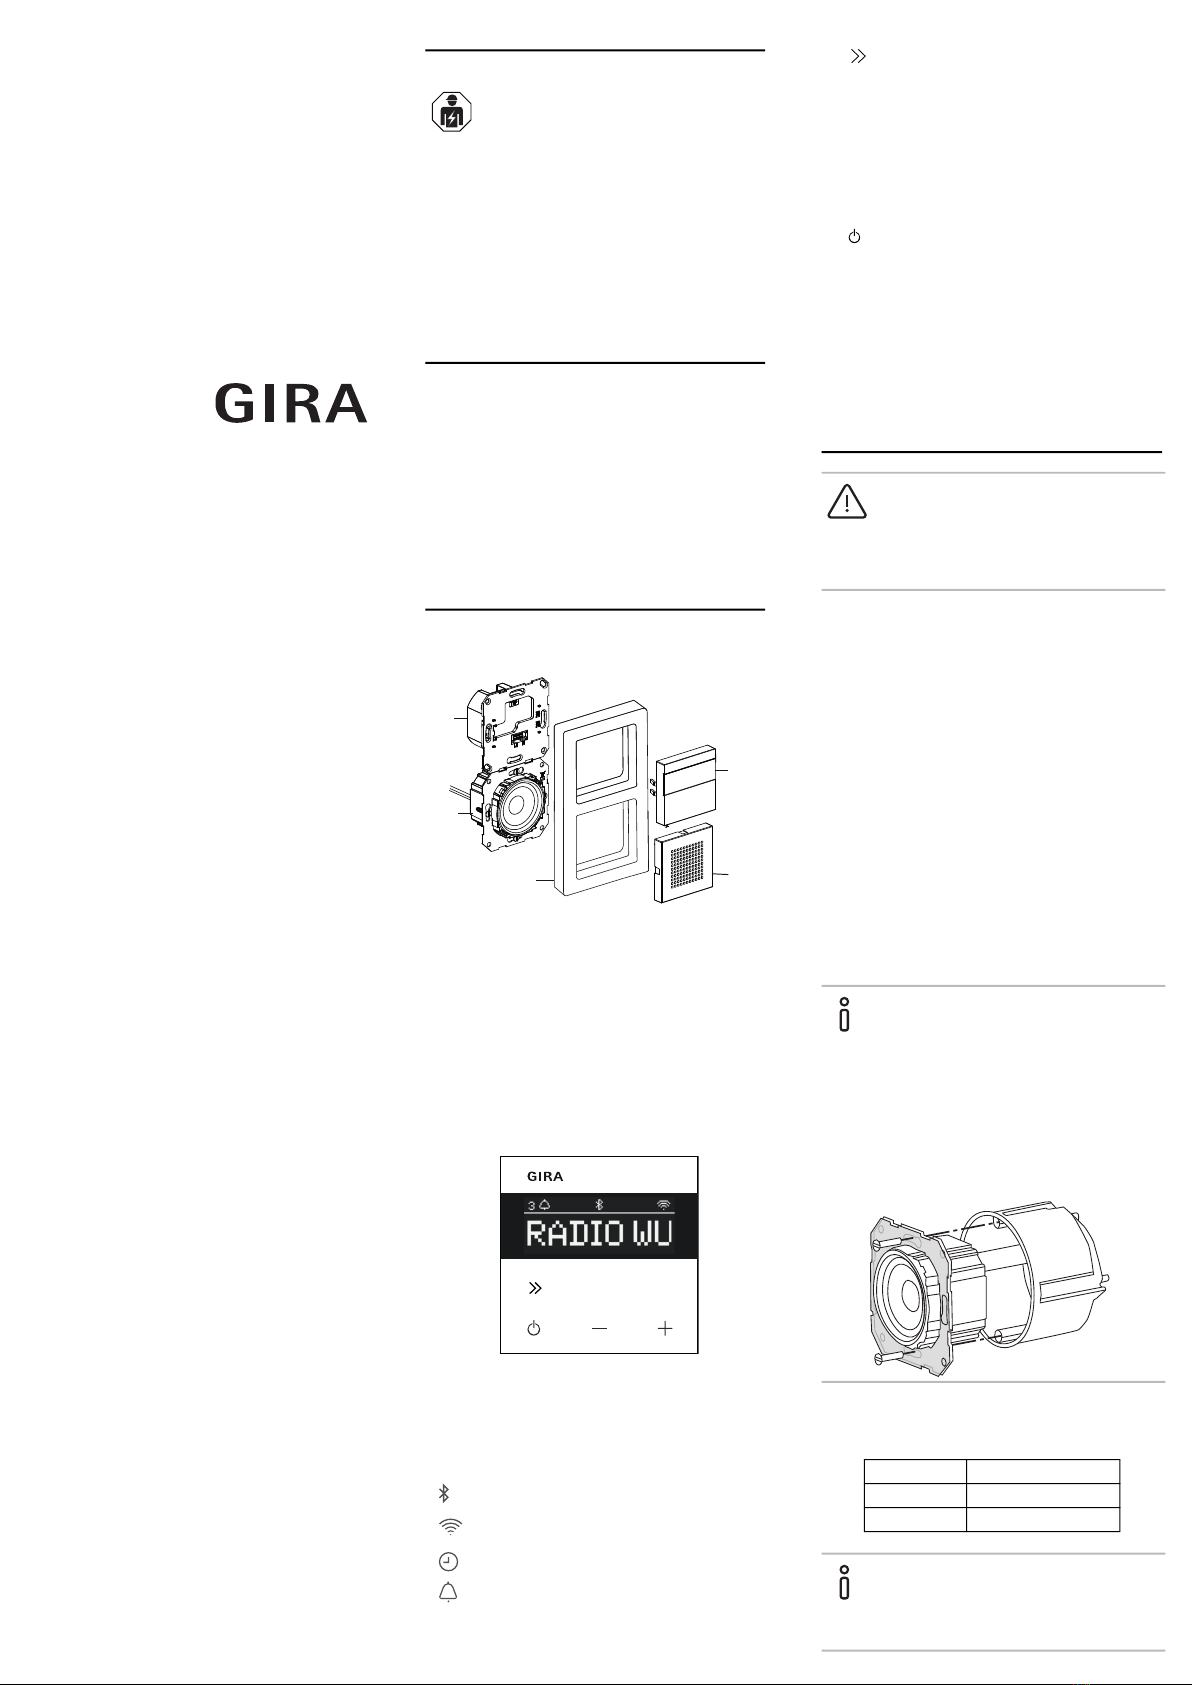
Device components
Symbols on the display
The information shown on the display may
be different, depending on the settings in
the Gira System 3000 app.
Operating surface symbols
Installation
Selecting the installation location:
• Install indoors in an area protected
against dripping and splashing water.
• If there are any electronic devices (e.g.
ballasts) in the same installation unit or
in the immediate vicinity, test on site and
increase the spacing in the event of
malfunctions.
• Recommended installation height
approx. 1.5 m
Connecting speakers (optional)
The speaker impedance must not be less
than 4 ohms!
1. Insert the speaker insert and lay the
speaker insert connection cables in the
device box of the IP flush-mounted radio
insert
.
2. Connect the speaker connection cables
to the IP flush-mounted radio insert.
Electrical devices may only be
installed and connected by a
qualified electrician!
1 IP flush-mounted radio operating top unit
with display and operating surface
2 Speaker cover
3 Cover frame
4 Speaker insert
5 IP flush-mounted radio insert
1,2,3 Favourite station active
Bluetooth connection active
WLAN connection active
Sleep mode active
Alarm clock active
12:03 Time
5
2
1
3
4
12
Press briefly: next station (radio)
or track (Sonos, Bluetooth stream)
Press and hold: previous station or
track
1, 2 Press briefly: call up favourite,
Sonos: 1-previous playlist, 2-next
playlist
Press and hold: save current
station as favourite
Press briefly: switch on or off or
set active alarm clock to snooze
mode
Press and hold: switch off
automatically after 30 minutes
(activate sleep mode) or switch off
active alarm clock when on,
activate alarm clock when off
+, - Increase or decrease volume
DANGER!
Risk of death from electric shock.
Disconnect the device. Cover any live parts.
Do not remove the support ring
seal for low-frequency
reproduction.
The support ring seal of the speaker insert
acoustically decouples the insert from the
front sound opening and improves the low-
frequency reproduction.
Do not remove the support ring seal and do
not damage it, except for piercing it with
the mounting screws.
Terminal Connection cable
+ red
- black
Mono operation!
For mono operation, connect the speaker
insert to the left channel (L+/L-).
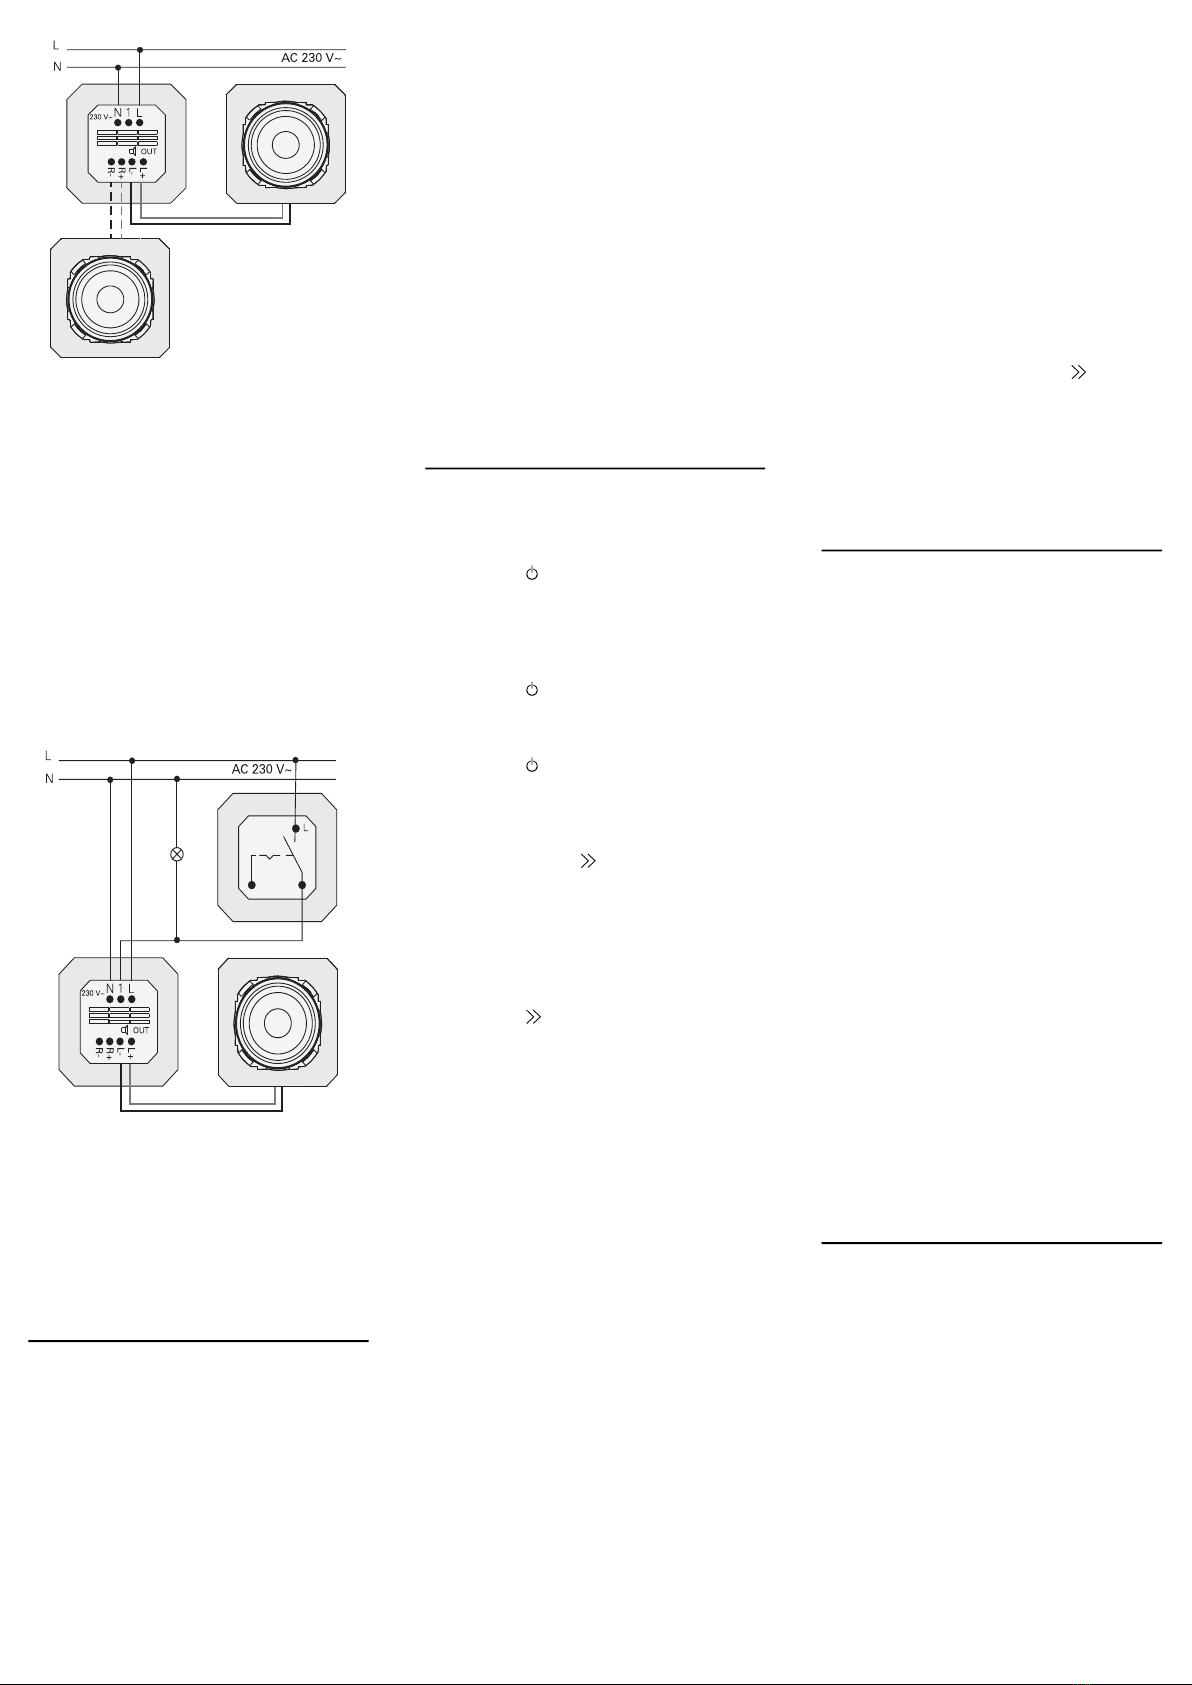
Connecting the supply voltage
3. Connect the supply voltage (230 V) to
the L/N terminals of the IP flush-moun-
ted radio insert.
Connecting auxiliary unit (optional)
The auxiliary unit can be used to switch the
flush-mounted radio simultaneously with
the lighting, for example.
After switching on, the radio may take up to
5-10 seconds to load.
4. Connect the switched phase of a switch
to the auxiliary input (1) of the IP flush-
mounted radio:
Use the same phase for the auxiliary
input and the power supply of the IP
flush-mounted radio.
Installing inserts and cover frames
5. Insert the IP flush-mounted radio insert
into the flush-mounted device box.
6. Remove the protective cover plate from
the speaker insert.
7. Position the cover frame and attach the
speaker cover and operating top unit.
Start-up
After starting the IP flush-mounted radio for
the first time or after a factory reset, the
start-up wizard will guide you through
selecting the countries and speakers.
Afterwards, you can choose to set it up with
the app or without the app (using WPS). It is
only possible to set it up as a Sonos
operating device via the app.
Setup with the app
Requirement: You must have the Gira
System 3000 app installed on a mobile end
device with a Bluetooth interface and
Android or iOS operating system.
1. Press button 2 on the IP flush-mounted
radio.
FSetup type “with the app” is selected.
2. Start the Gira System 3000 app and fol-
low the instructions.
3. At the end of the setup process, you can
choose between WLAN Radio and
Sonos Control. This selection is also
available via the device parameters in
the System 3000 App.
Setup without the app (using WPS)
1. Press button 1 on the IP flush-mounted
radio.
FSetup type “WPS” is selected.
2. Activate the WPS function on the router.
FThis establishes a WLAN connection.
FDuring start-up, the IP flush-mounted
radio saves the first 20 stations it finds.
Operation on the device
Only a light touch of the buttons is required
for operation.
Switch on
1. Press the button.
FWhen the device is switched on, the sta-
tion or track last listened to will be
played at the volume last set.
Switch off
1. Press the button.
FThe radio is switched off.
Activate sleep mode
1. Press the button for > 1 second.
FAfter 30 min, the IP flush-mounted radio
will switch off automatically.
Select the next station or track:
1. Briefly press the button repeatedly
until the desired station or track is
playing.
FEach time you press the button, the next
station or track in your favourites will be
played.
Select the previous station or track:
1. Press the button for > 1 second
repeatedly until the desired station is
playing.
FThe previous station or track from your
favourites will be played.
Changing the volume
1. Press the + or - buttons briefly to
change the volume in increments.
or
Press and hold the + or - buttons to
change the volume quickly.
FThe volume is increased or decreased.
Play favourite
1. Press button 1 or 2 or, for favourite 3,
press buttons 1 and 2 briefly at the same
time.
FThe selected favourite is played.
Save favourite
1. Press button 1 or 2 or, for favourite 3,
press buttons 1 and 2 for > 1 second at
the same time.
FOnce the favourite is saved, the memory
number is shown on the display.
Pairing the IP flush-mounted radio with
the Gira System 3000 app
Requirement: The IP flush-mounted radio
must be switched off.
1. Hold down the + button for 4 seconds.
FThe Bluetooth icon on the display will
flash, indicating that it is searching for a
connection.
2. Start the Gira System 3000 app and
search for the device.
FFollowing successful connection, the
Bluetooth symbol will light up for as long
as the Gira System 3000 app is connec-
ted to the IP flush-mounted radio.
Resetting the IP flush-mounted radio to
factory settings
1. Press and hold button 2 and at the
same time.
FAfter 4 seconds, a countdown will
appear on the display of the IP flush-
mounted radio. At the end of the count-
down, the device will be reset to factory
settings.
Technical data
Conformity
Gira Giersiepen GmbH & Co. KG hereby
declares that the wireless system type, item
no.
2320 .. conforms to Directive 2014/53/EU.
The complete item number can be found on
the device. The complete text of the EU
declaration of conformity is available at the
following web address:
www.gira.de/konformitaet
Rated voltage AC 230 V
Mains frequency 50 Hz
Input current 75 mA
Standby power ≤ 2 W
Audio output 1.5 W (8 Ω)
3.0 W (4 Ω)
Speaker impedance
4 to 16 Ω
Speaker cable Max. 20 m
Bluetooth
Wireless fre-
quency
2.402 to 2.480 GHz
Transmission
power
Max. 2.5 mW / 4 dBm
Class 2
Transmission
range
Typically 10 m
WLAN (IEEE 802.11b/g/n)
Wireless fre-
quency
2.400 ... 2.483 GHz
Transmission
power
Max. 100 mW /
20 dBm
Connection
terminals
Mains:
Speaker:
1.5 mm² to 2.5 mm²
0.5 mm² to 1.5 mm²
Installation depth 32 mm
Ambient
temperature
-5 to +45 °C
Storage/transport
temperature
-20 to +70 °C

Troubleshooting
Software update for IP flush-mounted ra-
dio
Once installed and connected, the IP flush-
mounted radio searches for new software
after 24 hours. This check then takes place
every 24 hours, even if the IP flush-mounted
radio is in standby mode. “FW Update”
appears in the display. Press button 1 to
start the update process.
Encryption protocol WPA3, WPA2
The IP flush-mounted radio can be operated
with both encryption protocols.
Encryption protocol WPA3 and WPS
Encryption protocol WPA3 does not support
the start-up process with WPS. To operate
the IP flush-mounted radio with WPS, you
must briefly set the encryption protocol on
the router to WPA2. Following start-up of
the IP flush-mounted radio with WPS, the
encryption protocol can be reset to WPA3.
As an alternative, start-up with WPA3 and
the System 3000 app is always possible.
Station list / radio favourites
• Following start-up, a station list
containing 20 radio favourites is created
automatically.
• The order in the favourites list is based
on the data available in your country/
region for the most popular radio
stations.
• The list of radio favourites cannot be
extended or reduced. Radio stations
cannot be deleted.
Station list sorting
1. Go to the menu “Set device
parameters”, followed by “Manage radio
stations”.
FList of 20 radio favourites.
2. Press the symbol on the left and
move the selected radio station to the
desired position.
You can select the first three positions of the
radio favourites directly on the IP flush-
mounted radio by pressing the button 1, 2
or [1+2].
Press the button to call up the next radio
station.
Add stations, change radio favourites
1. Go to the menu “Set device
parameters”, followed by “Find radio
stations”.
2. If necessary, change the country you
want to select for the radio station
search.
3. Scroll through the list or enter the name
of the radio station.
4. Highlight the desired radio station once
found.
FThe selected radio station is started.
5. Tap [Next] at the top.
6. Swap the new radio station with a sta-
tion from the favourites list by selecting
the station you want to swap on the
right.
7. Tap [Finished].
FThe new radio station now appears in the
radio favourites list.
Radio station interference
• Check location! Intermittent audio
interference is an indication of poor
network quality at the selected location.
Change the location or use a WLAN
repeater, for example, to improve the
network quality.
• If you select the menu “Configure
WLAN” in the System 3000 app, you will
not have any radio reception for the
duration of the network search.
• In the case of WLAN mesh networks,
reception may be lost if the IP flush-
mounted radio is relocated. In this
instance, you will have to reassign the
WLAN network to the IP flush-mounted
radio.
Bluetooth streaming
For Bluetooth streaming, the system
requires that a second Bluetooth profile also
be connected for audio transmission.
1. Go to the Bluetooth menu of your
smartphone.
2. The Gira IP radio is displayed twice. For
iOS, you will find the second Bluetooth
profile under “Other devices”.
3. “Connect” the second Bluetooth profile
to your smartphone.
FThe IP flush-mounted radio can now be
selected as a speaker in the streaming
app.
Warranty
The warranty is provided in accordance with
the statutory requirements via the retailer.
Please hand over or send faulty devices
postage paid and with a description of the
problem to your sales representative
(retailer / installation company / electronics
retailer),
who will forward the devices to the Gira
Service Centre.
Gira
Gira
Giersiepen GmbH & Co KG
Elektro-Installations-Systeme
P.O. Box 1220
42461 Radevormwald, Germany
Phone: +49 2195 602 - 0
Fax: +49 2195 602 - 191
info@gira.de
www.gira.de
Other Gira Radio manuals


