GL PacketExpert 10G User manual

Page 1
PacketExpert™ 10G (PXG100)
Quick Install Guide
Normal Instructions –Follow these precisely
DO NOT CONNECT PacketExpert™ 10G hardware unit to PC. Perform Software installation first, and then plug-in the hardware
unit to the PC.
•System Requirements:
oWindows® 7 and above (32 bit or 64 bit) Operating System.
oCore i7 or equivalent, 8 GB Memory, USB 2.0 Ports.
oEnsure that system has latest Windows® updates and service packs installed.
oTurn OFF Windows Firewall - navigate to Control Panel Systems & Security Windows Firewall, click Turn Off
Windows Firewall for all networks.
•Plug-in the USB installation stick (pen drive) provided with the shipment package by GL Communications.
•From the Windows explorer, navigate to the below installation folder within the USB drive
\PXG100-PXG101-PacketExpert10G\PXG100-PXG101-Packetexpert10G-Software
•Right-click on the PacketExpert10G.exe (for 32 -bit OS) or PacketExpert10Gx64.exe (for 64 -bit OS), and select "Run as
administrator".
•Follow the onscreen instructions to install the software. The device driver for the new hardware gets automatically loaded into
the PC but not installed as the PacketExpert™10G unit is not yet connected to the PC.
Note: After PacketExpert™10G software installation, user may be prompted for 2 additional installations - PacketExpert™Device
Driver software installation (if this is the first time PacketExpert™10G installation) and Winpcap installation. Please proceed with
these installations to complete.
•NOW, CONNECT PacketExpert™ 10G hardware
unit to power adapter and connect the power adapter
to the AC power outlet.
•Check that the power LED, next to the power inlet is
glowing blue, indicating that power supply is correct
•Then connect the PacketExpert™ 10G hardware unit
to USB 2.0 port on PC using the USB cable provided
by GL.
•At this point, the operating system detects the
PacketExpert™ 10G hardware unit and the device
driver is installed automatically.
NOTE: DO NOT CONNECT PacketExpert™ 10G to USB 3.0 Connector.
•License installation for optional applications are required. Please refer to respective application Quick Verification Guides for
installation procedure.

Page 2
PacketExpert™ 10G (PXG100)
Quick Install Guide
Quick Checkout
•For 10G Optical Interface Type, plug-in SFP
Transceivers to the optical ports and connect LC
optical cable to 10G: Ports 1 & 2, (refer to
figure).
•To launch PacketExpert10G application, right-click on the PacketExpert10G shortcut icon on the desktop and select
"Run as Administrator" to launch PacketExpert 10G application.
•The Launcher screen should invoke without any errors and display the screen as shown below. Click on Launch 10G option,
to invoke the application with 10G ports as shown in the screen below.
Note: The application may take some time to get started due to hardware and software initializations.
•On launch, All Port Bert application is loaded. Also, a default
configuration file is automatically loaded with the pre-configured settings.
Verify the Green LEDs lit on both ports indicating that the Link Status is
UP (refer to figure). If the LED shows red (refer to the figure), then link is
down.
•Similarly, you can repeat the above connecting 10G Optical Ports in
loopback with optical cables. Invoke application and click on Launch 10G
option, to verify link status.
•To perform further tests, refer to PacketExpert 10G Quick Verification
Guide.

Page 3
PacketExpert™ 10G (PXG100)
Quick Install Guide
Troubleshoot
On launching PacketExpert™10G, if you get the following error message, troubleshoot using the steps below:
•Ensure that the power adapter is connected to the PacketExpert™ 10G hardware unit and to the
AC Power on the strip or Wall. Ensure that the power strip is ON.
•Verify that the tablet mounted on the PacketExpert™ 10G hardware unit is turned ON.
•Verify that PacketExpert™10G application is launched in Administrator mode (right-click and
select "Run As Administrator").
•Turn OFF Windows Firewall - navigate to Control Panel > Systems & Security > Windows Firewall, click Turn Off Windows
Firewall for all networks.
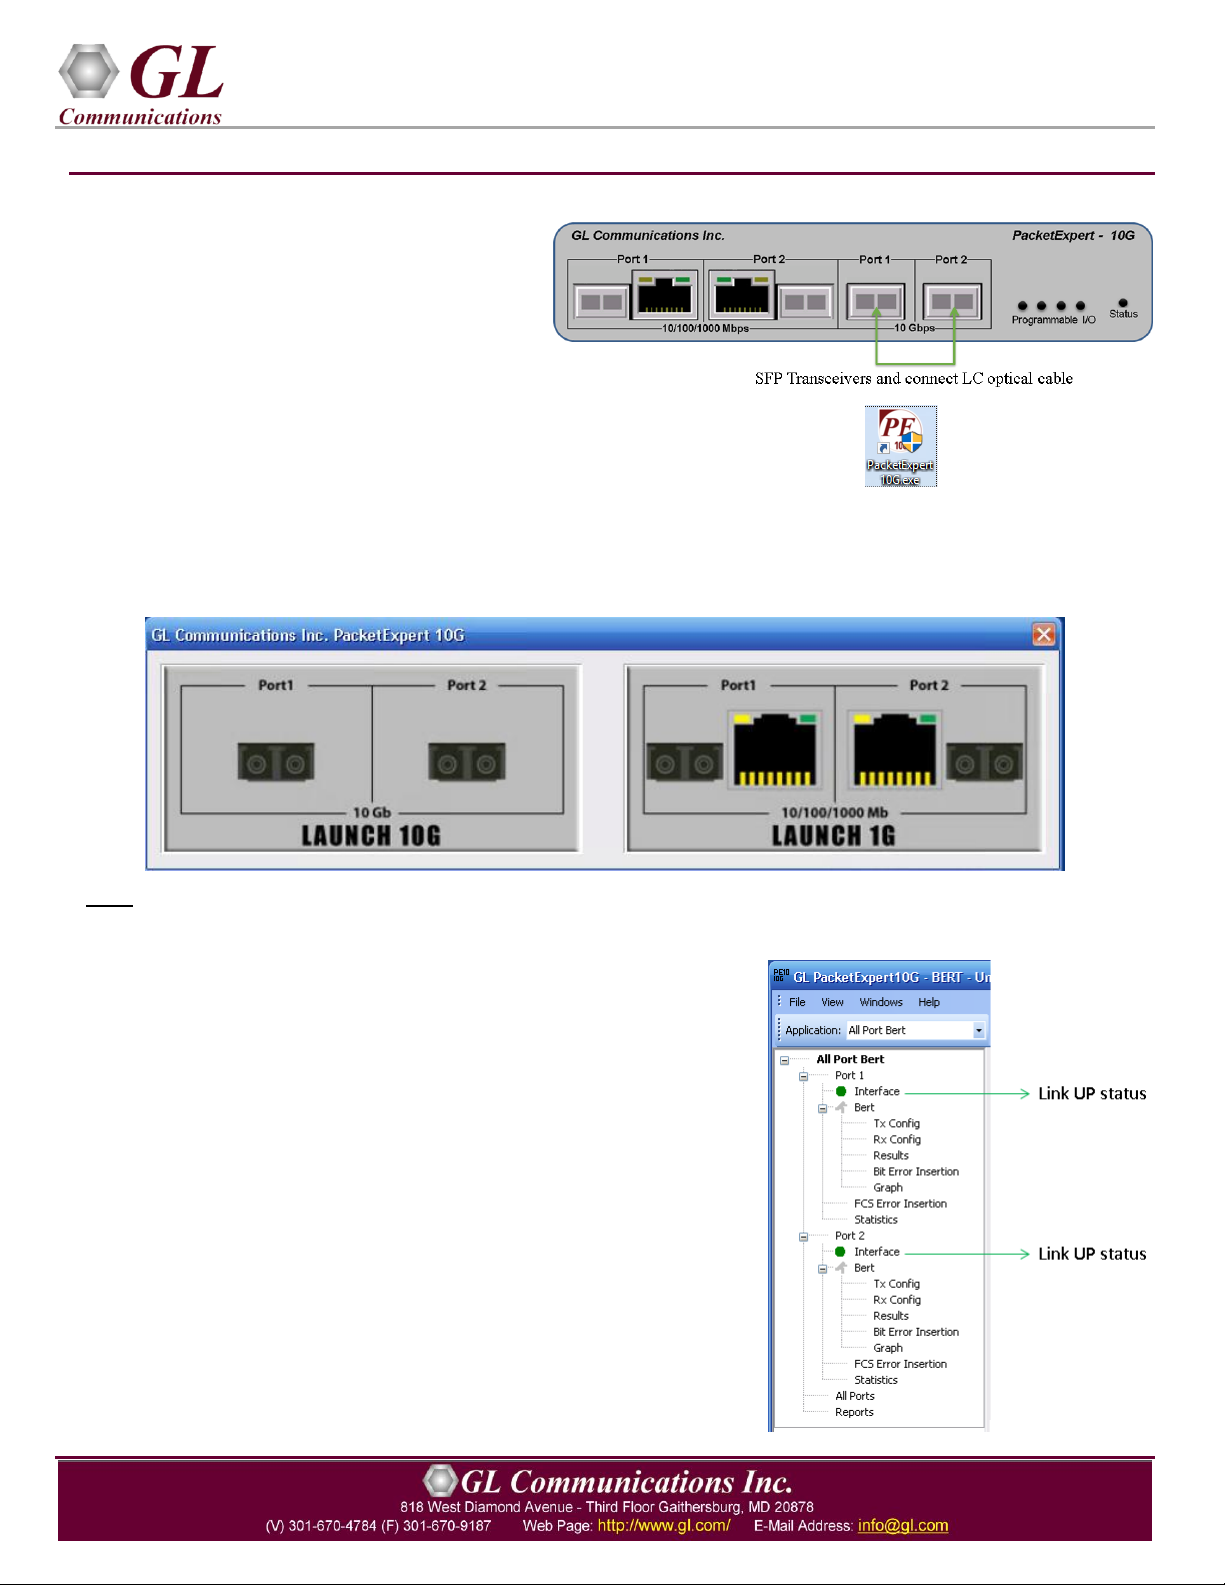
•If still link is not UP, double click "Interface" under the port in the LHS tree to launch the "Interface" dialog in one of the
RHS panes. Click the "Apply" button. This will reinitialize the port and will force it to go through the auto negotiation cycle
again.
•Secure the cables properly to ensure there aren’t any loose connections
•Check if PacketExpert™10G Board is connected to a USB 2.0 port (some USB 3.0 ports may not work correctly). If
connected to USB 3.0 port, change to USB 2.0 port.
•If the problem still persists, then the PacketExpert™ 10G USB device driver may not be installed correctly. If you connect
PacketExpert™ 10G hardware unit to the PC prior to installing the software, then the proper USB device driver will not be
installed. Do the following:
➢First, invoke Device Manager. To invoke Device
Manager window, right-click on Windows Start option
and select Device Manager from the list. (Or, go to
Control Panel System and Security System
Device Manager)
➢Under "Other Devices", check if there is an entry
named "PacketExpert" (refer to figure)
➢Right click on the device, click Update Driver option,
and choose Browse My Computer for Driver
Software and click on the Browse button.
➢Navigate to the PacketExpert™ 10G installation folder
–for example, “C:\Program Files (x86)\GL
Communications Inc\PacketExpert\” or “C:\Program
Files\GL Communications Inc\PacketExpert\”. Select
DriverFiles folder under it, and click OK. Follow the
on-screen instructions to complete the driver
installation.
➢If you are still having problems, please refer to detailed instructions in the PacketExpert™ 10G Installation Guide
provided in the USB installation (pen drive) stick.
For further queries, please contact GL Communications Inc.
Table of contents