Trio SafeTcheck Pro Logger II User manual

Pro Logger II & NaNto
oPerator's MaNuaL
SAFETCHECK OPERATOR'S MANUAL
2Introduction
2
ABOUT THE SAFETCHECK
PRO LOGGER II AND NANTO
ASafeTcheck ensures that mains powered portable appliances are compliant with the current Australian and New Zealand
Standard AS/NZS 3760 (In–service safety inspection and testing of electrical equipment).
ASafeTcheck is unique in that ensures an appliance is correctly connected prior to running a test sequence.
Most, if not all other testers, will pass an appliance even if it is not connected in accordance with the standard.
With a SafeTcheck , testing Electrical Safety of Appliances is simple, fast, accurate, thorough and safe.
You can test the safety of Class 1 (earthed) appliances, Class 2 (double insulated) appliances, 3 Phase appliances,
Fixed and Portable RCD's and Extension Leads in accordance with the standard, simply and efficiently. There is no
interpretation, no ambiguity, just a simple PASS or FAIL.
N1913N2068
A SafeTcheck is an electrical Portable Appliance Tester
(PAT), designed and manufactured in Australia. It has
been designed to comply with Australian Standards
AS3100 & AS3760 to maximise user safety.

TRIO TEST & MEASUREMENT
3
Copyright 2015 all rights reserved
General Information
Testing of appliances with a SafeTcheck 04
Frequency of electrical safety testing 05
Function and basic technical specification 06
Available options and accessories 08
Preparation of the appliance prior to safety testing 09
Operating a SafeTcheck
Operating a SafeTcheck 10
Safety testing earthed appliances 11
Safety testing double insulated appliances 13
Safety testing mains leads 15
Safety testing other appliances (Other Appliance menu) 16
Run testing (Leakage current test) 18
Run testing earthed (class 1) appliances 19
Run testing double insulated (class 2) appliances 20
Run testing 3 Phase appliances (Option – Pro Logger II only) 21
RCD Tester 22
High current earth test (Option - Pro Logger II only) 24
Battery Power (Standard on Nanto; Option on Pro Logger II) 25
Utilities Menu (F2 key) 26
Info display (F1 key) 29
Other Information
Data Logger operating instructions 30
Scanner Setup 34
Appendix A: Important Information regarding the Probe & Stainless Steel Cloak 35
For more information regarding the electrical testing of Portable Electrical Appliances such as Frequently Asked Questions
(FAQs), information relating to the standard AS/NZS 3760, more options for the SafeTcheck, the most recent updates in relation
to the SafeTcheck and for general information relating to Portable Appliance Testing go to our Appliance Testing website:
www.safetcheck.com.au
For all other general Test & Measurement Instrumentation go to our TRIO Test & Measurement website:
www.triotest.com.au
Contents

SAFETCHECK OPERATOR'S MANUAL
4General Information
A SafeTcheck will test most 240V 50Hz single phase class
1 and 2 electrical appliances and extension leads to comply
with the current electrical safety standard AS/NZS 3760. It
will also test, RCDs (both fixed and portable) and 3 Phase
appliances (option for Pro logger II only). Appliances with
characteristics which may require modified test parameters
(in accordance with the standard) may be found in the
OTHER APPLIANCE menu.
If you experience difficulties or doubts in testing certain
appliances please contact TRIO Test & Measurement.
SafeTchecks are designed & manufactured in Australia to
comply with Australian Standards AS3100 & AS3760 to
maximise user safety.
TRIO Test & Measurement
Sales, Technical & Service Enquiries
Phone 1300 852 402
Fax 1300 853 409
safety@triotest.com.au
www.SafeTcheck.com.au
General Test & Measurement enquiries
Phone 1300 853 407
sales@triotest.com.au
www.triotest.com.au
The testing of appliances with a SafeTcheck
SafeTcheck Models
Pro Logger II Nanto

5
Copyright 2015 all rights reserved
Frequency of electrical safety testing
Guide only
The minimum recommended frequency of safety testing of electrical equipment is specified in Australian Standard for in service
testing AS/NZS 3760.
Type of environment in which
equipment is used
Earthed
Appliance
Double Insulated
Appliance
Extension
Cords
Factories, shops & places of work manufacturing,
repair, maintenance or construction
6 months 12 months 6 months
Office environment where equipment is not subject
to constant flexing of the supply cord
5 years 5 years 12 months
Other commercial environments, e.g. tea rooms, office,
kitchens, health care studios, with no protection
12 months 12 months 6 months
Construction and Demolition sites 3 months 3 months 3 months
Hire equipment Before each hire Before each hire Before each hire
Note: Some organisations may alter these periods based on a documented risk assessment, undertaken in accordance
with the process specified in AS/NZS 4360 (see AS/NZS 3760 for details).

SAFETCHECK OPERATOR'S MANUAL
6General Information
Mains Power Outlet Check (may be factory disabled for
some situations)
The mains power outlet supplying a SafeTcheck is checked
for the existence of an Earth, Active-Neutral transposition and
Mains voltage tolerance.
Earthed appliances are tested for:
Note: If the appliance requires mains power to energise
its On/Off switch (and the switch must be “on” to
complete the mains electrical circuit), a SafeTcheck can
conduct a Current Leakage Test (Run Test) to ensure
Leakage Current is <= 5mA.
Double insulated appliances are tested for:
(unique to a SafeTcheck and an alternative
to Probe Mode) ensures the stainless steel cloak is correctly
in place to provide a return path for any leakage current
during the insulation resistance test
Note: If the appliance requires mains power to energise
its On/Off switch (and the switch must be “on” to
complete the mains electrical circuit), a SafeTcheck can
conduct a Current Leakage Test (Run Test) to ensure
Leakage Current is <= 1mA.
Extension/Mains leads are tested for:
Test duration
Electrical stress test parameters
Run test (leakage current test)
earth – compliant with AS3100)
RCD Tester conducts a Lead Test and then an RCD Test
(measured at 0° and 180° crossing)
3 Phase Appliance Testing (when fitted – Pro Logger II only)
available)
Note: *0.2, 10 & 25A test currents are available with
the High Current Earth Bond Option (Pro Logger II only).
Minimum Order Quantities (MOQ) apply for this option.
Function and basic technical specification
ASafeTcheck has been designed and manufactured
to comply with Australian Standards AS3100 & AS3760
to maximise user safety

TRIO TEST & MEASUREMENT
7
Copyright 2015 all rights reserved
Display LCD to indicate:
LEDs to indicate:
Run Test sockets)
Data Logging
- Logging can be switched on/off
- Individual Fields can be switched on/off
SafeTcheck's
memory or in real time via 'Data Dump'
to the USB port (real time is for use with 3rd party software)
accidental loss of data (i.e. no over writing of stored data)
Power requirements
240V AC +/–10% @ 50Hz (115V AC model available)
Battery power standard on the Nanto and an option on the
Pro Logger II – see section Battery Power
The mains power outlet supplying the SafeTcheck is checked
for (Mains Power Outlet Check):
Test inlets
standard 240V Plug on the Pro Logger II only), protected
from accidental application of 240V 50Hz mains voltage
indicate active Test Socket
Operating instructions
Warranty
24 months warranty against faulty workmanship and parts
(Batteries are not included in this warranty).
Lifetime warranty available – conditions apply (check online
at www.SafeTcheck.com.au).
Lifetime warranty
Check online at www.SafeTcheck.com.au for a lifetime
Calibration period
Recommended every 12 months (or 24 months with a
verification at alternate 12 months – contact TRIO for details)
Repairs and calibration (Cradle to Grave care)
SafeTcheck PATs can only be calibrated (with adjustment)
by TRIO Test & Measurement Service Centres. Continued
calibration at a TRIO Service Centre ensures a Lifetime
Warranty.
We recommend that a SafeTcheck is returned to a
TRIO Test & Measurement Service Centre for repair and/
or calibration. In doing so you are assured that any recent
enhancements to the Hardware & Firmware, where applicable
to your SafeTcheck,will be included in the calibration
and/or repair.
Note 1: Tolerance on all stated values is ±5% unless
otherwise stated.
Note 2: TRIO Test & Measurement reserves the right to
change specifications at any time without notice.
Function and basic technical specification
Contact TRIO Test & Measurement
or go to www.SafeTcheck.com.au
for more detail

SAFETCHECK OPERATOR'S MANUAL
8General Information
We have developed options and have a range of accessories to complement the SafeTcheck
Accessories
3 Phase Appliance Tester (20 & 32A Sockets - Pro Logger II only)
(Standard on Nanto, option on the Pro Logger II)
Batteries and Batter Charger (suitable for the Nanto only)
Carry Case & Accessories for the Nanto only
Stainless steel cloak (350 x 600mm)
Figure 8 & Clover Leaf to IEC Mains adaptors
Large 'suitcase' style carry cases
Scanner and/or memory upgrade to 2000 records
Data & Asset Management Software
Tag Printers (mains or battery)
Test tags (with optional company logos & barcodes)
Barcoded item stickers, tested labels and danger tags
Removable lid (Pro Logger II with Pelican Case only)
Note: *Pro Logger II only. Minimum quantities apply for
these options
Available options and accessories
For more information please
contact TRIO Test & Measurement
on 1300 852 402 or visit
www.SafeTcheck.com.au
9
Copyright 2015 all rights reserved TRIO TEST & MEASUREMENTS
General visual inspection
1 Ensure the appliance to be safety tested has no obvious
mechanical faults and is free from external damage.
2 Inspect the mains lead for any damage, defects or loose
terminals
in
the
accessories,
connectors,
plugs or outlet
sockets. Common faults encountered:
a) Frayed, cracked or otherwise damaged mains lead.
b) Exposed conductors and/or covered by insulation tape.
c) Abrasions in the outside insulation jacket.
d) Mains lead anchorage at plug or appliance entry.
3 Check that any controls, alarms and replaceable protective
devices accessible to the user, are of correct rating and in
good working order.
4 Inspect all switches and speed controls for mechanical
operation; ensure switches and controls are clear of any
obstruction, e.g. filings, swarf, metal particles, grease, etc.
5 Confirm all identity tags/labels etc. pertaining to the
frequency of safety testing are correctly attached and
records of all test/inspections are kept to ensure the safety
integrity and history of the appliance.
6 Unroll extension leads and inspect as above.
Identify the type of appliance to be tested
Examine the appliance to be tested and identify whether the
appliance is an earthed appliance, a double insulated appliance
or an extension cord.
Earthed appliances will always have an earth pin on their plug,
and may have exposed metal components.
Double insulated appliances may be identified by the double
insulation symbol, and/or by the absence of an earth pin on
a moulded socket (if not misssing or deliberately removed).
Note 1: Many double insulated tools are colour coded blue.
Note 2: If any doubt exists about the Class of an appliance
(Class I or II), the appliance should be tested as an earthed
appliance first (see also OTHER APPLIANCE menu).
Preparation of an earthed appliance to be safety tested
1 Switch any/all switches ‘ON’.
2 Set any speed control or thermostat to ‘FULL ON’
(Maximum speed).
3 Preparation for earthed appliance to be safety tested is now
complete and may be connected to the SafeTcheck.
(see Safety Testing Earthed Appliances)
Preparation of a double insulated appliance to
be safety tested
1 Switch any or all switches to the ‘ON’ position.
2 Set any speed control or thermostat to ‘FULL ON’
(Maximum speed/temperature).
3 If not in Probe Mode, preparation for a double insulated
appliance to be safety tested requires the appliance to
be wrapped in a stainless steel cloak taking care to make
contact with all metal components and the exterior of the
appliance where hand contact is normally possible.
4 The double insulated appliance is now ready to be safety
tested and may be connected to the SafeTcheck.
(see Safety Testing Double Insulated Appliances)
Note: The above description regarding the inspection
and testing of electrical appliances is a guide only.
Please refer also to the current standard AS/NZS 3760.
WARNING
Upon completion of a safety test and subsequent
removal of test lead and/or stainless steel cloak, please
ensure all switches, speed and thermostat controls are
returned to their ‘OFF’ or minimum position.
Preparation of the appliance prior to safety testing

SAFETCHECK OPERATOR'S MANUAL
10 Operating Instructions
Place the SafeTcheck on a convenient non–conductive
working surface. Insert the mains plug into a correctly wired and
earthed mains power outlet. The following sequence will occur:
1 Thereareaseriesofshortbeeps,apauseandasingle shortbeep;
2 The Start Prompt appears on the Liquid Crystal Display (LCD);
(If the Data Logging function is turned on then the Time
and Date and Memory used is displayed. Pressing reset
after each of these screens will display the Start Prompt). To
3 The TEST and FAIL LEDs flash momentarily.
The SafeTcheck is now ready to perform Appliance
Safety Testing.
ANY DEPARTURE FROM THESE CONDITIONS MAY
MEAN THE SAFETCHECK HAS A FAULT AND SHOULD
BE RETURNED TO A TRIO TEST & MEASUREMENT
SERVICE CENTRE FOR SERVICE.
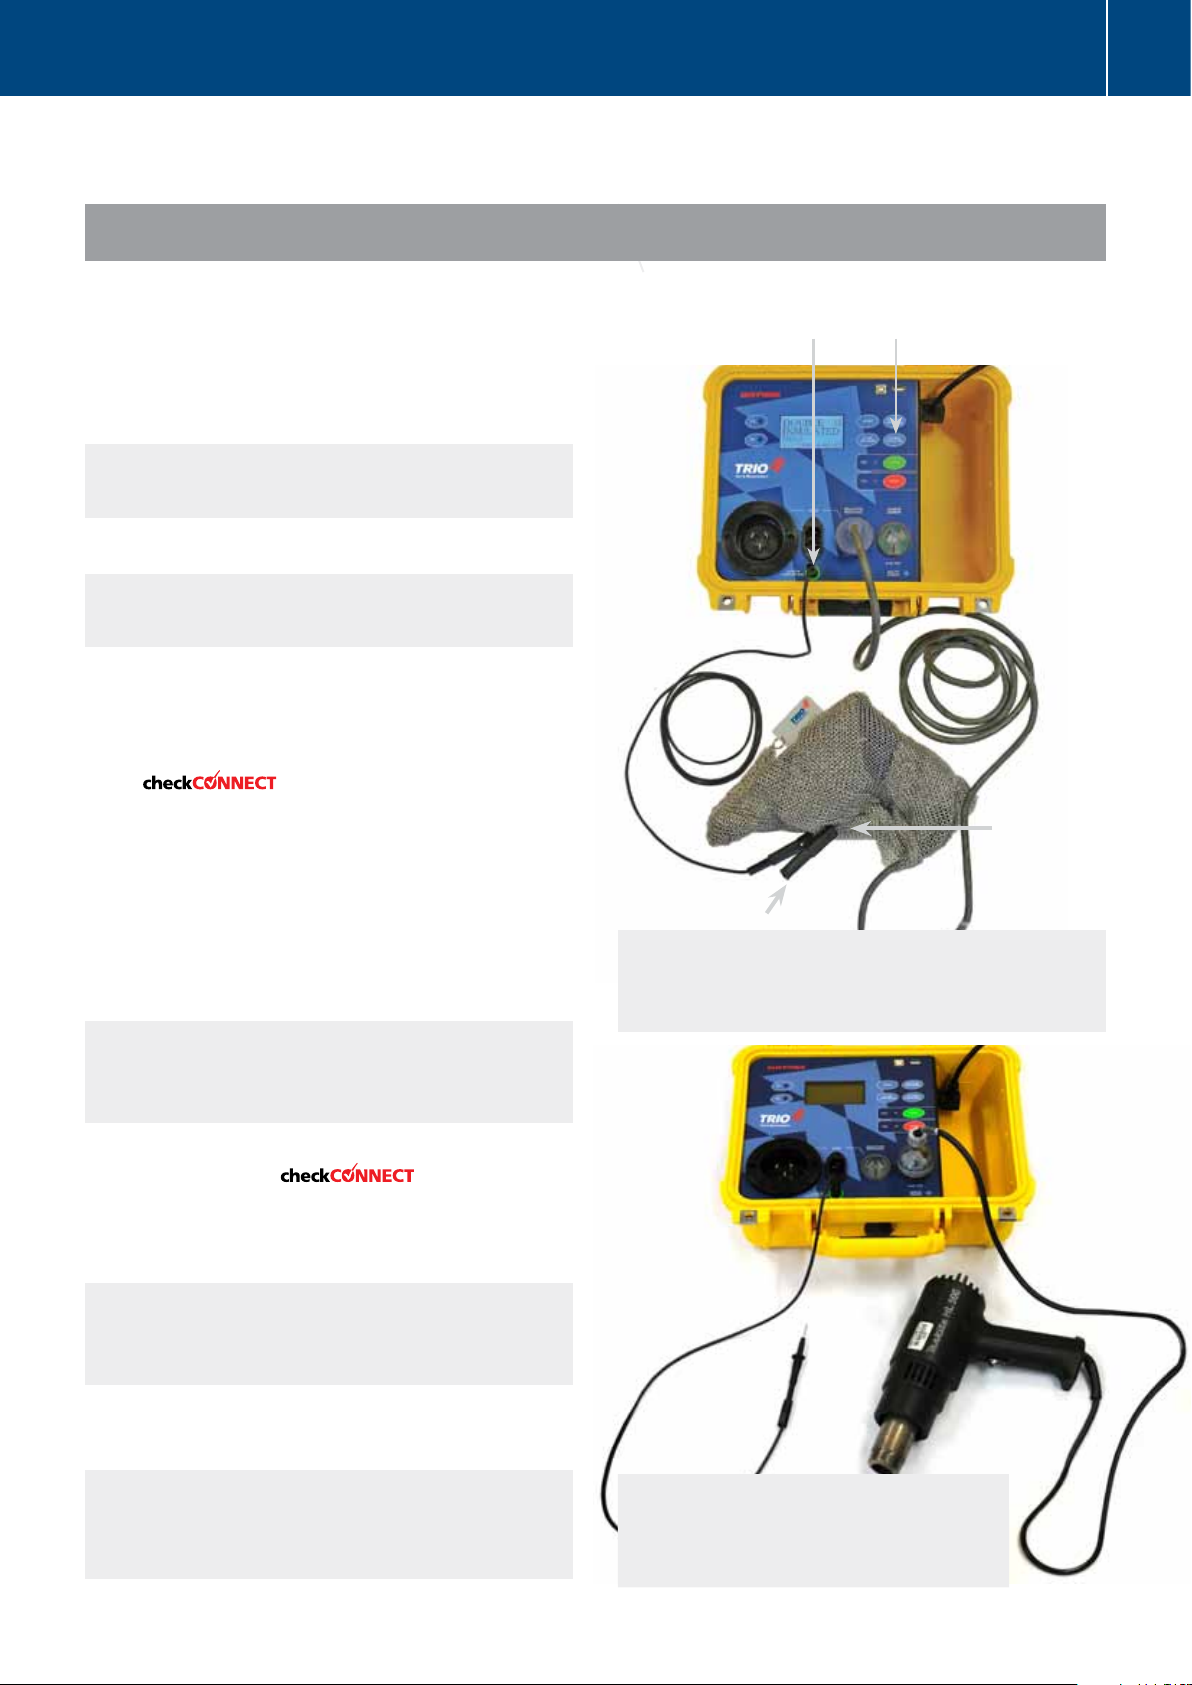
(F1 & F2)
INFO DISPLAY (F1)
UTILITIES MENU (F2)
LCD
DISPL AY
APPLIANCE
SELECTION
START TEST
RESET
(RUN TEST) COMPLIES
WITH AS 3100
INSULATION
ACCESSORY
WELL
(3 PHASE OPTION)
ONLY
STANDARD
ONLY – NANTO
COMES WITH
ADAPTOR CABLE
STANDARD IEC
COMPUTER I/F
USB PORT
SCANNER (USB PORT)
MAINS POWER
Note: a Test Socket's
LED will flash to indicate
which socket is active
Note 1: If a message appears on the LCD indicating an
Active/Neutral reversal or an Earth fault then there is a
problem with the power outlet supplying the SafeTcheck.
At this point the tester will cease to function, preventing
any appliance testing being performed under fault
conditions. Either the power outlet fault must be corrected
prior to proceeding or an alternate power outlet used to
power the SafeTcheck.
*Note 2: In some earlier models of the Pro Logger II
with dual USB ports, when using the Scanner together
with the Keyboard, connect the Keyboard to the Scanner’s
“Keyboard Wedge Cable” via the PS/2 connection.
Connecting the keyboard and scanner via separate USB
ports will occasionally cause the keyboard to send spurious
characters to the Pro Logger II while scanning barcodes.
Operating a SafeTcheck
(shows Pro Logger II layout only – Nanto features are similar)

TRIO TEST & MEASUREMENT
11
Copyright 2015 all rights reserved
1 Ensure the SafeTcheck is in the ready to test mode
i.e. the Start Prompt appears on the LCD Display.
2 Plug the appliance to be tested into the socket labelled
INSULATION RESISTANCE provided on the front panel
of the SafeTcheck. The appliance should be connected
directly and not via an extension lead.
3 Connect the Return Lead to the unit via the Earth Return
Socket
4 Connect the Return Lead to a convenient metal (conductive)
point of the appliance under test.
If any earthed appliance has one or more metal components
which are possibly not connected together, the overall test
must be repeated with the Return Lead connected to each
metal component in turn.
5 Switch the appliance to be tested ‘ON’
Note: Any or all switches must be "on" to ensure testing
of the appliance's complete electrical circuit.
6 If the appliance to be tested has a variable speed or
thermostat control fitted, turn the control to its highest
setting, this will connect Active/Neutral direct to the internal
windings.
7 Select EARTHED APPLIANCE. The SafeTcheck is now
ready to test the appliance.
5 Switch the appliance to be t
ested ‘ON’
Note: If Data Logging is switched on then additional
information will be requested. See section entitled
”Data Logging”
The green indicator alongside "Start" will now be flashing.
5 Switch the appliance to be t
ested ‘ON’
Note: During the test cycle the user should apply stress to
the supply lead and plug in order to detect any intermittent
faults. This is a ‘real world’ dynamic test.
8 Test results will be displayed on the LCD along with audible
tones and flashing LEDs.
a) Pass – 'Thumbs Up' and PASS indication on LCD
along side "Start".
b) Fail – 'Thumbs Down' and/or LCD Prompt indicating
the most probable reason for failure with:
The measured value (if enabled), a continuous BEEP
and a RED indicator flashing alongside "Reset".
Note 1: A FAIL indicating “poor continuity” denotes lack
of a circuit path between the Active and Neutral of the
appliance. If the appliance switch is on and this error
occurs then go to the RUN TEST.
WARNING
To avoid uncertain results when testing an earthed
appliance, ensure that:
1 The earth clip is securely attached to the
metal frame.
2 The appliance under test has been disconnected
from all other equipment.
3 The test is conducted on an insulated or
(non metallic) benchtop.
Note 2: For a FAILED earthed appliance known to be
fitted with surge protection i.e. metal oxide varistors
(MOVs), test again using Class 2 (250V) test, see
OTHER APPLIANCES.
Note 3: For appliances with no class identification, no
accessible earth and having 3 pins on the plug, a standard
earthed appliance test may fail, see OTHER APPLIANCE
menu.
Evaluation of in–service testing results for
erthed appliances
Evaluation of in–service testing results for earthed appliances
Where the SafeTcheck identifies an appliance which fails
to comply with the test criteria, the equipment shall be:
1 Withdrawn from service immediately and have a label
attached to it warning against further use.
2 Repaired by the appropriately qualified
person and retested after repair.
3 Refit test identity tags/labels etc. and log
test in safety history records.
WARNING
Upon completion of a safety test and subsequent removal
of test lead and/or stainless steel cloak, please ensure all
switches, speed or thermostat controls are returned to
their ‘OFF’ or minimum position.
Safety testing earthed appliances

SAFETCHECK OPERATOR'S MANUAL
12 Operating Instructions
SWITCH APPLIANCE ON AND
SET THERMOSTAT OR SPEED
CONTROL TO MAXIMUM
RETURN LEAD
AND CLAMP
(CLASS I & II)
SELECT
EARTHED
APPLIANCE
TEST
Safety testing earthed appliances
TRIO TEST & MEASUREMENT
13
Copyright 2015 all rights reserved
SELECT DOUBLE INSULATED
APPLIANCE TEST
1 Ensure the SafeTcheck is in the ready to test mode
i.e. the Start Prompt appears on the LCD Display.
2 Plug the double insulated appliance to be tested
into the socket labelled INSULATION RESISTANCE
provided on the front panel of the SafeTcheck.
Note: The appliance should be plugged in directly,
and not via extension leads, unless instructed to do so
3 Switch the appliance to be tested, 'ON'
5 Switch the appliance to be tested ‘ON’
Note: Any or all switches must be "on" to ensure
testing of the appliance's complete electrical circuit.
4 If the appliance to be tested has a variable speed or
thermostat control fitted, turn the control to its highest
setting, this will connect Active/Neutral direct to the internal
circuit.
5 if in mode, wrap the appliance in the
stainless steel cloak, taking care to make contact with all
metal components and the exterior of the appliance where
human hand contact is normally possible.
If the SafeTcheck is set to Probe Mode then see section
entitled Probe Mode at the end of this section
The stainless steel cloak may also be woven metal cloth
mesh, conductive braid, aluminium foil, or other suitable
flexible conductor with low resistance.
Note: The wrapped appliance should be on an
insulated bench to avoid earthing the measurement
circuit in the SafeTcheck.
6 Connect the Clamp of the Return Lead to the stainless
steel cloak as shown. ensures the
Clamp is connected to the stainless steel cloak.
7 Select DOUBLE INSULATED.
The SafeTcheck is now ready to test the appliance.
5 Switch the appliance to be t
ested ‘ON’
Note: If Data Logging is switched on
then additional information will be requested.
See section entitled ”Data Logging”
The green indicator alongside "Start" will now be flashing.
8 Switch the appliance to be tested ‘ON’
Note: During the test cycle the user may apply stress to
the supply lead and plug in order to detect any intermittent
faults
RETURN LEAD AND
CLAMP OR PROBE
Safety testing double insulated appliances
Note: Use the probe to make contact with
metal exposed parts and insulated surfaces.
See section entitled "Utilities Menu" for more
information about the Probe Mode
Note: Switch appliance on & Set appliance thermostat
or speed control to maximum. See also Appedix A for
details relating to using the Stainless Steel Cloak.
STAINLESS
OR PROBE
ON SURFACE

SAFETCHECK OPERATOR'S MANUAL
14 Operating Instructions
9 During the test cycle the SafeTcheck's
will check that the stainless steel cloak and return lead are
correctly connected. This will ensure that the correct test
environment is present to measure the insulation resistance
of a double insulated appliance. is a unique
feature of the SafeTcheck Portable Appliance Testers.
10 If the verification test passes the SafeTcheck will continue
with the double insulated appliance test.
If the verification test fails then it maybe for one or more of
the following reasons:
a) has found the double insulated
appliance is not correctly wrapped or connected to the
return lead for double insulated appliances.
b) The assumed double insulated appliance is in fact an
earthed appliance.
c) The double insulated appliance is connected to the
SafeTcheck via a non–compliant extension cord.
d) The appliance is earthed via another path
such as a metal earthed bench.
e) Both active (A) and neutral (N) leads are open circuited
in the appliance e.g. failure to turn ‘ON’ appliance
switch(es).
f) The resistance of the stainless steel cloak around the
appliance is too high.
g) The appliance has low capacitive coupling between the
external surface (the stainless steel cloak) and the internal
electrical circuit. Place some of the mains cable under the
Cloak to overcome this problem. This may apply to some
appliances with minimum internal circuitry e.g. a plastic
bedlamp, a vacuum cleaner where the motor is separated
by a relatively large distance from the case, or a mobile
phone charger.
11 Test results will be displayed on the LCD along with audible
tones and flashing LEDs.
a) Pass – C'Thumbs Up' and PASS indication on LCD
along side "Start".
b) Fail –
C
'Thumbs Down' and/or LCD Prompt indicating
the most probable reason for failure with: The measured
value (if enabled), a continuous BEEP and a RED indicator
flashing along side "Reset".
A FAIL indicating “poor continuity” denotes lack of
a circuit path between the Active and Neutral of the
appliance. If the appliance switch is on and this error
occurs then go to the RUN TEST.
For a FAILED double insulated appliance known to be
fitted with surge protection i.e. metal oxide varistors
(MOVs), test again using Class 2 (250V) test, see
OTHER APPLIANCE menu.
For appliances with no class identification, no accessible
earth and having 3 pins on the plug, a standard double
insulated test may fail, see OTHER APPLIANCE menu.
PROBE MODE
If for some reason it is not practical to use the stainless
steel cloak, then Probe Mode may be used. In
Probe Mode a test may proceed without a return lead
connected. This will ensure a 'Pass" for the test but
a valid test will not have been performed. To
bypass , switch to Probe Mode, see
OTHER APPLIANCE menu.
Evaluation of in–service testing results
Where the SafeTcheck identifies an appliance/tool which fails
to comply with the test criteria the equipment shall be:
1 Withdrawn from service immediately and have a label
attached to it warning against further use.
2 Repaired by the appropriately qualified person and retested
after repair.
3 Refit test identity tags/labels etc. and log test in Safety
History records.
WARNING
Upon completion of a safety test and subsequent removal
of test lead and/or stainless steel cloak, please ensure all
switches, speed or thermostat controls are returned to their
‘OFF’ or minimum position.
Note: may be turned off by switching to
Probe Mode. See the UTILITIES MENU.
Safety testing double insulated appliances

TRIO TEST & MEASUREMENT
15
Copyright 2015 all rights reserved
1 Plug the extension lead into the plug and socket labelled
LEADS provided on the front panel of the SafeTcheck. An
adaptor lead (IEC to Aust. plug) is provided for the Nanto.
2 Select LEADS. The SafeTcheck is now ready to test the
appliance. The green indicator alongside "Start" will now be
flashing.
Note 1: The appliance should be on an insulated
bench to avoid earthing the measurement circuit in the
SafeTcheck.
Note 2: If Data Logging is switched on then additional
information will be requested. See section entitled ”
Data Logging”
Note 3: During the test cycle the user may apply stress
to the supply lead and plug in order to detect any
intermittent faults
3 Test results will be displayed on the LCD along with audible
tones and flashing LEDs.
a) Pass – C'Thumbs Up' and PASS indication on LCD
side "Start".
b) Fail –
C
'Thumbs Down' and/or LCD Prompt indicating
the most probable reason for failure with: The measured
value (if enabled), a continuous BEEP and a RED indicator
flashing along side "Reset".
SELECT
LEADS
TEST
Note 1: If the extension lead has a fixed socket (as in
extension reels), this must be connected to the fixed test
plug on the SafeTcheck with a short TEST extension lead
of rated voltage and current, which has been previously
tested and verified SAFE. Normally, extension leads must
be tested individually and not cascaded.
Note 2: If EPODs are fitted with surge protection i.e.
metal oxide varistors (MOVs), they may fail the LEADS
test. If so, test again using EPOD (250V) test, see
OTHER APPLIANCES.
Note 3: Each socket of the EPOD must be tested in turn.
Note 4: Long extension lead may fail if it is left coiled. Be
sure to uncoil leads prior to testing. This must be done to
visually inspect the lead in any case.
Note 5: Additional Two (2) Wire Lead Test
Many modern appliances use a two wire mains power
lead with a figure 8 style socket i.e. no earth conductor.
The SafeTcheck’S Lead Test tests this style lead as a
Class 2 appliance (requires a Figure 8 adaptor; a Clover
Leaf adaptor is also available). The SafeTcheck will
conduct an Insulation Resistance (IR) Test if the lead is
found to have no earth (requires confirmation by the user).
The IR is measured between the inner mains conductors
and the SafeTcheck’S Cloak which should be wrapped
around the length of the lead or touched with the Probe
over its length.
For the Pro Logger II this feature is available on all testers
with Firmware Version V4.64 and above
Lead under test EPOD under test
Safety testing mains leads

SAFETCHECK OPERATOR'S MANUAL
16 Operating Instructions
The SafeTcheck is capable of testing many electrical
appliances with unusual characteristics. The Other Appliance
menu is used to select the test suitable for any of these
appliances. The user may scroll though the list by using the
F1 and F2 keys.
1 Appliances such as those fitted with surge protection
or MOVs (Metal Oxide Varistors) may be tested at 250V
(instead of 500V) by selecting one of the following:
2 Appliances requiring the mains voltage to be applied to
activate the On/Off switch, shall have their leakage current
checked by selecting one of the following:
(see also Run testing)
3 An earth continuity test may be conducted by selecting:
SELECT
OTHER
APPLIANCE
4 Appliances employing Mineral Insulated Metal Sheath
(MIMS) such as stoves and electric jugs may be tested
using a run test by selecting:
5 As for appliances in 1 above EPODs with surge protection
may be tested at 250V by selecting:
6 RCDs rated at 10mA, 30mA either portable or fixed
may be tested by selecting one of the following:
7 Appliances employing a PIEZO starter such as the starter
on a portable gas stove may be tested by performing a:
Safety testing other appliances (OTHER APPLIANCE menu)

TRIO TEST & MEASUREMENT
17
Copyright 2015 all rights reserved
8 Appliances connected to the mains via a 3 pin plug with
no Double Insulated (Class 2) symbol visible, should be
considered Earthed Appliances (Class 1), however, with
some appliances of this kind, the earth conductor provides
not only a degree of electrical safety but also a path to
conduct EMI currents, to reduce noise. This EMI current
may cause an appliance to fail due to, what the
Pro Logger sees, as excessive leakage. Also, with some
other appliances, there is simply no practical way of
finding a connection to the Earth Conductor i.e. it has
no exposed earthed metal parts.
The first phase of this test, while running the appliance,
looks for 1mA of leakage current between the Pro Logger’s
Cloak and the appliance’s case i.e. a standard Double
Insulated Run Test. If the Pro Logger measures more
than this, it will try again with an increased 5mA threshold
(because the appliance is Earthed, up to 5mA of Leakage
Current is permissible).
The person conducting the test will be warned that the
1mA threshold has been exceeded and that a 5mA test will
be conducted. Any more than 5mA of leakage current will
cause the test to fail.
To test these appliances use:
9 Where a Class I earthed appliance requires a longer than
normal run time (approximately 2 minutes), the following
test may be used:
†
10 For a 3 phase appliance Run Test, select:
Note 1: New tests may be added to the Other Appliance
menu from time–to–time. For details regarding upgrades
contact TRIO.
*Note 2: The 3 Phase Run Test is an option for the
Pro Logger II (see also Run testing 3 Phase appliances)
†Note 3: Available only on Pro Logger II's with firmware
version 4.04 or later.
WARNING
This test does not look for the presence of an Earth
Conductor. It should only be used if the normal Earthed
Appliance Insulation Resistance Test has continually failed.
Safety testing other appliances (OTHER APPLIANCE menu)

SAFETCHECK OPERATOR'S MANUAL
18 Operating Instructions
Overview
The Run Test is primarily for performing safety tests on
appliances that require a mains voltage applied to operate
their mains switch (on/off switch). In these cases the Insulation
Test will fail due to poor continuity though the mains switch or
associated circuitry (speed controls, remote controls, etc)
Run testing (Leakage current tests)
ABOUT THE SafeTcheck
PRO LOGGER II AND NANTO
TRIO Test & Measurement recommends that the
following Run tests are used only if the insulation testing
of an appliance fails or is unsuitable for that type of
appliance. Run tests apply the mains voltage (240V) to
the appliance under test, exposing the user to the risk of
personal injury (e.g. electric shock or electrocution).
Remember, until proven otherwise the appliance under
test should be considered unsafe for use.

TRIO TEST & MEASUREMENT
19
Copyright 2015 all rights reserved
1 Ensure the appliance is switched off.
2 Plug the appliance into the separate Run Test socket.
3 Connect the return lead to the SafeTcheck via the
Earth Return Socket.
4 Connect the Clamp of the Return Lead to a convenient
earthed metal point on the appliance under test.
WARNING
Upon completion of a safety test and subsequent
removal of test lead, please ensure all switches, speed
or thermostat controls are returned to their ‘OFF’ or
minimum position.
5 Switch the appliance on.
6 Select Class 1 Run Test under Other
APPLIANCE menu (F1 and F2 keys move the
selection of mode up or down respectively)
7 Press START button and follow the screen
instructions. The appliance will operate for
up to 20 seconds during the run test.
8 For Class I appliances requiring a longer than
normal run test duration, move to Long Class I
Run under OTHER APPLIANCE menu.
Note 1: Pressing RESET at any point during the Run
Test will shorten the test duration. This does not invalidate
the test result.
Note 2: If Data Logging is switched on then additional
information will be requested. See section entitled
”Data Logging”
WARNING
The appliance will operate for up to 20 seconds in the
run test mode. Ensure rotating parts or heating elements
are able to operate safely. Appliances such as drills, angle
grinders etc should be firmly restrained during the run test.
Run testing earthed (class 1) appliances
SWITCH APPLIANCE ON & SET
APPLIANCE THERMOSTAT OR
SPEED CONTROL TO MAXIMUM

SAFETCHECK OPERATOR'S MANUAL
20
Note 1: Pressing RESET at any point during the test
will shorten the test duration. This does not invalidate
the test result.
Note 2: The
SafeTcheck
does not use
to test for the presence of a return lead/probe in the Run
Test mode. Failing to use the return lead/probe while
running the appliance invalidates the test.
Note 3: If Data Logging is switched on then additional
information will be requested. See section entitled
'Data Logging'
Operating Instructions
1 Ensure the appliance is switched off.
2 Plug the appliance into the separate Run Test socket.
4 Connect the return lead/probe to the SafeTcheck via the
Earth Return Socket. Use the Probe to wipe over the
surface of the appliance and make contact with metal parts
during the test.
WARNING
The appliance will operate for up to 20 seconds in the run
test mode. Ensure rotating or heating elements are able to
operate safely. Appliances such as drills, angle grinders etc
should be firmly restrained during the run test.
5 Switch the appliance on.
6 Select Class 2 Run Test under Other APPLIANCE menu
using the F1 and F2 keys.
7 Press START button and follow the screen instructions. The
appliance will operate for up to 20 seconds during the run test.
WARNING
Upon completion of a safety test and subsequent
removal of test lead, please ensure all switches, speed
or thermostat controls are returned to their ‘OFF’ or
minimum position.
Run testing double insulated (class 2) appliances
Note: Use the probe to make contact with metal
exposed parts and insulated surfaces. See section
entitled "Utilities Menu" for more information about
the Probe Mode
This manual suits for next models
1
Table of contents
Other Trio Test Equipment manuals


Popular Test Equipment manuals by other brands

pico Technology
pico Technology TA041 user guide

PCB Piezotronics
PCB Piezotronics 480E09 Installation and operating manual

PEMTECH
PEMTECH PT301N Reference manual

Amprobe
Amprobe AMB-25 instruction manual

Cascade Microtech
Cascade Microtech IZI Probe Quick reference guide

SIRETTA
SIRETTA SNYPER-LTE graphyte quick start guide


Honeywell
Honeywell Posi 3 Setup guide

Proceq
Proceq Pundit PL-200PE operating instructions

Niigata seiki
Niigata seiki LHT-400 instruction manual

Nidec
Nidec Shimpo DT-315AEB-230V-NIST instruction manual

Reach Technology
Reach Technology RT-PoE4N manual

Bante Instruments
Bante Instruments ECscan40 user manual