Instructions for Use, Installation and Servicing
Climastat
Room Thermostat
Customer Service:
01773 828100
These instructions consist of, Instructions for Use, Installation, Servicing and Fault
Finding. The instructions are an integral part of the appliance and must, to comply with
the current issue of the Gas Safety (Installation and Use) Regulations, be handed to the
user on completion of the installation.
General and Sales enquiries:
Tel. 01773 824639
Fax: 01773 820569
Technical Helpline:
01773 828300
CONTENTS DESCRIPTION SECTION
General 1
Documents 1
Appliancation 1
Servicing 1
Recycling 1
Setting knob description 2
Setting the room temperature 2
Setting the domestic hot water 2
Fault nding 3
Frost protection 3
Appliance location 4
Safety instructions and regulations 4
Regulations 4
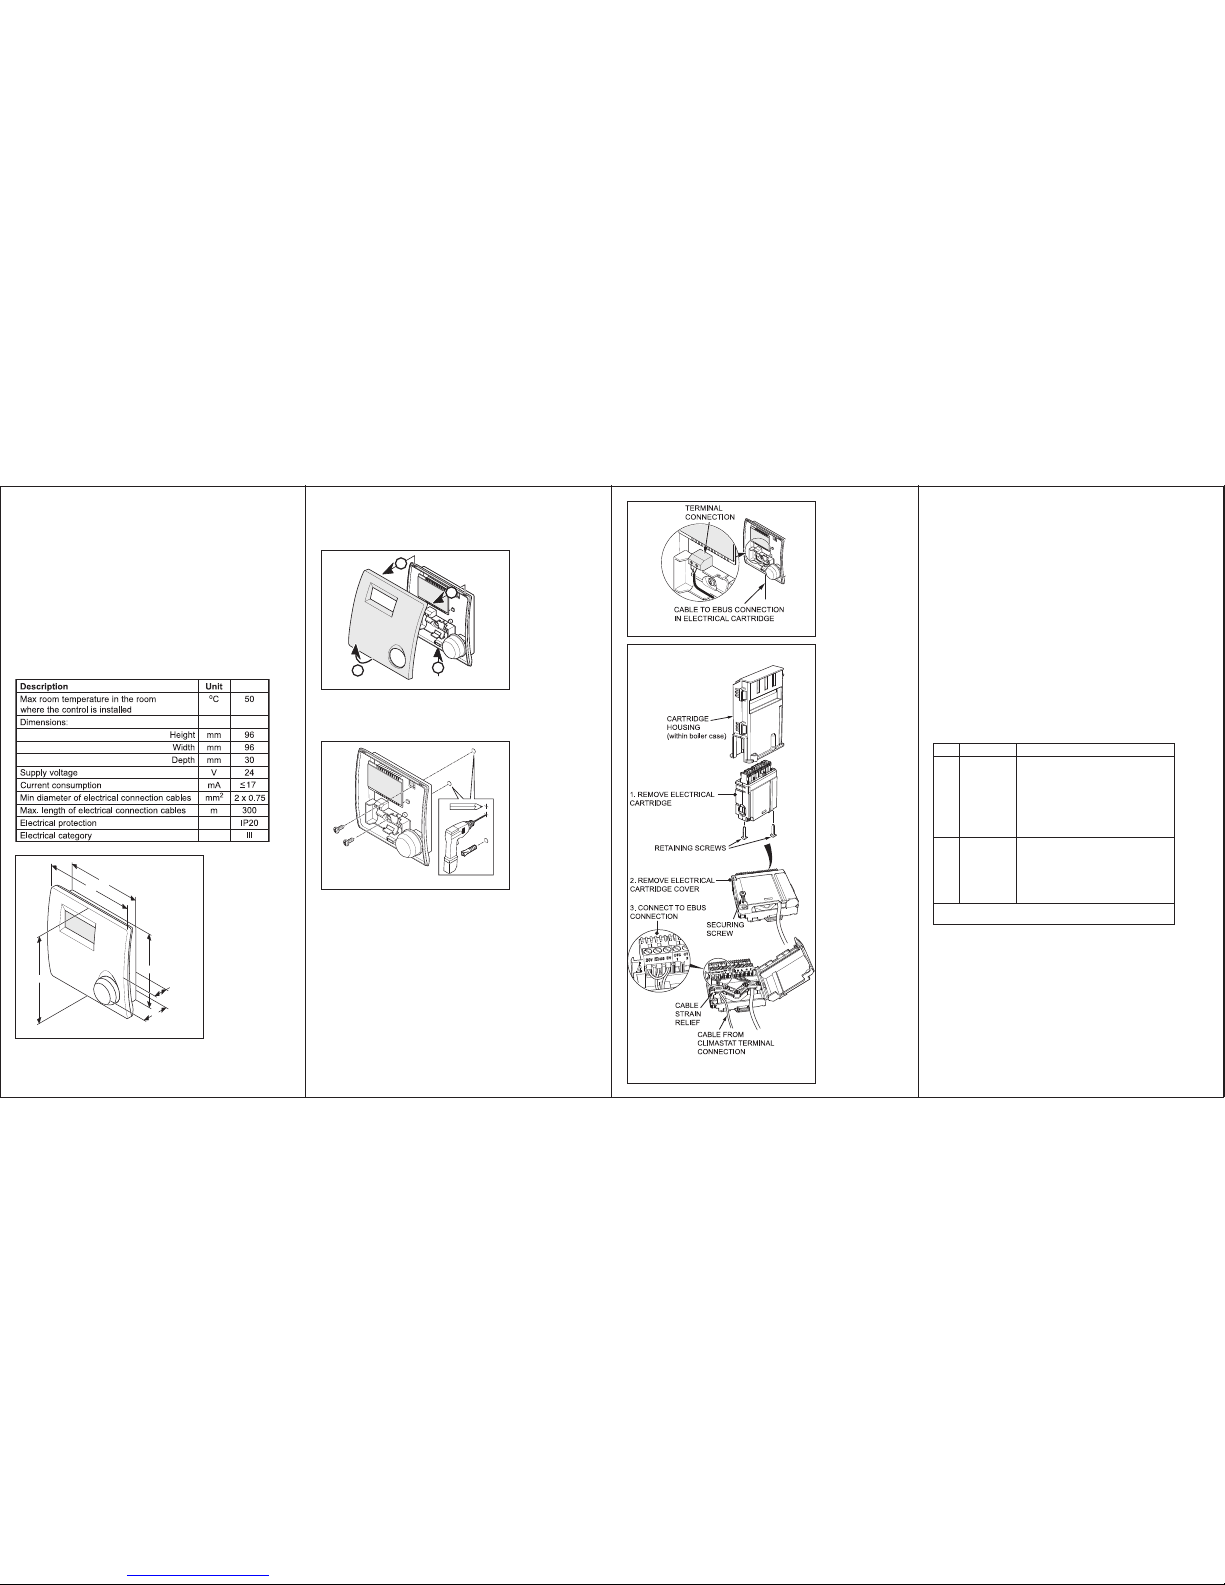
Technical data 4
Climastat Room Thermostat installation 5
Fixing to the wall 5
Electrical connection 5
Adjustment 6
Control / Commissioning 6
User information 6
General
Information
Instructions
for Use
User
Fault Finding and
Frost Protection
Installer Important
Information
Installation
and
Servicing
Commissioning
General
Climastat is a room thermostat that gives you personalised heating comfort
according to your needs and enhances the energy efciency of your heating
system. The modulating regulation built into this thermostat changes the
temperature of the radiators to suit the desired ambient temperature.
Documents
Please keep these instructions as well as any documents enclosed with it,
safe for future reference.
We accept no liability in case of damage due to the non-compliance of
these instructions.
Application
The Climastat room thermostat controls a heating appliance depending on
the room temperature.
Any other use is considered as inappropriate and is forbidden.
The manufacturer shall not be responsible for any damage caused by
another use. In that case the user shall be responsible.
Servicing
Clean the case of the Climastat with damp soapy cloth.
Make sure that no water goes inside the Climastat.
Do not use any abrasive cleaning products as they could damage the
housing or plastic case.
Recycling
The Climastat comprises many recyclable parts.
The packaging, the Climastat and the content of the package shall not
be thrown together with domestic waste but disposed of according to the
current regulations.
1 General Information
2 Instructions for Use
Front cover
13543
Diagram 1
Description of display
13735
Diagram 2
Setting knob description
Turn setting knob anti-clockwise (A) to adjust setting downward.
Turn setting knob clockwise (B) to adjust setting upward.
To access or conrm a setting, press the knob (C).
Setting the room temperature
Turn the setting knob to adjust to the desired room temperature once and
the set temperature will ash.
The setting is saved automatically after 5 seconds and the main screen is
displayed.
Setting the domestic hot water temperature
(for combination boilers only)
Press the setting knob.
Turn the setting knob once to adjust to desired hot water temperature and
the set temperature will ash. Press the knob again to conrm the new
temperature or the setting is saved automatically after 5 seconds. The set
temperature ashes.
3 User Fault Finding and Frost Protection
Fault finding
In the event of an anomaly, the Climastat displays error messages on the
display.
Warning:
Never try to service or repair the Climastat by yourself and only start the
Climastat once a skilled professional has repaired the fault.
4 Installer Important Information
Appliance location
Do not install the Climastat above another appliance that could damage it,
for example, above a cooker that might emit steam or grease or in a room,
which has a lot of dust in the atmosphere which is corrosive.
The Climastat must be installed in a room protected from freezing
temperatures. Take the necessary precautions.
Install the Climastat in such a manner so as to guarantee optimum
measurement of the ambient temperature by positioning it on an inside wall
in the main room of the house, approximately 1.5 metres from the ground.
Do not install the Climastat near heat sources such as radiators, televisions,
sunlight, on cold walls, between furniture, behind curtains, or other objects
that could effect measurement of ambient air temperature in the room.
Do not install close to draughts of air that could come from doors or
windows.
Explain these requirements to the home owner.
Safety instructions and regulations
This Climastat is tested and certicated for safety and performance. It is,
therefore, important that no alteration is made to the Climastat, without
permission, in writing, from Glow-worm.
Any alteration not approved by Glow-worm, could invalidate the certication,
appliance warranty and may also infringe the current issue of the statutory
requirements.
Warning:
Incorrect installation can cause electric shock or
appliance damage. Protect all the electrical components from water when
you carry out any work.
Setting knob
13545
Diagram 3
Frost protection
The frost protection system activates the boiler when the ambient
temperature in the room where the Climastat is installed falls below 3°C.
The outside temperature falls below 5°C (protection possible only if an
outside sensor is connected to the boiler).
If you leave home for a long period, consult the boiler manual.
0020041169-04