User Manual
-01- -02- -03- -04- -05-
-07--06- -08- -09- -10- -11-
-13--12- -14- -15- -16- -17-
Read this before using
KEEP THESE INSTRUCTIONS IN A SAFE PLACE
DANGER - Misuse of this electrical device can cause
electrocution, burns, fire and other HAZARDS.
Basic safety precautions should always be taken, including
all those listed below.
Close supervision is necessary when equipment is used
by, on, or near children, handicapped persons or invalids.
The following basic safety notices should always
be taken:
1. Do not place the device in liquid, nor put it where it
could fall into liquid.
2. The following basic safety notices should always be taken.
3. Use the device only for the intended use described in
this manual.
4. Do not use adjunct which are not supplied by the producer.
5. Do not make the device come into contact with surfaces
which are too hot to touch.
6. Do not use the device where aerosol sprays are being
used.
7. Do not use the device if it is not working properly, or if
it has been damaged.
8. Read all the manuals, and practice the test, and then use
the product to test your blood glucose. Do all quality control
checks as directed and consult with a diabetes expert.
Dear Glucoracy Blood Glucose Monitoring System
G-425-2 Owner:
Thank you for choosing this system!
This manual contains important information you must
know about the system.
Please read it thoroughly and carefully.
The system provides No Code function which means that
you don't need to calibrate your meter making it easier for
the user to monitor blood glucose at home.
Important safety instructions
The meter and lancing device are for single patient use.
Do not share them with anyone including other family
member! Do not use on multiple patients!
All parts of the kit are considered biohazardous and can
potentially transmit infectious diseases even after you
have performed cleaning and disinfection.
Changes or modifications not expressly approved by
the party responsible for compliance could void the
user’s authority to operate the equipment.
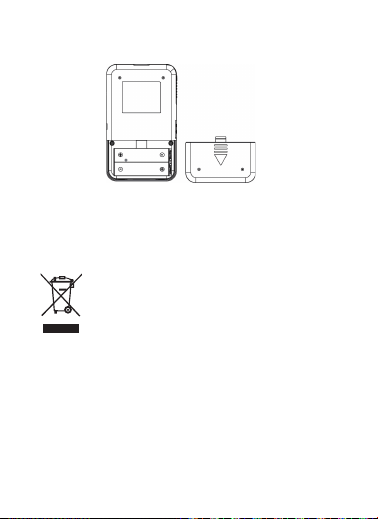
Installing the battery
1. Open the battery cover on the back of meter.
2. If replacing the batteries, please remove the used batteries.
3. Insert 2 new (AAA) batteries with correct +/- direction.
4. Close the battery cover.
►The Blood Glucose Monitoring System is not intended
for use on neonates.
►The Blood Glucose Monitoring System is not intended
for use on artery blood, neonates’ serum and plasma.
►The system can be used up to an altitude of 10744 feet.
►The following substances at levels greater than normal
or therapeutic levels may cause significant interference
(affect the result by greater than 10%) resulting in an
inaccurate result: ascorbic acid, uric acid, hemoglobin,
acetaminophen, Dopamine, L-dopa and Tolbutamide
etc. These sub- stances do not affect test results in
normal concentration but may affect test results in high
concentration. Do not use haemolysis sample, icterus
sample or high lipemia samples.
►Patients undergoing oxygen therapy may yield falsely
lower results.
►Not used for patients in a hyperglycemic-hyperosmolar
state, with or without ketosis.
►Not for use on critically ill patients.
►Not to be used for patients who are dehydrated,
hypertensive, hypotensive or in shock.
►Very low (less than 20%) or very high (more than 60%)
red blood cell count (hematocrit) can lead to incorrect
test results. If you do not know your hematocrit level,
please consult your health care provider.
►High temperature (more than 104°F) and low temperature
(less than 50°F) may lead to incorrect test results.
►High humidity (more than 85%) and low humidity (less
than 10%) may lead to incorrect test results.
Environment Protection – Waste electrical products should
not be disposed of with household waste. Please recycle
where facilities exist. Check with your local Authority or
retailer for recycling advice.
Limitations of use: Before Your Begin
■ The System is intended for use outside the body (in vitro
diagnostic use). It is for single-patient use. It should be used
only for testing glucose (sugar) and only with fresh capillary
whole blood samples taken from the finger. The system is
intended for use at home. It should not be used for the
diagnosis of diabetes or for the testing of newborns.
■ The System is intended for self-testing outside the body
(in vitro diagnostic use) by people with diabetes at home
as an aid to monitor the effectiveness of diabetes control.
Alternative site testing should be done only during steady
– state times (when glucose is not changing rapidly).
■ The blood glucose test strips are for use with the Blood
Glucose Meter to quantitatively measure glucose in fresh
capillary whole blood samples drawn from the fingertips.
■ This device is not intended for use in healthcare or assisted-use
settings such as hospitals, physician’s offices, or long-term
care facilities because it has not been determined to be safe
and effective for use in these settings, including for routine
assisted testing or as part of glycemic control procedures.
■ Use of this device on multiple patients may lead to transmission
of Human Immunodeficiency Virus (HIV), Hepatitis C Virus
(HCV), Hepatitis B Virus (HBV), or other bloodborne pathogens.
■ When the following phenomenon happens, the user should
stop using meter and contact customer service:
-The test result of control solution exceeds the range of vial labeled.
-The meter fails to display relative information;
-The meter does not respond when inserted test strips;
-The meter damaged severely (eg. Broken case, screen chalkboard)
Warnings
Intended Use
INTRODUCTION TO THE SYSTEM
ABOUT YOUR SYSTEM
■
The Glucoracy Blood Glucose Monitoring System is
comprised of Glucoracy Blood Glucose Meter and
Glucoracy Blood Glucose Test Strips.
■
The Glucoracy Blood Glucose Monitoring System is intended
to be used for the quantitative measurement of glucose
(sugar) in fresh capillary whole blood samples drawn from
the fingertip. The Glucoracy Blood Glucose Monitoring
System is intended to be used by a single person and
should not be shared. It is intended for self-testing outside
the body (in vitro diagnostic use) by people with diabetes
at home as an aid to monitor the effectiveness of diabetes
control. The Glucoracy Blood Glucose Monitoring System
should not be used for the diagnosis of or screening for
diabetes. The Glucoracy Blood Glucose Monitoring System
is not for use in neonates.
J
Overview of the lancing device
A.Device Cap
B.Handle
C.Needle Cap
D.Needle Holder
E.Device Body
F.Connecting Collar
G.Adjustable Tip
H.Release Button
I .Ejection Button
J .Device Control Cap on the
Lancets and the Lancing Device.
If your lancing device differs from the one shown here, please
refer to the manufacturer’s manual to ensure proper usage.
NOTE:
To reduce the chance of infection:
●
Never share a lancet or the lancing device.
●
Always use a new, sterile lancet. Lancets are for single use only.
●
Avoid getting hand lotion, oils, dirt, or debris when handling the
lancets.
1. Screw the device cap off. 2. Put the needle into the needle
holder until it reaches the bottom.
3. Screw the needle cap and
put it in the recycling dustbin.
4. Cover the cap 5. Adjust the proper level
(usually level 3)
6. Aiming at the sterilized part
for blood-taking, press the
blue release key to finish
blood taking.
7. Screw the device cap. 8. Push the ejection button and
discard the used lancet in
appropriate container.
9. Cover the device cap.
NOTE:
The adjustable tip offers 5 levels of skin penetration. Twist the
adjustable tip to the proper level:
1-2 level for soft or thin skin
3 level for average skin
4-5 level for thick or calloused skin
Setting up the lancing device
NOTE:
■
The date, time, unit and memory deletion can ONLY be set in
the setting mode.
■
When the meter is in setting mode, if no button is pressed within
3 minutes, the meter will turn off.
■
No set up necessary, meter is pre-set. Meter is pre-set for Eastern
Standard Time. Please refer to page 13 of this manual for set
up instruction.
Setting the meter and deleting the memory
1. Setting the date and time
1.1 Setting the year
Press and Hold “S” button for 3 seconds, until
the last two digits of the year will flash on the
screen (for example, “14” equals 2014). Press
“M” button until the correct year appears.
Press “S”.
1.2 Setting the month
With the month flashing, press “M” until the
correct month appears. Press “S”.
1.3 Setting the day
With the day flashing, Press “M” until the
correct day appears. Press “S”.
1.4 Setting the AM/PM
With the AM or PM flashing, Press “M” until
the correct one appears. Press “S”.
1.5 Setting the hour
With the hour flashing, Press “M” until the
correct hour appears. Press S“.
1.6 Setting the minute
With the minute flashing, Press “M” until the
correct minute appears. Press “S”.
2. Deleting the Memory
2.1 Press “S” , then “dEL” will display
with flashing “M”.
2.2 Press “M” once to confirm delete,
press “M” button again to delete
ALL memory. The meter then
displays “OK”, which means that
the memory is deleted. If you don’t
want to delete the memory, press
the S button to skip this step. The
meter will automatically turn “OFF”,
and the set up will be completed.
2
4
5
6
7
1
3
89
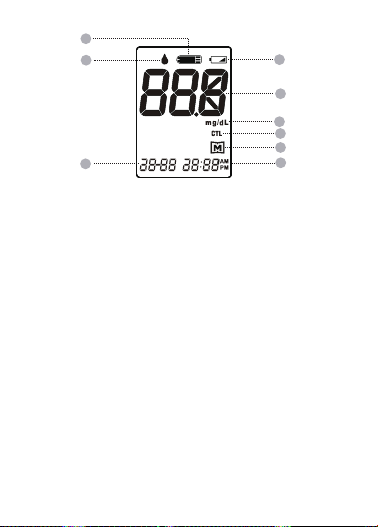
Meter Screen Display Message Test Strip
1
2
3
4
1) Blood drop symbol
Flashes when it is ready to apply the blood sample.
2) Low battery symbol
Appears when the battery power is low.
3) Test strip symbol
Appears when the meter is turned on.
4) Test result area
Displays glucose results
5) Measurement unit
Appears with the test result in mg/dL
6) CTL symbol
Appears when doing a control test and indicates that the result
won’t be stored in the memory
7) Memory symbol
Appears when you review the memory
8) Date
9) Time
Each strip can be used only once. The test strip consists of the
following parts:
Attention!
Test results might be wrong if the contact
bar is not fully inserted into the test slot.
NOTE: The front side of the test strip should
face up when inserting the test strip.
1-Absorbent hole
Apply a drop of blood here. The blood will
be drawn in automatically.
2-Confirmation window
This is where you confirm if enough blood has
been drawn into the absorbent hole of the strip.
3-Test strip handle
Hold this part to insert the test strip into the
slot.
4-Contact bars
Insert this end of the test strip into the meter.
Push it in firmly until it will go no further.
1
2
3
4
5
Test principle
The System uses electrochemical methodologies. The System
quantitatively measures blood glucose levels using an Amperometric
method. The method involves detecting the current produced from
glucose oxidation. The strength of the current produced by the
reaction depends on the amount of glucose in the blood sample.
The electrons generated during this reaction are transferred from
the blood to the electrodes. The magnitude of the resultant current
is proportional to the concentration of glucose in the specimen.
The current level is converted into a readout displayed on the meter.
Contents of the kits
NOTE:
■
A Meter
■
Owner’s Manual
■
Test Strips
■
Lancing Device
■
Sterile Lancet
Blood Glucose Meter
1. Strip port
Where you insert the test strip into strip port, the meter will
turn on automatically.
2. Strip ejector
Slide forward to eject the test strip after test.
3. LCD Display
It guides you through the test using symbols and simple
messages
4. "M" Button
It is used to turn on the meter to enter the memory mode
5. "S" Button
It is used to set up the meter
■ The Lancing Device can be used for several times, however
the sterile lancet should be changed after each use.
■ Control solution is not included in the standard kit.
■ There are three levels for the control solutions: level 1,
level 2 and level 3 available, please contact the place of
purchase for more information.
If any items are missing from your kit or opened prior to use,
please contact local customer services or place of purchase
for assistance.
NOTE:
●
Choose a different spot each time you test. Repeated punctures
at the same spot may cause soreness and calluses.
●
It is recommended to discard the first drop of blood as it might
contain tissue fluid, which may affect the test result.
Fingertip testing
Hold the lancing device firmly against the
side of your finger. Press the release key.
You will hear a click, indicating that the
puncture is complete.
Preparing the puncture site
Stimulating blood perfusion by rubbing the puncture site prior to
blood extraction has a significant influence on the glucose value
obtained. Blood from a site that has not been rubbed exhibits a
measurably different glucose concentration than blood from the
finger. When the puncture site was rubbed prior to blood extraction,
the difference was significantly reduced.
Please follow the suggestions below before obtaining a drop of blood:
●
Rub the puncture site for about 20 seconds before penetration.
●
Select the puncture site at the fingertips.
●
Clean the puncture site using cotton moistened with 70% alcohol
and let it air dry.
Modes Use when
General test (not display)
CTL
Any time of day without regard
to time since last meal
Testing with the control solution