Goldlantern DPF-10102 User manual

English
1
Digital Photo Frame
User Guide
Copyright Information
All rights reserved. No part of this publication may be reproduced,
transmitted, stored in a retrieval system, or translated into any
language in any form by any means, optical, electronic, recording,
or otherwise, without the written permission of our company.
We reserve the right to revise this manual and to make changes to
any or all parts at any time, without obligation to notify any person
or entity of such revisions and changes.

English
2
Table of contents
¾Specifications··············································· 3
¾System Requirements·································· 4
¾USB Device Unplugging Notice··················· 4
¾Getting to Know Your Digital Photo Frame··· 5
¾Remote Control············································ 6
¾Playback Mode( Viewing JPEG/AVI Files)··· 7
Turning on the Digital Photo Frame…….7
Viewing Images……………………………8
Slideshow……………………………..8
Photo Rotation & Display Ratio…….8
Playing Video Clips……………………….9
¾Time Mode··················································· 9
¾MP3 Mode ················································· 10
¾Setup Mode ··············································· 10
¾Card Reader·············································· 12

English
3
Specifications
Display: 10.2”TFT LCD
Supports 16:9 and 4:3 displays
On-screen Display English, French, Spanish
Language: German, Italian, Dutch
File formats supported:JPEG (up to 26 Mega Pixels),
Pure Motion JPEG (AVI), MP3
Expansion Slot: SD/MMC/MS/xD Card slot
Speaker: Built-in Speaker and Phone Jack
Audio Format: MP3
Internal Memory: Nand Flash(Optional)
Interface: USB2.0 High speed
Infrared: IRRemoteControl
Other Functions: Slide show with various transition effects,
Photo rotation, Alarm Clock & Calendar,
USB 2.0 Host/ Device (Mass Storage
Device)
Standard Accessories: USB Cable
Adapter (100V-240V)
Instruction Manual,Stand
Remote control
Dimension: 258*177*26mm ( W x H x D)
(external frame not included)
Weight: 685± 5g
(external frame not included)
PowerSource: Input AC 100V-240V
Output DC 9V, 2A

English
Minimum System Requirements:
Pentium 166 MHz processor or higher
Microsoft Windows 2000/XP/Vista
Available USB port
Super VGA video card and color monitor
CD-ROM or DVD-ROM drive
64 MB RAM
200MB available HD space
Mass Storage Operating System: Windows 2000, XP,Vista
USB Device Unplugging Notice:
To unplug the Digital Photo Frame from the computer, be sure to
stop the device beforehand. To stop the Digital Photo Frame,
please follow the steps below:
Removing the Digital Photo Frame from a PC: (For Windows
2000/XP/Vista)
1. Click on the “ ” device icon located on the taskbar. Select
the device you want to stop (e.g. Stop USB Mass Storage
Device Drive (E:)).
2. Follow on-screen instructions to safely remove the Digital
Photo Frame.
Notice:
1. The Digital Photo Frame with a SD card acts exactly like a
card reader (mass storage device) by connecting the
Digital Photo Frame to a computer via USB. (See “Card
Reader” section.)
4

English
Getting to Know Your Digital Photo Frame
Remote Control Receive
r
RIGHT ESC
UP
DOWN LEFT
OK
LCD Panel
Power Indicato
r
POWER
Stand
S
p
eake
r
USB Port
5
Notice: You can hang your Digital Photo Frame on the wall
shown as the below picture.
DC Jack
Memor
y
Card Port
Earphone Jack
USB Port

English
REMOTE CONTROL
Stop
Date
Slide Show
Left
Down
Right
Enter
Delete
Volume+
Time
o
w
e
6
Preview
Pr
Menu
Rotate Ratio: 4:3/16:9
Copy
ESC Up
MP3
Play mode
Volume -
Information
Previous song
Next song Play/Pause
For better performance, operate the remote control
in an appropriate range as recommended below.
15°
5M
45
°
3M
Horizontal Angle ≤45°
Effective Distance: 3m
Horizontal Angle ≤15°
Effective Distance: 5m

English
Playback Mode( Viewing JPEG/AVI Files)
Notice:
1. Internal memory is optional. JPEG/AVI files saved in the internal
memory can be played in the Digital Photo Frame without a
memory card.
2. The video-playing function is optional; some Digital Photo
Frame models may be unable to play AVI files.
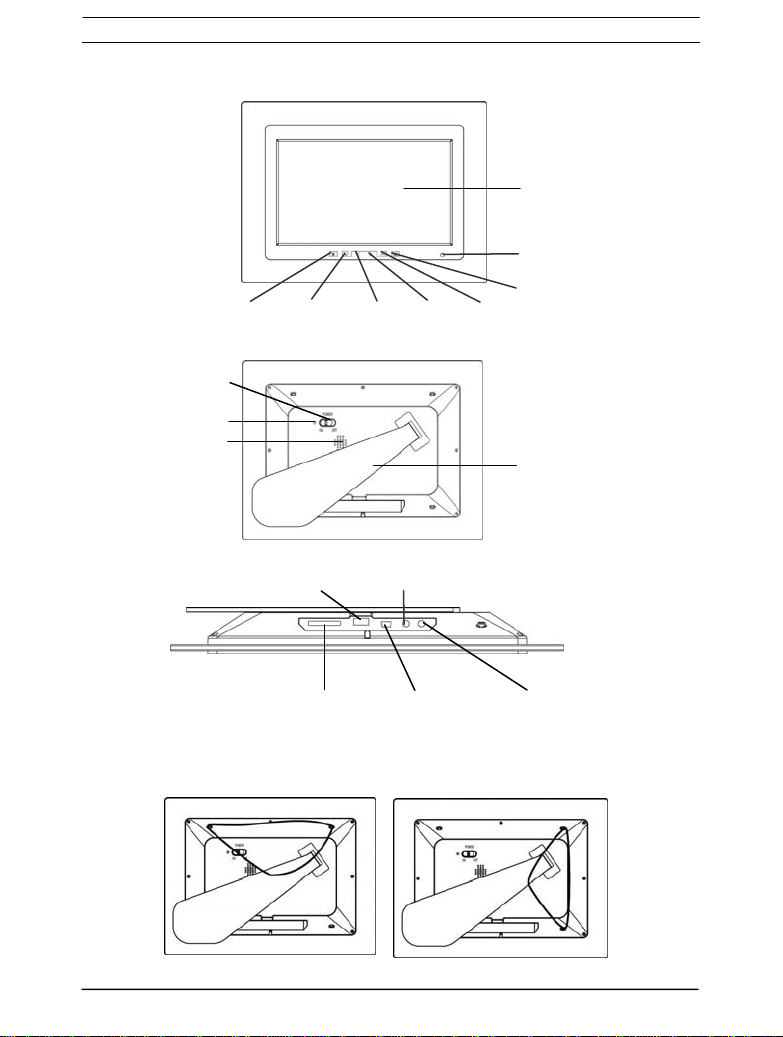
● Turning on the Digital Photo Frame
1. Connect the Digital Photo Frame to the DC 9V adapter.
2. To read files from a memory card, insert a memory card into the
Digital Photo Frame Memory Card Port first. If the Digital Photo
Frame is equipped with internal memory, then it is not
necessary to insert a memory card.
3. Press the “Power” button on the Digital Photo Frame to activate it.
4. The Digital Photo Frame will automatically recognize image or
video files saved in a memory card or in internal memory, and it
will display all image or video thumbnails.
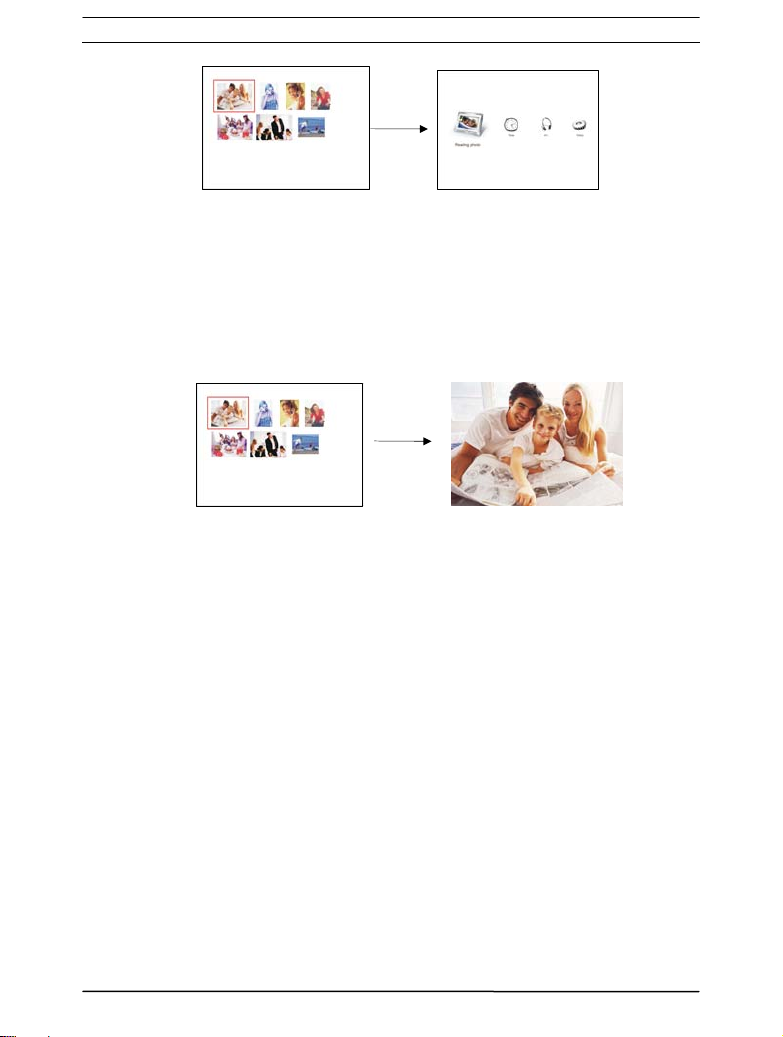
5.1 To start viewing images or playing video clips, see the below
section “Viewing Images” or “Playing Video Clips.”
5.2 To return to the main menu, press the “ESC” button or the
“Menu” button on the remote control as shown in FIG2. To enter
the thumbnail mode again, press the “UP”, “DOWN”, “LEFT” or
“RIGHT” button( the navigation buttons on the remote control)
to select the playback icon in the main menu and then
press the “OK” button.
7

English
8
FIG1 FIG2
● Viewing Images
1. After entering the thumbnail mode, press the “UP”, “DOWN”,
“LEFT” or “RIGHT” button( the navigation buttons on the
remote control) to select the thumbnail to view. Press the “OK”
button to enlarge the image.
2. To view the previous image, press “UP” when an image is
enlarged. Press “DOWN” to view the next one.
3. Slideshow:
3.1.1 When in the thumbnail mode, press the “Slide” button on
the remote control,
3.1.2 When an image is enlarged, press either the “Slide”
button on the remote control or the “OK” button to enter
the slideshow mode.
3.2 Stop viewing the slideshow:
Press “OK” to stop at the current full-sized image. To
return to the thumbnail mode, press “ESC” or the
“Preview” button on the remote control.
4. Photo Rotation & Display Ratio:
4.1 When the display ratio is set to 4:3, an enlarged image can

English
be rotated by pressing “RIGHT,” “LEFT,” or the “Rotate”
button on the remote control. Press “RIGHT” to rotate the
current image clockwise rotate; press “LEFT” to rotate
anti-clockwise.
4.2 To change the display ratio, press the “Ratio” button on the
remote control when in the playback mode. Or set the ratio
in the setup mode. See “Setup Mode” section.
5. Press the “ESC” button to return to the previous mode or press
the “Menu” button on the remote control to return to the main
menu,
●Playing Video Clips
1. After entering the thumbnail mode, press “UP”, “DOWN”,
“LEFT” or “RIGHT”( the navigation buttons on the remote
control) to select the thumbnail to play.
2. Press “OK” to start playing a video clip.
3. Press “OK” again to pause. To continue playing, press “OK.”
4. Press “ESC” once to return to the thumbnail mode. Press “ESC”
again to return to the main menu.
NOTICE: The Digital Photo Frame only supports Motion JPEG
format videos.
Time Mode
1. Press “UP”, “DOWN”, “LEFT” or “RIGHT” to select the icon in
9

English
the main menu and then press “OK” to enter the Time Mode.
2. Press “UP” or “DOWN” to select items; press “OK” to confirm;
Press “UP” or “DOWN” to change settings.
3. Press “ESC” to save the settings and exit.
(See the “Show Time” and the “Show Calendar” sections in
the “Setup Mode.”)
MP3 Mode
1. Press the “MP3”button on the remote control to enter the MP3
mode. Or press “UP”, “DOWN”, “LEFT” or “RIGHT”to select
the icon in the main menu and then press “OK” to enter the
MP3 Mode.
MP3 LIST
If you had my love.mp3
Big Big World.mp3
Right here waiting.mp3
2. Press “UP”, “DOWN”, “LEFT” or “RIGHT” to select MP3 files.
3. Press “OK”( or the play button on the remote control) to play a
song. Press “OK”( or the pause button on the remote control)
again to pause.
4. Press “ESC” to stop and return to the main menu.
Setup Mode
1. Press “UP”, “DOWN”, “LEFT” or “RIGHT”to select the icon
in the main menu. Press “OK” to enter the setup mode.
10

English
2. Press “UP”, “DOWN”, “LEFT” or “RIGHT” to select items.
Press “OK” to change settings.
3. Note the following details:
--Slide Interval
5/10/30/60 seconds
--Show Time
ON/OFF
( When it is set to ON, the time will be displayed in the
playback mode. It can also be switched to ON/OFF by
pressing the “Time” button on the remote control.)
--Show Calendar
ON/OFF
( When it is set to ON, the calendar and date that have
been set in the Time Mode will be displayed in the
playback mode. It can also be switched to ON/OFF by
pressing the “Date” button on the remote control.)
--Music Repeat
ALL/ONE/NONE
--Aspect
4:3/16:9
(Set the display ratio of images. See the “Photo Rotation &
Display Ratio” section in the “Playback Mode.”)
--Volume
0~9
11

English
12
--Language
English/French/Spanish/German/Italian/Dutch
--Format storage
Delete all internal photos?
[ENTER] Yes
[ESC] NO
It can select Yes/NO by pressing the Enter or ESC botton
on the remote control.
4. To complete Setup, please press “ESC” to save the setting
and exit.
Card Reader (Mass Storage Mode)
1. Connect the Digital Photo Frame to a computer with the
supplied USB cable.
2. In Mass Storage mode, the Digital Photo Frame with a
memory card acts exactly like a Card Reader. It can be
accessed via any Windows user interface. Pictures or video
clips can be copied, moved or deleted in exactly the same
way PC files are manipulated. (See “USB Device Unplugging
Notice” section.)
Notice:
1. In the playback mode, files saved in a memory card can be
copied to internal memory by pressing the “Copy” button on
the remote control. But the function will not be effective if the
Digital Photo Frame does not equipped with internal
memory.
2. The Digital Photo Frame does not display files saved in
internal memory unless a memory card is removed. With an
inserted memory card, the Digital Photo Frame will only
capture files saved in a memory card.
Other manuals for DPF-10102
1
Table of contents
Other Goldlantern Digital Photo Frame manuals

Goldlantern
Goldlantern DPF-12000 User manual

Goldlantern
Goldlantern DPF-7000P User manual

Goldlantern
Goldlantern DPF-10400 User manual

Goldlantern
Goldlantern DPF-7000 User manual

Goldlantern
Goldlantern DPF-8000 User manual

Goldlantern
Goldlantern DPF12000P User manual

Goldlantern
Goldlantern DPF-8000 User manual

Goldlantern
Goldlantern DPF-10400 User manual

Goldlantern
Goldlantern DPF-10102 User manual