Good Health Saunas GE-2 User manual

1.888.99.SAUNA
GoodHealthSaunas.com
NATIONAL DISTRIBUTION CENTER
2140 W. WISCONSIN AVENUE
APPLETON, WI 54914
Owner’s
Manual
National Sales Inc.,DBA

2
A Few Words About Us...
For over a decade, Good Health Saunas has been supplying retailers and consumers with infrared
saunas. Our affordable prices and delivery-ready inventory make us the undisputed leader for a
factory-direct sauna purchase.
Passing on the factory-direct savings to you means you can enjoy all the health benets our saunas
have to offer, in the privacy of your own home, without breaking the bank!
Good Health Saunas is committed to providing each and every customer with unparalleled, excel-
lent customer service; the highest in the industry.
Why? Because we want you to trust us and be completely comfortable with your purchase! We are
also committed to producing the highest quality saunas for you at the best prices!
Our mission is to provide you with much deserved rest, relaxation and rejuvenation with your new
sauna! Please do not hesitate to call us with any questions you may have.
Thank You,
Keith Hueffner
President, Good Health Saunas
For your record, please complete the following information. You
need to refer to this information when calling the manufacturer
for customer service.
Date of Purchase:______________________________________
Date of Delivery:______________________________________
Model Number:_______________________________________
SerialNumber:________________________________________
Dealer Information
Name:_______________________________
Phone:_______________________________

3
Good Health Saunas
®
Dear Customer,
Thank you for purchasing a Good Health Sauna.
Before using your new sauna, please read this consumer manual carefully!
This consumer manual covers both ceramic heater saunas and carbon ber heater saunas.
Table of Contents
Preview................................................................................................................4
Installation Overview............................................................................................5
Corner Installation................................................................................................6
General Safety Rules.............................................................................................7
Installation...........................................................................................................9
Digital Control Operating Instructions..................................................................16
Tips for Use........................................................................................................16
Maintenance......................................................................................................17
Transportation....................................................................................................17
Limited Warranty.................................................................................................17
What is Chromotherapy?.....................................................................................18

4
Preview
A.1 Brief
All growth depends on sunlight, yet 40% of the ultraviolet and high-energy rays of the sun are harmful to the human
body. The remaining 60% of the sun’s energy, which is comprised of infrared rays, is benecial for the human body.
Our infrared sauna uses these invisible (5.6-15μm) infrared rays to increase cell tissue resonance, accelerate blood
circulation, and improve organic functions. Infrared sauna therapy is becoming increasingly popular and accepted by
the medical profession, with more studies now supporting the science behind this exciting new technology. An infrared
sauna has been shown to increase blood circulation, which can help relieve pain and improve wound healing and recov-
ery. It has also been known to increase metabolic rates and help the body burn calories as it works to sweat. This aids
fat burning, improves cardiac tness, strengthens the heart, helps eliminate toxins, and improves cellulite and general
skin tone.
A 30-minute session in an infrared sauna could burn the same calories as a six-mile run. The quality stereo systems in
our saunas also reduce stress and aid relaxation through the use of sound therapy.
A.2 Operating Conditions
USA or Canada standard
A.2.1 Temperature: 60°F - 140°F, 5°C - 60°C
A.2.2 Power supply: 120V AC, 15 amp or 20 amp
A.2.3 Do not install closer than 0.5 inches (12.7MM) to wall.
A.3 Features
A.3.1 Wooden construction
A.3.2 Digital microprocessor controlled
A.3.3 Adjustable timer from 0 to 60 minutes
A.3.4 Digital temperature sensor
A.3.5 Soft touch keypad
A.3.6 Long-life ceramic infrared heater and carbon ber heater
Sauna Outside Measurement
Model Number inch
GSE-1 36×36×75
GE2 48×48×75
GSE-2 48×48×75
GSE-3 60×49×75
GSE-4 69×53×75
GSE-3C 59×59×75
Front 23.5×49.75×23.5

5
Panels and Set-up Diagrams (Straight Sauna)
Below are pictures of individual panels for the 1-person GSE-1 Signature Sauna. Other models may
vary.
Tool Required for Installation: Phillips Screwdriver
STEP 1
STEP 5
STEP 2
STEP 6
STEP 3
STEP 7
STEP 4
STEP 8

6

7
B.1 General Safety Rules
1. READ INSTRUCTIONS - All the safety and operating instructions should be read before the sauna is installed and
operated.
2. RETAIN INSTRUCTIONS - The safety and operating instructions should be retained for future reference.
3. HEED WARNINGS - All warnings on the sauna should be adhered to.
4. FOLLOW INSTRUCTIONS - All operating and usage instructions should be followed at all times.
5. CLEANING - Unplug the sauna from the wall outlet before cleaning. Do not use liquid cleaners or aerosol cleansers
inside the sauna. Use a damp cloth for cleaning.
6. ATTACHMENTS - Do not use attachments that are not recommended by the manufacturer, or they may cause hazard.
7. WATER OR MOISTURE - Do not use this product near water. For example, do not use it near a bathtub, in a wet
basement, or near a swimming pool.
8. GROUNDING OR POLARIZATION - This sauna is intended for use with a three-wire properly grounded power socket.
Do not alter the plug or cord.
9. POWER SOURCES - This product should be operated only from the type of power source indicated on the marking
label. If you are not sure of the type of power you have, please consult a licensed electrician.
10. POWER CORD PROTECTION - Power supply cords should be routed so they are not likely to be walked on or
pinched by items placed upon or against them.
11. LIGHTNING - For added protection during a lightning storm, or when the sauna is left unattended and unused for
long periods of time, unplug the sauna from the wall outlet.
12. OVERLOADING - Do not overload wall outlets, as this can result in a risk of re or electrical shock. (Unit should be
plugged into a dedicated outlet.)
13. SERVICING - Always unplug the sauna from the wall outlet before servicing the product.
14. POWER SUPPLY - Do not remove power supply covers. No user-serviceable parts are located inside the power
supply.
15. REPLACEMENT PARTS - When replacement parts are required, be sure to use replacement parts specied by the
manufacturer, or those that have the same characteristics as the original parts. Unauthorized substitutes may result in
re, electrical shock or other hazards.
B.2 Hyperthermia Warning
Hyperthermia occurs when the internal temperature of the body reaches a level several degrees above the normal body
temperature of 98.60°F. The symptoms of hyperthermia include an increase in the internal temperature of the body, dizzi-
ness, lethargy, drowsiness, and fainting.
The eects of hyperthermia include:
B.2.1 Failure to perceive heat;
B.2.2 Failure to recognize the need to exit the room;
B.2.3 Unawareness of impending hazard;
B.2.4 Fetal damage in pregnant women;
B.2.5 Physical inability to exit the room;
B.2.6 Unconsciousness
B.2.7 Warning - The use of alcohol, drugs, or medication is capable of greatly increasing the risk of fatal hyperthermia.
B.3 Safety Precautions
1.When installing and using this electrical equipment, basic safety precautions should always be followed.
2.Do NOT dry clothes or leave towels in the sauna.
3.Do NOT touch the heater tube with your nger or metal tools.
4.Do NOT touch the light when it is on.
5.Do NOT splash water or other liquid onto the heating tube.
6.Do NOT use the sauna if you have any of the following conditions:
1)Open wounds, eye diseases or serious burns.
2)Elderly & frail people, especially those suering from a disease.
3)Children under the age of six years should NOT use the sauna. To reduce the risk of injury, do not allow children over
the age of six to use the sauna unless they are closely supervised at all times.
4)Those with heat sensitivity, obesity, heart disease, blood pressure, circulatory system problems, or diabetes should
consult their doctor before using.
7.Saunas are not intended for use by persons (including children) with reduced physical, sensory or mental capabilities,
or lack of experience and knowledge, unless a person responsible for their safety has given them supervision or instruc-

8
tion concerning the use of the sauna.
8.Do not place pets into the sauna.
9.Do not use the sauna immediately following strenuous exercise. Wait at least 30 minutes to allow the body to cool
down completely.
10.Excessive temperatures have a high potential for causing fetal damage during the early months of pregnancy. Preg-
nant or possibly pregnant women should contact their physician prior to using the sauna.
11.The use of alcohol, drugs, or medications prior to or during the sauna session may lead to unconsciousness. Do not
use after drinking excessive alcohol.
12.Persons using medications should consult a physician before using the sauna, as some medications may induce
drowsiness while others may aect heart rate, blood pressure, and circulation.
13.Exercise care when entering or exiting the sauna.
14.Never sleep inside the sauna while the unit is in full operation.
15.Do not use any type of cleaning agents on the interior of the sauna.
16.Do not stack or store any objects on top of or inside the sauna.
17.Do not use the unit during an electrical storm, as there is a remote risk of shock.
18.Altering or tampering of any electrical connections on the power supply will void the manufacturer’s warranty.
19.Dry your hands before handling electrical controls. Never unplug the power cord or adjust the controls with wet hands
or when you have wet bare feet. A danger of electrical shock exists.
20.Do not attempt any repair without consulting the manufacturer rst. Unauthorized repair attempts will void the manu-
facturer’s warranty.
21.Be careful when using the sauna in places where there are combustible materials.
22.Do not use the sauna in the presence of an explosive atmosphere.
23.Be aware that heat may be conducted to combustible materials that are out of sight.
24.Do not leave the sauna unattended when it is switched on.
25.If the supply cord is damaged, it must be replaced with a special cord or assembly (which is available from the manu-
facturer or its service agent or a similarly qualied person) to avoid a hazard.
C. Circuit Diagram

9
Tool Required for Installation: Phillips Screwdriver
D. Installation
D.1 Review the following before installation!
D.1.1 Do not share the same plug with other appliances.
D.1.2 Position it on a at level surface.
D.1.3 Do not splash the exterior with water. If the oor is damp, install a oor separator to keep the sauna dry.
D.1.4 Do not store ammable objects or chemical substances near the sauna.
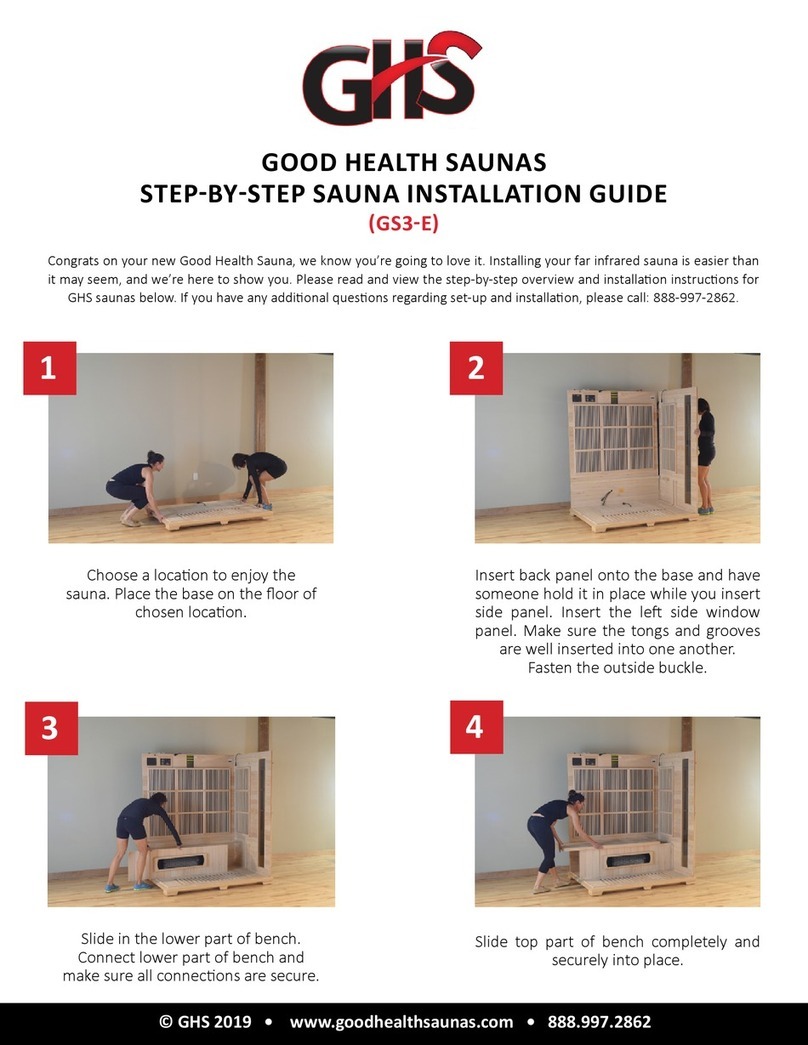
D.2 Review the following during installation!
D.2.1 Place the Bottom Panel on the oor and make sure the at side is facing up.
D.2.2 Install the Back Panel in place before the sides (see illustration below).

10
D.2.3 Install the side panel in place (see illustration below). Fasten outside buckles.
D.2.4 Outside Buckle Fastened.
D.2.5 Install the Bench Heater Panel in place.

11
D.2.6 Plug the Bench Heater Cable onto the outlet located on the Back Panel. Make sure the connection is secure.
D.2.7 Install the Bench Panel in place (see illustration below). Make sure it ts securely.
D.2.8 Install the other side panel in place (see illustration below). Fasten outside buckles.

12
D.2.9 Install the Front Panel in place (see illustration below). Fasten outside buckles.
D.2.10 Check the top panel for all the wires. The Top Panel must be positioned in the right corner. Connect the plugs for
the heater through the holes around the Top Panel.

13
D.3 Connect Interior Wiring
D.3.1 Control Panel: Locate the two at connector wires coming through the ceiling and connect them.
D.3.2 Oxygen Ionizer: The black wire coming from the ceiling near the side panel plugs into the ionizer. Mount ionizer
within easy reach of this wire and plug the black wire into the ionizer.
Never plug this cord into the stereo.
Oxygen Ionizer Functionality:
Oxygen Ionizer helps purify the air by removing allergens, dander, and orders from your infrared sauna. Each Ionizer
comes with one scent pack. To install the scent pack, open the lid at the back of the Ionizer, place the scent in the back,
and close the lid.
Ionizer Direction:
1. The green (ion) light must be on when you’re using the sauna. Ion will be released in the air to help purify the air,
remove the dust, bacteria and other microbes.
2. The red (O3) light must be turned on when you’re nished using the sauna. Ozone will be released in the air to help kill
bacteria and sterilize the sauna.

14
D.3.3.1 MP3 already installed.
D.3.4 Run the power cord through the hole in the dust cover, then attach the dust cover with the remaining short screws.
Above are screen shots from the MP3 player. Please note, there are funcons on the remote that are not available on the player itself.
When the player is turned on a radio staon will be in the readout screen. With the band buon on the player or remote the customer
can access two FM selecons for presets. Pressing the forward or back buon on the player or the remote once quickly will move to
the next staon. A long press of the buon will make the radio scan unl the buon is pressed once again.
MODE BUTTON: On the player or the remote the readout can change from the radio bands to AUX when the buon is pressed.
BT, USB, and S/D, corresponding display will only appear if device is connected. Further explanaon is below.
BLUETOOTH:
To connect a Bluetooth device follow these steps.
1. Turn on the MP3 player in the sauna.
2. Go to the Bluetooth seng on your device. Look for other devices.
3. Tap on “CARBT” to connect.
4. Once your device connects, the readout on the MP3 should change to phone.
5. Then go to your music app and start the music playing. The readout will change and the music should now play through the
speakers in the sauna in a minute or so.
6. When the phone is connected it will receive calls through the MP3 and audio over the speakers.
Page 1 of 2
Shows aer Phone is connected
AUX:
C
onnect any device through the AUX jack and music etc can be played through the speakers in the sauna.
U
SB:
If
your device is connected through the USB, it will charge your device but IT WILL NOT play music from the
d
evice. The USB is meant for a flash drive that contains music files.
SD Sl
ot:
T
his slot is for a SD card that has music files, push card into slot.
E
Q Buon on Remote:
T
here are four choices, ROCK, POP, Classic and Flat. Theses are preprogrammed into the sauna and are
not user changeable.
O
THER TIPS:
T
he user should always disconnect their device from BT on the MP3 player upon leaving the sauna.
Es
pecially of others in the household will be connecng via BT.
If
you are unable to reconnect to the MP3 players. Please do the following:
1
. Go to the device Bluetooth sengs and “FORGET THE DEVICE”.
2
. You may then find “CARBT” again and connect as you did originally.
3
. If necessary, you may need to disconnect the sauna from the wall outlet. Wait at least one minute and
plug the sauna back into the outlet. This should not disrupt any of the other sengs (Clock, mer etc.)

15
D.3.5 Plug into the appropriate outlet.
D.3.6 You are ready to enjoy your Good Health Sauna!
D3.7 You will need 2 AAA batteries to power the chrome light remote.
For more information, see page 18.
This is for our
GSE-1 and GE-2
models only.
CLOCK SETTING: Clock setting is military time
setting only. You can set clock by pressing on
Timer and use the Temp up and down arrow to
adjust the hour, and use the time up and down
arrow to adjust the minutes.
TIMER SETTING: You can set your sauna to turn
on at a pre-set time. Press the Timer Button, use
the Temp arrows to adjust the hours, use the Time
arrows to adjust the minutes. When the Timer
display stops blinking, it is set.
TEMPERATURE SETTING: Temperature can be
set at Fahrenheit or Celsius. To switch Fahrenheit
from Celsius (or vice versa), press the Temp up and
down arrow at the same time.

16
1. Press “ON” or “OFF” to turn it on and off.
2. Press “▼” to change the color: blue, green, red, blue green and red,
blue red, blue green, red green.
3. Press “▲” to change the color: blue, red green, blue green, blue red,
blue green red, red, green.
4. Press to change the intensity of light and five strengths from
strong to weak.
5. Press the light will cycle the color automatically from blue, green,
red, blue green and red, blue red, blue green, red green. If you want to
end the cycle, please press “▼or ▲.”
6. Press the light will start to cycle the color again, as in step five.
F. Tips For Use
F.1 Set the temperature to a comfortable level, normally 100-140°F.
F.2 Allow approximately 10-15 minutes for the sauna to warm up.
F.3 Perspiration should begin within 10 to 15 minutes aer stepping into the unit. We recommend a sauna ses-
sion should not exceed 60 minutes. Consult your physician.
F.4 When the temperature reaches the level set on the thermostat, the heaters will turn o and on periodically to
maintain the desired temperature level inside the sauna.
F.5 e front door and ceiling vent can be opened at any time to allow fresh air into the room.
F.6 Drink plenty of water before, during and aer a session to replenish lost uids from the body.
F.7 A shower should be taken immediately aer sauna use to cleanse the skin of sweat. Do not let the sweat dry,
or pores can become clogged.
F.8 To absorb perspiration and keep the sauna tidy, place a towel on the bench and oor of the sauna. Keep one
towel handy to wipe o sweat from the body.
F.9 To prevent hair from drying out, you can apply coconut oil and wrap your hair in a towel. Rinse your hair
thoroughly in the shower aer using the sauna.
F.10 Massage the aected areas to relieve sore and tense muscles.
F.11 Do not eat at least an hour before your sauna session. It is better to go in a sauna with an empty stomach. Do
not use the sauna immediately aer strenuous exercise.
F.12 At the rst sign of cold or u, increasing your sauna sessions may be benecial in boosting your immune
system and decreasing the reproductive rate of viruses.
F.13 Any area in which you’d like to achieve a deep heating should be moved closer to the heaters.
F.14 Consult your physician for proper treatment or any other conditions.
1. Press “ON or “OFF” to turn it on and o.
2. Press “q” to change the color: blue, green, red
3. Press “p” to change the color: blue, red, or green.
4. Press “p” to change the intensity of light. ere are
ve strengths from strong to weak.
5. Press “p” to cause the light to cycle the color auto-
matically from blue, green, red. If you want to end the
cycle, please press “q” or “p”.
6. Press “q” to resume the color cycle again, as in step
ve.

17
H. Maintenance
H.1 Clean the sauna room with a so wet cloth. NEVER use petrol, alcohol, benzene or any other such chemical
to clean the unit. One part Apple Cider Vinegar and three parts water works well.
I. Transportation and Storage
I.1 Avoid exposure to rain, snow or any other weather elements that may cause damage to sauna.
I.2 Do not store in damp environments.
J. Limited warranty
We warrant the sauna to be free of defects in material and workmanship.
1) Heaters: Lifetime
2) Workmanship: 5-Year Warranty
3) Electrical Components: Lifetime
4) Radio/CD Player: 12-Month Warranty
is warranty extends only to the original retail purchaser of the sauna and terminates upon transfer of owner-
ship. is is a replacement parts only warranty. Freight charges to and from the customer are the responsibility of
the customer. is includes freight charges for parts shipped for the service of your sauna.
is warranty is void if the sauna has been altered, misused, or abused. Such instances shall include the opera-
tion or maintenance of the sauna in deviation to the published instructions. e warranty extends only to the
manufacturing defects and does not cover any damages resulting from mishandling of the product by the owner,
natural disaster, or non-factory authorized modication or repair. is warranty also does not cover any dam-
ages caused by natural weather conditions—even when the sauna is covered with the factory-authorized outside
cover. e sauna cannot get wet, and is not meant for outdoor use. Broken glass and light bulbs, whatever the
cause, are not covered by this warranty. is warranty does not cover any normal wear and tear due to usage.
We shall not be liable for the loss of use of the sauna or other incidental or consequential damages. Under no
circumstances shall National Sales Inc. or any of its representatives be held liable for injury to any persons or
damages to any properties. Some states do not allow exclusion or limitation of incidental or consequential dam-
ages, so the above limitations or exclusions may not apply to you. is warranty gives you specic legal rights,
and you may also have additional rights that vary from state to state. Specications are subject to change without
notice.
NOTE: Warranty is applicable ONLY if purchased directly from National Sales Inc. dba Good Health Saunas. If
NOT purchased through National Sales Inc., please contact the company you purchased your sauna from for
warranty information.

18
What is Chromotherapy?
Chromotherapy, also called color therapy, is the use of color and light to gently bring about homeo-
stasis. Color and light is applied to specic areas and accupoints on the body.
History of Color and Light Healing
Color and light have been used for healing across time. Ancient Egyptians built solarium-type rooms
with colored panes of glass. The sun would shine through the glass and ood the patient with color.
Some people use colored silk cloths which are placed on the body and then ooded with sunlight.
Early color and light healers in the modern world used colored gels and sheets of glass to apply
light to the body. Others used color infused water and color meditations to send healing rays to the
person.
Today, there are many practitioners who use color and light in interesting ways. Some therapists
have a box with a mechanism that ickers light into the eyes. They report success in speeding the
recovery of stroke victims and those people who experience chronic depression.
Some healers recommend the wearing of eyeglasses with colored lenses. Practitioners of Feng
bring color into our homes and workplaces for optimum balance of energy.
Why it Works:
The earth, the oceans, in fact every living thing, is dependent upon light for its very existence. A
recent scientic study disclosed that each cell in the body emits light. We live in a sea of energy and
our bodies are composed of energy.
Color works through and in us, in every nerve, cell, gland and muscle. It shines in our auras and
radiates upon us from the sun. Color is an active power, exerting a tremendous inuence on our
consciousness, soul and spirit.
Within our body, our organs, muscles, cells and nerves all have a level of vibration. When our body
becomes out of balance, disease occurs. Each color has its own frequency and vibration. Through
extensive research, we know that color and light will help bring our physical and emotional systems
into balance.
RED
Brings warmth, energy and
stimulation; therefore good
for energy, fatigue, colds,
chilly and passive people. It
energizes heart and blood
circulation. It energizes all
organs and the senses.
TURQUOISE
Increases intuition and
sensitivity. It mentally relax-
es and tackles embodied
psychological barriers. It
acts as a tonier and can
help regulate imbalances in
the lung and large intes-
tines system. It facilitates
spiritual growth.
YELLOW
Increases neuromuscular
tone. Puries blood,
helps digestion and has a
cleansing effect. Strongly
stimulates happiness,
brings on a sense of
security, as well as a strong
feeling of well-being.
BLUE
Is a cool color that is
calming. It stimulates the
parasympathetic system,
and reduces blood pressure
and calms both breathing
and heart-rate. It helps
treat sleep disorders and
headaches.
GREEN
Is a cooling, sedating color,
which helps reduce swelling
of joints and tissues; it
calms the body’s nervous
system. It’s the color of the
relaxed heart.
VIOLET
Promotes awareness and
consciousness. It increases
effects of medication. It
promotes proper function-
ing of the lymphatic system
and very helpful with
menopause. It is the color
for neutralizing emotional
wounds and for spiritual
growth.

Resourceful Books:
National Sales Inc.,DBA
Please tear o below for mail-in registration.
Please mail to: Good Health Saunas
2140 W. Wisconsin Avenue
Appleton, WI 54914
Please print clearly
Name: __________________________________________________________________________________
Street:__________________________________________________________________________________
City:____________________________________________State:_______________Zip:_________________
Phone:_____________________________Email:________________________________________________
Sauna Model:___________________________________Date of Purchase:___________________________
Location of Purchase:______________________________________________________________________

National Sales Inc., DBA Good Health Saunas
2140 W. Wisconsin Avenue
Appleton, WI 54914
1.888.99.SAUNA
WWW.GOODHEALTHSAUNAS.COM
National Sales Inc.,DBA
C
A
R
B
O
N
•
C
E
R
T
I
F
I
E
D
•
L
O
W
•
E
M
F
•
T
E
C
H
N
O
L
O
G
Y
•
1.1.19
This manual suits for next models
5
Table of contents
Other Good Health Saunas Plumbing Product manuals
Popular Plumbing Product manuals by other brands

Pfister
Pfister Pasadena LF-049-PD Maintenance & Care Guide

Kohler
Kohler 10373 installation instructions

Hans Grohe
Hans Grohe AXOR Starck 40871000 Instructions for use/assembly instructions

ProFlo
ProFlo PFSH309GCP quick start guide

Signature Hardware
Signature Hardware GREYFIELD 948657 quick start guide

Hans Grohe
Hans Grohe Croma E 100 VarioJet 04331 0 Series Installation/User Instructions/Warranty