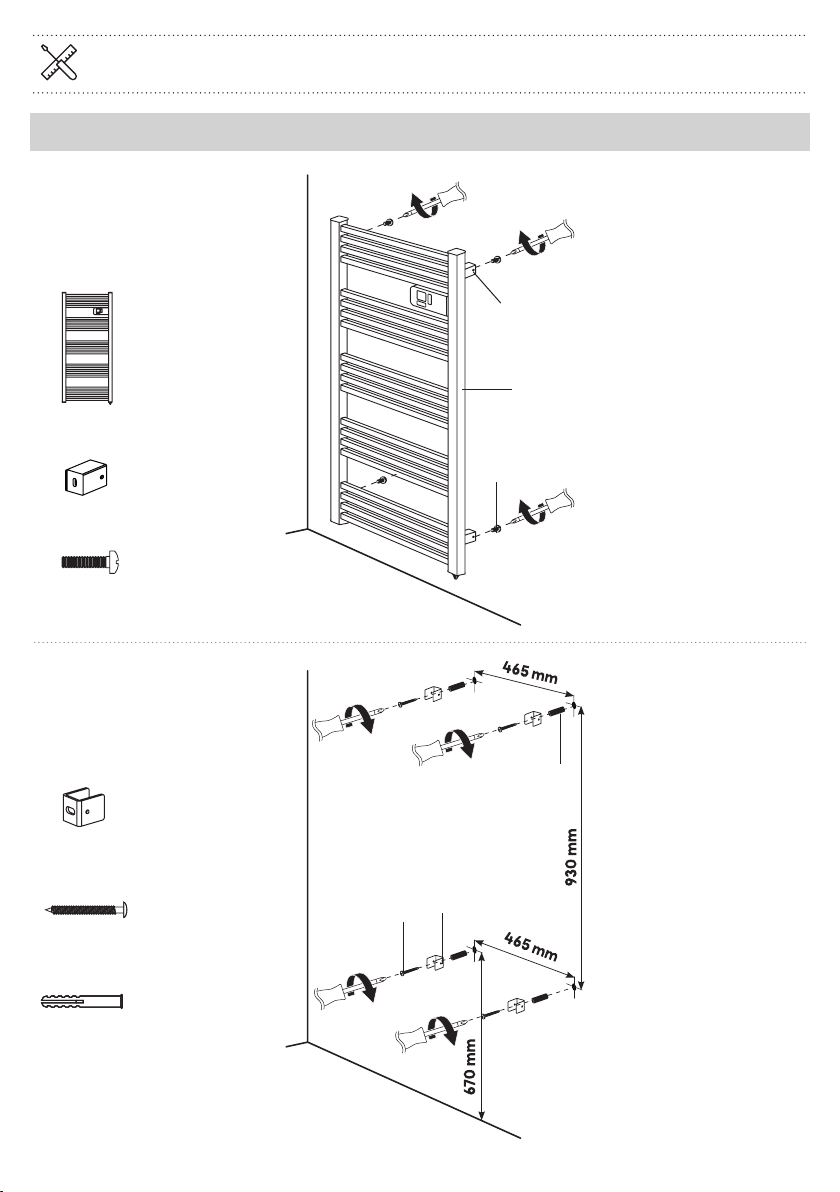
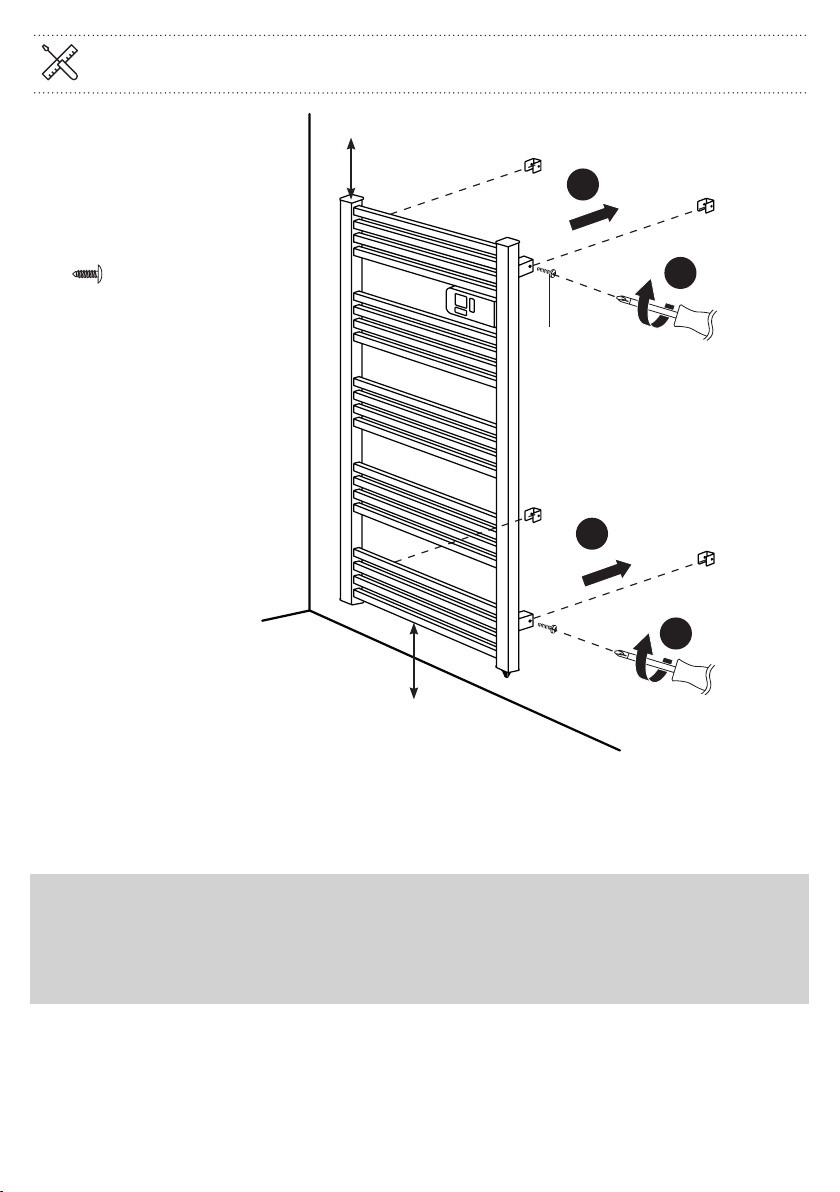
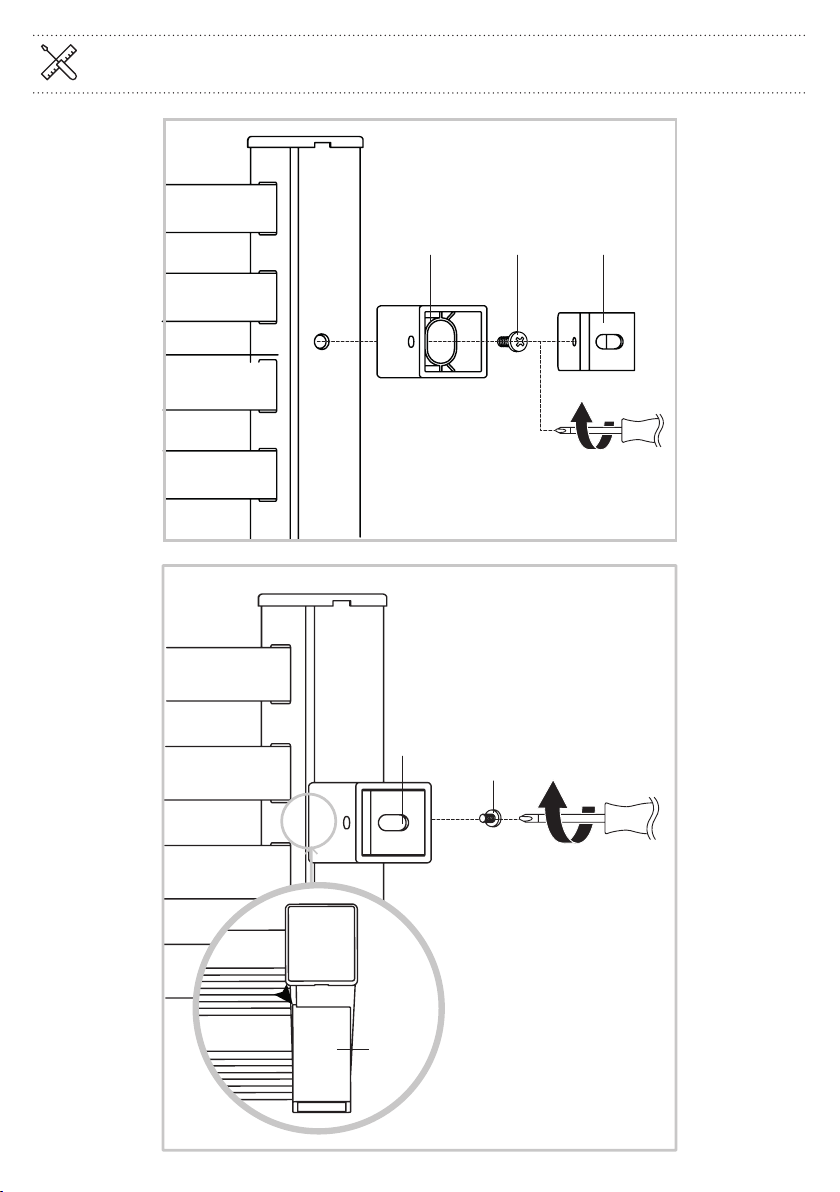
GoodHome Duala User manual

Duala
5036581056858
V10220

.
.
.
.
.
.
.
.
Safety 04
.
.
.
FR Sécurité 25
.
.
.
.
.
.
.
.
Installation 07
.
.
.
FR Installation 29
.
.
.
.
.
.
.
.
Use 11
.
.
.
FR Utilisation 33
.
.
.
.
.
.
.
.
Care and Maintenance 24
.
.
.
FR Entretien et maintenance 46
.
.
.
.
.
.
.
.
Guarantee 24
.
.
FR Garantie 47
.
.
.
.
EN Contents
.
.
. . 02
.
.
FR Contenu
.

EN IMPORTANT - Please read the following instructions carefully before using the appliance and retain for further reference.
FR IMPORTANT - Veuillez lire attentivement les instructions suivantes avant d’utiliser l’appareil et les conserver pour référence.
x ?
[01] x1 [02] x4 [03] x4
[04] x4 [05] x4 [06] x4 [07] x4

.
.
.
.
.
EN . Before you start
PLEASE READ THE SAFETY
ADVICE CAREFULLY
BEFORE USING THE
APPLIANCE.
WARNING: Risk of fire,
electric shock, physical
injuries and material damage.
Before using this appliance,
always follow the safety
advice during assembly, use
and maintenance.
• This appliance can be
used by children aged
from 8years and above
and persons with reduced
physical, sensory or mental
capabilities or lack of
experience and knowledge
if they have been given
supervision or instruction
concerning use of the
appliance in a safe way and
understand the hazards
involved. Children shall not
play with the appliance.
Cleaning and user
maintenance shall not be
made by children without
supervision.
• Children of less than
3years should be kept
away unless continuously
supervised.
• Children aged from 3years
and less than 8years
shall only switch on/off
the appliance provided
that it has been placed or
installed in its intended
normal operating position
and they have been given
supervision or instruction
concerning use of the
appliance in a safe way and
understand the hazards
involved. Children aged
from 3years and less than
8years shall not plug in,
regulate and clean the
appliance or perform user
maintenance.
CAUTION: Some parts of
this product can become
very hot and cause burns.
Particular attention has to
be given where children
and vulnerable people are
present.
.
.
.
.
.
.
.
. Safety 04
.
.
.

.
.
.
.
.
.
.
. Safety 05
.
.
.
WARNING: This appliance
is intended only for drying
textiles washed in water.
• If the supply cord
is damaged, it must
be replaced by the
manufacturer, its service
agent or similarly qualified
persons in order to avoid a
hazard.
• The appliance must not be
used outdoors.
• The appliance is intended
for domestic use only. Do
not use this appliance for
anything other than its
intended purpose.
• Do not operate the
appliance in a room where
flammable liquids, solvents
or varnishes are stored
and/or where flammable
vapours may exist.
• Do not attempt to
disassemble this appliance,
repair it or perform any
modifications yourself. This
appliance does not contain
any parts that can be used
separately.
• Keep plastic packaging out
of the reach of children.
• Information on appliance
installation is provided in
the Installation section on
pages 07to 10.
• The heater must not be
located immediately below
a socket-outlet.
WARNING: Means for
disconnection having a
contact separation in all
poles must be incorporated
in the fixed wiring in
accordance with the wiring
rules.
CAUTION: In order to avoid
a hazard due to inadvertent
resetting of the thermal
cut-out, this appliance must
not be supplied through an
external switching device,
such as a timer, or connected
to a circuit that is regularly
switched on and off by the
utility.

.
.
.
.
.
.
.
. Safety 06
.
.
.
• The appliance must be
supplied through a residual
current device (RCD)
having a rated residual
operating current not
exceeding 30mA.
WARNING: This appliance
must only be used as a
fixed appliance. It must
be attached vertically
and securely to a vertical
wall. Any other position is
potentially dangerous.
WARNING: In order to avoid
a hazard for very young
children, this appliance
should be installed so that
the lowest heated rail is at
least 600mm above the
floor.
WARNING: If this appliance
is installed in a bathroom, it
must be installed only in the
volume 2and out of volume
of the bathroom in line with
the installation standards
applicable in your country.
IMPORTANT: KEEP THIS
INFORMATION FOR
FUTURE REFERENCE. READ
CAREFULLY.
Conformity with all relevant EC
Directive requirements.
Waste electrical products should not
be disposed of with household waste.
Please recycle where facilities exist.
Check with your Local Authority or
local store for recycling advice.
Class II product - Double Insulated -
No earth required.
Caution, hot surface
IP24 Protected against splashing water
in all directions.
Manufacturing date code; year of
yyWxx manufacturing (20yy) and week of
manufacturing (Wxx).

IMPORTANT : Please follow the safety advice set out on pages 4 to 6.
:
:
:
:
:
:
01 :
:
:
:
:
:
:
:
:
:
:
:
:
:
[01] x1 :
:
:
:
:
:
:
[03] x4 :
:
:
:
:
:
[04] x4 :
:
:
[04]
[03]
[01]
:
:
:
:
:
:
02 :
:
:
:
:
:
:
:
[02] x4 :
:
:
:
:
:
:
[06] x4 :
:
:
:
:
:
:
[07] x4 :
:
:
:
:
:
:
:
:
[02]
[06]
[07]
.
.
.
.
.
.
.
. Installation 07
.
.
.

.
.
.
.
.
.
.
. Installation 08
.
.
.
:
:
:
:
:
:
03 :
:
:
:
:
:
:
:
[05] x4 :
:
:
:
:
:
:
:
:
:
:
:
:
:
:
:
:
:
:
:
:
:
:
:
:
:
:
:
:
:
:
:
:
:
:
Min. 150 mm
from the
ceiling
Min. 600 mm
from the floor
1
1
2
2
[05]
The screws and wall plugs supplied are suitable for solid walls.
For all other types of wall, please use suitable screws and wall plugs.
CAUTION: The surface of this product can become very hot and is therefore not
suitable for use in an environment where there could be risks. Vulnerable persons
and young children should not be left unattended near the towel drying rack. To
prevent any danger to very young children, we recommend installing this appliance
so that the lowest heated bar is at least 600 mm above the ground.

.
.
.
.
.
.
.
. Installation 09
.
.
.
[03]
[04]
[02]
[02]
[05]
[03]
Top view

.
.
.
.
.
.
.
. Installation 10
.
.
.
Electrical connection
Warning: you need to connect the two
conductors of the supply cable to a
connection block in respecting the
polarities as following :
IMPORTANT: The wires in the mains
lead are coloured in accordance with
the following code :
Blue – Neutral
Brown – Live
• The blue wire must be connected to the terminal
marked with an N or coloured black.
• The brown wire must be connected to the
terminal marked with an L or coloured red.
WARNING: Never connect live or
neutral wires to the earth terminal.
• This product is double insulated and must not be
earthed. If there are any incoming earth cables,
they must be joined together using a suitable
connector (not supplied) and well insulated with
good quality insulation tape. This is to ensure
earth continuity throughout your property.
Flex outlet method - metal frontplates
Connect the cables as shown in the diagram:
From supply:
Neutral
Live
Earth
To appliance: Live
Neutral
ALL EARTH WIRES MUST BE SLEEVED AND
TERMINATED TO BACK BOX.
• DO NOT wire/fit a plug to this appliance. The
appliance must be electrically connected to a
fused fixed spur, which is fitted with a 10 Amp
fuse.
• All fittings must be installed by a competent
person in accordance with the current IET
Wiring Regulations (BS7671). If in doubt, consult
a qualified electrician.
• This product is suitable for use in living areas,
and Bathroom (dry) outside Zones and zone
2 only (see diagram below and current IET
Wiring Regulations for details). It is not suitable
for Bathroom Zones 0 and 1. If being fitted in
a bathroom a 30 mA RCD must be used. This
appliance does not come fitted/supplied with a
fused plug.
• Always refer to the Reference Drawing for
Bathroom Installation.
Note: The below drawing is for reference only.
(DRY) OUTSIDE ZONES
ZONES 0 ZONES 2
ZONES 1
2.25m
0.6m
0.6m
ZONES 2 Window
recess
Ceiling
IP24: THIS PRODUCT IS SUITABLE FOR
BATHROOMS (DRY) OUTSIDE ZONES AND
ZONE2.
• Full details can be found in the current IET
Wiring Regulations (BS7671).
L N
L N
E E

The controls
Setpoint temperature
Frost protection mode
Heating LED
Lock
Programme mode
Temperature
OK or Boost (3 sec.) settings
or Menu
selection
Menu
ECO mode
Comfort mode
Open window
Prolonged absence
ON/Standby
The icon and the value being adjusted flash. Flashing stops when the setting is validated by pressing
OK-boost, or after 30seconds of inaction (any modification to the setting is then cancelled).
On / standby
• Press the button to switch the heat on or off (appliance on standby).
Two short beeps that increase in pitch sound when switched on and three beeps that decrease in pitch
sound when shut down.
When switched on, the setpoint temperature and current mode are displayed alternatively every 3
seconds.
Standby ON ON
The icon is the heating LED. It is displayed on and off cyclically.
.
.
.
.
.
.
.
. Use 11
.
.
.

Locking the buttons
• Press and hold for more than 3 seconds on the button to lock or unlock the buttons. The icon
indicates that it is locked.
The button is never locked.
Mode selection
• Press the button to display Πod, then the OK-boost button, then press +or -to select one of the
following modes :
Con (Comfort) Constant temperature that can be set between 13.5°C and 30°C.
Pro (Programme) Weekly programming (refer to the Weekly programming section).
EcP (Programme Ecopilote) Simplified weekly programming (refer to the Weekly programming
section).
FilP unused
FrF (Frost protection) Temperature at 7.5°C, not adjustable.
Eco (Economy) Constant temperature that can be set between 13°C and 29.5°C.
• Press the button to cancel the setting, or the OK-boost button to validate the mode: the mode and
temperature are displayed alternately every 3 seconds.
Setting the Comfort mode temperature
The Comfort and ECO setpoint temperatures are set separately.
The Comfort mode temperature range is between 13.5°C and 30°C and can be adjusted in increments of
0.5°C. If limited, reduce the ECO temperature, as the Comfort temperature is always higher than the ECO
temperature.
• When Comfort mode (Con) is in operation, press the +or -button to increase or reduce the setpoint
temperature ; the temperature flashes.
• Press the button to cancel the setting, or the OK-boost button to validate the Comfort temperature
selected.
.
.
.
.
.
.
.
. Use 12
.
.
.

Setting the ECO mode temperature
The Comfort and ECO setpoint temperatures are
set separately.
The ECO mode temperature range is between 13°C
and 29.5°C and can be adjusted in increments of
0.5°C. If limited, increase the Comfort temperature,
as the ECO temperature is always lower than the
Comfort temperature.
• When ECO mode (Eco) is in operation, press the
+or -button to increase or reduce the setpoint
temperature. The temperature flashes.
• Press the
button to cancel the setting,
or the OK-boost button to validate the ECO
temperature selected.
Setting the Boost
The temperature setting is automatically forced
to 30°C during boost. When Boost finishes, the
thermostat returns to the mode and temperature
that was previously set.
• Press and hold for 3seconds on the OK-boost
button to switch Boost on or off.
• Press the +or -button to select the Boost time:
5, 10, 15, 20, 30, 45, 60, 90or 120minutes (the
default selection is 60minutes). Then press the
OK-boost button to validate the selection; the
remaining time in Boost is displayed.
• Press the MENU button to stop the Boost.
In Programme mode, Boost can be stopped at any
time by pressing and holding for 3seconds on the
OK-boost. Following a manual stop in
Programme mode, Boost can only be reactivated by
a programme after a period of 2hours.
Precautions for use
Setting the temperature
• The heating power is maximal as long as the
setpoint temperature has not been reached.
Programming the setpoint temperature to the
maximum temperature possible, will not heat the
room quicker.
• Wait several hours for the room temperature
to stabilise before adjusting the temperature
setting.
• Shut down the appliance when ventilating the
room.
Power cuts
• Following a power cut and resume, the
appliance will automatically restart with all of the
settings and programs used before the cut (if
it was in operation before the cut, it will stay on
after the power resume).
• The programmer clock starts from the time the
cut began. This means that the time and day
could be misaligned.
• Following a power resume, the reference, then
the total time the appliance is turned on is
displayed for 30seconds on power resume.
.
.
.
.
.
.
.
. Use 13
.
.
.

Secondary programmes and
functions
Setting the Time
• Press , then +to access the Hor menu.
• Press OK-boost to enter this menu.
• Press +or -to set the day of the week
d1 = Monday, d2 = Tuesday,...., d7 = Sunday.
• Press OK-boost to validate
• Press +or -to set the hour.
• Press OK-boost to validate.
• Press + or -to set the minutes.
• Press OK-boost to validate.
• Press +or -to select automatic (Aut) or manual
(ΠAn) time setting.
• Press OK-boost to validate.
• Press to exit the menu
If the icon permanently flashes in programme
mode (Pro or EcP), this indicates that the time is
offset following a power cut. It is flashing as a time
has not been set.
Following a power cut, the appliance will
automatically restart with all of the settings used
before the cut (if it was on or standby before the
cut, it will stay on or standby after the cut).
Automatic time setting is not possible outside
France.
Select manual time setting if daily automatic time
setting is incorrect.
Weekly programming
The time must be set before any programming.
There are two programmers available. They
comprise 6 programs: Pr1 to Pr6 for one, and 3
programs, Ec1 to Ec3 for the other. Selecting Pro or
EcP mode activates one or the other.
Each program defines a time period in which the
setting can be Comfort or Boost (only for Pr1 to
Pr6). Outside time periods, the setting is ECO.
The time period for one programme may overlap
the time period of another. In this case, the higher
number programme has priority.
Each programme is defined by:
• its name: Pr1,Pr2,Pr3, Pr4,Pr5,Pr6,Ec1,Ec2
or Ec3,
• its operating mode: Comfort (Con) or Boost
(bSt).
• its days of activation: Monday to Sunday (1-7), or
Saturday and Sunday (6-7), or Monday to Friday
(1-5), or a day of the week (d1, d2, d3, d4, d5, d6,
d7),
• its start time,
• its end time.
.
.
.
.
.
.
.
. Use 14
.
.
.

Example of weekly programming
Pr 1: Monday to Friday from 5:20 to 7:00 in Comfort mode.
Pr 2: Monday to Sunday from 17:50 to 19:30 in Comfort mode.
Pr 3: Monday to Friday from 7:00 to 7:30 in Boost mode.
Pr 4: Wednesday from 16:30 to 20:00 in Comfort mode.
Pr 5: Saturday and Sunday from 8:10 to 20:00 in Comfort mode.
Pr 6: Saturday and Sunday from 9:20 to 10:10 in Boost mode.
• Press , then +to access the Pro menu.
• Press OK-boost to enter this menu.
• Press +or -to select the programme number (Pr1, Pr2, Pr3, Pr4, Pr5, Pr6,
Ec1, Ec2 or Ec3).
• Press OK-boost to validate.
• (Only for Pr1 to Pr6) Press +or -to select programme operating mode ; Con
(Comfort), or bSt (Boost).
• Press OK-boost to validate.
Monday
Tuesday
Wednesday
Thursday
Friday
Saturday
Sunday
.
.
.
.
.
.
.
. Use 15
.
.
.

• Press +or -to select the day(s) of programme activation or inactivation (not);
Monday, Tuesday, Wednesday, Thursday, Friday, Saturday, Sunday (d1 ... d7),
from Monday morning to Sunday evening (1-7), from Saturday morning to
Sunday evening (6-7), from Monday morning to Friday evening (1-5).
• Press OK-boost to validate.
• Press +or -to set the hour of start time of the programme.
• Press OK-boost to validate.
• Press +or -to set the minutes of the start time in blocks of 10 minutes.
• Press OK-boost to validate.
• In the same way, press +or -to set the end time of the programme.
The end time is only programmable between the start time and midnight.
The Boost function is limited to a maximum of 2 hours.
• Press OK-boost to validate (Pro mode is selected by default).
• Press the button to exit the menu without validating the latest
modifications.
Consumptions
This menu displays the actual consumption duration. It is expressed as a percentage of the total time.
• Press , then +to access the EnE menu, or to access the Out menu to exit
the menu.
• Press OK-boost to enter this menu.
• Press +or -to successively display the consumption duration from today
(dAY), yesterday (d-1), the week (7-d), the month (30d), the year (360d), and
the reset (rES) for all consumption durations (wait a few seconds to see the
consumption duration, as for example E:32).
• Press to exit the menu.
dAY Consumption duration of the current day starting at midnight and ending at midnight.
d-1 Consumption duration of the previous day starting at midnight and ending at midnight.
7-d Consumption duration for the 7 previous days (example: the consumption displayed on Wednes-
day 11 started Tuesday 3 at midnight and ended Tuesday 10 at midnight).
30d Consumption duration for the 30 previous days (example: the consumption displayed on 11 May
started 11 April at midnight and ended 10 May at midnight).
360d Consumption duration for the previous 360 days (example: the consumption displayed on 11 May
2013 started 16 May 2012 at midnight and ended 10 May 2013 at midnight).
rES Press and hold more than 3 seconds on OK-boost to reset the consumption counters.
.
.
.
.
.
.
.
. Use 16
.
.
.

For example, a 1500 W heater displays its consumption duration
For the year 360d -> E:06 (1500 W for 6 % of the time),
i.e. 777.6 kW.h (= 777600 W.h = 1500 x 360 x 24 x 0.06).
For the month 30d -> E:14 (1500 W for 14 % of the time),
i.e. 151.2 kW.h (= 151200 W.h = 1500 x 30 x 24 x 0.14).
For the week 7-d -> E:21 (1500 W for 21 % of the time),
i.e. 52.9 kW.h (= 52920 W.h = 1500 x 7 x 24 x 0.21).
For yesterday d-1 -> E:28 (1500 W for 28 % of the time),
i.e. 10.1 kW.h (= 10080 W.h = 1500 x 24 x 0.28).
For today up to 12:45 dAY -> E:32 (1500 W for 32 % of the time elapsed since 0:00),
i.e. 6.1 kW.h (6120 W.h = 1500 x 12.75 (= 12:45) x 0.32).
Setting the temperature offset
This setting compensates for any difference (offset) between the temperature displayed by the unit and
ambient temperature measured in the room. This difference varies from one room to another as it depends
on the insulation, room layout and location of the appliance.
This difference must be closed when the ambient temperature is stabilised after more than 2 hours of
heating in Comfort or Eco mode.
This setting changes neither the stability nor the accuracy of the temperature regulation.
• Press , then +to access the OFS menu.
• Press OK-boost to enter this menu.
• Press +or -to set the offset between 8°C and -8°C
• Press OK-boost to validate the offset.
• Press to exit the menu.
For example, if the appliance is set at 20°C and if the ambient thermometer displays 18°C, the offset must
be -2°C.
For example, if the appliance is set at 20°C and if the ambient thermometer displays 22°C, the offset must
be 2°C.
.
.
.
.
.
.
.
. Use 17
.
.
.

Derogation (prolonged absence)
This function maintains frost protection mode at 7.5°C during a prolonged absence then returns to the
initial settings.
• Press , then +to access the dEr menu.
• Press OK-boost to enter this menu.
• Press +or -to select the number of days of absence from 1to 99 days (for
example, 5 days = 05.d). The current day must be counted as an absence
day.
• Press OK-boost to activate the absence setting; the number of
remaining days is displayed alternately with the setpoint temperature.
The initial mode (Comfort, Eco or Programme) is re-established at midnight
on the last day of absence.
• Press to cancel the absence function.
For example, if the absence is programmed on Monday for 3 days, the appliance will remain in frost
protection mode until Wednesday at midnight.
Open window
This function switches automatically to frost protection mode when an open window is detected and
returns to the initial mode when the window is closed.
• Press , then +to access the Und menu.
• Press OK-boost to enter this menu.
• Press +or –to permanently activate the function (Aut), or to activate it
once (ΠAn) or to deactivate it (OFF).
• Press OK-boost to validate.
The manual position (ΠAn) puts the heater into frost protection mode for one
hour. During this hour, the initial settings can be re-established by pressing .
The icon flashes when it detects an open window.
When an open window is detected, the heater heats for a few minutes every half hour to check whether
the window is closed.
Important to note:
• The sensor in the heater detects whether a window is open or closed by measuring abnormal
temperature variations. Detection is carried out several minutes after the window is opened or closed.
• Detection may be ineffective if these temperature variations are insufficient or untimely. This is the
case where:
• The difference between the indoor and outdoor temperature is insufficient.
• The heater is too far from the window.
• The temperature gradient in the room does not allow for significant temperature variations in the
heater sensor.
• The ambient temperature is not stabilised at least one hour before the window is opened.
• The temperature setting or mode were modified manually or by a programme before or during
detection.
.
.
.
.
.
.
.
. Use 18
.
.
.

Display of references
This menu displays the equipment and software references (these references differ according to the
device reference).
• Press , then +to access the references; the reference for the equipment
and the reference for the software are displayed alternately.
• Press to exit the menu.
Out
• Select Out, then press OK-boost to exit the menu,
or
• Press to exit the menu.
.
.
.
.
.
.
.
. Use 19
.
.
.

...
...
...
...
...
MODE SELECTION
...
The information
displayed on this
screen differs
according to the
device reference.
Secondary programmes and functions
.
.
.
.
.
.
.
. Use 20
.
.
.
This manual suits for next models
1
Table of contents
Languages:
Other GoodHome Dryer manuals
Popular Dryer manuals by other brands

Maytag
Maytag Amana NDE2330AYW Service manual

Alliance Laundry Systems
Alliance Laundry Systems Drying Cabinet installation manual

Maytag
Maytag MDE17MN installation instructions

Kogan
Kogan KAGDRYCD80A user guide

AEG
AEG TR9MUNCHEN user manual

Master equipment
Master equipment SuperDry TP2401 Assembly instructions